


Help with constructing a [B]Universal triple-LED headlight[/B] greatly appreciated...

 08-13-08, 05:38 AM
#27

Zoom zoom zoom zoom bonk

Join Date: Sep 2006
Location: New Zealand
Posts: 4,624
Bikes: Giant Defy, Trek 1.7c, BMC GF02, Fuji Tahoe, Scott Sub 35, Kona Rove, Trek Verve+2
Mentioned: 6 Post(s)
Tagged: 0 Thread(s)
Quoted: 551 Post(s)
Liked 722 Times
in
366 Posts
Best bet is order one of these triple cree optics from cutter in aussie. For road riding get the 3way narrow, off road the medium.
08-13-08, 12:11 PM
#28
Senior Member
Thread Starter
Join Date: Jul 2008
Location: UK
Posts: 1,757
Mentioned: 0 Post(s)
Tagged: 0 Thread(s)
Quoted: 0 Post(s)
Likes: 0
Liked 0 Times
in
0 Posts
Best bet is order one of these triple cree optics from cutter in aussie.
TIA...
 09-02-08, 01:42 PM
#31
Senior Member
Thread Starter
Join Date: Jul 2008
Location: UK
Posts: 1,757
Mentioned: 0 Post(s)
Tagged: 0 Thread(s)
Quoted: 0 Post(s)
Likes: 0
Liked 0 Times
in
0 Posts
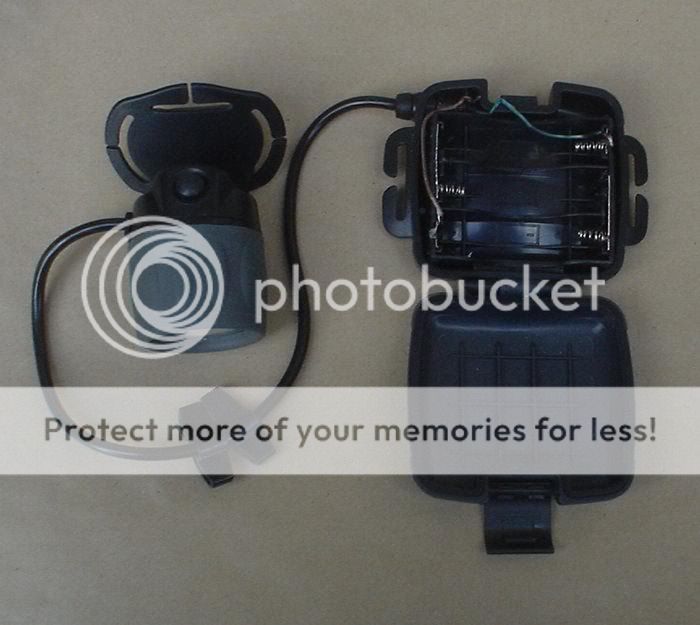
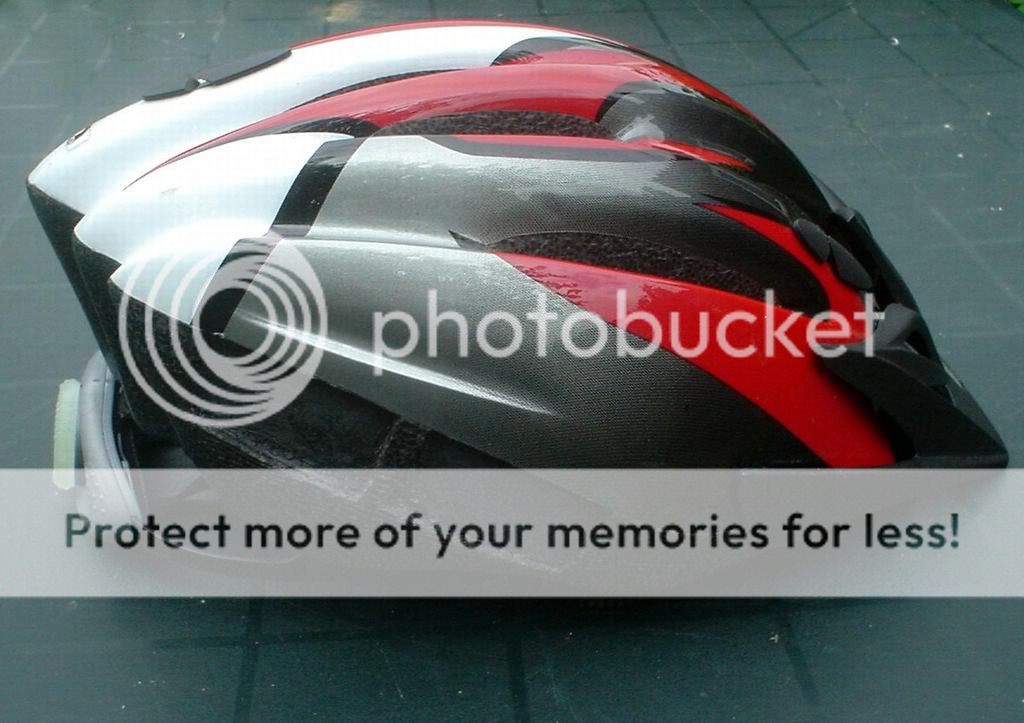
New Headlight from ebay (strap removed) - I have since discovered they are cheaper elsewhere...
Good points - size, weight, price, self contained enclosure with switch and power lead (and a luxeon)
Bad points - 3 x AA alkaline, large heavy battery case, switch = LUXEON - OFF LEDs - OFF
Last edited by Unknown Cyclist; 09-11-08 at 01:13 PM.
09-03-08, 04:06 AM
#32
Senior Member
Thread Starter
Join Date: Jul 2008
Location: UK
Posts: 1,757
Mentioned: 0 Post(s)
Tagged: 0 Thread(s)
Quoted: 0 Post(s)
Likes: 0
Liked 0 Times
in
0 Posts

Headlight claims to be 3 Watt side emitting focusable luxeon
It isn't 3W, it isn't focusing or side emitting, though the main LED looks like it could be a luxeon.
Power test on 3 AA Alkaline cells
Power at battery using luxeon = 4.55V x 0.25A = 1.14W
Power at battery using 5mm LEDs = 4.55V x 0.2A = 0.91W
Power at luxeon after resistor = 3.2V x 0.25A = 0.8W
Last edited by Unknown Cyclist; 09-11-08 at 01:20 PM.
09-03-08, 04:18 AM
#33
Senior Member
Thread Starter
Join Date: Jul 2008
Location: UK
Posts: 1,757
Mentioned: 0 Post(s)
Tagged: 0 Thread(s)
Quoted: 0 Post(s)
Likes: 0
Liked 0 Times
in
0 Posts
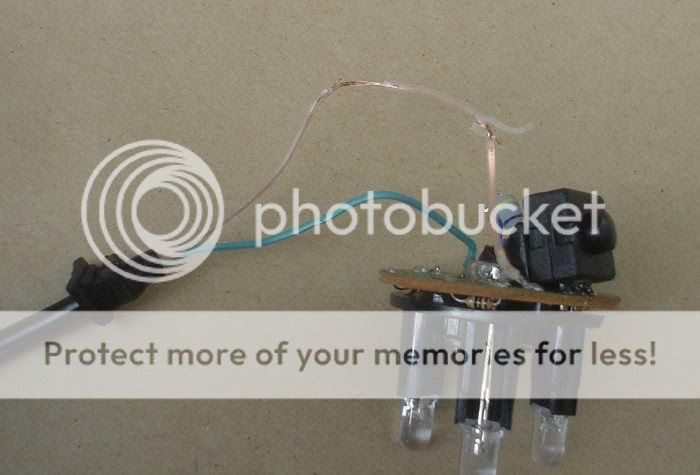
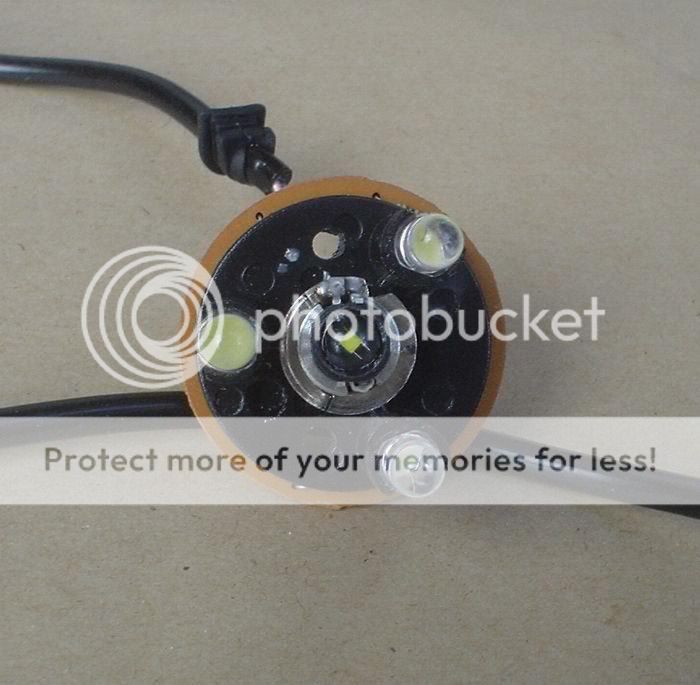
Note the damaged leads discovered on disassembly.
Can anyone say if the main LED is a luxeon ?
Option 1) I could change the luxeon resistor to up the voltage/current
but more power in = more heat and the heatsink is somewhat nominal
Also, I don't know what spec the luxeon is.
Option 2) Increase the input voltage to increase the voltage across the luxeon - unfortunately this would also increase the voltage across the 5 mm LEDs.
As I don't want to remove the circuitboard/switch to allow fitting of a larger heatsink, I'd rather not run the luxeon at higher watts.
The obvious solution is a full rebuild with a higher power LED, new optics and big heatsink - this would also need more mAh to run it, where I want to keep this lightweight and self contained.
Last edited by Unknown Cyclist; 09-11-08 at 01:28 PM.
09-03-08, 02:27 PM
#34
Senior Member
Thread Starter
Join Date: Jul 2008
Location: UK
Posts: 1,757
Mentioned: 0 Post(s)
Tagged: 0 Thread(s)
Quoted: 0 Post(s)
Likes: 0
Liked 0 Times
in
0 Posts
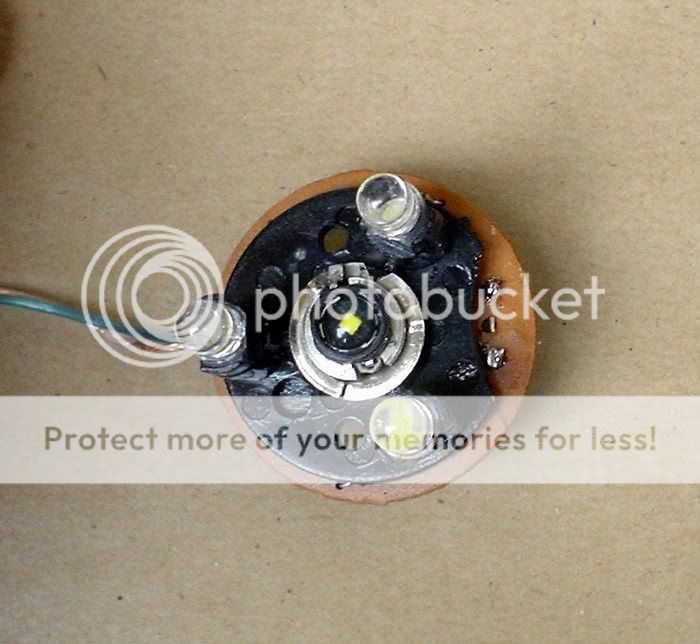
After examining the switch, circuitboard and LEDs there is no easy way to rewire the switch as the 5mm LEDs hold the whole thing together.
After some thought I cut part of the plastic mount away, being careful to leave the spacer legs intact.
This allowed access to the back of the switch where it was possible to wire both outputs together.
The modified switch now give four settings = LUXEON & LEDs ON - OFF - LEDs & LUXEON ON - OFF
So I now have more light without the Luxeon needing more heatsink and without having to modify the board and resistors overly.
Also, my switch is now a simple ON/OFF.
Last edited by Unknown Cyclist; 09-11-08 at 01:34 PM.
09-04-08, 03:52 AM
#35
Senior Member
Thread Starter
Join Date: Jul 2008
Location: UK
Posts: 1,757
Mentioned: 0 Post(s)
Tagged: 0 Thread(s)
Quoted: 0 Post(s)
Likes: 0
Liked 0 Times
in
0 Posts
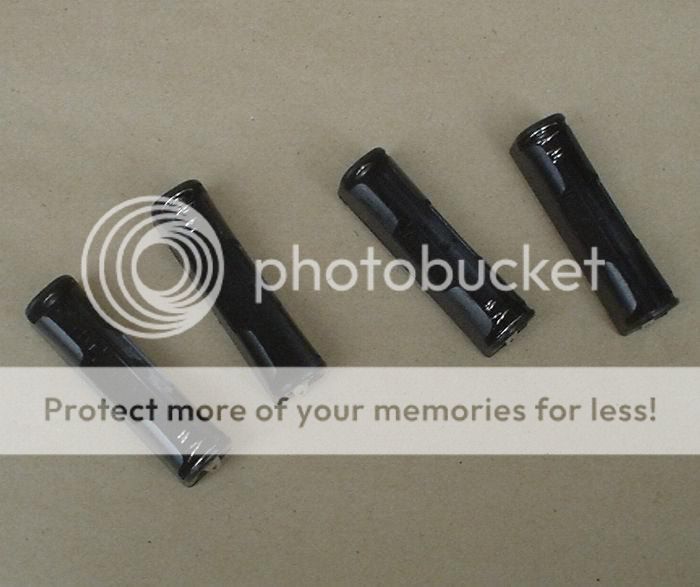
4 x AAA battery clips from Maplins
4 X AAA Nimh gives appr. 4.8 volts.
The 3 x AA alkaline cells gave 4.55 volts under load.
However as the luxeon is under driven the extra voltage won't be a bad thing....

Last edited by Unknown Cyclist; 09-11-08 at 01:38 PM.
09-04-08, 03:53 AM
#36
Senior Member
Thread Starter
Join Date: Jul 2008
Location: UK
Posts: 1,757
Mentioned: 0 Post(s)
Tagged: 0 Thread(s)
Quoted: 0 Post(s)
Likes: 0
Liked 0 Times
in
0 Posts
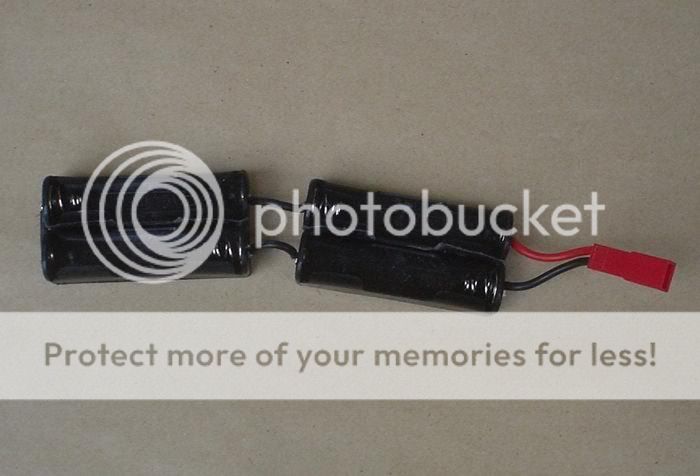
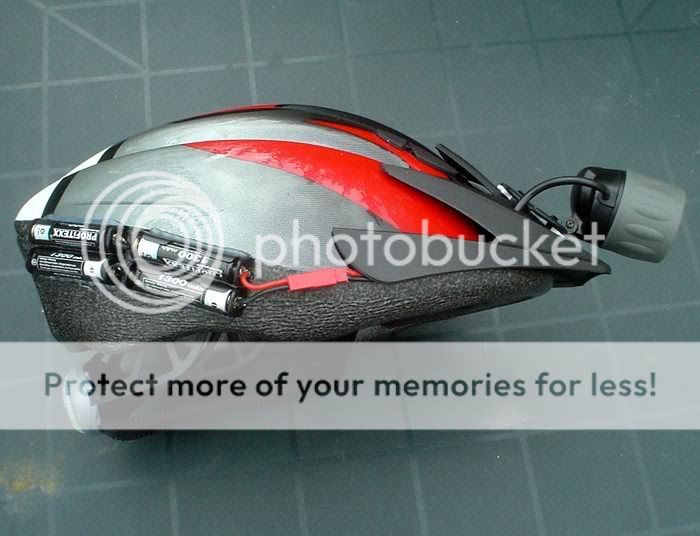
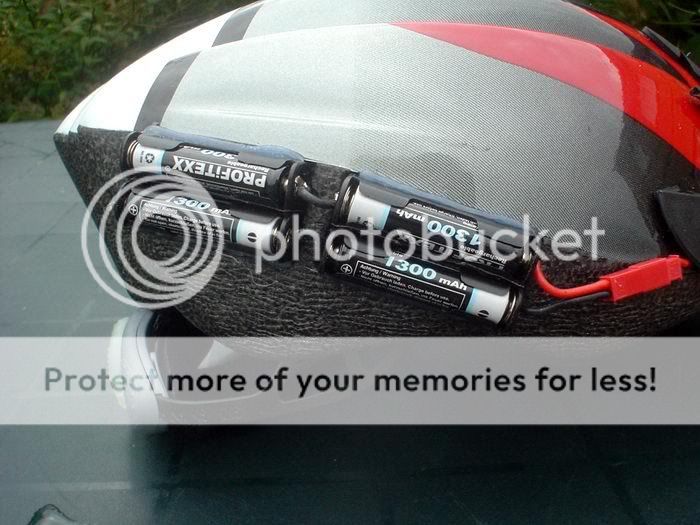
Battery Carrier assembled and ready to fit.
4 individual AAA lips allow the joining leads to be fitted, if I had used 2 x 2 AAA carriers the carriers would only have had tags on one end.
The JST connector allows easy upgrade replacement of battery pack or headlight and also allows me to charge the pack on the helmet, either a slow trickle charge or an intelligent fast charge.
Last edited by Unknown Cyclist; 09-11-08 at 01:42 PM.
09-04-08, 03:53 AM
#37
Senior Member
Thread Starter
Join Date: Jul 2008
Location: UK
Posts: 1,757
Mentioned: 0 Post(s)
Tagged: 0 Thread(s)
Quoted: 0 Post(s)
Likes: 0
Liked 0 Times
in
0 Posts
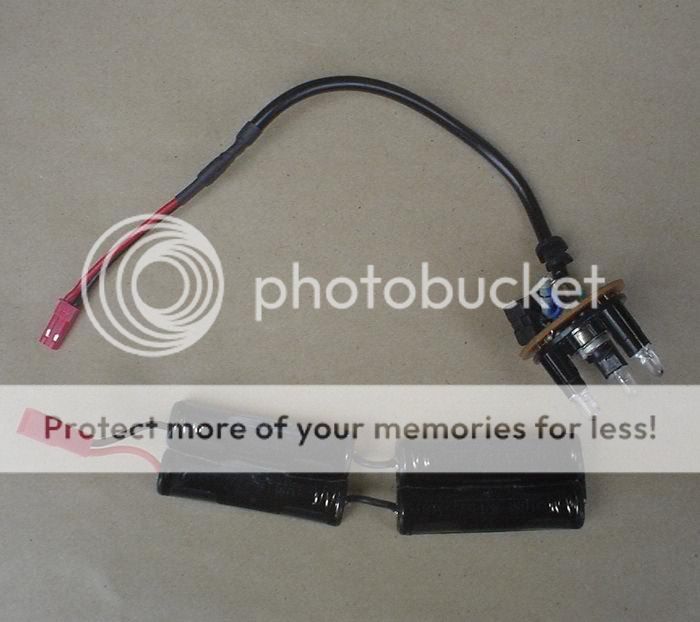
Circuit board with JST plug fitted and heatshrink added.
Last edited by Unknown Cyclist; 09-11-08 at 01:43 PM.
 09-04-08, 08:21 PM
#39
Senior Member
Thread Starter
Join Date: Jul 2008
Location: UK
Posts: 1,757
Mentioned: 0 Post(s)
Tagged: 0 Thread(s)
Quoted: 0 Post(s)
Likes: 0
Liked 0 Times
in
0 Posts

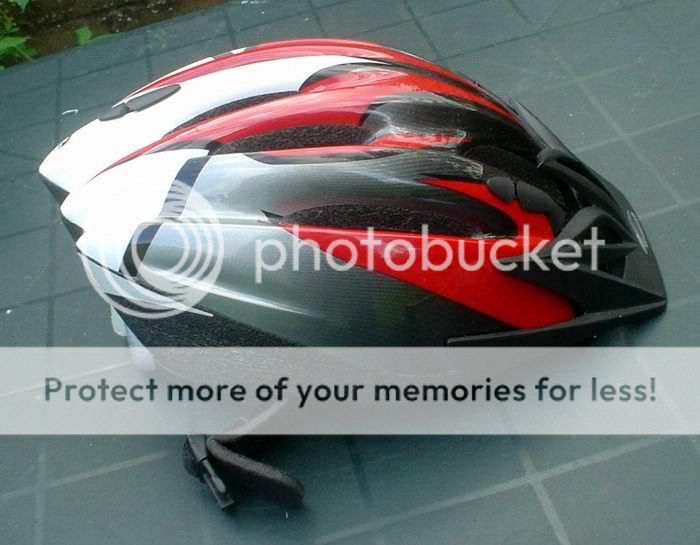
Because I want the light to be self contained the battery pack will be fitted into a recess in the side of the helmet.
This means I can just pick up the helmet and go, and not have to plug it into a separate pack in my pocket, frame/handlebar mounted or in a rucksack.
This is one of the reasons for using 4 x AAA and not 4 X AA.
Last edited by Unknown Cyclist; 09-11-08 at 01:48 PM.
09-07-08, 10:35 AM
#40
Senior Member
Thread Starter
Join Date: Jul 2008
Location: UK
Posts: 1,757
Mentioned: 0 Post(s)
Tagged: 0 Thread(s)
Quoted: 0 Post(s)
Likes: 0
Liked 0 Times
in
0 Posts
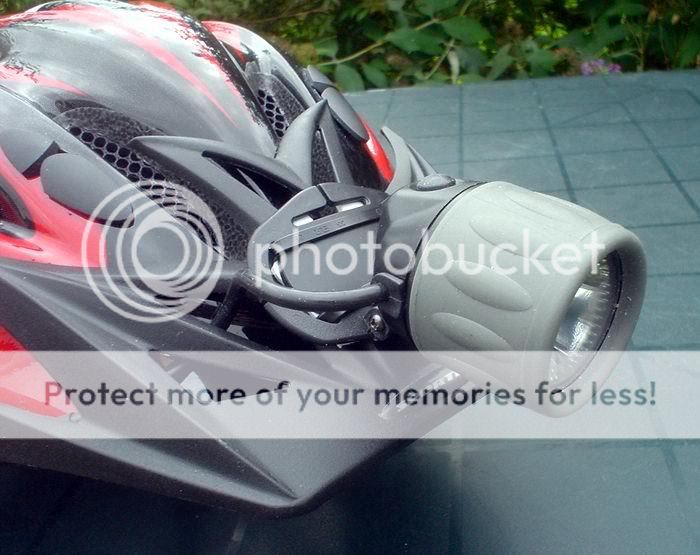
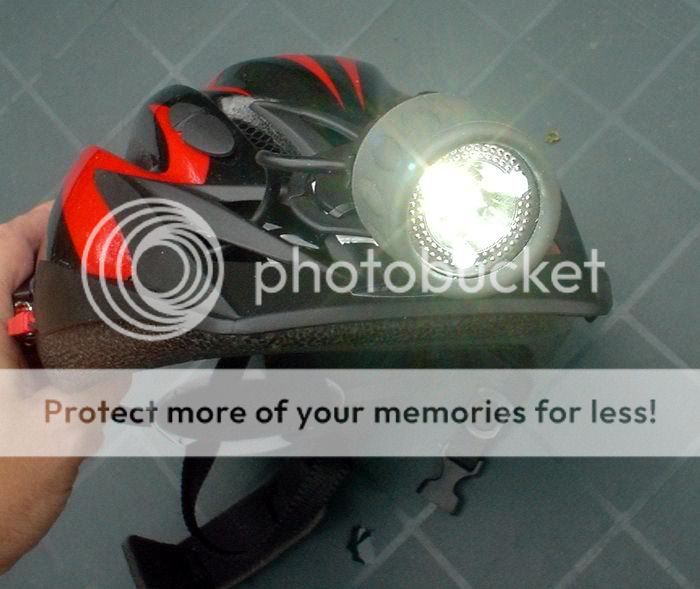
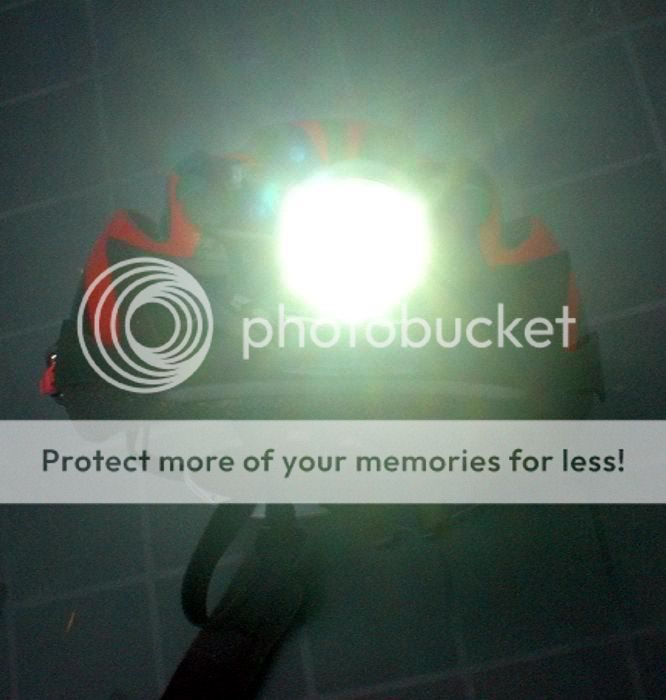
Final assembly.
Works quite well, light output is reasonable, better than my sigma halogen and nearly as good as my Hella 6V Luxeon.
The beam is very much a cone and lights up the hedgerows in narrow lanes, which my other lights do not do.
Bright enough to use on it's own, but not enough light for high speed on windy roads.
Runtime should be just over 3 hours, I've got some higher capacity AAAs in the post that should increase the runtime to 4 hours.
Last edited by Unknown Cyclist; 09-11-08 at 02:04 PM.
09-07-08, 11:01 AM
#41
Senior Member
Thread Starter
Join Date: Jul 2008
Location: UK
Posts: 1,757
Mentioned: 0 Post(s)
Tagged: 0 Thread(s)
Quoted: 0 Post(s)
Likes: 0
Liked 0 Times
in
0 Posts
Original weight = 303g
AUW = 409g
Aims:
Low weight, reasonable output and runtime, ON/OFF, weatherproof, easy to charge and hopefully reasonably good looking at not too much expense.
Also, it was important that the mounting bracket was adjustable and stable - fortunately this one is very good.
I would have liked a bit more light output and a longer runtime, maybe next time....
Last edited by Unknown Cyclist; 09-11-08 at 02:00 PM.
 09-10-08, 08:00 AM
#43
Senior Member
Join Date: Aug 2008
Location: MN
Posts: 252
Bikes: Trek 800
Mentioned: 0 Post(s)
Tagged: 0 Thread(s)
Quoted: 0 Post(s)
Likes: 0
Liked 0 Times
in
0 Posts
I think it looks very nice. I may have to tap into the knowledge you gained if I ever get around to building one. 
09-10-08, 08:35 AM
#44
Senior Member

Join Date: Sep 2007
Location: Edmonton, AB
Posts: 1,143
Bikes: '07 Giant OCR3
Mentioned: 0 Post(s)
Tagged: 0 Thread(s)
Quoted: 0 Post(s)
Likes: 0
Liked 0 Times
in
0 Posts
09-10-08, 09:40 AM
#45
Member
Join Date: Jan 2008
Posts: 35
Mentioned: 0 Post(s)
Tagged: 0 Thread(s)
Quoted: 0 Post(s)
Likes: 0
Liked 0 Times
in
0 Posts
Great light , your battery placement opens the doors for a whole new design line of helmets with built-in battery holders. Noticed you ended using a different light housing from your original post. What made you switch and do you have a link for the housing you used?
, your battery placement opens the doors for a whole new design line of helmets with built-in battery holders. Noticed you ended using a different light housing from your original post. What made you switch and do you have a link for the housing you used?
09-11-08, 12:23 PM
#46
Senior Member
Join Date: Jul 2007
Location: sebtown
Posts: 192
Mentioned: 0 Post(s)
Tagged: 0 Thread(s)
Quoted: 0 Post(s)
Likes: 0
Liked 0 Times
in
0 Posts
Cutter is a reseller for Cree, in australia. They ship all over.
The MR11 is 36mm diameter.
See threads in my sig for more details

The MR11 is 36mm diameter.
See threads in my sig for more details
https://forums.mtbr.com/showthread.php?t=390371
but a larger diameter. I measured the inside diameter of the pipe cap to be 35.00mm I think this is the size for an MR11.
Anyone have an idea where to get that board (w/ or w/o leds)? Cutter doesn't have it anymore.
I built a dual Q5 using this design and it works good.
09-11-08, 12:38 PM
#47
Senior Member
Thread Starter
Join Date: Jul 2008
Location: UK
Posts: 1,757
Mentioned: 0 Post(s)
Tagged: 0 Thread(s)
Quoted: 0 Post(s)
Likes: 0
Liked 0 Times
in
0 Posts
09-11-08, 02:06 PM
#48
Senior Member
Thread Starter
Join Date: Jul 2008
Location: UK
Posts: 1,757
Mentioned: 0 Post(s)
Tagged: 0 Thread(s)
Quoted: 0 Post(s)
Likes: 0
Liked 0 Times
in
0 Posts
09-15-08, 09:58 AM
#49
Senior Member
Thread Starter
Join Date: Jul 2008
Location: UK
Posts: 1,757
Mentioned: 0 Post(s)
Tagged: 0 Thread(s)
Quoted: 0 Post(s)
Likes: 0
Liked 0 Times
in
0 Posts
The original triple-led light is still undergoing construction, I'm having problems finding a suitable mount/mounting point that I am entirely happy with.
I bought the salt & pepper pots from a fairly local cookware shop.
I got sidetracked by the helmet light
The triple-led has 3 x star LEDs, a stainless case and a fairly large aluminium heatsink, so it's a bit heavier than I would like on a helmet.
The experimental aluminium heatsinks I'm using I cut by hand (each one is a different thickness), so I'm having some more made by an engineering company.
I'll update soon.
Last edited by Unknown Cyclist; 09-15-08 at 10:05 AM.
