


Pig Chasers Lighting System
 08-27-08, 08:19 AM
#1
Senior Member
Thread Starter

Join Date: Sep 2007
Location: Edmonton, AB
Posts: 1,143
Bikes: '07 Giant OCR3
Mentioned: 0 Post(s)
Tagged: 0 Thread(s)
Quoted: 0 Post(s)
Likes: 0
Liked 0 Times
in
0 Posts
Pig Chasers Lighting System
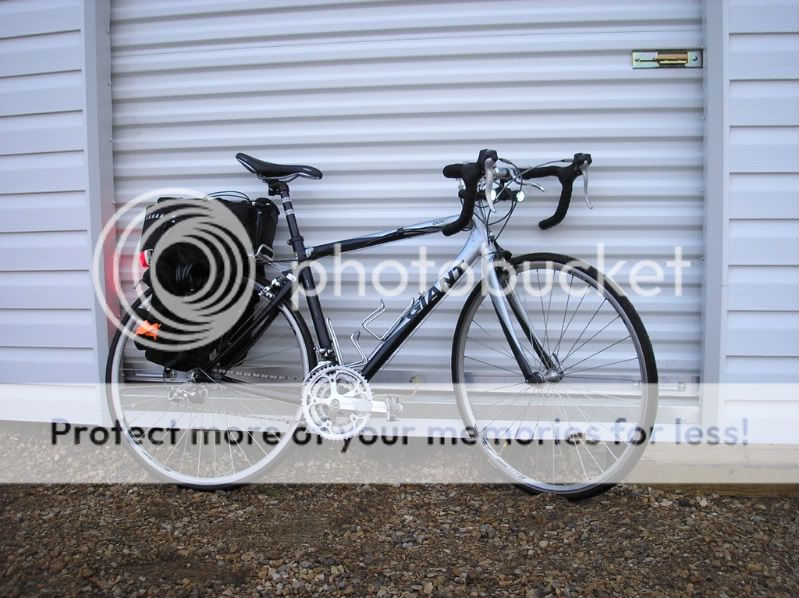
Finally am close to finished my lighting system. It's evolved along the way and will probably continue to do so (as soon as those r2's become more affordable  ) Right now here are just a few shots, more details will follow in subsequent posts.
) Right now here are just a few shots, more details will follow in subsequent posts.
 08-27-08, 08:46 AM
#2
Senior Member
Thread Starter
Join Date: Sep 2007
Location: Edmonton, AB
Posts: 1,143
Bikes: '07 Giant OCR3
Mentioned: 0 Post(s)
Tagged: 0 Thread(s)
Quoted: 0 Post(s)
Likes: 0
Liked 0 Times
in
0 Posts
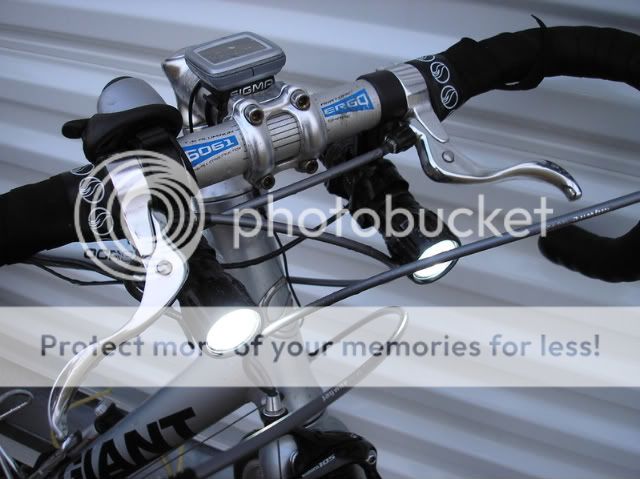
The Headlights are Q5s using these Optics. I'm driving them @ 1A using an LM3404. One of the biggest problems i encountered was how to house these. I was going to use electrical conduit when i stumbled across a 3 pack of Garity flashlights at Costco for 20CAD. So i gutted two and replaced the innards with my Q5s and optics. The Q5's fit perfectly into the holders and are nicely heat sinked (sunk?). The optics didn't quite fit... i had to do just a little customizing (grinding). The driver i made fit nicely in the body of one. I've also used the switches on the flashlights. One switch (on my right, left as you look at the pictures) turns the lighting system (headlight(s) + taillights) on and off. The other switch turns off the headlight on the left (right as you look at the picture).
I've also mixed the optics, i'm running just the 6* base on the left, and the wide 16* on the right (again reversed as you look at them in the pictures). I'm pretty fond of the beam pattern and quality. The 6* throws nicely and really lights up the road. The 16* puts out a nice wide beam lighting up the sides and i believe makes a better "be seen" light.
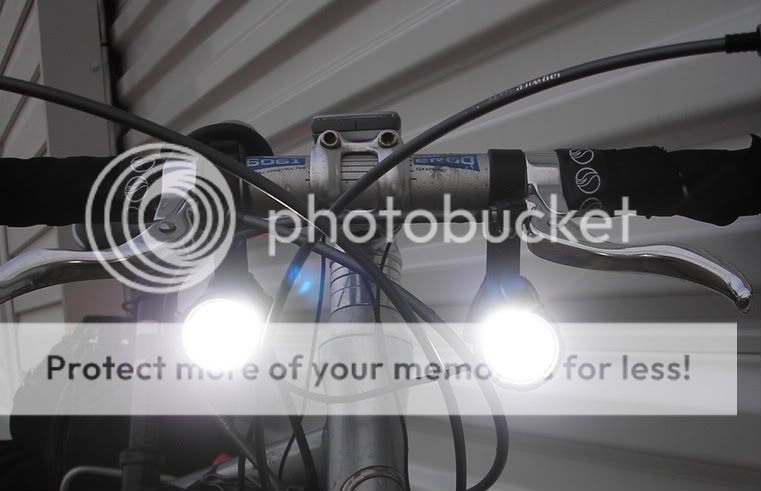
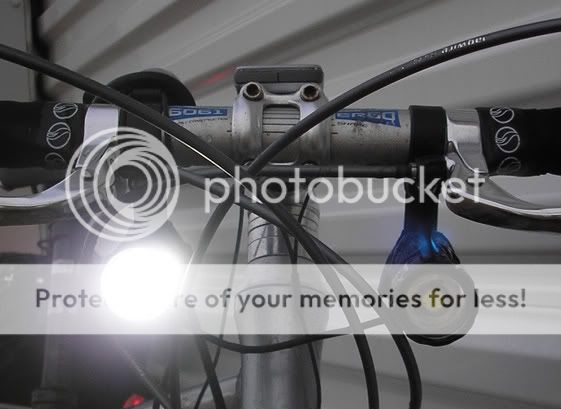
I've also mixed the optics, i'm running just the 6* base on the left, and the wide 16* on the right (again reversed as you look at them in the pictures). I'm pretty fond of the beam pattern and quality. The 6* throws nicely and really lights up the road. The 16* puts out a nice wide beam lighting up the sides and i believe makes a better "be seen" light.
Last edited by Pig_Chaser; 08-27-08 at 10:25 AM.
08-27-08, 09:08 AM
#3
Senior Member
Thread Starter
Join Date: Sep 2007
Location: Edmonton, AB
Posts: 1,143
Bikes: '07 Giant OCR3
Mentioned: 0 Post(s)
Tagged: 0 Thread(s)
Quoted: 0 Post(s)
Likes: 0
Liked 0 Times
in
0 Posts
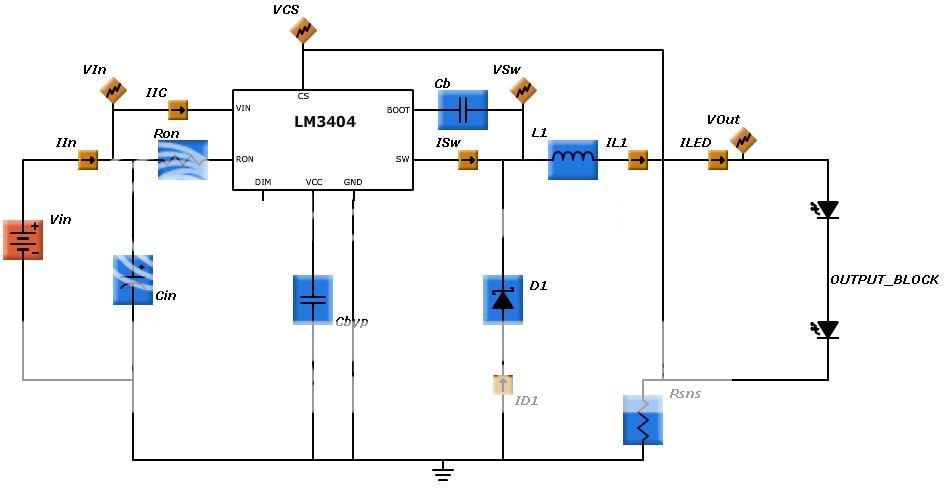
Here's a schematic of the driver:
And a picture of the final product:
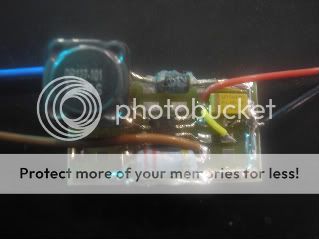
Parts List:
Cb: 0.01uF
Cbyp: 0.1uF
Cin: 4.7uF, 25V
D1: ?? Schotky something or other
L1: 100uH, 5A
Ron: 210kOhm
Rsns: 0.22Ohm
I was able to build this "viturally" for free, but then i have excellent sources for surplus electronic parts and knick knacks. I wouldn't recommend building a driver, there are excellent off the shelf solutions out there for pretty cheap.
And a picture of the final product:
Parts List:
Cb: 0.01uF
Cbyp: 0.1uF
Cin: 4.7uF, 25V
D1: ?? Schotky something or other
L1: 100uH, 5A
Ron: 210kOhm
Rsns: 0.22Ohm
I was able to build this "viturally" for free, but then i have excellent sources for surplus electronic parts and knick knacks. I wouldn't recommend building a driver, there are excellent off the shelf solutions out there for pretty cheap.

 08-27-08, 02:00 PM
#5
Senior Member
Thread Starter
Join Date: Sep 2007
Location: Edmonton, AB
Posts: 1,143
Bikes: '07 Giant OCR3
Mentioned: 0 Post(s)
Tagged: 0 Thread(s)
Quoted: 0 Post(s)
Likes: 0
Liked 0 Times
in
0 Posts
 08-28-08, 07:52 AM
#7
Senior Member
Thread Starter
Join Date: Sep 2007
Location: Edmonton, AB
Posts: 1,143
Bikes: '07 Giant OCR3
Mentioned: 0 Post(s)
Tagged: 0 Thread(s)
Quoted: 0 Post(s)
Likes: 0
Liked 0 Times
in
0 Posts
Well every thing's regulated so the power source can be anything from 10V to 30V. I can actually get away with less voltage but then i can only run 1 headlight as the 3404 is a buck regulator and has some drop out associated with it.
I can use SLA's and they're my good old backup. I also utilize used batteries from work. In our pipeline pigs we use electrochem lithium batteries (not lithium ion). These batteries come in the standard battery packages, AA, C, D and Double D, but each cell has a voltage output of 3.9V and the AH ranges from 5 for the C to 30 for the DD. As per company policy, a new set of batteries is used for each run, which means there's allot of batteries with allot of life left in em. oh, and off the top of my head, each 'C' cell is costs about $80, you wouldn't want to use these things if they weren't free
I can use SLA's and they're my good old backup. I also utilize used batteries from work. In our pipeline pigs we use electrochem lithium batteries (not lithium ion). These batteries come in the standard battery packages, AA, C, D and Double D, but each cell has a voltage output of 3.9V and the AH ranges from 5 for the C to 30 for the DD. As per company policy, a new set of batteries is used for each run, which means there's allot of batteries with allot of life left in em. oh, and off the top of my head, each 'C' cell is costs about $80, you wouldn't want to use these things if they weren't free
 09-05-08, 11:06 AM
#9
Senior Member
Thread Starter
Join Date: Sep 2007
Location: Edmonton, AB
Posts: 1,143
Bikes: '07 Giant OCR3
Mentioned: 0 Post(s)
Tagged: 0 Thread(s)
Quoted: 0 Post(s)
Likes: 0
Liked 0 Times
in
0 Posts
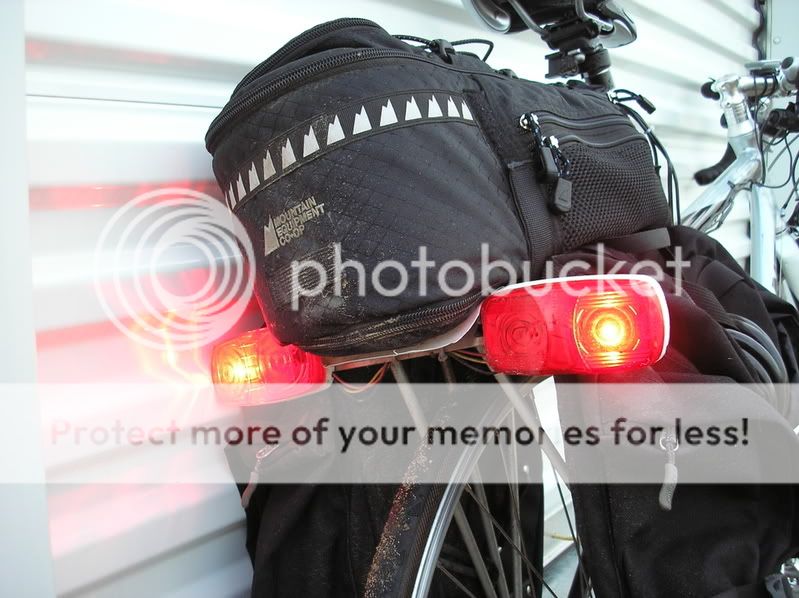
Here's some shots of the taillights. They're side markers for trucks (i think i paid $3 each), i just ripped out the incandescent bulbs and glued in LED's. No optics at all, that way i get some side visibility on them. They're driven by a 5V power supply that i literally ripped (dremel cut) out of another electronics assembly. It's a switching power supply so again, fairly efficient. They're wire in series and use a current limiting resistor of 2.2ohms to limit the current to 300mA. I've heard people driving these at 600mA but the difference in brightness didn't seem worth it to me, i'd rather stick in more LED's and as you can see, i have the real estate to do that (later).
 09-23-08, 08:32 AM
#11
Senior Member
Thread Starter
Join Date: Sep 2007
Location: Edmonton, AB
Posts: 1,143
Bikes: '07 Giant OCR3
Mentioned: 0 Post(s)
Tagged: 0 Thread(s)
Quoted: 0 Post(s)
Likes: 0
Liked 0 Times
in
0 Posts
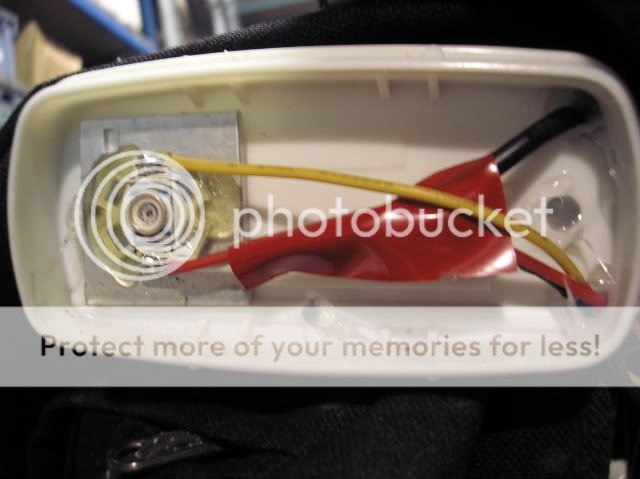
Sorry to disapoint, the mounts are cheap dollar store blinky holders. I tie-wrapped the flashlights on and then covered the tie-wraps with electrical tape so it doesn't look totally tacky. They're cheap and they vibrate, i'm looking to upgrade them eventually.
 09-25-08, 11:32 AM
#13
Senior Member
Thread Starter
Join Date: Sep 2007
Location: Edmonton, AB
Posts: 1,143
Bikes: '07 Giant OCR3
Mentioned: 0 Post(s)
Tagged: 0 Thread(s)
Quoted: 0 Post(s)
Likes: 0
Liked 0 Times
in
0 Posts
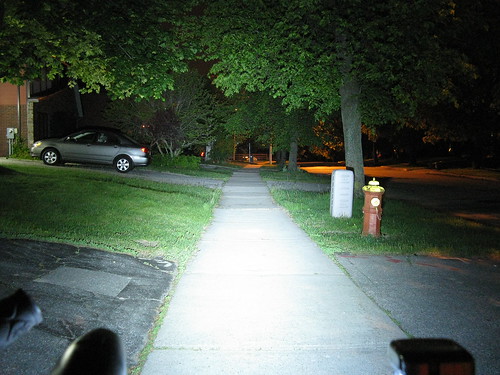
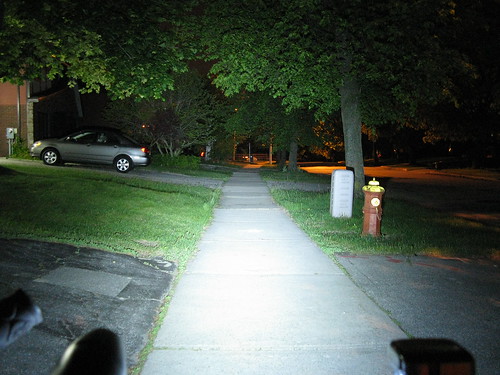
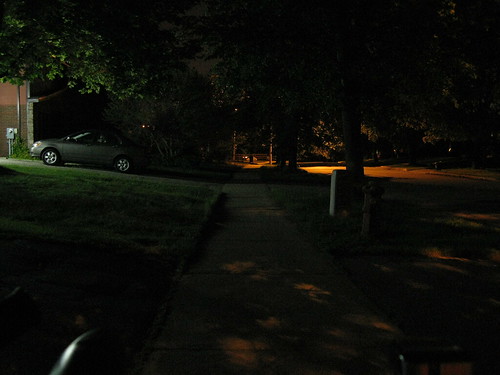
And finally the beam shots, i guess these will serve as a comparison for when i upgrade to MC-E's.
These were taken at ISO100, F4.0, 4' . I had tried 6' exposure but the brights were just too washed out.
this is with only the 16* "Been Seen" light:
this is with both the 16* "Been Seen" and the 4* See lights on:
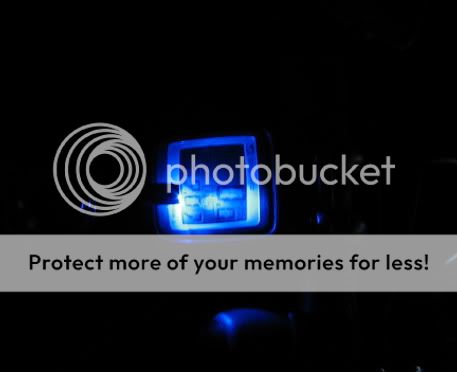
And here's one of the computer light i recently added on:
These were taken at ISO100, F4.0, 4' . I had tried 6' exposure but the brights were just too washed out.
this is with only the 16* "Been Seen" light:
this is with both the 16* "Been Seen" and the 4* See lights on:
And here's one of the computer light i recently added on:
10-03-08, 02:36 AM
#14
Senior Member

Join Date: May 2006
Location: North of the 49th Parallel (GPS grid soon)
Posts: 1,766
Bikes: MTB Peugoet Canyon (forgot the model), Nikishi? roadbike, MTB custom build,
Mentioned: 0 Post(s)
Tagged: 0 Thread(s)
Quoted: 0 Post(s)
Likes: 0
Liked 0 Times
in
0 Posts
Piggy,
I would not have understood those schematics if my life depended on it. I may understand like 5-10% if I really looked hard. Thank goddess for cheap drivers out there where you can buy 1-2 of them.
I'm replying to this because I saw your post in my CPF thread and checked out your link here. BTW nice lights.
I've got a ghetto looking light that is all exposed here but pumps out eye protection needing ~800lms. https://www.flickr.com/photos/49184877@N00/page3/ This is my flickr page.
To anyone else wanting to build something like this but does not know much how to do this I am more then willing to help out. I would consider myself a 'noob' at electronics. But I have advanced a bit from blank_stare to uber_noob to noob right now so I see things from a newbies view when building stuff. If this noob here can build a light that crazy running off 6xAA (granted I'm pushing the cells hard but the driver only allows for up to 9v and 6xAA NIMH = 8.6v hot off the charger) so can you. I'm planning on reviewing what I used and seeing what I can downgrade a bit should someone not have the luxury of having a certian item to still be able to make the light. I'll tell you right off the bat Arctic Alumina Adhesive is EXPENSIVE and you'll not likely find that in any local shop other then online. We're talking like ~$10USD for 5mL. A work around this is to use CPU thermo adhesive which you can find in any computer/electronics shop. I'm sure you can get them in a small paste tube for ~$2-4. If you ask really nicely to the computer repair/building department at your local computer store the tech guys may have some CPU paste which they may give you about a Q-tips amount or if you're really lucky I remember when I was building my own computers the CPU boxes came with a little syringe of thermopaste. Obviously to the techs in a computer store they won't use that small unit and put it aside or throw it out. That is your bonus and homework to check out these stores and ask for that. You may want to explain you're building a high powered LED light which being in a computer store would not make you sound/look funny. You can also get a small 486 CPU heatsink (comes with a fan you won't need but keep it for future projects or give to a friend or me ) at the shop which would be a good gesture if the techs gave you the small bit of thermo paste on a qtip/paper or one of those small one time use thermopaste syringe.
I went to www.dealextreme.com (I have no affilations or get kick backs for mentioning thier site. Just a happy customer) and got 90% of all my parts. You can get pretyy much all you need off DX's site. I just specified 20mm optics because I wanted to put them into a 1in aluminum tubing later (A la SirAchealot style).
Type 'circuit board' at DX and get the 3.6-9v regulator. They have two units there. One has 5-modes (no memory so it does not remember the last mode you're in) and the other is a 4pack of 3.6-9v @ 800mA but only one mode which powers the LED at 80% full power (thus the 800mA rating. It's a good balance of thermo to light output). If you get a 4 pack to make 2 lights or say one light you can have 2-3 units to cheaply cut your teeth into the project. Check my site. It will tell you the right way of which is positive and which is negative. I plan on making a simple how to page soon as many popele have asked me how I made my stuff. THe good thing about riding at night with the ghetto exposed light setup is that people go by the crazy lighting you have first and give a positive comment then some run of the mouth negative comment about how the unit looks like I get a lot of during the day.
I would not have understood those schematics if my life depended on it. I may understand like 5-10% if I really looked hard. Thank goddess for cheap drivers out there where you can buy 1-2 of them.
I'm replying to this because I saw your post in my CPF thread and checked out your link here. BTW nice lights.
I've got a ghetto looking light that is all exposed here but pumps out eye protection needing ~800lms.
https://www.flickr.com/photos/49184877@N00/page3/ This is my flickr page.To anyone else wanting to build something like this but does not know much how to do this I am more then willing to help out. I would consider myself a 'noob' at electronics. But I have advanced a bit from blank_stare to uber_noob to noob right now so I see things from a newbies view when building stuff. If this noob here can build a light that crazy running off 6xAA (granted I'm pushing the cells hard but the driver only allows for up to 9v and 6xAA NIMH = 8.6v hot off the charger) so can you. I'm planning on reviewing what I used and seeing what I can downgrade a bit should someone not have the luxury of having a certian item to still be able to make the light. I'll tell you right off the bat Arctic Alumina Adhesive is EXPENSIVE and you'll not likely find that in any local shop other then online. We're talking like ~$10USD for 5mL. A work around this is to use CPU thermo adhesive which you can find in any computer/electronics shop. I'm sure you can get them in a small paste tube for ~$2-4. If you ask really nicely to the computer repair/building department at your local computer store the tech guys may have some CPU paste which they may give you about a Q-tips amount or if you're really lucky I remember when I was building my own computers the CPU boxes came with a little syringe of thermopaste. Obviously to the techs in a computer store they won't use that small unit and put it aside or throw it out. That is your bonus and homework to check out these stores and ask for that. You may want to explain you're building a high powered LED light which being in a computer store would not make you sound/look funny. You can also get a small 486 CPU heatsink (comes with a fan you won't need but keep it for future projects or give to a friend or me
) at the shop which would be a good gesture if the techs gave you the small bit of thermo paste on a qtip/paper or one of those small one time use thermopaste syringe.I went to www.dealextreme.com (I have no affilations or get kick backs for mentioning thier site. Just a happy customer) and got 90% of all my parts. You can get pretyy much all you need off DX's site. I just specified 20mm optics because I wanted to put them into a 1in aluminum tubing later (A la SirAchealot style).
Type 'circuit board' at DX and get the 3.6-9v regulator. They have two units there. One has 5-modes (no memory so it does not remember the last mode you're in) and the other is a 4pack of 3.6-9v @ 800mA but only one mode which powers the LED at 80% full power (thus the 800mA rating. It's a good balance of thermo to light output). If you get a 4 pack to make 2 lights or say one light you can have 2-3 units to cheaply cut your teeth into the project. Check my site. It will tell you the right way of which is positive and which is negative. I plan on making a simple how to page soon as many popele have asked me how I made my stuff. THe good thing about riding at night with the ghetto exposed light setup is that people go by the crazy lighting you have first and give a positive comment then some run of the mouth negative comment about how the unit looks like I get a lot of during the day.
Last edited by Zero_Enigma; 10-03-08 at 03:04 AM.
10-03-08, 02:43 AM
#15
Senior Member
Join Date: May 2006
Location: North of the 49th Parallel (GPS grid soon)
Posts: 1,766
Bikes: MTB Peugoet Canyon (forgot the model), Nikishi? roadbike, MTB custom build,
Mentioned: 0 Post(s)
Tagged: 0 Thread(s)
Quoted: 0 Post(s)
Likes: 0
Liked 0 Times
in
0 Posts
Took a while in the manual mode to accurately reproduce what I was seeing from my eyes. Yes it is that freaking bright. I used 4 x 3.6-9v @ 800ma (80% full power so each LED is getting 80% full power and not 80% divide 4) wired in parallel to achieve this and used a 6xAA battery holder which I will note is pushing the batteries hard but it's mega bright and the 6xAA weight/size/space penalty is worth it as downhill burners or when I'm riding fast in a dark area for a moment.
Edit: LEDs being used are SSC P4 U-bin (bin is like a 'grade/selection'. Think of it like diamonds and thier grading) which when I got them at DX back then it was ~$7.50 USD/ea unit. Now a days it's getting closer to being $5/ea which is good for newbies to try.
The photo shows a 4xLED unit and also a 2xLED unit (2xLED is also SSC P4 U-bin) both on high.
The photo below shows only 4xLED's on.
You may not notice the extra brightness but in person yo will see it about 20% brighter which is good when you need extra lighting.
This is the control photo so people know what I was dealing with before the ligths are one and so they can guage for themselves.
Camera was tripod mounted so the photo is the same in each shot give or take a possilbe 5% bump on the tripod shifting not that is makes any difference.
Last edited by Zero_Enigma; 10-03-08 at 02:53 AM.
