


Ultegra BB installation hit a snag...
 02-23-04, 09:01 PM
#1
Member
Thread Starter
Join Date: Feb 2004
Location: Miami
Posts: 28
Mentioned: 0 Post(s)
Tagged: 0 Thread(s)
Quoted: 0 Post(s)
Likes: 0
Liked 0 Times
in
0 Posts
Ultegra BB installation hit a snag...
Background: Installing a Shimano Ultegra BB-6500, 105x68 into a Felt B2 frameset (shell--68mm). Well, minor difficulty...
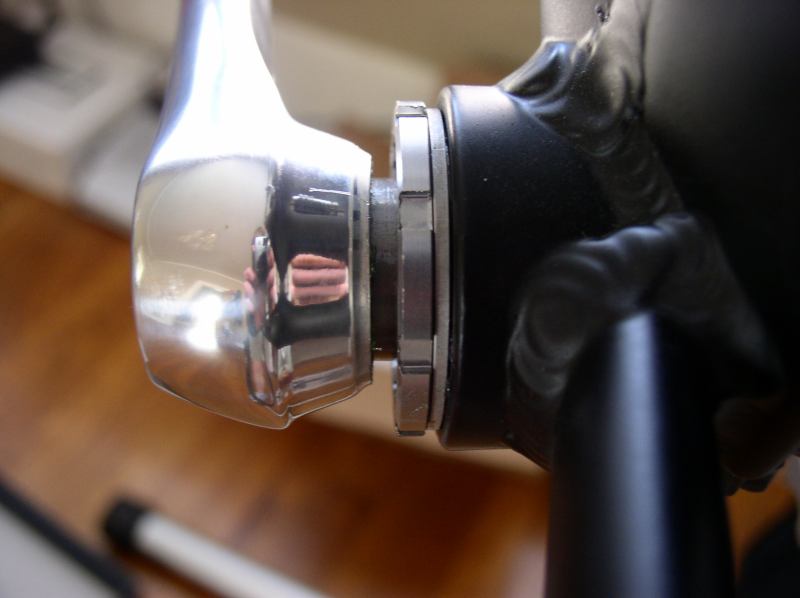
When I put the drive side cartridge in, flush with the shell, and then put the non-drive cup in--it doesn't sit flush:

So, who's at fault--the BB, the BB shell, or ME? I won't rule out myself, as this is my first BB install, but what's there to mess up!? Did I miss something?
The exterior of the BB shell measures 68mm. And the BB itself won't "collapse" to less than ~69mm. In the pic below I took the BB shell measurement and compared it to the BB:

Finally, a possible patch: bottom bracket spacer. Any problems with this?
Any thoughts? Thanks in advance..
Andy
When I put the drive side cartridge in, flush with the shell, and then put the non-drive cup in--it doesn't sit flush:
So, who's at fault--the BB, the BB shell, or ME? I won't rule out myself, as this is my first BB install, but what's there to mess up!? Did I miss something?
The exterior of the BB shell measures 68mm. And the BB itself won't "collapse" to less than ~69mm. In the pic below I took the BB shell measurement and compared it to the BB:
Finally, a possible patch: bottom bracket spacer. Any problems with this?
Any thoughts? Thanks in advance..
Andy
 02-23-04, 09:41 PM
#2
Direct Hit Not Required

Join Date: Nov 2003
Location: San Bruno, CA
Posts: 6,193
Bikes: Leopard DC1, Ridley X-Fire, GT Zaskar 9r
Mentioned: 0 Post(s)
Tagged: 0 Thread(s)
Quoted: 2 Post(s)
Likes: 0
Liked 1 Time
in
1 Post
Was the drive side screwed on tightly when you tried installing the left cup? What I did was left the drive side slightly loose, maybe 1-2 turns from flush, tighten the non-drive side, then tighten the drive-side completely.
The worked for me.
The worked for me.
02-23-04, 10:51 PM
#3

Compulsive Upgrader

Join Date: May 2002
Location: Toronto, Ontario
Posts: 603
Bikes: 2002 Kona Deluxe (road), 2001 Cove Stiffee (mtb)
Mentioned: 0 Post(s)
Tagged: 0 Thread(s)
Quoted: 0 Post(s)
Likes: 0
Liked 0 Times
in
0 Posts
Not to sound like an idiot...are you sure its in as far as it will go? Shimano BB non-drive cups have that funky rubber gasket on the inside that sometimes feels like it won't go in any further unless you give it a couple more cranks with the socket wrench. Shimano only makes two sizes 68 & 70, so it looks like yours has got to fit. Hmmmm weird.
__________________
"No drug, not even alcohol, causes the fundamental ills of society. If we're looking for the source of our troubles, we shouldn't test people for drugs. We should test them for stupidity, ignorance, greed, and love of power." -P.J. O'Rourke
"No drug, not even alcohol, causes the fundamental ills of society. If we're looking for the source of our troubles, we shouldn't test people for drugs. We should test them for stupidity, ignorance, greed, and love of power." -P.J. O'Rourke
02-24-04, 08:06 AM
#4
Member
Thread Starter
Join Date: Feb 2004
Location: Miami
Posts: 28
Mentioned: 0 Post(s)
Tagged: 0 Thread(s)
Quoted: 0 Post(s)
Likes: 0
Liked 0 Times
in
0 Posts
Yes, drive side was snug. If I do as you suggest and tighten the non-drive cup first (flush), then the drive side won't tighten completely. Thanks for the suggestion though...
Originally Posted by BlastRadius
Was the drive side screwed on tightly when you tried installing the left cup? What I did was left the drive side slightly loose, maybe 1-2 turns from flush, tighten the non-drive side, then tighten the drive-side completely.
The worked for me.
The worked for me.
02-24-04, 08:11 AM
#5
Member
Thread Starter
Join Date: Feb 2004
Location: Miami
Posts: 28
Mentioned: 0 Post(s)
Tagged: 0 Thread(s)
Quoted: 0 Post(s)
Likes: 0
Liked 0 Times
in
0 Posts
No offense taken  This is the kind of tip/trick that I wasn't aware of. But no, I haven't completely torqued down either side, as I didn't want to screw anything up (without asking first)...haha. I've never installed a BB before, but I've definitely done my fair share of wrenching (mostly on cars)....it just feels like it's definintely not going any farther. I'll give it a good turn and see though, you might be right. Thanks again.
This is the kind of tip/trick that I wasn't aware of. But no, I haven't completely torqued down either side, as I didn't want to screw anything up (without asking first)...haha. I've never installed a BB before, but I've definitely done my fair share of wrenching (mostly on cars)....it just feels like it's definintely not going any farther. I'll give it a good turn and see though, you might be right. Thanks again.
Originally Posted by stiffee_shane
Not to sound like an idiot...are you sure its in as far as it will go? Shimano BB non-drive cups have that funky rubber gasket on the inside that sometimes feels like it won't go in any further unless you give it a couple more cranks with the socket wrench. Shimano only makes two sizes 68 & 70, so it looks like yours has got to fit. Hmmmm weird.
02-24-04, 09:01 AM
#6
Recovering Retro-grouch
Join Date: Dec 2003
Location: Some call it God's country. I call it Acton, Maine
Posts: 5,008
Bikes: Too Many - 7 or 8
Mentioned: 0 Post(s)
Tagged: 0 Thread(s)
Quoted: 0 Post(s)
Likes: 0
Liked 0 Times
in
0 Posts
Depending on the actual dimensions of the BB shell, I have seen this type of BB end up with as much as 2 + mm of thread outside the lock ring on the non-drive side of the shell. I am of the opinion this is expected to happen by Shimano, so they provide plenty of threads to make up for the discrepancies in actual BB shell dimensions. If you only have 2mm or so outside the Lock ring when it is tightened, I wouldn't sweat it. If it makes you nervous though, put a 1mm spacer behind the Fixed cup first and then reinstall. But be careful, changing the alignment of the drive side can alter the chain line. In a lot of cases this can be a good thing. Anyway, I would never put a spacer behind the adjustable Lock ring. IMO, not a good idea.
02-24-04, 09:25 AM
#7
Member
Thread Starter
Join Date: Feb 2004
Location: Miami
Posts: 28
Mentioned: 0 Post(s)
Tagged: 0 Thread(s)
Quoted: 0 Post(s)
Likes: 0
Liked 0 Times
in
0 Posts
Thanks for the input, good to know that this isn't abnormal. Why is a spacer not as good an idea on the lock ring side, as it would be on the drive side? I assumed that ideally the drive side should be flush, as to not alter the chain line....even though as you say, it could be a good thing. I'll tinker with it and see what works best. Anyways, thanks again for your input...
Originally Posted by CRUM
Depending on the actual dimensions of the BB shell, I have seen this type of BB end up with as much as 2 + mm of thread outside the lock ring on the non-drive side of the shell. I am of the opinion this is expected to happen by Shimano, so they provide plenty of threads to make up for the discrepancies in actual BB shell dimensions. If you only have 2mm or so outside the Lock ring when it is tightened, I wouldn't sweat it. If it makes you nervous though, put a 1mm spacer behind the Fixed cup first and then reinstall. But be careful, changing the alignment of the drive side can alter the chain line. In a lot of cases this can be a good thing. Anyway, I would never put a spacer behind the adjustable Lock ring. IMO, not a good idea.
02-24-04, 07:57 PM
#8
Senior Member
Join Date: Dec 2003
Location: Huntsville, AL
Posts: 157
Bikes: Sano, Raleigh
Mentioned: 0 Post(s)
Tagged: 0 Thread(s)
Quoted: 0 Post(s)
Likes: 0
Liked 0 Times
in
0 Posts
It's been a while since I've worked with a BB, but I believe the non-drive side adapter is supposed to clamp down on the BB anyway, and not bottom out on the shell. If your non-drive-side flange was bottoming out on the shell, it wouldn't do anything to clamp up the BB. So, you should have a gap between the threads and the flange...it's correct. Shimano says to always torque the main-body side first, then the non-drive side. Specified torque is 50-70 nm (435-608 in-lbs) with grease.
If I'm off-base here, somebody please step in...as I said, it's been a few years since I've had the BB out.
If I'm off-base here, somebody please step in...as I said, it's been a few years since I've had the BB out.
02-24-04, 08:20 PM
#9

The Red Lantern

Join Date: Apr 2003
Location: Raleigh NC
Posts: 5,965
Mentioned: 0 Post(s)
Tagged: 0 Thread(s)
Quoted: 1 Post(s)
Likes: 0
Liked 0 Times
in
0 Posts
I always install the drive side first, most of the way in, then install the non-drive most of the way. Then torque(Or tighten the crap out of) the drive side, then the non drive side. They usually bottom but sometimes you get a bit hanging out.
__________________
Are you a registered member? Why not? click here to register. Its free, and only takes 27 seconds!
Help out the forums, abide by our community guidelines.
I am in the woods and I have gone crazy.
Are you a registered member? Why not? click here to register. Its free, and only takes 27 seconds!
Help out the forums, abide by our community guidelines.
I am in the woods and I have gone crazy.
02-24-04, 10:21 PM
#10
Direct Hit Not Required
Join Date: Nov 2003
Location: San Bruno, CA
Posts: 6,193
Bikes: Leopard DC1, Ridley X-Fire, GT Zaskar 9r
Mentioned: 0 Post(s)
Tagged: 0 Thread(s)
Quoted: 2 Post(s)
Likes: 0
Liked 1 Time
in
1 Post
Have you checked if the non-drive side screws all the way in without the drive-side installed? Perhaps the threads on the non-drive side don't go deep enough.
02-25-04, 07:32 AM
#11
Member
Thread Starter
Join Date: Feb 2004
Location: Miami
Posts: 28
Mentioned: 0 Post(s)
Tagged: 0 Thread(s)
Quoted: 0 Post(s)
Likes: 0
Liked 0 Times
in
0 Posts
Yes, if I screw the non-drive cup in first it will sit flush, and then the drive side will stick out. Thanks everyone for the help...
Originally Posted by BlastRadius
Have you checked if the non-drive side screws all the way in without the drive-side installed? Perhaps the threads on the non-drive side don't go deep enough.
08-22-08, 10:22 PM
#12
is kungfulicious
Join Date: Aug 2008
Posts: 42
Mentioned: 0 Post(s)
Tagged: 0 Thread(s)
Quoted: 0 Post(s)
Likes: 0
Liked 0 Times
in
0 Posts
This was a really helpful thread for me: also a newbie to BB installations. I just want to verify what the OP was experiencing. The first Shimano UN54 I installed with perfectly flush with the frame on both sides, but it gave me the wrong chain line. So I just installed the right length UN54 and ran into this same problem. If I screwed the drive side all the way in, the non-drive side would stick out by 1 mm or so. Further attempts to tighten cracked the POS plastic ring. Fortunately, I had that spare on hand. So, on my second go, I just made sure the drive side was nice and tight before tightening the non-drive side. I tightened it to around 225-250 inch pounds. Any more than this will crack the plastic ring on the UN54.
So I've got a gap on the non-drive side of about 1 mm. It's filled with grease. I just figure, if the grease disappears, I'll just smear a little more grease in.
I tried to eliminate this little gap by reinstalling the bottom bracket in many different ways - to no avail. My conclusion: at $20 for the UN54, you can't complain. It works well, and it's cheap to replace if something goes wrong. I'm not going to fret about a non-drive side 1 mm gap.
08-23-08, 05:31 AM
#13
Senior Member
Join Date: Oct 2005
Location: SW Ohio
Posts: 3,682
Bikes: Puch Marco Polo, Saint Tropez, Masi Gran Criterium
Mentioned: 25 Post(s)
Tagged: 0 Thread(s)
Quoted: 1163 Post(s)
Liked 442 Times
in
315 Posts
Just a question about your technique: Have you applied enough grease to the bottom bracket threads and also to the junction between the bottom bracket (fixed side) and the cup part of the adjustable (non-drive) side?
Also, what set up are you using for a bottom bracket wrench? Are you using a Shimano, a Park or some other brand of splined tool. The only reason I mention this is because if you are using a tool with a short built in handle, and there is any resistance in the threads from lack of grease or little burrs or a squashed portion of a thread - you might think the BB it tight, when in fact it is not. I'm not saying to over-torque but if you have the type of BB spline tool that fits on a 3/8" ratchet you might try mounting it on a medium size (12-18") breaker bar. As you tighten the adustable cup, you might find that it goes just a bit further. I'm not saying to whale on it and and damage your BB threads in any way though.
Also, what set up are you using for a bottom bracket wrench? Are you using a Shimano, a Park or some other brand of splined tool. The only reason I mention this is because if you are using a tool with a short built in handle, and there is any resistance in the threads from lack of grease or little burrs or a squashed portion of a thread - you might think the BB it tight, when in fact it is not. I'm not saying to over-torque but if you have the type of BB spline tool that fits on a 3/8" ratchet you might try mounting it on a medium size (12-18") breaker bar. As you tighten the adustable cup, you might find that it goes just a bit further. I'm not saying to whale on it and and damage your BB threads in any way though.
Last edited by masi61; 08-23-08 at 05:58 AM.
08-23-08, 06:37 AM
#14
Senior Member
Join Date: Dec 2004
Location: Athens, Ohio
Posts: 5,104
Bikes: Custom Custom Custom
Mentioned: 0 Post(s)
Tagged: 0 Thread(s)
Quoted: 1 Post(s)
Likes: 0
Liked 1 Time
in
1 Post
I've seen this happen on a few frames. Just tighten down the DS super tight and then do the NDS. If both are tight, it shouldn't be a problem even if the NDS cup is hanging out a little. The NDS cup basically just supports the BB. If it really concerns you, pop a spacer on the NDS.
