


Freewheel skipping
 11-20-11, 02:21 PM
#1
Senior Member
Thread Starter
Join Date: Aug 2010
Posts: 263
Mentioned: 0 Post(s)
Tagged: 0 Thread(s)
Quoted: 0 Post(s)
Likes: 0
Liked 1 Time
in
1 Post
Freewheel skipping
I am using an old shimano freewheel on a beater build. Everything looks great so far. However, on it's first test ride, the freewheel started skipping under a moderate load. I have "inserted" oil between the first two gears and blew it around with an air compressor. It still skips. Any other suggestions?
 11-20-11, 02:33 PM
#2
Banned
I am using an old shimano freewheel on a beater build.
they are consumables.
11-20-11, 03:32 PM
#3
Senior Member
Join Date: May 2008
Location: Calgary, Alberta
Posts: 679
Mentioned: 0 Post(s)
Tagged: 0 Thread(s)
Quoted: 1 Post(s)
Likes: 0
Liked 0 Times
in
0 Posts
Lay the bike down with the freewheel side up. Spin the wheel and drip oil in the gap between the rotating part of the freewheel, and the fixed part. Keep spinning and doing it until oil starts to come out the bottom.
It will be incredibly dirty, and the freewheel should work much better after.
You learn a lot more when you try to fix stuff than when you just run out and buy a new one.
I always think it's the best approach.
best wishes, good luck with that
It will be incredibly dirty, and the freewheel should work much better after.
You learn a lot more when you try to fix stuff than when you just run out and buy a new one.
I always think it's the best approach.
best wishes, good luck with that
11-20-11, 03:35 PM
#4
Senior Member
Join Date: May 2004
Location: Southern California
Posts: 2,191
Mentioned: 1 Post(s)
Tagged: 0 Thread(s)
Quoted: 114 Post(s)
Liked 119 Times
in
92 Posts
Some questions:
1. Were the same chain and freewheel used together during its previous install (I assume you took the parts from another ride).
2. Are you sure it is the freewheel? If you answered "no" to 1., then it could be the chain isn't "matched" to the freewheel cogs (due to a "stretched" chain).
3. Did you push out or install chain pins? If "yes", check for a tight link. If you didn't shorten/lengthen the chain and used a master link (SRAM, KMC, Wipperman), this this is less likely.
4. BTW - I assume the derailleur is adjusted, And the frame is not damaged, such that the frame's rear triangle flexes upon load.
11-20-11, 03:35 PM
#5
Senior Member
Join Date: Oct 2010
Location: Minnesota- the frozen tundra
Posts: 1,946
Bikes: 1977 Raleigh Super Grand Prix, 1976 Gitane Tour de France
Mentioned: 1 Post(s)
Tagged: 0 Thread(s)
Quoted: 0 Post(s)
Likes: 0
Liked 2 Times
in
2 Posts
The freewheel is worn out, I run into that all the time and the only solution is replacement if your goal is to use all the gears.
11-20-11, 03:42 PM
#6
Senior Member
Join Date: May 2004
Location: Southern California
Posts: 2,191
Mentioned: 1 Post(s)
Tagged: 0 Thread(s)
Quoted: 114 Post(s)
Liked 119 Times
in
92 Posts
+1! That's how I learned and the best way to gain hands-on experience.
Also, you might want to flush it with WD40. WD40 is a great degreaser and will dissolve old grease and grime. Then after the flush, introduce oil as suggested above. FWIW, I'd recommend a heavier oil, like Phil Wood Tenacious Oil.
11-20-11, 03:44 PM
#7

Friendship is Magic

Join Date: Nov 2010
Location: Sacramento, CA
Posts: 22,984
Bikes: old ones
Mentioned: 304 Post(s)
Tagged: 0 Thread(s)
Quoted: 26419 Post(s)
Liked 10,380 Times
in
7,208 Posts
Most people describe what happens when either your chain is
stretched excessively or your cogs are worn as "skipping", but
without a more precise description of what you mean by skipping,
it is hard to approach your problem.
Measure your chain for stretch. Check the cog teeth visually
for wear. As has been stated:
stretched excessively or your cogs are worn as "skipping", but
without a more precise description of what you mean by skipping,
it is hard to approach your problem.
Measure your chain for stretch. Check the cog teeth visually
for wear. As has been stated:
Originally Posted by fietsbob
Buy a new freewheel and chain.
they are consumables.
they are consumables.
__________________
11-20-11, 09:50 PM
#8
Broom Wagon Fodder

Join Date: Jul 2006
Location: Minnesota
Posts: 1,384
Bikes: Fuji Supreme; Kona Wo; Nashbar road frame custom build; Schwinn Varsity; Nishiki International; Schwinn Premis, Falcon Merckx, American Flyer muscle bike, Motobecane Mulekick
Mentioned: 0 Post(s)
Tagged: 0 Thread(s)
Quoted: 52 Post(s)
Liked 64 Times
in
30 Posts
I've rarely seen a worn out freewheel -- and I've seen a lot of them. I usually take them off (a special freewheel puller is needed) and soak them overnight in degreaser. Then I brush them off and lube the insides with Marvel Mystery Oil or some other medium weight lube. If it is catches a lot, I flush out the interior with something like WD-40 then once it spins free and clicks nicely, I lubricate it with proper oil. The freewheel bearings are only used when coasting so there is no load -- so only a little lubrication is needed. As I said, I've only had a couple that I wasn't able to save -- and they were super, super rusty.
As several people have said, the problem is much more likely to be a worn/sticky chain. Make sure you clean and lubricate the jockey pulleys as well.
As several people have said, the problem is much more likely to be a worn/sticky chain. Make sure you clean and lubricate the jockey pulleys as well.
11-20-11, 11:08 PM
#9

Insane Bicycle Mechanic

Join Date: Mar 2008
Location: other Vancouver
Posts: 9,838
Mentioned: 34 Post(s)
Tagged: 0 Thread(s)
Quoted: 805 Post(s)
Liked 706 Times
in
377 Posts
I'd agree- if the problem is truly worn freewheel bearings or ratchet pawls. However, it's more likely that the freewheel cogs are worn and/or the chain is worn and/or they are no longer matched. The easiest and generally cheapest solution is to replace both with new parts.
__________________
Jeff Wills
Comcast nuked my web page. It will return soon..
Jeff Wills
Comcast nuked my web page. It will return soon..
11-21-11, 03:04 AM
#10
Ride, Wrench, Swap, Race

Join Date: Jan 2010
Location: Northern California
Posts: 9,194
Bikes: Cheltenham-Pedersen racer, Boulder F/S Paris-Roubaix, Varsity racer, '52 Christophe, '62 Continental, '92 Merckx, '75 Limongi, '76 Presto, '72 Gitane SC, '71 Schwinn SS, etc.
Mentioned: 132 Post(s)
Tagged: 0 Thread(s)
Quoted: 1565 Post(s)
Liked 1,296 Times
in
866 Posts
Most likely, the chain isn't worn-out enough to engage the worn freewheel teeth under load. Worn sprockets need a chain with the slightly-increased pitch of a worn chain.
"Failure to engage" happens when the rollers strike the corner of the driven side of the tooth, preventing the rollers from dropping into the space between teeth when there is heavy load on the chain. The lifted chain then skips across the tips of the teeth.
Grinding the corner off of the driven side of the tooth (at the tip) of the affected sprocket can allow the chain to mesh under load.
The problem is caused by the chain running in a more-advanced position on the sprocket, allowed by the wear near the base of the teeth. Since the tip doesn't wear much, the driven corner becomes a snagging point as the chain tries to engage the rollers between the teeth. Making matters worse, there is only a paltry amount of chain tension where the chain is moving from the derailer pulley up to the freewheel sprocket, provided entirely by the derailer springs. Any friction in the pulleys robs tension even further from this paltry spring tension. Since all metals are elastic, the higher pedaling force advances the rollers just that much more to where the rollers hit the tips of the teeth.
Only a 1mm bevel needs to be ground at the corner, at a 30-degree angle to the driven side (only) of the tooth. I can do an entire sprocket in 2 minutes using a 3/8" diameter grinding wheel on my Dremel. I've had to do this in an emergency more than once, and it works like a charm as long as the teeth aren't so far gone that they're "tombstoned" or keeled over near the tips.
Last edited by dddd; 11-21-11 at 03:13 AM.
11-21-11, 02:28 PM
#12
Friendship is Magic
Join Date: Nov 2010
Location: Sacramento, CA
Posts: 22,984
Bikes: old ones
Mentioned: 304 Post(s)
Tagged: 0 Thread(s)
Quoted: 26419 Post(s)
Liked 10,380 Times
in
7,208 Posts
activated by fine wire springs. They can give up
for a number of reasons.
Nobody tries to rebuild a freewheel more than once.
If the chain is new, this is a wonderful time to also
renew the freewheel.
__________________
11-21-11, 03:43 PM
#14
Insane Bicycle Mechanic
Join Date: Mar 2008
Location: other Vancouver
Posts: 9,838
Mentioned: 34 Post(s)
Tagged: 0 Thread(s)
Quoted: 805 Post(s)
Liked 706 Times
in
377 Posts
This is straightforward work for an experienced mechanic.
__________________
Jeff Wills
Comcast nuked my web page. It will return soon..
Jeff Wills
Comcast nuked my web page. It will return soon..
11-21-11, 03:47 PM
#15
Insane Bicycle Mechanic
Join Date: Mar 2008
Location: other Vancouver
Posts: 9,838
Mentioned: 34 Post(s)
Tagged: 0 Thread(s)
Quoted: 805 Post(s)
Liked 706 Times
in
377 Posts
Your cheapest/fastest/easiest/most effective solution is to replace the freewheel.
__________________
Jeff Wills
Comcast nuked my web page. It will return soon..
Jeff Wills
Comcast nuked my web page. It will return soon..
11-21-11, 06:55 PM
#16
Ride, Wrench, Swap, Race
Join Date: Jan 2010
Location: Northern California
Posts: 9,194
Bikes: Cheltenham-Pedersen racer, Boulder F/S Paris-Roubaix, Varsity racer, '52 Christophe, '62 Continental, '92 Merckx, '75 Limongi, '76 Presto, '72 Gitane SC, '71 Schwinn SS, etc.
Mentioned: 132 Post(s)
Tagged: 0 Thread(s)
Quoted: 1565 Post(s)
Liked 1,296 Times
in
866 Posts
"Nobody tries to rebuild a freewheel more than once."
Don't know about that. I've done several different types, all to good effect (except one poorly-hardened Chinese freewheel that ended up with a bent adjusting cone ring from using a drift/hammer to remove it).
I haven't even had to resort to the dental floss methods to reassemble them, just twist backward as I lower the outer body onto the inner half. A modest amount of grease holds the balls in place.
I always use a bit of LocTite on the adjustable cone threads, after having those come loose while riding. It's just too hard to put enough torque on the ring using the Park pin spanners.
Newer Sachs freewheels have bearing retainers that double as seals. Clever, but you have to strip off the cogs to access the oil port in the freewheel body. The original lube typically gums up after a while.
Sometimes, a broken bearing ball or broken pawl leaves hardened debris floating around that can cause intermittent seizure while coasting. It's enough to throw your feet violently off the pedals.
A freewheel that slips could just be gummed up and may respond to simple oiling. 20 drops of light oil should be plenty.
11-21-11, 08:49 PM
#17
Constant tinkerer
New chain on old freewheel = chain is riding up the teeth and slipping. The clue was in your original description of "moderate load." That's how it happens. Time for a new freewheel. The internals aren't worn out, the teeth are.
11-21-11, 09:40 PM
#18

Super Moderator

Join Date: Jul 2004
Location: Ffld Cnty Connecticut
Posts: 21,843
Bikes: Old Steelies I made, Old Cannondales
Mentioned: 12 Post(s)
Tagged: 0 Thread(s)
Quoted: 1173 Post(s)
Liked 927 Times
in
612 Posts
What he said ... along with several other similar posts.
__________________
Bikes: Old steel race bikes, old Cannondale race bikes, less old Cannondale race bike, crappy old mtn bike.
FYI: https://www.bikeforums.net/forum-sugg...ad-please.html
Bikes: Old steel race bikes, old Cannondale race bikes, less old Cannondale race bike, crappy old mtn bike.
FYI: https://www.bikeforums.net/forum-sugg...ad-please.html
11-22-11, 01:08 PM
#20
Insane Bicycle Mechanic
Join Date: Mar 2008
Location: other Vancouver
Posts: 9,838
Mentioned: 34 Post(s)
Tagged: 0 Thread(s)
Quoted: 805 Post(s)
Liked 706 Times
in
377 Posts

__________________
Jeff Wills
Comcast nuked my web page. It will return soon..
Jeff Wills
Comcast nuked my web page. It will return soon..
11-22-11, 07:47 PM
#21
Senior Member
Thread Starter
Join Date: Aug 2010
Posts: 263
Mentioned: 0 Post(s)
Tagged: 0 Thread(s)
Quoted: 0 Post(s)
Likes: 0
Liked 1 Time
in
1 Post
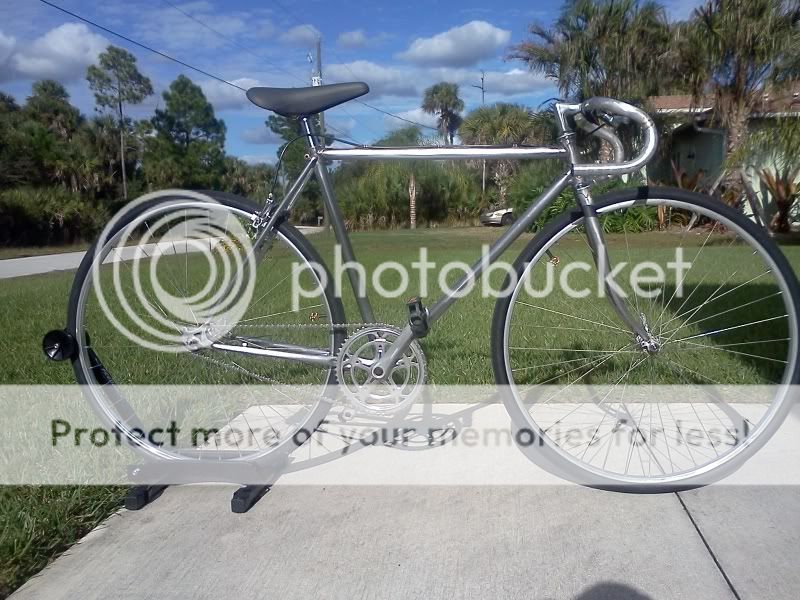
I picked up a 16 tooth bmx sprocket from my LBS today. After flipping the BB spindle and re-spacing/re-dishing the wheel, I ended up with this. Its a Nishiki Century completely raw built from leftover crap in my garage (converted to single speed for aforementioned reasons).
11-22-11, 08:46 PM
#22
Insane Bicycle Mechanic
Join Date: Mar 2008
Location: other Vancouver
Posts: 9,838
Mentioned: 34 Post(s)
Tagged: 0 Thread(s)
Quoted: 805 Post(s)
Liked 706 Times
in
377 Posts
I picked up a 16 tooth bmx sprocket from my LBS today. After flipping the BB spindle and re-spacing/re-dishing the wheel, I ended up with this. Its a Nishiki Century completely raw built from leftover crap in my garage (converted to single speed for aforementioned reasons).
__________________
Jeff Wills
Comcast nuked my web page. It will return soon..
Jeff Wills
Comcast nuked my web page. It will return soon..
11-22-11, 10:57 PM
#23
Constant tinkerer
If you're only gonna run one brake (you should really have 2) at least put it on the front where it can do you some good.
11-23-11, 06:44 AM
#24
Senior Member
Thread Starter
Join Date: Aug 2010
Posts: 263
Mentioned: 0 Post(s)
Tagged: 0 Thread(s)
Quoted: 0 Post(s)
Likes: 0
Liked 1 Time
in
1 Post
The brake setup is temporary at best (enough to test ride the bike without shortening the cable I had). I prefer regular brake levers with hoods for drop bars, but I didn't have any around.

