


Is this going to work?
 01-14-12, 05:03 PM
#1
Senior Member
Thread Starter

Join Date: Apr 2010
Location: vermont
Posts: 3,081
Bikes: Many
Mentioned: 8 Post(s)
Tagged: 0 Thread(s)
Quoted: 5 Post(s)
Likes: 0
Liked 10 Times
in
10 Posts
Is this going to work?
I usually TIG weld my frames together but I have been practicing the torch brazing quite a bit. I still am not great but I have the concept down. I have done a few seat tube collars and also fillet brazed some bridges and canti bosses that were pretty good. Not great but OK.
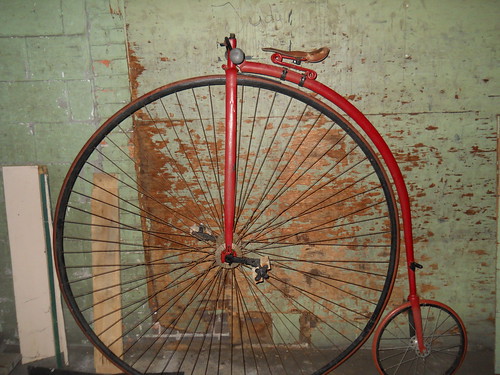
I collect vintage bikes also and really like the British racers of the 30's on up. I started thinking about making the lauterwasser handlebars, headclip stem and plate crown fork, I knew i wanted to include a goose-neck style seat pillar and a "hand hewn" look that I love about those bikes. I figured I may be able to find some old cast lugs or take apart an old frame but I decided to make some lugs with the geometry I wanted for this project with 650B wheels and 68 seat angle. I also wanted it to be light and use materials in an efficient manner. I wanted a young wolf in an old wolf's clothing. I love riding the Zona tubes and have a 7/5/7 kit chillin' on the shelf
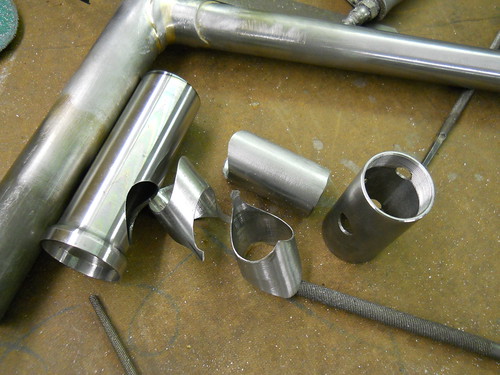
One of the latest things I thought about was the steering head platform. I have a head tube cutter for 1" and thought about doing that. While digging around for parts for this rig I found a couple of "Italian" type BMX 1-1/8" headtubes with integrated cups. I don't really like this system but I thought it would be cool to use make lugs out of the ends of one of those and slip a smaller tube inside to look a bit slimmer than the fat 1-1/8 head lugs. (1-3/8" fits inside perfect)
I am also planning to use Paragon track type dropouts (In case I end up fixed/flip flop) . For the chainstays, I am thinking of using the zona chainstays after I have re-drawn them back to tapered-round on the front end if they will go without splitting.
I started machining the lug sleeves a while ago. I used 4130. 1018-1020 would have been a better choice.
OK, so here is my question. How will it go if I try to lug braze the pieces I have here and fillet braze the lug joint? I am thing about doing it all during one "heat" but deep brazing the sleeves and switching torches and doing the fillet?
I really don't want to TIG steel in the lug joint and file it all out to make it look like a lug.
Here is what I made yesterday.
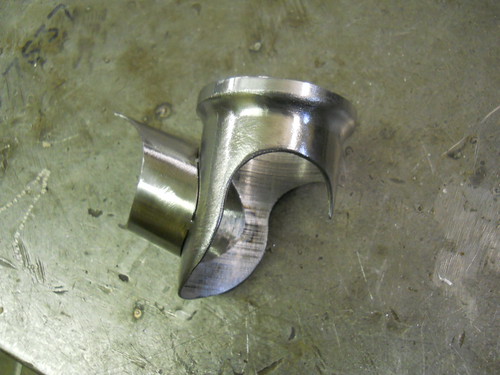
29 360 by frankthewelder, on Flickr
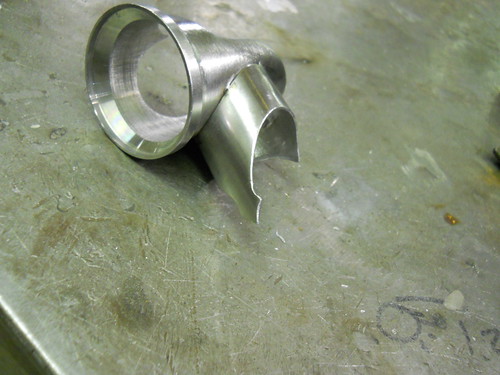
29 361 by frankthewelder, on Flickr
I collect vintage bikes also and really like the British racers of the 30's on up. I started thinking about making the lauterwasser handlebars, headclip stem and plate crown fork, I knew i wanted to include a goose-neck style seat pillar and a "hand hewn" look that I love about those bikes. I figured I may be able to find some old cast lugs or take apart an old frame but I decided to make some lugs with the geometry I wanted for this project with 650B wheels and 68 seat angle. I also wanted it to be light and use materials in an efficient manner. I wanted a young wolf in an old wolf's clothing. I love riding the Zona tubes and have a 7/5/7 kit chillin' on the shelf
One of the latest things I thought about was the steering head platform. I have a head tube cutter for 1" and thought about doing that. While digging around for parts for this rig I found a couple of "Italian" type BMX 1-1/8" headtubes with integrated cups. I don't really like this system but I thought it would be cool to use make lugs out of the ends of one of those and slip a smaller tube inside to look a bit slimmer than the fat 1-1/8 head lugs. (1-3/8" fits inside perfect)
I am also planning to use Paragon track type dropouts (In case I end up fixed/flip flop) . For the chainstays, I am thinking of using the zona chainstays after I have re-drawn them back to tapered-round on the front end if they will go without splitting.
I started machining the lug sleeves a while ago. I used 4130. 1018-1020 would have been a better choice.
OK, so here is my question. How will it go if I try to lug braze the pieces I have here and fillet braze the lug joint? I am thing about doing it all during one "heat" but deep brazing the sleeves and switching torches and doing the fillet?
I really don't want to TIG steel in the lug joint and file it all out to make it look like a lug.
Here is what I made yesterday.
29 360 by frankthewelder, on Flickr
29 361 by frankthewelder, on Flickr
 01-14-12, 05:51 PM
#2
Senior Member

Join Date: Sep 2008
Location: Collegeville, PA
Posts: 1,350
Bikes: Ruckelshaus Randonneur, Specialized Allez (early 90's, steel), Ruckelshaus Path Bomber currently being built
Mentioned: 1 Post(s)
Tagged: 0 Thread(s)
Quoted: 4 Post(s)
Likes: 0
Liked 1 Time
in
1 Post
Frank, you've forgotten more about bike fabrication in a week than I've learned in a year, but here's my two cents. I would either TIG the lug, or use brass and a very small fillet to fab just the lug, and then use silver to stick the frame together. This is what I've seen other builders do when they fab lugs. Any reason why you want to do it all in one pass?
Amazingly cool idea, looking forward to seeing the final result. Looks like it'll use some sort of anular contact cartridge bearing?
Pete
Amazingly cool idea, looking forward to seeing the final result. Looks like it'll use some sort of anular contact cartridge bearing?
Pete
01-14-12, 06:32 PM
#3
Senior Member
Thread Starter
Join Date: Apr 2010
Location: vermont
Posts: 3,081
Bikes: Many
Mentioned: 8 Post(s)
Tagged: 0 Thread(s)
Quoted: 5 Post(s)
Likes: 0
Liked 10 Times
in
10 Posts
I am thinking something along the lines of the Claude Butler bi-lam construction. His builder would do a combo of the lug sleeve and fillet braze. I think my sleeve may be a bit short.
I might try brazing just the HT/lug assy and TT tomorrow and see how it goes. I have bit of a head cold today though..
The bearing and a race just drop in. Most BMX bikes are done that way these days. I have a set of cutters so I can dress them down when the frame is done. I really like the look of the cup grafted to the head tube. I hope it works well.
I have been doing this for a really long time. It's fun to mix it up. I get some grief from other builders from time to time for "making anything that a sticker will stick to" but I like getting frightened, thrilled and excited about my work. It's great to build racing bikes for people until 4pm then playing with this till dinner.
29 313 by barnstormerbikes, on Flickr
Last edited by ftwelder; 01-14-12 at 06:51 PM.
01-14-12, 06:34 PM
#4
Senior Member
I did a bilaminate two frames ago and did the joints in one pass, with brass. I tacked it then was careful in the brazing to flow the socket without braking the tack at first (doing so tinned the joint also) then did the fillet. It might be more difficult with a full lug but it could work. You could also tig-tack it and it'll be just like a lug plus a fillet at the end.
Awesome project btw!
Awesome project btw!
01-15-12, 09:04 AM
#6
Senior Member
Have you seen what Tom Kellogg has posted in the Framebuilders Collective site? Look under Resources, Workshop Techniques Hints and Tips, Spectrum's Hand Built Lugs. Good discussion of what you are wanting to do with great photos.
01-15-12, 02:49 PM
#8
Senior Member
Thread Starter
Join Date: Apr 2010
Location: vermont
Posts: 3,081
Bikes: Many
Mentioned: 8 Post(s)
Tagged: 0 Thread(s)
Quoted: 5 Post(s)
Likes: 0
Liked 10 Times
in
10 Posts
Wow, nice work there. That would for sure be the easiest way with silver to hold the lugs to the tubes. I guess my biggest worry will be over heating sleeve edges while trying to do the fillet braze. I could TIG it with steel also at this point also. I guess we will see how it goes..
01-15-12, 05:17 PM
#9


Randomhead
Join Date: Aug 2008
Location: Happy Valley, Pennsylvania
Posts: 24,399
Mentioned: 0 Post(s)
Tagged: 0 Thread(s)
Quoted: 4 Post(s)
Liked 3,699 Times
in
2,519 Posts
cut back the really thin parts of the sleeves so they don't burn
01-16-12, 03:39 AM
#10
Senior Member
Thread Starter
Join Date: Apr 2010
Location: vermont
Posts: 3,081
Bikes: Many
Mentioned: 8 Post(s)
Tagged: 0 Thread(s)
Quoted: 5 Post(s)
Likes: 0
Liked 10 Times
in
10 Posts
Do people ever touch another piece of metal to the "danger" areas to draw heat out during brazing? Like gently setting something on the points then removing before the filler metal sets?
Do YOU think this will be ugly? I want to make the lugs look like old castings a bit.
IMG_3759 by barnstormerbikes, on Flickr
Do YOU think this will be ugly? I want to make the lugs look like old castings a bit.
IMG_3759 by barnstormerbikes, on Flickr
01-16-12, 07:25 AM
#11
Randomhead
Join Date: Aug 2008
Location: Happy Valley, Pennsylvania
Posts: 24,399
Mentioned: 0 Post(s)
Tagged: 0 Thread(s)
Quoted: 4 Post(s)
Liked 3,699 Times
in
2,519 Posts
I think it will look great. I can't tig, but if I could I would be inclined to tig the lugs and then fillet braze over the tig
01-16-12, 03:30 PM
#12
Senior Member
Thread Starter
Join Date: Apr 2010
Location: vermont
Posts: 3,081
Bikes: Many
Mentioned: 8 Post(s)
Tagged: 0 Thread(s)
Quoted: 5 Post(s)
Likes: 0
Liked 10 Times
in
10 Posts
I did that head lug today and it came out good. I managed to get brass where it belonged (90% or so) and didn't burn anything up. I was far from efficient but pleased. I will add some pics a bit later.
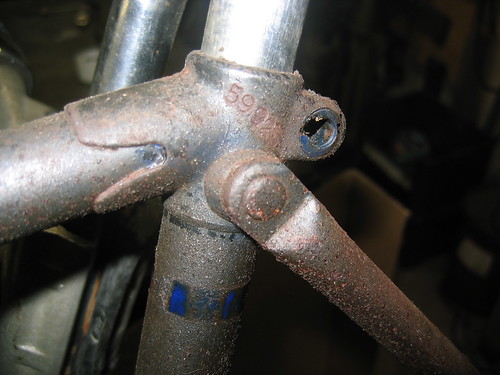
OK, so here is the joint (s) after cleaning the flux off. I was OK with it at this point. It took a long while to clean it up but that is certainly motivation to improve my skills. I should have taken more care to keep the sharp edges on the corner that touches the tube. The places that weren't filled properly looked pretty bad. Now it looks like a lot of brass. I totally lost my cool on this touch-up and went backwards.

29 366 by frankthewelder, on Flickr
The Points came out good. I am not sure why. I think I need to put a lot more BTU's with a bigger, softer flame in before adding filler (lug part) You can see the "loose gums" on the left.

29 370 by frankthewelder, on Flickr
The real issue was (in my book of 2.5 paragraphs) is the porosity in the fillet. I have seen people talk about fixing it on their frames. I really want to improve here. I am going to finish this one with silver but I am not stoked about that. I used a very small torch for the fillet and it seemed to go well. Perhaps not.

29 375 by frankthewelder, on Flickr
I got it really clean and fluxed it like crazy so I am guessing I wasn't giving enough time to let the flux "float" the dookie to the surface.
One thing that was pretty thrilling was seeing the brass show up in the lug joint far from where I was putting filler in. For a second, I was somebody.
OK, so here is the joint (s) after cleaning the flux off. I was OK with it at this point. It took a long while to clean it up but that is certainly motivation to improve my skills. I should have taken more care to keep the sharp edges on the corner that touches the tube. The places that weren't filled properly looked pretty bad. Now it looks like a lot of brass. I totally lost my cool on this touch-up and went backwards.
29 366 by frankthewelder, on Flickr
The Points came out good. I am not sure why. I think I need to put a lot more BTU's with a bigger, softer flame in before adding filler (lug part) You can see the "loose gums" on the left.
29 370 by frankthewelder, on Flickr
The real issue was (in my book of 2.5 paragraphs) is the porosity in the fillet. I have seen people talk about fixing it on their frames. I really want to improve here. I am going to finish this one with silver but I am not stoked about that. I used a very small torch for the fillet and it seemed to go well. Perhaps not.
29 375 by frankthewelder, on Flickr
I got it really clean and fluxed it like crazy so I am guessing I wasn't giving enough time to let the flux "float" the dookie to the surface.
One thing that was pretty thrilling was seeing the brass show up in the lug joint far from where I was putting filler in. For a second, I was somebody.
Last edited by ftwelder; 01-16-12 at 07:07 PM.
01-17-12, 02:36 AM
#13

Rustbelt Rider

Join Date: Oct 2008
Location: Canton, OH
Posts: 9,104
Bikes: 1990 Trek 1420 - 1978 Raleigh Professional - 1973 Schwinn Collegiate - 1974 Schwinn Suburban
Mentioned: 20 Post(s)
Tagged: 0 Thread(s)
Quoted: 261 Post(s)
Liked 372 Times
in
177 Posts
It looks really great to my untrained eye.
__________________
|^^^^^^^^^^^^^^| ||
|......GO.BROWNS........| ||'|";, ___.
|_..._..._______===|=||_|__|..., ] -
"(@)'(@)"""''"**|(@)(@)*****''(@)
|^^^^^^^^^^^^^^| ||
|......GO.BROWNS........| ||'|";, ___.
|_..._..._______===|=||_|__|..., ] -
"(@)'(@)"""''"**|(@)(@)*****''(@)
 01-17-12, 04:05 AM
#15

Bicycle Repair Man !!!

I was thinking why is Frank asking questions and see that it has turned into another lesson... 
01-17-12, 04:35 AM
#16
Rustbelt Rider
Join Date: Oct 2008
Location: Canton, OH
Posts: 9,104
Bikes: 1990 Trek 1420 - 1978 Raleigh Professional - 1973 Schwinn Collegiate - 1974 Schwinn Suburban
Mentioned: 20 Post(s)
Tagged: 0 Thread(s)
Quoted: 261 Post(s)
Liked 372 Times
in
177 Posts
I was browsing your flickr photostream - wow! I really like that riff-raff cyclocross frame.
__________________
|^^^^^^^^^^^^^^| ||
|......GO.BROWNS........| ||'|";, ___.
|_..._..._______===|=||_|__|..., ] -
"(@)'(@)"""''"**|(@)(@)*****''(@)
|^^^^^^^^^^^^^^| ||
|......GO.BROWNS........| ||'|";, ___.
|_..._..._______===|=||_|__|..., ] -
"(@)'(@)"""''"**|(@)(@)*****''(@)
01-17-12, 07:27 AM
#17
Randomhead
Join Date: Aug 2008
Location: Happy Valley, Pennsylvania
Posts: 24,399
Mentioned: 0 Post(s)
Tagged: 0 Thread(s)
Quoted: 4 Post(s)
Liked 3,699 Times
in
2,519 Posts
The porosity on the fillet seems to be related pretty strongly to the quality and cleanliness of the lfb you are using, although there may be some element of technique that I'm not really aware of.
Too bad about the touch up going bad. You probably would have been better off doing that with silver. I would consider reflowing that somewhere else because I can't stand filing.
My recent experiment with LFB and lugs proved to me that heat is everything. I had a mess that looked like a rank beginner's worst efforts until I got the biggest tip my acetylene tank could support (Smith AW207). When I finally got enough heat, it was like flowing silver. It might be easier because brass will flow when silver refuses due to contamination. Looking at the spill you got leads me to believe that you might not have had enough heat.
01-17-12, 10:33 AM
#18
Senior Member
Looks pretty good! Your fillets are better than mine damn +1 on heat for sweating brass, enough of it and the filler flows wonderfully.
So how did you proceed? Just kept the tig tacks on the lug?
+1 on heat for sweating brass, enough of it and the filler flows wonderfully.So how did you proceed? Just kept the tig tacks on the lug?
01-17-12, 04:18 PM
#19
framebuilder
Frank, I've keep a close eye on this subject thread you started asking essentially about methods for doing a bilaminate type of lug construction. From the pictures it looks like things have turned out fairly well. I haven't had time to respond before now but I'll contribute a couple of thoughts. First of all Herbie Helm - my framebuilding class teaching assistant - has done a number of frames using this method lately and you'll find pictures of his work under his name on flickr and his website. I also have a Claude Butler in my shop waiting to be repainted and looked carefully at it's construction after I removed all the paint. The front triangle looks like it was made by the masters and the rear by the new apprentice or when they were drunk. Lugs were scarce after WWII so this technique filled that void. This frame was made in 1949 and proves a bilaminate lugged frame can last a long time.
There are 3 ways of adding decorative sleeves and they all work (because I've done it all 3 ways). However, I suggest brazing the sleeves to the tubes first and then mitering them as a two piece unit and then fillet braze those units together. Brazing 2 sleeves into a lug first requires a lot more work. Doing it all in one go (brazing the sleeves and the tubes together all at once) requires more skill than most hobbyists typically have. It may work well for you but is more risky for newer builders. It is unlikely they have enough of the brazing motions on auto-pilot so they can get clean shorelines and the right amount of brass in the fillet all at the same time. It is common for someone to think that somehow the brazing from the sleeves will get messed up when doing the fillets but that isn't so. Well unless one has trouble keeping their flame in the zone where it belongs.
Here are some hints to reducing porosity. First clean the brass rods very throughly. Herbie not only uses Scotchbrite on the rod until it is very shinny but also uses a chemical cleaner afterwards. He gets virtually no holes in his fillets at all. You also need to make sure your flux stays clean and you don't apply too much (not nearly as much as silver) which might get encapsulated in the brass and becomes holes later. And also it is possible that when you go over your joint a second time (because you didn't do it all in one pass or want to correct its shape), the bottom of the joint isn't up to brazing temperature while the top part gets overheated and kind of "boils" - which creates those pin holes. Adding a bit of brass over the melted brass from the first pass can reduce this problem during this 2nd pass. The point being that you try and bring the whole joint up to temperature at the same time and not overheat the top getting to the bottom.
01-17-12, 05:34 PM
#20
Senior Member
Thread Starter
Join Date: Apr 2010
Location: vermont
Posts: 3,081
Bikes: Many
Mentioned: 8 Post(s)
Tagged: 0 Thread(s)
Quoted: 5 Post(s)
Likes: 0
Liked 10 Times
in
10 Posts
Thanks for the tips. I did TIG tack the lugs in four spots, very tiny. I held the head tube and top tube in the correct relation and angle in a weird production fixture that has at least 30 nice tube holding blocks machined at the correct offset.
I would love to add a CB to my collection. it must be an amazing machine to behold. If that guy vanishes, you know who to call. I would gladly pick up that paint bill.
I was wondering about brazing the sleeves on first. I worried about variables and the sleeve OD's being an odd size. I likely way over fluxed it as I spent a lot of time chasing bubbles out of the way to try to see what was going on. I failed on cleaning the filler also.
I made a couple more lug sleeves already mitred so I will mark the tube up and cut a fresh end on the lug sleeve.
Part of the big brass stain was from trying to pick up extra brass with a piece of steel filler rod. It sort of worked but not well. I need something like a brush or something.
29 384 by frankthewelder, on Flickr
The best part about doing the sleeves first is I have an excuse to run the hillbilly hot tub longer. It put an 80,000 BTU propane burner under an oil drum. it goes from 40 to 140 in about an hour.
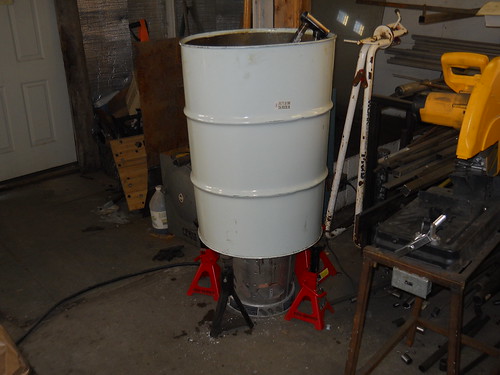
29 by frankthewelder, on Flickr
I would love to add a CB to my collection. it must be an amazing machine to behold. If that guy vanishes, you know who to call. I would gladly pick up that paint bill.
I was wondering about brazing the sleeves on first. I worried about variables and the sleeve OD's being an odd size. I likely way over fluxed it as I spent a lot of time chasing bubbles out of the way to try to see what was going on. I failed on cleaning the filler also.
I made a couple more lug sleeves already mitred so I will mark the tube up and cut a fresh end on the lug sleeve.
Part of the big brass stain was from trying to pick up extra brass with a piece of steel filler rod. It sort of worked but not well. I need something like a brush or something.
29 384 by frankthewelder, on Flickr
The best part about doing the sleeves first is I have an excuse to run the hillbilly hot tub longer. It put an 80,000 BTU propane burner under an oil drum. it goes from 40 to 140 in about an hour.
29 by frankthewelder, on Flickr
Last edited by ftwelder; 01-17-12 at 05:37 PM.
01-17-12, 07:31 PM
#21
Randomhead
Join Date: Aug 2008
Location: Happy Valley, Pennsylvania
Posts: 24,399
Mentioned: 0 Post(s)
Tagged: 0 Thread(s)
Quoted: 4 Post(s)
Liked 3,699 Times
in
2,519 Posts
This is a really great thread, thanks for sharing.
I think wire rope works pretty well, when you get tired of a piece you can just cut it off. Usually I will try to flow excess filler somewhere harmless, hopefully somewhere I'm going to cut off, but if not, away from any edges or transitions so it's easy to file/sand off.
I think wire rope works pretty well, when you get tired of a piece you can just cut it off. Usually I will try to flow excess filler somewhere harmless, hopefully somewhere I'm going to cut off, but if not, away from any edges or transitions so it's easy to file/sand off.
01-17-12, 07:33 PM
#22
Senior Member
Join Date: Sep 2008
Location: Collegeville, PA
Posts: 1,350
Bikes: Ruckelshaus Randonneur, Specialized Allez (early 90's, steel), Ruckelshaus Path Bomber currently being built
Mentioned: 1 Post(s)
Tagged: 0 Thread(s)
Quoted: 4 Post(s)
Likes: 0
Liked 1 Time
in
1 Post
Frank, if the wife changes jobs and we relocate to NH (Concord), I want to hang around your shop on odd Saturdays and soak in the awesome.
01-17-12, 07:35 PM
#23
Senior Member
Join Date: Sep 2008
Location: Collegeville, PA
Posts: 1,350
Bikes: Ruckelshaus Randonneur, Specialized Allez (early 90's, steel), Ruckelshaus Path Bomber currently being built
Mentioned: 1 Post(s)
Tagged: 0 Thread(s)
Quoted: 4 Post(s)
Likes: 0
Liked 1 Time
in
1 Post
This is a really great thread, thanks for sharing.
I think wire rope works pretty well, when you get tired of a piece you can just cut it off. Usually I will try to flow excess filler somewhere harmless, hopefully somewhere I'm going to cut off, but if not, away from any edges or transitions so it's easy to file/sand off.
I think wire rope works pretty well, when you get tired of a piece you can just cut it off. Usually I will try to flow excess filler somewhere harmless, hopefully somewhere I'm going to cut off, but if not, away from any edges or transitions so it's easy to file/sand off.
01-18-12, 02:40 AM
#24
Senior Member
Thread Starter
Join Date: Apr 2010
Location: vermont
Posts: 3,081
Bikes: Many
Mentioned: 8 Post(s)
Tagged: 0 Thread(s)
Quoted: 5 Post(s)
Likes: 0
Liked 10 Times
in
10 Posts
Wow, the Herbie does some nice work. I think Doug is awesome too. This is a pretty good place to "soak up awesome" also.!
02-09-12, 03:56 PM
#25
Senior Member
Join Date: Sep 2007
Location: Gaseous Cloud around Uranus
Posts: 3,741
Mentioned: 0 Post(s)
Tagged: 0 Thread(s)
Quoted: 38 Post(s)
Likes: 0
Liked 11 Times
in
7 Posts
Draw a line with a #2 pencil on the tube where you don't want brass,flux and braze away.The brass will not cross the pencil line,saves you alot of clean up.
I don't build bicycle frames but I've been around a torch once or twice.Try it on some scrap and see for yourself.
I don't build bicycle frames but I've been around a torch once or twice.Try it on some scrap and see for yourself.
Last edited by Booger1; 02-09-12 at 04:01 PM.