


MYOG----Tent
 03-21-12, 12:33 PM
#1
Senior Member
Thread Starter
Join Date: Sep 2007
Location: Gaseous Cloud around Uranus
Posts: 3,741
Mentioned: 0 Post(s)
Tagged: 0 Thread(s)
Quoted: 38 Post(s)
Likes: 0
Liked 11 Times
in
7 Posts
MYOG----Tent
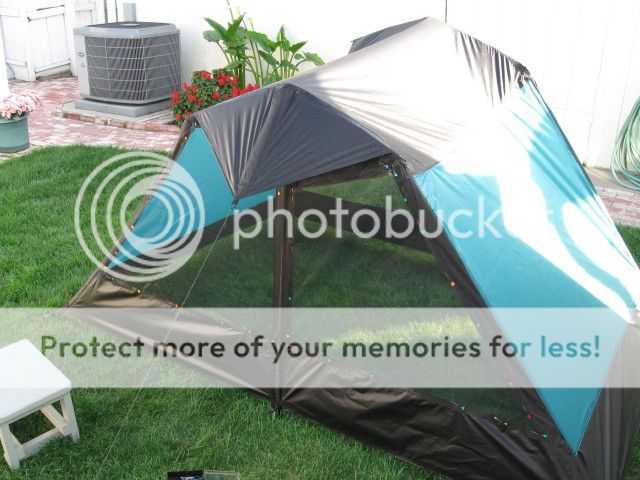
In the following weeks,I will be making my 2nd tent.The first one turned out fine but I wanted to try and make one out of silnylon just for fun,keeps me from roaming the streets at night.
I decided to make an a-frame style tent,sort of.No crossing poles to fight with in the sleeves,in fact,no bent poles at all.
A few weeks ago a did a tour of Death Valley and one night I was so tired,seems like it took almost an hour to set my tent up,I almost crawled inside as is and just let it lay on top of me.

I make tents like I make race cars,I build a frame first that takes all of the abuse,then hang panels from that.
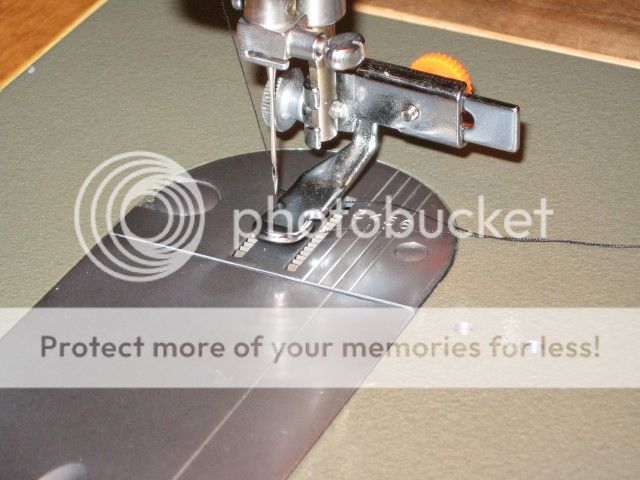
On the tent above,sleeves were made for the poles with flanges,to sew a felled seam too.
I considered the same thing for this tent,that's what most of the big companies do(not the sleeves but the felled seams),but after extensive testing at the Booger1 Laboratory,I have found that a lapped seam bonded together with 100% silicone,then sewn,is MUCH stronger than sewing alone.It's so strong,that the parent material fails before the seam.It's FAR stronger than a felled seam alone,no comparison.
Also a zig zag stitch in silnylon spreads the tension over more threads than a straight line of stitching,a stepped zig zag stitch is better yet.
The addition of bonding all seams will add about 3oz to the overall weight,well worth the extra strenght in my opinion.You could bond the tent together with silicone only but you have to watch your seams,shear strenght is enormous,peel strenght not so good..So with the addition of a line of stitching to prevent peeling,the seam is more than strong enough.
I have started already,and have some parts done.I didn't bring my camera to work but I will post some pics when I get home tonight.
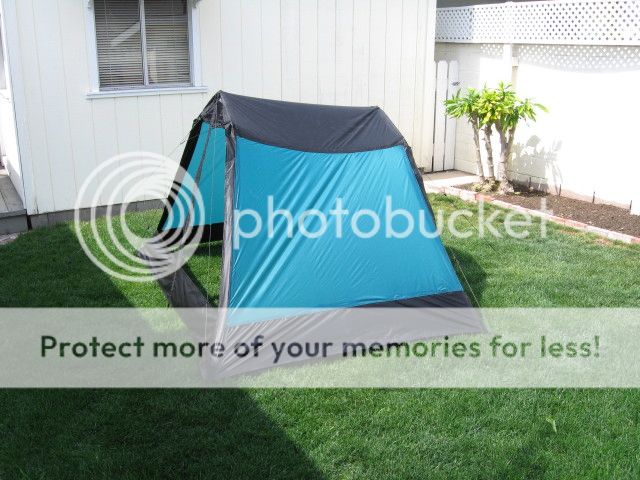
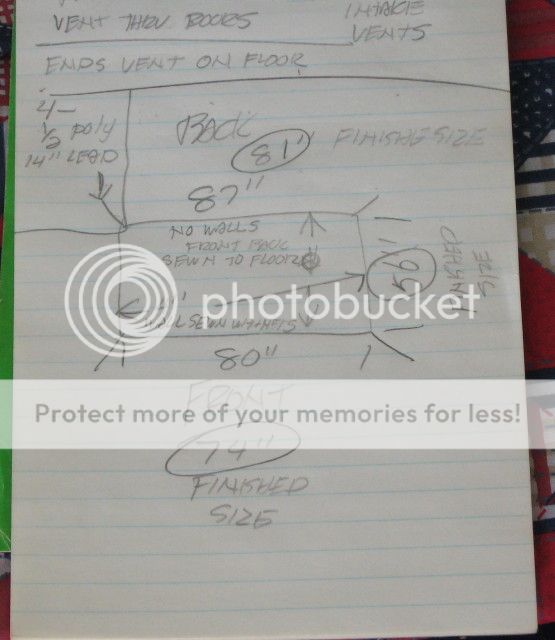
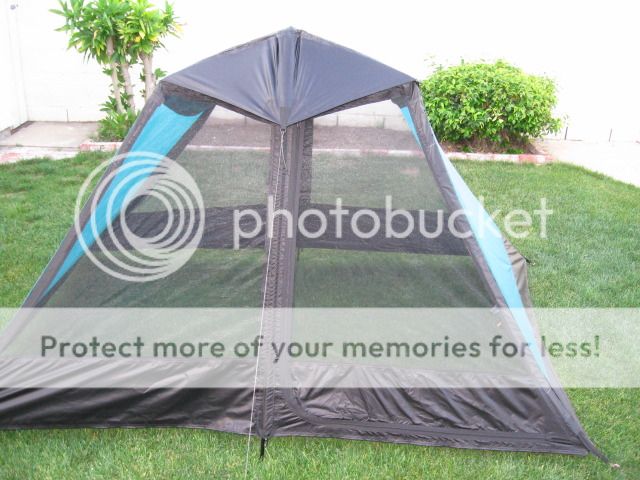
The tent will be 5' x 7'------52" high in front,46" high in back.It will be a "hybrid" tent,meaning I will be seperated from the tent walls on most of the tent but not all.It doesn't have a seperate net tent inside.I will sleep crossways in the tent giving me 8 1/2feet of lenght on the bathtub floor,LOTS of room.
It seems big but the vestibule is inside with me,instead of on the outside.It just seems stupid to have all that wasted space on the outside.There will be some covered room on the outside for wet stuff.
According to my math,this tent should weight about 3lbs,maybe a few ounces over.That includes everything,poles,ground cloth,stakes,guyropes,bathtub floor.....everything.
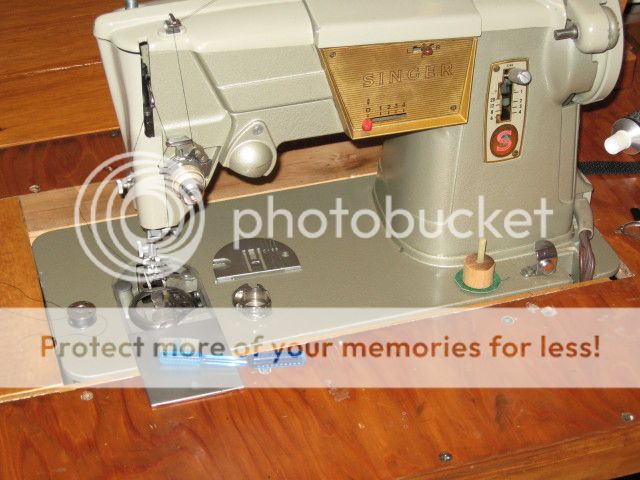
You don't need fancy sewing machines,I made the tent above with a $25 dollar straight stitch machine from the second hand store.I upgraded to a Singer 328 zig zag for this tent because of the light materials,it was $35 from the second hand store.
So follow along if you wish,maybe visit the Goodwill near you and try your hand at making stuff,it's fun(most of the time)
I decided to make an a-frame style tent,sort of.No crossing poles to fight with in the sleeves,in fact,no bent poles at all.
A few weeks ago a did a tour of Death Valley and one night I was so tired,seems like it took almost an hour to set my tent up,I almost crawled inside as is and just let it lay on top of me.
I make tents like I make race cars,I build a frame first that takes all of the abuse,then hang panels from that.
On the tent above,sleeves were made for the poles with flanges,to sew a felled seam too.
I considered the same thing for this tent,that's what most of the big companies do(not the sleeves but the felled seams),but after extensive testing at the Booger1 Laboratory,I have found that a lapped seam bonded together with 100% silicone,then sewn,is MUCH stronger than sewing alone.It's so strong,that the parent material fails before the seam.It's FAR stronger than a felled seam alone,no comparison.
Also a zig zag stitch in silnylon spreads the tension over more threads than a straight line of stitching,a stepped zig zag stitch is better yet.
The addition of bonding all seams will add about 3oz to the overall weight,well worth the extra strenght in my opinion.You could bond the tent together with silicone only but you have to watch your seams,shear strenght is enormous,peel strenght not so good..So with the addition of a line of stitching to prevent peeling,the seam is more than strong enough.
I have started already,and have some parts done.I didn't bring my camera to work but I will post some pics when I get home tonight.
The tent will be 5' x 7'------52" high in front,46" high in back.It will be a "hybrid" tent,meaning I will be seperated from the tent walls on most of the tent but not all.It doesn't have a seperate net tent inside.I will sleep crossways in the tent giving me 8 1/2feet of lenght on the bathtub floor,LOTS of room.
It seems big but the vestibule is inside with me,instead of on the outside.It just seems stupid to have all that wasted space on the outside.There will be some covered room on the outside for wet stuff.
According to my math,this tent should weight about 3lbs,maybe a few ounces over.That includes everything,poles,ground cloth,stakes,guyropes,bathtub floor.....everything.
You don't need fancy sewing machines,I made the tent above with a $25 dollar straight stitch machine from the second hand store.I upgraded to a Singer 328 zig zag for this tent because of the light materials,it was $35 from the second hand store.
So follow along if you wish,maybe visit the Goodwill near you and try your hand at making stuff,it's fun(most of the time)
Last edited by Booger1; 03-21-12 at 12:51 PM.
 03-21-12, 08:29 PM
#4
Senior Member
Thread Starter
Join Date: Sep 2007
Location: Gaseous Cloud around Uranus
Posts: 3,741
Mentioned: 0 Post(s)
Tagged: 0 Thread(s)
Quoted: 38 Post(s)
Likes: 0
Liked 11 Times
in
7 Posts
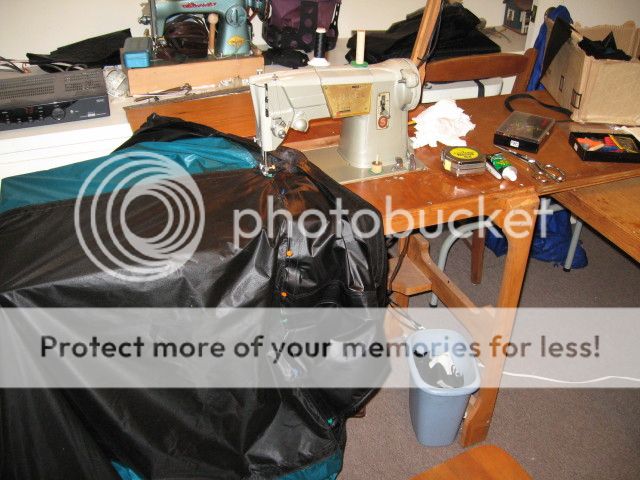
Here's the first installment:
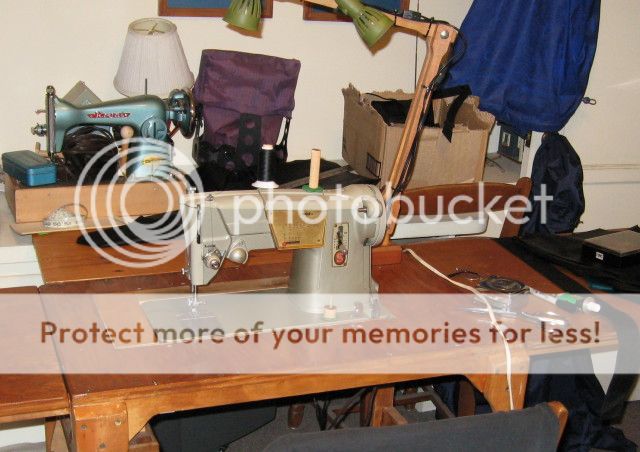
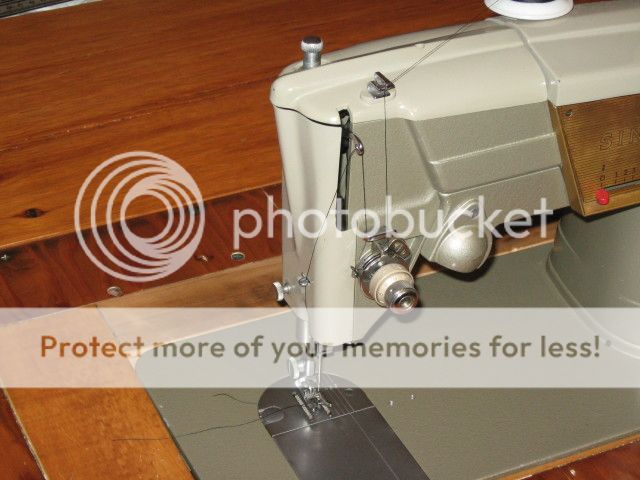
Here's my new $35 60 year old Singer 328,pretty isn't it......This will be doing my sewing,oldy but goody.You can run twin needles on this machine without buying a special twin needle,just put 2 needles in it and add another spool.I like this feature ALOT! Under where the thread sits are cams for different stiches,there are about 30 different cams available,I will use 2,straight and multi-stitch zig zag.
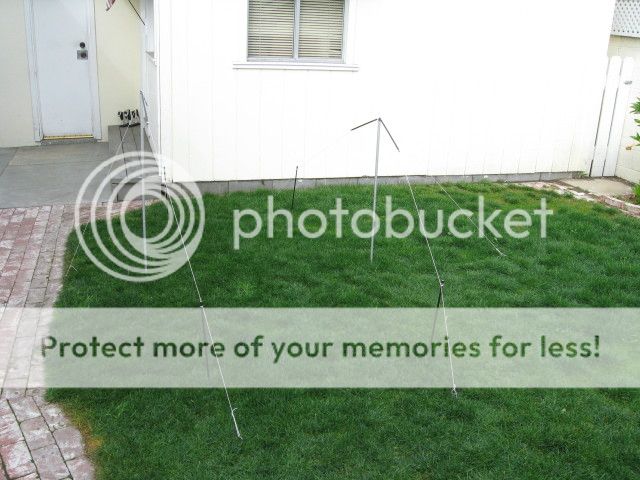
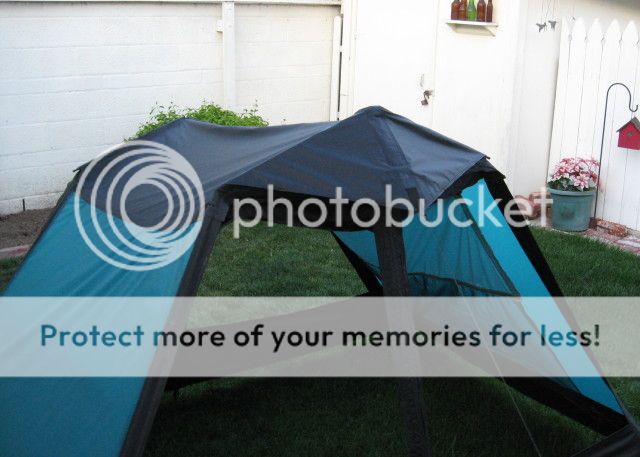
Here we have the test setups for size and height.Using some test poles and kite string,I tried many many types of sizes and shapes.With end poles and without,single pole,using a brow pole,all kinds of different things.

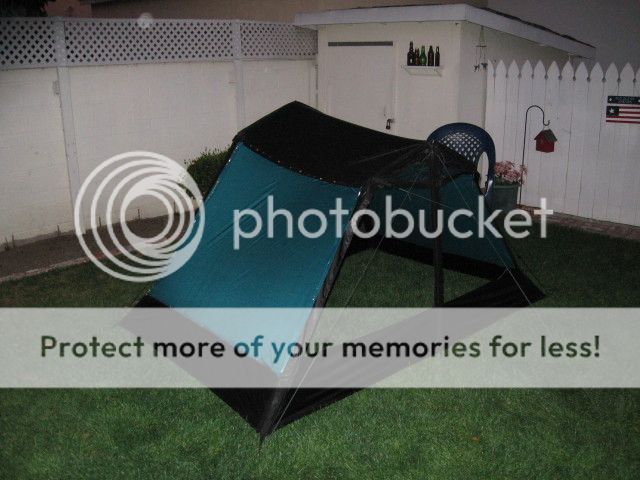
Here I settled on a design,simple is better.No sewn in end poles,no crossing poles.
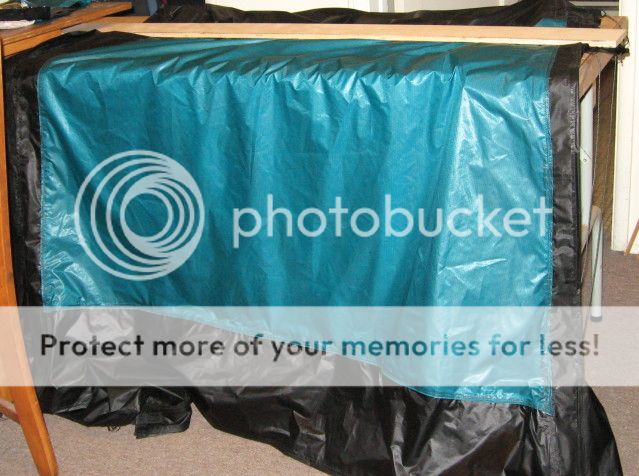
Made the sleeves for the poles,roof panel and started to add the skirts.
The real poles have been made and the main guy ropes and tension ropes have been added.All skirts have been added and working on the end panels,they are in the test fit stage at this point,just pinned to the sleeves/panels for size.
More to come as time allows......
Here's my new $35 60 year old Singer 328,pretty isn't it......This will be doing my sewing,oldy but goody.You can run twin needles on this machine without buying a special twin needle,just put 2 needles in it and add another spool.I like this feature ALOT! Under where the thread sits are cams for different stiches,there are about 30 different cams available,I will use 2,straight and multi-stitch zig zag.
Here we have the test setups for size and height.Using some test poles and kite string,I tried many many types of sizes and shapes.With end poles and without,single pole,using a brow pole,all kinds of different things.
Here I settled on a design,simple is better.No sewn in end poles,no crossing poles.
Made the sleeves for the poles,roof panel and started to add the skirts.
The real poles have been made and the main guy ropes and tension ropes have been added.All skirts have been added and working on the end panels,they are in the test fit stage at this point,just pinned to the sleeves/panels for size.
More to come as time allows......
Last edited by Booger1; 03-21-12 at 09:20 PM.
03-21-12, 08:58 PM
#5
Senior Member
Guess it keeps you out of the pool halls.
I think you're nuts but am very impressed with your planning and production of these.
I think you're nuts but am very impressed with your planning and production of these.
03-22-12, 02:13 AM
#6
Senior Member
When you say 100% silicone, exactly what are you using and where do you source it? Is there an alternative?
Your threads like this are fascinating. Well done!
Your threads like this are fascinating. Well done!
03-22-12, 09:16 AM
#7
Senior Member
Thread Starter
Join Date: Sep 2007
Location: Gaseous Cloud around Uranus
Posts: 3,741
Mentioned: 0 Post(s)
Tagged: 0 Thread(s)
Quoted: 38 Post(s)
Likes: 0
Liked 11 Times
in
7 Posts
This

you can use any brand,but if must be aquarium safe(meaning 100%,no additives for mold and stuff),it cures differently than regular silicone.Regular silicone didn't grip as well.I got this at Home Depot for $3-$4.
you can use any brand,but if must be aquarium safe(meaning 100%,no additives for mold and stuff),it cures differently than regular silicone.Regular silicone didn't grip as well.I got this at Home Depot for $3-$4.
Last edited by Booger1; 03-22-12 at 09:32 AM.
03-25-12, 08:02 PM
#8
Senior Member
Thread Starter
Join Date: Sep 2007
Location: Gaseous Cloud around Uranus
Posts: 3,741
Mentioned: 0 Post(s)
Tagged: 0 Thread(s)
Quoted: 38 Post(s)
Likes: 0
Liked 11 Times
in
7 Posts
Round 2:
After a final fitting,the panels are sewn to the roof,sleeves and skirts.It's raining right at the moment,so I'll have to see how bad it looks in a day of so.Nothing a guy rope to a stake can't fix..... These panels will actually have 3 guyout points on them of some kind,one on the middle of the skirt and 2 in the middle of the panel.These will be for high winds only,these are my biggest panels with no support.
Now that I think of it,this tent will have 6 stakes under normal conditions and 8 in high wind.I could have up to 10(2 each for the main pole guys) but I don't forsee anything like that except under extreme conditions.

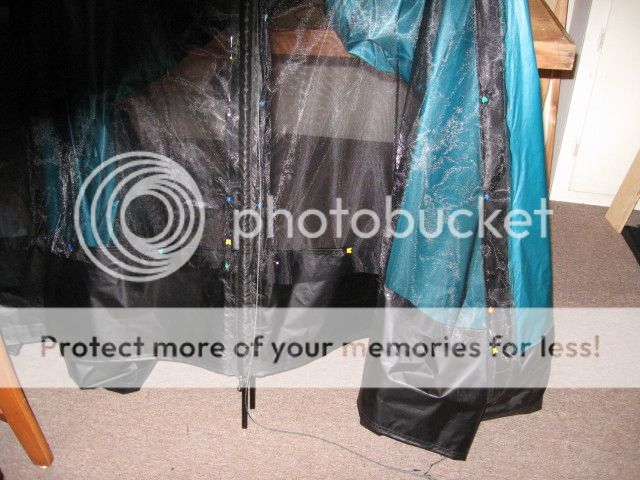
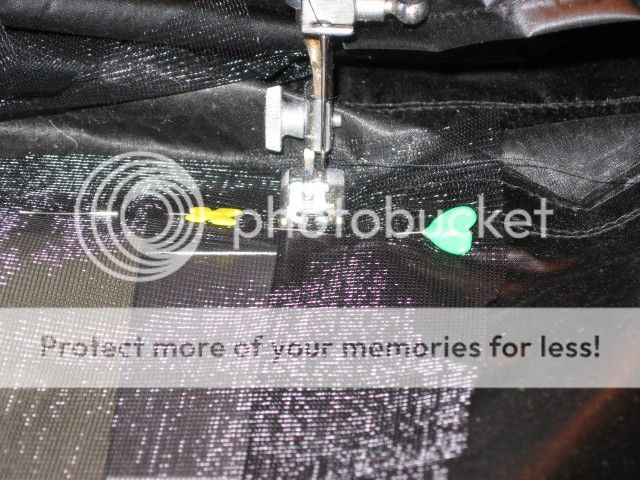
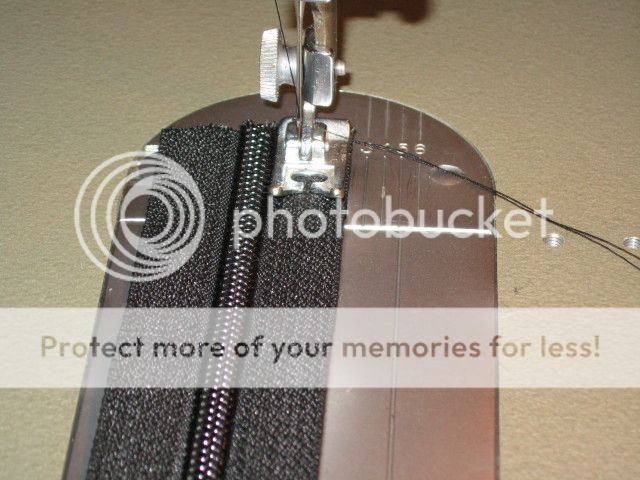
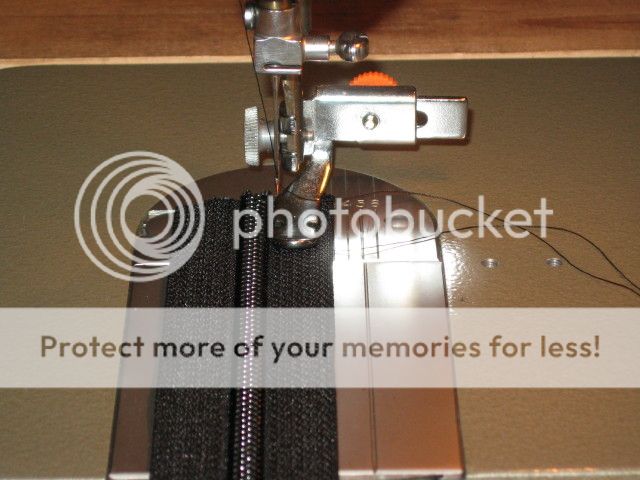
I'm using a bonded lapped seam with 2 lines of stitching,straight and zig zag as a team.All of the main panels will be attached this way.
You see 3 lines of stitching because 1 straight stitch is used to make a plain folded seam on the panel,then sewn under to the sleeve to hide the edge.
Look close and you can see the reversed hem on the sleeve to the right.That part will have noseeum netting attached,and storm panels.......we're getting ahead of ourselves.
I pin the seams together,leaving a little flap,then smear a line of silly putty underneath,press down on the seam good.I let it set up for 15-20 min,then lay down a straight stitch to hold it.Come back with a zig- zag 2nd stitch,call it good.
The silicone is still wet,so it locks the stitches as it is sewn,but it also puts silly putty into the bobbin case,little by little.So every few hours I clean it up,just so that I don't have problems.Get's some some good little snot balls going.......It hasn't actually bothered the stitching to my surprize,though,trying to get through a few layers of material which have set silly putty can be exciting......beer makes a good thread lube on silicone......(rubbing alcohol works good,no mess,clean fire.....
Next up will be the groundcloth and main pole tensioner.Now is the time to set the tent perimeters in stone or poly......
I threw it on the scale,as of now,poles,guy ropes and all,1lb 6oz......about an ounce lighter than expected,must have an ounce of silcone in my hair and beard......
It's heavier than some of the ultralite "tents" now........
After a final fitting,the panels are sewn to the roof,sleeves and skirts.It's raining right at the moment,so I'll have to see how bad it looks in a day of so.Nothing a guy rope to a stake can't fix.....
These panels will actually have 3 guyout points on them of some kind,one on the middle of the skirt and 2 in the middle of the panel.These will be for high winds only,these are my biggest panels with no support.Now that I think of it,this tent will have 6 stakes under normal conditions and 8 in high wind.I could have up to 10(2 each for the main pole guys) but I don't forsee anything like that except under extreme conditions.
I'm using a bonded lapped seam with 2 lines of stitching,straight and zig zag as a team.All of the main panels will be attached this way.
You see 3 lines of stitching because 1 straight stitch is used to make a plain folded seam on the panel,then sewn under to the sleeve to hide the edge.
Look close and you can see the reversed hem on the sleeve to the right.That part will have noseeum netting attached,and storm panels.......we're getting ahead of ourselves.
I pin the seams together,leaving a little flap,then smear a line of silly putty underneath,press down on the seam good.I let it set up for 15-20 min,then lay down a straight stitch to hold it.Come back with a zig- zag 2nd stitch,call it good.
The silicone is still wet,so it locks the stitches as it is sewn,but it also puts silly putty into the bobbin case,little by little.So every few hours I clean it up,just so that I don't have problems.Get's some some good little snot balls going.......It hasn't actually bothered the stitching to my surprize,though,trying to get through a few layers of material which have set silly putty can be exciting......beer makes a good thread lube on silicone......(rubbing alcohol works good,no mess,clean fire.....
Next up will be the groundcloth and main pole tensioner.Now is the time to set the tent perimeters in stone or poly......
I threw it on the scale,as of now,poles,guy ropes and all,1lb 6oz......about an ounce lighter than expected,must have an ounce of silcone in my hair and beard......
It's heavier than some of the ultralite "tents" now........
Last edited by Booger1; 03-26-12 at 08:45 PM.
03-26-12, 04:43 PM
#10
Senior Member
Thread Starter
Join Date: Sep 2007
Location: Gaseous Cloud around Uranus
Posts: 3,741
Mentioned: 0 Post(s)
Tagged: 0 Thread(s)
Quoted: 38 Post(s)
Likes: 0
Liked 11 Times
in
7 Posts
Rain stopped......
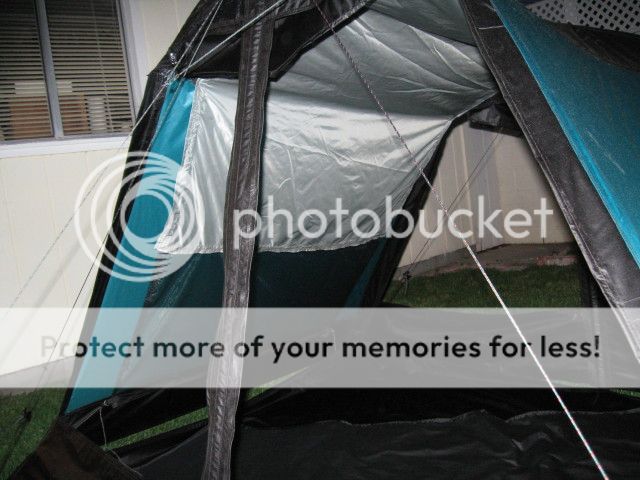
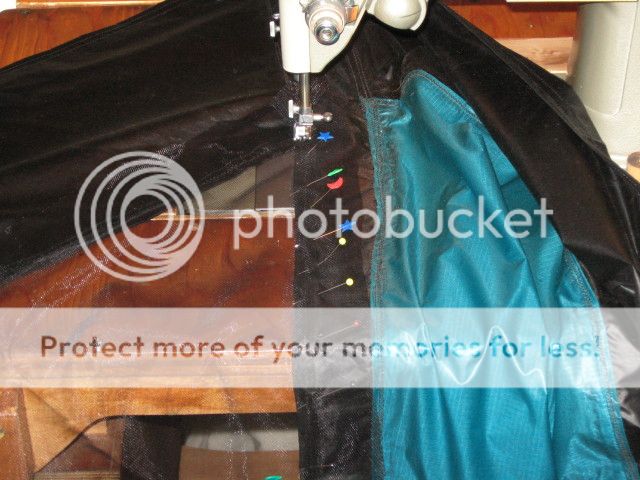
There will be no inner tent per say.It will be a hybred tent,I will be separated from most of the "fly" walls.The parts you see open now will be noseeum net,covered with separated storm doors on the outside.The top and side walls will be separated from me with an inner ceiling and side nets.So the actual "fly" will not be in contact with me,but the ground cloth,netting and bathtub will be sewn in.
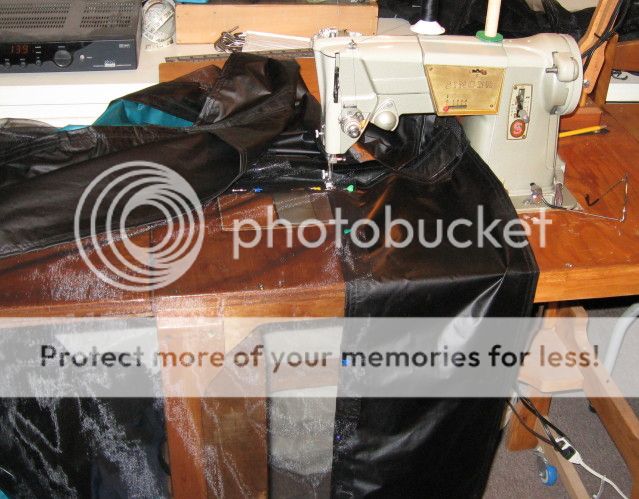
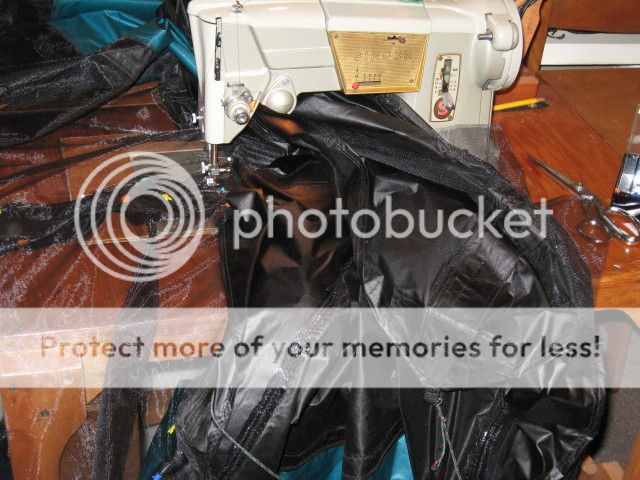
During the rain,I had the chance to sew the panels on.This is the hardest part of the sewing,dragging the whole tent under the arm a couple times and only sewing what you want sewn.The sewing part is easy,just push the pedal,it's the keeping the rest of the material out of the way that's hard.
Not perfect,but good enough for what I'm doing,it isn't going to Everest.

Here, I X-out the corners to make sure it is setup square.If both measure the same distance,it's square.Now I take measurements to prep the groundcloth for sewing.The groundcloth will be sewn to the skirts front and back,then have a 4"-5" wall on the ends to meet up with the netting from the inner roof panel.
The groundcloth/bathtub will clip into the stakes at this point,so that I can take it in and out for sewing.In the end,it will be sewn in front and back and hang from the noseeum net walls on the ends.
I think this stuff up in my head,then take measurements with string to see if it's possible,then scratch down some numbers and start sewing.I can use it most of the time when I'm finished....
The floor will be 2 pieces,a full size silnylon groundcloth with a urethane coated bathtub floor attached to the groundcloth walls.I've had bad experiences with silnylon as a floor alone,I don't trust it in bad situations.It's worth the extra few ounces for a separate urethane coated bathtub.
Off to start on the groundcloth and bathtub......
There will be no inner tent per say.It will be a hybred tent,I will be separated from most of the "fly" walls.The parts you see open now will be noseeum net,covered with separated storm doors on the outside.The top and side walls will be separated from me with an inner ceiling and side nets.So the actual "fly" will not be in contact with me,but the ground cloth,netting and bathtub will be sewn in.
During the rain,I had the chance to sew the panels on.This is the hardest part of the sewing,dragging the whole tent under the arm a couple times and only sewing what you want sewn.The sewing part is easy,just push the pedal,it's the keeping the rest of the material out of the way that's hard.
Not perfect,but good enough for what I'm doing,it isn't going to Everest.
Here, I X-out the corners to make sure it is setup square.If both measure the same distance,it's square.Now I take measurements to prep the groundcloth for sewing.The groundcloth will be sewn to the skirts front and back,then have a 4"-5" wall on the ends to meet up with the netting from the inner roof panel.
The groundcloth/bathtub will clip into the stakes at this point,so that I can take it in and out for sewing.In the end,it will be sewn in front and back and hang from the noseeum net walls on the ends.
I think this stuff up in my head,then take measurements with string to see if it's possible,then scratch down some numbers and start sewing.I can use it most of the time when I'm finished....
The floor will be 2 pieces,a full size silnylon groundcloth with a urethane coated bathtub floor attached to the groundcloth walls.I've had bad experiences with silnylon as a floor alone,I don't trust it in bad situations.It's worth the extra few ounces for a separate urethane coated bathtub.
Off to start on the groundcloth and bathtub......
Last edited by Booger1; 03-26-12 at 08:44 PM.
04-01-12, 04:24 PM
#11
Senior Member
Thread Starter
Join Date: Sep 2007
Location: Gaseous Cloud around Uranus
Posts: 3,741
Mentioned: 0 Post(s)
Tagged: 0 Thread(s)
Quoted: 38 Post(s)
Likes: 0
Liked 11 Times
in
7 Posts
Another round in the books.....
It's been rainy and windy here lately so I haven't been able to get much done,but I did get a floor and insert in and fitted.Also made some storm covers for the top vents.
Here is the silnylon groundcloth with a urethane insert,I don't trust silnylon on the floor alone.You can get wet spots around your knees or hands at times.I guess from real high pressure spots.

It's held up in the corners with a loop,d-ring and glove clip.There is no tension to speak of on the floor or inner panels,they'll just hang from the poles and walls.
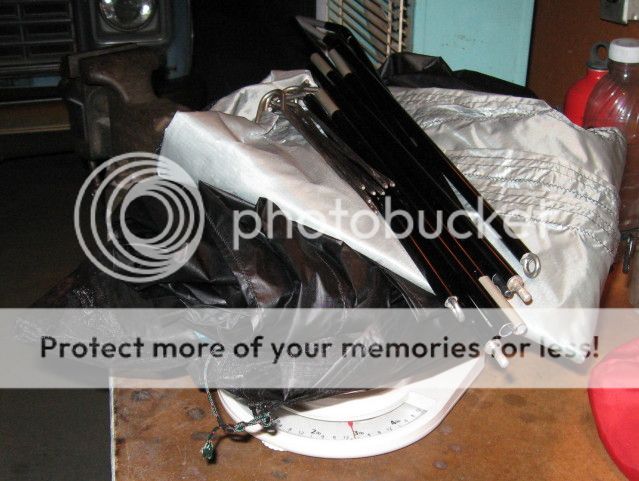
I haven't weighed it with the floor yet but it's got to be around 2 1/4 pounds about now.So I'm starting to get close to my 3 lbs limit,looks like it may be a few ounces over.....OH NOOOOOOOO!!!!!!

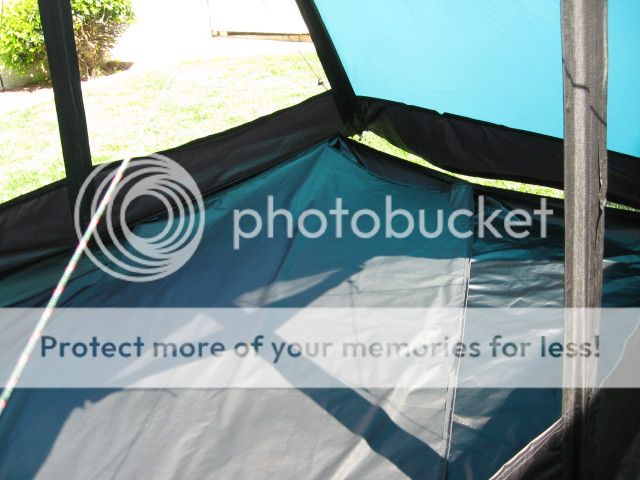
The little flap hanging down is a storm cover for the top vents,one on each side.They are sewn in but still need a couple small pieces of hook and loop to hold them closed.
Look real close and you'll see a couple d-rings hanging down to the left/right of the vent,there's one in the center at the top of the vent also.These are where the top panel and side panels hang from.The bottom of the side panels will attach to the d-rings that the floor hang from.
Now to start on the inner roof panel and side nets......
It's been rainy and windy here lately so I haven't been able to get much done,but I did get a floor and insert in and fitted.Also made some storm covers for the top vents.
Here is the silnylon groundcloth with a urethane insert,I don't trust silnylon on the floor alone.You can get wet spots around your knees or hands at times.I guess from real high pressure spots.
It's held up in the corners with a loop,d-ring and glove clip.There is no tension to speak of on the floor or inner panels,they'll just hang from the poles and walls.
I haven't weighed it with the floor yet but it's got to be around 2 1/4 pounds about now.So I'm starting to get close to my 3 lbs limit,looks like it may be a few ounces over.....OH NOOOOOOOO!!!!!!
The little flap hanging down is a storm cover for the top vents,one on each side.They are sewn in but still need a couple small pieces of hook and loop to hold them closed.
Look real close and you'll see a couple d-rings hanging down to the left/right of the vent,there's one in the center at the top of the vent also.These are where the top panel and side panels hang from.The bottom of the side panels will attach to the d-rings that the floor hang from.
Now to start on the inner roof panel and side nets......
Last edited by Booger1; 04-01-12 at 04:38 PM.
04-02-12, 09:05 PM
#12
Senior Member
Thread Starter
Join Date: Sep 2007
Location: Gaseous Cloud around Uranus
Posts: 3,741
Mentioned: 0 Post(s)
Tagged: 0 Thread(s)
Quoted: 38 Post(s)
Likes: 0
Liked 11 Times
in
7 Posts
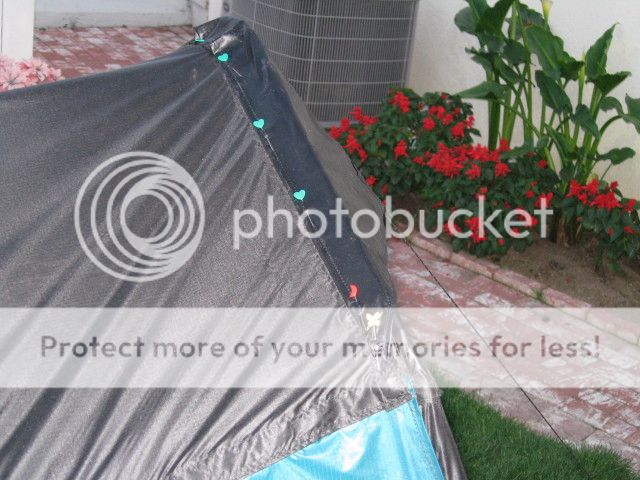
Had some time today,so made the inner roof panel and side nets.Figured I would try silver,to brighten it up some and maybe reflect or capture some heat.....I don't know about that part but there is 1 tent company that does that,though I think they use a kind of space blanket type stuff.
It looks slack somewhat and it is to some extent.I don't need or want it tight like the outside,it doesn't have to shed wind and rain,it just keeps me from brushing the walls.I need to keep a couple inch gap between the outside and inside or the whole thing is useless,so it's adjustable.
I ended up tying off directly to the stakes instead of the floor,I can put as much/little tension on it as needed without effecting anything else.If you look closely towards the bottom of the net part,you can see one of the leads heading for the stake.
I have some finish work to do on the floor and my vent covers,so off to have more fun.
I'm not exactly sure but I think some front and back netting and maybe a zipper or two are up next,I need to think about it for a bit,don't want to sew myself into a corner.....
Last edited by Booger1; 04-02-12 at 09:24 PM.
04-08-12, 10:40 PM
#13
Senior Member
Thread Starter
Join Date: Sep 2007
Location: Gaseous Cloud around Uranus
Posts: 3,741
Mentioned: 0 Post(s)
Tagged: 0 Thread(s)
Quoted: 38 Post(s)
Likes: 0
Liked 11 Times
in
7 Posts
Not alot of progress this week......I did manage to get some hook and loop closures on the vent stormflaps.Made up some small beaks to cover the upper vents.
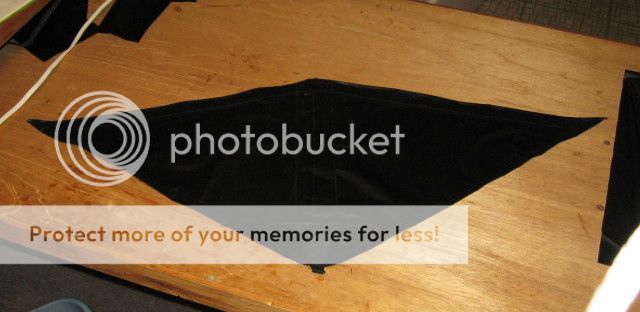
Here is a finished beak,one for both front and back.
Pin them in place.
Stand back and look at them for awhile,make sure they look straight and stuff.With the addition of the beaks,inner panels and floor,I was able to remove all of the tension guys.They were there to help repeat the setups of the tent,made it much easier to setup square.Makes sewing much easier without all of that junk.
The beaks are the main tension for the poles,so they may get a couple small side panels at some point,to help stablize the side to side movement.I'll have to see after the netting is in.The netting is stretchy in one direction,so we'll see how much stability it adds after it's in,it might surprize me.
The beak and top are not tensioned in this picture,the guy rope is not attached to the beak,it's running underneath to the pole.
All that's left is to stuff it all under the arm a couple times to sew it in.
That's it for now.I'm finished sewing at the top of the tent,so it's on to the front and back netting and a zipper so I can get in when I'm finished.
Last edited by Booger1; 04-09-12 at 09:33 AM.
04-09-12, 08:36 PM
#14
Senior Member
Thread Starter
Join Date: Sep 2007
Location: Gaseous Cloud around Uranus
Posts: 3,741
Mentioned: 0 Post(s)
Tagged: 0 Thread(s)
Quoted: 38 Post(s)
Likes: 0
Liked 11 Times
in
7 Posts
Nice and sunny today!
The front and rear beaks are sewn on,Check................Starting on the rear netting,here is the rear pinned in place.Same goes for the front,except after sewing is completed,I will set it up for the millionth time and add a zipper to the front right door.Light tents are suppose to have #3 zips but they are not worth a crap.
You can baby them,brush them clean.....yada yada yada......They're too damn small for outdoor gear,#5 zippers are the minimum in my world.......Coils are fine unless your in freezing weather or snow alot,you can get locked in if your not careful.....don't ask me how I know.
Bring it in,remove poles,try to figure out what's what......
With the addition of the front and back netting,even just pinned in,the tent is solid.I'm actually somewhat suprized by this,the noseeum stretches alot in one direction,so I didn't think it would work so well at stabizing the side to side movement.
After thinking about this and looking to see what noseeum actually does when stretched,it makes sense now.When stretched out,the sides get narrower.....sides can't get narrow,no stretchy.....DOH!....I feel like an idiot sometimes.I guess the equal but opposite thing works in material also.
After awhile,I get it sorted out and the fun begins.Slip it under the foot,check to make sure nothing is trapped under the foot that isn't suppose to be.....CHECK AGAIN STUPID!.....MAKE REAL SURE!.......it's getting quite a bit of fluff now........And off we go.....
The best way I have found to do netting,is to sew it on at the width you want your seam,double back on itself and lay down another line of stitching as close to the edge as you dare,I like about a 3/16" or so.Trim up to your stitch line.I'm not trying to hide this edge or I would have put the netting on the inside of the tent.If you take your time when trimming,it looks nice.
You need to back off of the foot tension some or pin it real good when sewing noseeum or it magically get longer........
This is my view for the couple hours it will take me to sew in the 4 panels........are we having fun yet!
Last edited by Booger1; 04-09-12 at 09:19 PM.
04-09-12, 08:53 PM
#15


Randomhead
Join Date: Aug 2008
Location: Happy Valley, Pennsylvania
Posts: 24,398
Mentioned: 0 Post(s)
Tagged: 0 Thread(s)
Quoted: 4 Post(s)
Liked 3,697 Times
in
2,518 Posts
really nice work. I'm getting ready to try to make a bag, going to do some practicing. My mother gave me a better sewing machine than the one I had, hopefully that helps a little.
04-11-12, 12:12 AM
#16
Senior Member
Thread Starter
Join Date: Sep 2007
Location: Gaseous Cloud around Uranus
Posts: 3,741
Mentioned: 0 Post(s)
Tagged: 0 Thread(s)
Quoted: 38 Post(s)
Likes: 0
Liked 11 Times
in
7 Posts
You can make a bag,it should be fun.I've made a down quilt,wasn't bad,just think it through some.I would think real hard about using down again.....great fun!
The "big secret" to sewing is thread tension.If you get that going good and somewhat figured out,the rest is easy.I like the way the RAY_WAY guy (sorry,cant think of his last name)Ray Jardin?...anyway,he has a good way of setting thread tension.
Basically,set the needle tension to the middle (4-5) then use the bobbin tension to adjust for a balanced straight stitch in your fabric.Then you just need to adjust the top tension for different thickness,with the same thread and needle combo.I found that works well,at least on older machines. Have fun....
Last edited by Booger1; 04-11-12 at 11:17 AM.
04-11-12, 12:44 AM
#17
Senior Member
Thread Starter
Join Date: Sep 2007
Location: Gaseous Cloud around Uranus
Posts: 3,741
Mentioned: 0 Post(s)
Tagged: 0 Thread(s)
Quoted: 38 Post(s)
Likes: 0
Liked 11 Times
in
7 Posts
Managed to sneak in some work today......Yeah!
The panels are re-pinned when doing noseeum,LOTS of pins.It's like never ending pins...put a row in,stitch,remove pins that were just in front,put them back in the front...repeat...repeat.....repeat......
You should lighten up the foot tension some,that will help with puckers and help you keep from ending up with an extra inch of noseeum at the end of your seam.It that's little silver knob way at the top,straight above the needle.Clockwise more pressure-----counter clockwise less pressure.
That's actually OPPOSITE of what you would do with regular material.You sort of have to balance between a good feed and bunching of the noseeum.It's not THAT hard to sew but it is different.

This shows my first line of stitching,about half inch seam or so.Left of the pencil tip is how wide the seam is,to the right is a couple inches of noseeum.
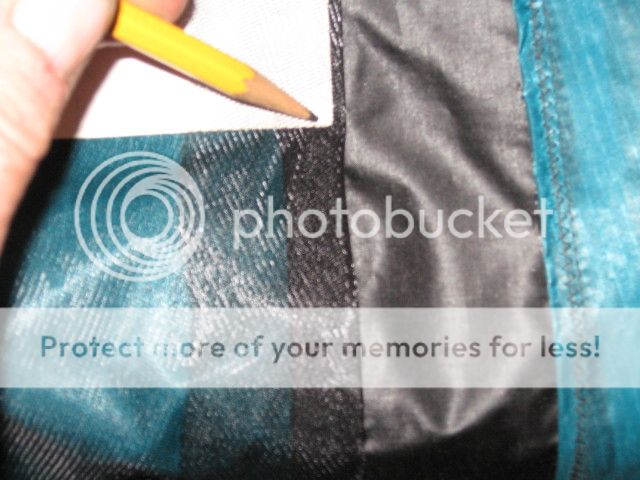
Here we have the noseeum folded back onto itself,my final line of stitching will run left of the pencil tip,half way to the edge,with a light pull of the netting so it lies flat.
I have the first stitch done on all 4 panels,need to go back and do it all again....Much easier now,no pins....Yeah!
Take your time Booger........we only want to do this......twice..... Crap I did double check underneath right???? (note to self) invent sewing maching with needle on right side......sure would come in handy at times......I can't make everything sew to the left at all times.....
The panels are re-pinned when doing noseeum,LOTS of pins.It's like never ending pins...put a row in,stitch,remove pins that were just in front,put them back in the front...repeat...repeat.....repeat......
You should lighten up the foot tension some,that will help with puckers and help you keep from ending up with an extra inch of noseeum at the end of your seam.It that's little silver knob way at the top,straight above the needle.Clockwise more pressure-----counter clockwise less pressure.
That's actually OPPOSITE of what you would do with regular material.You sort of have to balance between a good feed and bunching of the noseeum.It's not THAT hard to sew but it is different.
This shows my first line of stitching,about half inch seam or so.Left of the pencil tip is how wide the seam is,to the right is a couple inches of noseeum.
Here we have the noseeum folded back onto itself,my final line of stitching will run left of the pencil tip,half way to the edge,with a light pull of the netting so it lies flat.
I have the first stitch done on all 4 panels,need to go back and do it all again....Much easier now,no pins....Yeah!
Take your time Booger........we only want to do this......twice.....
Crap I did double check underneath right???? (note to self) invent sewing maching with needle on right side......sure would come in handy at times......I can't make everything sew to the left at all times.....
Last edited by Booger1; 04-11-12 at 11:08 PM.
04-15-12, 12:21 AM
#18
Senior Member
Thread Starter
Join Date: Sep 2007
Location: Gaseous Cloud around Uranus
Posts: 3,741
Mentioned: 0 Post(s)
Tagged: 0 Thread(s)
Quoted: 38 Post(s)
Likes: 0
Liked 11 Times
in
7 Posts
Had a little more time,we're back at it.....
I stuffed it all onto my hi-tech $3 swapmeet kitchen scale,with everything so far,8 Ti stakes,double floor,inner roof and side panels,including it's first #5 zipper........2lbs-14 1/4 oz.... Not so bad,there's alot of tent there....5ft x 7ft.....4 feet tall......

Believe it or not,I think I'm still on track for the 3 1/4--1/2 pound range.....

I finished the sewing on the front/back noseeum netting.Run a final stitch close,trim,done.Looks nice if you take your time trimming.I need to add a zipper in the front,I'm sewn out......
The zip will go in the right front panel in this picture,where the zipper is sitting.The zip comes in a roll,so I hack off the length needed.
Add a couple of zipper pulls,for the days I can't make up my mind which way the door should go,all zips are double pulls,I need to get in and out.
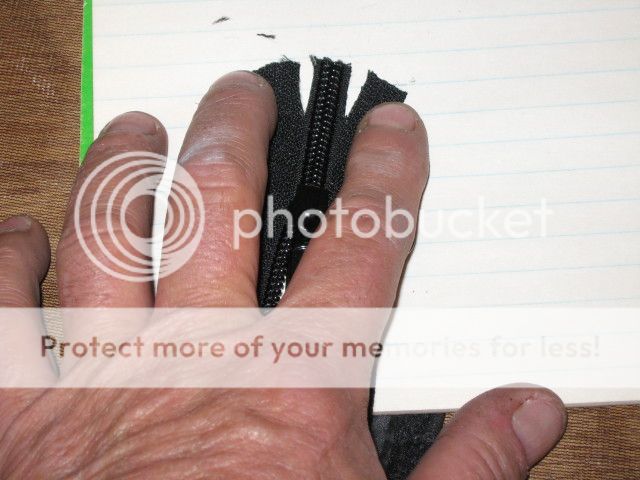
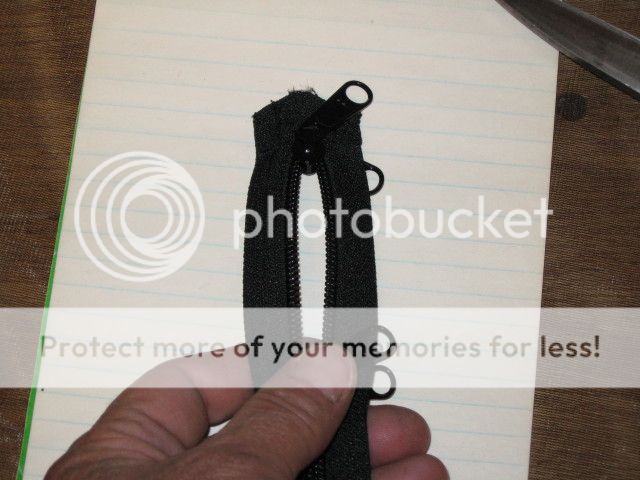
The inner zip will be closed on BOTH ends.The ends of the zips need to be prepped in some way to keep the pulls from coming off.You can use wire,they sell little staple type things....here's what I do,it's free.
Start by making a couple snips down the side.....make a little flap.
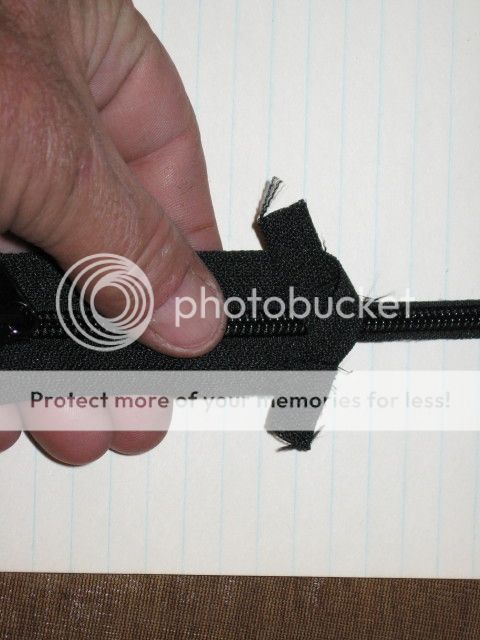
Fold the little flaps criss-cross over the teeth and stitch them down.
Cut off the remaining teeth that stick up,done.I need to do that on both ends of the inner zip to get it ready to put in. Don't use your good scissors for cutting zips,it's tough stuff!
Now I need to actually put it in.....Off I go......

Just in case anybody was wondering how that loop gets in the end of the poles with shockcord attached......There are some plastic type ones for kite building but these are my main poles.....it's a tent not a kite.....I want a steel and/or aluminum something.....
I stuffed it all onto my hi-tech $3 swapmeet kitchen scale,with everything so far,8 Ti stakes,double floor,inner roof and side panels,including it's first #5 zipper........2lbs-14 1/4 oz.... Not so bad,there's alot of tent there....5ft x 7ft.....4 feet tall......
Believe it or not,I think I'm still on track for the 3 1/4--1/2 pound range.....
I finished the sewing on the front/back noseeum netting.Run a final stitch close,trim,done.Looks nice if you take your time trimming.I need to add a zipper in the front,I'm sewn out......
The zip will go in the right front panel in this picture,where the zipper is sitting.The zip comes in a roll,so I hack off the length needed.
Add a couple of zipper pulls,for the days I can't make up my mind which way the door should go,all zips are double pulls,I need to get in and out.
The inner zip will be closed on BOTH ends.The ends of the zips need to be prepped in some way to keep the pulls from coming off.You can use wire,they sell little staple type things....here's what I do,it's free.
Start by making a couple snips down the side.....make a little flap.
Fold the little flaps criss-cross over the teeth and stitch them down.
Cut off the remaining teeth that stick up,done.I need to do that on both ends of the inner zip to get it ready to put in. Don't use your good scissors for cutting zips,it's tough stuff!
Now I need to actually put it in.....Off I go......
Just in case anybody was wondering how that loop gets in the end of the poles with shockcord attached......There are some plastic type ones for kite building but these are my main poles.....it's a tent not a kite.....I want a steel and/or aluminum something.....
Last edited by Booger1; 04-15-12 at 01:57 PM.
04-15-12, 06:51 AM
#19
Senior Member
Again Mr mucus, I have absolutely no urge to do something like this, but am still impressed and also by the time you've spent putting up the photos and details that would be a big help to someone interested in doing this project themselves.
Btw, been meaning to ask, what sort of racecars- short dirt stock? Modified shorty dirt? Formula ford types? As a lifelong motorsport fan, just curious.
Cheers
Btw, been meaning to ask, what sort of racecars- short dirt stock? Modified shorty dirt? Formula ford types? As a lifelong motorsport fan, just curious.
Cheers
04-15-12, 01:49 PM
#20
Senior Member
Thread Starter
Join Date: Sep 2007
Location: Gaseous Cloud around Uranus
Posts: 3,741
Mentioned: 0 Post(s)
Tagged: 0 Thread(s)
Quoted: 38 Post(s)
Likes: 0
Liked 11 Times
in
7 Posts
I build dragsters and do block/machine work from Top fuel cars to weekend warriors to Grandmas' car,I work on anything that comes in the door.I have an engine dyno also,so we do alot of R&D work for people,some famous-some soon to be.I'll work on anything if I have time.
When some people don't have time to do there own machine work or want something special,or are not setup to do some type of specialty work,they bring it to me.
You want a V-6 Hemi?.....bring me an 8 cyl and I'll take off 2 cyl and I'll give it back running on 6.Just fill your wallet and limp in the door.....
Last edited by Booger1; 04-15-12 at 02:20 PM.
04-15-12, 02:52 PM
#21
Senior Member
interesting, you know, of all the diff types of motorsport Ive watched, either on tv or in person, I have never been to a dragstrip. Sure Ive seen some drag stuff on tv but never really had the urge to go to a meet.
That said, I can see how it must make the hairs stand up on your arms from the raw, completely nutso power with the top fuel guys. It always makes my eyebrows go up when I read some of the specs (I seem to recall well over 6000hp) just because it is just so so over the top. I had motorcycles, did a small amount of production road racing many years ago on a two-stroke, but have always followed circuit racing, as rights and lefts and outbraking are where my loves are, but can still appreciate the art of oval racing, just never really followed it (Nascar) but have followed the open wheel oval stuff going back to Indy, ChampCars etc.
For a bunch of years Ive followed Lemans, which I find a fascinating event, and speaking of engines, traditionally has a whole slew of diff engine types out there throughout the field, and so tons of great sounding different engine notes...at night it is especially cool with 4 and 6 bangers with turbos, normally aspirated 8s like the Vettes that won for years in their class, 12s of Ferraris, and then the weird quiet diesels that have been winning now for a bunch of years (Audi, Puegot).
kinda rare to find others who have feet in both worlds of bicycling and racing (or at least just an interest like myself)
04-18-12, 01:02 AM
#22
Senior Member
Thread Starter
Join Date: Sep 2007
Location: Gaseous Cloud around Uranus
Posts: 3,741
Mentioned: 0 Post(s)
Tagged: 0 Thread(s)
Quoted: 38 Post(s)
Likes: 0
Liked 11 Times
in
7 Posts
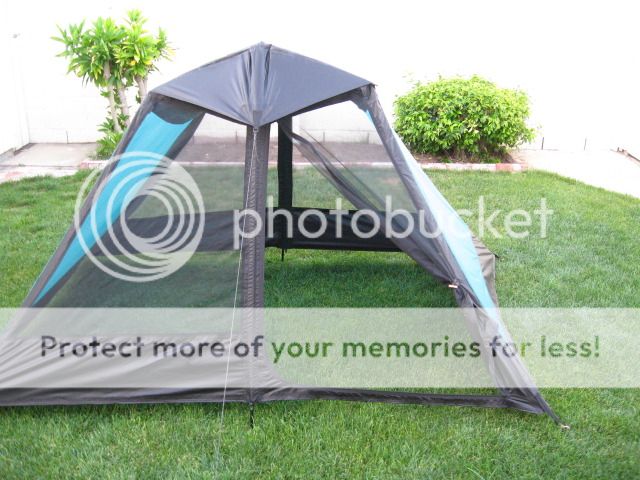
I can get inside my tent.....Yeah!

I pinned the zip in place on both sides.Half on the main pole sleeve and half on the netting.2 zips on this tent,1 on the inner netting(this one) and 1 for the outer storm doors(not made yet).
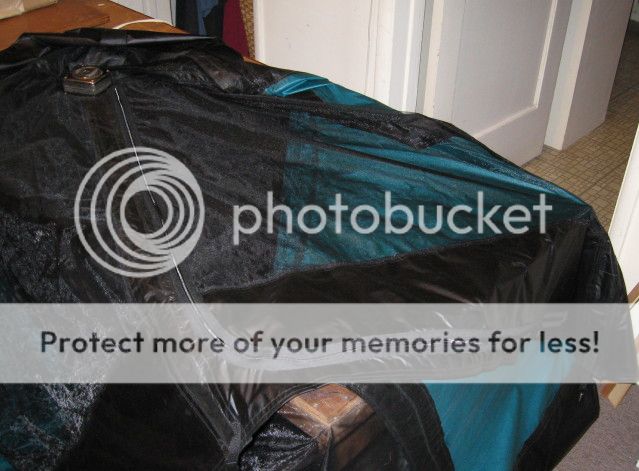
This is the best picture I have right now,you get the idea.You'll see it a few times when the storm doors go on.

A close up,on the right the door is flipped to show the back.I doubled the silnylon with 3 inch panel on the backside of the zipper.Zippers get a workout.
The extra panels are just bonded in place.I could sew them,but there's really no reason too.
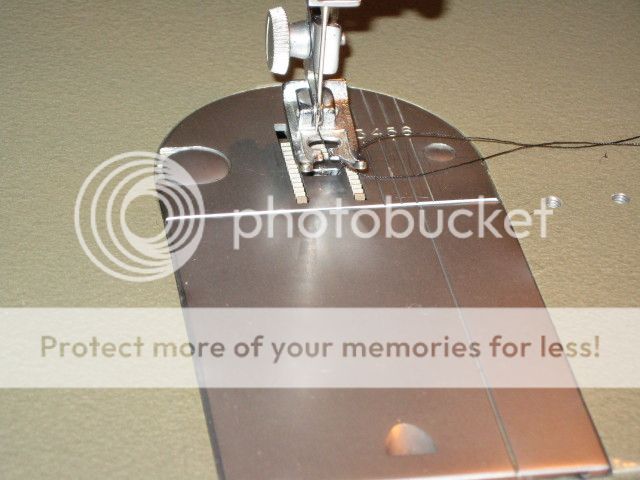
Here's a zigzag foot,a normal foot for a machine.
Here's a zipper foot.Adjustable for left/right of the teeth.
With a normal foot,you can't sew right next to the zipper teeth,even with the needle all the way over to the left.
With a zipper foot,you can sew right next to the teeth,as close as you dare.So what's the big deal....
You know when you use a zipper and that little flap of material gets caught in the zipper pull? Sewing close to the teeth helps with that,alot around corners,there's nothing to butch up and get caught.
After double stitching the zip in,I open it and cut the material behind it open.I trim it back as close to the stitching as I can and call it good.
My zipper installations are not going to win any awards anytime soon....
4 Storm doors next.........were on the home stretch........
I pinned the zip in place on both sides.Half on the main pole sleeve and half on the netting.2 zips on this tent,1 on the inner netting(this one) and 1 for the outer storm doors(not made yet).
This is the best picture I have right now,you get the idea.You'll see it a few times when the storm doors go on.
A close up,on the right the door is flipped to show the back.I doubled the silnylon with 3 inch panel on the backside of the zipper.Zippers get a workout.
The extra panels are just bonded in place.I could sew them,but there's really no reason too.
Here's a zigzag foot,a normal foot for a machine.
Here's a zipper foot.Adjustable for left/right of the teeth.
With a normal foot,you can't sew right next to the zipper teeth,even with the needle all the way over to the left.
With a zipper foot,you can sew right next to the teeth,as close as you dare.So what's the big deal....
You know when you use a zipper and that little flap of material gets caught in the zipper pull? Sewing close to the teeth helps with that,alot around corners,there's nothing to butch up and get caught.
After double stitching the zip in,I open it and cut the material behind it open.I trim it back as close to the stitching as I can and call it good.
My zipper installations are not going to win any awards anytime soon....
4 Storm doors next.........were on the home stretch........
Last edited by Booger1; 04-18-12 at 01:22 AM.
04-20-12, 11:43 PM
#23
Senior Member
Thread Starter
Join Date: Sep 2007
Location: Gaseous Cloud around Uranus
Posts: 3,741
Mentioned: 0 Post(s)
Tagged: 0 Thread(s)
Quoted: 38 Post(s)
Likes: 0
Liked 11 Times
in
7 Posts
I had it up to take some measurements for starting the storm doors.
Closed
Open

Simple loop/toggle tie back.
Wrinkly when the main pole sleeved aren't tensioned,I think mostly from using the glue on panels inside,doesn't hang,sorty springy a tiny bit......some from my zipper expertise.....
Looks a bit better when the pole sleeves are tensioned.None of that actually matters at all,it needs to keep bugs and rain drop splash off me....it will do that just fine.
Storm doors coming up......almost ready for the sprinklers... I mean the Booger1 hydro test lab......
I just noticed,going on 4 weeks since I started......time flies when your having fun!
Can Booger finish in under 30 days? If Mickey's a mouse and Donalds' a duck------What the Hell is Goofy???? Who Cares!
Closed
Open
Simple loop/toggle tie back.
Wrinkly when the main pole sleeved aren't tensioned,I think mostly from using the glue on panels inside,doesn't hang,sorty springy a tiny bit......some from my zipper expertise.....
Looks a bit better when the pole sleeves are tensioned.None of that actually matters at all,it needs to keep bugs and rain drop splash off me....it will do that just fine.
Storm doors coming up......almost ready for the sprinklers... I mean the Booger1 hydro test lab......
I just noticed,going on 4 weeks since I started......time flies when your having fun!
Can Booger finish in under 30 days? If Mickey's a mouse and Donalds' a duck------What the Hell is Goofy???? Who Cares!
Last edited by Booger1; 04-21-12 at 12:41 AM.
04-21-12, 09:58 AM
#24
Junior Member
Cool project you have going there. Very good craftsmanship. I've been feeling some pain realizing the fact that I'll probably need a much lighter,(and more expensive,) tent than I have if I want to do any serious touring, but I never even considered the fact that I might be able to make one. Inspiring!
It sounds like you've got one hell of an auto shop too. I'm a novice backyard mechanic at best, but my first and foremost passion is cars. I try to learn every little thing I can about them. I find myself re-entering the bike world as a victim of circumstance, but it's fast becoming an addiction like automobiles.
Looking forward to the end result!
04-25-12, 10:12 AM
#25
Senior Member
Thread Starter
Join Date: Sep 2007
Location: Gaseous Cloud around Uranus
Posts: 3,741
Mentioned: 0 Post(s)
Tagged: 0 Thread(s)
Quoted: 38 Post(s)
Likes: 0
Liked 11 Times
in
7 Posts
Sorry I haven't been doing much in the last few days,it's racing season,so they come first.I did manage to get my storm panels cut out one night.I'll get some more done this weekend,everybody will be at the track doing their thing.