


Friday is today
 01-25-13, 05:30 AM
#1
Senior Member
Thread Starter

Join Date: Apr 2010
Location: vermont
Posts: 3,081
Bikes: Many
Mentioned: 8 Post(s)
Tagged: 0 Thread(s)
Quoted: 5 Post(s)
Likes: 0
Liked 10 Times
in
10 Posts
Friday is today
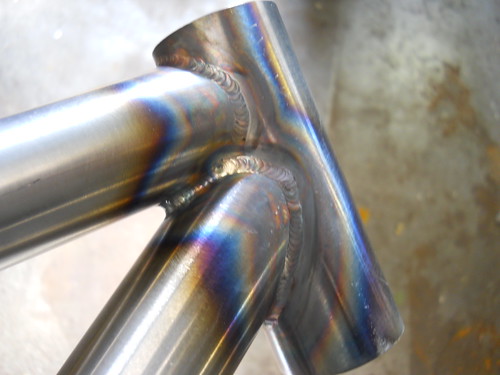
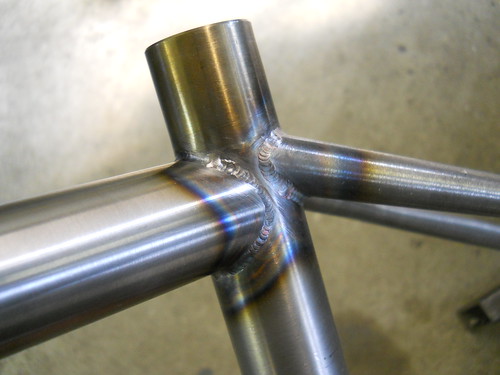
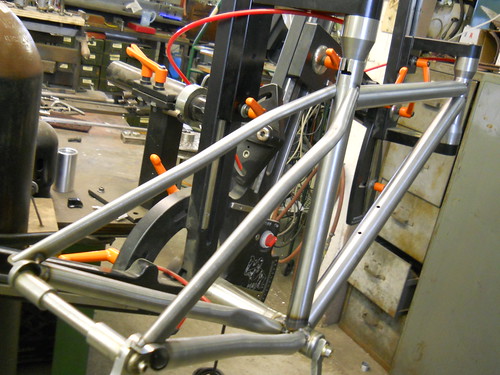
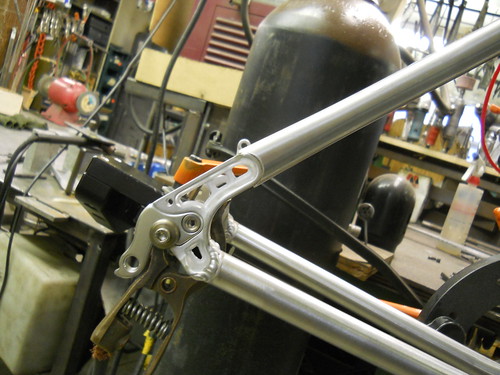
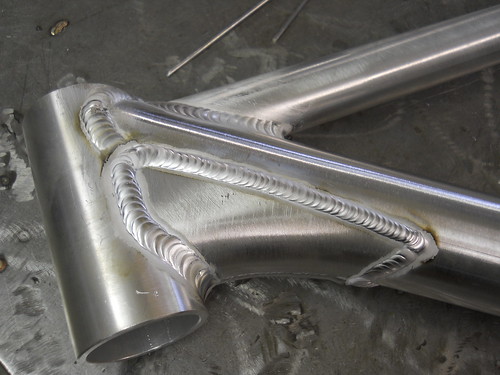
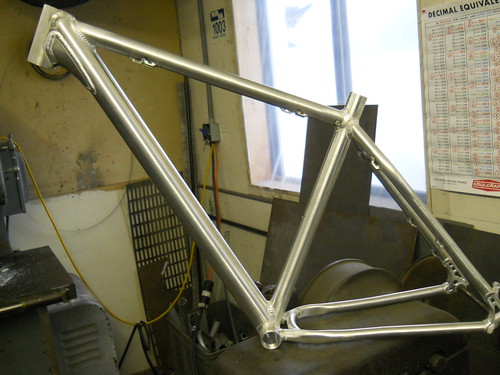
Here is what I did this week, how about you.
26 035 by frankthewelder, on Flickr
26 034 by frankthewelder, on Flickr
26 025 by frankthewelder, on Flickr
26 030 by frankthewelder, on Flickr
26 017 by frankthewelder, on Flickr
26 015 by frankthewelder, on Flickr
26 011 by frankthewelder, on Flickr

26 009 by frankthewelder, on Flickr
26 035 by frankthewelder, on Flickr
26 034 by frankthewelder, on Flickr
26 025 by frankthewelder, on Flickr
26 030 by frankthewelder, on Flickr
26 017 by frankthewelder, on Flickr
26 015 by frankthewelder, on Flickr
26 011 by frankthewelder, on Flickr
26 009 by frankthewelder, on Flickr
 01-25-13, 12:43 PM
#3

Senior Member

Join Date: Mar 2012
Location: santa barbara CA
Posts: 1,087
Mentioned: 1 Post(s)
Tagged: 0 Thread(s)
Quoted: 96 Post(s)
Liked 30 Times
in
21 Posts
Yet another bar set extremely high(figuratively); as always great looking work Frank. So there are two frames shown, mtn and road(or track)? What type if tubing is this (I'm not familiar enough with mtls to tell from just looking) and what are the main triangle ODs and wall thickness? BTW I see your area is in a major cold spell, hope you(and all others in in the affected region) are doing well.
thanks, Brian
bb on frame #1, mtn
bb on frame #2 road
thanks, Brian
bb on frame #1, mtn
bb on frame #2 road
__________________
Brian
Brian
Last edited by calstar; 01-25-13 at 12:56 PM.
01-25-13, 02:32 PM
#4
Senior Member
Join Date: Jul 2011
Posts: 2,441
Mentioned: 0 Post(s)
Tagged: 0 Thread(s)
Quoted: 33 Post(s)
Likes: 0
Liked 4 Times
in
3 Posts
Nice! I love weld porn.
I'm closed down for at least a few more months. I have heat in my shop, but I stopped running it after the recession. Can't afford it for my production level. It was OK here till last week, it is minus 10-20 at the moment, when it gets like that I can't even run the heat during the day and get it up to a decent level. My main floor will not go below freezing, the upstairs gets like whatever it is outside.
I'm closed down for at least a few more months. I have heat in my shop, but I stopped running it after the recession. Can't afford it for my production level. It was OK here till last week, it is minus 10-20 at the moment, when it gets like that I can't even run the heat during the day and get it up to a decent level. My main floor will not go below freezing, the upstairs gets like whatever it is outside.
01-25-13, 05:07 PM
#5
Senior Member
Join Date: Apr 2011
Posts: 73
Mentioned: 0 Post(s)
Tagged: 0 Thread(s)
Quoted: 0 Post(s)
Likes: 0
Liked 2 Times
in
1 Post
I've been painting here lately. Three Rivendells with a matching his/her set.

__________________
cforestryan.com
cforestryan.com
01-25-13, 05:41 PM
#6
Senior Member
Thread Starter
Join Date: Apr 2010
Location: vermont
Posts: 3,081
Bikes: Many
Mentioned: 8 Post(s)
Tagged: 0 Thread(s)
Quoted: 5 Post(s)
Likes: 0
Liked 10 Times
in
10 Posts
Yet another bar set extremely high(figuratively); as always great looking work Frank. So there are two frames shown, mtn and road(or track)? What type if tubing is this (I'm not familiar enough with mtls to tell from just looking) and what are the main triangle ODs and wall thickness? BTW I see your area is in a major cold spell, hope you(and all others in in the affected region) are doing well.
thanks, Brian
bb on frame #1, mtn
bb on frame #2 road
thanks, Brian
bb on frame #1, mtn
bb on frame #2 road
Thanks, it was way warmer than they predicted today. I left the dog at home just in case.
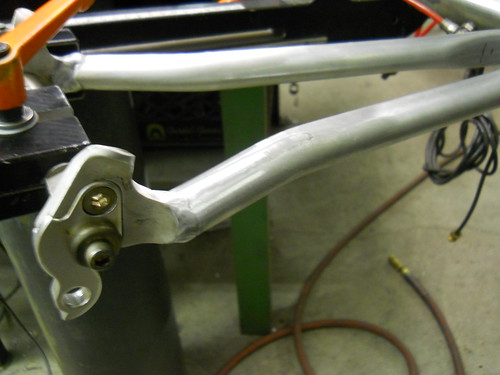
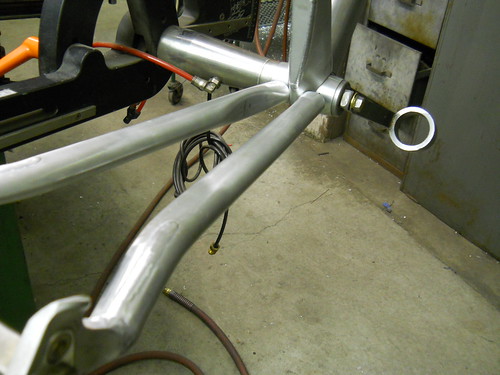
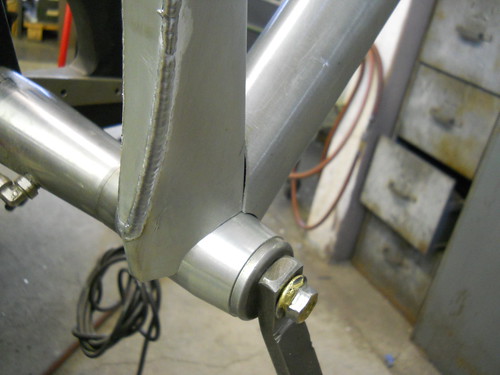
The steel bike is a mix of steel tubes .8/5/8 dt and 7/5/7 TT with straight gauge stays, 26" MTB. The tubes TT/1.25, ST/1.25. DT/1.375. CS/.875, SS/.625
The aluminum bike is a time trial. That was fun! Mostly around 1.1 or 1.2mm 7005. I think the down tube is around 80mm in diameter before smashing.
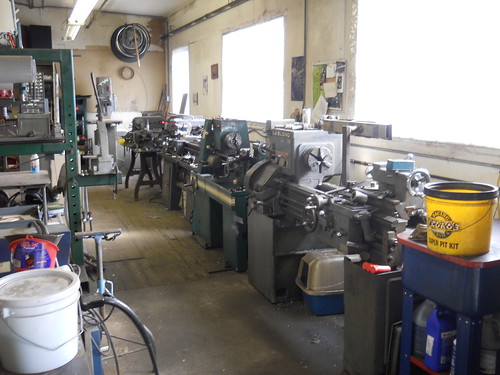
I use two of those BBQ cans of propane a week to heat my 2,000' shop. I try to keep it above 50 or so. That isn't bad.
Nice paint work there Craig Ryan.
01-28-13, 05:37 AM
#8
Senior Member
Join Date: Apr 2011
Posts: 73
Mentioned: 0 Post(s)
Tagged: 0 Thread(s)
Quoted: 0 Post(s)
Likes: 0
Liked 2 Times
in
1 Post
Brian, I use PPG products primarily. I like their DBC line of basecoat/clearcoat.
__________________
cforestryan.com
cforestryan.com
02-02-13, 04:40 AM
#9
Senior Member
Thread Starter
Join Date: Apr 2010
Location: vermont
Posts: 3,081
Bikes: Many
Mentioned: 8 Post(s)
Tagged: 0 Thread(s)
Quoted: 5 Post(s)
Likes: 0
Liked 10 Times
in
10 Posts
I made a repro stem from memory (and it came out right) the last time I made one of these was about 1993 or so.
I also sectioned a fat chance chain stay and put many new tubes in an old Yeti and patched up a couple of Klein frames and made a 29'r from scratch.
AND the really exciting part was brazing some housing guides on the top tube. I am new to this process still and I am sure it's very rough but it's real mile-marker for me as a "best ever" on a pretty small part.
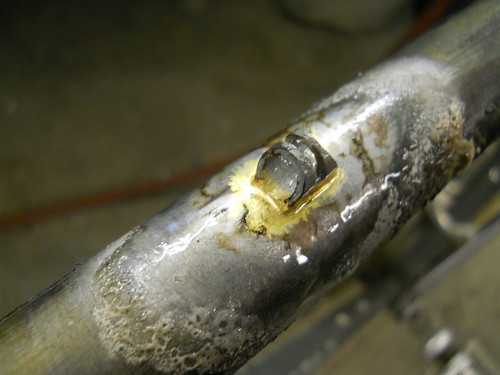
26 076 by frankthewelder, on Flickr
26 072 by frankthewelder, on Flickr
26 084 by frankthewelder, on Flickr
26 092 by frankthewelder, on Flickr
I also sectioned a fat chance chain stay and put many new tubes in an old Yeti and patched up a couple of Klein frames and made a 29'r from scratch.
AND the really exciting part was brazing some housing guides on the top tube. I am new to this process still and I am sure it's very rough but it's real mile-marker for me as a "best ever" on a pretty small part.
26 076 by frankthewelder, on Flickr
26 072 by frankthewelder, on Flickr
26 084 by frankthewelder, on Flickr
26 092 by frankthewelder, on Flickr
02-02-13, 03:40 PM
#10
Senior Member
Join Date: Mar 2012
Location: santa barbara CA
Posts: 1,087
Mentioned: 1 Post(s)
Tagged: 0 Thread(s)
Quoted: 96 Post(s)
Liked 30 Times
in
21 Posts
You're a busy guy, like seeing your projects, thanks for posting them. I may have asked this question before but when you build or repair an alu frame what temp and time period is it heated/annealed(correct terminology?)?
Brian
Brian
__________________
Brian
Brian
02-03-13, 08:10 AM
#11
Senior Member
Thread Starter
Join Date: Apr 2010
Location: vermont
Posts: 3,081
Bikes: Many
Mentioned: 8 Post(s)
Tagged: 0 Thread(s)
Quoted: 5 Post(s)
Likes: 0
Liked 10 Times
in
10 Posts
Your question about heattreating is a big one and doesn't have one answer. The trick is that some things you do result in a gradually changing condition (hardness) and others not so. You can also harden/condition metals by moving the molecules.
If you are welding a cracked tube, leave it alone after you weld it. If you are welding a 6061 dropout, keep it as cool as you can by welding a little and quenching, If you are replacing a part of a 7005 frame with a new piece of metal, you can locally age the new piece of metal and should if it saturated with heat during the welding. (you can't use the weld/quench replacing a head tube for example).
All those process' are called heattreating. Softening is annealing and hardening is hardening. Each has a recipe that sort of makes sense. It's a bit like making real pasta.
02-25-13, 02:03 PM
#12
Senior Member
Join Date: Mar 2012
Location: santa barbara CA
Posts: 1,087
Mentioned: 1 Post(s)
Tagged: 0 Thread(s)
Quoted: 96 Post(s)
Liked 30 Times
in
21 Posts
Hi Frank. Personally I think it would be great if you'd post a pic of two every week of some of your projects, jigs for them, etc. I sure wouldn't think of it as self promoting, just sharing your fabrication knowledge/skills with the rest of us that don't have the facilities/tools/skills as you. Maybe if you continued posting on this thread others, including myself, will show/share whatever projects, large or small, they are doing. So to all you "others", lets see some current projects related(at least somewhat) to frame building.
thanks,
Brian
BTW, that trike you posted in C&V was amazing! https://www.bikeforums.net/showthread...ron?highlight=
thanks,
Brian
BTW, that trike you posted in C&V was amazing! https://www.bikeforums.net/showthread...ron?highlight=
__________________
Brian
Brian
Last edited by calstar; 02-25-13 at 03:23 PM.
02-27-13, 03:51 AM
#13
Senior Member
Thread Starter
Join Date: Apr 2010
Location: vermont
Posts: 3,081
Bikes: Many
Mentioned: 8 Post(s)
Tagged: 0 Thread(s)
Quoted: 5 Post(s)
Likes: 0
Liked 10 Times
in
10 Posts
Hi Frank. Personally I think it would be great if you'd post a pic of two every week of some of your projects, jigs for them, etc. I sure wouldn't think of it as self promoting, just sharing your fabrication knowledge/skills with the rest of us that don't have the facilities/tools/skills as you. Maybe if you continued posting on this thread others, including myself, will show/share whatever projects, large or small, they are doing. So to all you "others", lets see some current projects related(at least somewhat) to frame building.
Brian
BTW, that trike you posted in C&V was amazing! https://www.bikeforums.net/showthread...ron?highlight=
Brian
BTW, that trike you posted in C&V was amazing! https://www.bikeforums.net/showthread...ron?highlight=
I do have some photos to show if friday actually comes on time.
Last edited by ftwelder; 02-27-13 at 03:55 AM.
03-01-13, 10:24 AM
#14
Senior Member
Join Date: Mar 2012
Location: santa barbara CA
Posts: 1,087
Mentioned: 1 Post(s)
Tagged: 0 Thread(s)
Quoted: 96 Post(s)
Liked 30 Times
in
21 Posts
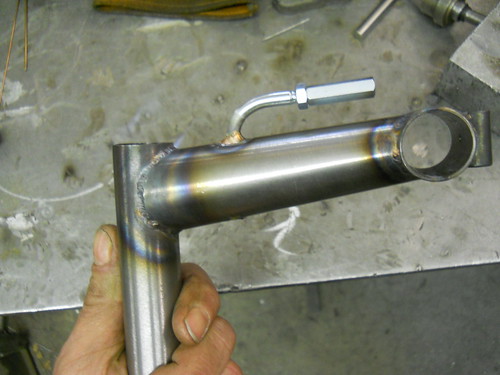
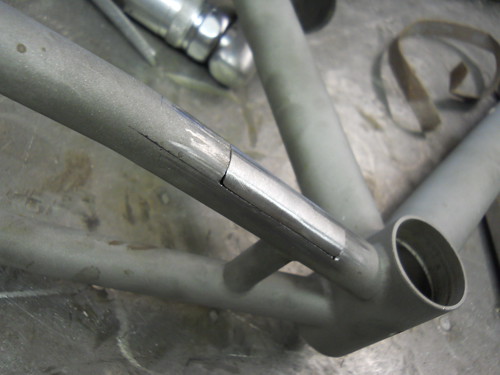
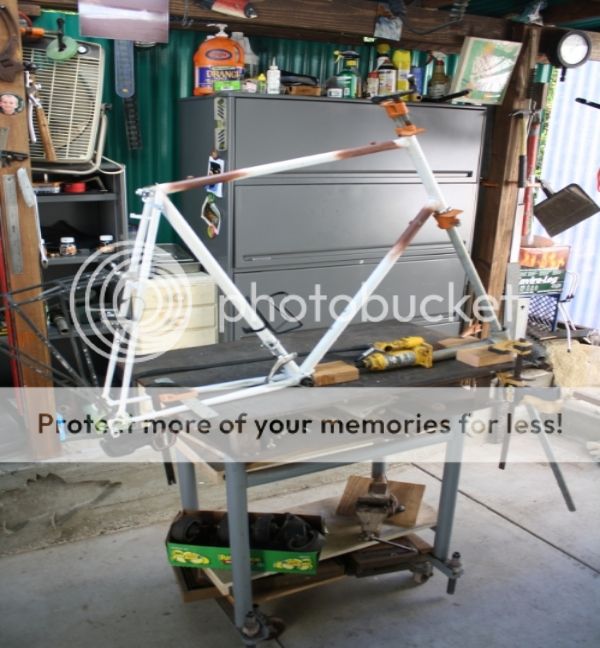
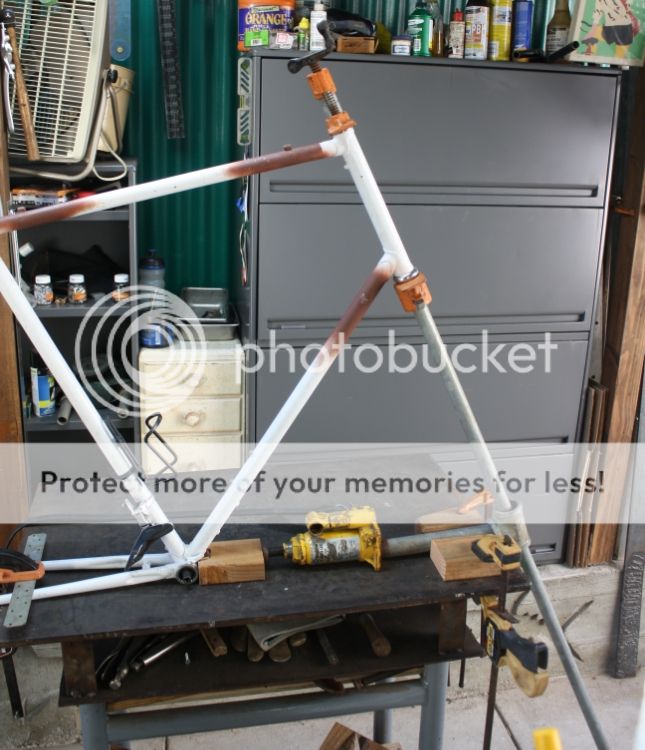
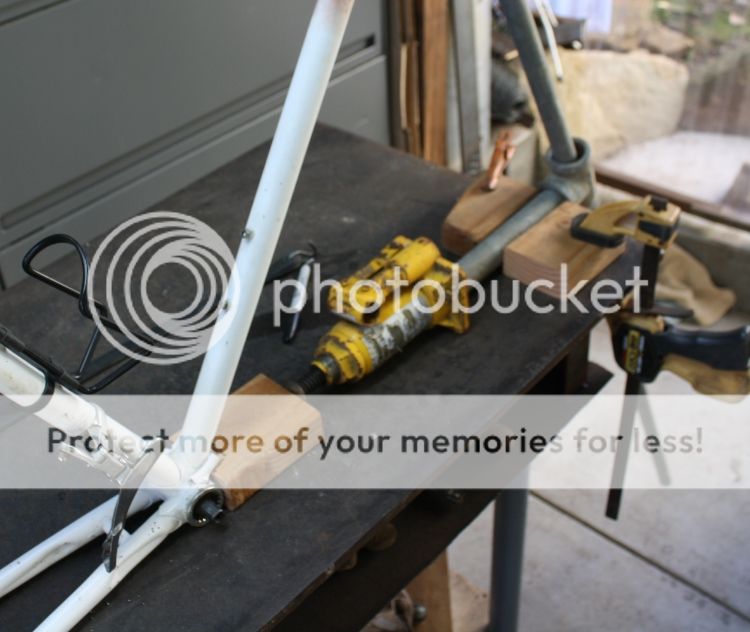
Not frame building but frame working. I got this Specialized Expedition with a slightly tweaked tt and dt from a front impact of some sort. The fork was straight(checked on a friends surface plate) but the tweak was just behind the ht lugs where this usualy occurs. The ride was squirley, the front end feeling very "light". I asked for and got help from C&Vers finding a spec sheet for it, and yes its the 68cm at the bottom of the sheet.
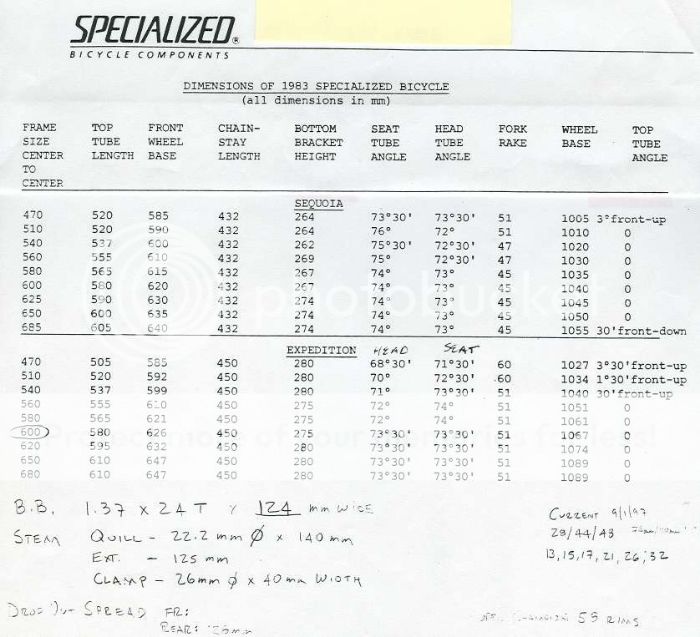
Measuring the ht angle with the "handy level" app(free app, works well) on my smart phone I came up with a 77 degres ht angle, and a wheelbase about an inch shorter than spec. My method was primative but worked well, see the set up below. It took me several tries to get the cold set to stay, I was really surprised how much the bending bar flexed to reach the desired spec.
Materials for the process: pieces of 2x4, one 3/4"bar clamp, one 1.5" T fitting, one short 1" pipe, all of which I had. I "dogpatched" together after seeing the real tool on a thread somewhere on BF. Using the wheelbase as the target as was able to get it as per spec, measured at the back of the drop. Eyeballing(closing out the light) the ht and st show parallel, at least to my eye, and good to go! This is now my grocery getter/errand bike and rides/handles great.
crude set up as used(except I had to use a screw jack of similar size because the bottle jack didn't work on its side!) The primered areas are where I brazed on cable guides as none were present, someone must have removed them for whatever reason, but I didn't take pics of doing it, should have as its more pertinent to this forum but oh well
and a nothing to do with frames pic of a chainring I used as a stamp when I built my little work shop a few months ago
__________________
Brian
Brian
Last edited by calstar; 03-01-13 at 10:29 AM. Reason: Couple of braze-ons and frame straightening
03-01-13, 01:47 PM
#15
Senior Member
Join Date: Feb 2012
Location: Rochester, NY
Posts: 18,056
Bikes: Stewart S&S coupled sport tourer, Stewart Sunday light, Stewart Commuting, Stewart Touring, Co Motion Tandem, Stewart 3-Spd, Stewart Track, Fuji Finest, Mongoose Tomac ATB, GT Bravado ATB, JCP Folder, Stewart 650B ATB
Mentioned: 0 Post(s)
Tagged: 0 Thread(s)
Quoted: 4195 Post(s)
Liked 3,837 Times
in
2,295 Posts
03-01-13, 03:10 PM
#16
Senior Member
Join Date: Mar 2012
Location: santa barbara CA
Posts: 1,087
Mentioned: 1 Post(s)
Tagged: 0 Thread(s)
Quoted: 96 Post(s)
Liked 30 Times
in
21 Posts
Andy, what size rod and what flux are you using? Also might as well ask for the brand and size of torch tip. thanks, Brian
__________________
Brian
Brian
03-01-13, 03:46 PM
#17
Senior Member
Join Date: Feb 2012
Location: Rochester, NY
Posts: 18,056
Bikes: Stewart S&S coupled sport tourer, Stewart Sunday light, Stewart Commuting, Stewart Touring, Co Motion Tandem, Stewart 3-Spd, Stewart Track, Fuji Finest, Mongoose Tomac ATB, GT Bravado ATB, JCP Folder, Stewart 650B ATB
Mentioned: 0 Post(s)
Tagged: 0 Thread(s)
Quoted: 4195 Post(s)
Liked 3,837 Times
in
2,295 Posts
Brian- Purox W-200 torch with #4 tip (.036" diameter). Straight O/A set at about 4.5 lbs each. Neutral flame of small to mid size. GasFlux type B flux. GasFlux CO-4 rod in 3/32" dia.
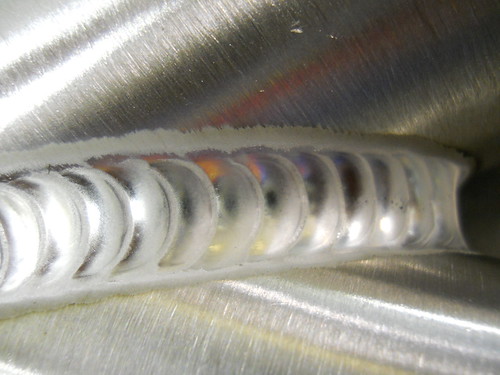
The first joint i just ran a fillet around it, no flowing first. The others i flowed to get a significant internal fillet then ran a fillet. All got two small tacks to hold things so i could remove the strip of steel that held the stubs in place during the tacking. Most were bike tubing wall thicknesses but the last were .058/.065 thick pieces. While the mitering wasn't bad all were not quite as tight as I'd do a real frame miter. These were for the fillet practice.
My project is a seat post thing and a back of bag vertical support strut. Ill post shots when they are done. Andy.
03-01-13, 07:34 PM
#18
Senior Member
Thread Starter
Join Date: Apr 2010
Location: vermont
Posts: 3,081
Bikes: Many
Mentioned: 8 Post(s)
Tagged: 0 Thread(s)
Quoted: 5 Post(s)
Likes: 0
Liked 10 Times
in
10 Posts
Brian- Purox W-200 torch with #4 tip (.036" diameter). Straight O/A set at about 4.5 lbs each. Neutral flame of small to mid size. GasFlux type B flux. GasFlux CO-4 rod in 3/32" dia.
The first joint i just ran a fillet around it, no flowing first. The others i flowed to get a significant internal fillet then ran a fillet. All got two small tacks to hold things so i could remove the strip of steel that held the stubs in place during the tacking. Most were bike tubing wall thicknesses but the last were .058/.065 thick pieces. While the mitering wasn't bad all were not quite as tight as I'd do a real frame miter. These were for the fillet practice.
My project is a seat post thing and a back of bag vertical support strut. Ill post shots when they are done. Andy.
I think I go about 35 degrees uphill and 5-10 degrees over the top and down the other side. I prefer uphill welding.
03-01-13, 07:52 PM
#19
Senior Member
Thread Starter
Join Date: Apr 2010
Location: vermont
Posts: 3,081
Bikes: Many
Mentioned: 8 Post(s)
Tagged: 0 Thread(s)
Quoted: 5 Post(s)
Likes: 0
Liked 10 Times
in
10 Posts
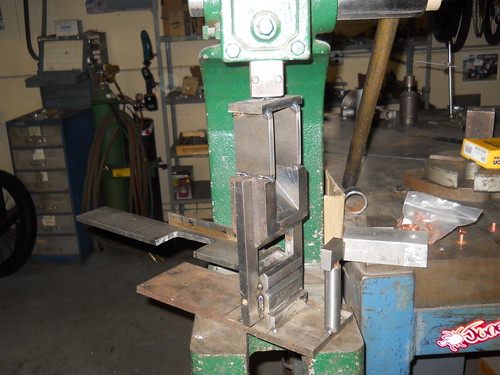
I had to bend some prototype wire frames for a concept retail outlet. I have been doing this for a while and it's pretty fun but time is always an issue.
I can't show the parts but they look quite a bit like a water bottle cage. I made this device that did all but one of the bends required. It's basically a 90 degree forming press that has clearance for U-bends.
I thought the salvaged V-block would be hard but the 3/16 wire caused huge grooves in the faces that will have to be repaired later. The punch part was case hardened with burnt leather, powered and applied with heat. It works well. Hooves are supposed to be better. Gross.
30 140 by frankthewelder, on Flickr
I also built a fat bike. I enjoy those quite a bit. The tooling to make the DT gusset is really something.
These aren't my favorite dropouts but they are OK. I flatten the tube for a nice fit.
30 136 by frankthewelder, on Flickr
30 135 by frankthewelder, on Flickr
30 142 by frankthewelder, on Flickr
I came in late one day and the sun was already up. This was the first thing I saw when I walked through the door. The scene made me wish I could write poetry. I was filled with joy.
30 130 by frankthewelder, on Flickr
03-01-13, 08:08 PM
#20

Bicycle Repair Man !!!

Frank...I love your shop.
Quiet week for me work wise but we hashed out ideas for upcoming projects and I did a lot of prep for rack building projects that I am lining up as well as some LD stems I plan to build... I need one for myself so that always gets me fired up.
Have not been as well as I would like so that has slowed me down a great deal but the shop awaits and as winter turns to spring I figure I will get busier and busier here.
03-01-13, 10:32 PM
#21
Senior Member
Join Date: Mar 2012
Location: santa barbara CA
Posts: 1,087
Mentioned: 1 Post(s)
Tagged: 0 Thread(s)
Quoted: 96 Post(s)
Liked 30 Times
in
21 Posts
Get better soon. When you start your racks/stems pics would be much appreciated. thanks, Brian
__________________
Brian
Brian
03-01-13, 10:35 PM
#22
Senior Member
Join Date: Mar 2012
Location: santa barbara CA
Posts: 1,087
Mentioned: 1 Post(s)
Tagged: 0 Thread(s)
Quoted: 96 Post(s)
Liked 30 Times
in
21 Posts
Shop looks great as usual, I always have shop envy when I see pics of it. Did you make the dropouts? That is one beefy dt assembly, downhill bike? Thanks, Brian
__________________
Brian
Brian
03-01-13, 10:48 PM
#23
Senior Member
Join Date: Feb 2012
Location: Rochester, NY
Posts: 18,056
Bikes: Stewart S&S coupled sport tourer, Stewart Sunday light, Stewart Commuting, Stewart Touring, Co Motion Tandem, Stewart 3-Spd, Stewart Track, Fuji Finest, Mongoose Tomac ATB, GT Bravado ATB, JCP Folder, Stewart 650B ATB
Mentioned: 0 Post(s)
Tagged: 0 Thread(s)
Quoted: 4195 Post(s)
Liked 3,837 Times
in
2,295 Posts
You did a really good job managing the heat with the short pieces of tubing. How many degrees of circumference do you estimate you cover in a single position?
I think I go about 35 degrees uphill and 5-10 degrees over the top and down the other side. I prefer uphill welding.
I think I go about 35 degrees uphill and 5-10 degrees over the top and down the other side. I prefer uphill welding.
03-02-13, 05:27 AM
#24
Senior Member
Thread Starter
Join Date: Apr 2010
Location: vermont
Posts: 3,081
Bikes: Many
Mentioned: 8 Post(s)
Tagged: 0 Thread(s)
Quoted: 5 Post(s)
Likes: 0
Liked 10 Times
in
10 Posts
I know you work with a gent with a lot of years under his belt. Ill bet he has some interesting bits. The big machines are cheap here. The area is known as "precision valley" as there were a lot of tooling and machinery makers in the area at one point.
Frank...I love your shop.
Quiet week for me work wise but we hashed out ideas for upcoming projects and I did a lot of prep for rack building projects that I am lining up as well as some LD stems I plan to build... I need one for myself so that always gets me fired up.
Have not been as well as I would like so that has slowed me down a great deal but the shop awaits and as winter turns to spring I figure I will get busier and busier here.
Quiet week for me work wise but we hashed out ideas for upcoming projects and I did a lot of prep for rack building projects that I am lining up as well as some LD stems I plan to build... I need one for myself so that always gets me fired up.
Have not been as well as I would like so that has slowed me down a great deal but the shop awaits and as winter turns to spring I figure I will get busier and busier here.
Last edited by ftwelder; 03-02-13 at 05:32 AM.
03-02-13, 12:15 PM
#25
Bicycle Repair Man !!!