


2013 Calfee Di2 retrofit, nuding and rebuild (2014)
 03-02-14, 03:24 PM
#1
Clipless in Coeur d'Alene
Thread Starter

2013 Calfee Di2 retrofit, nuding and rebuild (2014)
After the original build last year, I decided to rebuild our 2013 Calfee Tetra tandem with a little experimental flair to it and maybe not so conventional. So, after all the parts the frame was sent to Calfee to do all the frame & paint (err... no paint) modifications.
Major change points:
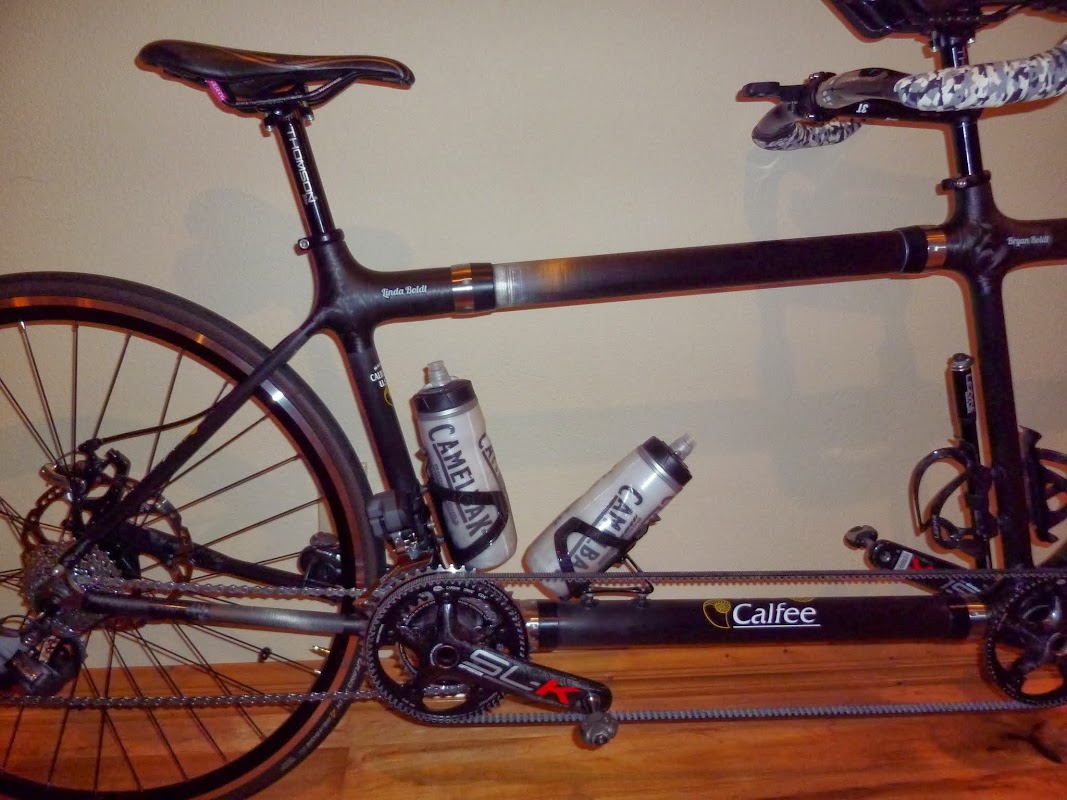
Here are a few snapshots of the initial rebuild (see full Google+ album here):


Other minor adjustments and interests to note:
First ride impression:
Well, it's 11F and a blizzard today (Sunday). Yesterday after getting the steerer tube cut at my LBS, I took a few spins around the parking lot, dodging sheets of ice until my bare hands were completely numb. The Di2 shifting was so smooth and quiet (maybe it was the 15-20mph wind @ 15F) that I had to look back to see what was going on. Not exactly a true ride report - yet. Time to head out skiing (I feel a Monday cough coming on .
.
TBD:
Major change points:
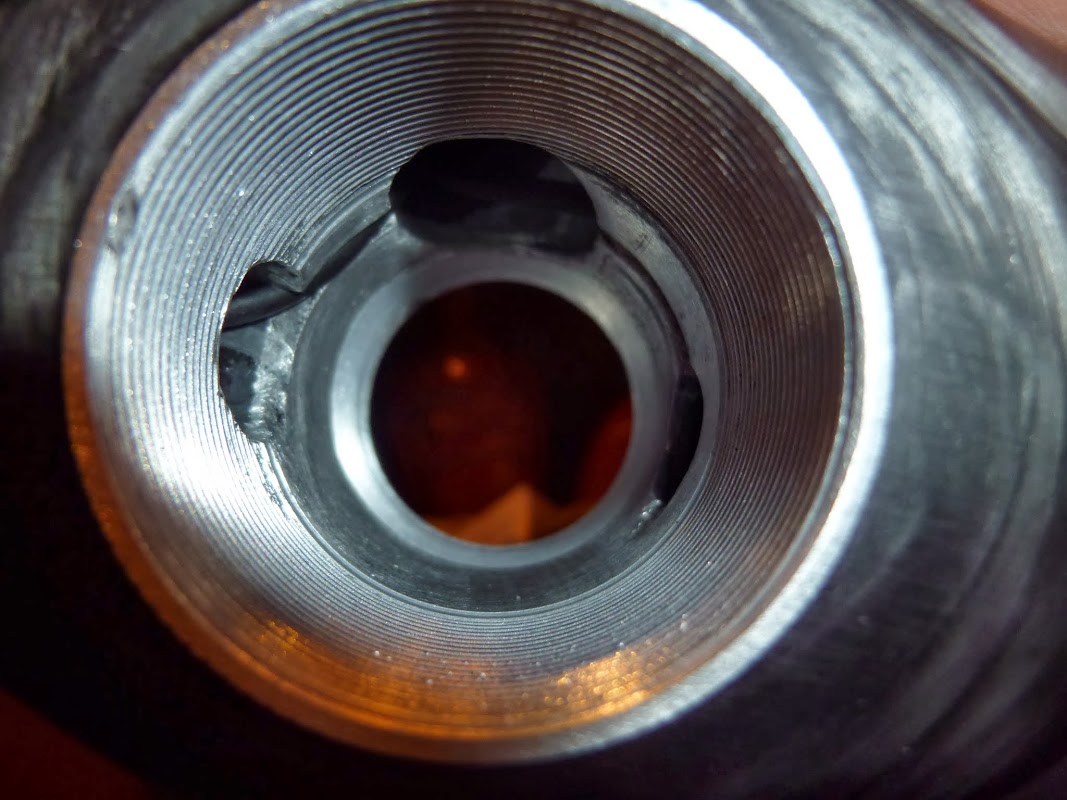
- frame retrofit for Di2 shifting. Removed all traces of mechanical shift cable routings. Drilled holes in BB shells and frame to allow Di2 wire routing. Reinforced FD mounting location.
- added 1 rear water bottle mount on the bottom tube to improve ergonomics for a short (5'2") stoker that didn't like reaching forward to grab a bottle from between my spinning heels.
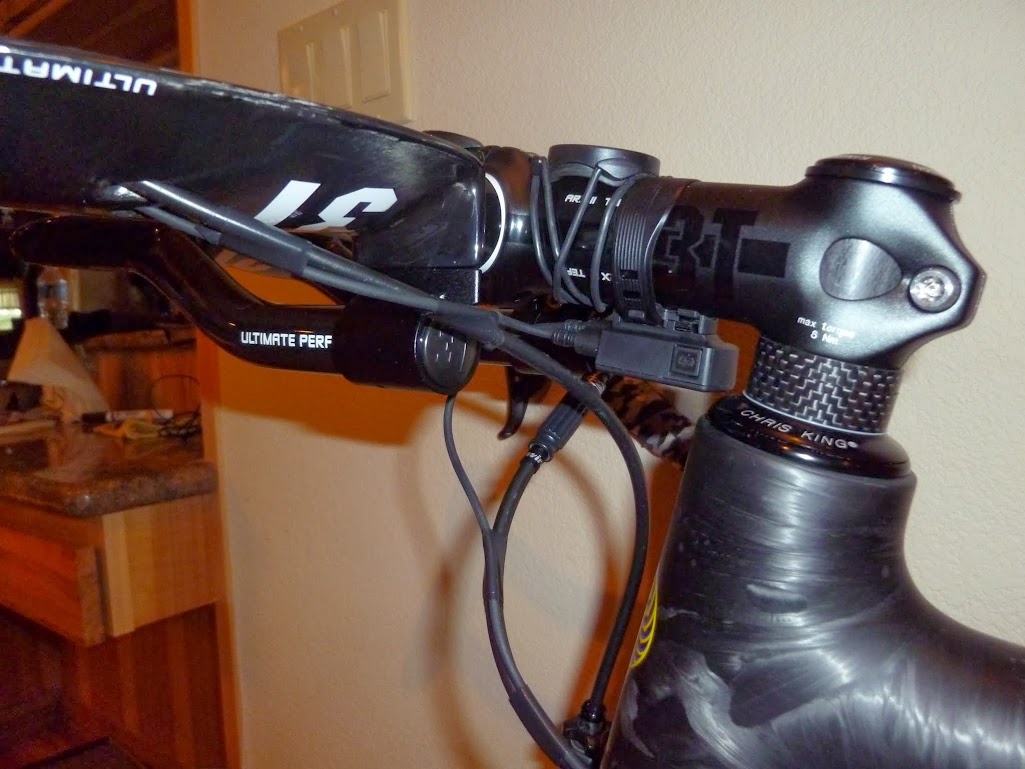
- cut head tube extention by 1cm. We had added a 2.5cm extension during the original build, but I didn't like the look and depending on the stem used was resting directly on the top headset.
- "nuded" the frame and fork (stripped the Cobalt Blue transparent paint job). Frame was left with a polished nude carbon finish, with 303 Aerospace UV Protectant applied by Calfee. I added a couple applications of 303 Detailer (also contains UV protectant and a little more glossy finish).
- nuding the original ENVE 2.0 tapered fork revealed a lot of ugly filler, so Calfee had ENVE replace it under warranty. The 2nd fork has a far better appearance, but still has some filler that shows up mostly under flash photo conditions. Otherwise the new fork looks nice enough.
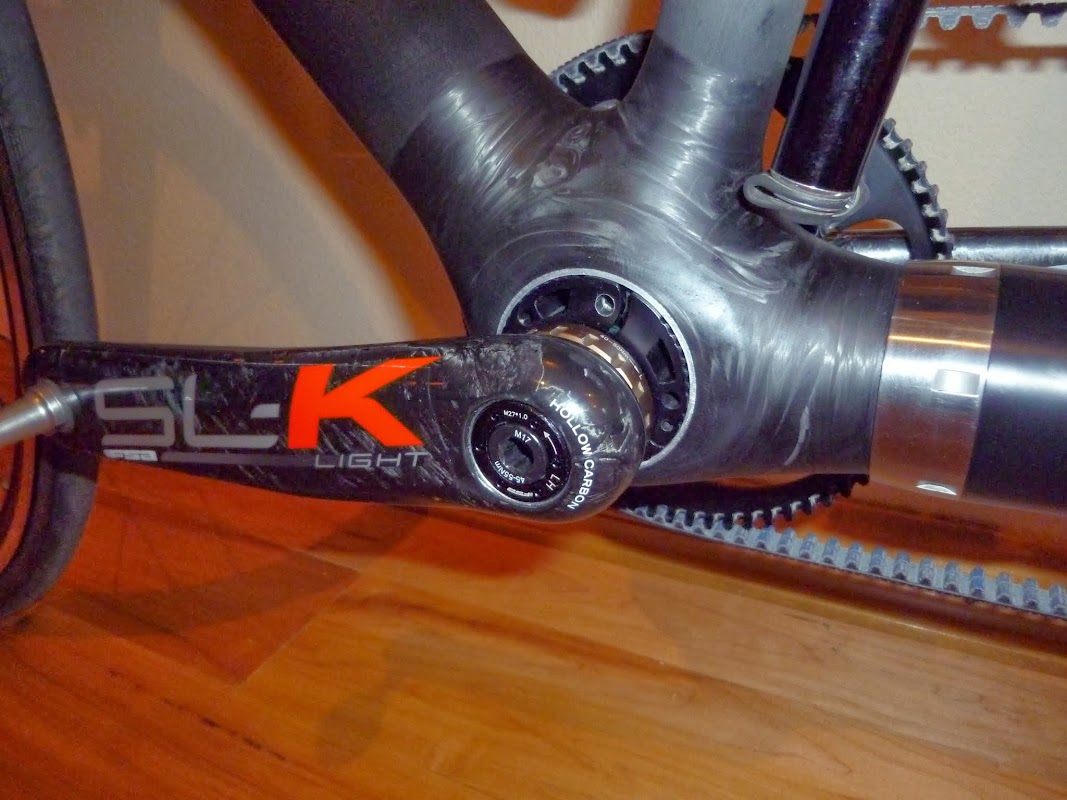
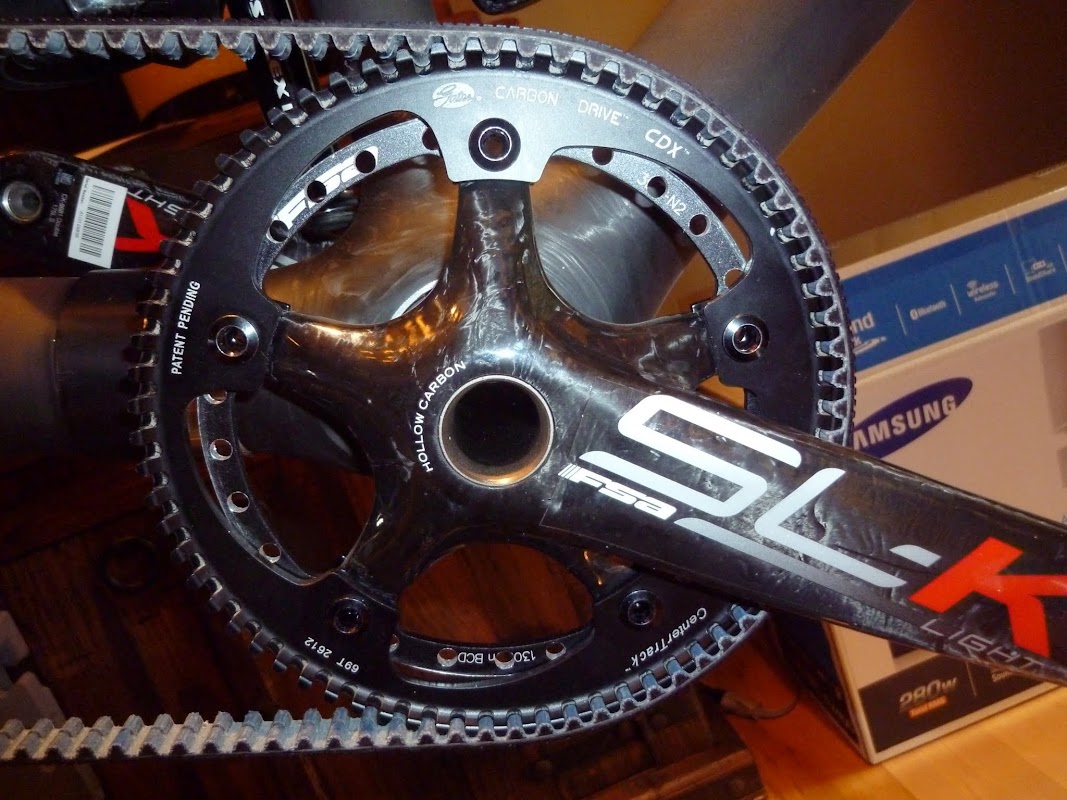
- swapped out the Shimano Ultegra 10sp (r601/603) tandem crankset and in with a set of standard road FSA SL-K Light cranksets (triple rear, double front).
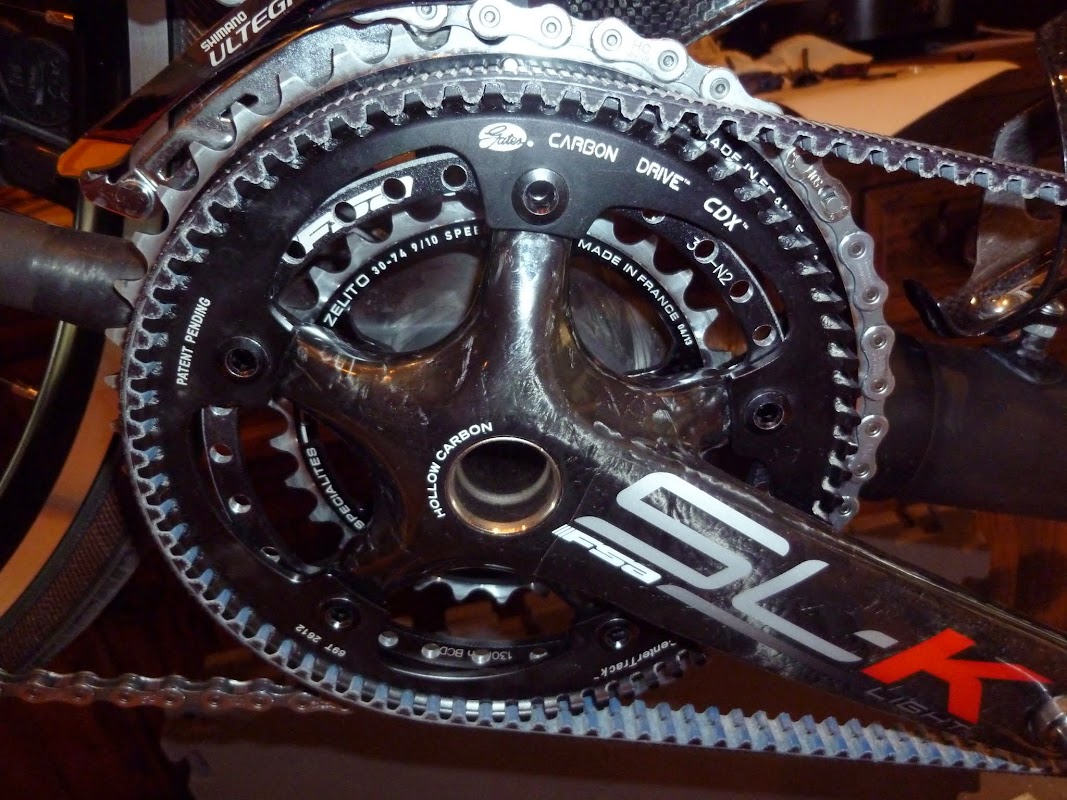
- installed 48/30 TA Specialites chainrings. Problems with big ring as noted here, so changing to Stronglight rings.
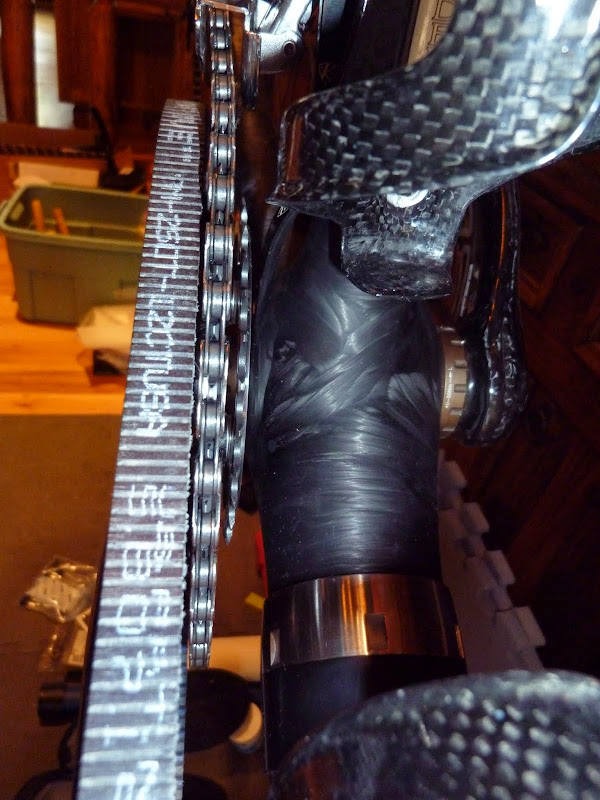
- mounted the Gates CenterTrack as same-side-drive. To achieve the required belt/chain clearance in the rear drive, that meant installing 3.5mm Origin8 chainring spacers behind the CDX rings. Of course, using spacers also requires using longer chainring bolts. Also needed to add 1.0-1.2mm worth of spacers to the granny in order to provide good clearance from the 130BCD bolts.
- modified the Di2 6770 RD with a GS (mid-long) cage from a 6700A. Parts available from Shimano (for $30), or by stripping from a 6700A GS RD ($90+). This cage has a 41T total capacity. Tested successfully with a 11-34T cassette after installing a reversed "B-screw" that had a big enoung screw head to catch the lip of the hanger stop.
- swapped out the draggy Shimano jockey wheels, installed KCNC ceramic pulleys. Used a smaller 10T top pulley (increases clearance for a 34T cog (if/when needed) and a standard sized 11T bottom pulley.
- installed a modified 11-28 cassette (11,13,14,15,16,17,19,21,24,28). The 11T and 21-28T spider is from a Ultegra 10spd cassette I had on hand. The individual 13-19T cogs are borrowed from a SRAM 12-27 cassette, each with a full set of splines to engage the freehub body (unlike the Ultegra 10spd cogs).
- built up some new wheels. Rims: 32 hole, 23mm wide x 28mm tall Kinlin 279 / BikeHubStore 472, hubs: White Ind Mi5 front / Mi6 disc rear. Front is cross-2 DT Aerolite spokes, rear is cross-3 DT Aero Comp spokes. Specific thread about these wheels here.
- installed a TRP Spyer (v2) rear disc caliper
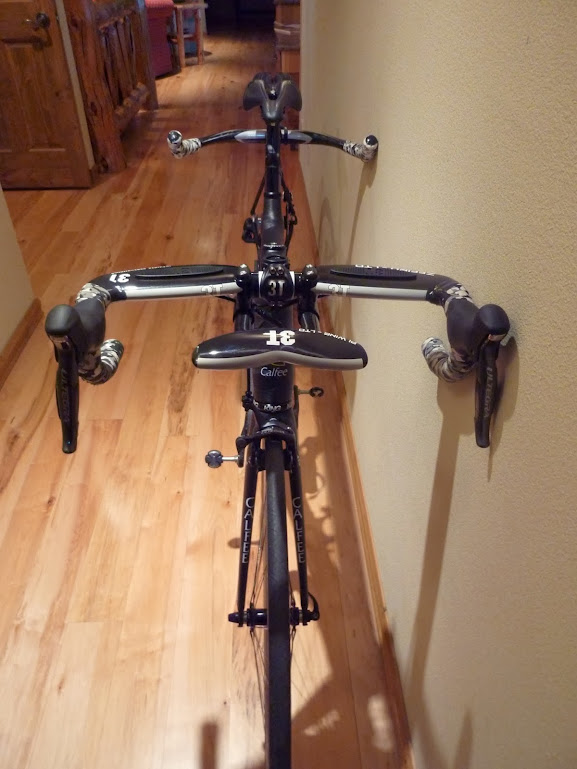
- lastly(?) obtained a funky new set of captain's bars: 3T Zefiro + Pi Wing.
- 2013 Calfee Tetra S&S
https://www.bikeforums.net/showthread...-Tetra-S-amp-S - Google+ album:
https://plus.google.com/photos/10955...IO76qSjuLTNtAE
- Frame: 9.8lbs, fork: 365gm (13oz). Total including Di2 wiring and 3 internal junction boxes: 10.6lbs. Recall, this frame has 3lbs worth of S&S couplers, so you could net that down to 7.6lbs for a Tetra frame + fork without couplers.
- Wheels (bare): 1864gm. Front 788gm, rear 1076gm.
- FSA SL-K Light cranksets, w/BBs, TA chainrings, CDX rings and chainring spacers: front 700gm, rear 864gm.
- Captain's 3T Zefiro LTD bars (42cm) w/Pi Wing: 460gms.
Here are a few snapshots of the initial rebuild (see full Google+ album here):
Other minor adjustments and interests to note:
- rotated the Bushnell/DaVinci eccentric "wings" 180 degrees to put the adjustment/tightening bolt on the non-drive/left side.
- Di2 wiring is using 3 internal junction boxes. 1 at front S&S coupler, 1 at rear coupler, and 1 in the bottom of the rear seat tube. Access to the rear seat tube box is best done via the hole drilled in the BB shell. When installing this box, rotate the box (endo) to prevent any potential cable disconnects. For the junction boxes at the S&S couplers, I wrapped these with closed cell foam to prevent rattling and provide some impact protection to the connections.
- Di2 battery is the Shimano BTR2, installed in the stoker's seatpost. Charging is via a USB port in the front junction box (mounted under the capt stem). I'm using a BTR2 seattube battery holder made by Specialized. Ritchey also makes a simplier design. In either case, no epoxy or duct tape required.
First ride impression:
Well, it's 11F and a blizzard today (Sunday). Yesterday after getting the steerer tube cut at my LBS, I took a few spins around the parking lot, dodging sheets of ice until my bare hands were completely numb. The Di2 shifting was so smooth and quiet (maybe it was the 15-20mph wind @ 15F) that I had to look back to see what was going on. Not exactly a true ride report - yet. Time to head out skiing (I feel a Monday cough coming on
.TBD:
- Fabricate(?) a 45 degree bracket for the new water bottle mount. Idea is to create a similar bottle cage angle as with a normal downtube mount. This will 1) ease stoker access, 2) reduce any dripping from bottle, 3) prevent ejection of bottle.
- Think about replacing the Pi Wing with standard TT extensions, then add Di2 bar end shifters into the mix.
Last edited by twocicle; 01-09-15 at 08:22 PM.
 03-02-14, 03:30 PM
#2
Clipless in Coeur d'Alene
Thread Starter
Di2 access / wire routing ports:
Front downtube...

Rear seat tube...

Rear derailleur...

Rear BB shell...
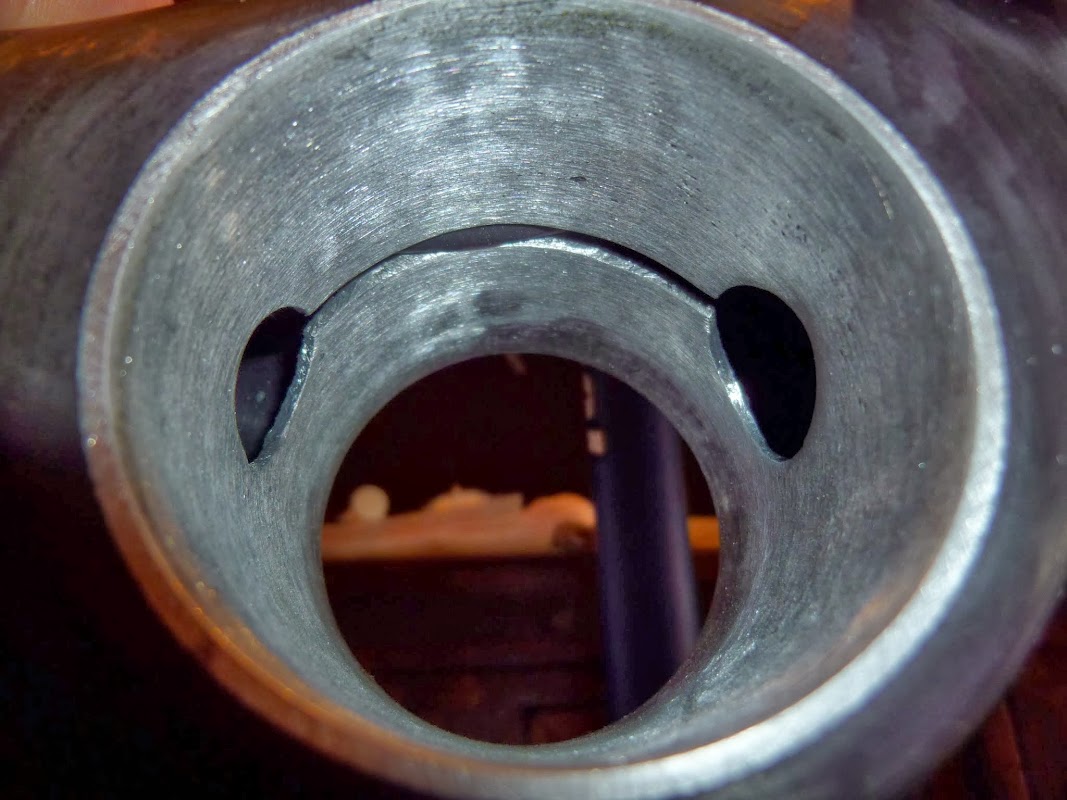
Front (eccentric)...
Di2 connections at captain's handlebars & stem...
Front downtube...
Rear seat tube...
Rear derailleur...
Rear BB shell...
Front (eccentric)...
Di2 connections at captain's handlebars & stem...
Last edited by twocicle; 03-03-14 at 12:43 AM.
03-02-14, 04:22 PM
#3
Senior Member
Join Date: Jan 2008
Location: Ft Worth, TX
Posts: 1,971
Bikes: Custom 650B tandem by Bob Brown, 650B tandem converted from Santana Arriva, Santana Noventa, Boulder Bicycle 700C, Gunnar Sport
Mentioned: 0 Post(s)
Tagged: 0 Thread(s)
Quoted: 23 Post(s)
Likes: 0
Liked 4 Times
in
4 Posts
Very interesting report. Really shows how important component weight is in determining total bike weight. My steel Santana frame went from 11to 9 lbs when we removed the lateral tube. With your fork and components we would have a sub 30 lb bike.
The devil is in the details with a lot of areas that we have decided to spend weight. Example stoker drop bars and triple tandem triple cranks. No regrets as ours is 36 lbs as we like it.
Your rebuild looks great. I like your gearing choice for the double crankset.
If you want a little more even gaps in the low gears Shimano makes a 12 -28 Tiagra 10 speed cassette that you could swap the 12 for an 11 cog. (12,13,14,15,17,19,21,23,25,28). This would cost you about 80 grams of additional weight but might be nice since you might be spending a lot of time in the big ring.
Last edited by waynesulak; 03-02-14 at 04:39 PM.
03-02-14, 06:47 PM
#4
Clipless in Coeur d'Alene
Thread Starter
Very interesting report. Really shows how important component weight is in determining total bike weight. My steel Santana frame went from 11to 9 lbs when we removed the lateral tube. With your fork and components we would have a sub 30 lb bike.
The devil is in the details with a lot of areas that we have decided to spend weight. Example stoker drop bars and triple tandem triple cranks. No regrets as ours is 36 lbs as we like it.
Your rebuild looks great. I like your gearing choice for the double crankset.
If you want a little more even gaps in the low gears Shimano makes a 12 -28 Tiagra 10 speed cassette that you could swap the 12 for an 11 cog. (12,13,14,15,17,19,21,23,25,28). This would cost you about 80 grams of additional weight but might be nice since you might be spending a lot of time in the big ring.
The devil is in the details with a lot of areas that we have decided to spend weight. Example stoker drop bars and triple tandem triple cranks. No regrets as ours is 36 lbs as we like it.
Your rebuild looks great. I like your gearing choice for the double crankset.
If you want a little more even gaps in the low gears Shimano makes a 12 -28 Tiagra 10 speed cassette that you could swap the 12 for an 11 cog. (12,13,14,15,17,19,21,23,25,28). This would cost you about 80 grams of additional weight but might be nice since you might be spending a lot of time in the big ring.
As far as weight goes, My build target was a on-the-road weight of 30lbs. Yeah I cheated with the lightweight horn bars for this initial setup. Not sure if we will revert to stoker drops again... maybe if someone develops a set of real stoker grips @ 100gms.
Other components that added weight were the wheels at +200gm, rear disc brake +100gm(?), and capt TT bars +200gm. +3lbs for the S&S couplers is a big percentage of the frame weight, but a trade off for travel convenience.
Last edited by twocicle; 03-02-14 at 06:50 PM.
03-02-14, 07:08 PM
#5
Senior Member
Twocicle,
Awesome build! Beautiful bike! Thanks for the pictures. I've been ogling them for the last hour. Now I understand what needs to be done with the wire routing through the eccentric. I keep thinking I need to modify the Bushnell essentric, I even ordered an extra one to play with. But, what I really need to do was to cut a grove in the shell. Interesting that Calfee also cut a grove in the rear bottom bracket shell. I have always assumed that there is sufficient room between the shell and the bottom bracket to accommodate the wires. I'll have to look at that again.
CJ
03-02-14, 10:50 PM
#6

Senior Member
Join Date: Nov 2007
Location: Anchorage, Ak
Posts: 620
Bikes: 2015 Calfee Tetra tandem,2016 Calfee Tetra Adventure Tandem, Ventana ECDM 26 mtn tandem, Ventana ECDM 29r full suspension Mtn tandem ,Ventana Fat tire tandem, Calfee Dragon Fly, Santa Cruz Carbon 5010, 907 Whiteout fat tire
Mentioned: 3 Post(s)
Tagged: 0 Thread(s)
Quoted: 57 Post(s)
Likes: 0
Liked 6 Times
in
5 Posts
Twocicle,
Awesome build! Beautiful bike! Thanks for the pictures. I've been ogling them for the last hour. Now I understand what needs to be done with the wire routing through the eccentric. I keep thinking I need to modify the Bushnell essentric, I even ordered an extra one to play with. But, what I really need to do was to cut a grove in the shell. Interesting that Calfee also cut a grove in the rear bottom bracket shell. I have always assumed that there is sufficient room between the shell and the bottom bracket to accommodate the wires. I'll have to look at that again.
CJ
Awesome build! Beautiful bike! Thanks for the pictures. I've been ogling them for the last hour. Now I understand what needs to be done with the wire routing through the eccentric. I keep thinking I need to modify the Bushnell essentric, I even ordered an extra one to play with. But, what I really need to do was to cut a grove in the shell. Interesting that Calfee also cut a grove in the rear bottom bracket shell. I have always assumed that there is sufficient room between the shell and the bottom bracket to accommodate the wires. I'll have to look at that again.
CJ
03-03-14, 12:13 AM
#7
Clipless in Coeur d'Alene
Thread Starter
I think there is room but possibility of pinching a wire putting in the BB in the shell is the reason for the groove plus the wires have to essentially turn 90 degrees in the shell so they would ride over a sharp edge, The groove allows them to make a gradual curve and there is no possibility of rubbing. When Calfee does the build they put a dab of silicone in the groove to hold the wire in place, I'm not sure it is necessary but it is insurance the wire doesn't get caught or pulled. I don't know much about drilling Ti except slow, sharp, lots of pressure and cooling lubricant (apparently olive oil work very well).
Another reason for pulling the wiring was to ensure the new bottle cage bolts on the rear seat tube were not impelling the junction box installed there (Calfee has apparently changed to screw-in bolts rather than using fixed bolts + nuts. The new bolts enter into the seat tube space by quite a bit). The rear internal junction box is now installed safely below the bottle cage bolts, just above the rear BB shell.
I was thinking of moving the seatpost battery forward to the captain's area and reduce the internal junction box count to 2, but could not fit the Di2 wire ends through the slot cut into the eccentric shell... that only accepts a wire thickness and I have no tools to modify that myself. The bigger access holes you see in the eccentric shell do not provide any routing above the shell, so the slot is just a recess for a wire to clear the eccentric itself.
All the wires were loose - no silicone, some anti-rattle "zip ties" but that was all.
Last edited by twocicle; 03-03-14 at 12:26 AM.
03-03-14, 06:14 AM
#8
Likes to Ride Far
Thanks a lot for taking the time to document all of this, it makes very interesting reading and viewing. I have just a couple of comments and questions:
Regarding the Veloplugs: I recommend not using them on any wheels with rim brakes. I've found that because there is then no barrier between most of the metal rim and the inner tube, if you heat up the rim by braking then it is far easier to burst an inner tube than if you use a conventional rim strip. This is due to my experience of only ever having two punctures that appeared to be due to rim heat, both of which were on wheels with veloplugs instead of rim tape. I've also seen one and heard of another incident when other people were using tubeless-ready wheels (and so did not need rim tape) but with inner tubes and again appeared to have heat-caused punctures.
It seems that the direct contact between the tube and metal rim means that the tube will puncture at lower rim temperatures than when you have a rim strip providing a small amount of insulation between the two. I don't have really solid evidence to support this, but my experience is enough for me to decide that for any wheel that is going to be used with a rim brake and an inner tube, I always ensure that there is a solid rim tape installed to give some insulation between the tube and rim. I'm happy to use Veloplugs in my disc-brake only wheels to save a little weight, but not in rim brake wheels. If the veloplugs don't fit snugly so that they keep falling out, then just put some very thin tape all the way around the rim to keep them in (electrical insulation tape works fine for this and weighs almost nothing, the setup is still far less than proper rim tape - but this is no substitute for real rim tape if rim brakes are being used).
Regarding the use of Di2 bar-end shifters, for me this would be one of the biggest advantages of switching to Di2 - having multiple shift buttons. I would install the "climbing" buttons on the bar tops, the bar-end shifters, and the integrated brake/shifters. I'm also pleased to have it finally confirmed that you can get long enough Di2 cables for a tandem by just using multiple junction boxes; I'd asked about this somewhere before but never got an answer.
I also like the crank setup. It is very similar to ours, except that our gearing is adapted for more mountainous riding (we live in Switzerland) and loaded touring, so we have 26 and 42 tooth rings in the inner and middle positions of the triple crank (with an 11-32 10-speed cassette), then the Gates CenterTrack belt in the outside ring position. We're using single-bike Shimano 105 triple cranks (specifically, the 5603 version, which has slightly more clearance behind the crank arm for the belt ring than the newer 5703 cranks do). This also gives us the advantage of being able to easily obtain our preferred crank length of 165mm cranks for front and rear (we have short legs and like to pedal at a high cadence).
We're using the same triple cranks front and rear to make it easy to get the belt line the same on each - how did you achieve the same belt line on the front double cranks as on the rear triple cranks?
I added a 2.5mm spacer behind each right-side external HTII bearing cup to get the chainline slightly further out since we have a 145mm wide rear hub. With the Shimano cranks, this is easy to do because the left-hand crank still installs fine even though it has 2.5mm less axle to go onto, but this probably wouldn't work with most other crank models whose attachment system is different. Our 42 tooth chainring is now lined up pretty close with the center of the cassette, which is pretty ideal. With the inner chainring, we can access about the 7 largest cogs before the chain starts rubbing on the 42-tooth ring, but we don't miss the last few cross-over gears.
One thing that is interesting about your setup with a 48-tooth chaingring is how that ring is so much bigger than the belt-ring. Our 42-tooth chainring is a similar size to the belt ring, which means that I had to space the belt ring out an extra mm so that the chain didn't touch the belt when using the smallest rear cogs with the chain on the 42-tooth ring (even though it was fine when using the lower half of the cassette. Having a chainring that is bigger than the belt ring would avoid this problem, which is something that I had not thought about until I saw it in your photos.
Again, thanks for such an interesting and descriptive post.
03-03-14, 09:15 AM
#9
Member
Join Date: Feb 2014
Location: Olympia, WA
Posts: 43
Bikes: 13 Volagi, 12 Scott Foil 10, 13 Scott Scale, 10 Ridley xfire, 12 Cannondale Tandem, 06 Raliegh Tandem, 10 Stevenson Tandem
Mentioned: 0 Post(s)
Tagged: 0 Thread(s)
Quoted: 0 Post(s)
Likes: 0
Liked 0 Times
in
0 Posts
Twocicle, what a great informative post and it couldn't be more timely given the fact that I'm working on a Calfee build right now. I have a couple of questions:
1) Why TRP Sypre vs. Hy/RD or the new Shimano Hydraulic?
2) Why did you go the route of the right side timing belt ?
3) Did you not like the Translucent Blue ?
4) What would you have done differently if you were building the frame today vs. 2013...
Great Stuff, thanks.
1) Why TRP Sypre vs. Hy/RD or the new Shimano Hydraulic?
2) Why did you go the route of the right side timing belt ?
3) Did you not like the Translucent Blue ?
4) What would you have done differently if you were building the frame today vs. 2013...
Great Stuff, thanks.
03-03-14, 11:52 AM
#10
Senior Member
Awesome, very complete, very detailed article. I am hoping that in a couple of years to upgrade to a new Dragonfly with Di2. This is good information, thanks for posting it.
03-03-14, 01:05 PM
#11
Senior Member
Join Date: Nov 2007
Location: Anchorage, Ak
Posts: 620
Bikes: 2015 Calfee Tetra tandem,2016 Calfee Tetra Adventure Tandem, Ventana ECDM 26 mtn tandem, Ventana ECDM 29r full suspension Mtn tandem ,Ventana Fat tire tandem, Calfee Dragon Fly, Santa Cruz Carbon 5010, 907 Whiteout fat tire
Mentioned: 3 Post(s)
Tagged: 0 Thread(s)
Quoted: 57 Post(s)
Likes: 0
Liked 6 Times
in
5 Posts
twocicle
At the junctions of the wires at the couplers you can actually cut at the connectors in half lengthwise to make them slimmer if you want they work just fine cut in half. that way you can heat shrink wrap the front one and only have to deal with one during assembly and disassembly. I just take the wire and stuff it (carefully)in the frame at the front coupler when the bike is in the case. I made a short coat hanger wire with a hook on it that stays in the case to fish the wire back through the bottom loose tube and connect at the rear couplers when putting the bike back together. The shrink wrap insures you don't have to worry about that connection coming loose. I hope that all made sense it is hard to describe .
At the junctions of the wires at the couplers you can actually cut at the connectors in half lengthwise to make them slimmer if you want they work just fine cut in half. that way you can heat shrink wrap the front one and only have to deal with one during assembly and disassembly. I just take the wire and stuff it (carefully)in the frame at the front coupler when the bike is in the case. I made a short coat hanger wire with a hook on it that stays in the case to fish the wire back through the bottom loose tube and connect at the rear couplers when putting the bike back together. The shrink wrap insures you don't have to worry about that connection coming loose. I hope that all made sense it is hard to describe .
03-03-14, 04:48 PM
#12
Clipless in Coeur d'Alene
Thread Starter
Wow, a lot of Q&A to respond to. In order...
Chris:
Thanks for the feedback on the Veloplugs. Confirms my decision to remove them and use tape instead. For pretty much all non-wire bead tires I can install them by hand without tools. I can do the same, with the Veloplugs, but they required a slightly different technique of holding the tire bead up against the "mounting-side" rim face, otherwise if the tire sat on the plugs it was too tight to mount it.
Adding TT shifters + extension bars + 5-port A-junction box = approx. $500. I'm holding off on that upgrade until the dust settles on the current bills and I have a chance to see how I like the Zefiro bars. I'm not sure if the Ultegra 10spd Di2 can accept both TT shifters and climbing shifters at the same time. Even if it could, I would only use one or the other, not both + brifters, depending on the capt bar setup (TT bars or standard).
Concerning big ring size being a clearance factor, initially I thought so too, but then realized there will always be a clearance issue to solve regardless. The chain will always pass next to the belt, at the top and bottom (at 1 o'clock and 5 o'clock). With the FSA cranks, TA ring and CenterTrack, I had to use 3.5mm spacers to keep the belt and chain from touching each other, and that left around .5-1mm extra clearance for good measure.
I was hoping to be able to get the big ring modified on the inside by adding chainring recesses, but upon further thought found that the chainring would then be too thin at the mounts. Instead, I filed down the upper 1/3 of each bolt head to provide a smoother ramp and prevent the chain from catching on the bolts. Works great.
Lastly, using the middle position of the rear triple cranks and the outer position of the front doubles = same belt line. No special spacing and no cheating the eccentric to one side. The alignment is actually better than it was with the Shimano Ultegra crossover setup previously installed.
One slight cheat I did do was to put the FSA wave washers on the crank side for both front & back cranks as a means to slightly improve the chainline, but it is otherwise dead center for the big ring and cassette middle w/145mm spacing. I couldn't think of any reason why the wave washer should not be put on the drive side... it performs the same function regardless, and moves the drive cranks outboard only a mm or so.
---
Plowhorse:
1. Simplicity is the deciding factor. I've never been a fan of messing with hydraulic fluid, especially when on a tour. Plus I've heard way too many stories of various hydraulic issues (vapor lock, fluid expansion, stuck plungers, etc) that I'm steering clear. Also, I've run rim brakes for years without problem and only toss on the disc setup to play around. We travel light (no loaded touring and a light team) so we don't have a high brake demand.
2. 1st sentence of the OP... experiment, try something new, looks cool, lighter weight, can use standard single bike components instead of harder to find tandem parts.
3. Translucents look great until there is a little wear & tear. Then you see every little hairline dirt/dust scratch. Toss in that we travel every year, it is difficult to keep the finish at the near perfect level we wanted. With the use of UV Protectant once every 6 months, the Calfee nude finish is the most durable of anything. I asked Calfee (Mike Moore) and a couple paint shops about adding extra hardeners, but gave up on that (plus it was more costly). I had this tandem in the LBS on Saturday for the steerer trim, and there were a lot of OMGs and dropped jaws... it looks better nude than painted. This is from a bunch of guys that routinely assemble and ride road/TT/mtn bikes in the same price bracket as this tandem. Bonus, less weight too.
4. First I would build it Di2 ready - no extra cost. I would also build it with a rear X-12 thru axle (142mm spacing, 135mm chainline) and maybe do a thru axle up front + disc too, though I'm still not completely comfortable with the idea of a front dished wheel or that lightweight road disc forks are mature enough yet. Just my feeling. If this tandem was not also our travel setup, then I'd obviously drop the S&S couplers and 3lbs in the process (and save $2500).
---
akexpress (Mark):
I have been contemplating eliminating the junction box at the rear coupler by simply running a longer wire from the box in the rear seat tube all the way up to the box at the front coupler. A single 750mm or 950mm wire might be the ticket. I would leave these boxes uncut, just in case one port somehow gets broken or flakey while on a trip... then there would be 2 other spares remaining in the box. For fishing a wire through the bottom tube... just use a piece of string and leave it tied to the wire. KISS
Speaking of fishing... the Specialized seatpost battery holder does tend to easily push up into the seatpost, which is a pesky thing while trying to snap on the Di2 wire end. My solution was to tie a string around the top end of the battery mount plug and run that down and out through the bottom of the seatpost. This helps to hold the battery in place while pushing up on it, or as a simple method to remove the battery if needed.
Last edited by twocicle; 03-03-14 at 05:02 PM.
03-03-14, 08:16 PM
#13
Senior Member
Join Date: Mar 2010
Location: City of Brotherly Love
Posts: 1,562
Bikes: Raleigh Companion, Nashbar Touring, Novara DiVano, Trek FX 7.1, Giant Upland
Mentioned: 0 Post(s)
Tagged: 0 Thread(s)
Quoted: 22 Post(s)
Likes: 0
Liked 0 Times
in
0 Posts
There's too much paint on the handlebars and cranks.
What about putting the battery in the keel tube?
What about putting the battery in the keel tube?
03-03-14, 09:19 PM
#14
Senior Member
Join Date: May 2013
Posts: 272
Mentioned: 0 Post(s)
Tagged: 0 Thread(s)
Quoted: 28 Post(s)
Likes: 0
Liked 4 Times
in
4 Posts
How about a hanging weight with pedals, tires, tubes, cages, etc, to see how close you really are on true weight as ridden?
Last edited by Bad1; 03-03-14 at 09:25 PM.
03-03-14, 09:33 PM
#15
Clipless in Coeur d'Alene
Thread Starter
Bezalel:
True, the Shimano BTR2 seatpost battery is so small it could be placed in any of the major tubes, especially easy to do with the coupled sections. I'm not sure if it is better to keep the battery tucked safely away in a seatpost (as long as nobody steals the seat/post that is) or bottom tube. For the latter I suppose a bunch of foam wrap would work as a holder.
---
Bad1:
Total weight for complete build (ready to ride) is shown in the OP, just above the first photo.
03-03-14, 11:13 PM
#16
Senior Member
Join Date: Nov 2007
Location: Anchorage, Ak
Posts: 620
Bikes: 2015 Calfee Tetra tandem,2016 Calfee Tetra Adventure Tandem, Ventana ECDM 26 mtn tandem, Ventana ECDM 29r full suspension Mtn tandem ,Ventana Fat tire tandem, Calfee Dragon Fly, Santa Cruz Carbon 5010, 907 Whiteout fat tire
Mentioned: 3 Post(s)
Tagged: 0 Thread(s)
Quoted: 57 Post(s)
Likes: 0
Liked 6 Times
in
5 Posts
Bezalel:
True, the Shimano BTR2 seatpost battery is so small it could be placed in any of the major tubes, especially easy to do with the coupled sections. I'm not sure if it is better to keep the battery tucked safely away in a seatpost (as long as nobody steals the seat/post that is) or bottom tube.
---
Bad1:
Total weight for complete build (ready to ride) is shown in the OP, just above the first photo.
With the new e tube wiring you can mount the battery anywhere you want and could even put it in the handle bar in most bars and just plug it into a port on the A junction box , really up to ones imagination however the seat post works just fine. In the builds I have been doing I have just been wrapping the battery in packing foam and pushed them into the seat post with a zip tie sticking out to remove it by and they stay just fine light and free.For the latter I suppose a bunch of foam wrap would work as a holder. BTW I carry one long spare wire when traveling that I could replace any wire on the bike with if one were to get damaged.
Last edited by akexpress; 03-03-14 at 11:16 PM. Reason: added info
03-03-14, 11:54 PM
#17
Senior Member

Join Date: Dec 2003
Location: Tucson, AZ
Posts: 11,016
Bikes: Custom Zona c/f tandem + Scott Plasma single
Mentioned: 3 Post(s)
Tagged: 1 Thread(s)
Quoted: 77 Post(s)
Likes: 0
Liked 19 Times
in
11 Posts
Have used Veloplugs on our Zona tandem wheels for 40,000 miles. Did put a small bit of tape over each plug.
Easy to mount/dismount tires without any levers.
Pedal on!
Rudy and Kay/zonatandem
Easy to mount/dismount tires without any levers.
Pedal on!
Rudy and Kay/zonatandem
03-04-14, 01:25 PM
#18
Clipless in Coeur d'Alene
Thread Starter
Bryan
With the new e tube wiring you can mount the battery anywhere you want and could even put it in the handle bar in most bars and just plug it into a port on the A junction box , really up to ones imagination however the seat post works just fine. In the builds I have been doing I have just been wrapping the battery in packing foam and pushed them into the seat post with a zip tie sticking out to remove it by and they stay just fine light and free.For the latter I suppose a bunch of foam wrap would work as a holder. BTW I carry one long spare wire when traveling that I could replace any wire on the bike with if one were to get damaged.
With the new e tube wiring you can mount the battery anywhere you want and could even put it in the handle bar in most bars and just plug it into a port on the A junction box , really up to ones imagination however the seat post works just fine. In the builds I have been doing I have just been wrapping the battery in packing foam and pushed them into the seat post with a zip tie sticking out to remove it by and they stay just fine light and free.For the latter I suppose a bunch of foam wrap would work as a holder. BTW I carry one long spare wire when traveling that I could replace any wire on the bike with if one were to get damaged.
I've already ordered a couple long wires (850mm and 1000mm). The first one is to redo the run from the rear seatube junction box all the way to the front coupler box, eliminating the rear couple junction box (1 few box and cable - less is probably better - KISS). The second wire is for a travel spare as you noted.
While I was doing initial Di2 research and putting together my parts list, these links were very helpful in better understanding the configuration requirements:
- https://glorycycles.blogspot.com/2013...onversion.html
- https://carltonbale.com/shimano-di2-e...-need-to-know/
- https://www.parktool.com/blog/repair-...installation-1
- https://si.shimano.com/#seriesList/51 (Shimano Dealer's Manual / Users Manual repository)
Last edited by twocicle; 03-06-14 at 10:38 AM. Reason: added research links
03-09-14, 01:26 AM
#19
Clipless in Coeur d'Alene
Thread Starter
For the new stoker bottle cage mount, we now have a "ICE Water Bottle Cage Riser" (see: icetrikes.co, or this doc) instead of fabricating one myself. The riser is a little on the heavy side for what it is, but functional and stable. The Arundel Sideloader cages are now mounted for left side access to keep stoker hands away from the right-side drive. Linda likes the new bottle proximity and is dealing with using her left hand to grab a bottle... minor inconvenience.
Here's a couple pics of the new cage mount...

First ride impressions:
Maiden voyage on this new build was today with temps reaching 55F though it didn't feel like it. We have done this same photo stop for 3 years in a row, but this is the first one with ice still on Fernan Lake (almost entirely frozen over). Not the best of photos with the back lighting + gray skies and all:

Everything worked flawlessly and the Di2 shifting was SMOOOOOOOOTH in spite of using an old Ultegra chain from mid-last season (a temporary setup with a loose quick-connect to help with easy changouts while doing frequent reassemblies). It will take a little more training for me to unlearn my manual shifting habits. No problem though, and pleased with the precise shifting. I also spent a good amount of time using the TT bars which are quite comfortable and stable.
The new wheels are rock solid, but will need more time & opportunity to rail these once the roads are cleared of winter grim & rock. Also need more time to dial in the optimal tire pressure. Today we had the 25mm tires @ 106psi (down from 115-118psi on previous skinny rims), which still felt a little too firm. It was our first tandem ride of the year, so the impression may be due to our soft butts.
Here's a couple pics of the new cage mount...
First ride impressions:
Maiden voyage on this new build was today with temps reaching 55F though it didn't feel like it. We have done this same photo stop for 3 years in a row, but this is the first one with ice still on Fernan Lake (almost entirely frozen over). Not the best of photos with the back lighting + gray skies and all:
Everything worked flawlessly and the Di2 shifting was SMOOOOOOOOTH in spite of using an old Ultegra chain from mid-last season (a temporary setup with a loose quick-connect to help with easy changouts while doing frequent reassemblies). It will take a little more training for me to unlearn my manual shifting habits. No problem though, and pleased with the precise shifting. I also spent a good amount of time using the TT bars which are quite comfortable and stable.
The new wheels are rock solid, but will need more time & opportunity to rail these once the roads are cleared of winter grim & rock. Also need more time to dial in the optimal tire pressure. Today we had the 25mm tires @ 106psi (down from 115-118psi on previous skinny rims), which still felt a little too firm. It was our first tandem ride of the year, so the impression may be due to our soft butts.
Last edited by twocicle; 03-09-14 at 03:29 PM.
03-09-14, 05:38 AM
#20
Senior Member
Join Date: May 2008
Location: Royal Palm Beach, Florida
Posts: 1,236
Bikes: 2006 Co-Motion Roadster (Flat Bars, Discs, Carbon Fork), Some 1/2 bikes and a couple of KTM's
Mentioned: 2 Post(s)
Tagged: 0 Thread(s)
Quoted: 28 Post(s)
Likes: 0
Liked 1 Time
in
1 Post
I would agree with this. Calfee has the skill to build a simple trap door setup that would easily house the battery, situate the weight lower, and likely have more concise wire runs that are a direct path to where it is needed.
The bike sounds and looks very nice.
Shame about the fork, but pretty typical of what I see when accomplishing repairs on carbon bikes.
Couple weeks until spring.
PK
The bike sounds and looks very nice.
Shame about the fork, but pretty typical of what I see when accomplishing repairs on carbon bikes.
Couple weeks until spring.
PK
03-09-14, 01:30 PM
#21
Clipless in Coeur d'Alene
Thread Starter
I would agree with this. Calfee has the skill to build a simple trap door setup that would easily house the battery, situate the weight lower, and likely have more concise wire runs that are a direct path to where it is needed.
The bike sounds and looks very nice.
Shame about the fork, but pretty typical of what I see when accomplishing repairs on carbon bikes.
Couple weeks until spring.
PK
The bike sounds and looks very nice.
Shame about the fork, but pretty typical of what I see when accomplishing repairs on carbon bikes.
Couple weeks until spring.
PK
Do you realize the BTR2 seatpost battery is only ~56gms? It is very tiny and so the weight is of no consequence.
As for battery location as far as Di2 configuration is concerned, probably having battery placement as close to the derailleurs as possible is the best setup re: DC current degradation over longer wire runs. FWIW, I could reduce the installed seatpost battery 750mm wire to a 600mm length. Moving the battery to the bottom tube would likely use a 400mm.
Regarding what is typically hidden on carbon frames, the head mechanic at my LBS said he has seen some nuded (various brands) that had huge amounts of filler throughout. Luckily Calfee did a great job building our frame and only the nuded ENVE forks have the filler revealed in a less than appealing manner.
Last edited by twocicle; 03-09-14 at 01:38 PM.
03-09-14, 08:57 PM
#22
Senior Member
Join Date: May 2008
Location: Royal Palm Beach, Florida
Posts: 1,236
Bikes: 2006 Co-Motion Roadster (Flat Bars, Discs, Carbon Fork), Some 1/2 bikes and a couple of KTM's
Mentioned: 2 Post(s)
Tagged: 0 Thread(s)
Quoted: 28 Post(s)
Likes: 0
Liked 1 Time
in
1 Post
Do you realize the BTR2 seatpost battery is only ~56gms? It is very tiny and so the weight is of no consequence.
As for battery location as far as Di2 configuration is concerned, probably having battery placement as close to the derailleurs as possible is the best setup re: DC current degradation over longer wire runs. FWIW, I could reduce the installed seatpost battery 750mm wire to a 600mm length. Moving the battery to the bottom tube would likely use a 400mm.
Regarding what is typically hidden on carbon frames, the head mechanic at my LBS said he has seen some nuded (various brands) that had huge amounts of filler throughout. Luckily Calfee did a great job building our frame and only the nuded ENVE forks have the filler revealed in a less than appealing manner.
Calfee frames are not molded, which is a great for obtaining a finish of their choice as they are built. So yes, I agree that a Calfee will have a nice finish.
Regardless you have a nice machine and I wish you a safe riding season.
PK
03-09-14, 09:43 PM
#23
Clipless in Coeur d'Alene
Thread Starter
My 2012 Specialized Tarmac SL4 S-Works with internal mechanical cable routing, is also Di2 ready, but no compartments provided in that frame, just access points. I like the internal cable routing a lot as it makes easy work of keeping a bike clean. This is one of the reasons I decided to change the tandem over to Di2 and get rid of the glossy paint... two years of tandem tours with a lot of rain and crud.
Last edited by twocicle; 03-09-14 at 09:52 PM.
03-15-14, 02:14 PM
#24
Clipless in Coeur d'Alene
Thread Starter
With 3.5mm of chainring spacers needed for sufficient belt-chain clearance, the CDX rings are sitting outside the spider arm shoulders, so there is not a lot of support there at the moment. I haven't noticed any issues yet, just looking to improve the install.
Borrowing an idea from these trackie monsters:


Searching online I couldn't find a 130bcd chain/bash guard small enough to fit under the CDX teeth, so I'm starting with a 130bcd 39t ring which does fit as-is, but removing the teeth just to clean up the finish look as in the last photo above.
I had a FB chat with one of the trackie guys who told me about their custom machining for the spacer ring. These guys can put out > 2000 watts, which is one of the reasons why they reinforced their same-side drive in this manner. It seems like a good idea to reinforce things... my 98lb stoker being such a powerhouse and all
Borrowing an idea from these trackie monsters:
Searching online I couldn't find a 130bcd chain/bash guard small enough to fit under the CDX teeth, so I'm starting with a 130bcd 39t ring which does fit as-is, but removing the teeth just to clean up the finish look as in the last photo above.
I had a FB chat with one of the trackie guys who told me about their custom machining for the spacer ring. These guys can put out > 2000 watts, which is one of the reasons why they reinforced their same-side drive in this manner. It seems like a good idea to reinforce things... my 98lb stoker being such a powerhouse and all
Last edited by twocicle; 03-15-14 at 02:24 PM.
03-25-14, 12:09 PM
#25
Clipless in Coeur d'Alene
Thread Starter
I'm still streamlining a couple things, but here is my implementation of using chainrings as spacers for the same-side Gates CenterTrack setup.
The key thing is that a minimum of 3.5mm worth of spacers are needed to move the Gates ring out away from the rear big chainring. By using a regular chainring (which are typically ~3mm thick) plus a 0.6mm chainring spacer (basically a washer), this is the best way I can think of to provide maximum support for the chainring bolts and prevent any extra shear forces on the crankarm spider tabs. The front Gates ring is spaced to match/align with the rear belt ring. Chainring bolts used are from the Truvativ bolt kit, which provides 12.5mm long nuts... adequate to engage everything.
Front rings:

Rear rings:


The "spacer rings" used above also help to center the Gates ring, because with the +3.5/3.6mm spacing provided, the Gates ring sits outboard, beyond the spider arm shoulders. I added some Race Face crank arm tab spacers on the inside of the front cranks for a clean finishing touch instead of using just round washers/spacers.
All in all, I think this is a robust implementation that is easy to install and maintain, and a definite improvement over using just chainring spacers.
More photos posted here.
The key thing is that a minimum of 3.5mm worth of spacers are needed to move the Gates ring out away from the rear big chainring. By using a regular chainring (which are typically ~3mm thick) plus a 0.6mm chainring spacer (basically a washer), this is the best way I can think of to provide maximum support for the chainring bolts and prevent any extra shear forces on the crankarm spider tabs. The front Gates ring is spaced to match/align with the rear belt ring. Chainring bolts used are from the Truvativ bolt kit, which provides 12.5mm long nuts... adequate to engage everything.
Front rings:
Rear rings:
The "spacer rings" used above also help to center the Gates ring, because with the +3.5/3.6mm spacing provided, the Gates ring sits outboard, beyond the spider arm shoulders. I added some Race Face crank arm tab spacers on the inside of the front cranks for a clean finishing touch instead of using just round washers/spacers.
All in all, I think this is a robust implementation that is easy to install and maintain, and a definite improvement over using just chainring spacers.
More photos posted here.
Last edited by twocicle; 03-26-14 at 10:45 PM.