


Hypercracker (or similar) or ChainWhip when touring?
 08-06-09, 10:38 PM
#1
Senior Member
Thread Starter
Join Date: Oct 2008
Location: Vancouver, BC
Posts: 87
Bikes: Surly LHT 54cm, Thorn Nomad Mk2
Mentioned: 0 Post(s)
Tagged: 0 Thread(s)
Quoted: 0 Post(s)
Likes: 0
Liked 0 Times
in
0 Posts
Hypercracker (or similar) or ChainWhip when touring?
Just doing some final preparations for Phase 2 of my plan for getting away from working for a bit - and I've come to the freewheel/chainwhip battle in my mind. Ideally for size the Hypercracker or whatever similar tools would work, at a higher price, would I get any other benefit to just having a chainwhip and a seperate remover?
 08-06-09, 10:51 PM
#2
Banned
Join Date: Aug 2005
Posts: 5,115
Mentioned: 0 Post(s)
Tagged: 0 Thread(s)
Quoted: 0 Post(s)
Likes: 0
Liked 2 Times
in
1 Post
For me, I check the hubs before I leave. I had an experience once where I felt like going in there on a hub with only 1K on it, and when I got in there discovered some mud, as well as mostly grease keeping things running ok. The hube was protected by a rubber boot, and it engaged a groove that was bent out of shape, therefor no seal. So it pays to look before abig trip even without any real reason.
Anyway, once all that is in place, my main fear is spokes. With properly stress relieved wheels I have never broken one, but it coould happen therefore, I carry a carbon spoke, and some ground back regular spokes (and more recently am moving to Rohloff). So I don't really need an HP for the spoke thing.
So overall I don't carry this stuff, but if you need to, then I think the main reason for carrying a whip beyond a spoke change was to fix freewheels in you ran those. With cassetes that isn't an issue. I think that is why I have two whips in my tool box, one unopened. My current ride is a freewheel bike, but I have so many freewheels I don't think I will ever rebuild one.
08-07-09, 05:21 AM
#3
Senior Member
Join Date: May 2006
Location: San Diego
Posts: 1,435
Bikes: IF steel deluxe 29er tourer
Mentioned: 0 Post(s)
Tagged: 0 Thread(s)
Quoted: 0 Post(s)
Likes: 0
Liked 0 Times
in
0 Posts
I carry a hypercracker, but it's not been out of the plastic bag it came in. Never broke a spoke either. I use my chain whip at home, of course.
08-07-09, 05:35 AM
#4
Senior Member
Just doing some final preparations for Phase 2 of my plan for getting away from working for a bit - and I've come to the freewheel/chainwhip battle in my mind. Ideally for size the Hypercracker or whatever similar tools would work, at a higher price, would I get any other benefit to just having a chainwhip and a seperate remover?

In case you happen to use Campagnolo cassettes, the HyperCracker comes in a Campy model and the Unior does not.
A regular cassette lockring remover is already heavier than either and when you add chain whips, and a big wrench for the cassette lockring remover the weight becomes very prohibitive IMO. I can't imagine carrying all that on tour.
08-07-09, 06:28 AM
#5
A little North of Hell
Join Date: Mar 2006
Posts: 4,892
Mentioned: 0 Post(s)
Tagged: 0 Thread(s)
Quoted: 71 Post(s)
Likes: 0
Liked 4 Times
in
4 Posts
hypercracker
I still have my Pamir, unused.
Custom made for Jobst Brandt. https://pardo.net/bike/pic/fail-029/index.html

Custom made for Jobst Brandt. https://pardo.net/bike/pic/fail-029/index.html
08-07-09, 07:36 AM
#6
Senior Member
Join Date: May 2006
Location: San Diego
Posts: 1,435
Bikes: IF steel deluxe 29er tourer
Mentioned: 0 Post(s)
Tagged: 0 Thread(s)
Quoted: 0 Post(s)
Likes: 0
Liked 0 Times
in
0 Posts
I'm just stunned that someone took the time to analyze and document to such an extent all of the available (and unavailable) portable tools for removng cassettes. Hooray for the internet! And Hooray for those who make it work!
08-07-09, 08:11 AM
#7
sniffin' glue

Join Date: Jul 2007
Location: Seattle
Posts: 3,177
Bikes: Surly crosscheck ssfg, Custom vintage french racing bike, Bruce Gordon Rock & Road
Mentioned: 0 Post(s)
Tagged: 0 Thread(s)
Quoted: 2 Post(s)
Likes: 0
Liked 0 Times
in
0 Posts
Personally I would just make sure the wheel is trued and tensioned correctly before the tour and carry a fiberfix spoke for an emergency situation.
08-07-09, 08:36 AM
#8
Senior Member
Join Date: Aug 2006
Location: Central Coast, CA
Posts: 3,392
Bikes: Surly LHT, Specialized Rockhopper, Nashbar Touring (old), Specialized Stumpjumper (older), Nishiki Tourer (model unknown)
Mentioned: 0 Post(s)
Tagged: 0 Thread(s)
Quoted: 1 Post(s)
Likes: 0
Liked 2 Times
in
2 Posts
I carry the Hypercracker. I used it when my lockring came off. It was well designed and worked well.
I haven't had any broken spokes since I started carrying it, but I had a previous tour ruined by broken spokes. It's light enough that I'll be carrying it and a couple of spare spokes on every tour henceforth.
I haven't had any broken spokes since I started carrying it, but I had a previous tour ruined by broken spokes. It's light enough that I'll be carrying it and a couple of spare spokes on every tour henceforth.
08-07-09, 08:58 AM
#9
-

There is a downside to these weight and space saving devices versus chainwhip, cassette cracker and wrench.
They put a lot of force into your chainstay (or dropout) in the course of being used to break the cassette lock ring free. This particular joint (chainstay-to-dropout on drive side) is also the one most likely to break under normal use, so adding more damage to it seems like a bad idea.
You'll almost always get paint/powdercoat damage to the underside of the chainstay with the Pamir tool. I added extra padding (duct tape) and still got paint damage. I've used it on two occasions, (first one was test in garage) and same result, finish damaged.
Also, the Pamir tool may not fit your bike well depending on the chainstay tubing diameter and angle at which it departs from the dropout.
The NBT2 fits in the dropout. I've read 2 reports (one with pics) where proper use of the NBT2 bent the entire dropout (steel) so that the derailleur was misaligned. This is potentially serious damage since replacing a dropout may cost several hundred dollars after refinish. In a way, you could think of an NBT2 as the ideal dropout destroyer.
If your lockring is not too tight you may get away undamaged.
Of all the tools on the pardo.net link, I think the Pamir is your safest bet. It's long lever arm results in the least amount of force being applied to the bike frame. They are difficult to find.
Something to think about.
I think Zoltani's comment is probably the best route: good wheels and a fiberfix spoke.
08-07-09, 10:25 AM
#10
Senior Member
Join Date: Oct 2008
Posts: 537
Mentioned: 0 Post(s)
Tagged: 0 Thread(s)
Quoted: 0 Post(s)
Likes: 0
Liked 0 Times
in
0 Posts
If you carry one of these tools, then go to the trouble of removing the lockring at home in the garage with your chainwhip. Then grease the threads and reinstall it with a torque wrench, making sure it's not too tight.
08-07-09, 10:53 AM
#11
Senior Member
Join Date: Sep 2007
Location: Gaseous Cloud around Uranus
Posts: 3,741
Mentioned: 0 Post(s)
Tagged: 0 Thread(s)
Quoted: 38 Post(s)
Likes: 0
Liked 11 Times
in
7 Posts
I carry spokes that have a dogleg bent into them.No need to remove the cassette to install a spoke.
08-07-09, 11:09 AM
#12
Member

Join Date: Feb 2006
Location: Jasper Alberta Canada
Posts: 27
Bikes: Karate Monkey, Jake, Steamroller
Mentioned: 0 Post(s)
Tagged: 0 Thread(s)
Quoted: 0 Post(s)
Likes: 0
Liked 0 Times
in
0 Posts
https://www.jastein.com/Html/Tools_for_Wheels.htm
There's a tool here that should do the job and save you some weight. Your other option is the park pedal wrench/chainwhip along with a hyperglide tool. Light enough for a portable toolkit.
There's a tool here that should do the job and save you some weight. Your other option is the park pedal wrench/chainwhip along with a hyperglide tool. Light enough for a portable toolkit.
08-07-09, 12:05 PM
#13
Senior Member
- Do you use the " dog legged" spokes permanently, until you reach a bike shop, or until you are home? If the last... even if that is thousands of miles?
- Do you find that they need much attention after installation due to seating in?
- Can you describe how you create the bends?
08-07-09, 01:12 PM
#14
Senior Member
Join Date: Sep 2007
Location: Gaseous Cloud around Uranus
Posts: 3,741
Mentioned: 0 Post(s)
Tagged: 0 Thread(s)
Quoted: 38 Post(s)
Likes: 0
Liked 11 Times
in
7 Posts
The repair spokes will last as long as a standard spoke.You can make all of your spokes that way if you want.
There is no more seating in than a standard spoke.
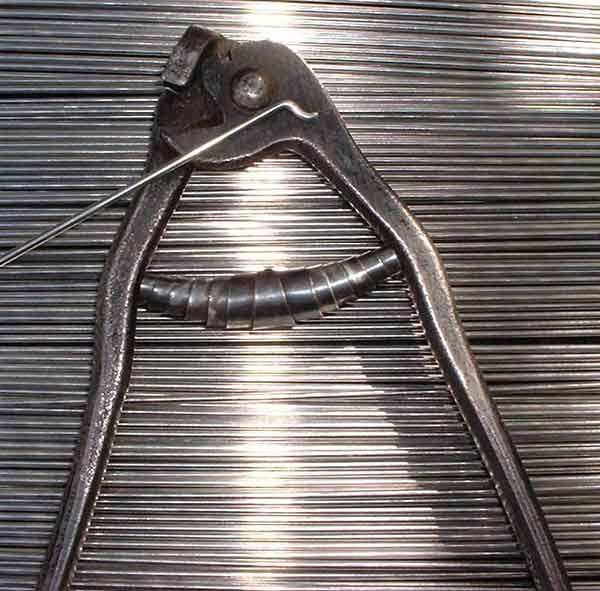
They used to make pliers that made the dog leg but I have not seen any for a loooooong time.You buy spokes that are too long,cut the heads off.Then in the end you cut off,you bent a dog leg at the right place(practice makes perfect).There will be a little tail at the end of the dog leg that keeps the spoke from staightening out.It rests against the hub flange.That's it,repair spokes for about .80 cents
There is no more seating in than a standard spoke.
They used to make pliers that made the dog leg but I have not seen any for a loooooong time.You buy spokes that are too long,cut the heads off.Then in the end you cut off,you bent a dog leg at the right place(practice makes perfect).There will be a little tail at the end of the dog leg that keeps the spoke from staightening out.It rests against the hub flange.That's it,repair spokes for about .80 cents

 08-07-09, 01:42 PM
#16
Senior Member
Join Date: Oct 2006
Location: Northeast Ohio
Posts: 160
Bikes: 2011 Co-Motion Nor'Wester, 2007 Co-Mo Speedster copilot tandem
Mentioned: 0 Post(s)
Tagged: 0 Thread(s)
Quoted: 0 Post(s)
Likes: 0
Liked 0 Times
in
0 Posts
Wow! Thats clever. Pictures, please.
This could be handy solution for us. We are touring with tandem and I would need to carry both a cassette cracker as well as a tool to remove the drum brake on the non-drive side.
I guess the bend had to be in exactly the right place, otherwise not long enough to reach the nipple, or too long and not enough threads?
08-07-09, 02:15 PM
#17
Senior Member
Join Date: Sep 2007
Location: Gaseous Cloud around Uranus
Posts: 3,741
Mentioned: 0 Post(s)
Tagged: 0 Thread(s)
Quoted: 38 Post(s)
Likes: 0
Liked 11 Times
in
7 Posts
Yep,those are the pliers.I used to own a pair of them 40+ years ago when I worked at bike shops.I wouldn't mind having another pair now.
It's just getting the bend in the right place.After the first couple,you'll figure it out.I could teach a monkey to make em.
It's just getting the bend in the right place.After the first couple,you'll figure it out.I could teach a monkey to make em.
08-07-09, 04:04 PM
#18
Senior Member
Join Date: Dec 2006
Location: Banff, Ab
Posts: 135
Bikes: Norco Fluid 3, Cannondale R800, Trek 7.3FX
Mentioned: 0 Post(s)
Tagged: 0 Thread(s)
Quoted: 0 Post(s)
Likes: 0
Liked 0 Times
in
0 Posts
I'm pretty sure I got the idea from here originally, so there should be pictures somewhere, but I'm too lazy to look for them. I have replaced the chain whip with a piece of nylon webbing that weighs next to nothing. Tie a knot in the end that you can jam into the cassette, then wrap it around the cassette and back to the rim and around the rim a couple of times to hold it tight. Fills the same purpose as the chain whip. I already carry a small to medium adjustable wrench for other repairs, so really all I am carrying extra is the cassette removal tool. Simple and light weight solution that never contacts your frame.
08-07-09, 08:53 PM
#19

Dirt Bomb

Join Date: Aug 2006
Location: Illinois
Posts: 2,861
Mentioned: 64 Post(s)
Tagged: 0 Thread(s)
Quoted: 5453 Post(s)
Liked 287 Times
in
238 Posts
I'm pretty sure I got the idea from here originally, so there should be pictures somewhere, but I'm too lazy to look for them. I have replaced the chain whip with a piece of nylon webbing that weighs next to nothing. Tie a knot in the end that you can jam into the cassette, then wrap it around the cassette and back to the rim and around the rim a couple of times to hold it tight. Fills the same purpose as the chain whip. I already carry a small to medium adjustable wrench for other repairs, so really all I am carrying extra is the cassette removal tool. Simple and light weight solution that never contacts your frame.
")
edit: Do you mean webbing or flat strap, like a nylon belt?
08-07-09, 09:41 PM
#20
Senior Member
Join Date: Dec 2006
Location: Banff, Ab
Posts: 135
Bikes: Norco Fluid 3, Cannondale R800, Trek 7.3FX
Mentioned: 0 Post(s)
Tagged: 0 Thread(s)
Quoted: 0 Post(s)
Likes: 0
Liked 0 Times
in
0 Posts
I think you would want webbing rather than cord. Essentially you want the teeth of the cassette to bite into the material to stop it from turning. I would think there would be more chance of the cord slipping between the rings and not getting a good purchase. A nylon belt would probably work in a pinch, but it might be a little too stiff. I just cut an old retired climbing sling for mine, but you can buy it off a reel by the foot at any climbing store, and probably lots of other places. It looks like this https://www.mec.ca/Products/product_d...=1249702469205 It even serves dual purpose, as I wrap my tools up in a rag and secure the package with the webbing.
08-08-09, 12:26 AM
#21

If you have a multitool with a chain tool component, remove the chain, loop around the cassette and hold with a rag.
Personally I'd forget cassette removal and carry a couple of kevlar spokes and get to the nearest bike shop for a proper repair.
If you're not traveling in the third world or real outback don't carry any more than a multitool. Lugging tools just increases your weight and makes it more likely that you'll break a spoke.
08-08-09, 12:29 PM
#22
Senior Member
Join Date: Jan 2008
Posts: 123
Bikes: 80's Marin, 90's Dawes, ALAN & various unicycles.
Mentioned: 0 Post(s)
Tagged: 0 Thread(s)
Quoted: 0 Post(s)
Likes: 0
Liked 0 Times
in
0 Posts
I think you would want webbing rather than cord. Essentially you want the teeth of the cassette to bite into the material to stop it from turning. I would think there would be more chance of the cord slipping between the rings and not getting a good purchase. A nylon belt would probably work in a pinch, but it might be a little too stiff. I just cut an old retired climbing sling for mine, but you can buy it off a reel by the foot at any climbing store, and probably lots of other places. It looks like this https://www.mec.ca/Products/product_d...=1249702469205 It even serves dual purpose, as I wrap my tools up in a rag and secure the package with the webbing.
08-08-09, 07:17 PM
#23
Senior Member
Join Date: Oct 2008
Posts: 537
Mentioned: 0 Post(s)
Tagged: 0 Thread(s)
Quoted: 0 Post(s)
Likes: 0
Liked 0 Times
in
0 Posts
It seems to me that all of these homemade solutions would be no lighter, not much cheaper, and work worse than one of the standard solutions.
08-08-09, 11:29 PM
#24
Senior Member
Join Date: Dec 2006
Location: Banff, Ab
Posts: 135
Bikes: Norco Fluid 3, Cannondale R800, Trek 7.3FX
Mentioned: 0 Post(s)
Tagged: 0 Thread(s)
Quoted: 0 Post(s)
Likes: 0
Liked 0 Times
in
0 Posts
Cheaper: ummm, cheaper than free?
Works better: ummm, it works, so not sure how much more I can ask of it...
Bottom line I guess is we should all carry whatever we feel comfortable with.
