


Making Your Own Studded Tyres
 11-30-10, 03:44 PM
#76
Stealing Spokes since 82'

Join Date: Jan 2010
Location: Boy-z, Ideeeho
Posts: 1,875
Bikes: The always reliable kuwie
Mentioned: 0 Post(s)
Tagged: 0 Thread(s)
Quoted: 0 Post(s)
Likes: 0
Liked 0 Times
in
0 Posts
I had a flat on my studded this morning, seems my liner i made didnt work, this go around i used the old tube as a liner, its a thick "goat head proof" which is a whole other subject but i also think my tire was to blame its an old specialized ground control and the sidewalls have seen better days im gonna run it till it falls apart and get another, i like the tread on those kendas fiver and might get me one. My brand new CST's just dont have the lugs shaped right to put screws through.
 12-07-10, 08:09 AM
#77
Member
Join Date: Nov 2010
Location: Madison, WI
Posts: 31
Mentioned: 0 Post(s)
Tagged: 0 Thread(s)
Quoted: 0 Post(s)
Likes: 0
Liked 0 Times
in
0 Posts
The nail studs worked great on a 20m ride last night, over snow and ice. Still had trouble with half frozen slush, but nothing can overcome that. I was having a little bit of icee buildup on the tires, and I will be reporting back on attempts at applying a release agent to the rubber. My plan is to only apply the substance to half the tire, so I can see the differance, if any, when I'm riding. Haven't decided what yet.
12-09-10, 09:22 AM
#79
Member
Join Date: Nov 2010
Location: Madison, WI
Posts: 31
Mentioned: 0 Post(s)
Tagged: 0 Thread(s)
Quoted: 0 Post(s)
Likes: 0
Liked 0 Times
in
0 Posts
Thinking about a silicon spray, or one of those snowblower sprays. The snowblower spray looks like a good idea for wheelwells and fenders. The silicon will be easy to apply to rubber, and I know that it will not damage. Klister looks hard to apply.
Last edited by JAHowe; 12-09-10 at 09:23 AM. Reason: add
12-10-10, 08:23 AM
#80
Member
Join Date: Nov 2010
Location: Madison, WI
Posts: 31
Mentioned: 0 Post(s)
Tagged: 0 Thread(s)
Quoted: 0 Post(s)
Likes: 0
Liked 0 Times
in
0 Posts
Nail Studs
We had a sticky wet snow during rush hour hear in Madison last evening. I passed two #6 buses in four blocks (normaly 30min apart), and made it to work in about 18min (10min norm.) To my surprise, the front tire, with a centerline of studs, seemed to perform better than the rear tire, with offset studes. Was I noticing a difference between the stud pattern or it this a tire position issue? It would have been a perfect night for a release agent test, snow build up was an issue, but I am out of silicon based spray.
We had a sticky wet snow during rush hour hear in Madison last evening. I passed two #6 buses in four blocks (normaly 30min apart), and made it to work in about 18min (10min norm.) To my surprise, the front tire, with a centerline of studs, seemed to perform better than the rear tire, with offset studes. Was I noticing a difference between the stud pattern or it this a tire position issue? It would have been a perfect night for a release agent test, snow build up was an issue, but I am out of silicon based spray.
12-10-10, 09:53 PM
#81
Senior Member
Join Date: Mar 2008
Posts: 92
Mentioned: 0 Post(s)
Tagged: 0 Thread(s)
Quoted: 0 Post(s)
Likes: 0
Liked 0 Times
in
0 Posts
I can't wait to try this! I'm curious about the ones with the screw heads on the outside. It seems like that would make for less rolling resistance and result in beefier studs that wouldn't wear down as fast. What if you drove screws straight through the lugs, into the tire from the outside, then cut off and filed down any metal that was poking through? With the help of a major tire liner, do you think that would work?
12-14-10, 09:07 PM
#82
Got Hills, I do!
Join Date: Aug 2006
Location: Northern Michigan
Posts: 765
Bikes: Trek Domane SLR 9.9 - Trek Supercaliber 9.9.
Mentioned: 1 Post(s)
Tagged: 0 Thread(s)
Quoted: 4 Post(s)
Likes: 0
Liked 9 Times
in
8 Posts
I thought I would share how I do Studded Tires.
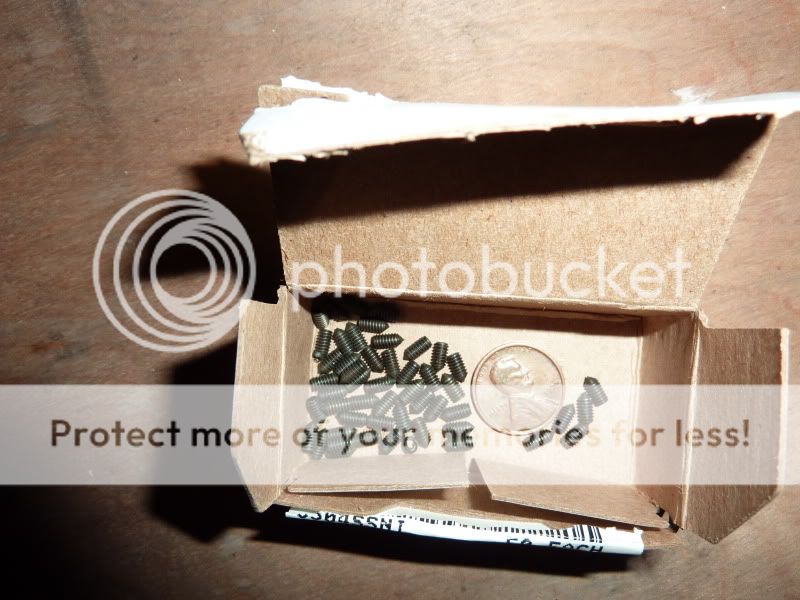
I use cone point set screws (#5-40 X 1/4"). They are small, lightweight and hidden completely in the carcass helping to avoid flats or you could just go tubeless like I do and not worry about pesky tubes.
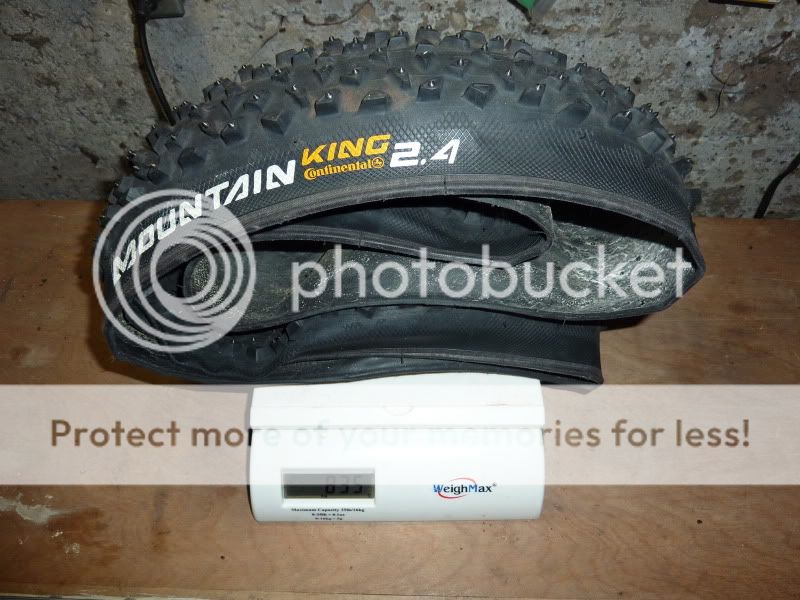
I decided to make my own studded tires not to save money (although I did) but because I wanted a big fat tire for snow and ice and nobody makes one. I used a Mountain King 29 x 2.4 tire. It has large well spaced lugs to shed snow and the size was perfect for my frame. I put 336 studs in the front tire (only added 65 grams) and 240 studs in the rear. It took me 2 1/2 hours for the front and 1 1/2 for the rear. The time did not bother me as I enjoy tinkering but thought you might like to know.
My total cost was $65 for two tires, $62 for the set screws/studs $4 for two drill bits and a small allen wrench. Total cost was $131 and 4 hours of my time.
First I determined where I wanted the studs and how many I would need. I ordered the studs from here. Then I drilled a very small hole through each lug that I wanted to have a stud. I put the tire on a bench and on a piece of plywood to stop the drill. Then turn the tire inside out and drill the studs in through the holes. last but not least I set the tires up tubeless. The Stans sealant sealed all the holes and if I do loose any studs the sealant will seal those as well.
The set screws arrive.

See how small they are.
Inside the tire after studs were installed, you can't even see them

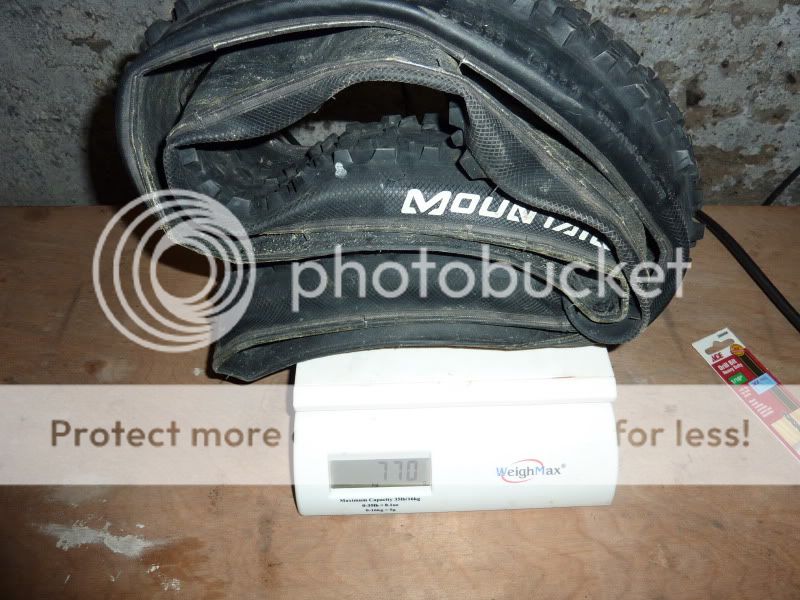
Front tire weight before studs
Front tire after 336 studs and 65 grams heavier
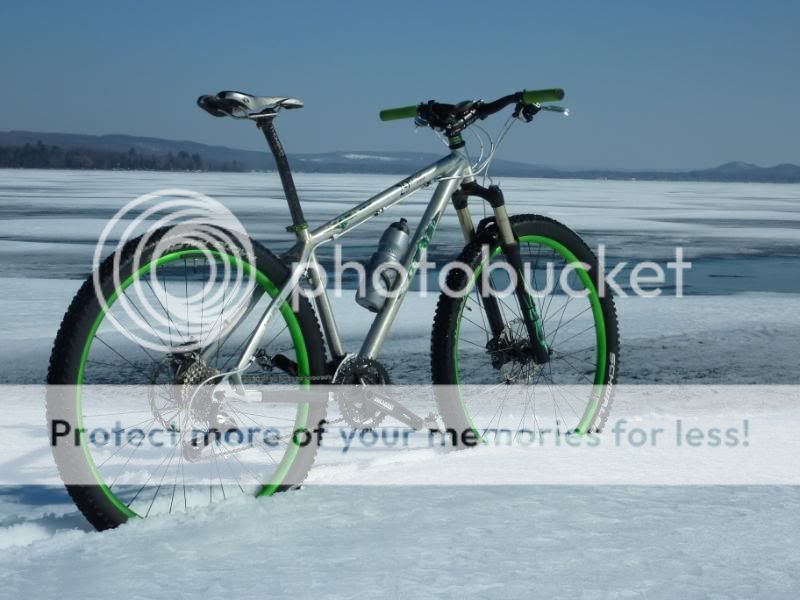
The final product.

I use cone point set screws (#5-40 X 1/4"). They are small, lightweight and hidden completely in the carcass helping to avoid flats or you could just go tubeless like I do and not worry about pesky tubes.
I decided to make my own studded tires not to save money (although I did) but because I wanted a big fat tire for snow and ice and nobody makes one. I used a Mountain King 29 x 2.4 tire. It has large well spaced lugs to shed snow and the size was perfect for my frame. I put 336 studs in the front tire (only added 65 grams) and 240 studs in the rear. It took me 2 1/2 hours for the front and 1 1/2 for the rear. The time did not bother me as I enjoy tinkering but thought you might like to know.
My total cost was $65 for two tires, $62 for the set screws/studs $4 for two drill bits and a small allen wrench. Total cost was $131 and 4 hours of my time.
First I determined where I wanted the studs and how many I would need. I ordered the studs from here. Then I drilled a very small hole through each lug that I wanted to have a stud. I put the tire on a bench and on a piece of plywood to stop the drill. Then turn the tire inside out and drill the studs in through the holes. last but not least I set the tires up tubeless. The Stans sealant sealed all the holes and if I do loose any studs the sealant will seal those as well.
The set screws arrive.
See how small they are.
Inside the tire after studs were installed, you can't even see them
Front tire weight before studs
Front tire after 336 studs and 65 grams heavier
The final product.
12-14-10, 09:48 PM
#83
Senior Member
Join Date: Mar 2008
Posts: 92
Mentioned: 0 Post(s)
Tagged: 0 Thread(s)
Quoted: 0 Post(s)
Likes: 0
Liked 0 Times
in
0 Posts
Those are AWESOME Fred!! I cannot believe those set screws cost you so much though. Yikes. Well... I guess you did use a lot of them. Again, nice work.
12-17-10, 06:51 AM
#84
Senior Member
Join Date: Feb 2001
Location: England
Posts: 12,948
Mentioned: 0 Post(s)
Tagged: 0 Thread(s)
Quoted: 19 Post(s)
Likes: 0
Liked 7 Times
in
7 Posts
My tyres have about 23 panhead self-tapping screws each. They are cut to about 3mm and have been worn down a little on the road. They still extend 2-3mmm but th ends are a bit rounded.
Today we had terrible road conditions; rain all day yesterday with a heavy freeze-up so the roads are covered in thin, hard ice. The studs seemed to have no purchase on the ice and scratched and skittered across the surface when I brakes. I wimped out, not wishing to crash.
Do I need:
New (sharper) studs
More studs
Anything else?
12-20-10, 03:43 PM
#85
Stealing Spokes since 82'
Join Date: Jan 2010
Location: Boy-z, Ideeeho
Posts: 1,875
Bikes: The always reliable kuwie
Mentioned: 0 Post(s)
Tagged: 0 Thread(s)
Quoted: 0 Post(s)
Likes: 0
Liked 0 Times
in
0 Posts
My tyres have about 23 panhead self-tapping screws each. They are cut to about 3mm and have been worn down a little on the road. They still extend 2-3mmm but th ends are a bit rounded.
Today we had terrible road conditions; rain all day yesterday with a heavy freeze-up so the roads are covered in thin, hard ice. The studs seemed to have no purchase on the ice and scratched and skittered across the surface when I brakes. I wimped out, not wishing to crash.
Do I need:
New (sharper) studs
More studs
Anything else?
Today we had terrible road conditions; rain all day yesterday with a heavy freeze-up so the roads are covered in thin, hard ice. The studs seemed to have no purchase on the ice and scratched and skittered across the surface when I brakes. I wimped out, not wishing to crash.
Do I need:
New (sharper) studs
More studs
Anything else?
12-26-10, 05:06 PM
#86
Senior Member
Join Date: Apr 2009
Location: Charlotte, NC (originally from MA)
Posts: 331
Bikes: 2015 Niner RLT9 / 2006 Felt F5C / 2012 Stumpjumper
Mentioned: 0 Post(s)
Tagged: 0 Thread(s)
Quoted: 0 Post(s)
Likes: 0
Liked 0 Times
in
0 Posts
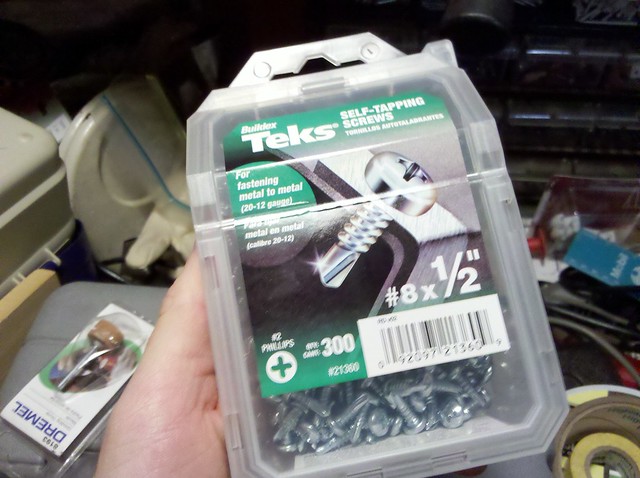
I converted two of my mountain bike tires (WTB Moto Raptors) to studded tires tonight. Used some 1/2" self-tapping screws, although i still drilled pilot holes with a 7/16" bit. 50 screws per tire.
I initially did just the front tire as a test run, then went out for a mile and a half in the current blizzard conditions and was completely blown away. I tried to get the front tire to slide out and it would not, although my backend fishtailed a little. Needless to say I did the rear as well, and I'm probably going to head out for another few miles soon if the visibility allows.
Pictures later.
12-27-10, 10:14 AM
#88
Member
Join Date: Nov 2010
Location: Madison, WI
Posts: 31
Mentioned: 0 Post(s)
Tagged: 0 Thread(s)
Quoted: 0 Post(s)
Likes: 0
Liked 0 Times
in
0 Posts
Nice video. With my nail studs, I wiped out once in the parking lot of a bike shop. The surface conditions were very close to the video, snow over ice. The video does a good job illistrating how to keep upright in really slick conditions.
12-27-10, 02:38 PM
#89
Born Again Pagan

Join Date: Aug 2009
Location: Southwestern Ontario
Posts: 2,241
Bikes: Schwinn hybrid, Raleigh MTB
Mentioned: 0 Post(s)
Tagged: 0 Thread(s)
Quoted: 0 Post(s)
Likes: 0
Liked 2 Times
in
2 Posts
...I decided to make my own studded tires not to save money (although I did) but because I wanted a big fat tire for snow and ice and nobody makes one. I used a Mountain King 29 x 2.4 tire. It has large well spaced lugs to shed snow and the size was perfect for my frame. I put 336 studs in the front tire (only added 65 grams) and 240 studs in the rear. It took me 2 1/2 hours for the front and 1 1/2 for the rear. The time did not bother me as I enjoy tinkering but thought you might like to know.
My total cost was $65 for two tires, $62 for the set screws/studs $4 for two drill bits and a small allen wrench. Total cost was $131 and 4 hours of my time...
My total cost was $65 for two tires, $62 for the set screws/studs $4 for two drill bits and a small allen wrench. Total cost was $131 and 4 hours of my time...

Of course, this is the DIY studded tire thread, so kudos on what looks like a job well done!
Last edited by irclean; 12-27-10 at 02:45 PM.
12-27-10, 06:33 PM
#90
Got Hills, I do!
Join Date: Aug 2006
Location: Northern Michigan
Posts: 765
Bikes: Trek Domane SLR 9.9 - Trek Supercaliber 9.9.
Mentioned: 1 Post(s)
Tagged: 0 Thread(s)
Quoted: 4 Post(s)
Likes: 0
Liked 9 Times
in
8 Posts
Very impressive. FWIW, Nokian makes a 29*2.1" studded tire, the Extreme 294. They can be found for under 90 bucks per tire if you're willing to shop around. The carbide pins would probably outlast the tire, so in the long run they'd probably be cheaper than your set up. Just sayin'.
Of course, this is the DIY studded tire thread, so kudos on what looks like a job well done!
Of course, this is the DIY studded tire thread, so kudos on what looks like a job well done!
Here is a picture from last year I took off the Nokians and was running 2.4 Racing Ralphs they were OK but very very scary on the smooth ice sections.

 12-27-10, 10:15 PM
#91
Born Again Pagan
Join Date: Aug 2009
Location: Southwestern Ontario
Posts: 2,241
Bikes: Schwinn hybrid, Raleigh MTB
Mentioned: 0 Post(s)
Tagged: 0 Thread(s)
Quoted: 0 Post(s)
Likes: 0
Liked 2 Times
in
2 Posts
I read some posts recently from a guy who bought a Pugsley and studded himself a set of Surly Larry tires for it. I couldn't find it during a quick search, but I remember he painted the bike with a green and yellow John Deere theme. Now a fat bike with 4" studded tires... there's a bike for traversing frozen lakes. Come to think of it, that would make a great bike for some of the winter riding I face around here, too.
12-27-10, 11:07 PM
#93


Bicycle Repair Man !!!
Thread Starter
 01-01-11, 03:09 PM
#95
Member
Join Date: Oct 2010
Location: Roanoke, VA
Posts: 41
Bikes: 1974 Schwinn Continental, 1980 Peugeot UO10
Mentioned: 0 Post(s)
Tagged: 0 Thread(s)
Quoted: 7 Post(s)
Likes: 0
Liked 0 Times
in
0 Posts
Thanks for this awesome tutorial!
Here is a link to the thread where I document my studded tire making:
[ https://www.bikeforums.net/showthread...-Bloodhound%29 ]
Here is a link to the thread where I document my studded tire making:
[ https://www.bikeforums.net/showthread...-Bloodhound%29 ]
01-01-11, 03:49 PM
#96
Senior Member
Join Date: Apr 2009
Location: Charlotte, NC (originally from MA)
Posts: 331
Bikes: 2015 Niner RLT9 / 2006 Felt F5C / 2012 Stumpjumper
Mentioned: 0 Post(s)
Tagged: 0 Thread(s)
Quoted: 0 Post(s)
Likes: 0
Liked 0 Times
in
0 Posts
Here are pictures as promised. I made these with 25 screws on each side (every third side knob)
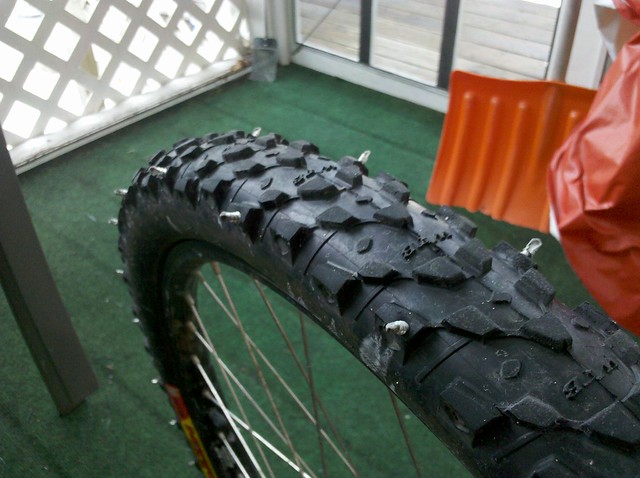
using these
Thanks again for the guide, it was truly helpful!
using these
Thanks again for the guide, it was truly helpful!
01-07-11, 12:54 PM
#97
Senior Member
Join Date: Feb 2008
Location: UK
Posts: 2,324
Mentioned: 0 Post(s)
Tagged: 0 Thread(s)
Quoted: 0 Post(s)
Likes: 0
Liked 3 Times
in
3 Posts
https://www.instructables.com/id/Pop-...our-Road-Bike/
got this link in an email from my bike insurance company looks quite good.
Daven
got this link in an email from my bike insurance company
looks quite good.Daven
01-08-11, 02:17 AM
#98
weirdo
Join Date: Jan 2008
Location: Reno, NV
Posts: 1,962
Mentioned: 0 Post(s)
Tagged: 0 Thread(s)
Quoted: 0 Post(s)
Likes: 0
Liked 3 Times
in
3 Posts
Fred, I love those pictures! Especially the second with the closer shot of your bike. Hell, with 29 x 2.4 tires, you should just about be able to ride lakes in the summer time. Rolling pontoons.
Bike insurance company?
Bike insurance company?
01-12-11, 08:29 AM
#100
Senior Member
Join Date: Nov 2010
Location: souther NH
Posts: 165
Bikes: 2011 Specialized Hardrock Sport Disc 29er, 2009 DK Aura
Mentioned: 0 Post(s)
Tagged: 0 Thread(s)
Quoted: 0 Post(s)
Likes: 0
Liked 0 Times
in
0 Posts
i just made me one of these. i used the same screws as rob. they are coming out pretty good. i just need to put in the liner and then try them out. we are having a blizzard as i type this. if your in southern NH then you can probally see it to. i will post pictures after.