


Making Your Own Studded Tyres
 10-18-12, 03:47 PM
#176


Bicycle Repair Man !!!
Thread Starter

If you ride studded tyres on dry pavement there is a greater risk of damaging them be they DIY or commercially made.
I do not ride my winter beast every day in the winter... when the conditions allow I will ride on regular knobby tyres or just run a studded front.
I do not ride my winter beast every day in the winter... when the conditions allow I will ride on regular knobby tyres or just run a studded front.
 10-18-12, 03:53 PM
#177
ouate de phoque
Join Date: Mar 2012
Location: La Prairie, Qc, Canada
Posts: 1,781
Bikes: Bianchi, Nakamura,Opus
Mentioned: 6 Post(s)
Tagged: 0 Thread(s)
Quoted: 6 Post(s)
Liked 0 Times
in
0 Posts
Thanks, very helping. It's my first winter on a bike so I'm a bit nervous.
10-28-12, 08:15 PM
#178
ouate de phoque
Join Date: Mar 2012
Location: La Prairie, Qc, Canada
Posts: 1,781
Bikes: Bianchi, Nakamura,Opus
Mentioned: 6 Post(s)
Tagged: 0 Thread(s)
Quoted: 6 Post(s)
Liked 0 Times
in
0 Posts
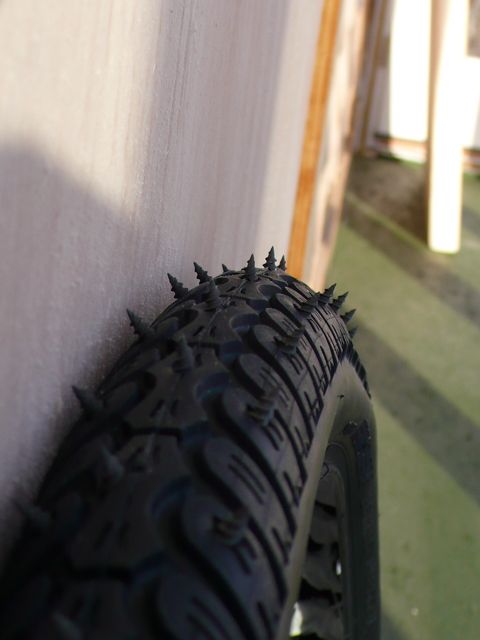
What do you think? Is it supose to look like that? they're 26 x 1.75

11-03-12, 10:13 PM
#179
Full Member

Join Date: Oct 2012
Location: Upstate NY
Posts: 339
Bikes: Various "modded" eZips and multiple econversions
Mentioned: 0 Post(s)
Tagged: 0 Thread(s)
Quoted: 2 Post(s)
Likes: 0
Liked 2 Times
in
2 Posts
Homemade Studded Tires
There are 2 major "theories" on handling Winter cycling.
Wide heavily knobbied tires -
Best for off-road
Designed to ride on top of snow
Thin studded tires -
Best for street-road use
Designed to cut through snow, allowing studs to contact hard road surface
Most designs are a compromise, somewhere in between.
I use a standard mountain bike tread with a fair percentage of the knobbies studded.
I don't recommend a 100% studded tire, for street use. I feel it important to have some "rubber on the road".

I tried building my own!
1st attempt:
I left the center stud free.
My experience with the Innova brand demonstrated that studs close to the center wore quickly, and worse, any turn or lean lifted one row of studs ... effectively giving you 1/2 the "grip" ... when you need more not less!
I studded every 3rd knobby, just wanted a quick test item. Surprisingly, it performs excellently! I normally keep the tires at full pressure (65psi), both of the inner rows hit firmly, braking - more firmly. A slight turn lifts one row but firmly plants the other inside row. A heavier turn and the outside row makes an impression.
Nasty conditions?
Just lower the tire pressure - both inner and one outer row digging in on any turn!
I highly recommend not exceeding 1/8" "stud" length, tipping under acceleration, or braking, damages tire and degrades traction.
Yes ... I have considered doubling or tripling the number of studs-screws ... but present performance seems adequate - 2 Winters.
Plan of action:
Surprisingly, the aluminum pop rivet debacle, help guide me away-towards many good-bad ideas.
Avoid:
1. Drill will cut-damage the ply-cords
2. anything jagged-pointy against tube
3. screws in center
Use:
1. Screw with wide-low profile head
2. Screw with wide deep threads
I found 2 candidates: #8x1 /2"

The screws fit nice and flush to the tire, hopefully with their wide heads, the tube will help support them nicely.

For my first attempt I decided to use one of my swapped out EZip tires.

The "studs" look nasty, I thought about grinding them down some, but I believe I'll just wait for the next heavy snow-ice storm.

I didn't over do it on quantity, this is just a test item. 100 of these sharp little screws and 8 bloody fingers later, I have my prototype!

I left the center "stud free", straight line riding requires very little extra traction. My stud pattern will wear some, on the straight but studs will cut deeply on slight turn, and outer row will dig in, on sharper turn. Lowering tire pressure will allow outer row to hit with a lighter turn.
Wide heavily knobbied tires -
Best for off-road
Designed to ride on top of snow
Thin studded tires -
Best for street-road use
Designed to cut through snow, allowing studs to contact hard road surface
Most designs are a compromise, somewhere in between.
I use a standard mountain bike tread with a fair percentage of the knobbies studded.
I don't recommend a 100% studded tire, for street use. I feel it important to have some "rubber on the road".
I tried building my own!
1st attempt:
I left the center stud free.
My experience with the Innova brand demonstrated that studs close to the center wore quickly, and worse, any turn or lean lifted one row of studs ... effectively giving you 1/2 the "grip" ... when you need more not less!
I studded every 3rd knobby, just wanted a quick test item. Surprisingly, it performs excellently! I normally keep the tires at full pressure (65psi), both of the inner rows hit firmly, braking - more firmly. A slight turn lifts one row but firmly plants the other inside row. A heavier turn and the outside row makes an impression.
Nasty conditions?
Just lower the tire pressure - both inner and one outer row digging in on any turn!
I highly recommend not exceeding 1/8" "stud" length, tipping under acceleration, or braking, damages tire and degrades traction.
Yes ... I have considered doubling or tripling the number of studs-screws ... but present performance seems adequate - 2 Winters.
Plan of action:
Surprisingly, the aluminum pop rivet debacle, help guide me away-towards many good-bad ideas.
Avoid:
1. Drill will cut-damage the ply-cords
2. anything jagged-pointy against tube
3. screws in center
Use:
1. Screw with wide-low profile head
2. Screw with wide deep threads
I found 2 candidates: #8x1 /2"
The screws fit nice and flush to the tire, hopefully with their wide heads, the tube will help support them nicely.
For my first attempt I decided to use one of my swapped out EZip tires.
The "studs" look nasty, I thought about grinding them down some, but I believe I'll just wait for the next heavy snow-ice storm.
I didn't over do it on quantity, this is just a test item. 100 of these sharp little screws and 8 bloody fingers later, I have my prototype!
I left the center "stud free", straight line riding requires very little extra traction. My stud pattern will wear some, on the straight but studs will cut deeply on slight turn, and outer row will dig in, on sharper turn. Lowering tire pressure will allow outer row to hit with a lighter turn.
Last edited by DrkAngel; 12-19-14 at 08:08 AM.
11-03-12, 10:39 PM
#180
Full Member
Join Date: Oct 2012
Location: Upstate NY
Posts: 339
Bikes: Various "modded" eZips and multiple econversions
Mentioned: 0 Post(s)
Tagged: 0 Thread(s)
Quoted: 2 Post(s)
Likes: 0
Liked 2 Times
in
2 Posts
Studs should barely touch on the straight, dig in firmly, on a slight turn, and second row joining first row, on a heavier turn.
Next trial will be with tires with larger knobbies, better target and support for screws.
I just found some, same type screws, with 3/8" length. They should be the perfect length for the inner rows!
First "trial" tire will be placed on front. All reports, and my experience, insist that best traction is needed on the front. If the back tire loses its grip, it is called "fun"! If the front tire ... it is called "ouch!"
Screws should have good wearability on ice and snow, not so good on clear roads. I intend on keeping a spare wheel-tire handy, not a quick change hub, but my practice change time is well under 5 min. If a few changes double the life of my studs, it will be well worth it! (Yes, I do my changes in a nice warm interior area.)
My testbed is an EZip electric bike, it has a, rear, geared external motor, something of a job to swap the tire. Still it is slated for SMSS (Sheet Metal Screw Studding), as soon as concept is proven, and stud wear determined.
Also, as studs are becoming "worn" a second ring of fresh studs can be added, ... then, a third! My source for the screws charges $6 shipping for the first 200 screws, but the additional 5 boxes (1000 screws) were free shipping. My prototype used only 100 screws, adding screws to all the inner row of studs will, only, finish off the 1st box.
3/8" screws arrived about 1/2 hr ago. Replaced 50 of them in about 20 min., with a normal screwdriver!

Indeed! The shorter length is almost ideal, for the inner rows!

Now, believe it or not, I have to wait for more snow.
Choosing Screws
One of my most important requirements was that the screw "heads" should be wide and low profile!

Coarseness and depth of thread also considered!

Depth of point was very important.

Next trial will be with tires with larger knobbies, better target and support for screws.
I just found some, same type screws, with 3/8" length. They should be the perfect length for the inner rows!
First "trial" tire will be placed on front. All reports, and my experience, insist that best traction is needed on the front. If the back tire loses its grip, it is called "fun"! If the front tire ... it is called "ouch!"
Screws should have good wearability on ice and snow, not so good on clear roads. I intend on keeping a spare wheel-tire handy, not a quick change hub, but my practice change time is well under 5 min. If a few changes double the life of my studs, it will be well worth it! (Yes, I do my changes in a nice warm interior area.)
My testbed is an EZip electric bike, it has a, rear, geared external motor, something of a job to swap the tire. Still it is slated for SMSS (Sheet Metal Screw Studding), as soon as concept is proven, and stud wear determined.
Also, as studs are becoming "worn" a second ring of fresh studs can be added, ... then, a third! My source for the screws charges $6 shipping for the first 200 screws, but the additional 5 boxes (1000 screws) were free shipping. My prototype used only 100 screws, adding screws to all the inner row of studs will, only, finish off the 1st box.
3/8" screws arrived about 1/2 hr ago. Replaced 50 of them in about 20 min., with a normal screwdriver!
Indeed! The shorter length is almost ideal, for the inner rows!
Now, believe it or not, I have to wait for more snow.
Choosing Screws
One of my most important requirements was that the screw "heads" should be wide and low profile!
Coarseness and depth of thread also considered!
Depth of point was very important.
Last edited by DrkAngel; 07-31-14 at 10:35 AM.
11-04-12, 06:22 AM
#181
Full Member
Join Date: Oct 2012
Location: Upstate NY
Posts: 339
Bikes: Various "modded" eZips and multiple econversions
Mentioned: 0 Post(s)
Tagged: 0 Thread(s)
Quoted: 2 Post(s)
Likes: 0
Liked 2 Times
in
2 Posts
Roundup
I tried to consolidate my homemade studded project results from a different forum.
Some points are unclear, so I'll attempt to fill in some blanks.
Positioning screws?
Did not pre-drill for screws.
I cordless drill screwed screws into the knobbies from the outside.
Then reversed screws out.
Then rescrewed from the inside using the provided screwpath.
Tire liner?
No tire liner! ... ?
Very wide heads, normal tube and 65lb pressure hold screws firmly in place. - 2 years running - so far.
During center screw replacement, noticed some rust under a few screws. Added a couple layers of boxing tape between tire-studs and tube to protect tube.
I toyed with the idea of adding a dab of PL400 construction adhesive between screw and tire but would rather be able to easily replace screws.
Screw source?
My original source seems to have dried up - can't find it ... ?
Search for "Truss head sheet metal screw"
I used #8 x 1/2" and #8 x 3/8".
Unless strictly for off road I recommend a maximum 1/8" protrusion!
Longer cause damaging tipage, especially if on your drive wheel.
Last edited by DrkAngel; 12-12-12 at 10:51 AM.
11-04-12, 11:55 AM
#182
Bicycle Repair Man !!!
Thread Starter
DrkAngel, your technique looks very sounds save for the lack of a tyre liner and your description is excellent.
11-04-12, 05:31 PM
#183
Full Member
Join Date: Oct 2012
Location: Upstate NY
Posts: 339
Bikes: Various "modded" eZips and multiple econversions
Mentioned: 0 Post(s)
Tagged: 0 Thread(s)
Quoted: 2 Post(s)
Likes: 0
Liked 2 Times
in
2 Posts
Tyre (Tire) Liner
I had planned on a tire liner.
Even had a twice patched tube ready to slit, remove valve and and place new tube inside of.
But hating to waste, and having low confidence in project durability I decided to destroy tube ... during use.
Imagine my surprise when hundreds of miles later, I have had no problems.
Cold, potholes ... no damage! ... ?
A careful inspection, after 1 Winter use, showed ... no apparent damage!
Of course, for any project build of this type, I do, highly recommend a tire liner.
My donor tires are cheap enough that I considered making disposable studded tires.
My previously explained method, with construction adhesive under screw heads.
Then a liberal slathering of adhesive covering the inside of the tread area and screw heads.
A slit, valve removed, tube covering a new good tube, placed into mounted tire, pressurized and allowed to set-cure.
After appropriate adhesive set period, deflate tire and allow final, open air, cure.
The double sided tube and tire adhesion should securely support large headed screws.
There might be something better ... now, but my old goto adhesive was Loctite PL400 multi purpose construction adhesive.
"Disposable" in that it would be too difficult to replace screws.
Last edited by DrkAngel; 12-12-12 at 10:50 AM.
11-04-12, 05:46 PM
#184
Bicycle Repair Man !!!
Thread Starter
When I build winter tyres I plan for them to roll for thousands and thousands of kilometres... the one flat I did have was on a tyre that had seen well over 10,000 km and the culprit was a screw that had backed itself out a little and had worn through the liner and the tube. I am not sure how long it took to do this but the liner was thicker and probably saved me from what would have been a more immediate flat.
My current set of winter tyres is going into their third season and using averages, they have already seen nearly 10,000 km... when I pulled the winter bike out of storage and topped up the tyres they were still in the rideable range of pressure and that was after being stored over 6 months.
Will be building another set here soon for my other winter bike as it lent it's tyres to my daily driver while it gets used for general riding but is primarily my shopping bike / pickup truck in the winter and is very stable even without studs on it's 2.3 Kendas.
I have several tyres already made up and still have tyres I built 5 years ago that could serve me well but I want to stud those 2.3's as in themselves they are an excellent winter tyre with a great tread pattern and very important is that they are also rather supple in cold temperatures.
This can make a huge difference as some bicycle tyres become very stiff and inflexible in the winter and this really reduces ride quality and traction.
11-04-12, 06:15 PM
#185
Mrs. Hop-along

Join Date: Oct 2009
Location: Seville, FL
Posts: 338
Bikes: Ladies Schwinn Super Sport and Gateway
Mentioned: 0 Post(s)
Tagged: 0 Thread(s)
Quoted: 1 Post(s)
Likes: 0
Liked 0 Times
in
0 Posts
Wow, DrkAngel, that's awesome!! I like all your pictures very much.
Thank you
Thank you
11-10-12, 10:51 AM
#186
Senior Member
My 3 year old nephew asked for studded tyres "like Dad's winter bike!" for his Strider. (This was a couple of weeks after requesting lights on his bike "just like Auntie" -needless to say, I am one EXTREMELY proud Auntie Bug over here!!) My supervisor at work also has a 3 year old, and apparently little Jack looked at the first snowfall and demanded to go riding in it, then looked at his dad's bike and asked for winter tyres for HIS Strider!
So... 12" studded tyres. This could be entertaining as hell.
So... 12" studded tyres. This could be entertaining as hell.
11-10-12, 11:02 AM
#187
Bicycle Repair Man !!!
Thread Starter
my 3 year old nephew asked for studded tyres "like dad's winter bike!" for his strider. (this was a couple of weeks after requesting lights on his bike "just like auntie" -needless to say, i am one extremely proud auntie bug over here!!) my supervisor at work also has a 3 year old, and apparently little jack looked at the first snowfall and demanded to go riding in it, then looked at his dad's bike and asked for winter tyres for his strider!
So... 12" studded tyres. This could be entertaining as hell.
So... 12" studded tyres. This could be entertaining as hell.
:d
11-11-12, 07:37 PM
#188
Mrs. Hop-along
Join Date: Oct 2009
Location: Seville, FL
Posts: 338
Bikes: Ladies Schwinn Super Sport and Gateway
Mentioned: 0 Post(s)
Tagged: 0 Thread(s)
Quoted: 1 Post(s)
Likes: 0
Liked 0 Times
in
0 Posts
Well, I had a flat in my thorn-resistant tube last week, and luckily I had a spare tube to replace it. I just patched the thicker tube. Looking at the weather for the next week and not seeing a single overnight temperature above freezing anymore, I decided that I should be wary of morning frost, which is mostly what caused my falls last year.
I put last year's screws into the tire and remounted it with TWO split junk tubes as liners over an already thick-walled inner tube. If that isn't enough to prevent a flat tire from the screw heads I don't know what is.
I just wish that I had water-bathed the patch to be absolutely sure of its integrity....
11-24-12, 03:28 PM
#189
Mrs. Hop-along
Join Date: Oct 2009
Location: Seville, FL
Posts: 338
Bikes: Ladies Schwinn Super Sport and Gateway
Mentioned: 0 Post(s)
Tagged: 0 Thread(s)
Quoted: 1 Post(s)
Likes: 0
Liked 0 Times
in
0 Posts
The studs worked fine, but after that second or third snowfall it seems we're back in late summer / warm autumn weather. With no snow in sight for the forecasts and daily highs back up into the high 50s low 60s, I took the studs back out after two weeks. It's an easy operation now and the tire doesn't seem to be the worse for it.
12-01-12, 07:42 PM
#190
Senior Member
Join Date: Oct 2008
Location: Northern Utah
Posts: 121
Bikes: '04 Cannondale R1000, Haluzak Horizon recumbent
Mentioned: 0 Post(s)
Tagged: 0 Thread(s)
Quoted: 0 Post(s)
Likes: 0
Liked 0 Times
in
0 Posts
On the subject of tyre lyners I was thynking of using a thin foam pipe insulation.... overkill maybe, but lighter than an old cut tyre. Anyone try this before?
12-02-12, 07:00 AM
#191
Full Member
Join Date: Oct 2012
Location: Upstate NY
Posts: 339
Bikes: Various "modded" eZips and multiple econversions
Mentioned: 0 Post(s)
Tagged: 0 Thread(s)
Quoted: 2 Post(s)
Likes: 0
Liked 2 Times
in
2 Posts
The studs worked fine, but after that second or third snowfall it seems we're back in late summer / warm autumn weather. With no snow in sight for the forecasts and daily highs back up into the high 50s low 60s, I took the studs back out after two weeks. It's an easy operation now and the tire doesn't seem to be the worse for it.
Even better a spare wheel-tire.
Much easier to just swap front wheel!
LBS might set you up with a used for $10-15?
Probably better to buy new-better tire for non-stud usage.
Last edited by DrkAngel; 12-02-12 at 12:21 PM.
01-07-13, 12:11 AM
#192
Full Member
Join Date: Oct 2012
Location: Upstate NY
Posts: 339
Bikes: Various "modded" eZips and multiple econversions
Mentioned: 0 Post(s)
Tagged: 0 Thread(s)
Quoted: 2 Post(s)
Likes: 0
Liked 2 Times
in
2 Posts
Double Nasty
Since it looks like we're getting some real snow this Winter, I have decided to build a Nasty version of my homemade studded.
Purpose:
To bite through that "salt snow", climb ruts, traverse snow covered frozen earth etc.
Means:
Lengthen and multiply the number of screws.

These are pictures of my original "prototype" build.
I relented and shortened the center screws.
Upcoming build will take advantage of the longer screws and and be doubled, possibly tripled, in quantity.
The longer screws might tip and damage on bare roads.
So I will install on a spare wheel and swap for the appropriate "nastiness".
Will post up pictures and evaluation ... pretty soon!

Purpose:
To bite through that "salt snow", climb ruts, traverse snow covered frozen earth etc.
Means:
Lengthen and multiply the number of screws.
These are pictures of my original "prototype" build.
I relented and shortened the center screws.
Upcoming build will take advantage of the longer screws and and be doubled, possibly tripled, in quantity.
The longer screws might tip and damage on bare roads.
So I will install on a spare wheel and swap for the appropriate "nastiness".
Will post up pictures and evaluation ... pretty soon!
Last edited by DrkAngel; 12-19-14 at 08:23 AM.
01-07-13, 12:22 AM
#193
Full Member
Join Date: Oct 2012
Location: Upstate NY
Posts: 339
Bikes: Various "modded" eZips and multiple econversions
Mentioned: 0 Post(s)
Tagged: 0 Thread(s)
Quoted: 2 Post(s)
Likes: 0
Liked 2 Times
in
2 Posts
Triple Nasty!
Goal - All terrain Winter Tire
Proposal - A ridiculously large number of long sheet metal screws!
Step 1
From the outside, screw in screws at desired locations.
Step 2
Invert tire ... turn it inside out.
Mark the locations of all screws.
A BIC medium ball point works nicely,
2 lines converging on screw, screw hole is difficult to see.

Step 3
Remove screws.
Step 4
Reinsert screws using pre-screwed holes.
Step 5
"Revert" tire.


Next?
Slather all screw heads with construction adhesive, insert old tube, add normal pressure, allow to set.
(Due to lack of air, curing might not occur, contact adhesive night be a better idea.)
Slit tube in center, remove stem, place real tube inside.
Wait for more nastiness!
Regrets?
Way too many screws!
Further thoughts.
Next project I may predrill from the outside with an extremely small bit 1/16th or smaller, just enough to mark the screw position.
As a front tire, 10 screws hitting the road simultaneously, it is possible that it could survive limited bare road use?
PS
Oh Crap!
I just decided that I should add 2 more rows of 3/8" screws around the center ... 444 total !!!
Proposal - A ridiculously large number of long sheet metal screws!
Step 1
From the outside, screw in screws at desired locations.
Step 2
Invert tire ... turn it inside out.
Mark the locations of all screws.
A BIC medium ball point works nicely,
2 lines converging on screw, screw hole is difficult to see.
Step 3
Remove screws.
Step 4
Reinsert screws using pre-screwed holes.
Step 5
"Revert" tire.
Next?
Slather all screw heads with construction adhesive, insert old tube, add normal pressure, allow to set.
(Due to lack of air, curing might not occur, contact adhesive night be a better idea.)
Slit tube in center, remove stem, place real tube inside.
Wait for more nastiness!
Regrets?
Way too many screws!
Further thoughts.
Next project I may predrill from the outside with an extremely small bit 1/16th or smaller, just enough to mark the screw position.
As a front tire, 10 screws hitting the road simultaneously, it is possible that it could survive limited bare road use?
PS
Oh Crap!
I just decided that I should add 2 more rows of 3/8" screws around the center ... 444 total !!!
01-07-13, 12:42 AM
#194
Full Member
Join Date: Oct 2012
Location: Upstate NY
Posts: 339
Bikes: Various "modded" eZips and multiple econversions
Mentioned: 0 Post(s)
Tagged: 0 Thread(s)
Quoted: 2 Post(s)
Likes: 0
Liked 2 Times
in
2 Posts
444 Magnum - the Hedge Hog
Well, I coulda stopped at 148, but went to 296, then ... figured I might as well go "Whole Hog", 444 screws!
Hedge Hog ... that is!

The screws might weigh more than the tire did!

Will I actually use it?
Damn Skippy!
If only to scare the hell out of pedestrians!
I intend on making some decent impression on any weather that gets dropped on me this winter.

I added a 5x Slime tube, outer area at 5x the thickness of normal tubes.
There might be an actual danger of picking up stuff in my tread, chipmunks, squirrels, shoes etc.
Hedge Hog ... that is!
The screws might weigh more than the tire did!
Will I actually use it?
Damn Skippy!
If only to scare the hell out of pedestrians!
I intend on making some decent impression on any weather that gets dropped on me this winter.
I added a 5x Slime tube, outer area at 5x the thickness of normal tubes.
There might be an actual danger of picking up stuff in my tread, chipmunks, squirrels, shoes etc.
Last edited by DrkAngel; 07-31-14 at 10:38 AM.
 01-08-13, 11:31 PM
#196
Full Member
Join Date: Oct 2012
Location: Upstate NY
Posts: 339
Bikes: Various "modded" eZips and multiple econversions
Mentioned: 0 Post(s)
Tagged: 0 Thread(s)
Quoted: 2 Post(s)
Likes: 0
Liked 2 Times
in
2 Posts
Bare road worthy?
Originally Posted by DrkAngel
As a front tire, 10 screws hitting the road simultaneously, it is possible that it could survive limited bare road use?
PS - Oh Crap!
Just decided to add 2 rows of 3/8" screws along the center ... 444 screws total!
PS - Oh Crap!
Just decided to add 2 rows of 3/8" screws along the center ... 444 screws total!
Each head covers about .3 square inches.
.3" x 32 x 40psi = 384lb against the screws vs about 70lb weight on front tire.
Looks like straight treking on bare road might be extremely well supported.
Last edited by DrkAngel; 01-09-13 at 02:52 PM.
01-09-13, 08:50 AM
#197
Senior Member

Join Date: Dec 2008
Posts: 939
Mentioned: 0 Post(s)
Tagged: 0 Thread(s)
Quoted: 0 Post(s)
Likes: 0
Liked 6 Times
in
6 Posts
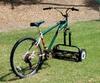
I compromised, I wanted chains (4 the deep stuff ) and studs ( ice ) ...without spending half my paycheck, or more than the price of my wally-goose .( 6$ tires and 30 in self taping sheet metal screws. ) I went cheap/over kill on the tire liner and used a used road bike tire cut with the bears cut off...(I hate changing tubes.) Tires ARE heavy not a real big surprise, but considering riding ( traction ) vs. pushing ( no traction ) its a no brainer ... on with the pics!


For "off road" use only ... if I made a commuter tire, it would look more like this :
For "off road" use only ... if I made a commuter tire, it would look more like this :
Last edited by martinus; 01-09-13 at 09:32 AM.
01-09-13, 08:52 PM
#198
Senior Member
Join Date: Mar 2010
Location: Edmonton, Ab
Posts: 153
Mentioned: 1 Post(s)
Tagged: 0 Thread(s)
Quoted: 7 Post(s)
Likes: 0
Liked 0 Times
in
0 Posts
Well, I coulda stopped at 148, but went to 296, then ... figured I might as well go "Whole Hog", 444 screws!
I added a 5x Slime tube, outer area at 5x the thickness of normal tubes.
There might be an actual danger of picking up stuff in my tread, chipmunks, squirrels, shoes etc.
I added a 5x Slime tube, outer area at 5x the thickness of normal tubes.
There might be an actual danger of picking up stuff in my tread, chipmunks, squirrels, shoes etc.
Last edited by TuckamoreDew; 01-11-13 at 12:02 AM.