


New project
 10-07-17, 07:27 PM
#1
Junior Member
Thread Starter
New project
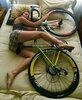
Bought a vintage Bianchi made in Japan I nearly did not buy it as it looked too far gone I told him bike was basically scrap and he should donate it, so I thought in terms of the glass is half full I looked at the good parts he said wheels where 27 inches and at a glance they looked like 27 it had superficial surface rust in quite a few places, tires are perished.
He wanted $50 and I offered him $20 that was an insult, then $40 cad I nearly walked away then he showed me the leather saddle in very good condition we settled on $45, the saddle sweetened the deal
I was thinking I should not have bought it on way home.
Soon as got home I started cleaning with SOS pad for about an hour and I was amazed that 99% of rust is gone
one of the reasons I bought it was because of the 022 light frame
The seat tube seized does not bother me as once I had a bike and seat tube was a bit big I thought if I can hammer it down to correct size it will be OK it would not go down so I got a bigger hammer and an even bigger hammer
still not correct so now I had the job of getting it out. I have a slitting grinder to make a groove in the back
after cleaning I found wheels are 700
it's a 25-inch frame correct size for me and everything is straight,
never seen brakes like this before, brake pad is missing from rear
I think it just needs seat post new tires and cables, chain maybe different rear derailer it has a long cage and a few more things
no play in Sugino triple cranks and teath and BB look good. wheels are true. it did not look like this before I cleaned it
I was thinking on the rear wheel stays some paint is missing and it looks chrome underneath it would look good all chrome on stays if it's possible to get paint off
Any advice would be welcomed
Last edited by Bigbadjohn; 10-09-17 at 10:57 AM.

 10-07-17, 08:16 PM
#3
Junior Member
Thread Starter
Thanks, this is very helpful an easier way. I might be able to borrow one of those saws think I going to need it.
I read a CL post about a years ago where somebody had this problem and he took it to 4 or 5 LBS and none of them could do it they said you have to take it to a metal fabrication shop so he was selling bike cheap.
This is another guy complaining on CL he went to see bike I bought, he says tube is below 10 - 11 inches yikes
This is what happens when a smaller person rides a 25-inch frame AArgh!!
If I had known he was not supposed to bring it back home he would have only got $5
https://vancouver.craigslist.ca/van/bik/6326521200.html
Vendor told me when he saw this post he panicked and removed it, I would not have got it for this price without negative post but that's all it was worth
After reading this post I think it is going to be more difficult, gotta stay away from CL got 5 bikes now
Blade on Youtube saber saw looks to be about 12 inches so should not be a problem.
Last edited by Bigbadjohn; 10-11-17 at 11:04 AM.
10-07-17, 08:50 PM
#4
Grumpy Old Bugga

Join Date: Oct 2006
Location: Adelaide, AUSTRALIA
Posts: 4,229
Bikes: Hillbrick, Malvern Star Oppy S2, Europa (R.I.P.)
Mentioned: 2 Post(s)
Tagged: 0 Thread(s)
Quoted: 370 Post(s)
Likes: 0
Liked 8 Times
in
6 Posts
Those brakes are cantilever brakes, very good in their day, much better that the side pulls of the time. Ancestor of V-brakes.
The seat post is a worry. That craigslist posting is interesting. Best of luck with it. Don't mess it up in the process, you'll have a rather neat vintage bike if you can get it sorted.
The seat post is a worry. That craigslist posting is interesting. Best of luck with it. Don't mess it up in the process, you'll have a rather neat vintage bike if you can get it sorted.
10-08-17, 09:48 AM
#5
Nigel
Join Date: Mar 2011
Location: San Jose, CA
Posts: 2,991
Bikes: 1980s and 1990s steel: CyclePro, Nishiki, Schwinn, SR, Trek........
Mentioned: 12 Post(s)
Tagged: 0 Thread(s)
Quoted: 384 Post(s)
Likes: 0
Liked 6 Times
in
6 Posts
In the worst case; you can take the BB out, run a 1/2-13 or M12 threaded rod down thru the seat post, put a washer and nut on thru the BB, and pull the seat post out. Use a LOT of lubricant on the pulling end of the threaded rod, and plan on scrapping the threaded rod - unless it is high grade. This sort of tool can exert over 10K lbs (45KN).
Canti brakes pads: https://www.amazon.com/Kool-Stop-Bic.../dp/B000GDCXBA will improve the braking performance. Also read: https://www.sheldonbrown.com/cantilever-geometry.html
Canti brakes pads: https://www.amazon.com/Kool-Stop-Bic.../dp/B000GDCXBA will improve the braking performance. Also read: https://www.sheldonbrown.com/cantilever-geometry.html
10-08-17, 11:52 AM
#7
Junior Member
Thread Starter
I have a couple of new sets of 700x23 but I don't know if that will work on these rims
Thanks Nigel
I was pondering while in bed about this kind of solution, and thanks for the link to the pads that's the only part missing
Thanks Nigel
I was pondering while in bed about this kind of solution, and thanks for the link to the pads that's the only part missing
10-08-17, 12:03 PM
#8
Banned
You will find a vast collection of fused due to galvanic corrosion solution suggestions in this forums Archives.
Note the word 'Archive' at the bottom of the page.

Note the word 'Archive' at the bottom of the page.
10-08-17, 12:56 PM
#9

I'm good to go!
Join Date: Jul 2017
Location: Mississippi
Posts: 14,985
Bikes: Tarmac Disc Comp Di2 - 2020
Mentioned: 51 Post(s)
Tagged: 0 Thread(s)
Quoted: 6193 Post(s)
Liked 4,808 Times
in
3,316 Posts
25" seat tube is probably long enough it would never happen, but you might take the bottle cage screws out to make sure that the stem wasn't one of those super long ones someone might have put in there as a replacement and later wound up screwing the bottle mount screws into it. (I do hope my english teachers never see this run-on sentence)
Nice bike though. I've thought that I'd like to have a Bianchi many times before, but the right one never turned up. So if you want to send it this way.......................................
Nice bike though. I've thought that I'd like to have a Bianchi many times before, but the right one never turned up. So if you want to send it this way.......................................
10-08-17, 06:18 PM
#10
Junior Member
Thread Starter
It's coming but slow not at all like the Youtube maybe his blade is new, less chance of an older blade to wreck frame
one of the problems LBS made it much worse by cutting it so close to seat post and hammering it down not much to grip pulling it up
when they got it saddle was attached.
seem to be making more filings than anything else will get a new blade tomorrow this will be a slow job but as long as I don't wreck frame I don't care.
I will have to pull BB and clean as it will be full of filings I guess there is no way you can tell if it's a sealed unit until you take it out
I may have to make a threaded puller jig to extract it.
I will work on it relentlessly until it's done, a bike stand would help.
This will not be a costly project all I need is tires chain and cables and maybe a few other low-cost items
This is a case of a disaster becoming an adventure
Last edited by Bigbadjohn; 10-08-17 at 06:33 PM.
10-08-17, 06:44 PM
#11
Junior Member
Thread Starter
I read on the Ishiwata 022 seat tube is 0.6mm thickness of the non-butted sections so it's paper thin
Just found this it's 1-inch dia looks about right size hope I don't have to use it. I was going to dump it many years ago I knew it would come in handy one day. I do have a .5 inch drill chuck somewhere
I once read on light frames bikes they make tubes different thickness's, seat tube would be thinest since it's in compression.
Last edited by Bigbadjohn; 10-09-17 at 01:26 PM.
10-08-17, 09:53 PM
#12
Senior Member
Join Date: Aug 2014
Location: WA
Posts: 341
Mentioned: 1 Post(s)
Tagged: 0 Thread(s)
Quoted: 52 Post(s)
Likes: 0
Liked 0 Times
in
0 Posts
10-08-17, 10:05 PM
#13
Junior Member
Thread Starter
I agree I have some continental 28 but wires are a bit bent tried to straighten them out today
they were on another bike I bought thought the wheel was out of round
they were on another bike I bought thought the wheel was out of round
10-09-17, 06:01 AM
#14
Dirty Heathen
Join Date: Oct 2015
Location: MC-778, 6250 fsw
Posts: 2,182
Bikes: 1997 Cannondale, 1976 Bridgestone, 1998 SoftRide, 1989 Klein, 1989 Black Lightning #0033
Mentioned: 19 Post(s)
Tagged: 0 Thread(s)
Quoted: 889 Post(s)
Liked 906 Times
in
534 Posts
@Bigbadjohn You've got the wrong kind of blade in that sawzall.
That long blade with the big teeth is a 'pruning' blade, made for cutting quickly through green wood, like tree branches.
Metal cutting blades have much smaller teeth, like the one shown below; will make the job much cleaner.

Also, why ditch the RD? You've got a half-step triple on the front, and a wide-range 6-speed on the rear, plus a looong wheelbase. That long cage Suntour will come in handy.
That long blade with the big teeth is a 'pruning' blade, made for cutting quickly through green wood, like tree branches.
Metal cutting blades have much smaller teeth, like the one shown below; will make the job much cleaner.
Also, why ditch the RD? You've got a half-step triple on the front, and a wide-range 6-speed on the rear, plus a looong wheelbase. That long cage Suntour will come in handy.
10-09-17, 08:02 AM
#15
I'm good to go!
Join Date: Jul 2017
Location: Mississippi
Posts: 14,985
Bikes: Tarmac Disc Comp Di2 - 2020
Mentioned: 51 Post(s)
Tagged: 0 Thread(s)
Quoted: 6193 Post(s)
Liked 4,808 Times
in
3,316 Posts
Taking the bottom bracket out, turning the frame upside down and letting some Kroil penetrating oil run down the seat tube so it can get under between the seat post and tube might help too. It is good stuff.
Make sure to post a pic of the seat post before you throw it as far away as you can in a fit of successful rage.
Make sure to post a pic of the seat post before you throw it as far away as you can in a fit of successful rage.
10-09-17, 10:07 AM
#17
Junior Member
Thread Starter
@Bigbadjohn You've got the wrong kind of blade in that sawzall.
That long blade with the big teeth is a 'pruning' blade, made for cutting quickly through green wood, like tree branches.
Metal cutting blades have much smaller teeth, like the one shown below; will make the job much cleaner.
Also, why ditch the RD? You've got a half-step triple on the front, and a wide-range 6-speed on the rear, plus a looong wheelbase. That long cage Suntour will come in handy.
or maybe a more aggressive blade than what I am using.
You are right, I will keep RD if it's functional and it seems to be plus anything else to keep it as it was when new.
I was looking Suntour RD are not cheap and getting more collectible.
On closer inspection this morning althought bike is not good cosmetically it's hardly been riden chain rings are like new as are all other wearable parts so what is best a beutiful bike that is worn out or the other
I was thinking the 3 rings was a later add-on maybe it's original, you don't often see these on racing bikes
I notice the top 2 are very close and a super low for hills.
BB looks original, it's very smooth and no sideway wiggle
I think in those days they did not use sealed so will have to be taken out to be cleaned, I am guessing it's about 82 vintage
I wish I had never found that drill bit that just happens to be a perfect size it's getting more tempting and it would use the tube as a guide and nicely ream it out with no danger of damaging the frame in theory. 1-inch drill is 25.4 and seat tube must be 27.2
it would still leave 1.5 inches because that's as far down drill will go, but still enough room for another seat post, and last little bit might come out easy.
Last edited by Bigbadjohn; 10-09-17 at 05:12 PM.
10-10-17, 06:42 AM
#18
2-Wheeled Fool
Join Date: Sep 2016
Location: New Hampshire
Posts: 2,346
Bikes: Surly Ogre, Brompton
Mentioned: 18 Post(s)
Tagged: 0 Thread(s)
Quoted: 1385 Post(s)
Liked 677 Times
in
457 Posts
I've had bikes with seat posts in this predicament many times. Kroil and a slide hammer usually works well enough. I've built myself cutting chisels out of naval bronze rod. It'll part the aluminum seatpost and do no harm to the steel tubing. Just don't get over-zealous with your hammering, or the bronze rod will deform the seat tube from the inside. That will ruin your day, and don't ask me how I know. I have never tried the use of caustic soda to remove the seatpost. Youtube is a good source if you want to know how to do it. I'm just ticklish about the idea of putting that stuff inside my frame, and prefer mechanical methods.
10-10-17, 10:03 AM
#19
Junior Member
Thread Starter
I've had bikes with seat posts in this predicament many times. Kroil and a slide hammer usually works well enough. I've built myself cutting chisels out of naval bronze rod. It'll part the aluminum seatpost and do no harm to the steel tubing. Just don't get over-zealous with your hammering, or the bronze rod will deform the seat tube from the inside. That will ruin your day, and don't ask me how I know. I have never tried the use of caustic soda to remove the seatpost. Youtube is a good source if you want to know how to do it. I'm just ticklish about the idea of putting that stuff inside my frame and prefer mechanical methods.
I am a bit worried about using a new saw blade owing to the 0.6mm tube thickness I don't care how long it takes I just don't want to ruin frame, I will briefly try it then if I still have doubts I will use the drill since there is not much meat at top to pull on.
The drill seems at this point to be the easiest and safest method but I could be wrong, I might even leave it for a week and come back with fresh eyes.
I am going very slow on this if I spend too much time in one session I will get frustrated and do something stupid like last time hammering down seat post on a different bike.
Now I know why most LBS won't do this it takes too much time for what they can charge and the possibility of ruining frame
Last edited by Bigbadjohn; 10-10-17 at 10:15 AM.
10-10-17, 11:19 AM
#20
I'm good to go!
Join Date: Jul 2017
Location: Mississippi
Posts: 14,985
Bikes: Tarmac Disc Comp Di2 - 2020
Mentioned: 51 Post(s)
Tagged: 0 Thread(s)
Quoted: 6193 Post(s)
Liked 4,808 Times
in
3,316 Posts
If you do, be sure to get some penetrating oil in there. Even if it is just wd-40 or such. A week will give it plenty of time to soak in. I still think adding through the bottom bracket on a upside down frame will let the oil get where it is needed between the tube and post.
10-10-17, 11:29 AM
#21
Junior Member
Thread Starter
If you do, be sure to get some penetrating oil in there. Even if it is just wd-40 or such. A week will give it plenty of time to soak in. I still think adding through the bottom bracket on a upside down frame will let the oil get where it is needed between the tube and post.
I removed decals today since they looked terrible pealing and faded.
On my last Bianchi that was stolen 6 months ago after it was fixed to perfection spent $300.
I removed with a razor blade took forever this time 15 mins all gone and no damage to paint using a heat gun and scraper.
I saw some nice blue ones on eBay will order once seat post is successful.
Chained to bike rack left for 30 min’s when I came back it was gone.
I don’t know if you saw that movie pee wee Herman great adventure where he has his bike stolen it was like that.
It was left on Main St. bike theft capital of Canada, after a few days I was talking to a mechanic in a bike shop
he said to go to Main St. you will find your bike there that's where all stolen bikes end up then he said where was it stolen from I was so embarrassed I could not tell him.
Another time I was on a bus with my bike it was raining hard when I started to get off at Main St. everybody on bus said don't get off here with a bike.
Picked up a couple of blades one a wood demolition the other a metal demolition.
Last edited by Bigbadjohn; 10-11-17 at 11:19 AM.
10-10-17, 06:39 PM
#22
Junior Member
Thread Starter
Made pay dirt today was like a dog with a bone could not leave it alone, I was getting nowhere with the saw new wood blade did cut a lot better but you did not know what you where cutting, tube was 10 inches in and I was scared
of cutting into the frame but that would not be a total disaster as I could braize the hole or slot I have plumbers soldering torch would probably not get hot enough for braizing would need oxygen so that's out not to mention the ruined paint job.
Destroying a $45 bike would be no big deal I have done worse, could still sell other parts, but I would look like a total idiot to all the people here reading my posts.
Decided to use drill it was all done in 3 mins just went naturally into tube and reamed it all out as I expected only better.
I should rent it out to bike shops I bet they don't have one, it's the only way to go.
the only problem now it there is still 4 inches still in lower down and drill has no more reach I will try and get an extension I have one but it's for a 1/4 inch drill. I have 6 inches clear so I could leave it but it has to be done right.
Next job remove BB to clean.
the minor marks on the top are from saw if I had used drill they would not be there.
I can order my new decals now there either blue or black, blue would look good, I will wait awhile once you press buy on eBay your locked in.
once saw something better and much cheaper but I had just pressed buy for another item
Bianchi Decals Stickers Bicycle Vinyl Graphics Autocollant Aufkleber Adesivi #2 | eBay
After that, I cleaned rear wheel much more satisfying I could see an end result
I was going to change cassette since they are cheap but this one is like new bike has hardly been ridden as all wearable parts are like that even chain is good
I can explain it to you but I can't make you understand
Last edited by Bigbadjohn; 10-11-17 at 11:23 AM.
 10-12-17, 10:07 AM
#24
Junior Member
Thread Starter
In my opinion using a saw is all Hollywood smoke and mirrors if you have watched the youtube video it was not a real-life event
he would have staged it for video knocked post in not to hard so it would come out easy it would be embarrassing if he could not do it on youtube
He only cuts top 1/3 of tube and he cheated because youtube is supposed to show people how to do things and nobody would have a pneumatic hammer power tool
The drill was so easy if I did not have one, I would have rented one, if they did not have a steel drill a masonry one would do for aluminum.
You could also drill out a steel seat post but would have to use sort of cutting fluid on drill or even light oil would do.
Got post clear to 9-inch depth I always have my saddle 5 inches above so I am leaving it as that.
Last edited by Bigbadjohn; 10-12-17 at 11:14 AM.
10-12-17, 10:37 AM
#25
I'm good to go!
Join Date: Jul 2017
Location: Mississippi
Posts: 14,985
Bikes: Tarmac Disc Comp Di2 - 2020
Mentioned: 51 Post(s)
Tagged: 0 Thread(s)
Quoted: 6193 Post(s)
Liked 4,808 Times
in
3,316 Posts
I do!
I like pneumatic tools. They tend to be lighter and smaller than their electric counter parts. Of course you have to deal with compressor and hose, so electric and battery tools still dominate my shop. But I'm thinking of getting some more pneumatic tools so I can DIY my own stone or solid surface counter tops without fear of electrocution from the water to cool the cut. They seem to be cheaper than their equivalent electric that is made to work with water cooling.
How far down is the rest of that seat post? Must have been a ridiculously long post. Have you found a friend with a slide hammer?