


Litespeed frame - metal sleeve holding back brake is toast
 02-01-19, 07:29 PM
#1

Newbie
Thread Starter
Join Date: Feb 2019
Posts: 3
Mentioned: 1 Post(s)
Tagged: 0 Thread(s)
Quoted: 1 Post(s)
Likes: 0
Liked 0 Times
in
0 Posts
Litespeed frame - metal sleeve holding back brake is toast
I've got an old Litespeed frame with a carbon seat stay. There was a metal insert to hold the back brake. I bought the frame used and the sleeve was cracked back then (15 years ago). It lasted this long but the part just basically disintegrated and the brake fell off. I'm looking for options. Does anyone have any ideas? I just sent an email to Litespeed to ask about it.
I haven't submitted enough posts to be able to post a picture, but I can send one if you ask.
I haven't submitted enough posts to be able to post a picture, but I can send one if you ask.
 02-01-19, 08:31 PM
#2
Senior Member
Join Date: Feb 2012
Location: Rochester, NY
Posts: 18,063
Bikes: Stewart S&S coupled sport tourer, Stewart Sunday light, Stewart Commuting, Stewart Touring, Co Motion Tandem, Stewart 3-Spd, Stewart Track, Fuji Finest, Mongoose Tomac ATB, GT Bravado ATB, JCP Folder, Stewart 650B ATB
Mentioned: 0 Post(s)
Tagged: 0 Thread(s)
Quoted: 4197 Post(s)
Liked 3,849 Times
in
2,300 Posts
It sounds like what is generally called the brake bridge has broken and/or come loose from the seat stays (not sure which). But the fix is about the same, replace the bridge. Given the manor of the question I would suggest that the OP is not the best person to do this repair. I would suggest that they contact a carbon bike repair company (Calfee comes to mind first) for an estimate. Calfee usually wants a few photos and some bike data to be able to offer a reasonably correct cost range. They can also do paint repair if that's part of the situation. I have seen a number of repaired carbon frames they have done and all have looked very nice after and have continued to give many miles of use after. Andy
__________________
AndrewRStewart
AndrewRStewart
02-01-19, 08:59 PM
#3
Senior Member

Join Date: Nov 2014
Location: Eugene, Oregon, USA
Posts: 27,547
Mentioned: 217 Post(s)
Tagged: 0 Thread(s)
Quoted: 18369 Post(s)
Liked 4,507 Times
in
3,350 Posts


Last edited by CliffordK; 02-02-19 at 12:26 PM.
02-01-19, 09:06 PM
#4
Senior Member
Join Date: Nov 2014
Location: Eugene, Oregon, USA
Posts: 27,547
Mentioned: 217 Post(s)
Tagged: 0 Thread(s)
Quoted: 18369 Post(s)
Liked 4,507 Times
in
3,350 Posts
What I'd probably do in this case would be to take two stainless steel "fender washers", maybe about 1 1/2" in diameter.
Bend them to the shape of your B-Stay. Drill the hole out to match the brake bolt on the rear side (rearward facing), and to match the smaller diameter shoulder of the recessed nut on the front side (forward facing). Grind the lower edge to match the wheel well. Then epoxy it all in place, perhaps adding the original tube if the OP still has it.
Using a bolt or dowel or twig, brake bolt, or something to help center it all.
02-01-19, 09:26 PM
#5
Senior Member
Join Date: Feb 2012
Location: Rochester, NY
Posts: 18,063
Bikes: Stewart S&S coupled sport tourer, Stewart Sunday light, Stewart Commuting, Stewart Touring, Co Motion Tandem, Stewart 3-Spd, Stewart Track, Fuji Finest, Mongoose Tomac ATB, GT Bravado ATB, JCP Folder, Stewart 650B ATB
Mentioned: 0 Post(s)
Tagged: 0 Thread(s)
Quoted: 4197 Post(s)
Liked 3,849 Times
in
2,300 Posts
Oh a wishbone set up? If the Op's problem is the same the I'd consider making a through tube with a flange on the rear end. The diameter to fit the, now, big hole through the wishbone. Maybe some prep/clean up of the hole first to insure the tub's diameter is correct. The flange would be as large around as fits for max surface area. The tube would fit all the way through the wishbone, have a counter bore to fit the recessed brake nut and extend far enough out to allow a large washer to fit over the tube's end to further expand the surface area. All the surfaces that touch the wishbone would be roughened for increased epoxy bite. The epoxy I'd use is DP460 (IIRC this is what some repair shops use and is readily available to a consumer). The wishbone might need some build up first with either carbon ply or a JB Weld like that has a filler in it.
But all this is speculation and as I mentioned before I question the OP's skill set to do this type of repair. Perhaps not too hard for someone with the right experience and tooling. Andy
But all this is speculation and as I mentioned before I question the OP's skill set to do this type of repair. Perhaps not too hard for someone with the right experience and tooling. Andy
__________________
AndrewRStewart
AndrewRStewart
02-01-19, 09:27 PM
#6
Clark W. Griswold
Join Date: Mar 2014
Location: ,location, location
Posts: 13,493
Bikes: Foundry Chilkoot Ti W/Ultegra Di2, Salsa Timberjack Ti, Cinelli Mash Work RandoCross Fun Time Machine, 1x9 XT Parts Hybrid, Co-Motion Cascadia, Specialized Langster, Phil Wood Apple VeloXS Frame (w/DA 7400), R+M Supercharger2 Rohloff, Habanero Ti 26
Mentioned: 54 Post(s)
Tagged: 0 Thread(s)
Quoted: 4342 Post(s)
Liked 3,978 Times
in
2,659 Posts
I wouldn't have bothered Litespeed they have nothing to do with that bike any more, you bought it used and broken 15 years ago. If you were the original owner than maybe you might reach out depending on their warranty and what happened but that is far from the case.
I would reach out to Calfee or Ruckus Composites or assuming it is a Ti frame maybe see if you can re-build the rear triangle with titanium. Bilenky Cycle Works or TiCycles could help out with that possibly (possibly not)
https://calfeedesign.com/carbon-repair/
https://www.ruckuscomp.com/
home | Repairs
https://www.ticycles.com/services/
02-01-19, 10:14 PM
#7
Senior Member
Join Date: Nov 2014
Location: Eugene, Oregon, USA
Posts: 27,547
Mentioned: 217 Post(s)
Tagged: 0 Thread(s)
Quoted: 18369 Post(s)
Liked 4,507 Times
in
3,350 Posts
I like @Andrew R Stewart;'s idea of a custom sleeve/flange on one side, and a washer on the other side.
Or, one could do two of the sleeve/flange parts that would meet in the middle.
You should be able to safely remove old epoxy and clearcoat, but I would be careful about removing significant amounts of carbon fiber.
I was wondering if there are any hollow recessed nut/bolts like crank arm bolts that would fit into your hole, as well as fitting the brake bolts.
02-02-19, 08:30 AM
#8
Senior Member
Join Date: Aug 2005
Location: Pittsburgh, PA
Posts: 33,656
Bikes: '96 Litespeed Catalyst, '05 Litespeed Firenze, '06 Litespeed Tuscany, '20 Surly Midnight Special, All are 3x10. It is hilly around here!
Mentioned: 39 Post(s)
Tagged: 0 Thread(s)
Quoted: 2026 Post(s)
Likes: 0
Liked 1,096 Times
in
742 Posts
I wouldn't have bothered Litespeed they have nothing to do with that bike any more, you bought it used and broken 15 years ago. If you were the original owner than maybe you might reach out depending on their warranty and what happened but that is far from the case.
I would reach out to Calfee or Ruckus Composites or assuming it is a Ti frame maybe see if you can re-build the rear triangle with titanium. Bilenky Cycle Works or TiCycles could help out with that possibly (possibly not)....
I would reach out to Calfee or Ruckus Composites or assuming it is a Ti frame maybe see if you can re-build the rear triangle with titanium. Bilenky Cycle Works or TiCycles could help out with that possibly (possibly not)....
Perhaps Calfee or other carbon repair shop could fix the damaged brake anchor hole at acceptable cost but replacing the carbon rear triangle with Ti would probably cost a significant fraction of a new frame. Lynsky offers new all-Ti road frames with MSRP's as low a $1150 so if the replacement is much less than that it should be considered.
02-02-19, 10:17 AM
#9
Newbie
Thread Starter
Join Date: Feb 2019
Posts: 3
Mentioned: 1 Post(s)
Tagged: 0 Thread(s)
Quoted: 1 Post(s)
Likes: 0
Liked 0 Times
in
0 Posts
First off, huge thanks to everyone for their suggestions. I've been thinking and googling and have learned a lot.
CliffordK, thank you for posting my pictures and for the suggestion. The stacked washers are going to be plan A.
The carbon is in great shape and there is no damage to the bridge. It is just that the alloy insert cracked in a couple of places over the years and eventually completely fell out. I will definitely file Calfee away in case a carbon problem develops.
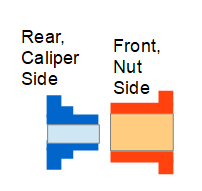
I've uploaded a couple of other pictures to my gallery. For nomenclature sake, I'm going to call the side with the missing piece the front of the brake mount, although it is the back of the bike, and the side with the intact insert the back of the brake mount. There is a PDF with my hand sketches and another picture of the insert on the back of the bridge for the recessed nut.
The back of the brake mount has an insert with a 10mm ID. The recessed brake nut slides in there and the 10mm contains the head of the nut to provide additional support for the brake. It does nothing to keep the brake from sliding out, it just keeps the brake from wobbling.
The broken insert on the front of the brake mount has an M6 hole for the brake bolt and the recessed nut would press on it when tightened to hold the brake in place and prevent it from rotating. Prior to my purchase, the brake nut was probably overtightened causing the original crack. It is also possible that the brake received a shock in an accident. I have always had issues keeping the rear brake from rotating.
It would be great to have a custom part machined. It isn't very complicated geometry. Unfortunately, I haven't had that done before and don't know where I would go locally. I got a quote from an online maker who quoted about $140 to make it out of stainless with a 40 day lead time. I don't necessarily mind the expense, but I fear that I might have it made and then discover that my design doesn't work as I intend and then I'm back to square one 40 days later and $140 lighter.
I did not previously know about the DP460 Epoxy, but I am definitely going to use that in my solution. I've decided to try taking 2 6Mx18mmx1.5mm washers and 3-4 6Mx12mmx1.5mm and stacking them together with the Epoxy. I'll then see how that fits in the hole and if it looks good, I'll epoxy it to the bridge after being sure to clean up the hole and remove the finish from the mounting surface, roughing up the carbon and the washer mount side and swabbing it all with alcohol. I put a PDF with some drawings that I made which might make help you understand what I'm planning.
The finished piece should look like a flanged sleeve. The flange will be 18mm in diameter and be about 3mm (more with glue) thick. The sleeve, which will fit in the existing hole will be 12mm in diameter. The inner holes will be M6 to fit the brake bolt. The recessed nut will seat against the 12mm washer. I'll use a straw or something else suitable that will be easy to clean out if it gets glued in. This should be stronger than the original piece, and it is definitely stronger than that piece after it has been cracked for 15+ years. When I'm done, you shouldn't even be able to tell that I had to get creative, hopefully. My thought is that the flange design provides more area to bond the part to the frame and the DP460 should be plenty strong to keep everything together.
Just to clarify my inquiry to Litespeed, I definitely didn't expect any warranty. I just sent them some pictures and asked if they could maybe offer some advice. Often these types of things are a common failure mode, so I figure it is likely that they have seen it before and maybe fixed it under warranty for others. Maybe they can sell me a sleeve. It can't hurt. I've ridden this bike cross country once and from Miami to Tallahassee twice. I've put tens of thousands of miles on it and hope to put tens of thousands more. We are very fond of each other. With my luck, I will finish my rigged solution and then hear back from them that they will gladly give me the part to fix it.
My background is that I am an electrical engineer. I've worked in plant environments on custom-built equipment, so I do have some experience solving mechanical type problems, but it definitely is not my forte. I started this major overhaul with new wheels, BB, etc, and then got in over my head when this piece fell apart on me. Any other helpful advice or comments about my plan are appreciated. I'm optimistic about Plan A. I'll keep you posted on my progress.
Thanks again, everyone.
CliffordK, thank you for posting my pictures and for the suggestion. The stacked washers are going to be plan A.
The carbon is in great shape and there is no damage to the bridge. It is just that the alloy insert cracked in a couple of places over the years and eventually completely fell out. I will definitely file Calfee away in case a carbon problem develops.
I've uploaded a couple of other pictures to my gallery. For nomenclature sake, I'm going to call the side with the missing piece the front of the brake mount, although it is the back of the bike, and the side with the intact insert the back of the brake mount. There is a PDF with my hand sketches and another picture of the insert on the back of the bridge for the recessed nut.
The back of the brake mount has an insert with a 10mm ID. The recessed brake nut slides in there and the 10mm contains the head of the nut to provide additional support for the brake. It does nothing to keep the brake from sliding out, it just keeps the brake from wobbling.
The broken insert on the front of the brake mount has an M6 hole for the brake bolt and the recessed nut would press on it when tightened to hold the brake in place and prevent it from rotating. Prior to my purchase, the brake nut was probably overtightened causing the original crack. It is also possible that the brake received a shock in an accident. I have always had issues keeping the rear brake from rotating.
It would be great to have a custom part machined. It isn't very complicated geometry. Unfortunately, I haven't had that done before and don't know where I would go locally. I got a quote from an online maker who quoted about $140 to make it out of stainless with a 40 day lead time. I don't necessarily mind the expense, but I fear that I might have it made and then discover that my design doesn't work as I intend and then I'm back to square one 40 days later and $140 lighter.
I did not previously know about the DP460 Epoxy, but I am definitely going to use that in my solution. I've decided to try taking 2 6Mx18mmx1.5mm washers and 3-4 6Mx12mmx1.5mm and stacking them together with the Epoxy. I'll then see how that fits in the hole and if it looks good, I'll epoxy it to the bridge after being sure to clean up the hole and remove the finish from the mounting surface, roughing up the carbon and the washer mount side and swabbing it all with alcohol. I put a PDF with some drawings that I made which might make help you understand what I'm planning.
The finished piece should look like a flanged sleeve. The flange will be 18mm in diameter and be about 3mm (more with glue) thick. The sleeve, which will fit in the existing hole will be 12mm in diameter. The inner holes will be M6 to fit the brake bolt. The recessed nut will seat against the 12mm washer. I'll use a straw or something else suitable that will be easy to clean out if it gets glued in. This should be stronger than the original piece, and it is definitely stronger than that piece after it has been cracked for 15+ years. When I'm done, you shouldn't even be able to tell that I had to get creative, hopefully. My thought is that the flange design provides more area to bond the part to the frame and the DP460 should be plenty strong to keep everything together.
Just to clarify my inquiry to Litespeed, I definitely didn't expect any warranty. I just sent them some pictures and asked if they could maybe offer some advice. Often these types of things are a common failure mode, so I figure it is likely that they have seen it before and maybe fixed it under warranty for others. Maybe they can sell me a sleeve. It can't hurt. I've ridden this bike cross country once and from Miami to Tallahassee twice. I've put tens of thousands of miles on it and hope to put tens of thousands more. We are very fond of each other. With my luck, I will finish my rigged solution and then hear back from them that they will gladly give me the part to fix it.
My background is that I am an electrical engineer. I've worked in plant environments on custom-built equipment, so I do have some experience solving mechanical type problems, but it definitely is not my forte. I started this major overhaul with new wheels, BB, etc, and then got in over my head when this piece fell apart on me. Any other helpful advice or comments about my plan are appreciated. I'm optimistic about Plan A. I'll keep you posted on my progress.
Thanks again, everyone.
02-02-19, 10:33 AM
#10
Senior Member
Join Date: Feb 2012
Location: Rochester, NY
Posts: 18,063
Bikes: Stewart S&S coupled sport tourer, Stewart Sunday light, Stewart Commuting, Stewart Touring, Co Motion Tandem, Stewart 3-Spd, Stewart Track, Fuji Finest, Mongoose Tomac ATB, GT Bravado ATB, JCP Folder, Stewart 650B ATB
Mentioned: 0 Post(s)
Tagged: 0 Thread(s)
Quoted: 4197 Post(s)
Liked 3,849 Times
in
2,300 Posts
I'll have to reread Robin's plan again to follow all the details but one thing I would avoid is ending up with a fix that then allowed compressive pressures on the carbon. The insert needs to handle all the brake mounting tightening forces. The carbon should only see the locating and twisting (when the caliper is applying braking) forces. Andy
__________________
AndrewRStewart
AndrewRStewart
02-02-19, 10:57 AM
#11
Newbie
Thread Starter
Join Date: Feb 2019
Posts: 3
Mentioned: 1 Post(s)
Tagged: 0 Thread(s)
Quoted: 1 Post(s)
Likes: 0
Liked 0 Times
in
0 Posts
I fully agree, my plan should be similar to the original and will not compress the carbon. The flanged sleeve will insert into the hole and the epoxy bond on the surface of the carbon and inside the hole will be mounting it to the frame. All of the pressure from the brake nut will be applied to the washer.
Unfortunately, I have not posed enough to be able to put the pictures in my post, but they are uploaded to my gallery.
Unfortunately, I have not posed enough to be able to put the pictures in my post, but they are uploaded to my gallery.
02-02-19, 11:18 AM
#12
Banned
Bodging theory
you might fill the hollow space with epoxy putty that when cured will form a solid ...
poke a hole in the putty while soft so your liner sleeve or at least a pilot drill , will fit through
does not have to be precise later you can ream out the cured putty for a accurate sleeve fit & epoxy it in and that + the cured putty will not compress
metal sleeve is edge on , then add a washer on the faces
if back flange & sleeve are a single piece epoxied in place then the knurling on the brake center bolt will resist rotation
Thinking a big enough pop rivet, with a 6mm hole can be used, push the pin out rather than pulling it.. (have not done this I'm not into carbon bikes)
might have to settle for an external nut fixed brake, rather than a sleeve flush nut ..
... of course a machine shop can make you a custom part...
~o) .. morning coffee
...
Last edited by fietsbob; 02-02-19 at 11:26 AM.
02-02-19, 12:40 PM
#13
Senior Member
Join Date: Nov 2014
Location: Eugene, Oregon, USA
Posts: 27,547
Mentioned: 217 Post(s)
Tagged: 0 Thread(s)
Quoted: 18369 Post(s)
Liked 4,507 Times
in
3,350 Posts
The PDF didn't show up.
I've linked to the second photo above.
You might try converting your drawing to a JPG to upload.
Also, you can go up one level in the Gallery, and add photos without posts.
Let us know if Litespeed gets back to you, and has spare parts, and perhaps instructions. That may well be the easiest.
I've sent you a PM. Hopefully you can read it.
02-02-19, 02:27 PM
#14
Senior Member
Join Date: Nov 2014
Location: Eugene, Oregon, USA
Posts: 27,547
Mentioned: 217 Post(s)
Tagged: 0 Thread(s)
Quoted: 18369 Post(s)
Liked 4,507 Times
in
3,350 Posts
Ok, I got an E-Mail from Rob.
Let's see if I can attach his original PDF.
2019_02_02_10_32_09.pdf
I'm thinking about machining two step-cylinders designed to slide together.
I've got rudimentary machining capabilities, but should be able to handle a simple slide-together part. Maybe thread together, but perhaps threading isn't necessary, especially if it is all epoxied in place.
I'm thinking of looking for stainless 1/2" bolts as raw materials (somewhat of a flange built in)

Knurling the outside?
Let's see if I can attach his original PDF.
2019_02_02_10_32_09.pdf
I'm thinking about machining two step-cylinders designed to slide together.
I've got rudimentary machining capabilities, but should be able to handle a simple slide-together part. Maybe thread together, but perhaps threading isn't necessary, especially if it is all epoxied in place.
I'm thinking of looking for stainless 1/2" bolts as raw materials (somewhat of a flange built in)
Knurling the outside?
02-02-19, 07:34 PM
#15
Senior Member
Join Date: Jan 2009
Location: San Diego, CA
Posts: 3,666
Mentioned: 10 Post(s)
Tagged: 0 Thread(s)
Quoted: 836 Post(s)
Liked 1,060 Times
in
744 Posts
An aluminum Schrader valve to Presta valve rim hole reducer may work. Not sure if they all have the same exact dimensions but the ones I have are 6.05mm ID x 8mm OD x 10mmLength & has a flange 9.5mm OD x 1.75mm Thick. So length with flange = 11.75mm total length. https://www.biketiresdirect.com/prod...iABEgJvPfD_BwE
02-03-19, 05:37 AM
#16
SE Wis
Join Date: Apr 2005
Location: Milwaukee, WI
Posts: 10,505
Bikes: '68 Raleigh Sprite, '02 Raleigh C500, '84 Raleigh Gran Prix, '91 Trek 400, 2013 Novara Randonee, 1990 Trek 970
Mentioned: 40 Post(s)
Tagged: 0 Thread(s)
Quoted: 2743 Post(s)
Liked 3,390 Times
in
2,053 Posts
02-04-19, 06:02 AM
#18
SE Wis
Join Date: Apr 2005
Location: Milwaukee, WI
Posts: 10,505
Bikes: '68 Raleigh Sprite, '02 Raleigh C500, '84 Raleigh Gran Prix, '91 Trek 400, 2013 Novara Randonee, 1990 Trek 970
Mentioned: 40 Post(s)
Tagged: 0 Thread(s)
Quoted: 2743 Post(s)
Liked 3,390 Times
in
2,053 Posts
It would be great to have a custom part machined. It isn't very complicated geometry.
My background is that I am an electrical engineer. I've worked in plant environments on custom-built equipment, so I do have some experience solving mechanical type problems, but it definitely is not my forte. I started this major overhaul with new wheels, BB, etc, and then got in over my head when this piece fell apart on me. Any other helpful advice or comments about my plan are appreciated. I'm optimistic about Plan A. I'll keep you posted on my progress..
My background is that I am an electrical engineer. I've worked in plant environments on custom-built equipment, so I do have some experience solving mechanical type problems, but it definitely is not my forte. I started this major overhaul with new wheels, BB, etc, and then got in over my head when this piece fell apart on me. Any other helpful advice or comments about my plan are appreciated. I'm optimistic about Plan A. I'll keep you posted on my progress..
 . The other place to look for cheap fast one off parts fab is your manufacturer has a prototyping lab.
I visited one of our manufacturers and got to talking to their design lab guys. Ended up getting an unobtanium Sturmey-Archer S-5 plastic shifter 3D printed for nothing. Mailed him the broken part, he modeled it, and printed a couple in different materials.
02-04-19, 06:08 AM
#19
SE Wis
Join Date: Apr 2005
Location: Milwaukee, WI
Posts: 10,505
Bikes: '68 Raleigh Sprite, '02 Raleigh C500, '84 Raleigh Gran Prix, '91 Trek 400, 2013 Novara Randonee, 1990 Trek 970
Mentioned: 40 Post(s)
Tagged: 0 Thread(s)
Quoted: 2743 Post(s)
Liked 3,390 Times
in
2,053 Posts
Maybe even use that as the raw material and drill out the threads in the center.
https://framebuildersupply.com/produ...RoCircQAvD_BwE
02-04-19, 06:13 PM
#20
Banned
a bit of texture, will keep the brake center bolt from rotating without going heavy on the tightening

Thread
Thread Starter
Forum
Replies
Last Post
andreunin1936
Bicycle Mechanics
15
08-16-16 11:04 AM
Yo Spiff
Bicycle Mechanics
18
05-31-13 09:04 AM
