


Pinarello F10 and Super Record 12 question
 06-06-19, 10:05 AM
#26
Junior Member
Thread Starter
 06-06-19, 10:17 AM
#27

Full Member
Join Date: Apr 2019
Location: Northern NJ
Posts: 419
Bikes: 1987 Pinarello Montello, 1996 Litespeed Classic, 1996 Colnago Master Light, 1997 Litespeed Ultimate, 2006 Opera Leonardo FP, 2006 Pinarello Paris FP, 1984 Pinarello Record, 89-ish Cornelo Profilo
Mentioned: 5 Post(s)
Tagged: 0 Thread(s)
Quoted: 148 Post(s)
Liked 119 Times
in
73 Posts
I'm about to start a brand new build of a 2006 Opera Leonardo FP (2006 Pinarello Paris) with Chorus 11. Not much different from your build. I can take photos as I go and post a thread if it'll help you. The only thing done so far is a LBS cut down the carbon steerer tube for me - I don't have those tools and will never need them again. Also the headset bearings came installed in the frame.
06-06-19, 11:01 AM
#28
Junior Member
Thread Starter
I'm about to start a brand new build of a 2006 Opera Leonardo FP (2006 Pinarello Paris) with Chorus 11. Not much different from your build. I can take photos as I go and post a thread if it'll help you. The only thing done so far is a LBS cut down the carbon steerer tube for me - I don't have those tools and will never need them again. Also the headset bearings came installed in the frame.
06-06-19, 06:21 PM
#29
Senior Member
Join Date: Jun 2002
Location: Montreal, Quebec
Posts: 5,917
Mentioned: 16 Post(s)
Tagged: 0 Thread(s)
Quoted: 1813 Post(s)
Liked 1,691 Times
in
972 Posts
This person has chosen to have the fork steer tube cut by the shop. This is very easy to screw up. Cutting the steer tube to the correct length is critical to the future of your bike. If you do it yourself and cut off too much you will have scrapped an expensive part of your bike. The red tubing cutter is a very large red flag to your bike build. Don't do this part of the job yourself
06-06-19, 07:35 PM
#30
Full Member
Join Date: Apr 2019
Location: Northern NJ
Posts: 419
Bikes: 1987 Pinarello Montello, 1996 Litespeed Classic, 1996 Colnago Master Light, 1997 Litespeed Ultimate, 2006 Opera Leonardo FP, 2006 Pinarello Paris FP, 1984 Pinarello Record, 89-ish Cornelo Profilo
Mentioned: 5 Post(s)
Tagged: 0 Thread(s)
Quoted: 148 Post(s)
Liked 119 Times
in
73 Posts
This person has chosen to have the fork steer tube cut by the shop. This is very easy to screw up. Cutting the steer tube to the correct length is critical to the future of your bike. If you do it yourself and cut off too much you will have scrapped an expensive part of your bike. The red tubing cutter is a very large red flag to your bike build. Don't do this part of the job yourself
Likes For CyclingFool95:
06-06-19, 08:36 PM
#31
Junior Member
Thread Starter
This person has chosen to have the fork steer tube cut by the shop. This is very easy to screw up. Cutting the steer tube to the correct length is critical to the future of your bike. If you do it yourself and cut off too much you will have scrapped an expensive part of your bike. The red tubing cutter is a very large red flag to your bike build. Don't do this part of the job yourself
06-06-19, 08:39 PM
#32
Full Member
Join Date: Apr 2019
Location: Northern NJ
Posts: 419
Bikes: 1987 Pinarello Montello, 1996 Litespeed Classic, 1996 Colnago Master Light, 1997 Litespeed Ultimate, 2006 Opera Leonardo FP, 2006 Pinarello Paris FP, 1984 Pinarello Record, 89-ish Cornelo Profilo
Mentioned: 5 Post(s)
Tagged: 0 Thread(s)
Quoted: 148 Post(s)
Liked 119 Times
in
73 Posts
Park Tool Carbon Cutting Saw Blade https://www.amazon.com/dp/B00426GT1W..._.4C-CbFXGRWCN
Park Tool Oversized Adjustable Saw Guide https://www.amazon.com/dp/B0042696TY..._G5C-CbBE7JXNP
Likes For CyclingFool95:
06-06-19, 11:13 PM
#33
Junior Member
Thread Starter
Absolutely do not use that cutter on a carbon steerer. You need these:
Park Tool Carbon Cutting Saw Blade https://www.amazon.com/dp/B00426GT1W..._.4C-CbFXGRWCN
Park Tool Oversized Adjustable Saw Guide https://www.amazon.com/dp/B0042696TY..._G5C-CbBE7JXNP
Park Tool Carbon Cutting Saw Blade https://www.amazon.com/dp/B00426GT1W..._.4C-CbFXGRWCN
Park Tool Oversized Adjustable Saw Guide https://www.amazon.com/dp/B0042696TY..._G5C-CbBE7JXNP
06-07-19, 04:54 AM
#35
Junior Member
Thread Starter
Likes For alcjphil:
06-07-19, 07:03 PM
#37
Junior Member
Thread Starter
Absolutely do not use that cutter on a carbon steerer. You need these:
Park Tool Carbon Cutting Saw Blade https://www.amazon.com/dp/B00426GT1W..._.4C-CbFXGRWCN
Park Tool Oversized Adjustable Saw Guide https://www.amazon.com/dp/B0042696TY..._G5C-CbBE7JXNP
Park Tool Carbon Cutting Saw Blade https://www.amazon.com/dp/B00426GT1W..._.4C-CbFXGRWCN
Park Tool Oversized Adjustable Saw Guide https://www.amazon.com/dp/B0042696TY..._G5C-CbBE7JXNP

Is the screw necessary? In super record 12 cranks?
06-07-19, 10:12 PM
#38
Junior Member
Thread Starter
I'm about to start a brand new build of a 2006 Opera Leonardo FP (2006 Pinarello Paris) with Chorus 11. Not much different from your build. I can take photos as I go and post a thread if it'll help you. The only thing done so far is a LBS cut down the carbon steerer tube for me - I don't have those tools and will never need them again. Also the headset bearings came installed in the frame.


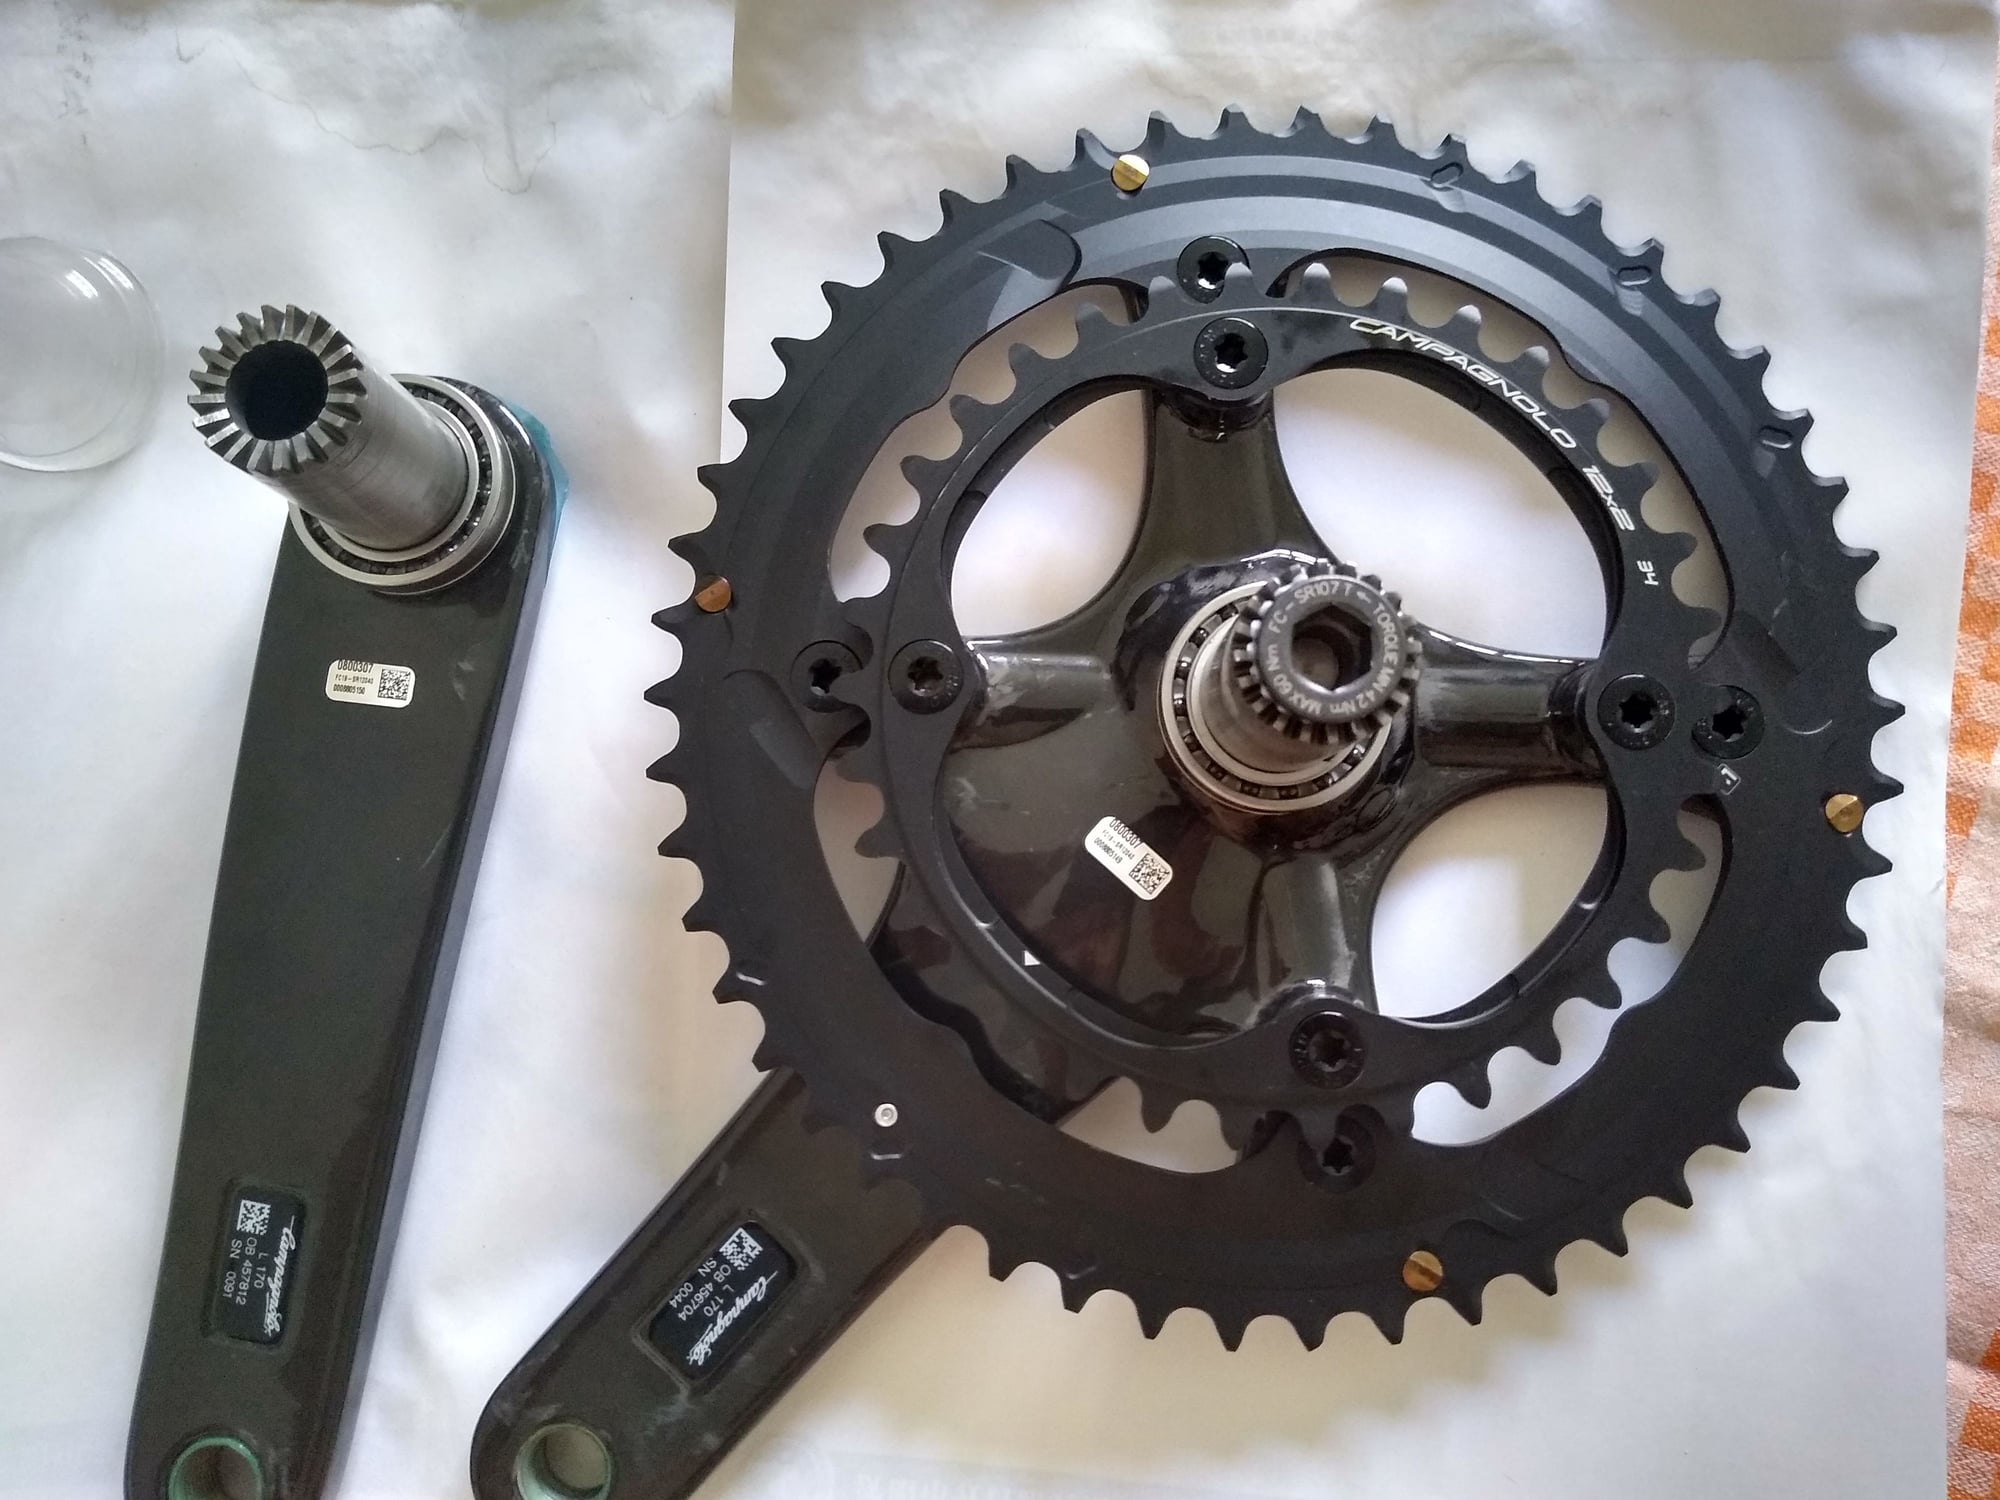

The crankset chainrings ,some are flat,some are not flat,is it all right?
How to install crank? Remove six angle screw sr107 and install?
Min 42nm max 60nm, what does it mean?
Last edited by cycling2012; 06-08-19 at 05:20 AM.
06-08-19, 06:01 AM
#39
Senior Member
Join Date: Oct 2007
Location: West Yorkshire, United Kingdom
Posts: 5,773
Mentioned: 5 Post(s)
Tagged: 0 Thread(s)
Quoted: 453 Post(s)
Liked 104 Times
in
87 Posts
The tools (and pipe cutter!) you have photoed (take it they are yours?) are pretty basic/generic, and you're wanting to build a very high end bike!! You will need specific tools, also, higher quality tools are nicer to work with & have higher tolerances, so less likely to slip
From your posts, your probably better off leaving it with the LBS, same for any post that asks about high-end bikes, they immediately indicate that the poster is out of their depth with out needing to read anything else.
06-08-19, 06:10 AM
#40
Full Member
Join Date: Mar 2015
Location: Gatineau, Quebec
Posts: 293
Bikes: Lynskey GR270
Mentioned: 5 Post(s)
Tagged: 0 Thread(s)
Quoted: 115 Post(s)
Liked 69 Times
in
49 Posts
What @jimc101 said, leave it to the pros, you have no idea what you're doing. It's fine to learn on a cheap bike, not on a (fake?) 5000$ bike!
06-08-19, 07:06 AM
#41
Full Member
Join Date: Apr 2019
Location: Northern NJ
Posts: 419
Bikes: 1987 Pinarello Montello, 1996 Litespeed Classic, 1996 Colnago Master Light, 1997 Litespeed Ultimate, 2006 Opera Leonardo FP, 2006 Pinarello Paris FP, 1984 Pinarello Record, 89-ish Cornelo Profilo
Mentioned: 5 Post(s)
Tagged: 0 Thread(s)
Quoted: 148 Post(s)
Liked 119 Times
in
73 Posts
You should read all of Campy's instruction manuals that came with the groupset - they will answer your questions. They are very good. I've always found there warning on every other page about don't screw up, it can cause death (I'm paraphrasing a little) to be over the top, but maybe not. At the very least, you can ruin expensive components or frame.
To answer your question though, once the cups are properly installed in the frame's bottom bracket, you just push in the crankset (follow Campy's instructions and don't forget the wavy washer). Then, the bolt is used to join the two halves of the crankset together in the middle (make sure the crankarms are exactly 180� apart). You then torque the bolt to 42-60 N-m (Newton-meters) using a torque wrench. You can convert N-m to in-lbs here: Newton Meters to Pound-Force Inchs Conversion Calculator
06-08-19, 07:44 AM
#42
Senior Member
Join Date: Feb 2018
Posts: 566
Mentioned: 1 Post(s)
Tagged: 0 Thread(s)
Quoted: 241 Post(s)
Liked 232 Times
in
153 Posts
From the questions you're asking, I'm going to have to agree with others here. If you really want to work on bikes, buy something old/cheap, take it apart, and put it back together. You'll learn a lot that way. Don't have your first build be a $2000 groupset and $4000 frame (especially a carbon one).
You should read all of Campy's instruction manuals that came with the groupset - they will answer your questions. They are very good. I've always found there warning on every other page about don't screw up, it can cause death (I'm paraphrasing a little) to be over the top, but maybe not. At the very least, you can ruin expensive components or frame.
To answer your question though, once the cups are properly installed in the frame's bottom bracket, you just push in the crankset (follow Campy's instructions and don't forget the wavy washer). Then, the bolt is used to join the two halves of the crankset together in the middle (make sure the crankarms are exactly 180� apart). You then torque the bolt to 42-60 N-m (Newton-meters) using a torque wrench. You can convert N-m to in-lbs here: Newton Meters to Pound-Force Inchs Conversion Calculator
That said, yes, remove the center bolt SR107. It should be a 10mm hex wrench to remove it. Assemble per Campag's instructions like @CyclingFool95 said. A few of tips: Put a light coating of grease in the cups prior to inserting the chainset. Don't forget to install the spring clip as this is what locates the chainset in the proper position. It may take a little light pressure pushing the chainset in to get the clip to seat properly. And since you have a Super Record chainset the centerbolt (SR107) is a left-hand thread. It tightens anti-clockwise, and installs from the NDS crank.
Likes For RGMN:
06-08-19, 07:47 AM
#43
Senior Member
Join Date: Feb 2018
Posts: 566
Mentioned: 1 Post(s)
Tagged: 0 Thread(s)
Quoted: 241 Post(s)
Liked 232 Times
in
153 Posts
One more thing - That center bolt SR107 is titanium. Make sure your wrench is fully seated before applying any torque, and use a light touch when threading it into the chainset. It is pretty easy to bugger up on that bolt, and replacements are $$$$$.
06-08-19, 10:06 AM
#44
Junior Member
Thread Starter
I'll add my voice and echo what everyone else is saying - Having a first bike build with a $4000 frame and top of the line Super Record components is NOT the way to learn how to build a bike. As someone who has built literally hundreds of customs bikes (I wrench for a couple of local shops, ended up building the Campagnolo equipped customs for several shops because they didn't have any experience with Campagnolo) it is easy to damage some of these high end components and not even know you've done it.
That said, yes, remove the center bolt SR107. It should be a 10mm hex wrench to remove it. Assemble per Campag's instructions like @CyclingFool95 said. A few of tips: Put a light coating of grease in the cups prior to inserting the chainset. Don't forget to install the spring clip as this is what locates the chainset in the proper position. It may take a little light pressure pushing the chainset in to get the clip to seat properly. And since you have a Super Record chainset the centerbolt (SR107) is a left-hand thread. It tightens anti-clockwise, and installs from the NDS crank.
That said, yes, remove the center bolt SR107. It should be a 10mm hex wrench to remove it. Assemble per Campag's instructions like @CyclingFool95 said. A few of tips: Put a light coating of grease in the cups prior to inserting the chainset. Don't forget to install the spring clip as this is what locates the chainset in the proper position. It may take a little light pressure pushing the chainset in to get the clip to seat properly. And since you have a Super Record chainset the centerbolt (SR107) is a left-hand thread. It tightens anti-clockwise, and installs from the NDS crank.
I need to buy some necessary tools.
06-08-19, 05:51 PM
#45
Senior Member
Join Date: Jun 2002
Location: Montreal, Quebec
Posts: 5,917
Mentioned: 16 Post(s)
Tagged: 0 Thread(s)
Quoted: 1813 Post(s)
Liked 1,691 Times
in
972 Posts
Don't know what to say about this. A torque wrench is not a bicycle specific tool. If local bike shops don't have one, you are going to the wrong shops. Any reputable bike shop should have torque wrenches in their workshop. Shops that install Shimano and SRAM components have just as much need for a torque wrench as if they were installing Campagnolo components. Buying tools that you don't know how to use is not a solution unless you are willing to take a proper mechanics course to learn what they are for and how to use them. From a previous post, (#37) it appears that you don't even know the difference between a Powertorque crank and the Ultratorque crank that you bought. Ignorance can cost you a lot of money
Last edited by alcjphil; 06-08-19 at 05:56 PM.
Likes For Bandera:
06-08-19, 07:08 PM
#47
Expired Member

Join Date: Jun 2007
Location: TN
Posts: 11,491
Mentioned: 37 Post(s)
Tagged: 0 Thread(s)
Quoted: 3646 Post(s)
Liked 5,377 Times
in
2,729 Posts
06-08-19, 07:23 PM
#48
Senior Member
Join Date: Aug 2005
Location: Pittsburgh, PA
Posts: 33,656
Bikes: '96 Litespeed Catalyst, '05 Litespeed Firenze, '06 Litespeed Tuscany, '20 Surly Midnight Special, All are 3x10. It is hilly around here!
Mentioned: 39 Post(s)
Tagged: 0 Thread(s)
Quoted: 2026 Post(s)
Likes: 0
Liked 1,095 Times
in
741 Posts
06-08-19, 07:59 PM
#49
Senior Member
Join Date: Jun 2002
Location: Montreal, Quebec
Posts: 5,917
Mentioned: 16 Post(s)
Tagged: 0 Thread(s)
Quoted: 1813 Post(s)
Liked 1,691 Times
in
972 Posts
I know what you mean, but hope springs eternal. Some consolation in knowing that if I stop banging my head against this wall it will feel really good

