


New Bike Build - One Man's Tutorial
 06-09-19, 08:42 PM
#26

Full Member
Thread Starter
Join Date: Apr 2019
Location: Northern NJ
Posts: 419
Bikes: 1987 Pinarello Montello, 1996 Litespeed Classic, 1996 Colnago Master Light, 1997 Litespeed Ultimate, 2006 Opera Leonardo FP, 2006 Pinarello Paris FP, 1984 Pinarello Record, 89-ish Cornelo Profilo
Mentioned: 5 Post(s)
Tagged: 0 Thread(s)
Quoted: 148 Post(s)
Liked 119 Times
in
73 Posts
Every time I do a build, after its too late I think I should have weighed everything as I went along. This time is no exception.
 06-10-19, 04:30 PM
#27
Full Member
Thread Starter
Join Date: Apr 2019
Location: Northern NJ
Posts: 419
Bikes: 1987 Pinarello Montello, 1996 Litespeed Classic, 1996 Colnago Master Light, 1997 Litespeed Ultimate, 2006 Opera Leonardo FP, 2006 Pinarello Paris FP, 1984 Pinarello Record, 89-ish Cornelo Profilo
Mentioned: 5 Post(s)
Tagged: 0 Thread(s)
Quoted: 148 Post(s)
Liked 119 Times
in
73 Posts
Now I'm up to putting the levers on the bars. This was a take-off so the levers were pre-cabled. Fortunately, they came off a 60cm+ frame and are going onto a 53cm frame, so cable and housing length is no issue. In fact, I ended up cutting around 2" off the front brake cable housing and around an inch off the rear one at the back.
When I install the levers onto these Deda bars (this is the third time I'm doing this), I find it easiest to remove the clamp from the levers and then re-attach the levers once the clamp is in roughly the right place. To access the Torx bolt, you need to peel back the hood (rubber covering) on the lever - don't forget to carefully remove the little tab on the hood from the slot in the lever, just by the thumblever. I found a nice set at Harbor Freight with long hex torx drivers - the set came with a handle, which I use to seat the lever on the clamp. I then switch to the torque wrench. I actually don't torque all the way to the Campy specified value. I prefer the levers to be able to move very very slightly if hit, but not nearly loose enough to move if I'm leaning on them - I figure that might save some damage on impact.
I use a level on the end of the stem to make sure the bike is vertical, and then use the level across the levers to make sure they're even.
Last edited by CyclingFool95; 06-10-19 at 08:04 PM.
 06-10-19, 06:48 PM
#29
Full Member
Thread Starter
Join Date: Apr 2019
Location: Northern NJ
Posts: 419
Bikes: 1987 Pinarello Montello, 1996 Litespeed Classic, 1996 Colnago Master Light, 1997 Litespeed Ultimate, 2006 Opera Leonardo FP, 2006 Pinarello Paris FP, 1984 Pinarello Record, 89-ish Cornelo Profilo
Mentioned: 5 Post(s)
Tagged: 0 Thread(s)
Quoted: 148 Post(s)
Liked 119 Times
in
73 Posts
Yes. Very simply, I don't have the tools. This is my one and only bike with a carbon steerer (and I'm unlikely to get another one) and it was cheaper to have the LBS do it than to buy the tools. The hacksaw blade isn't too expensive, but the Park tool to hold the blade straight is pretty pricey.
06-12-19, 04:13 PM
#30
Senior Member
Join Date: Apr 2007
Posts: 6,760
Mentioned: 10 Post(s)
Tagged: 0 Thread(s)
Quoted: 1109 Post(s)
Liked 1,200 Times
in
760 Posts
Yes. Very simply, I don't have the tools. This is my one and only bike with a carbon steerer (and I'm unlikely to get another one) and it was cheaper to have the LBS do it than to buy the tools. The hacksaw blade isn't too expensive, but the Park tool to hold the blade straight is pretty pricey.
If I thought I could get my LBS to just cut it while I was waiting, I might make the 45 minute round trip to do it, but probably not. I'm tired of needing to convince them that I know what I'm doing when I bring stuff in that the casual rider doesn't need done.
Likes For Camilo:
06-12-19, 04:55 PM
#31
Full Member
Join Date: Mar 2015
Location: Gatineau, Quebec
Posts: 293
Bikes: Lynskey GR270
Mentioned: 5 Post(s)
Tagged: 0 Thread(s)
Quoted: 115 Post(s)
Liked 69 Times
in
49 Posts
If you have a carbon steerer tube, I suggest investing at least in a blade for carbon. Having used both a regular and the "for carbon" blade, it makes much nicer cuts, and is probably less harsh on the tube. You'll be able to use it again when you buy n+1 ;-)
Agree that the cutting guide is not required. I used an old crappy stem I had. Clamped it at the right height and used it as a guide. You could also wrap some masking tape around the tube to act as a visual guide.
Agree that the cutting guide is not required. I used an old crappy stem I had. Clamped it at the right height and used it as a guide. You could also wrap some masking tape around the tube to act as a visual guide.
Likes For ChinookTx:
06-13-19, 01:00 PM
#32
Senior Member

Join Date: Jul 2017
Location: Queens, NY for now...
Posts: 1,515
Bikes: 82 Lotus Unique, 86 Lotus Legend, 88 Basso Loto, 88 Basso PR, 89 Basso PR, 96 Bianchi CDI, 2013 Deda Aegis, 2019 Basso Diamante SV
Mentioned: 46 Post(s)
Tagged: 0 Thread(s)
Quoted: 943 Post(s)
Liked 172 Times
in
113 Posts
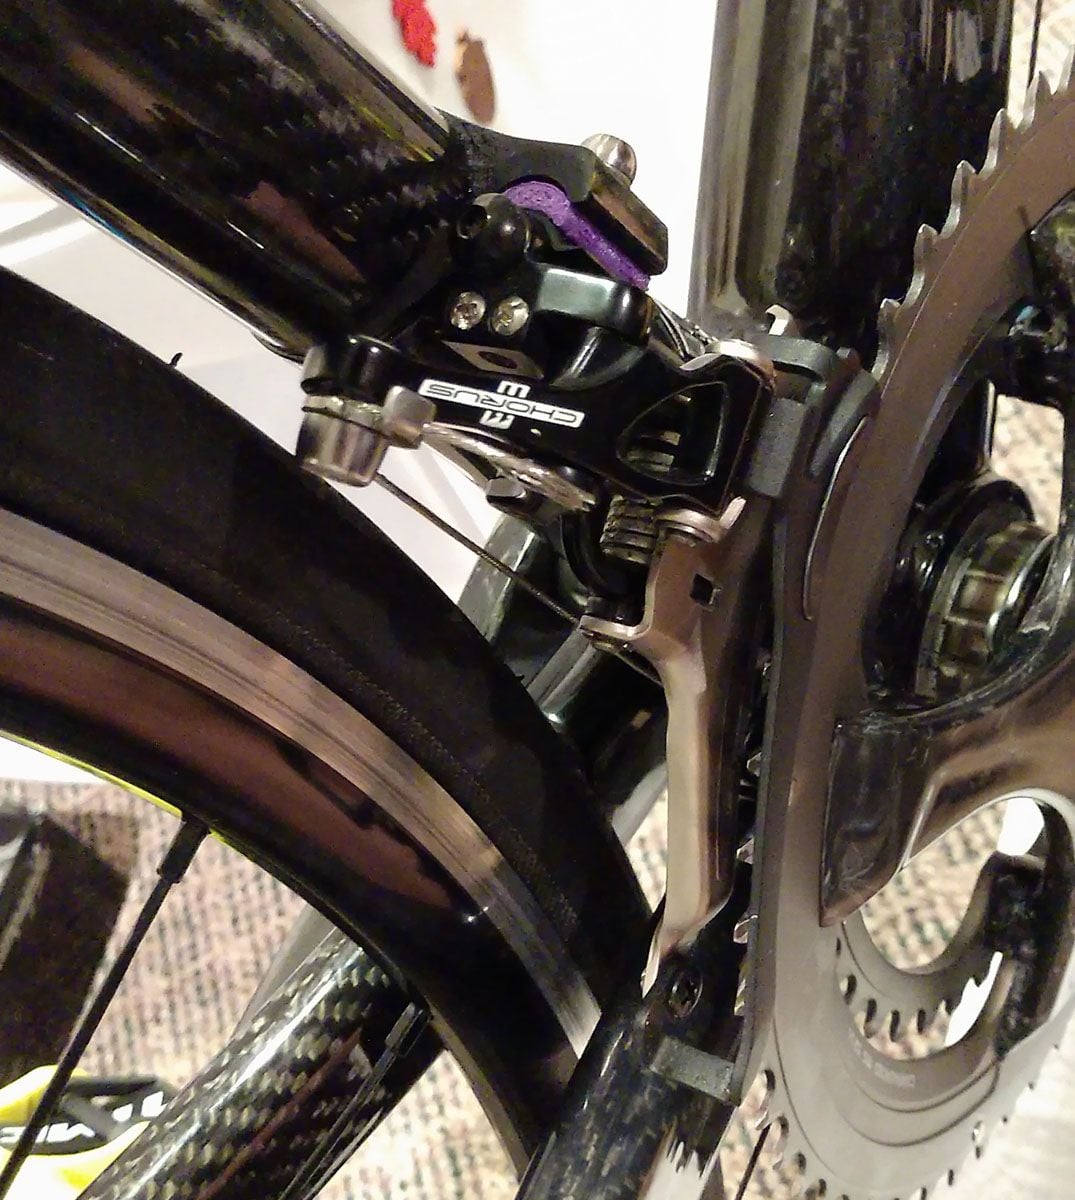
Now, and this is very important, The threads for the screw are in the non-drive arm for Chorus. You should have put anti-seize there too. Install the screw using your long 10mm allen wrench and snug it up. Do not, I repeat, do not install it on the non-drive side. If you do, you will spend the next fifteen minutes trying to figure out why the crankarms are moving slightly against each other, before you remember that this is Chorus and the bolt goes in on the drive side. So, don't do it this way:

Actually, do it this way but on the other side of the bike.
Actually, do it this way but on the other side of the bike.
06-13-19, 04:42 PM
#33

Senior Member

Join Date: Jul 2006
Location: San Jose (Willow Glen) Ca
Posts: 9,842
Bikes: Kirk Custom JK Special, '84 Team Miyata,(dura ace old school) 80?? SR Semi-Pro 600 Arabesque
Mentioned: 106 Post(s)
Tagged: 0 Thread(s)
Quoted: 2337 Post(s)
Liked 2,820 Times
in
1,540 Posts
Good choice of build the bike music.....especially Elvis Costello
__________________
Life is too short not to ride the best bike you have, as much as you can
(looking for Torpado Super light frame/fork or for Raleigh International frame fork 58cm)
Life is too short not to ride the best bike you have, as much as you can
(looking for Torpado Super light frame/fork or for Raleigh International frame fork 58cm)
06-13-19, 05:51 PM
#34
Full Member
Thread Starter
Join Date: Apr 2019
Location: Northern NJ
Posts: 419
Bikes: 1987 Pinarello Montello, 1996 Litespeed Classic, 1996 Colnago Master Light, 1997 Litespeed Ultimate, 2006 Opera Leonardo FP, 2006 Pinarello Paris FP, 1984 Pinarello Record, 89-ish Cornelo Profilo
Mentioned: 5 Post(s)
Tagged: 0 Thread(s)
Quoted: 148 Post(s)
Liked 119 Times
in
73 Posts
You can either put on loctite or anti-seize but not both. So, the question comes down to which you are more worried about, something corroding/galling/seizing or loosening. The way I see it, with that bolt fully torqued, there's a lot of clamping force, and it's not likely to loosen up - there's not a lot of vibration on a road bike. If you are worried about it, first, you'd probably feel/hear the cranks clicking. Second, you can periodically go in and re-torque. If you never have the bolt move, that tells you it isn't loosening.
As for the amount, I'm a goop slob. There's really no harm in it, especially inside that cavity. I wipe up the squeeze out after torquing - that's only an issue, for example, on the handlebars which have a very rough surface and therefore are hard to clean.
As for the amount, I'm a goop slob. There's really no harm in it, especially inside that cavity. I wipe up the squeeze out after torquing - that's only an issue, for example, on the handlebars which have a very rough surface and therefore are hard to clean.
06-14-19, 03:24 PM
#35
Senior Member
Join Date: Jul 2017
Location: Queens, NY for now...
Posts: 1,515
Bikes: 82 Lotus Unique, 86 Lotus Legend, 88 Basso Loto, 88 Basso PR, 89 Basso PR, 96 Bianchi CDI, 2013 Deda Aegis, 2019 Basso Diamante SV
Mentioned: 46 Post(s)
Tagged: 0 Thread(s)
Quoted: 943 Post(s)
Liked 172 Times
in
113 Posts
You can either put on loctite or anti-seize but not both. So, the question comes down to which you are more worried about, something corroding/galling/seizing or loosening.
As for the amount, I'm a goop slob. There's really no harm in it, especially inside that cavity. I wipe up the squeeze out after torquing - that's only an issue, for example, on the handlebars which have a very rough surface and therefore are hard to clean.
As for the amount, I'm a goop slob. There's really no harm in it, especially inside that cavity. I wipe up the squeeze out after torquing - that's only an issue, for example, on the handlebars which have a very rough surface and therefore are hard to clean.
I'm sure anti-seize is fine, but using that much of it just seems pretty messy, and anti-seize is particularly hard to deal with because it will get everywhere.
06-14-19, 04:31 PM
#36
Full Member
Thread Starter
Join Date: Apr 2019
Location: Northern NJ
Posts: 419
Bikes: 1987 Pinarello Montello, 1996 Litespeed Classic, 1996 Colnago Master Light, 1997 Litespeed Ultimate, 2006 Opera Leonardo FP, 2006 Pinarello Paris FP, 1984 Pinarello Record, 89-ish Cornelo Profilo
Mentioned: 5 Post(s)
Tagged: 0 Thread(s)
Quoted: 148 Post(s)
Liked 119 Times
in
73 Posts
Unless I'm mistaken, most loctite will also act as a corrosion inhibiter. And the official Campagnolo instructions call for loctite.
I'm sure anti-seize is fine, but using that much of it just seems pretty messy, and anti-seize is particularly hard to deal with because it will get everywhere.
I'm sure anti-seize is fine, but using that much of it just seems pretty messy, and anti-seize is particularly hard to deal with because it will get everywhere.
06-14-19, 04:36 PM
#37
Full Member
Thread Starter
Join Date: Apr 2019
Location: Northern NJ
Posts: 419
Bikes: 1987 Pinarello Montello, 1996 Litespeed Classic, 1996 Colnago Master Light, 1997 Litespeed Ultimate, 2006 Opera Leonardo FP, 2006 Pinarello Paris FP, 1984 Pinarello Record, 89-ish Cornelo Profilo
Mentioned: 5 Post(s)
Tagged: 0 Thread(s)
Quoted: 148 Post(s)
Liked 119 Times
in
73 Posts
When I left off on the build a few days ago, I had mounted up the bars/Ergos. I adjusted the rear derailleur limit screws and then routed the rear d, and both brake cables. The front derailleur is one of those things that I wasn't looking forward to on this build.
I bought an Omni Racing carbon clamp (35mm) and discovered it was too small for the seat tube. The clamp is fine, the tube is 35mm in one axis, and 35.7mm in the other. A Campy clamp, as well as a BBB that I had, are similar in fit. They would be a better choice - I've had them clamp before with 1/8" gap between the halves, and never had an issue. This carbon clamp worries me. I 3D printed a spacer (pruple is what was in the printer so purple it is) to fit between the two surfaces - I printed a half dozen, .2mm apart in thickness, and picked the one that fit the best. If it doesn't hold up, I'll go with the Campy clamp.

I bought an Omni Racing carbon clamp (35mm) and discovered it was too small for the seat tube. The clamp is fine, the tube is 35mm in one axis, and 35.7mm in the other. A Campy clamp, as well as a BBB that I had, are similar in fit. They would be a better choice - I've had them clamp before with 1/8" gap between the halves, and never had an issue. This carbon clamp worries me. I 3D printed a spacer (pruple is what was in the printer so purple it is) to fit between the two surfaces - I printed a half dozen, .2mm apart in thickness, and picked the one that fit the best. If it doesn't hold up, I'll go with the Campy clamp.
06-14-19, 04:38 PM
#38
Full Member
Thread Starter
Join Date: Apr 2019
Location: Northern NJ
Posts: 419
Bikes: 1987 Pinarello Montello, 1996 Litespeed Classic, 1996 Colnago Master Light, 1997 Litespeed Ultimate, 2006 Opera Leonardo FP, 2006 Pinarello Paris FP, 1984 Pinarello Record, 89-ish Cornelo Profilo
Mentioned: 5 Post(s)
Tagged: 0 Thread(s)
Quoted: 148 Post(s)
Liked 119 Times
in
73 Posts
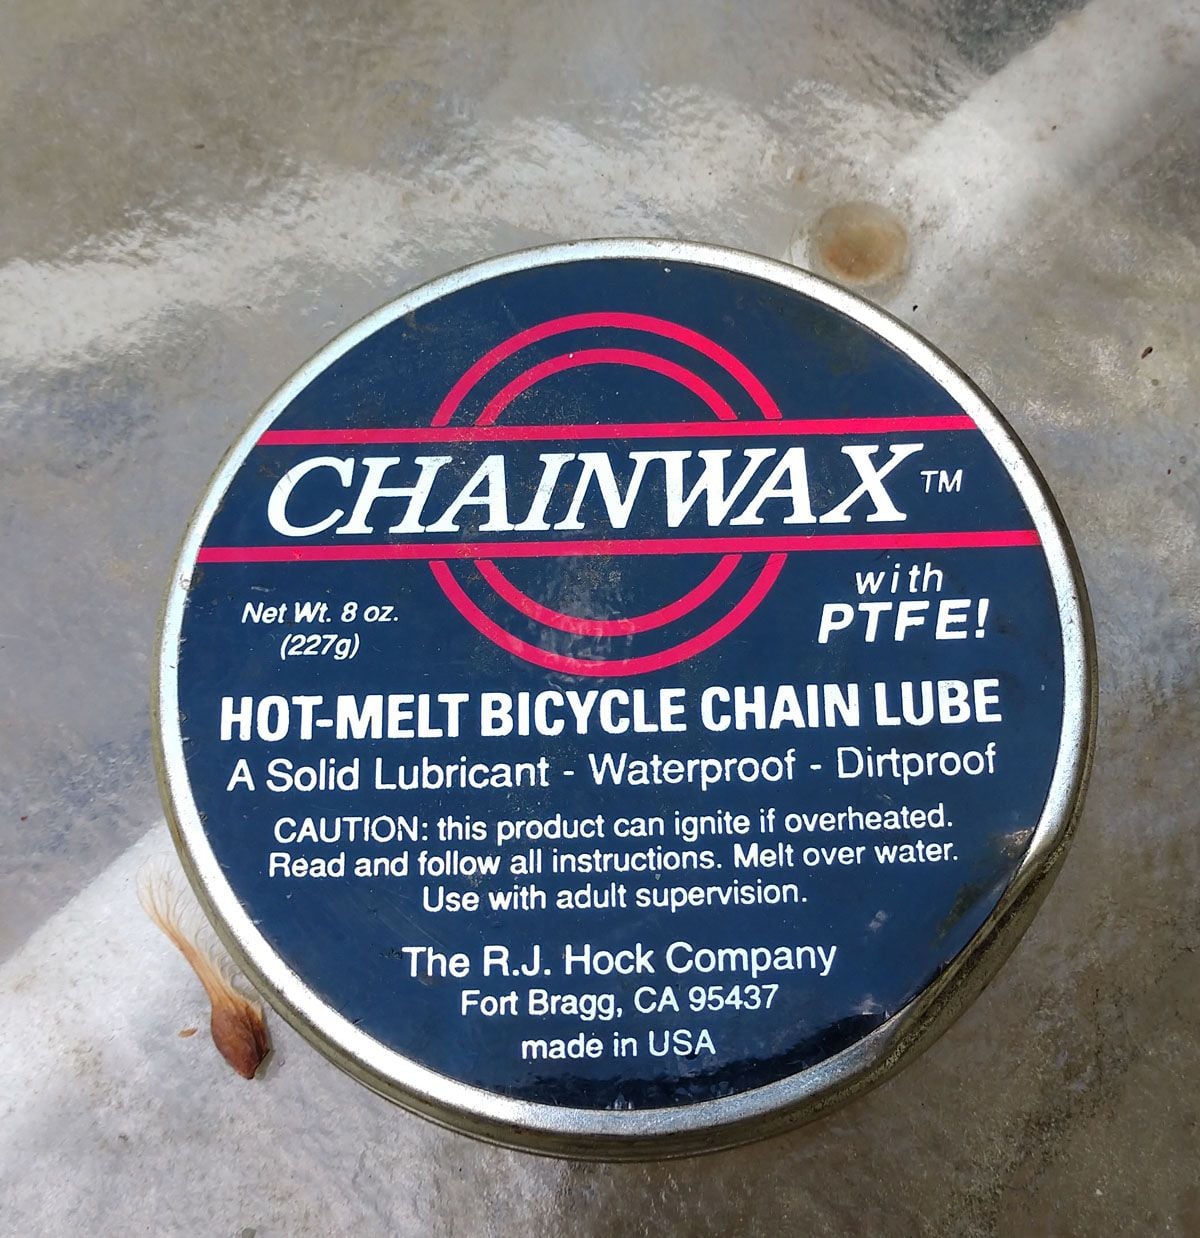
Those limit screws have been adjusted, and the cable run. I just waxed up the chain and will install it later. I like chainwax. Pity this stuff is no longer made.
I do like the cable guide under the BB that came with the bike. Nicer than the flimsy Campy ones I usually use

I do like the cable guide under the BB that came with the bike. Nicer than the flimsy Campy ones I usually use
06-14-19, 04:50 PM
#39
Senior Member
Join Date: Jul 2017
Location: Queens, NY for now...
Posts: 1,515
Bikes: 82 Lotus Unique, 86 Lotus Legend, 88 Basso Loto, 88 Basso PR, 89 Basso PR, 96 Bianchi CDI, 2013 Deda Aegis, 2019 Basso Diamante SV
Mentioned: 46 Post(s)
Tagged: 0 Thread(s)
Quoted: 943 Post(s)
Liked 172 Times
in
113 Posts
In the technical manual, Campy tells you to use 222, which is a very weak thread locker by the way, as a long term anti-oxidation compound. And, Henkel does not, AFAIK, claim any anti-corrosion (or galling prevention) properties for it. Based on my 25+ years of building bikes this way, and 30+ years as a design engineer in the aerospace industry, I will continue to do what I've been doing (that's just me - it's probably best you follow Campy's guidelines). And, yes, its messy, but, particularly down inside the bottom bracket, where's it going?
06-15-19, 10:20 AM
#40
Full Member
Thread Starter
Join Date: Apr 2019
Location: Northern NJ
Posts: 419
Bikes: 1987 Pinarello Montello, 1996 Litespeed Classic, 1996 Colnago Master Light, 1997 Litespeed Ultimate, 2006 Opera Leonardo FP, 2006 Pinarello Paris FP, 1984 Pinarello Record, 89-ish Cornelo Profilo
Mentioned: 5 Post(s)
Tagged: 0 Thread(s)
Quoted: 148 Post(s)
Liked 119 Times
in
73 Posts
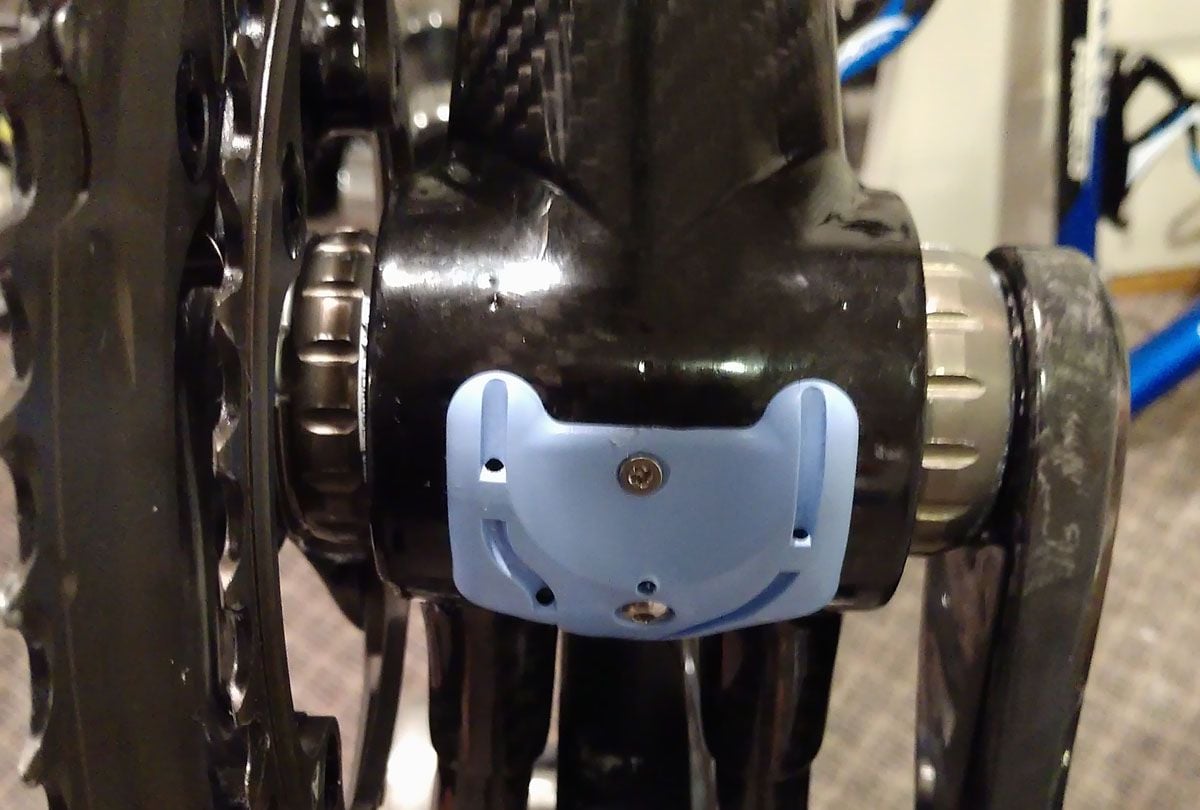
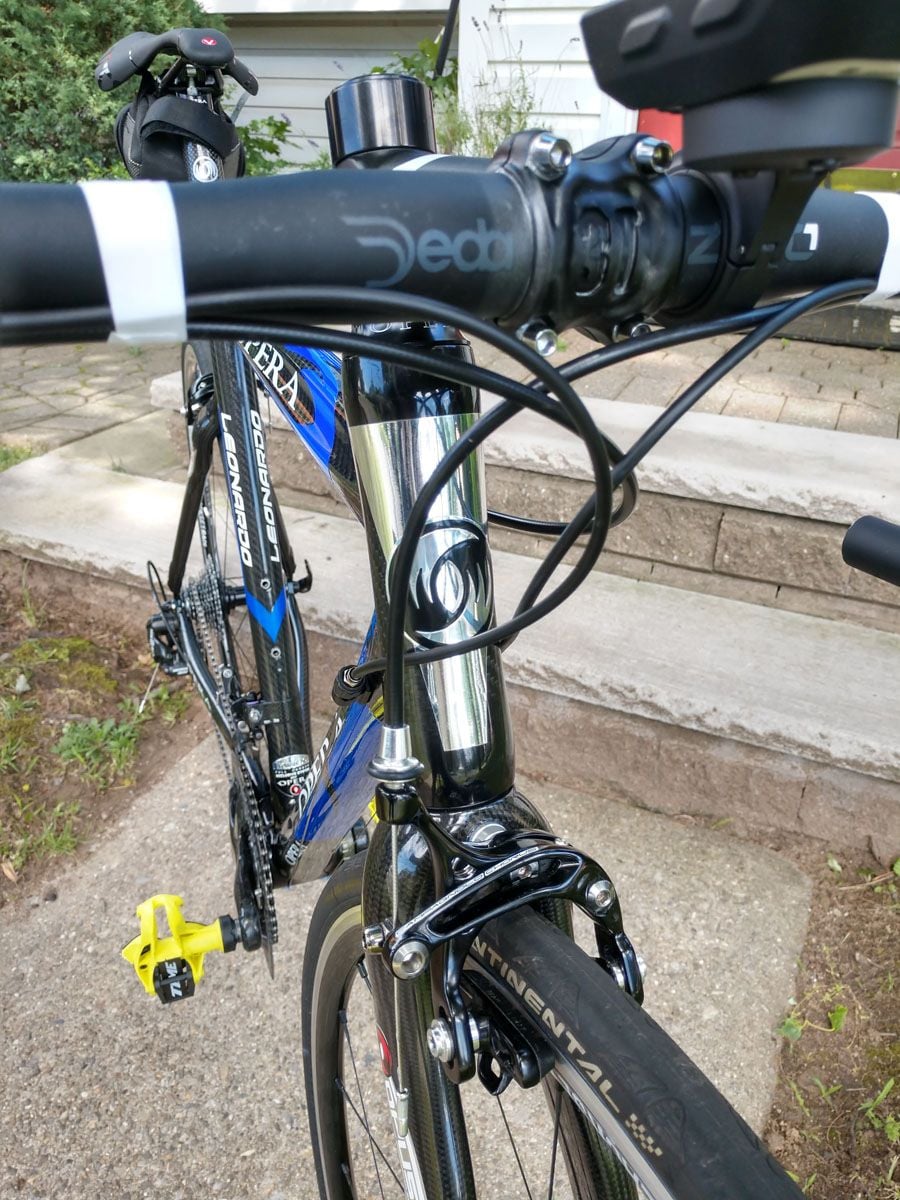
I actually just pulled and discarded the front cable - it's a bit too short to adjust properly. For that matter, I had to pull the front lever off the bars. I found it wasn't holding where set. Turns out, the little screw in the center of the silver disk in this photo was loose. No idea how tight to make it so tightened it to snug by hand, and then a little extra with a driver on the bit. Seems right now.

06-15-19, 10:26 AM
#41
Full Member
Thread Starter
Join Date: Apr 2019
Location: Northern NJ
Posts: 419
Bikes: 1987 Pinarello Montello, 1996 Litespeed Classic, 1996 Colnago Master Light, 1997 Litespeed Ultimate, 2006 Opera Leonardo FP, 2006 Pinarello Paris FP, 1984 Pinarello Record, 89-ish Cornelo Profilo
Mentioned: 5 Post(s)
Tagged: 0 Thread(s)
Quoted: 148 Post(s)
Liked 119 Times
in
73 Posts
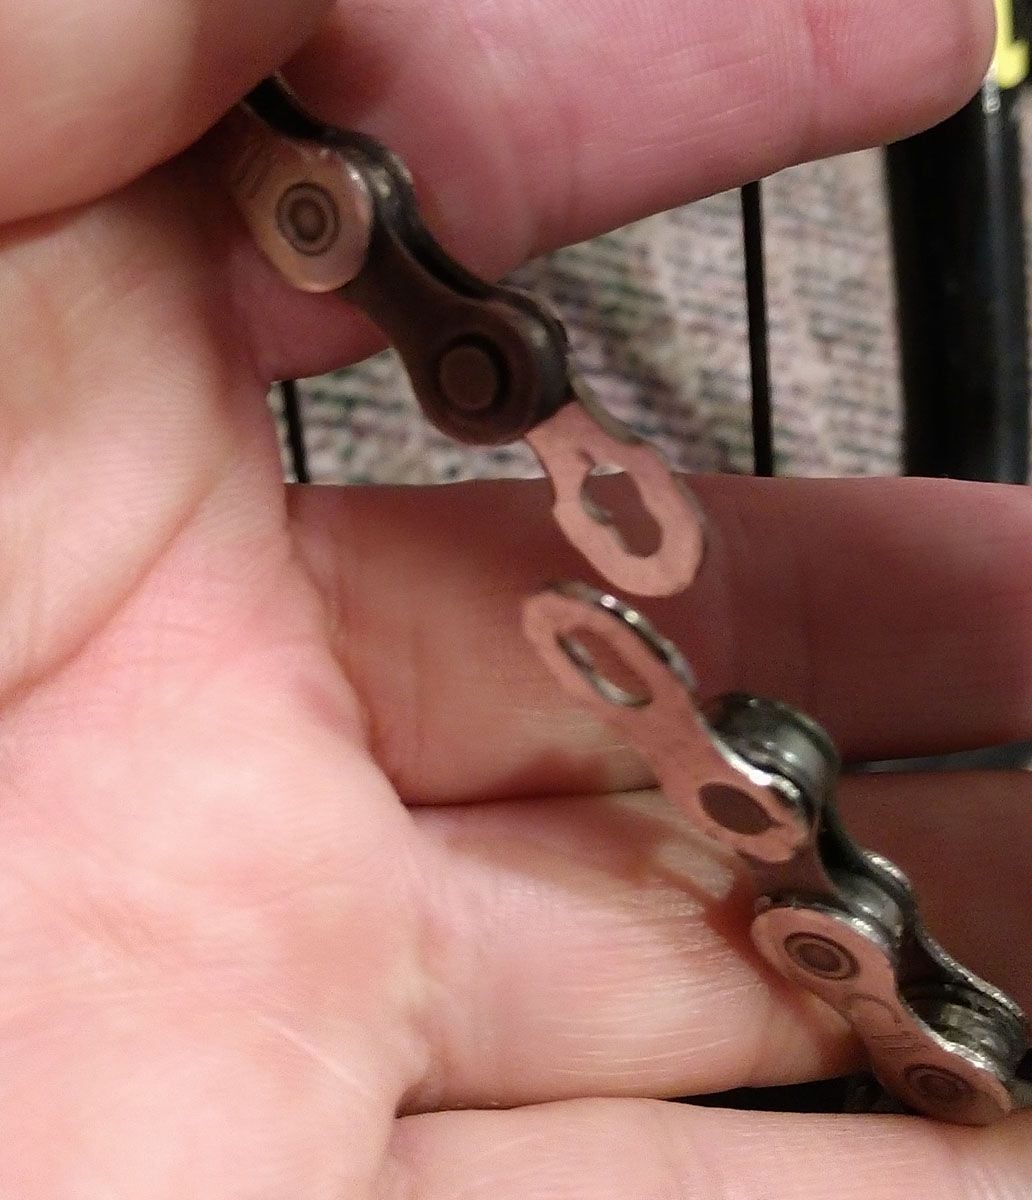
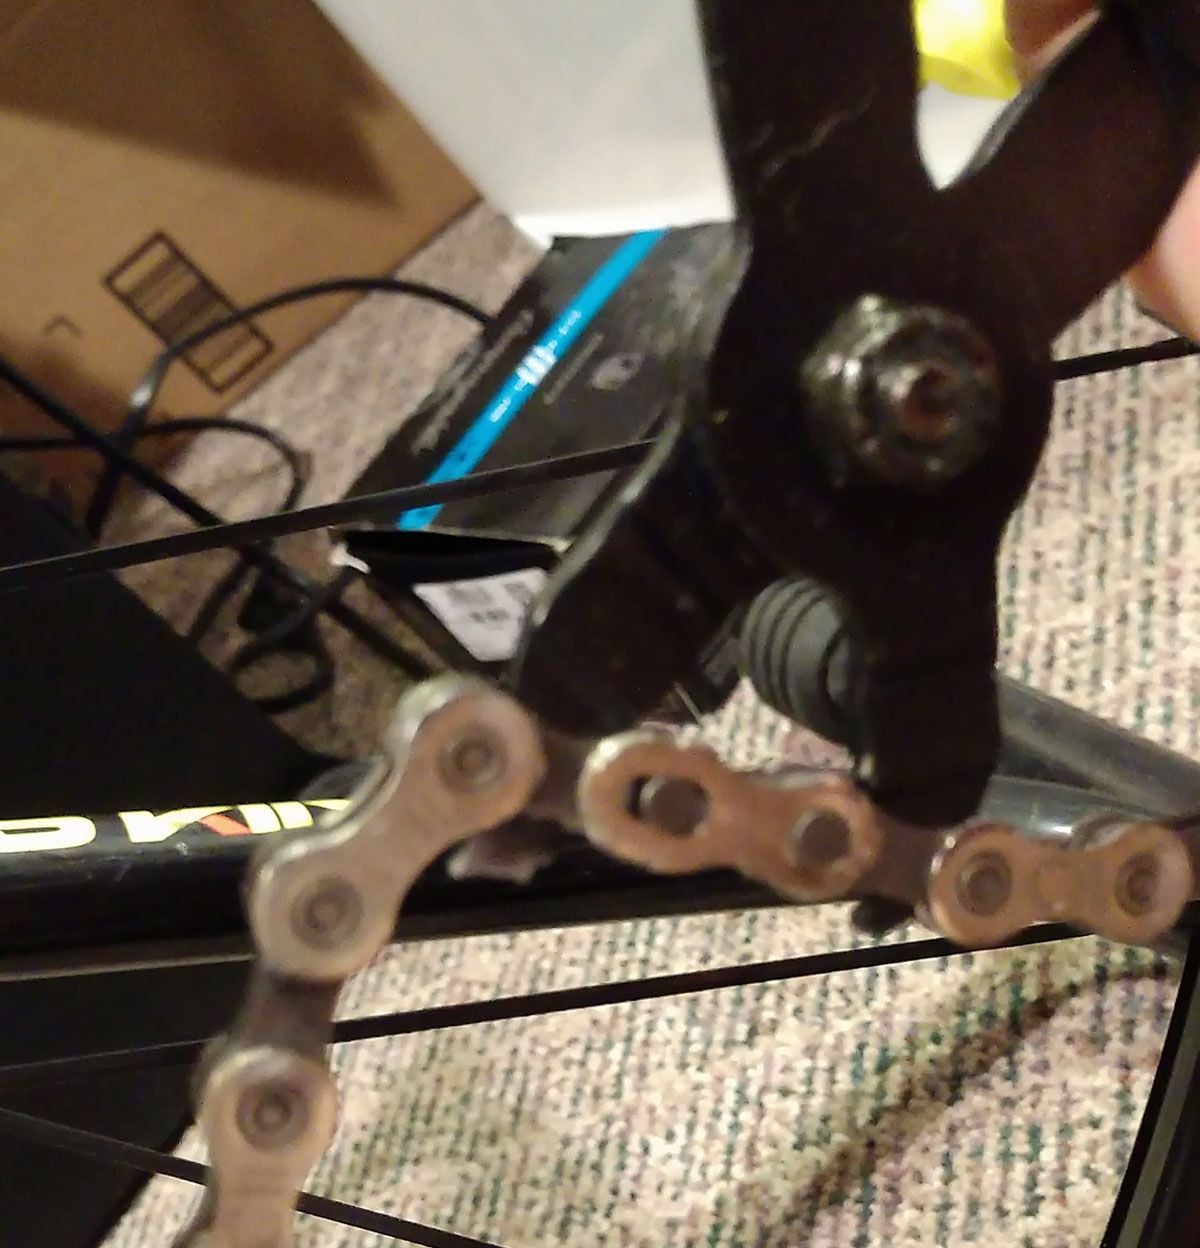
This was a take-off groupset from someone who bought it back in December, and decided he didnt like Campy. Anyway, the chain is a couple of links too short for my liking but I'm using it for now since I don't have another one. Here's the waxed chain, the master link, and the Park tool. You don't need to tool, certainly to put the link on. Just slip it into position and stomp on the pedals with the back wheel locked. It's much easier with the tool though. I've also removed the link without the tool - that's harder - pliers, for example, don't like to grab two round objects and squeeze when the jaws are open - you need a narrow nose curved jaw tool.

06-15-19, 12:57 PM
#42
Full Member
Thread Starter
Join Date: Apr 2019
Location: Northern NJ
Posts: 419
Bikes: 1987 Pinarello Montello, 1996 Litespeed Classic, 1996 Colnago Master Light, 1997 Litespeed Ultimate, 2006 Opera Leonardo FP, 2006 Pinarello Paris FP, 1984 Pinarello Record, 89-ish Cornelo Profilo
Mentioned: 5 Post(s)
Tagged: 0 Thread(s)
Quoted: 148 Post(s)
Liked 119 Times
in
73 Posts

So, all the cables are routed and adjusted. Brakes are easy - I usually just clamp them tight on the rims by hand, relax them a tiny bit, and tighten down on the cable. If there's too much throw, repeat.
Rear derailleur, adjust somewhere in the middle of the range, and it should be good (I needed to rotate the downtube barrel around a turn on the first ride to dial it in.
Front derailleur I find to be a royal pain. You need to get that inner stop perfect or there wont be enough throw to hit the big ring. You probably need just a tiny bit of over-travel in the stop when getting to the big ring, but not enough to drop the chain outboard. Again, tension needs to be just right to get enough travel going up to the big ring.
I only recently bought the Park cable cutter/crimper tool - never seemed worth having, but I now really find it useful.
06-15-19, 01:02 PM
#43
Full Member
Thread Starter
Join Date: Apr 2019
Location: Northern NJ
Posts: 419
Bikes: 1987 Pinarello Montello, 1996 Litespeed Classic, 1996 Colnago Master Light, 1997 Litespeed Ultimate, 2006 Opera Leonardo FP, 2006 Pinarello Paris FP, 1984 Pinarello Record, 89-ish Cornelo Profilo
Mentioned: 5 Post(s)
Tagged: 0 Thread(s)
Quoted: 148 Post(s)
Liked 119 Times
in
73 Posts
Another one of my weirdnesses in bike building is that I always tape down the cables to the bars using bandage tape - I suspect that one time years ago that's all I had, but, now it's just what I do. Bar tape is not yet on, nor are bottle cages, but I just came back from a five mile check-out. Other than a minor rear derailleur adjust, and the seat needs to come forward and up a bit, it's behaving nicely.

Last edited by CyclingFool95; 06-15-19 at 02:30 PM.
07-13-19, 03:23 PM
#44
Full Member
Thread Starter
Join Date: Apr 2019
Location: Northern NJ
Posts: 419
Bikes: 1987 Pinarello Montello, 1996 Litespeed Classic, 1996 Colnago Master Light, 1997 Litespeed Ultimate, 2006 Opera Leonardo FP, 2006 Pinarello Paris FP, 1984 Pinarello Record, 89-ish Cornelo Profilo
Mentioned: 5 Post(s)
Tagged: 0 Thread(s)
Quoted: 148 Post(s)
Liked 119 Times
in
73 Posts


To follow-up on this story, I put a bottle cage and bar tape on, and took the bike for a 15 mile hilly loop. I quickly realized that the bars were sitting too high, even with the -17� stem, and while it fit fine, it just felt a little top heavy and unsteady. I started researching, and realized that I could get a Ritchey 30� stem from Amazon. So, that went on the bike, and today I took it out for a proper ride (photo taken at the turn-around point). It does look a little odd with the downward sloped stem but it rides exactly like I expect from a Pinarello.
Last edited by CyclingFool95; 07-13-19 at 03:27 PM.
07-16-19, 08:05 AM
#45
Junior Member
Join Date: Jul 2019
Posts: 5
Mentioned: 0 Post(s)
Tagged: 0 Thread(s)
Quoted: 0 Post(s)
Likes: 0
Liked 0 Times
in
0 Posts
In the technical manual, Campy tells you to use 222, which is a very weak thread locker by the way, as a long term anti-oxidation compound. And, Henkel does not, AFAIK, claim any anti-corrosion (or galling prevention) properties for it. Based on my 25+ years of building bikes this way, and 30+ years as a design engineer in the aerospace industry, I will continue to do what I've been doing (that's just me - it's probably best you follow Campy's guidelines). And, yes, its messy, but, particularly down inside the bottom bracket, where's it going?

Thread
Thread Starter
Forum
Replies
Last Post
fiatjeepdriver
Classic & Vintage
21
06-14-15 06:00 PM
