


Replacing a bottom bracket - stuck on final steps
 04-22-20, 08:21 AM
#1
Junior Member
Thread Starter
Join Date: Apr 2020
Posts: 11
Mentioned: 0 Post(s)
Tagged: 0 Thread(s)
Quoted: 6 Post(s)
Liked 0 Times
in
0 Posts
Replacing a bottom bracket - stuck on final steps
Hi,
Before I begin my post, I just want to mention that I have used Sheldon Brown's guide on how to replace my square tapered cotterless bottom bracket and have managed to remove the crank arm and the crank with gears. An ebay user recommended that I replace the entire assembly so as not to mix technologies. I have an Apollo frame, not sure which model (though I'm sure that is not required for this post). The original BB was a 3P, the new BB is a 3SS which is supplemented with the corresponding cranks.
I need to know:
a) which tool I need to remove the right 'cup',
b) which tool I need to fit the new cups,
c) which side the new cups need to go on, and
d) understand what grease I should use (including how much and where).
i.ibb.co/jvq0q2P/IMG-4163.jpg Right side cup - size
i.ibb.co/tHc7ykr/IMG-4164.jpg Right side cup
i.ibb.co/7pH9B6H/IMG-4165.jpg Right side cup, thickness
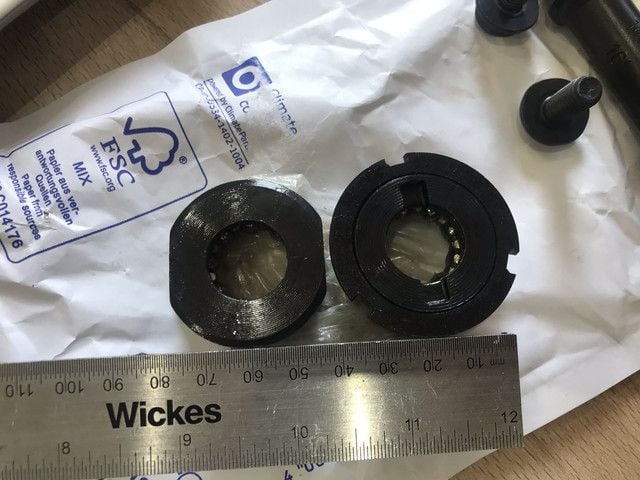
i.ibb.co/dPKjPhT/IMG-4168.jpg New cups - which one is right and which one is left?
Note to admin: I tried to upload pictures as attachments but it gave me a warning about not posting URLs as I have less than 10 posts (no idea why as I was not using any URLs). I had no choice but to put URLs as the attachment functionality seemed to have a bug.
Before I begin my post, I just want to mention that I have used Sheldon Brown's guide on how to replace my square tapered cotterless bottom bracket and have managed to remove the crank arm and the crank with gears. An ebay user recommended that I replace the entire assembly so as not to mix technologies. I have an Apollo frame, not sure which model (though I'm sure that is not required for this post). The original BB was a 3P, the new BB is a 3SS which is supplemented with the corresponding cranks.
I need to know:
a) which tool I need to remove the right 'cup',
b) which tool I need to fit the new cups,
c) which side the new cups need to go on, and
d) understand what grease I should use (including how much and where).
i.ibb.co/jvq0q2P/IMG-4163.jpg Right side cup - size
i.ibb.co/tHc7ykr/IMG-4164.jpg Right side cup
i.ibb.co/7pH9B6H/IMG-4165.jpg Right side cup, thickness
i.ibb.co/dPKjPhT/IMG-4168.jpg New cups - which one is right and which one is left?
Note to admin: I tried to upload pictures as attachments but it gave me a warning about not posting URLs as I have less than 10 posts (no idea why as I was not using any URLs). I had no choice but to put URLs as the attachment functionality seemed to have a bug.
Last edited by BeardyMan; 04-22-20 at 08:39 AM.
 04-22-20, 08:53 AM
#2

Senior Member
Join Date: Feb 2012
Location: Rochester, NY
Posts: 18,063
Bikes: Stewart S&S coupled sport tourer, Stewart Sunday light, Stewart Commuting, Stewart Touring, Co Motion Tandem, Stewart 3-Spd, Stewart Track, Fuji Finest, Mongoose Tomac ATB, GT Bravado ATB, JCP Folder, Stewart 650B ATB
Mentioned: 0 Post(s)
Tagged: 0 Thread(s)
Quoted: 4197 Post(s)
Liked 3,849 Times
in
2,300 Posts
By the 3P reference I assume your current BB is a loose ball, cup and cone, adjustable type with a threaded BB shell (and likely an Eng or ISO thread designation). Can you confirm?
A- The fixed cup (the RH) might use one of a few different removal tools. Your old cup likely fits a 36mm closed end tool, like the Park HCW-4. A simple measurement across the flats will tell you the tool size. Whichever tool is correct the challenge is to keep the tool firmly clamped to the cup so to not slip off during the sometimes massive amount of force needed to loosen a "fixed" cup. Running an all thread shaft with large washers and nuts through the shell and cup is a cheap tool "vice". If the threading is Eng ot ISO the removal direction is a left hand thread, or clockwise (note I don't use the stupid reference of righty loosey).
B-The correct tool for reinstalling is whatever the replacement cups "call for". In your case that's a HCW-4 and HCW-11 with a lock ring hook tool like a HCW-5.
C-The fixed flange cup goes in the frame's RH side and is likely a left hand thread. The cup with the removable lock ring is likely a right handed thread and belongs on the frame's left side.
D- common auto wheel bearing grease is fine. There are "specific" (more about marketing and distribution channels then formulation) greases available and they, too, work fine. For severe conditions a "marine grade" grease might be preferred. But know any grease will collect contaminates. age and get washed out over time with exposure to water. Like the question of which body soap is best it's more about using some kind of soap before you smell then which brand.
added notes- Do apply grease to the insides of the BB shell and the threads of the cups. Do look at the cup's threading and discover the likely different directions the threads wind around the cup with. If in doubt compare to a screw based light bulb, they are almost always a right hand thread. Really tighten down the RH/fixed cup tight. Lots of upper arm and shoulder effort. After loosely installing the left side cup and lock ring attach the right side crank arm and use the arm's end as a lever and pendulum to better judge the final bearing adjustment. The goal is no wiggle at the arm's end (when it and the chain stay are clasped in your hand and pulled/pushed apart and together) as well as a freely swinging arm as it settles into the bottom of it's swing, like a pendulum. For more help consider going to the Park Blue Book. Andy
__________________
AndrewRStewart
AndrewRStewart
04-22-20, 08:59 AM
#3
Sr Member on Sr bikes

Beards -- I cut-n-pasted the links you provided to look at all your pictures. Before you install that new BB...realize that style is an 'old school' model. Which is completely functional, and works fine when installed and adjusted properly. But, there are newer models that are sealed, maintenance-free cassettes. And IMO, I think they're longer lasting. Cost a bit more...but worth it IMO. I don't know how much you ride...but if you can return/exchange and get a cassette BB...give that some consideration.
For what you have...to remove the right cup you'll need a 36mm (+/-) wrench. The flat areas on either side are where you apply the wrench. For the left side, you'll need a spanner wrench to remove the outer ring, and something like pin spanner wrench for the cup.
Below are a couple of pics of my own combination wrenches. Long ago before I purchased them...I would use things like needle-nose pliers spread out to remove them. Of course, if you decide on the BB cassette...completely different tools will be required. And before you remove anything...make sure you know what the threading setup is for your specific frame the two sides can have either left handed or right handed threads. You can determine that by looking at the replacement part you have (providing they are in face the correct parts). As far as grease...any axle/bearing grease is fine. You can't really use too much. Better too much than not enough. Good luck.

FYI to others...this is the pic of his replacement parts which are the exact same style as what he pictured that are currently on the bike.
Dan
For what you have...to remove the right cup you'll need a 36mm (+/-) wrench. The flat areas on either side are where you apply the wrench. For the left side, you'll need a spanner wrench to remove the outer ring, and something like pin spanner wrench for the cup.
Below are a couple of pics of my own combination wrenches. Long ago before I purchased them...I would use things like needle-nose pliers spread out to remove them. Of course, if you decide on the BB cassette...completely different tools will be required. And before you remove anything...make sure you know what the threading setup is for your specific frame the two sides can have either left handed or right handed threads. You can determine that by looking at the replacement part you have (providing they are in face the correct parts). As far as grease...any axle/bearing grease is fine. You can't really use too much. Better too much than not enough. Good luck.
FYI to others...this is the pic of his replacement parts which are the exact same style as what he pictured that are currently on the bike.
Dan
Last edited by _ForceD_; 04-22-20 at 09:02 AM.
04-22-20, 10:44 AM
#4
Really Old Senior Member

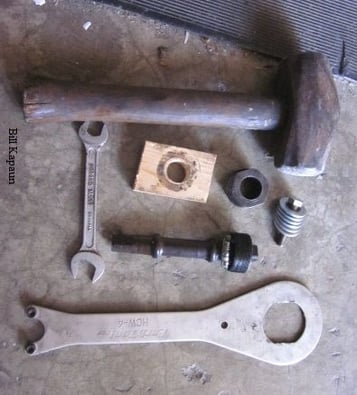
Here's a tool I made up with scrap parts. A LARGE steel washer could suffice for my wooden one. I njust used what I had handy.

04-22-20, 12:06 PM
#5
Junior Member
Join Date: Jul 2017
Location: SE Wisconsin
Posts: 128
Bikes: Trek Domane SLR 2019, Trek Trek Madone 5.1 (2011), Trek 1400 (1991)
Mentioned: 0 Post(s)
Tagged: 0 Thread(s)
Quoted: 47 Post(s)
Liked 74 Times
in
33 Posts
Andrew R Stewart Not to hijack the thread, can you explain why you don't want to grease the bottom bracket threads?
04-22-20, 01:55 PM
#6
Really Old Senior Member
Andrew R Stewart Not to hijack the thread, can you explain why you don't want to grease the bottom bracket threads?
04-22-20, 03:03 PM
#7
Junior Member
Join Date: Jul 2017
Location: SE Wisconsin
Posts: 128
Bikes: Trek Domane SLR 2019, Trek Trek Madone 5.1 (2011), Trek 1400 (1991)
Mentioned: 0 Post(s)
Tagged: 0 Thread(s)
Quoted: 47 Post(s)
Liked 74 Times
in
33 Posts
Sorry. I don't know why I read it wrong. Guess I gotta get new glasses.
04-23-20, 08:49 AM
#8
Junior Member
Thread Starter
Join Date: Apr 2020
Posts: 11
Mentioned: 0 Post(s)
Tagged: 0 Thread(s)
Quoted: 6 Post(s)
Liked 0 Times
in
0 Posts
Before you install that new BB...realize that style is an 'old school' model. Which is completely functional, and works fine when installed and adjusted properly. But, there are newer models that are sealed, maintenance-free cassettes. And IMO, I think they're longer lasting. Cost a bit more...but worth it IMO. I don't know how much you ride...but if you can return/exchange and get a cassette BB...give that some consideration.
Of course, if you decide on the BB cassette...completely different tools will be required.
Of course, if you decide on the BB cassette...completely different tools will be required.
Would you still recommend a BB cassette in light of the above? If so, can you help me identify the right size/make as well as tools?
04-23-20, 09:12 AM
#9
Really Old Senior Member
A symmetrical cartridge (not cassette) BB for a 3P is a 122mm.
A 3S will have the DS 2.5mm longer than a 3P. (127mm)
A 3S will work if your FDER has that much (2.5mm) more outward travel.
Scroll down just a bit to the spindle chart-
https://www.sheldonbrown.com/bbsize.html
A 3S will have the DS 2.5mm longer than a 3P. (127mm)
A 3S will work if your FDER has that much (2.5mm) more outward travel.
Scroll down just a bit to the spindle chart-
https://www.sheldonbrown.com/bbsize.html
04-23-20, 09:17 AM
#10
Junior Member
Thread Starter
Join Date: Apr 2020
Posts: 11
Mentioned: 0 Post(s)
Tagged: 0 Thread(s)
Quoted: 6 Post(s)
Liked 0 Times
in
0 Posts
 I'll break down your response to make it easier for us both to follow.
Apologies, I should have put more information about the existing setup. Yes, I have the following (don't know if I have a cone):
i.ibb.co/cy0ZzNR/IMG-3901.jpg - cotterless BB showing sizes
i.ibb.co/pQjD2VC/IMG-3905.jpg - image of the inside of the LH cup
i.ibb.co/2ySb5S1/IMG-3920.jpg - alternative view of the BB
i.ibb.co/Gfw30Qd/IMG-3921.jpg - the ring that attaches to the LH cup
i.ibb.co/N1Q29NC/IMG-3922.jpg - view of the frame where the LH cup screws in
i.ibb.co/JKGK6x5/IMG-3923.jpg - other side of the LH cup
i.ibb.co/tKLP4yV/IMG-3941.jpg - square hole of crank that is now rounded
A- The fixed cup (the RH) might use one of a few different removal tools. Your old cup likely fits a 36mm closed end tool, like the Park HCW-4. A simple measurement across the flats will tell you the tool size. Whichever tool is correct the challenge is to keep the tool firmly clamped to the cup so to not slip off during the sometimes massive amount of force needed to loosen a "fixed" cup. Running an all thread shaft with large washers and nuts through the shell and cup is a cheap tool "vice". If the threading is Eng ot ISO the removal direction is a left hand thread, or clockwise (note I don't use the stupid reference of righty loosey).
After loosely installing the left side cup and lock ring attach the right side crank arm and use the arm's end as a lever and pendulum to better judge the final bearing adjustment. The goal is no wiggle at the arm's end (when it and the chain stay are clasped in your hand and pulled/pushed apart and together) as well as a freely swinging arm as it settles into the bottom of it's swing, like a pendulum. For more help consider going to the Park Blue Book. Andy
04-23-20, 09:17 AM
#11
Mad bike riding scientist

Join Date: Nov 2004
Location: Denver, CO
Posts: 27,355
Bikes: Some silver ones, a red one, a black and orange one, and a few titanium ones
Mentioned: 152 Post(s)
Tagged: 1 Thread(s)
Quoted: 6214 Post(s)
Liked 4,212 Times
in
2,361 Posts
Thanks for replying Dan. I'll start with this reply as you ask a very important question here about changing to a BB cassette. I really wanted to get these but I wasn't sure if that was possible. How would I know which BB cassette to go for (i.e. is there any guidance where to measure from)? I hope no modifications would be required otherwise that would probably put it outside of my skillset. I don't use the MTB a lot, I've done a few forest rides and use it mainly for towing a children's trailer. I just want to get going without having to fork out too much
Would you still recommend a BB cassette in light of the above? If so, can you help me identify the right size/make as well as tools?
Would you still recommend a BB cassette in light of the above? If so, can you help me identify the right size/make as well as tools?
Your bike likely has an �English� bottom bracket since the vast majority are. It�s dimension are 1.370" x 24 TPI (TPI=threads per inch). Measure the width of your cup and see if it is 1 3/8� or 34.8mm. It probably is. You�ll also need to measure the width of the bottom bracket shell...the place where the bearing cups go. It will either be 68mm or 73mm and most likely 68mm. Next measure the length of the spindle that you are currently using. Order a new cartridge bearing bottom bracket with the proper threading, width and length of the spindle. While you are at it, order the proper tool for installing the bottom bracket.
The rest is just details.
__________________
Stuart Black
Plan Epsilon Around Lake Michigan in the era of Covid
Old School�When It Wasn�t Ancient bikepacking
Gold Fever Three days of dirt in Colorado
Pokin' around the Poconos A cold ride around Lake Erie
Dinosaurs in Colorado A mountain bike guide to the Purgatory Canyon dinosaur trackway
Solo Without Pie. The search for pie in the Midwest.
Picking the Scablands. Washington and Oregon, 2005. Pie and spiders on the Columbia River!
04-23-20, 09:19 AM
#12
Junior Member
Thread Starter
Join Date: Apr 2020
Posts: 11
Mentioned: 0 Post(s)
Tagged: 0 Thread(s)
Quoted: 6 Post(s)
Liked 0 Times
in
0 Posts
04-23-20, 09:27 AM
#13
Really Old Senior Member
04-23-20, 01:00 PM
#14
Sr Member on Sr bikes
Sorry. I inadvertantly used "cassette" above when what I actually meant was 'cartridge.' Sorry for the confusion.
Dan
Dan
04-23-20, 05:43 PM
#15
Mad bike riding scientist
Join Date: Nov 2004
Location: Denver, CO
Posts: 27,355
Bikes: Some silver ones, a red one, a black and orange one, and a few titanium ones
Mentioned: 152 Post(s)
Tagged: 1 Thread(s)
Quoted: 6214 Post(s)
Liked 4,212 Times
in
2,361 Posts
__________________
Stuart Black
Plan Epsilon Around Lake Michigan in the era of Covid
Old School�When It Wasn�t Ancient bikepacking
Gold Fever Three days of dirt in Colorado
Pokin' around the Poconos A cold ride around Lake Erie
Dinosaurs in Colorado A mountain bike guide to the Purgatory Canyon dinosaur trackway
Solo Without Pie. The search for pie in the Midwest.
Picking the Scablands. Washington and Oregon, 2005. Pie and spiders on the Columbia River!
Stuart Black
Plan Epsilon Around Lake Michigan in the era of Covid
Old School�When It Wasn�t Ancient bikepacking
Gold Fever Three days of dirt in Colorado
Pokin' around the Poconos A cold ride around Lake Erie
Dinosaurs in Colorado A mountain bike guide to the Purgatory Canyon dinosaur trackway
Solo Without Pie. The search for pie in the Midwest.
Picking the Scablands. Washington and Oregon, 2005. Pie and spiders on the Columbia River!
04-23-20, 06:21 PM
#16
Really Old Senior Member
Stein Tools. If I still had lots of loose bearing bottom brackets, I�d buy one but my system (and yours) is cheaper and it works.
I won't begrudge anybody that can spend the $ on a tool though.
04-23-20, 07:22 PM
#17
Senior Member
Join Date: Feb 2012
Location: Rochester, NY
Posts: 18,063
Bikes: Stewart S&S coupled sport tourer, Stewart Sunday light, Stewart Commuting, Stewart Touring, Co Motion Tandem, Stewart 3-Spd, Stewart Track, Fuji Finest, Mongoose Tomac ATB, GT Bravado ATB, JCP Folder, Stewart 650B ATB
Mentioned: 0 Post(s)
Tagged: 0 Thread(s)
Quoted: 4197 Post(s)
Liked 3,849 Times
in
2,300 Posts
 Andy
AndyI should have read more replies. Stuart beat me to this. I have two of these, slightly different versions and the pictured is still another version.
__________________
AndrewRStewart
AndrewRStewart
04-23-20, 07:40 PM
#18
Senior Member
Join Date: Feb 2012
Location: Rochester, NY
Posts: 18,063
Bikes: Stewart S&S coupled sport tourer, Stewart Sunday light, Stewart Commuting, Stewart Touring, Co Motion Tandem, Stewart 3-Spd, Stewart Track, Fuji Finest, Mongoose Tomac ATB, GT Bravado ATB, JCP Folder, Stewart 650B ATB
Mentioned: 0 Post(s)
Tagged: 0 Thread(s)
Quoted: 4197 Post(s)
Liked 3,849 Times
in
2,300 Posts
That is a lot of useful information, and a lot to take in at the same time I'll break down your response to make it easier for us both to follow.
Apologies, I should have put more information about the existing setup. Yes, I have the following (don't know if I have a cone):
i.ibb.co/cy0ZzNR/IMG-3901.jpg - cotterless BB showing sizes
i.ibb.co/pQjD2VC/IMG-3905.jpg - image of the inside of the LH cup
i.ibb.co/2ySb5S1/IMG-3920.jpg - alternative view of the BB
i.ibb.co/Gfw30Qd/IMG-3921.jpg - the ring that attaches to the LH cup
i.ibb.co/N1Q29NC/IMG-3922.jpg - view of the frame where the LH cup screws in
i.ibb.co/JKGK6x5/IMG-3923.jpg - other side of the LH cup
i.ibb.co/tKLP4yV/IMG-3941.jpg - square hole of crank that is now rounded
The LH cone screws in clockwise (never heard righty loosey before!).Righty loosey is a joke about left hand threads. Thanks for letting me know what the correct names are for the tools. Will make life a lot easier to find these now. I won't know which way the RH cup is threaded until I begin to try and remove it. As others have said the RH side cup is very likely a left hand thread I assume by the washer comment that you mean something to rest the tool against like what Bill had put in his post with the wooden 'washer'? Yes, the rather thin cup flats, wrench thickness and the large amount of force needed to loosen the cup the wrench can easily slip off and then one can end up punching some hard thing and feel pain before one can stop their hand's motion..
You lost me on this bit. I know that when I fit the LH crank, I should have the RH crank point down, and install the LH crank poited upwards. Are you saying that I should not install the right crank right away and look for any play in the arm once loosely tightened as well as ensure that it's free enough to drop down under the force of gravity?
I'll break down your response to make it easier for us both to follow.Apologies, I should have put more information about the existing setup. Yes, I have the following (don't know if I have a cone):
i.ibb.co/cy0ZzNR/IMG-3901.jpg - cotterless BB showing sizes
i.ibb.co/pQjD2VC/IMG-3905.jpg - image of the inside of the LH cup
i.ibb.co/2ySb5S1/IMG-3920.jpg - alternative view of the BB
i.ibb.co/Gfw30Qd/IMG-3921.jpg - the ring that attaches to the LH cup
i.ibb.co/N1Q29NC/IMG-3922.jpg - view of the frame where the LH cup screws in
i.ibb.co/JKGK6x5/IMG-3923.jpg - other side of the LH cup
i.ibb.co/tKLP4yV/IMG-3941.jpg - square hole of crank that is now rounded
The LH cone screws in clockwise (never heard righty loosey before!).Righty loosey is a joke about left hand threads. Thanks for letting me know what the correct names are for the tools. Will make life a lot easier to find these now. I won't know which way the RH cup is threaded until I begin to try and remove it. As others have said the RH side cup is very likely a left hand thread I assume by the washer comment that you mean something to rest the tool against like what Bill had put in his post with the wooden 'washer'? Yes, the rather thin cup flats, wrench thickness and the large amount of force needed to loosen the cup the wrench can easily slip off and then one can end up punching some hard thing and feel pain before one can stop their hand's motion..
You lost me on this bit. I know that when I fit the LH crank, I should have the RH crank point down, and install the LH crank poited upwards. Are you saying that I should not install the right crank right away and look for any play in the arm once loosely tightened as well as ensure that it's free enough to drop down under the force of gravity?
__________________
AndrewRStewart
AndrewRStewart
04-23-20, 08:01 PM
#19
Really Old Senior Member
Noted. I need to look beyond the Park catalog.
05-05-20, 07:37 AM
#20
Junior Member
Thread Starter
Join Date: Apr 2020
Posts: 11
Mentioned: 0 Post(s)
Tagged: 0 Thread(s)
Quoted: 6 Post(s)
Liked 0 Times
in
0 Posts
The parts that I've been provided are: a longer BB (3SS) along with the corresponding cranks. Now as this BB is longer than my original one (3P), does this have an impact on the position of my chain and deralieur? I recall seeing "Chainline Measurement" on the Sheldon Brown guide and am concerned that this will cause more work (and grief).
Should I return what I have and go for the original size and corresponding cranks from another seller?
Should I return what I have and go for the original size and corresponding cranks from another seller?
05-05-20, 08:25 AM
#21
I'm good to go!
Join Date: Jul 2017
Location: Mississippi
Posts: 14,976
Bikes: Tarmac Disc Comp Di2 - 2020
Mentioned: 51 Post(s)
Tagged: 0 Thread(s)
Quoted: 6187 Post(s)
Liked 4,803 Times
in
3,313 Posts
If it is installed with crank and chain wheels, then site down the side of the chain wheels and see where they hit on the cassette. Or if you have a straight edge long enough, narrow enough and rigid enough use it.
If they are significantly to the bigger or smaller cogs, then you might want consider something else. The further you are away from center of the cassette, the more issues you'll have with the angle of the chain and noise. Or in other words, cross chaining which seems to scare so many people.
If they are significantly to the bigger or smaller cogs, then you might want consider something else. The further you are away from center of the cassette, the more issues you'll have with the angle of the chain and noise. Or in other words, cross chaining which seems to scare so many people.
05-05-20, 09:17 AM
#22
Really Old Senior Member
The parts that I've been provided are: a longer BB (3SS) along with the corresponding cranks. Now as this BB is longer than my original one (3P), does this have an impact on the position of my chain and deralieur? I recall seeing "Chainline Measurement" on the Sheldon Brown guide and am concerned that this will cause more work (and grief).
Should I return what I have and go for the original size and corresponding cranks from another seller?
Should I return what I have and go for the original size and corresponding cranks from another seller?
IF the FDER will move the additional 2.5mm away from the ST, you're good. Not sure what you mean by "corresponding" cranks?
If designed for a 3S, the chain rings will be in approx. the correct place. If for a 3P, they'll be 2.5mm further out.
