


New Track Bike, help with stuck nuts and rust & wheels
 03-03-21, 03:41 AM
#1
Junior Member
Thread Starter
New Track Bike, help with stuck nuts and rust & wheels
Hi Guys,
So I just picked up this NJS Bridgestone track bike and would like to get it up and running for some fun times.

First thing I tried to do was adjust the stem and seatpost and I hit my first problem. The nut to unlock the quill stem as well as the nut to unoock the seatpost and the front tyre quick release seem to be stuck. I oiled them up and will try again tom however if anyone has some good solutions for this please let me know. Would hate to accidentally break something with my inexperience.
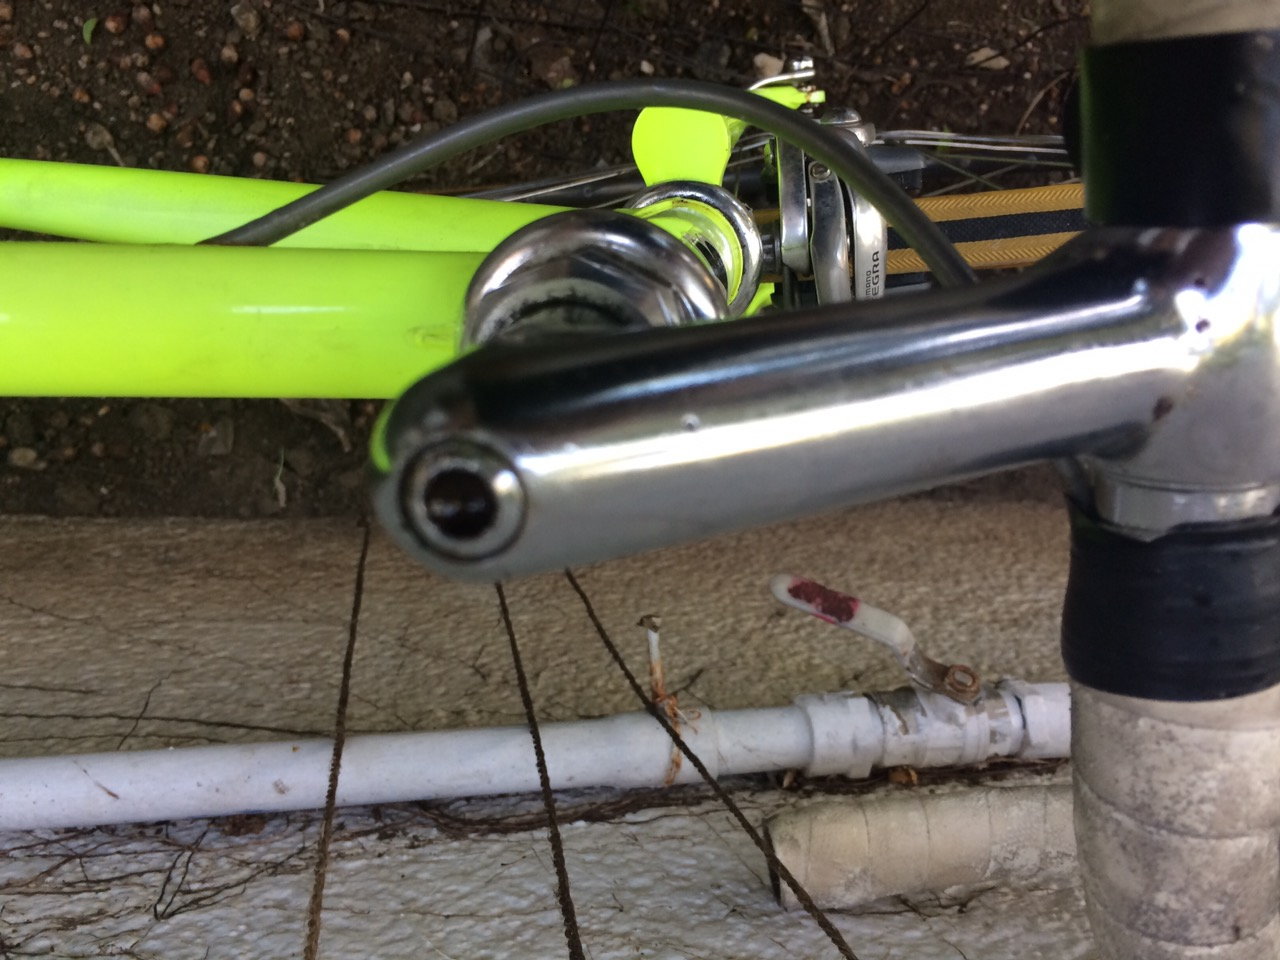
Cant get this nut to budge, afraid to torque it too much and break something or round out the bolt.

Same problem as the stem, cant unlock front quick release

Tried to torque this from one side, should I be anchoring one side while turning the other?
Secondly, I noticed there are some rust spots where the paint has chipped off. I would like to remedy this without sanding down the whole frame. I do intend to paint the bike sometime in the future when I grow tired of its current color and I would like to prevent the frame from further rust damage until I repaint.
Finally, there are discolorations on the rim, im not sure if this is what they mean by a worn down rim. It still feels smooth to me but I have never seen a worn rim so I dont really know. What do you guys think? Should I be looking to replace the rims? I know for sure the tires do need replacing but I will try to run them for a bit till I can find good ones.


Appreciate the help.
So I just picked up this NJS Bridgestone track bike and would like to get it up and running for some fun times.
First thing I tried to do was adjust the stem and seatpost and I hit my first problem. The nut to unlock the quill stem as well as the nut to unoock the seatpost and the front tyre quick release seem to be stuck. I oiled them up and will try again tom however if anyone has some good solutions for this please let me know. Would hate to accidentally break something with my inexperience.
Cant get this nut to budge, afraid to torque it too much and break something or round out the bolt.
Same problem as the stem, cant unlock front quick release
Tried to torque this from one side, should I be anchoring one side while turning the other?
Secondly, I noticed there are some rust spots where the paint has chipped off. I would like to remedy this without sanding down the whole frame. I do intend to paint the bike sometime in the future when I grow tired of its current color and I would like to prevent the frame from further rust damage until I repaint.
Finally, there are discolorations on the rim, im not sure if this is what they mean by a worn down rim. It still feels smooth to me but I have never seen a worn rim so I dont really know. What do you guys think? Should I be looking to replace the rims? I know for sure the tires do need replacing but I will try to run them for a bit till I can find good ones.
Appreciate the help.
 03-03-21, 04:15 AM
#2
Senior Member

Join Date: Sep 2020
Location: Eastern Poland
Posts: 743
Bikes: Romet Jubilat x 4, Wigry x 1, Turing x 1
Mentioned: 3 Post(s)
Tagged: 0 Thread(s)
Quoted: 194 Post(s)
Liked 204 Times
in
151 Posts
Well, you have bought yourself a little old lady, and she is going to need some tender care.
Patience, and the best penetrating oil you can find. Apply it to everything with a thread, including the spoke nipples. A nice copper / lead / weighted plastic hammer is always a good thing to have at hand.
When you say the nut to release the quill, do mean the bolt in the stem head or the locking nut over the top fork bearing? If it is the stem you are trying to remove then you need to loosen the recessed bolt in the top of the stem, by about a turn, then hit it with soft hammer to release the wedge buried in the forks.
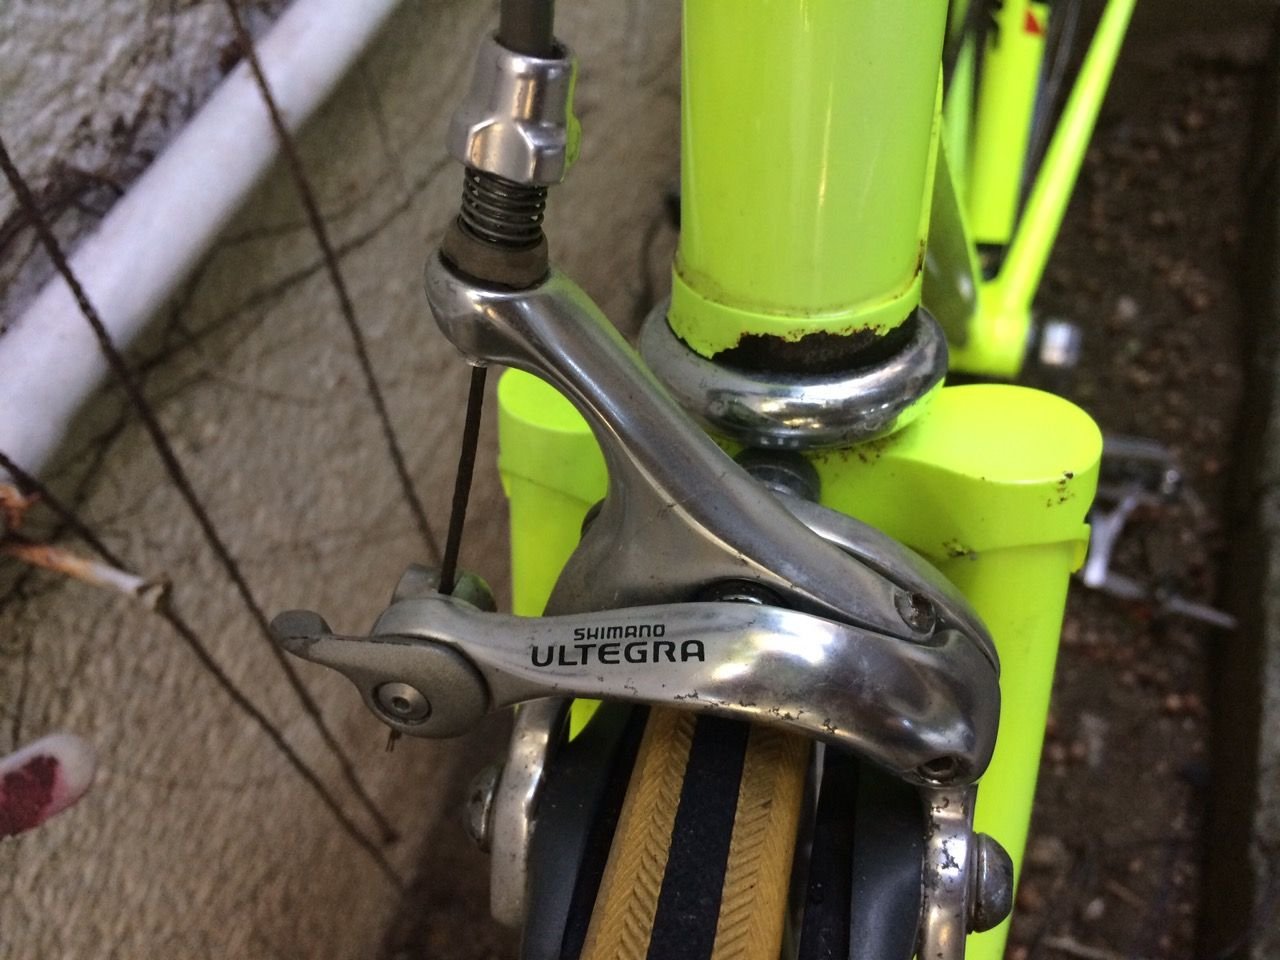
As for the rust you can wave goodbye to that tidy paint job, it already needs some serious work - especially where the brake cable enters the frame.
Anyway, good luck, working on old bikes is a great way to escape the modern world...
Patience, and the best penetrating oil you can find. Apply it to everything with a thread, including the spoke nipples. A nice copper / lead / weighted plastic hammer is always a good thing to have at hand.
When you say the nut to release the quill, do mean the bolt in the stem head or the locking nut over the top fork bearing? If it is the stem you are trying to remove then you need to loosen the recessed bolt in the top of the stem, by about a turn, then hit it with soft hammer to release the wedge buried in the forks.
As for the rust you can wave goodbye to that tidy paint job, it already needs some serious work - especially where the brake cable enters the frame.
Anyway, good luck, working on old bikes is a great way to escape the modern world...
Likes For Geepig:
03-03-21, 06:33 AM
#3
Junior Member
Thread Starter
Well, you have bought yourself a little old lady, and she is going to need some tender care.
Patience, and the best penetrating oil you can find. Apply it to everything with a thread, including the spoke nipples. A nice copper / lead / weighted plastic hammer is always a good thing to have at hand.
When you say the nut to release the quill, do mean the bolt in the stem head or the locking nut over the top fork bearing? If it is the stem you are trying to remove then you need to loosen the recessed bolt in the top of the stem, by about a turn, then hit it with soft hammer to release the wedge buried in the forks.
As for the rust you can wave goodbye to that tidy paint job, it already needs some serious work - especially where the brake cable enters the frame.
Anyway, good luck, working on old bikes is a great way to escape the modern world...
I just used WD40 for the oil is that good enough? So the only thing stuck now is the stem and front wheel. Stem is kinda ok since with the new seat height I can make it work.
Regarding the rust, when you say a lot of work how bad are we talking about? How long would you say I have before I really need to repaint it or risk frame damage? Is there an interim I can do buy some time? I kinda do like the color, I originally wanted blue for it but I would like to enjoy this color for the time being as long as I can.
I took it for a quick 5k test ride. Before this I have only ridden a city bike and a cheapo mountain/hybrid bike as a kid. I just want to say Dear God this thing is fast. All that blah blah on those youtube videos and forums about geometry and aero position, I now am beginning to understand. The thing just responds... With my 50lbs city bike I have to work it to get it to move. With this thing... it reads my mind. If she is a little old lady, I would like to be this fast when im old.
Likes For LeSexyFishorse:
03-03-21, 06:49 AM
#4
Zip tie Karen
Join Date: Aug 2009
Location: Fair Oaks Ranch, TX
Posts: 7,004
Bikes: '13 Motobecane Fantom29 HT, '16 Motobecane Turino Pro Disc, '18 Velobuild VB-R-022, '21 Tsunami SNM-100
Mentioned: 26 Post(s)
Tagged: 0 Thread(s)
Quoted: 1465 Post(s)
Liked 1,542 Times
in
806 Posts
I take it that you don't own an impact driver? That would make quick work of those bolts. Maybe you could find a neighbor who works on cars and borrow one for five minutes. As others have said, penetrating oil is your friend. You can mix ATF and acetone, or you can try Kroil or Marvel Mystery Oil, or try Liquid Wrench. Good luck.
03-03-21, 07:29 AM
#5
Junior Member
Thread Starter
I take it that you don't own an impact driver? That would make quick work of those bolts. Maybe you could find a neighbor who works on cars and borrow one for five minutes. As others have said, penetrating oil is your friend. You can mix ATF and acetone, or you can try Kroil or Marvel Mystery Oil, or try Liquid Wrench. Good luck.
So I will try penetrating oil first, if that fails I will go the drill/impact driver route.
03-03-21, 07:36 AM
#6
Zip tie Karen
Join Date: Aug 2009
Location: Fair Oaks Ranch, TX
Posts: 7,004
Bikes: '13 Motobecane Fantom29 HT, '16 Motobecane Turino Pro Disc, '18 Velobuild VB-R-022, '21 Tsunami SNM-100
Mentioned: 26 Post(s)
Tagged: 0 Thread(s)
Quoted: 1465 Post(s)
Liked 1,542 Times
in
806 Posts
Look on YouTube for videos that describe how an impact driver works and the differences between a drill and a driver. Those will answer your questions. You don't want one from an auto shop, you want a portable home/pro one with variable speed. That's your torque control. No, with a proper fitting bit/socket, an impact driver doesn't do any damage, except the auto garage ones that snap off car lug bolts. That's a different story.
Likes For Phil_gretz:

Likes For James1964:
03-03-21, 08:08 AM
#8
Old fart

Join Date: Nov 2004
Location: Appleton WI
Posts: 24,777
Bikes: Several, mostly not name brands.
Mentioned: 153 Post(s)
Tagged: 0 Thread(s)
Quoted: 3582 Post(s)
Liked 3,395 Times
in
1,929 Posts
The internal cable routing looks like something a previous owner did to adapt the bike to road use, as do the QR front hub and drilled fork crown and brake bridge.
Likes For JohnDThompson:
03-03-21, 08:26 AM
#9
Senior Member
Join Date: Jun 2002
Location: Montreal, Quebec
Posts: 5,921
Mentioned: 16 Post(s)
Tagged: 0 Thread(s)
Quoted: 1815 Post(s)
Liked 1,693 Times
in
974 Posts
The front quick release was closed in an awkward position, you will need to find something to wedge in between the lever and the fork leg so that you can move the lever away from the fork. Once you have room to get your fingers in there, it should open fairly easily. It doesn't open by turning it
03-03-21, 09:23 AM
#10
Senior Member

Join Date: Aug 2015
Posts: 3,283
Mentioned: 39 Post(s)
Tagged: 0 Thread(s)
Quoted: 1135 Post(s)
Liked 1,727 Times
in
951 Posts
For the stem bolt, I would use a cheater over the Allen wrench to extend the handle for increased tork. Penetrant from the bottom of the fork to the expander.
03-03-21, 11:19 AM
#11
Senior Member
Join Date: Oct 2017
Location: Chapel Hill NC
Posts: 1,683
Bikes: 2000 Litespeed Vortex Chorus 10, 1995 DeBernardi Cromor S/S
Mentioned: 4 Post(s)
Tagged: 0 Thread(s)
Quoted: 645 Post(s)
Liked 797 Times
in
446 Posts
If that were my bike I wouldn't be riding it - I'd strip it down to the frame, accept that I'm going to lose some of the paintwork and address the rust - use a wire brush to take it down to bare metal, apply some primer or rust inhibitor and repaint with something (anything) to protect the metal. This is especially important on the top tube where it appears someone drilled holes for a home-made internal cable routing (why???!!). Surface rust on solid metal like the fork ends isn't a big deal, but tubes are thinner, and a little rust penetration can go a long way (in a bad way).
Spend some time with some penetrating oil and WD40 if that's what you have, and soak the various stuck fasteners before attempting to shift them. I would suggest a ratchet with the requisite hex heads, but Allen keys and an extension would do. Stay away from impact drivers - any decent driver will snap the fasteners right off if they're not ready to turn. Almost nothing on a bike needs that degree of grunt. When you get the front wheel off (you do know how a QR works, right?) remove the front brake and squirt WD up into the steerer to soak the stem wedge. do this for a day, then replace the wheel and hold the front of the bike between your legs as you try to turn the top bolt.
When you get the parts off, give everything a good clean, lube and reassemble. It's a nice old bike - worth salvaging, but it's been abused.
Last edited by Litespud; 03-03-21 at 11:26 AM.
Likes For Litespud:
03-03-21, 12:05 PM
#12
Junior Member
Thread Starter
The front quick release was closed in an awkward position, you will need to find something to wedge in between the lever and the fork leg so that you can move the lever away from the fork. Once you have room to get your fingers in there, it should open fairly easily. It doesn't open by turning it
If that were my bike I wouldn't be riding it - I'd strip it down to the frame, accept that I'm going to lose some of the paintwork and address the rust - use a wire brush to take it down to bare metal, apply some primer or rust inhibitor and repaint with something (anything) to protect the metal.
Spend some time with some penetrating oil and WD40 if that's what you have, and soak the various stuck fasteners before attempting to shift them. I would suggest a ratchet with the requisite hex heads, but Allen keys and an extension would do. Stay away from impact drivers - any decent driver will snap the fasteners right off if they're not ready to turn. Almost nothing on a bike needs that degree of grunt. When you get the front wheel off (you do know how a QR works, right?) remove the front brake and squirt WD up into the steerer to soak the stem wedge. do this for a day, then replace the wheel and hold the front of the bike between your legs as you try to turn the top bolt.
When you get the parts off, give everything a good clean, lube and reassemble.
Do you really think the repaint needs to be that immediate?
I will try to see if I can source a ratchet. If not I will try the extender thing.
03-03-21, 12:19 PM
#13
Senior Member
Join Date: Oct 2017
Location: Chapel Hill NC
Posts: 1,683
Bikes: 2000 Litespeed Vortex Chorus 10, 1995 DeBernardi Cromor S/S
Mentioned: 4 Post(s)
Tagged: 0 Thread(s)
Quoted: 645 Post(s)
Liked 797 Times
in
446 Posts
Well it does say custom made.
Yes this was done because no brakes are not legal in Japan.
Will try this, hopefully it works.
I put WD40 in most of the places and am leaving it to soak overnight. Also looking for some of the penetrating oil suggested.
Do you really think the repaint needs to be that immediate?
I will try to see if I can source a ratchet. If not I will try the extender thing.
NJS spec is pretty stringent - if this was an NJS spec frame, what you call "custom made" is likely "some dude with a drill", which means the edges of the holes were bare metal and rust magnets
03-03-21, 04:52 PM
#14
Old fart
Join Date: Nov 2004
Location: Appleton WI
Posts: 24,777
Bikes: Several, mostly not name brands.
Mentioned: 153 Post(s)
Tagged: 0 Thread(s)
Quoted: 3582 Post(s)
Liked 3,395 Times
in
1,929 Posts
I've used a length of thin tubing to slip between the lever and the fork blade, with the lever inside the tube. The tube then provides leverage to get the lever open.
03-03-21, 05:50 PM
#15
Full Member
Likes For rickpaulos:
03-07-21, 06:22 AM
#16
Junior Member
Thread Starter
Like I said - "If this was my bike". It's not going to fall apart tomorrow, but rust doesn't get better with time. I personally couldn't own a bike in that condition and not want to do something about it, but your comfort level might be different.
NJS spec is pretty stringent - if this was an NJS spec frame, what you call "custom made" is likely "some dude with a drill", which means the edges of the holes were bare metal and rust magnets
NJS spec is pretty stringent - if this was an NJS spec frame, what you call "custom made" is likely "some dude with a drill", which means the edges of the holes were bare metal and rust magnets


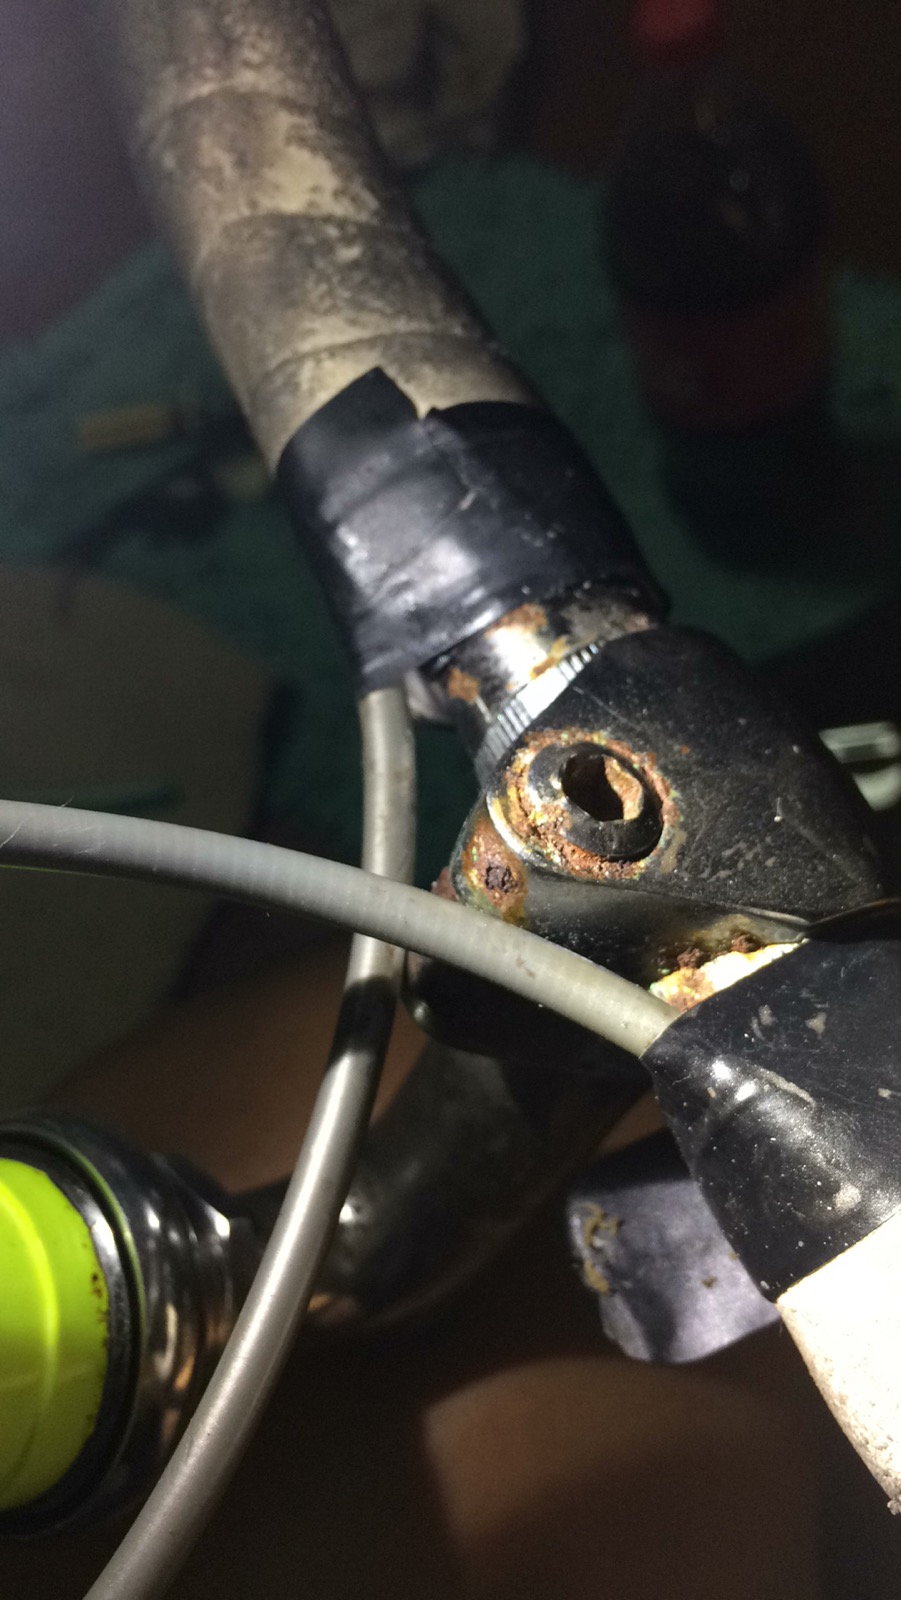
My only problem now is the stem is still stuck. I have tried the methods suggested except for using a drill since I couldnt find a shop with one. Right now I have added more penetrating oil and will try again tom to see if I can make progress. What solutions can I do if I cannot get the stem to free up? Its actually the right height so its ridable but I would it be good to get it painted with the stem and fork still on?

Additionally, the dropouts seem to have something written on them that I cant make out. Anyone know what they are?
Also, what is best to use to remove remaining tubular glue from the wheels?
 03-07-21, 06:55 AM
#17
SE Wis
Join Date: Apr 2005
Location: Milwaukee, WI
Posts: 10,499
Bikes: '68 Raleigh Sprite, '02 Raleigh C500, '84 Raleigh Gran Prix, '91 Trek 400, 2013 Novara Randonee, 1990 Trek 970
Mentioned: 40 Post(s)
Tagged: 0 Thread(s)
Quoted: 2740 Post(s)
Liked 3,388 Times
in
2,051 Posts
Likes For dedhed:
03-07-21, 08:14 AM
#18
Old fart
Join Date: Nov 2004
Location: Appleton WI
Posts: 24,777
Bikes: Several, mostly not name brands.
Mentioned: 153 Post(s)
Tagged: 0 Thread(s)
Quoted: 3582 Post(s)
Liked 3,395 Times
in
1,929 Posts
In general, it's not strictly necessary to remove old glue unless you're switching to tape or otherwise want to start fresh. But that stuff looks pretty nasty. I've found a wire wheel mounted in a bench grinder to be quite effective. About a minute per wheel, no nasty solvents, no tiresome scraping:
Likes For JohnDThompson:
03-07-21, 09:59 AM
#20
Senior Member
Join Date: Mar 2008
Posts: 8,688
Mentioned: 46 Post(s)
Tagged: 0 Thread(s)
Quoted: 1074 Post(s)
Liked 295 Times
in
222 Posts
If I was going to pay for a powdercoat, I�d have the frame + fork fully disassembled first. And properly masked off before painting.
Anything else would seem like a waste to me.
Everything has to come off. Fork, BB....
I�d keep going at the Allen head until it rounded off. Then I�d hammer in a slightly large Torx (support fork crown from below as you proceed) and go at it again.
If that fails, I�d drill out the Allen head, pop it off the shank. That would allow you to pull the stem. Finding a stem to act a donor for a new Allen bolt is usually quite easy.
Likes For dabac:
03-07-21, 11:13 AM
#21
Junior Member
Thread Starter
If I was going to pay for a powdercoat, I�d have the frame + fork fully disassembled first. And properly masked off before painting.
Anything else would seem like a waste to me.
Everything has to come off. Fork, BB....
I�d keep going at the Allen head until it rounded off. Then I�d hammer in a slightly large Torx (support fork crown from below as you proceed) and go at it again.
If that fails, I�d drill out the Allen head, pop it off the shank. That would allow you to pull the stem. Finding a stem to act a donor for a new Allen bolt is usually quite easy.
Anything else would seem like a waste to me.
Everything has to come off. Fork, BB....
I�d keep going at the Allen head until it rounded off. Then I�d hammer in a slightly large Torx (support fork crown from below as you proceed) and go at it again.
If that fails, I�d drill out the Allen head, pop it off the shank. That would allow you to pull the stem. Finding a stem to act a donor for a new Allen bolt is usually quite easy.
03-07-21, 12:08 PM
#22
SE Wis
Join Date: Apr 2005
Location: Milwaukee, WI
Posts: 10,499
Bikes: '68 Raleigh Sprite, '02 Raleigh C500, '84 Raleigh Gran Prix, '91 Trek 400, 2013 Novara Randonee, 1990 Trek 970
Mentioned: 40 Post(s)
Tagged: 0 Thread(s)
Quoted: 2740 Post(s)
Liked 3,388 Times
in
2,051 Posts
03-07-21, 12:24 PM
#23
Senior Member
Join Date: Dec 2019
Location: South Shore of Long Island
Posts: 2,785
Bikes: 2010 Carrera Volans, 2015 C-Dale Trail 2sl, 2017 Raleigh Rush Hour, 2017 Blue Proseccio, 1992 Giant Perigee, 80s Gitane Rallye Tandem
Mentioned: 12 Post(s)
Tagged: 0 Thread(s)
Quoted: 1079 Post(s)
Liked 1,019 Times
in
719 Posts
You want a new allen socket for that nut, tap it in quite firmly and use a breaker bar. It won't strip out unless you use a cheap tool. Order a bondhus or similar quality from amazon and you'll have it on tues. Worse case, and I've had this happen, it'll rip the head clean off the bolt but then you can use a drift to tap down the wedge and just buy a new bolt.
This frame, to me, borders on scary. I would find a local frame builder and have them strip the areas around the brake housing and install new cable routing bosses with a tube in between so the frame is properly sealed and the holes which could otherwise be stress risers are reinforced. Then I'd have the whole thing media blasted and powder coated and apply framesaver to the inside of the tubes to make sure nothing gets worse. Only then would I worry about reassembly.
This frame, to me, borders on scary. I would find a local frame builder and have them strip the areas around the brake housing and install new cable routing bosses with a tube in between so the frame is properly sealed and the holes which could otherwise be stress risers are reinforced. Then I'd have the whole thing media blasted and powder coated and apply framesaver to the inside of the tubes to make sure nothing gets worse. Only then would I worry about reassembly.
Likes For Russ Roth:
03-07-21, 12:49 PM
#24
Junior Member
Thread Starter
You want a new allen socket for that nut, tap it in quite firmly and use a breaker bar. It won't strip out unless you use a cheap tool. Order a bondhus or similar quality from amazon and you'll have it on tues. Worse case, and I've had this happen, it'll rip the head clean off the bolt but then you can use a drift to tap down the wedge and just buy a new bolt.
This frame, to me, borders on scary. I would find a local frame builder and have them strip the areas around the brake housing and install new cable routing bosses with a tube in between so the frame is properly sealed and the holes which could otherwise be stress risers are reinforced. Then I'd have the whole thing media blasted and powder coated and apply framesaver to the inside of the tubes to make sure nothing gets worse. Only then would I worry about reassembly.
This frame, to me, borders on scary. I would find a local frame builder and have them strip the areas around the brake housing and install new cable routing bosses with a tube in between so the frame is properly sealed and the holes which could otherwise be stress risers are reinforced. Then I'd have the whole thing media blasted and powder coated and apply framesaver to the inside of the tubes to make sure nothing gets worse. Only then would I worry about reassembly.
Is the frame really that bad? What are you looking at that scares you? Is it the rust or the "custom" brakejob that the owner assured me it was professionally done. Not sure I understand what you mean by installing new cable routing bosses with a tube in between. Are you referring to the internal cable routing holes? Or the holes drilled for the brakes? Are you trying to say that the brake mounting holes or the internal cable routing holes can be stress points which will cause the frame to eventually fail?
I will try to look for a pro framebuilder but thats quite unlikely in my area. There is only really one pro framebuiler shop with a good rep but they have a long wait line and dont really do small jobs anymore. Most other options are "self taught" frame builders which I am equally scared to go to. Would there be alternatives?
03-07-21, 01:28 PM
#25
SE Wis
Join Date: Apr 2005
Location: Milwaukee, WI
Posts: 10,499
Bikes: '68 Raleigh Sprite, '02 Raleigh C500, '84 Raleigh Gran Prix, '91 Trek 400, 2013 Novara Randonee, 1990 Trek 970
Mentioned: 40 Post(s)
Tagged: 0 Thread(s)
Quoted: 2740 Post(s)
Liked 3,388 Times
in
2,051 Posts

Likes For dedhed: