


Rear axle disassembly
 03-23-23, 01:55 PM
#1
Full Member
Thread Starter
Join Date: Mar 2021
Location: San Diego, CA
Posts: 277
Bikes: 1986 Schwinn High Sierra, 1989 Supergo Access Comp, 1989 Nishiki Pinnacle,1990 Trek 750, 1990 Trek 970, 1991 Miyata Quickcross, 1992 Bridgestone RB-2, 2002 Stumpjumper M4 Pro
Mentioned: 3 Post(s)
Tagged: 0 Thread(s)
Quoted: 156 Post(s)
Liked 262 Times
in
115 Posts
Rear axle disassembly
Hi, I think this is a pretty basic question. Having trouble pulling out the rear axle to service wheel bearings. Here's a short video showing the issue. Any advice would be appreciated, thanks!
https://photos.app.goo.gl/pneeVGgq998ZeTRj7
https://photos.app.goo.gl/pneeVGgq998ZeTRj7
 03-23-23, 02:19 PM
#2
Senior Member
Join Date: Jun 2002
Location: Montreal, Quebec
Posts: 5,921
Mentioned: 16 Post(s)
Tagged: 0 Thread(s)
Quoted: 1815 Post(s)
Liked 1,693 Times
in
974 Posts
You have what is left of a freewheel. You will have to remove it from the hub in order to service the bearings
Likes For alcjphil:
03-23-23, 03:58 PM
#3

Senior Member
Join Date: Apr 2011
Posts: 6,957
Mentioned: 41 Post(s)
Tagged: 0 Thread(s)
Quoted: 4340 Post(s)
Liked 1,526 Times
in
995 Posts
Yup, that's a Suntour freewheel body. You'll need a two or preferably four prong tool and a big wrench or bench vice. You might want to reassemble the axle so you can insert a QR skewer to hold the freewheel tool under torque.
Standard thread - turn it counterclockwise to remove.
Standard thread - turn it counterclockwise to remove.
Likes For Kontact:
03-23-23, 04:31 PM
#4
Senior Member

Join Date: Jul 2015
Location: NW Oregon
Posts: 2,975
Bikes: !982 Trek 930R Custom, Diamondback ascent with SERIOUS updates, Fuji Team Pro CF and a '09 Comencal Meta 5.5
Mentioned: 15 Post(s)
Tagged: 1 Thread(s)
Quoted: 1299 Post(s)
Liked 739 Times
in
534 Posts
the thing retaining the axle in the hub is a simple metal dust cover.. tap on the non-drive end of the axle with a soft hammer.clean and re-grease the bearing areas on both sides of the hub... Clean the Axle and cones, inspect for pittingon the load bearing surfaces... replace the cones if needed... .re-install the 9 1/4"ball bearings per side... then tap the axle back into the metal dust cover and hub from the drive side of the hub... put the cone and spacers/locknut back on the non-drive side... adjust to allow a very tiny amount of "play" in the axle ( the QR will TIGHTEN the axle adjustment a tiny bit!)... then put that old 4 notch freewheel back together.
Likes For maddog34:
03-23-23, 05:12 PM
#5
Mad bike riding scientist

Join Date: Nov 2004
Location: Denver, CO
Posts: 27,341
Bikes: Some silver ones, a red one, a black and orange one, and a few titanium ones
Mentioned: 152 Post(s)
Tagged: 1 Thread(s)
Quoted: 6200 Post(s)
Liked 4,201 Times
in
2,357 Posts
Yup, that's a Suntour freewheel body. You'll need a two or preferably four prong tool and a big wrench or bench vice. You might want to reassemble the axle so you can insert a QR skewer to hold the freewheel tool under torque.
Standard thread - turn it counterclockwise to remove.
Standard thread - turn it counterclockwise to remove.
SDHawk: At this point, it�s best to remove the palls and clamp the body in a vise on the flats. It�s called �destructive freewheel removal�. While the link is for a single speed freewheel, the idea is the same.

__________________
Stuart Black
Plan Epsilon Around Lake Michigan in the era of Covid
Old School�When It Wasn�t Ancient bikepacking
Gold Fever Three days of dirt in Colorado
Pokin' around the Poconos A cold ride around Lake Erie
Dinosaurs in Colorado A mountain bike guide to the Purgatory Canyon dinosaur trackway
Solo Without Pie. The search for pie in the Midwest.
Picking the Scablands. Washington and Oregon, 2005. Pie and spiders on the Columbia River!

Likes For cyccommute:
03-23-23, 05:16 PM
#6
Mad bike riding scientist
Join Date: Nov 2004
Location: Denver, CO
Posts: 27,341
Bikes: Some silver ones, a red one, a black and orange one, and a few titanium ones
Mentioned: 152 Post(s)
Tagged: 1 Thread(s)
Quoted: 6200 Post(s)
Liked 4,201 Times
in
2,357 Posts
Nope. The freewheel body won�t let the cones pass through. You can pound on the other end with Mj�lnir and it wouldn�t budge.
__________________
Stuart Black
Plan Epsilon Around Lake Michigan in the era of Covid
Old School�When It Wasn�t Ancient bikepacking
Gold Fever Three days of dirt in Colorado
Pokin' around the Poconos A cold ride around Lake Erie
Dinosaurs in Colorado A mountain bike guide to the Purgatory Canyon dinosaur trackway
Solo Without Pie. The search for pie in the Midwest.
Picking the Scablands. Washington and Oregon, 2005. Pie and spiders on the Columbia River!
Stuart Black
Plan Epsilon Around Lake Michigan in the era of Covid
Old School�When It Wasn�t Ancient bikepacking
Gold Fever Three days of dirt in Colorado
Pokin' around the Poconos A cold ride around Lake Erie
Dinosaurs in Colorado A mountain bike guide to the Purgatory Canyon dinosaur trackway
Solo Without Pie. The search for pie in the Midwest.
Picking the Scablands. Washington and Oregon, 2005. Pie and spiders on the Columbia River!
03-23-23, 05:22 PM
#7
Senior Member
Join Date: Apr 2011
Posts: 6,957
Mentioned: 41 Post(s)
Tagged: 0 Thread(s)
Quoted: 4340 Post(s)
Liked 1,526 Times
in
995 Posts
At this point that is not going to work. The freewheel body that has been removed stabilizes the tool for removal and without the body there the prongs are going to shear off. In my experience, the prongs shear off most of the time anyway but the problem is going be worse without the body in place.
SDHawk: At this point, it�s best to remove the palls and clamp the body in a vise on the flats. It�s called �destructive freewheel removal�. While the link is for a single speed freewheel, the idea is the same.
SDHawk: At this point, it�s best to remove the palls and clamp the body in a vise on the flats. It�s called �destructive freewheel removal�. While the link is for a single speed freewheel, the idea is the same.
But if you do clamp the pawls, use blocks of wood.
Likes For Kontact:
Likes For Kontact:
03-23-23, 05:53 PM
#9
Mad bike riding scientist
Join Date: Nov 2004
Location: Denver, CO
Posts: 27,341
Bikes: Some silver ones, a red one, a black and orange one, and a few titanium ones
Mentioned: 152 Post(s)
Tagged: 1 Thread(s)
Quoted: 6200 Post(s)
Liked 4,201 Times
in
2,357 Posts
Cones, lower locknut or dust cap or all three. The cone is wider than the spacer. The axle won�t come out with the freewheel body in place.
__________________
Stuart Black
Plan Epsilon Around Lake Michigan in the era of Covid
Old School�When It Wasn�t Ancient bikepacking
Gold Fever Three days of dirt in Colorado
Pokin' around the Poconos A cold ride around Lake Erie
Dinosaurs in Colorado A mountain bike guide to the Purgatory Canyon dinosaur trackway
Solo Without Pie. The search for pie in the Midwest.
Picking the Scablands. Washington and Oregon, 2005. Pie and spiders on the Columbia River!
Stuart Black
Plan Epsilon Around Lake Michigan in the era of Covid
Old School�When It Wasn�t Ancient bikepacking
Gold Fever Three days of dirt in Colorado
Pokin' around the Poconos A cold ride around Lake Erie
Dinosaurs in Colorado A mountain bike guide to the Purgatory Canyon dinosaur trackway
Solo Without Pie. The search for pie in the Midwest.
Picking the Scablands. Washington and Oregon, 2005. Pie and spiders on the Columbia River!
03-23-23, 06:18 PM
#10
Senior Member
Join Date: Apr 2011
Posts: 6,957
Mentioned: 41 Post(s)
Tagged: 0 Thread(s)
Quoted: 4340 Post(s)
Liked 1,526 Times
in
995 Posts
 03-23-23, 07:54 PM
#11
Senior Member
Join Date: Jul 2015
Location: NW Oregon
Posts: 2,975
Bikes: !982 Trek 930R Custom, Diamondback ascent with SERIOUS updates, Fuji Team Pro CF and a '09 Comencal Meta 5.5
Mentioned: 15 Post(s)
Tagged: 1 Thread(s)
Quoted: 1299 Post(s)
Liked 739 Times
in
534 Posts
Don't believe me? go try it yourself.
03-23-23, 08:18 PM
#12
SE Wis
Join Date: Apr 2005
Location: Milwaukee, WI
Posts: 10,499
Bikes: '68 Raleigh Sprite, '02 Raleigh C500, '84 Raleigh Gran Prix, '91 Trek 400, 2013 Novara Randonee, 1990 Trek 970
Mentioned: 40 Post(s)
Tagged: 0 Thread(s)
Quoted: 2740 Post(s)
Liked 3,387 Times
in
2,050 Posts
Likes For dedhed:
03-23-23, 08:34 PM
#13
Full Member
Thread Starter
Join Date: Mar 2021
Location: San Diego, CA
Posts: 277
Bikes: 1986 Schwinn High Sierra, 1989 Supergo Access Comp, 1989 Nishiki Pinnacle,1990 Trek 750, 1990 Trek 970, 1991 Miyata Quickcross, 1992 Bridgestone RB-2, 2002 Stumpjumper M4 Pro
Mentioned: 3 Post(s)
Tagged: 0 Thread(s)
Quoted: 156 Post(s)
Liked 262 Times
in
115 Posts
Thanks for the info, folks. Quite a lively discussion; I guess it wasn't as simple as I thought, I'll admit to still being a bit confused. Will check out the links etc and come back with any questions.
03-23-23, 08:39 PM
#14
Full Member
Thread Starter
Join Date: Mar 2021
Location: San Diego, CA
Posts: 277
Bikes: 1986 Schwinn High Sierra, 1989 Supergo Access Comp, 1989 Nishiki Pinnacle,1990 Trek 750, 1990 Trek 970, 1991 Miyata Quickcross, 1992 Bridgestone RB-2, 2002 Stumpjumper M4 Pro
Mentioned: 3 Post(s)
Tagged: 0 Thread(s)
Quoted: 156 Post(s)
Liked 262 Times
in
115 Posts
Yup, that's a Suntour freewheel body. You'll need a two or preferably four prong tool and a big wrench or bench vice. You might want to reassemble the axle so you can insert a QR skewer to hold the freewheel tool under torque.
Standard thread - turn it counterclockwise to remove.
Standard thread - turn it counterclockwise to remove.
I also saw the info about putting the freewheel back on, will try that.
03-23-23, 09:10 PM
#15
Mad bike riding scientist
Join Date: Nov 2004
Location: Denver, CO
Posts: 27,341
Bikes: Some silver ones, a red one, a black and orange one, and a few titanium ones
Mentioned: 152 Post(s)
Tagged: 1 Thread(s)
Quoted: 6200 Post(s)
Liked 4,201 Times
in
2,357 Posts
really? huh.. i just dug out three old 4 prong freewheels... Complete Axle Sets, including the cones(slightly smaller than the 17mm hex locknuts,btw) pass right through them as long as the dust covers aren't in place.... repeat.. THEY PASS RIGHT THROUGH.
Don't believe me? go try it yourself.
Don't believe me? go try it yourself.
__________________
Stuart Black
Plan Epsilon Around Lake Michigan in the era of Covid
Old School�When It Wasn�t Ancient bikepacking
Gold Fever Three days of dirt in Colorado
Pokin' around the Poconos A cold ride around Lake Erie
Dinosaurs in Colorado A mountain bike guide to the Purgatory Canyon dinosaur trackway
Solo Without Pie. The search for pie in the Midwest.
Picking the Scablands. Washington and Oregon, 2005. Pie and spiders on the Columbia River!
Stuart Black
Plan Epsilon Around Lake Michigan in the era of Covid
Old School�When It Wasn�t Ancient bikepacking
Gold Fever Three days of dirt in Colorado
Pokin' around the Poconos A cold ride around Lake Erie
Dinosaurs in Colorado A mountain bike guide to the Purgatory Canyon dinosaur trackway
Solo Without Pie. The search for pie in the Midwest.
Picking the Scablands. Washington and Oregon, 2005. Pie and spiders on the Columbia River!
03-23-23, 10:47 PM
#16
Senior Member
Join Date: Apr 2011
Posts: 6,957
Mentioned: 41 Post(s)
Tagged: 0 Thread(s)
Quoted: 4340 Post(s)
Liked 1,526 Times
in
995 Posts
Do your bearing service through the 17mm hole in the dust cover, then tap it back together to reseat the cover. Read it again and look at an axle.
Last edited by Kontact; 03-25-23 at 08:44 AM.
03-24-23, 03:21 PM
#18
Senior Member
Join Date: Jul 2015
Location: NW Oregon
Posts: 2,975
Bikes: !982 Trek 930R Custom, Diamondback ascent with SERIOUS updates, Fuji Team Pro CF and a '09 Comencal Meta 5.5
Mentioned: 15 Post(s)
Tagged: 1 Thread(s)
Quoted: 1299 Post(s)
Liked 739 Times
in
534 Posts
and also Measure some of the parts you're claiming Knowledge about.
i did.
03-24-23, 03:26 PM
#19
Senior Member
Join Date: Jul 2015
Location: NW Oregon
Posts: 2,975
Bikes: !982 Trek 930R Custom, Diamondback ascent with SERIOUS updates, Fuji Team Pro CF and a '09 Comencal Meta 5.5
Mentioned: 15 Post(s)
Tagged: 1 Thread(s)
Quoted: 1299 Post(s)
Liked 739 Times
in
534 Posts
If you showed us the cone and hub dust cover that you've already removed from the non-drive side, we could better understand the reason the axle won't pull out from the drive-side.
This is a little bizarre. I'm reminded of some dust covers that fit snugly to cones and are stationary as the hub revolves. If this is the case, you could just tap the axle out from the non drive side.
This is a little bizarre. I'm reminded of some dust covers that fit snugly to cones and are stationary as the hub revolves. If this is the case, you could just tap the axle out from the non drive side.
03-24-23, 04:03 PM
#20
Full Member
Thread Starter
Join Date: Mar 2021
Location: San Diego, CA
Posts: 277
Bikes: 1986 Schwinn High Sierra, 1989 Supergo Access Comp, 1989 Nishiki Pinnacle,1990 Trek 750, 1990 Trek 970, 1991 Miyata Quickcross, 1992 Bridgestone RB-2, 2002 Stumpjumper M4 Pro
Mentioned: 3 Post(s)
Tagged: 0 Thread(s)
Quoted: 156 Post(s)
Liked 262 Times
in
115 Posts
Thanks again for the replies. First, I DO want to keep using it.... I only took it apart to clean and degrease since I'm betting it hadn't been done for many years, if ever. Wheels were spinning ok, but I already did the front wheel and needed it for sure.
Good question. Wow I'm dumb, yes the outside had a dust cap that was so tight on the cone I thought it might be one-piece. So I bet the dust cap is preventing the axle from coming out. Here's the non-derive side:

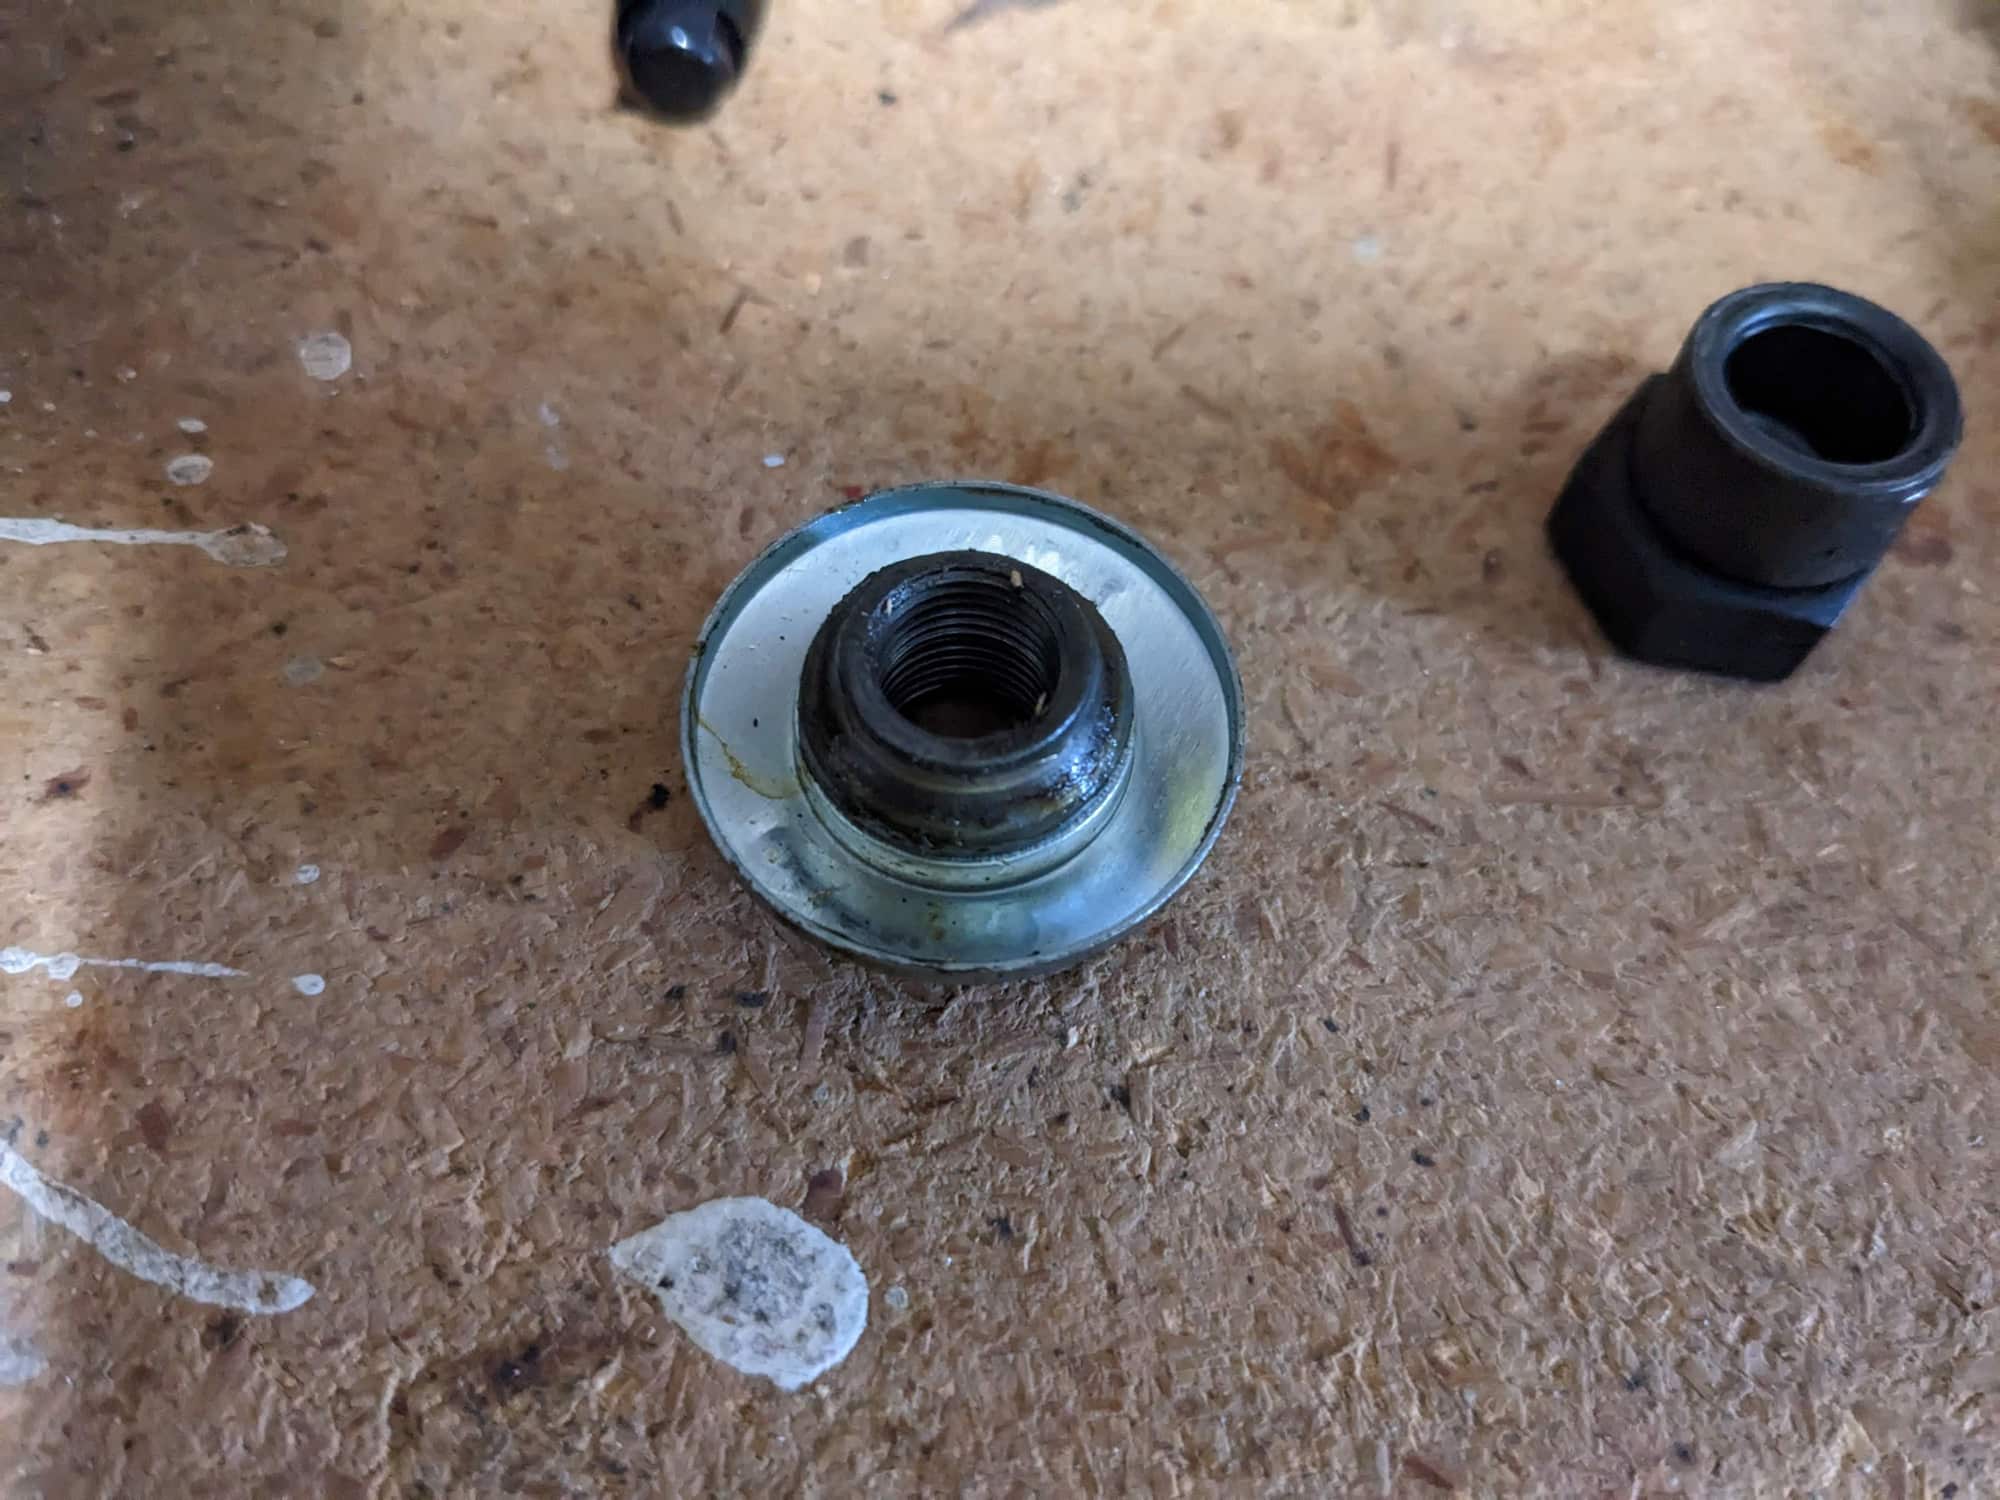
So I probably COIULD tap the axle out. However, I don't see how that would allow me to access the bearings... seems like there wouldn't be enough room to clean well and put them back.
If I pop the freewheel etc back on and use the tool to remove the 4-promg thing, will the whole assembly come off so I can easily get to the bearings?
If you showed us the cone and hub dust cover that you've already removed from the non-drive side, we could better understand the reason the axle won't pull out from the drive-side.
This is a little bizarre. I'm reminded of some dust covers that fit snugly to cones and are stationary as the hub revolves. If this is the case, you could just tap the axle out from the non drive side.
This is a little bizarre. I'm reminded of some dust covers that fit snugly to cones and are stationary as the hub revolves. If this is the case, you could just tap the axle out from the non drive side.
So I probably COIULD tap the axle out. However, I don't see how that would allow me to access the bearings... seems like there wouldn't be enough room to clean well and put them back.
If I pop the freewheel etc back on and use the tool to remove the 4-promg thing, will the whole assembly come off so I can easily get to the bearings?
03-24-23, 04:17 PM
#21
Senior Member
Join Date: Jul 2015
Location: NW Oregon
Posts: 2,975
Bikes: !982 Trek 930R Custom, Diamondback ascent with SERIOUS updates, Fuji Team Pro CF and a '09 Comencal Meta 5.5
Mentioned: 15 Post(s)
Tagged: 1 Thread(s)
Quoted: 1299 Post(s)
Liked 739 Times
in
534 Posts
Thanks again for the replies. First, I DO want to keep using it.... I only took it apart to clean and degrease since I'm betting it hadn't been done for many years, if ever. Wheels were spinning ok, but I already did the front wheel and needed it for sure.
Good question. Wow I'm dumb, yes the outside had a dust cap that was so tight on the cone I thought it might be one-piece. So I bet the dust cap is preventing the axle from coming out. Here's the non-derive side:
So I probably COIULD tap the axle out. However, I don't see how that would allow me to access the bearings... seems like there wouldn't be enough room to clean well and put them back.
If I pop the freewheel etc back on and use the tool to remove the 4-promg thing, will the whole assembly come off so I can easily get to the bearings?
you do own a Cone nut wrench, correct? this task can not be done properly without at least ONE Cone wrench, typically 15mm size for rear wheels, 13mm for front wheels...,and a 17mm Box end wrench helps too.
i'd think saving a few bucks by having a shop get that Freewheel loose would be the best route.
Last edited by maddog34; 03-24-23 at 04:26 PM.
Likes For maddog34:
03-24-23, 04:42 PM
#22
se�or miembro

Join Date: Dec 2018
Location: Pac NW
Posts: 6,601
Bikes: '70s - '80s Campagnolo
Mentioned: 92 Post(s)
Tagged: 0 Thread(s)
Quoted: 3869 Post(s)
Liked 6,454 Times
in
3,192 Posts
If it were me and I wanted to keep that freewheel, I would correctly reassemble it first with a little bit of grease on both races that will hold the bearings in place for reassembly.
Next time you do this (freewheel overhaul), it's fine to remove the lock ring while the freewheel is still threaded to the hub. BUT, use the correct freewheel removal tool to loosen the freewheel from the hub first, breaking that super tight, concrete-like bond.
You can then use the wheel itself to help you loosen the freewheel lock ring. Once the lock ring is loose, go back to the removal tool and remove the entire freewheel assembly without spilling a single bearing. Put the now independent freewheel on a towel for complete disassembly, so all those little bearings don't scatter all over the place. Ya dig?

Likes For SurferRosa:
03-24-23, 06:16 PM
#23
Full Member
Thread Starter
Join Date: Mar 2021
Location: San Diego, CA
Posts: 277
Bikes: 1986 Schwinn High Sierra, 1989 Supergo Access Comp, 1989 Nishiki Pinnacle,1990 Trek 750, 1990 Trek 970, 1991 Miyata Quickcross, 1992 Bridgestone RB-2, 2002 Stumpjumper M4 Pro
Mentioned: 3 Post(s)
Tagged: 0 Thread(s)
Quoted: 156 Post(s)
Liked 262 Times
in
115 Posts
yes. Holding the special 4 prong removal socket in a large Bench Vise then using the Rim to turn the wheel is the preferred method.. and If there is a bike shop near you, i'd advise stopping in and having them remove that old freewheel... You CAN get a twisted paper towel in the Bearing area without removing the Freewheel.. i use an old dull screwdriver to move the towel around in there... i use a magnet to get all 9 balls out first, then add a bit of Penetrant to loosen the old grease, then begin by using my finger and a paper towel to extract as much old grease as possible... then tuckan inch or two of P. towel in and use the old screwdriver to move the towel around in the Bearing area... Repeat until clean....Get some grease on the end of your finger and smear it around in there... use a bit of grease on your finger the re-install each ball bearing, one at a time...make sure each is pressed into place right up against the previous one... Tap the axle and cone back into place... give it another Tap to make sure the dust cover is properly located and won't rub the bearings... re-install the opposite side's cone and locknut. Adjust for a TINY amount of end play.
you do own a Cone nut wrench, correct? this task can not be done properly without at least ONE Cone wrench, typically 15mm size for rear wheels, 13mm for front wheels...,and a 17mm Box end wrench helps too.
i'd think saving a few bucks by having a shop get that Freewheel loose would be the best route.
So I figured why not try to pop out the axle as had also been suggested. Hey, it came out on the first moderate tap! It wasn't "easy" to access the bearings and clean the cup but it wasn't as tough as I thought either. I did almost exactly what you suggested above and it worked out well. I do have cone wrenches and a decent amount of tools that I'm slowly getting the hang of,
Happy to report that it's all cleaned, lubed, and spinning great! I did have a problem the first time.... it wasn't smooth at all.... I think the dust cap wasn't in straight or completely. So I pulled out the axle and hand-pressed it into the cup. 2nd try was the charm.
I still need to put the freewheel back on with those bearings, but I've done that before so I think it will be alright.
Of course.
If it were me and I wanted to keep that freewheel, I would correctly reassemble it first with a little bit of grease on both races that will hold the bearings in place for reassembly.
Next time you do this (freewheel overhaul), it's fine to remove the lock ring while the freewheel is still threaded to the hub. BUT, use the correct freewheel removal tool to loosen the freewheel from the hub first, breaking that super tight, concrete-like bond.
You can then use the wheel itself to help you loosen the freewheel lock ring. Once the lock ring is loose, go back to the removal tool and remove the entire freewheel assembly without spilling a single bearing. Put the now independent freewheel on a towel for complete disassembly, so all those little bearings don't scatter all over the place. Ya dig?
Any thoughts on the best method for that also appreciated. For instance, it better to put the grease/bearings on the freewheel and then lower onto the hub? Or better to grease the bearings onto the hub and lower freewheel? Does that make sense, haha?
03-24-23, 06:33 PM
#24
se�or miembro
Join Date: Dec 2018
Location: Pac NW
Posts: 6,601
Bikes: '70s - '80s Campagnolo
Mentioned: 92 Post(s)
Tagged: 0 Thread(s)
Quoted: 3869 Post(s)
Liked 6,454 Times
in
3,192 Posts
I haven't had good success applying grease/bearings into the lower cluster and then fitting that onto the freewheel body, so what I do is grease that thin freewheel body race (currently threaded to your hub) and load half the bearings there. If you don't know how many bearings came off there, put two less than what will fit. then fit the cluster on top of that. Then place grease and the other half of the bearings onto the race atop the cluster where the lock ring sits. Go skimpy on grease, using only enough to keep the bearings in place. Be sure you haven't added grease to the two pawls.
I haven't had good success applying grease/bearings into the lower cluster and then fitting that onto the freewheel body, so what I do is grease that thin freewheel body race (currently threaded to your hub) and load half the bearings there. If you don't know how many bearings came off there, put two less than what will fit. then fit the cluster on top of that. Then place grease and the other half of the bearings onto the race atop the cluster where the lock ring sits. Go skimpy on grease, using only enough to keep the bearings in place. Be sure you haven't added grease to the two pawls.
Likes For SurferRosa:
03-24-23, 07:25 PM
#25
Senior Member
Join Date: Jun 2002
Location: Montreal, Quebec
Posts: 5,921
Mentioned: 16 Post(s)
Tagged: 0 Thread(s)
Quoted: 1815 Post(s)
Liked 1,693 Times
in
974 Posts
It is pretty simple to get the freewheel body off. Thread the lockring back on and then you will be able to use the remover to take it off. You don't have to worry about anything else. If you can't get it off at that point, You may have to destroy the freewheel body