


Lowering stem height?
 12-22-24 | 03:47 PM
#1
Thread Starter
old newbie

Joined: Nov 2009
Posts: 1,802
Likes: 1,134
From: Fort Worth, Texas
Bikes: Specialized Roubaix
Lowering stem height?
The handlebars on my ‘13 Specialized Roubaix were at their highest setting. I wanted to lower the stack height so I took the handlebars off, removed the preload bolt and then the stem. When I removed the preload bolt the bolt under it became very loose. I ran it down and just snugged it up.
I took 2 spacers from the stack and put the stem on with those 2 spacers on top.
I snugged the preload bolt then tightened the stem. After I installed the handlebars when I checked things I noticed that when I turned the bars it felt rough like the bearing were too tight. I loosened the stem then the preload bolt again then just snugged it down. After I tightened the stem I tightened the preload bolt a little more but it felt rough again.
I dont want to ride it until that it right so I don’t damage the bearing races.
What did I probably do wrong and what do I need to do to fix it?
 12-22-24 | 07:15 PM
#2

Senior Member


Joined: Jul 2015
Posts: 7,439
Likes: 3,265
From: NW Oregon
Bikes: 1982 Trek 930R Custom, '91 Diamondback Ascent w/ XT, XTR updates, Fuji Team Pro CF road flyer, Specialized Sirrus Gravel Convert, '09 Comencal Meta 5.5 XC, '02 Marin MBX500, '84 Gitane Criterium bike
what "bolt under the preload bolt"?
if you mean the clamp screws that actually hold the stem to the steerer tube, then there was a problem with the preload CAP's shoulder diameter being too large for the stem, or the amount of un-filled stem clamp was too great, the clamp screw got reefed down by a ham fist, and the clamp has collapsed until it met the cap's shoulder diameter..... these are not good things, and you need to CLOSELY inspect things before something possibly breaks...
as to getting the adjustment wrong, then trying to loosen that adjustment, but not being successful..... you need to tap the fork downward while the stem and cap are both loose to reset the bearing preload... the wedge ring will hold the former bearing adjustment until you make it move some.. use a piece of wood or a soft face hammer to tap the fork downward to avoid denting the soft aluminum(most likely material)... Then, SLOWLY snug down the cap screw until zero play and zero drag is achieved in the steering...i do this last bit in 1/8 turns after getting near final adjustment...... once zero/zero is achieved, Tighten the CLAMP screws.. then add a quarter turn to the cap screw if it was fairly loose after pre-loading the headset.
SERIOUSLY.. Carefully and Completely Inspect that Stem clamp.. it may be Cracked already.
Magnifying Glass and Bright Light type inspection.
how much free space existed between the cap and the top of the steerer tube? more than 1/4", 6mm is too much, IMO.
Last edited by maddog34; 12-22-24 at 07:21 PM.
 12-22-24 | 07:26 PM
#3
Senior Member

Joined: Apr 2009
Posts: 39,897
Likes: 3,865
From: New Rochelle, NY
Bikes: too many bikes from 1967 10s (5x2)Frejus to a Sumitomo Ti/Chorus aluminum 10s (10x2), plus one non-susp mtn bike I use as my commuter
A possibility is that the stem isn't perfectly faced on the bottom, or that some part is touching the bearing or bearing cover and pressing unevenly.
You can check this by eyeballing, or try putting the thinnest spacer under the stem and restacking accordingly.
If a spacer below the stem is needed, shop for the thinnest you can find, ie. 2mm or so, and consider that to be rock bottom for stem height.
You can check this by eyeballing, or try putting the thinnest spacer under the stem and restacking accordingly.
If a spacer below the stem is needed, shop for the thinnest you can find, ie. 2mm or so, and consider that to be rock bottom for stem height.
__________________
FB
Chain-L site
An ounce of diagnosis is worth a pound of cure.
Just because I'm tired of arguing, doesn't mean you're right.
“One accurate measurement is worth a thousand expert opinions” - Adm Grace Murray Hopper - USN
WARNING, I'm from New York. Thin skinned people should maintain safe distance.
FB
Chain-L site
An ounce of diagnosis is worth a pound of cure.
Just because I'm tired of arguing, doesn't mean you're right.
“One accurate measurement is worth a thousand expert opinions” - Adm Grace Murray Hopper - USN
WARNING, I'm from New York. Thin skinned people should maintain safe distance.
12-22-24 | 08:21 PM
#4
Thread Starter
old newbie
Joined: Nov 2009
Posts: 1,802
Likes: 1,134
From: Fort Worth, Texas
Bikes: Specialized Roubaix
what "bolt under the preload bolt"?
if you mean the clamp screws that actually hold the stem to the steerer tube, then there was a problem with the preload CAP's shoulder diameter being too large for the stem, or the amount of un-filled stem clamp was too great, the clamp screw got reefed down by a ham fist, and the clamp has collapsed until it met the cap's shoulder diameter..... these are not good things, and you need to CLOSELY inspect things before something possibly breaks...
as to getting the adjustment wrong, then trying to loosen that adjustment, but not being successful..... you need to tap the fork downward while the stem and cap are both loose to reset the bearing preload... the wedge ring will hold the former bearing adjustment until you make it move some.. use a piece of wood or a soft face hammer to tap the fork downward to avoid denting the soft aluminum(most likely material)... Then, SLOWLY snug down the cap screw until zero play and zero drag is achieved in the steering...i do this last bit in 1/8 turns after getting near final adjustment...... once zero/zero is achieved, Tighten the CLAMP screws.. then add a quarter turn to the cap screw if it was fairly loose after pre-loading the headset.
SERIOUSLY.. Carefully and Completely Inspect that Stem clamp.. it may be Cracked already.
Magnifying Glass and Bright Light type inspection.
how much free space existed between the cap and the top of the steerer tube? more than 1/4", 6mm is too much, IMO.
if you mean the clamp screws that actually hold the stem to the steerer tube, then there was a problem with the preload CAP's shoulder diameter being too large for the stem, or the amount of un-filled stem clamp was too great, the clamp screw got reefed down by a ham fist, and the clamp has collapsed until it met the cap's shoulder diameter..... these are not good things, and you need to CLOSELY inspect things before something possibly breaks...
as to getting the adjustment wrong, then trying to loosen that adjustment, but not being successful..... you need to tap the fork downward while the stem and cap are both loose to reset the bearing preload... the wedge ring will hold the former bearing adjustment until you make it move some.. use a piece of wood or a soft face hammer to tap the fork downward to avoid denting the soft aluminum(most likely material)... Then, SLOWLY snug down the cap screw until zero play and zero drag is achieved in the steering...i do this last bit in 1/8 turns after getting near final adjustment...... once zero/zero is achieved, Tighten the CLAMP screws.. then add a quarter turn to the cap screw if it was fairly loose after pre-loading the headset.
SERIOUSLY.. Carefully and Completely Inspect that Stem clamp.. it may be Cracked already.
Magnifying Glass and Bright Light type inspection.
how much free space existed between the cap and the top of the steerer tube? more than 1/4", 6mm is too much, IMO.
I can’t really describe it better. I may take it to my lbs fir them to look at it. It can’t be anything really bad but I don’t want to mess it up.
12-22-24 | 10:26 PM
#6
Thread Starter
old newbie
Joined: Nov 2009
Posts: 1,802
Likes: 1,134
From: Fort Worth, Texas
Bikes: Specialized Roubaix
I never did anything with the headset parts.
12-22-24 | 10:52 PM
#7
Senior Member
Joined: Apr 2011
Posts: 12,704
Likes: 4,837
12-23-24 | 12:13 AM
#8
Thread Starter
old newbie
Joined: Nov 2009
Posts: 1,802
Likes: 1,134
From: Fort Worth, Texas
Bikes: Specialized Roubaix
12-23-24 | 07:50 AM
#9
Senior Member
Joined: Apr 2011
Posts: 12,704
Likes: 4,837
1. Hang the bike up by the seat so the front wheel is lower than the back and the seat tube is roughly vertical or the front wheel a little lower than that.
2. Tighten the cap bolt to take any looseness out of the headset bearing. Bump the wheel back and forth to verify that the headset turns easily and wants to swing back and forth.
3. Snug it up just a little more to where the headset seals just barely prevent the wheel from swinging back and forth more than once. When the wheel is turned it will still want to swing back to center, but won't 'pendulum' more than once.
4. Verify that the stem is aligned with the front wheel, and tighten the stem bolts to the steerer tube, alternating between top and bottom bolt. Use a torque wrench set to 5Nm.
5. Bounce your fist off the front tire to verify that the headset is snug and doesn't rattle; verify that the steering swings mostly free.
12-29-24 | 12:44 AM
#10
Senior Member
Joined: Apr 2007
Posts: 7,759
Likes: 1,741
Bing Videos
Last edited by Camilo; 12-29-24 at 12:53 AM.
12-29-24 | 09:58 AM
#11
Thread Starter
old newbie
Joined: Nov 2009
Posts: 1,802
Likes: 1,134
From: Fort Worth, Texas
Bikes: Specialized Roubaix
Probably one bolt is the bolt for the expander plug. The top cap preload bolt screws into that and pulls up against the expander to set the preload. Follow Kontact's instructions above and you'll probably be good. But, there should be a million videos online for the adjustment of a threadless fork/stem combo. I think this video will help you. it's for a mountain bike, but works for any bike with a threadless fork and stem. You might want to watch the whole thing as a basic tutorial, but starting at 7:00 is specifically the adjustment with the top cap bolt.
Bing Videos
Bing Videos
12-29-24 | 11:37 AM
#12

Senior Member

Joined: Jul 2005
Posts: 4,989
Likes: 709
From: Boulder County, CO
Bikes: '80 Masi Gran Criterium, '12 Trek Madone, early '60s Frejus track
The handlebars on my ‘13 Specialized Roubaix were at their highest setting. I wanted to lower the stack height so I took the handlebars off, removed the preload bolt and then the stem. When I removed the preload bolt the bolt under it became very loose. I ran it down and just snugged it up.
I took 2 spacers from the stack and put the stem on with those 2 spacers on top.
I snugged the preload bolt then tightened the stem. After I installed the handlebars when I checked things I noticed that when I turned the bars it felt rough like the bearing were too tight. I loosened the stem then the preload bolt again then just snugged it down. After I tightened the stem I tightened the preload bolt a little more but it felt rough again.
I dont want to ride it until that it right so I don’t damage the bearing races.
What did I probably do wrong and what do I need to do to fix it?
I took 2 spacers from the stack and put the stem on with those 2 spacers on top.
I snugged the preload bolt then tightened the stem. After I installed the handlebars when I checked things I noticed that when I turned the bars it felt rough like the bearing were too tight. I loosened the stem then the preload bolt again then just snugged it down. After I tightened the stem I tightened the preload bolt a little more but it felt rough again.
I dont want to ride it until that it right so I don’t damage the bearing races.
What did I probably do wrong and what do I need to do to fix it?
To see if that's what you have, remove your spacers and stem. See if there's a shim inside the part that clamps onto the steerer. It should slide out from the top, with and angled flange on top. The idea of it was, you could twist it 180 degrees and change the stem angle. These came equipped with a special top cap that was beveled to match the stem angle. Specialized simply presumed that all their Roubaix customers would want their stems at maximum height, or they might later have their shop trim the steerer.
If this is what you have, the easiest way to fix this is to buy a new stem (non-Specialized) and top cap. You might need to change your spacer stack, too, if the stack height of the new stem is different. And eventually you might want to have the steerer trimmed, but let's fix one thing at a time.
12-30-24 | 07:17 PM
#13
Thread Starter
old newbie
Joined: Nov 2009
Posts: 1,802
Likes: 1,134
From: Fort Worth, Texas
Bikes: Specialized Roubaix
Roubaixes of this period might have had an adjustable angle stem. I know the earlier ones did. These stems were designed to work only with no spacers on top.
To see if that's what you have, remove your spacers and stem. See if there's a shim inside the part that clamps onto the steerer. It should slide out from the top, with and angled flange on top. The idea of it was, you could twist it 180 degrees and change the stem angle. These came equipped with a special top cap that was beveled to match the stem angle. Specialized simply presumed that all their Roubaix customers would want their stems at maximum height, or they might later have their shop trim the steerer.
If this is what you have, the easiest way to fix this is to buy a new stem (non-Specialized) and top cap. You might need to change your spacer stack, too, if the stack height of the new stem is different. And eventually you might want to have the steerer trimmed, but let's fix one thing at a time.
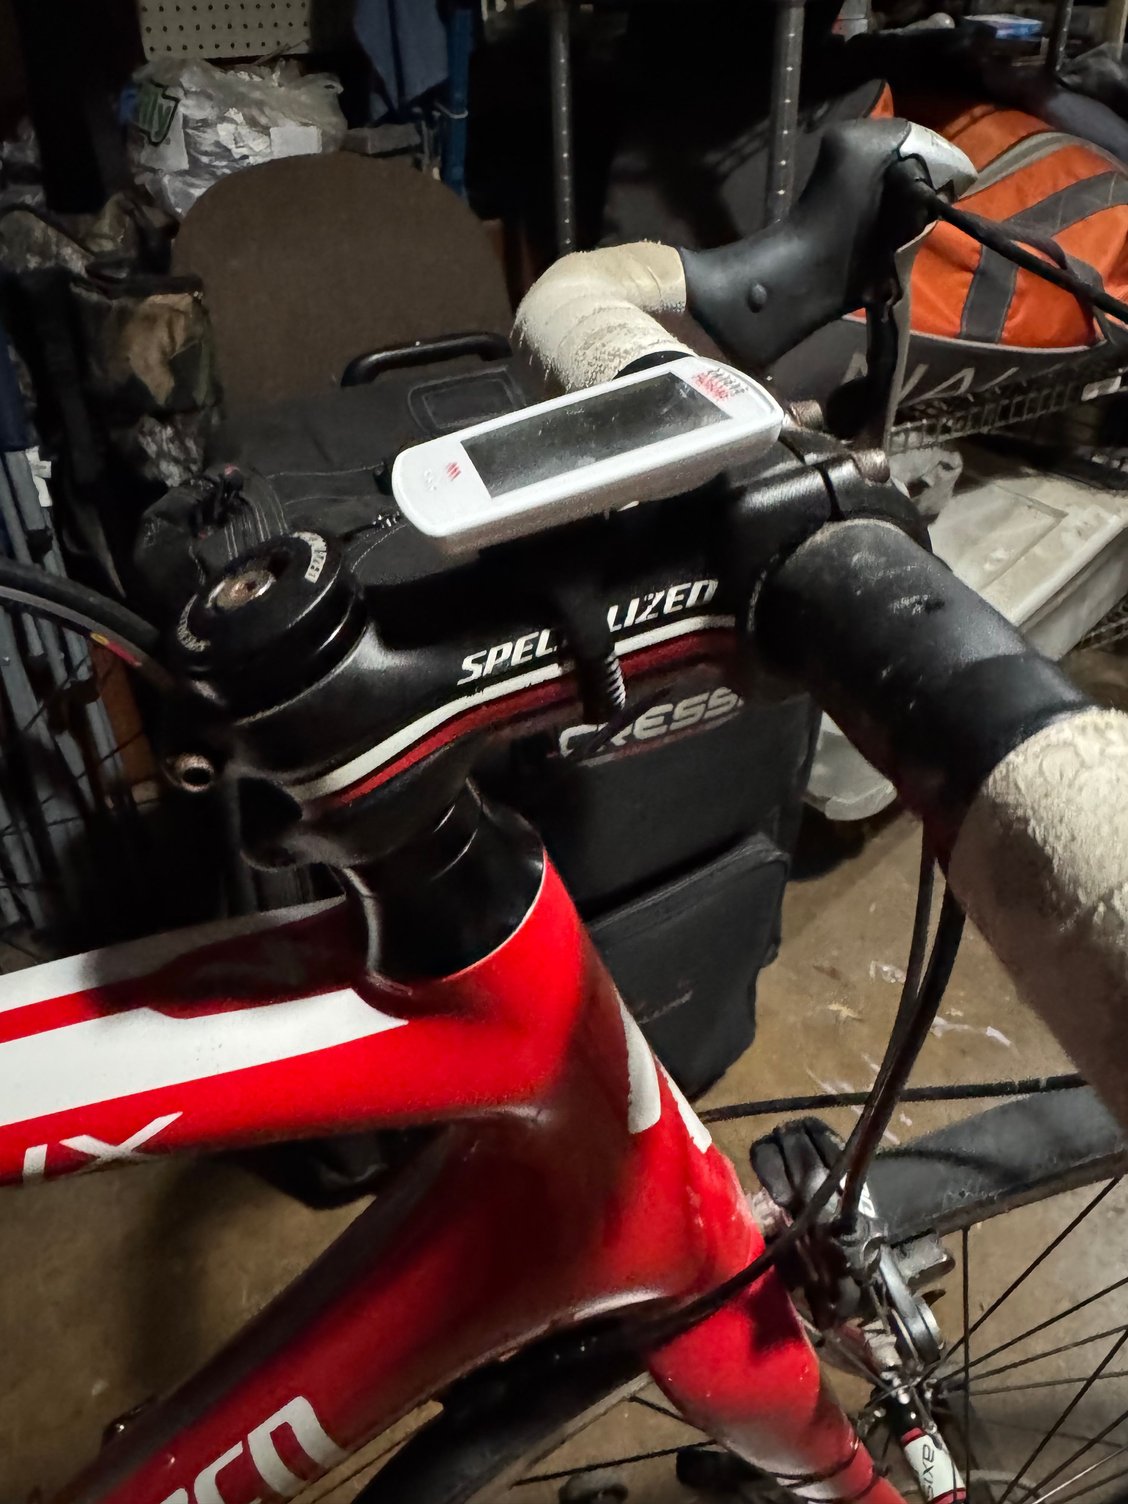
I did notice the cap does not fit flush on the spacers I moved to on top of the stem. It hangs over a little. Apparently the stem is a slightly larger diameter than the spacers. I wonder if that is causing some issue like it not being centered properly.
12-30-24 | 07:34 PM
#14
Thread Starter
old newbie
Joined: Nov 2009
Posts: 1,802
Likes: 1,134
From: Fort Worth, Texas
Bikes: Specialized Roubaix
I think I mentioned this at the start of the thread but when I began to lower the stack height I first removed the stem. Then I removed the cap bolt. When I did that I saw the “bolt” that adjusts the bearing tension was very loose. I snugged it trying hard to not over-tighten it so I didn’t damage the bearing races.
I removed 2 spacers then reinstalled the stem. After that I snugged the cap bolt. That was when I noticed it wasn’t smooth when I turned the handlebars. It felt rough like the bearings were rolling over dips. I call it indexed but it may be something else on a bicycle.
When I loosened the cap bolt it was smooth.
What in the heck could I have done?
Should I move the spacers back where they were?
12-30-24 | 11:07 PM
#15
Senior Member
Joined: Dec 2008
Posts: 2,733
Likes: 2,791
From: Pioneer Valley
I think I mentioned this at the start of the thread but when I began to lower the stack height I first removed the stem. Then I removed the cap bolt. When I did that I saw the “bolt” that adjusts the bearing tension was very loose. I snugged it trying hard to not over-tighten it so I didn’t damage the bearing races.
I removed 2 spacers then reinstalled the stem. After that I snugged the cap bolt. That was when I noticed it wasn’t smooth when I turned the handlebars. It felt rough like the bearings were rolling over dips. I call it indexed but it may be something else on a bicycle.
When I loosened the cap bolt it was smooth.
What in the heck could I have done?
Should I move the spacers back where they were?
I removed 2 spacers then reinstalled the stem. After that I snugged the cap bolt. That was when I noticed it wasn’t smooth when I turned the handlebars. It felt rough like the bearings were rolling over dips. I call it indexed but it may be something else on a bicycle.
When I loosened the cap bolt it was smooth.
What in the heck could I have done?
Should I move the spacers back where they were?
12-31-24 | 01:54 PM
#16
Thread Starter
old newbie
Joined: Nov 2009
Posts: 1,802
Likes: 1,134
From: Fort Worth, Texas
Bikes: Specialized Roubaix
12-31-24 | 06:54 PM
#17
Senior Member
Joined: Jan 2016
Posts: 1,518
Likes: 646
I think I mentioned this at the start of the thread but when I began to lower the stack height I first removed the stem. Then I removed the cap bolt. When I did that I saw the “bolt” that adjusts the bearing tension was very loose. I snugged it trying hard to not over-tighten it so I didn’t damage the bearing races.
I removed 2 spacers then reinstalled the stem. After that I snugged the cap bolt. That was when I noticed it wasn’t smooth when I turned the handlebars. It felt rough like the bearings were rolling over dips. I call it indexed but it may be something else on a bicycle.
When I loosened the cap bolt it was smooth.
What in the heck could I have done?
Should I move the spacers back where they were?
I removed 2 spacers then reinstalled the stem. After that I snugged the cap bolt. That was when I noticed it wasn’t smooth when I turned the handlebars. It felt rough like the bearings were rolling over dips. I call it indexed but it may be something else on a bicycle.
When I loosened the cap bolt it was smooth.
What in the heck could I have done?
Should I move the spacers back where they were?
If 'yes', then at this point, the cap bolt doesn't need any further tightening. The cap bolt (and the connection to the expander plug in the steerer) is only needed to push down on the stem/spacers to adjust the bearing preload. Once the stem is clamped to the steerer, the top bolt only needs to be tight enough to keep from rattling. If the headset and stem is installed correctly, the top bolt and cap can even be removed without affecting the bearing preload.
12-31-24 | 07:32 PM
#18
Senior Member
Joined: Apr 2009
Posts: 39,897
Likes: 3,865
From: New Rochelle, NY
Bikes: too many bikes from 1967 10s (5x2)Frejus to a Sumitomo Ti/Chorus aluminum 10s (10x2), plus one non-susp mtn bike I use as my commuter
I think you misunderstand how threadless headsets work.
It's the bolt that "tightens" the top cap that adjusts the headset preload. By tightening that you're overloading te bearing.
FWIW the assembly in the fork is tightened enough not to slide, so the top cap bolt can have a solid purchase when you use it to gently compress the stack and eliminate play.
The sequence is:
1- secure nut in fork
2- assemble headset, stem, spacers, etc.
3- tighten stem slightly, but leave it free to slide
4- add top cap and bolt, and tighten to adjust headset (not to secure top cap)
5- tighten stem to hold everything in place.
That should get you home.
01-01-25 | 10:03 PM
#19
Senior Member
Joined: Jul 2005
Posts: 4,989
Likes: 709
From: Boulder County, CO
Bikes: '80 Masi Gran Criterium, '12 Trek Madone, early '60s Frejus track
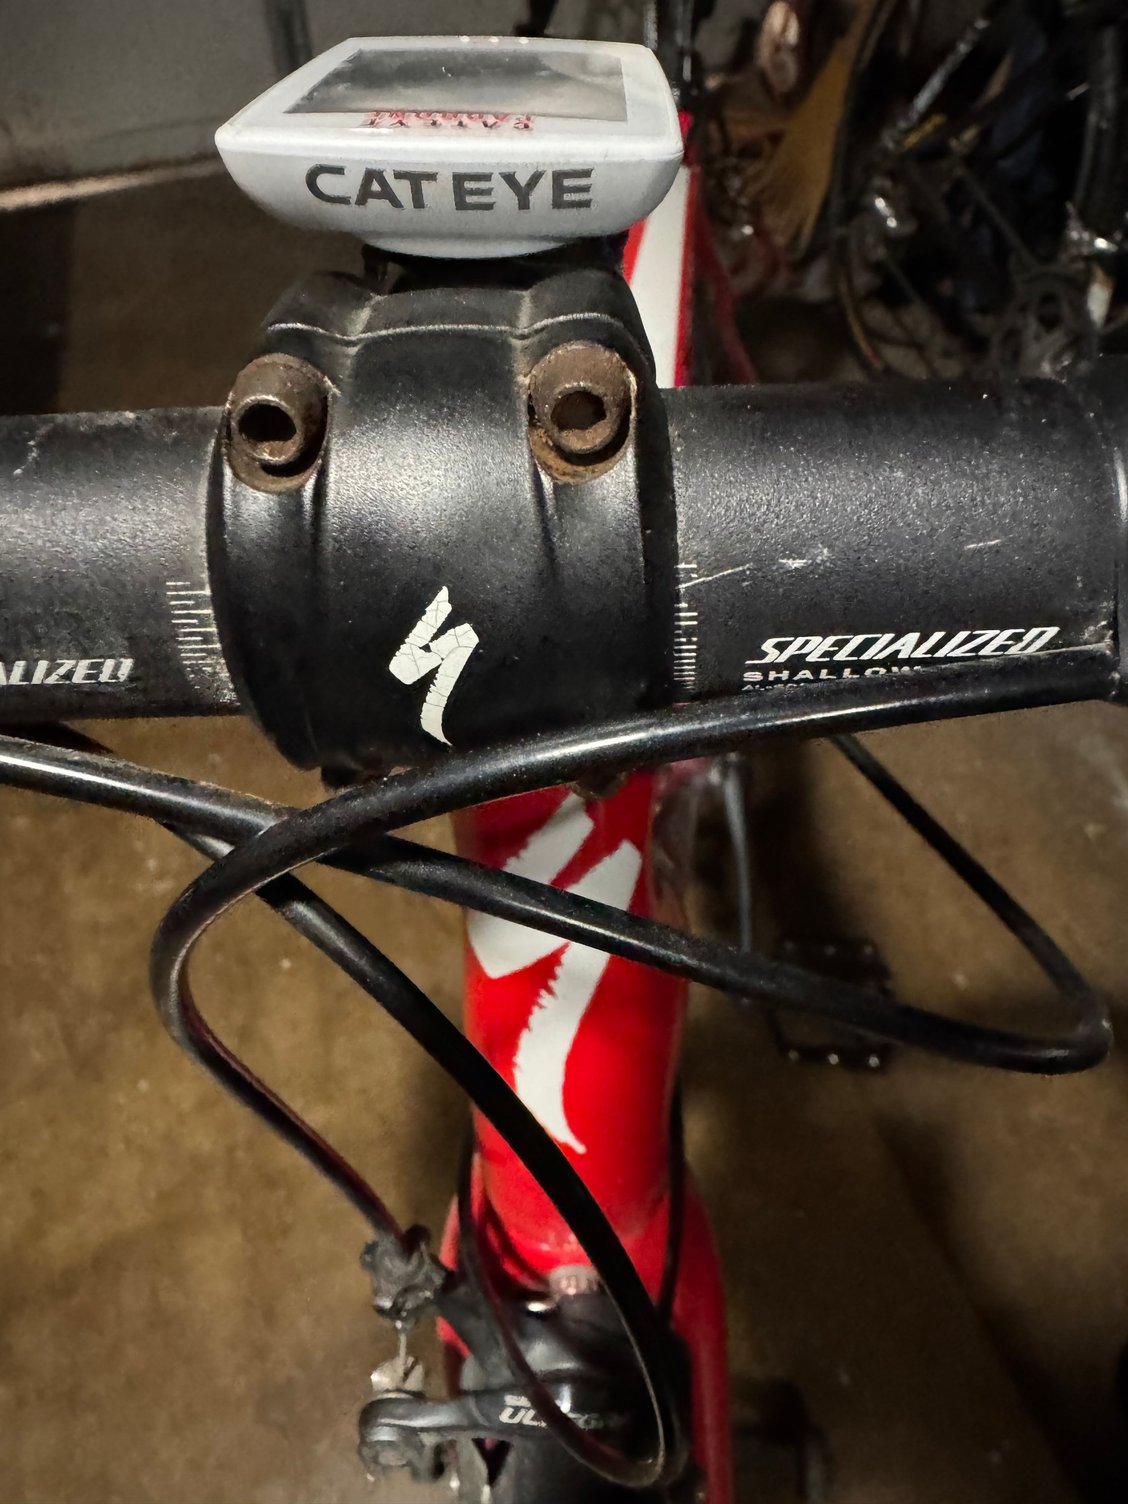
My stem doesn’t look to be adjustable.
I did notice the cap does not fit flush on the spacers I moved to on top of the stem. It hangs over a little. Apparently the stem is a slightly larger diameter than the spacers. I wonder if that is causing some issue like it not being centered properly.
I did notice the cap does not fit flush on the spacers I moved to on top of the stem. It hangs over a little. Apparently the stem is a slightly larger diameter than the spacers. I wonder if that is causing some issue like it not being centered properly.
You might have an aftermarket stem with a Specialized adjustable top cap. A couple photos would be really helpful about now. Meanwhile, familiarize yourself with this: https://www.parktool.com/en-us/blog/...ion-threadless
01-02-25 | 03:46 PM
#20
Thread Starter
old newbie
Joined: Nov 2009
Posts: 1,802
Likes: 1,134
From: Fort Worth, Texas
Bikes: Specialized Roubaix
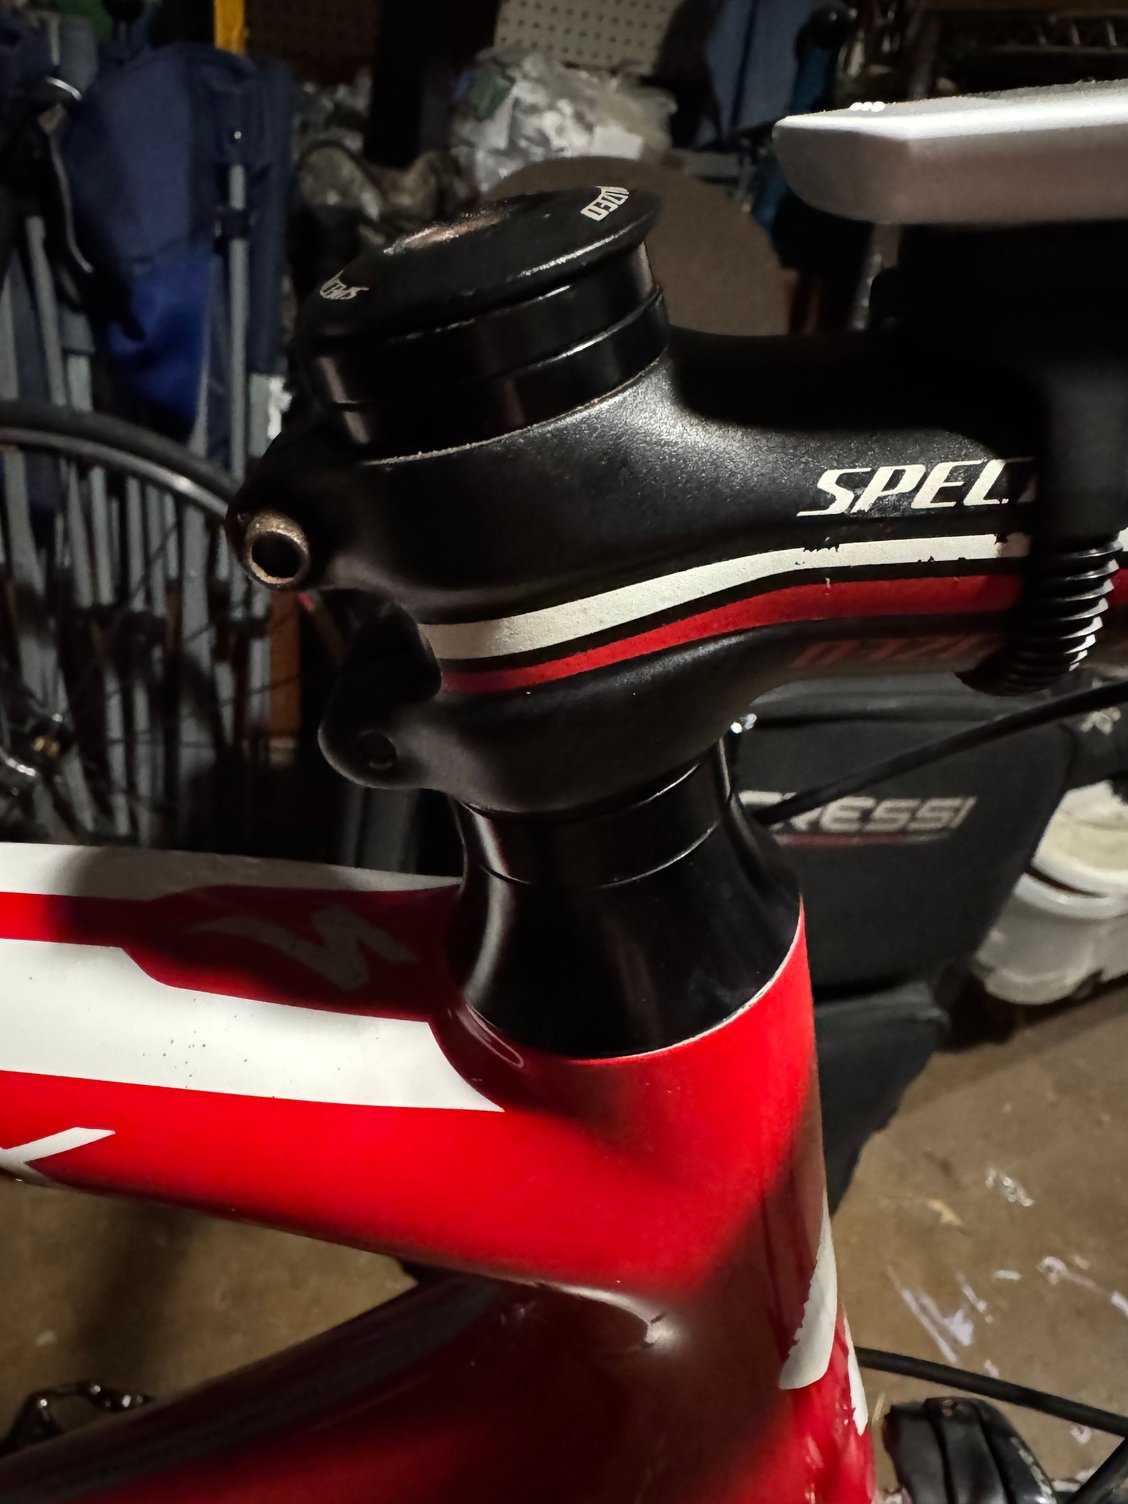
Is it a Specialized stem, or an aftermarket brand?
You might have an aftermarket stem with a Specialized adjustable top cap. A couple photos would be really helpful about now. Meanwhile, familiarize yourself with this: https://www.parktool.com/en-us/blog/...ion-threadless
You might have an aftermarket stem with a Specialized adjustable top cap. A couple photos would be really helpful about now. Meanwhile, familiarize yourself with this: https://www.parktool.com/en-us/blog/...ion-threadless
 01-02-25 | 04:28 PM
#21
Senior Member
Joined: Jan 2016
Posts: 1,518
Likes: 646
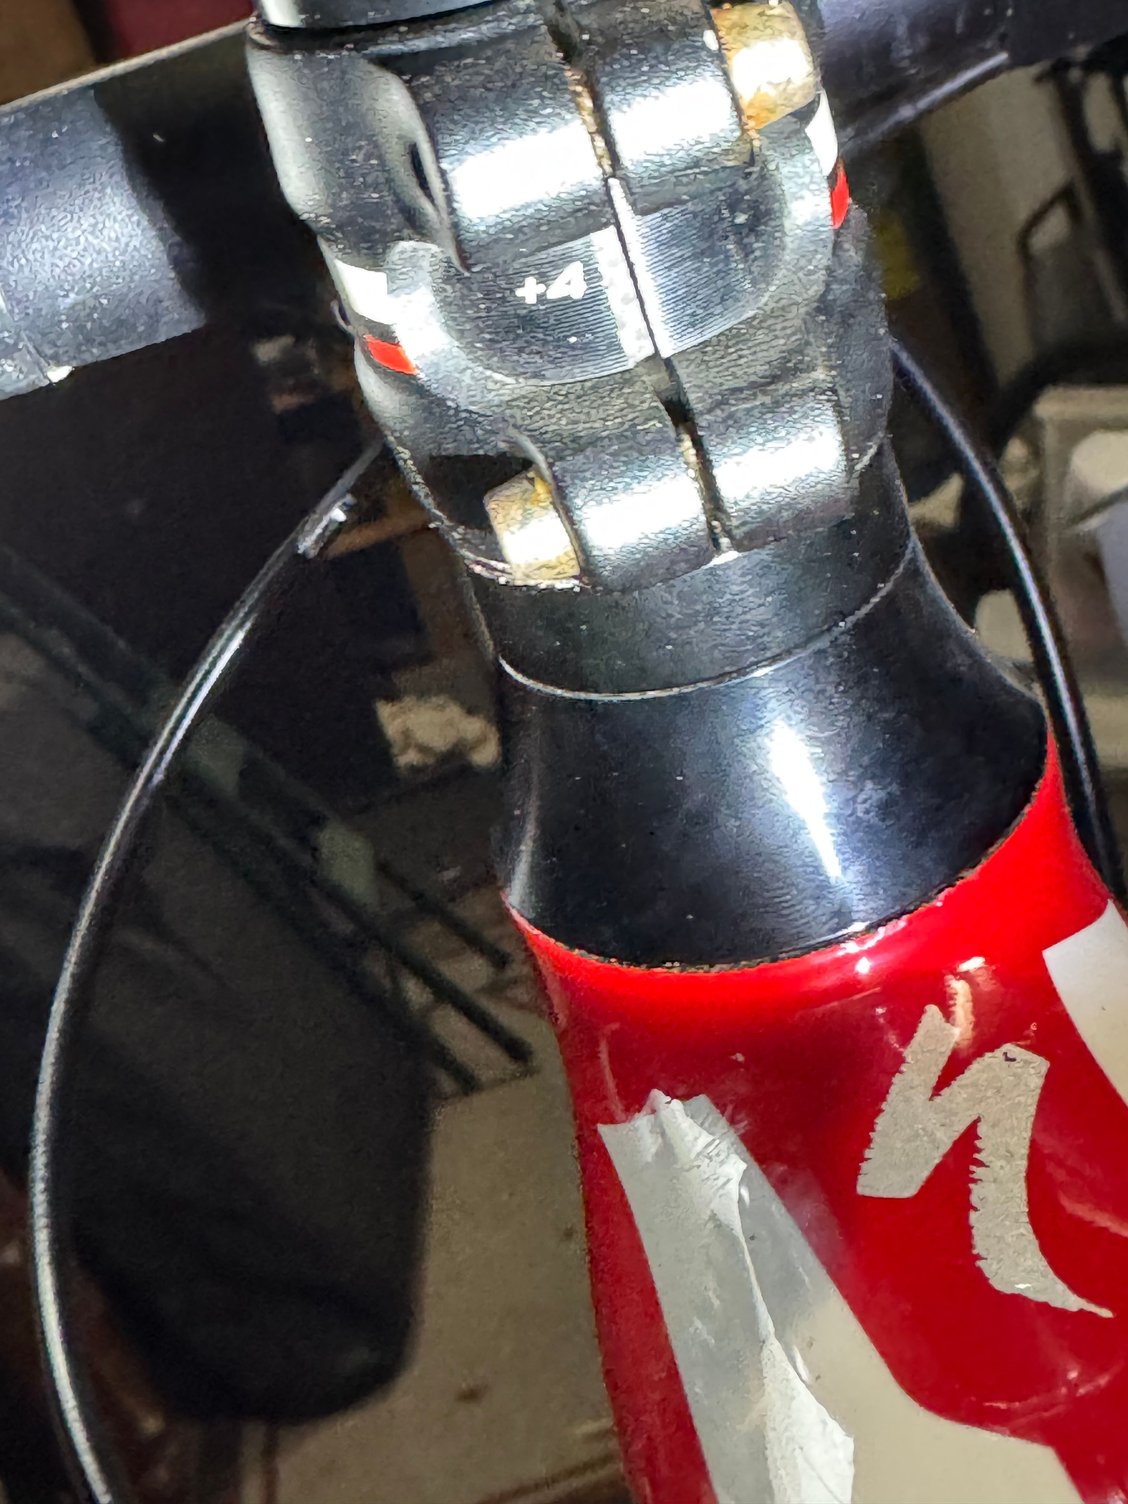
That may be one of the Specz stems that uses an angled shim to allow different adjustments to rise/drop.
Are there numbers visible on the back of the stem clamp area? See attached. Also pictured is the shim, one side is thicker than the other to angle the stem up/down.
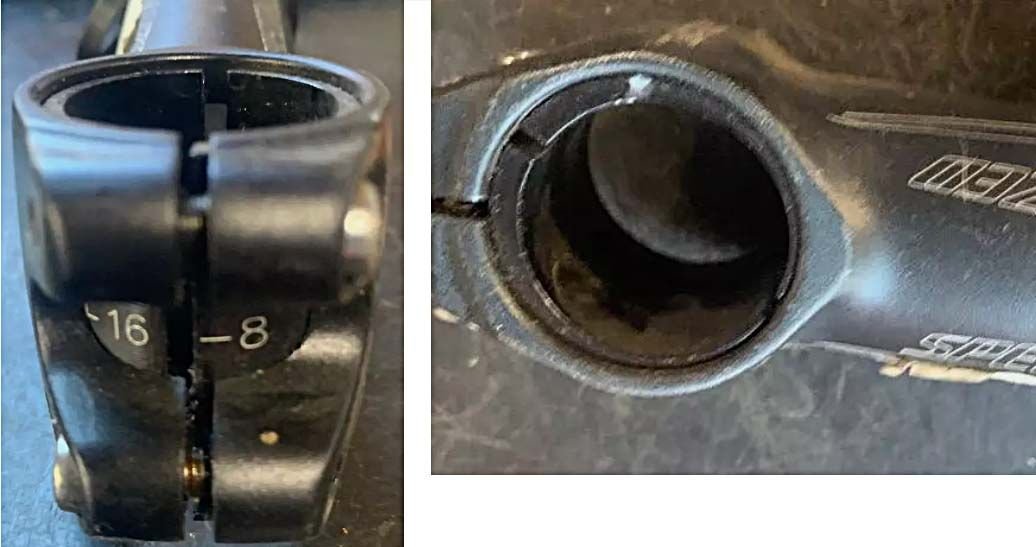
Specific top caps were provided to allow the top bolt to match the 'adjusted' angle of the system. Don't know how this is affected when there are spacers between the top of the stem and the cap. Maybe someone who is familiar can comment & assist.
Are there numbers visible on the back of the stem clamp area? See attached. Also pictured is the shim, one side is thicker than the other to angle the stem up/down.
Specific top caps were provided to allow the top bolt to match the 'adjusted' angle of the system. Don't know how this is affected when there are spacers between the top of the stem and the cap. Maybe someone who is familiar can comment & assist.
 01-02-25 | 06:53 PM
#23
Senior Member
Joined: Jul 2005
Posts: 4,989
Likes: 709
From: Boulder County, CO
Bikes: '80 Masi Gran Criterium, '12 Trek Madone, early '60s Frejus track
Yep, that's the one. It was my mistake. The angled flange is on the bottom of the stem. And it's already in the low position. It's been a long time since I'd worked with these. Anyway, if you want to lower the stem without cutting the steerer, you need to get a standard 1-1/8" x whatever your handlebar diameter is. Oh, yeah, and the slots inside are supposed to be lined up perfectly longitudinally so the handlebar doesn't tilt to one side and the top cap seats properly.
01-02-25 | 07:44 PM
#24
Thread Starter
old newbie
Joined: Nov 2009
Posts: 1,802
Likes: 1,134
From: Fort Worth, Texas
Bikes: Specialized Roubaix
Yep, that's the one. It was my mistake. The angled flange is on the bottom of the stem. And it's already in the low position. It's been a long time since I'd worked with these. Anyway, if you want to lower the stem without cutting the steerer, you need to get a standard 1-1/8" x whatever your handlebar diameter is. Oh, yeah, and the slots inside are supposed to be lined up perfectly longitudinally so the handlebar doesn't tilt to one side and the top cap seats properly.
The top cap does hang over in front. I don’t remember if it hung over the stem before.