


workshop efficiency
 02-25-10, 06:28 AM
#1
Newbie
Thread Starter
Join Date: Jan 2010
Posts: 4
Mentioned: 0 Post(s)
Tagged: 0 Thread(s)
Quoted: 0 Post(s)
Likes: 0
Liked 0 Times
in
0 Posts
workshop efficiency
I'm interested in efficiency, sometimes a little obsessive about it, and am always trying to make thing more efficient even if it is only for small gains. I imagine a lot of people on this forum are mechanics in bike shops, and I would like to begin a discussion on ways to make a a bike repair workshop more efficient.
To get the ball rolling, here are some ways I have identified to save time and energy in the workshop:
(1) Keep the bin within easy reach. For that matter, keep anything used frequently close to hand, and things rarely used out the way.
(2) Return things to the same spot every time to avoid hunting about.
(3) Over-organising tools can create more work rather than make life easy. Sometimes a system such as chucking small stuff in one drawer and large in another can be quite intuitive.
(4) Hide away tools that you have unnecessary duplicates of. They just create clutter.
That should be enough to get you guys thinking and generate some ideas....
 02-25-10, 09:13 AM
#2
nice idea, poor execution
Join Date: Oct 2009
Location: West Newton, MA
Posts: 395
Mentioned: 1 Post(s)
Tagged: 0 Thread(s)
Quoted: 2 Post(s)
Likes: 0
Liked 0 Times
in
0 Posts
Something important to consider, is not being too rigid in your initial setup. As time goes on and you gain experience, it makes sense to reevaluate where you keep your tools and supplies. Especially if you're a home mechanic, you'll likely be buying tools as you need them for projects, and your organization will have to be fluid.
A simple thing I've seen overlooked in a few shops, is that mechanics shouldn't have to walk for replacement cables and housing.
I could go on about this, since one of my current projects is organizing a new basement work area. Later maybe.
A simple thing I've seen overlooked in a few shops, is that mechanics shouldn't have to walk for replacement cables and housing.
I could go on about this, since one of my current projects is organizing a new basement work area. Later maybe.
02-25-10, 09:35 AM
#3
Senior Member
Join Date: Jul 2008
Location: 25 miles northwest of Boston
Posts: 29,549
Bikes: Bottecchia Sprint, GT Timberline 29r, Marin Muirwoods 29er, Trek FX Alpha 7.0
Mentioned: 112 Post(s)
Tagged: 0 Thread(s)
Quoted: 5224 Post(s)
Liked 3,581 Times
in
2,342 Posts
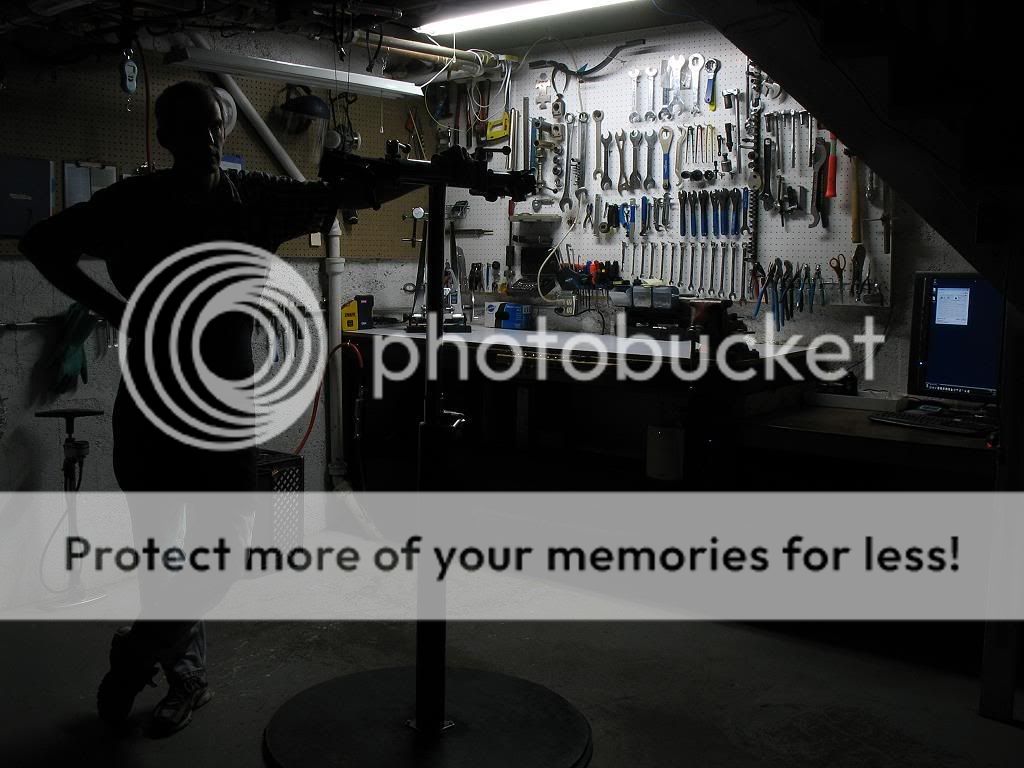
great thread even for home/novice mechanics! what does your shop look like? these are pics of my work area in my basement. when you come back from throwing up post some pics of your organization. PLEASE
02-25-10, 10:50 AM
#4
Senior Member

Join Date: Jul 2002
Posts: 6,956
Mentioned: 0 Post(s)
Tagged: 0 Thread(s)
Quoted: 0 Post(s)
Likes: 0
Liked 6 Times
in
5 Posts
Good lighting always helps.
Only having to handle the bike once is the ideal, i.e. get the repair ticket, get the bike out once, work on it until completed, and put it away. As opposed to: getting it out, finding that it was not assessed correctly at check-in, reassessing it, making a viable plan, leaving the customer a voicemail, creating a paper trail so other mechanics can pick up the ball if you're not there when the customer calls back, putting the bike away, re-filing the repair ticket, getting out the next repair, then the customer calls back, and you have to pick up where you left off. This is unfortunately a bit too common where I work, and has dire effects on mechanics' productivity, not to mention their morale and the overall team ethic.
For some bike-assembly steps, a carefully-used cordless driver may help speed you up on tasks such as removing all the bottle-cage screws for greasing, and stem bolts so you can grease them and install the handlebar. I use a 1/4"-drive adapter in the cordless driver so the driver can drive hex-bit sockets, and have two rows of hex-bit sockets in angled holes in a piece of wood with a strip of wood strategically laid across the face. I can plug the driver into any of the sockets, or use the edge of the wood strip to strip the sockets off the driver one-handed. One row is ball-ended bits, the other's straight-wall. You can see it bolted to the front face of this workbench:
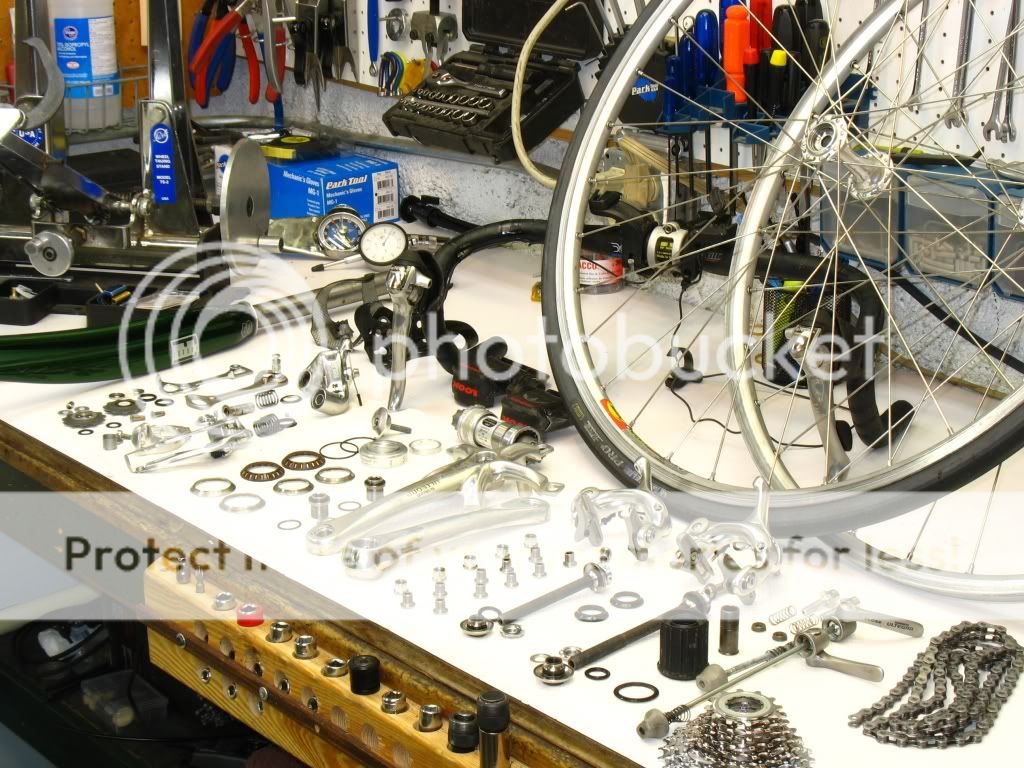
I'm also a fan of flex-head ratchets because in the 90� position they can be used as a speeder for tasks like spinning out the crank bolts on a square-taper or Isis crank. I have three copies of my favorite 3/8"-drive one so I can have three of the most commonly-used sockets on hand (14mm, 15mm deep for driving crank pullers, 8mm hex)without having to switch sockets.
Maybe some more contributions later, I have to get my day going I'll leave you with this one if you use a TS-2 and know a machinist:
Oh, and here's a design for a housing & cable spool holder I designed in trueSpace and built. All the pieces are either 15" or 32" (I used furring strip) and it can hold six "file boxes" of cables & housing of your choice. They'll dispense one-handed, or the file boxes can be lifted out if you need to do at-the-bike work:

Only having to handle the bike once is the ideal, i.e. get the repair ticket, get the bike out once, work on it until completed, and put it away. As opposed to: getting it out, finding that it was not assessed correctly at check-in, reassessing it, making a viable plan, leaving the customer a voicemail, creating a paper trail so other mechanics can pick up the ball if you're not there when the customer calls back, putting the bike away, re-filing the repair ticket, getting out the next repair, then the customer calls back, and you have to pick up where you left off. This is unfortunately a bit too common where I work, and has dire effects on mechanics' productivity, not to mention their morale and the overall team ethic.
For some bike-assembly steps, a carefully-used cordless driver may help speed you up on tasks such as removing all the bottle-cage screws for greasing, and stem bolts so you can grease them and install the handlebar. I use a 1/4"-drive adapter in the cordless driver so the driver can drive hex-bit sockets, and have two rows of hex-bit sockets in angled holes in a piece of wood with a strip of wood strategically laid across the face. I can plug the driver into any of the sockets, or use the edge of the wood strip to strip the sockets off the driver one-handed. One row is ball-ended bits, the other's straight-wall. You can see it bolted to the front face of this workbench:
I'm also a fan of flex-head ratchets because in the 90� position they can be used as a speeder for tasks like spinning out the crank bolts on a square-taper or Isis crank. I have three copies of my favorite 3/8"-drive one so I can have three of the most commonly-used sockets on hand (14mm, 15mm deep for driving crank pullers, 8mm hex)without having to switch sockets.
Maybe some more contributions later, I have to get my day going
I'll leave you with this one if you use a TS-2 and know a machinist:Oh, and here's a design for a housing & cable spool holder I designed in trueSpace and built. All the pieces are either 15" or 32" (I used furring strip) and it can hold six "file boxes" of cables & housing of your choice. They'll dispense one-handed, or the file boxes can be lifted out if you need to do at-the-bike work:
Last edited by mechBgon; 02-25-10 at 10:59 AM.
02-25-10, 11:26 AM
#5

la vache fant�me

Join Date: Aug 2004
Location: NH
Posts: 6,266
Mentioned: 0 Post(s)
Tagged: 0 Thread(s)
Quoted: 2 Post(s)
Likes: 0
Liked 1 Time
in
1 Post
Very nice setup, Mechbgon. Compact, yet it looks highly organized -- I'm impressed. I like seeing people modify their tools, as machining is a pretty serious hobby of mine. It's hard to tell from that video, but it looks like you're making use of an 8" acme screw with shaft collars. Is a thrust bearing between the surface of the shaft collar and the steel surface of the TS2?
__________________
C://dos
C://dos.run
run.dos.run
C://dos
C://dos.run
run.dos.run
02-25-10, 11:37 AM
#6
Senior Member
Join Date: Sep 2001
Location: Montreal
Posts: 6,521
Bikes: Peugeot Hybrid, Minelli Hybrid
Mentioned: 0 Post(s)
Tagged: 0 Thread(s)
Quoted: 2 Post(s)
Likes: 0
Liked 2 Times
in
2 Posts
Colour code wrenches and hex keys - 5 red, 6 orange, 7 yellow, 6 green, 9 blue, 10 red etc (thanks Sheldon)
02-25-10, 11:38 AM
#7
my brain hurts!

Join Date: Mar 2008
Location: Oak Knoll
Posts: 680
Bikes: Numerous bicycles.
Mentioned: 0 Post(s)
Tagged: 0 Thread(s)
Quoted: 0 Post(s)
Likes: 0
Liked 0 Times
in
0 Posts
02-25-10, 11:48 AM
#8
Over the hill

Join Date: Mar 2006
Location: Los Angeles, CA
Posts: 24,374
Bikes: Giant Defy, Giant Revolt
Mentioned: 1 Post(s)
Tagged: 0 Thread(s)
Quoted: 996 Post(s)
Liked 1,204 Times
in
690 Posts

__________________
It's like riding a bicycle
It's like riding a bicycle
02-25-10, 11:56 AM
#9
nice idea, poor execution
Join Date: Oct 2009
Location: West Newton, MA
Posts: 395
Mentioned: 1 Post(s)
Tagged: 0 Thread(s)
Quoted: 2 Post(s)
Likes: 0
Liked 0 Times
in
0 Posts
I don't color code wrenches though, because I put them back in order on the wall. After a little while you'll know the difference between hex keys at a glance anyway.
02-25-10, 12:23 PM
#10
Senior Member
Join Date: Jul 2008
Location: 25 miles northwest of Boston
Posts: 29,549
Bikes: Bottecchia Sprint, GT Timberline 29r, Marin Muirwoods 29er, Trek FX Alpha 7.0
Mentioned: 112 Post(s)
Tagged: 0 Thread(s)
Quoted: 5224 Post(s)
Liked 3,581 Times
in
2,342 Posts
just read up on the Japanese 5s methodology. sort, set in order, shine, standardize, sustain the cycle
I worked my way through high school and college as a short-order-cook and I always got used to my system(s). One time a manager moved where he wanted to store the plates. Well, I was so used to going left and up for those plates that it took a really REALLY long time for me to adapt to the plates new location. I would up, to the left, realize they weren't there, and then go down to the table top below the original place. I was always so engrossed in my food prep and onslaught of high volume orders that the final piece to the puzzle was too insignificant to be burned to my memory right away.
anyway ... here's to standardization! (and then keeping it that way!) :-)
02-25-10, 12:28 PM
#11
Banned.
Join Date: Sep 2007
Location: Carlsbad, CA
Posts: 6,434
Bikes: '09 Felt F55, '84 Masi Cran Criterium, (2)'86 Schwinn Pelotons, '86 Look Equippe Hinault, '09 Globe Live 3 (dogtaxi), '94 Greg Lemond, '99 GT Pulse Kinesis
Mentioned: 19 Post(s)
Tagged: 0 Thread(s)
Quoted: 389 Post(s)
Liked 270 Times
in
153 Posts
I once spent seven months and about $7,000 rebuilding a Honda Superhawk. About two of those months were spent looking for some d@mned little dowel pin or f-wording washer. But then motorcycles have a LOT more fasteners and little pieces than bicycles.
It made me a huge fan of transparent plastic drawers & bins, which can be found cheaply at fabric & sewing stores. The clear drawers make finding parts & tools a snap.

And for the little-bitty things, I like the little benchtop-jobbies. Some of them are even modular-customizable, so you can create the perfect sized compartment for your shims, cleat washers & screws, and headset spacers.

It made me a huge fan of transparent plastic drawers & bins, which can be found cheaply at fabric & sewing stores. The clear drawers make finding parts & tools a snap.
And for the little-bitty things, I like the little benchtop-jobbies. Some of them are even modular-customizable, so you can create the perfect sized compartment for your shims, cleat washers & screws, and headset spacers.
02-25-10, 02:38 PM
#12
Fred-ish
Join Date: Aug 2007
Location: Rhode Island
Posts: 1,800
Mentioned: 0 Post(s)
Tagged: 0 Thread(s)
Quoted: 0 Post(s)
Likes: 0
Liked 1 Time
in
1 Post
**From a home workshop point of view with limited space**
Kitchen drawer organizers for arranging tools by type, etc
Color code tool sizes used often - I code sockets and wrenches of 8mm and 10mm
Clear rolling organizers a little deeper than those already shown for storing spare parts; levers, derailleurs, brakes, cables etc
Clear freezer bags to use within the drawers to keep the spare parts organized. Stops things from tangling and keeps small components together.
Tool tray on the work stand.
Plastic dish pan to disassemble smaller parts over: The efficiency is time saved not looking for things that spring, shoot or bounce away.
02-25-10, 03:14 PM
#13
Senior Member
Join Date: Jul 2002
Posts: 6,956
Mentioned: 0 Post(s)
Tagged: 0 Thread(s)
Quoted: 0 Post(s)
Likes: 0
Liked 6 Times
in
5 Posts
I like seeing people modify their tools, as machining is a pretty serious hobby of mine. It's hard to tell from that video, but it looks like you're making use of an 8" acme screw with shaft collars. Is a thrust bearing between the surface of the shaft collar and the steel surface of the TS2?
02-25-10, 03:23 PM
#14
nice idea, poor execution
Join Date: Oct 2009
Location: West Newton, MA
Posts: 395
Mentioned: 1 Post(s)
Tagged: 0 Thread(s)
Quoted: 2 Post(s)
Likes: 0
Liked 0 Times
in
0 Posts
Now I know why you stressed the importance of good lighting.
I've known a few mechanics who had terrible times working in basements with no windows during the spring and summer. At least if you have windows you can watch everyone else riding while you're in there fixing someone else's bike instead of riding yours...
I've known a few mechanics who had terrible times working in basements with no windows during the spring and summer. At least if you have windows you can watch everyone else riding while you're in there fixing someone else's bike instead of riding yours...
02-25-10, 03:52 PM
#15
Senior Member
Join Date: Sep 2004
Location: boston, ma
Posts: 2,896
Mentioned: 0 Post(s)
Tagged: 0 Thread(s)
Quoted: 9 Post(s)
Likes: 0
Liked 1 Time
in
1 Post
Good lighting always helps.
Only having to handle the bike once is the ideal, i.e. get the repair ticket, get the bike out once, work on it until completed, and put it away. As opposed to: getting it out, finding that it was not assessed correctly at check-in, reassessing it, making a viable plan, leaving the customer a voicemail, creating a paper trail so other mechanics can pick up the ball if you're not there when the customer calls back, putting the bike away, re-filing the repair ticket, getting out the next repair, then the customer calls back, and you have to pick up where you left off. This is unfortunately a bit too common where I work, and has dire effects on mechanics' productivity, not to mention their morale and the overall team ethic.
For some bike-assembly steps, a carefully-used cordless driver may help speed you up on tasks such as removing all the bottle-cage screws for greasing, and stem bolts so you can grease them and install the handlebar. I use a 1/4"-drive adapter in the cordless driver so the driver can drive hex-bit sockets, and have two rows of hex-bit sockets in angled holes in a piece of wood with a strip of wood strategically laid across the face. I can plug the driver into any of the sockets, or use the edge of the wood strip to strip the sockets off the driver one-handed. One row is ball-ended bits, the other's straight-wall. You can see it bolted to the front face of this workbench:
I'm also a fan of flex-head ratchets because in the 90� position they can be used as a speeder for tasks like spinning out the crank bolts on a square-taper or Isis crank. I have three copies of my favorite 3/8"-drive one so I can have three of the most commonly-used sockets on hand (14mm, 15mm deep for driving crank pullers, 8mm hex)without having to switch sockets.
Maybe some more contributions later, I have to get my day going I'll leave you with this one if you use a TS-2 and know a machinist:
Oh, and here's a design for a housing & cable spool holder I designed in trueSpace and built. All the pieces are either 15" or 32" (I used furring strip) and it can hold six "file boxes" of cables & housing of your choice. They'll dispense one-handed, or the file boxes can be lifted out if you need to do at-the-bike work:
Only having to handle the bike once is the ideal, i.e. get the repair ticket, get the bike out once, work on it until completed, and put it away. As opposed to: getting it out, finding that it was not assessed correctly at check-in, reassessing it, making a viable plan, leaving the customer a voicemail, creating a paper trail so other mechanics can pick up the ball if you're not there when the customer calls back, putting the bike away, re-filing the repair ticket, getting out the next repair, then the customer calls back, and you have to pick up where you left off. This is unfortunately a bit too common where I work, and has dire effects on mechanics' productivity, not to mention their morale and the overall team ethic.
For some bike-assembly steps, a carefully-used cordless driver may help speed you up on tasks such as removing all the bottle-cage screws for greasing, and stem bolts so you can grease them and install the handlebar. I use a 1/4"-drive adapter in the cordless driver so the driver can drive hex-bit sockets, and have two rows of hex-bit sockets in angled holes in a piece of wood with a strip of wood strategically laid across the face. I can plug the driver into any of the sockets, or use the edge of the wood strip to strip the sockets off the driver one-handed. One row is ball-ended bits, the other's straight-wall. You can see it bolted to the front face of this workbench:
I'm also a fan of flex-head ratchets because in the 90� position they can be used as a speeder for tasks like spinning out the crank bolts on a square-taper or Isis crank. I have three copies of my favorite 3/8"-drive one so I can have three of the most commonly-used sockets on hand (14mm, 15mm deep for driving crank pullers, 8mm hex)without having to switch sockets.
Maybe some more contributions later, I have to get my day going
I'll leave you with this one if you use a TS-2 and know a machinist:Oh, and here's a design for a housing & cable spool holder I designed in trueSpace and built. All the pieces are either 15" or 32" (I used furring strip) and it can hold six "file boxes" of cables & housing of your choice. They'll dispense one-handed, or the file boxes can be lifted out if you need to do at-the-bike work:
02-25-10, 06:19 PM
#16
Call me The Breeze

I'm sure this was just for showing off's sake, but that looks like a great way to lose ALL the bits to everyting on your bike in one go! Surely you'd complete one rebuild before beginning the next?
I like your cable and housing holder! I think I'm going to measure the spaces I have and perhaps make a couple. Well, at this point probably next season!
I like your cable and housing holder! I think I'm going to measure the spaces I have and perhaps make a couple. Well, at this point probably next season!
02-25-10, 06:44 PM
#17
Senior Member
Join Date: Jul 2002
Posts: 6,956
Mentioned: 0 Post(s)
Tagged: 0 Thread(s)
Quoted: 0 Post(s)
Likes: 0
Liked 6 Times
in
5 Posts
Now I know why you stressed the importance of good lighting.
Last edited by mechBgon; 02-25-10 at 06:48 PM.
02-25-10, 07:25 PM
#18
Call me The Breeze
ah. a fancy parts cleaner. I'd use a rag and do each one individually. Of course, I can't imagine anyone paying me to do that much work, I thought that kind of thing only got done on personal bikes! Of course, at my shop I'm more likely explaining the advantages of the $30 tire over the $15 one!
02-25-10, 07:44 PM
#19
Senior Member
Some fine ideas here but in my case most of them aren't that useful to me because my shop has to support 4 to 6 different hobbies rather than just one. My various solutions to this multi role issue is to set up some limited number of duplicate tools. Common things like the wrenches and allen keys that are used for bicycles are installed on the tool/parts tray of my workstand. Plus I have a separate plastic toolbox that holds all the less frequently used bicycle tools So I can easily pluck it off the shelf and sit it open on one of my foot stools that is used as temporary staging spots and occasionally to sit on. Thus my tools are sort of stored in a modular fashion.
The work bench itself has it's own set of screwdrivers and allen keys along with other bench type tools. And yes, sometimes the duplication does get in the way but on the whole it save far more time than it costs.
I've got a similar setup for specialty tools used for paintball in another similar tool kit and yet another that goes out as a field kit for my model airplanes. Then there's the mechanics 3 drawer that has the metric tools, feeler guages and other stuff for working on my motorcycles and occasionally the truck. Each has some basics such as screwdrivers, allen keys, knives, electrical tape and other useful things in duplicate so that when I pull each out in turn to use it I don't have to rifle through some other kit or wald across the shop to where there's yet another on the wall way over there.
If my shop was dedicated to just one or two activities I would whole heartedly be setting up something such as I've seen in this thread and taking all the hints to heart.
02-25-10, 09:15 PM
#21

aka Tom Reingold

Join Date: Jan 2009
Location: New York, NY, and High Falls, NY, USA
Posts: 40,502
Bikes: 1962 Rudge Sports, 1971 Raleigh Super Course, 1971 Raleigh Pro Track, 1974 Raleigh International, 1975 Viscount Fixie, 1982 McLean, 1996 Lemond (Ti), 2002 Burley Zydeco tandem
Mentioned: 511 Post(s)
Tagged: 0 Thread(s)
Quoted: 7348 Post(s)
Liked 2,462 Times
in
1,433 Posts
The ceiling is low in my basement workshop is low. What kind of lights should I look at? I need better lights.
__________________
Tom Reingold, tom@noglider.com
New York City and High Falls, NY
Blogs: The Experienced Cyclist; noglider's ride blog
�When man invented the bicycle he reached the peak of his attainments.� � Elizabeth West, US author
Please email me rather than PM'ing me. Thanks.
Tom Reingold, tom@noglider.com
New York City and High Falls, NY
Blogs: The Experienced Cyclist; noglider's ride blog
�When man invented the bicycle he reached the peak of his attainments.� � Elizabeth West, US author
Please email me rather than PM'ing me. Thanks.
02-25-10, 09:25 PM
#22
Call me The Breeze
I had a basement workshop once and I put a 4' double flourescent above the work stand, with a 6' wide white coroplast reflector above it. Screwed it all straight into the joists. Then I had another double 4 footer haning on chains above the workbench. That set up worked pretty well, and cheap too.
02-25-10, 09:38 PM
#23
Internal gears FTW!
Join Date: Oct 2009
Location: Kalamazoo, MI
Posts: 203
Bikes: 1986 Raleigh Reliant, 2010 Schwinn Sporterra NX8
Mentioned: 0 Post(s)
Tagged: 0 Thread(s)
Quoted: 0 Post(s)
Likes: 0
Liked 0 Times
in
0 Posts
worked in a shop once with double benches. both had identical setups with color coded tools. never lost tools and could easily move from bench to bench. also, using an apron helps a lot. simple yet effective at keeping your common tools like a 5mm, pen, and Philips right where you need them. at high season we would often aim for 12 tune ups a day for an 8 hour shift. man those were the days!!
02-25-10, 09:56 PM
#24
Senior Member
Join Date: Jul 2002
Posts: 6,956
Mentioned: 0 Post(s)
Tagged: 0 Thread(s)
Quoted: 0 Post(s)
Likes: 0
Liked 6 Times
in
5 Posts
For those wrenching at a shop where you store bikes on hooks or in fixed racks, here's another possible time-saver for storing and retrieving customers' repair bikes:
1) number each hook and/or rack slot. I numbered ours 100-133 for the east wall, 200-225 for the west wall, for example. That way, the hook number's first numeral cues you which wall to aim for, just like you expect office 531 to be on the 5th floor of a building.
2) now that your hooks/slots are numbered, make hang-tags with those numbers on them, so there's one tag for each storage hook/slot. You'll keep these right next to your supply of blank repair forms, or your check-in computer if you do this electronically. Each tag represents a known-vacant hook.
3) whenever you write up a repair ticket or make a repair form, grab a hook tag and hang that on the bike you're bringing in. Write that hook number on the repair form or add it as a line-item note, and hang the bike on that hook. Now the mechanic doesn't have to look for "BLUE TREK" and consider everything from neon blue to deep-midnight blue, he can just go to Hook 225 and hey, there's the bike This'll save time, especially if your storage area isn't lit super-well.
4) when you go to retrieve the bike, you can just go to the hook, saving you valuable time during the daily pick-up rush. When handing over the bike, take the hook tag off the bike and put it back into your "pool" of available hooks.
The main gotcha is that people can't just go hanging bikes willy-nilly on any hook, they'll have to go get the hook tag and put it on the bike. Otherwise, someone will come along and find the hook occupied when it was supposed to be vacant. But that's easily overcome. The number of hook tags in your "vacant" pool will also show you how close you are to full capacity.
This tweak may be more of a benefit for our shop than average, because our storage is rather out-of-the-way in the building, one floor down and one basement over.
We seldom get full-bike overhauls, and actually that's fine with me because they're a "loss leader" for sure, as is custom wheelbuilding. I did the math later on that one, and it worked out to under $30/hour shop rate on the labor, whereas our blanket shop rate is (supposed to be) $60/hour.
Also, it's really NOT fun to spend a couple hours breathing through a respirator and sweating in heavy nitrile gloves while scrubbing stuff to perfection in a 30-gallon solvent tank. Aching arms, aching back, aching fingers... and just try scratching an itch on your nose with that apparatus on
1) number each hook and/or rack slot. I numbered ours 100-133 for the east wall, 200-225 for the west wall, for example. That way, the hook number's first numeral cues you which wall to aim for, just like you expect office 531 to be on the 5th floor of a building.
2) now that your hooks/slots are numbered, make hang-tags with those numbers on them, so there's one tag for each storage hook/slot. You'll keep these right next to your supply of blank repair forms, or your check-in computer if you do this electronically. Each tag represents a known-vacant hook.
3) whenever you write up a repair ticket or make a repair form, grab a hook tag and hang that on the bike you're bringing in. Write that hook number on the repair form or add it as a line-item note, and hang the bike on that hook. Now the mechanic doesn't have to look for "BLUE TREK" and consider everything from neon blue to deep-midnight blue, he can just go to Hook 225 and hey, there's the bike
This'll save time, especially if your storage area isn't lit super-well.4) when you go to retrieve the bike, you can just go to the hook, saving you valuable time during the daily pick-up rush. When handing over the bike, take the hook tag off the bike and put it back into your "pool" of available hooks.
The main gotcha is that people can't just go hanging bikes willy-nilly on any hook, they'll have to go get the hook tag and put it on the bike. Otherwise, someone will come along and find the hook occupied when it was supposed to be vacant. But that's easily overcome. The number of hook tags in your "vacant" pool will also show you how close you are to full capacity.
This tweak may be more of a benefit for our shop than average, because our storage is rather out-of-the-way in the building, one floor down and one basement over.
Of course, I can't imagine anyone paying me to do that much work [the $600 overhaul], I thought that kind of thing only got done on personal bikes!
Also, it's really NOT fun to spend a couple hours breathing through a respirator and sweating in heavy nitrile gloves while scrubbing stuff to perfection in a 30-gallon solvent tank. Aching arms, aching back, aching fingers... and just try scratching an itch on your nose with that apparatus on
Last edited by mechBgon; 02-25-10 at 10:47 PM.
02-25-10, 10:34 PM
#25
Senior Member
Join Date: Mar 2008
Posts: 433
Mentioned: 0 Post(s)
Tagged: 0 Thread(s)
Quoted: 0 Post(s)
Likes: 0
Liked 2 Times
in
2 Posts
Don't make your mechanics answer the phone!
Dropping the task at hand to talk to customers at the counter or on the phone, then going back and picking up where I left off is the single biggest time sucker in my situation. The shop I work for has a very "open concept" wrench area, and while it's nice for customers to be able to see what's going on (most of the time), I work about three times faster come 6pm when the doors close.
Dropping the task at hand to talk to customers at the counter or on the phone, then going back and picking up where I left off is the single biggest time sucker in my situation. The shop I work for has a very "open concept" wrench area, and while it's nice for customers to be able to see what's going on (most of the time), I work about three times faster come 6pm when the doors close.