


Extracting a hinge pin on a Bike Friday folder
 12-24-23, 04:17 PM
#1
Senior Member
Thread Starter
Join Date: May 2008
Location: Toronto, Canada
Posts: 895
Bikes: (shortlist) Cyclops, Marinoni, Mariposa, Air Firday, Pocket Rocket Pro, NWT, SLX Fuso, Claude Pottie (France) x3, Masi Team 3v, Lemond Zurich, Bianchi OS
Mentioned: 2 Post(s)
Tagged: 0 Thread(s)
Quoted: 167 Post(s)
Liked 34 Times
in
27 Posts
Extracting a hinge pin on a Bike Friday folder
I have a problem with a Bike Friday but it is more of a general mechanical problem than a BF-specific problem so I thought I would ask here for herlp.
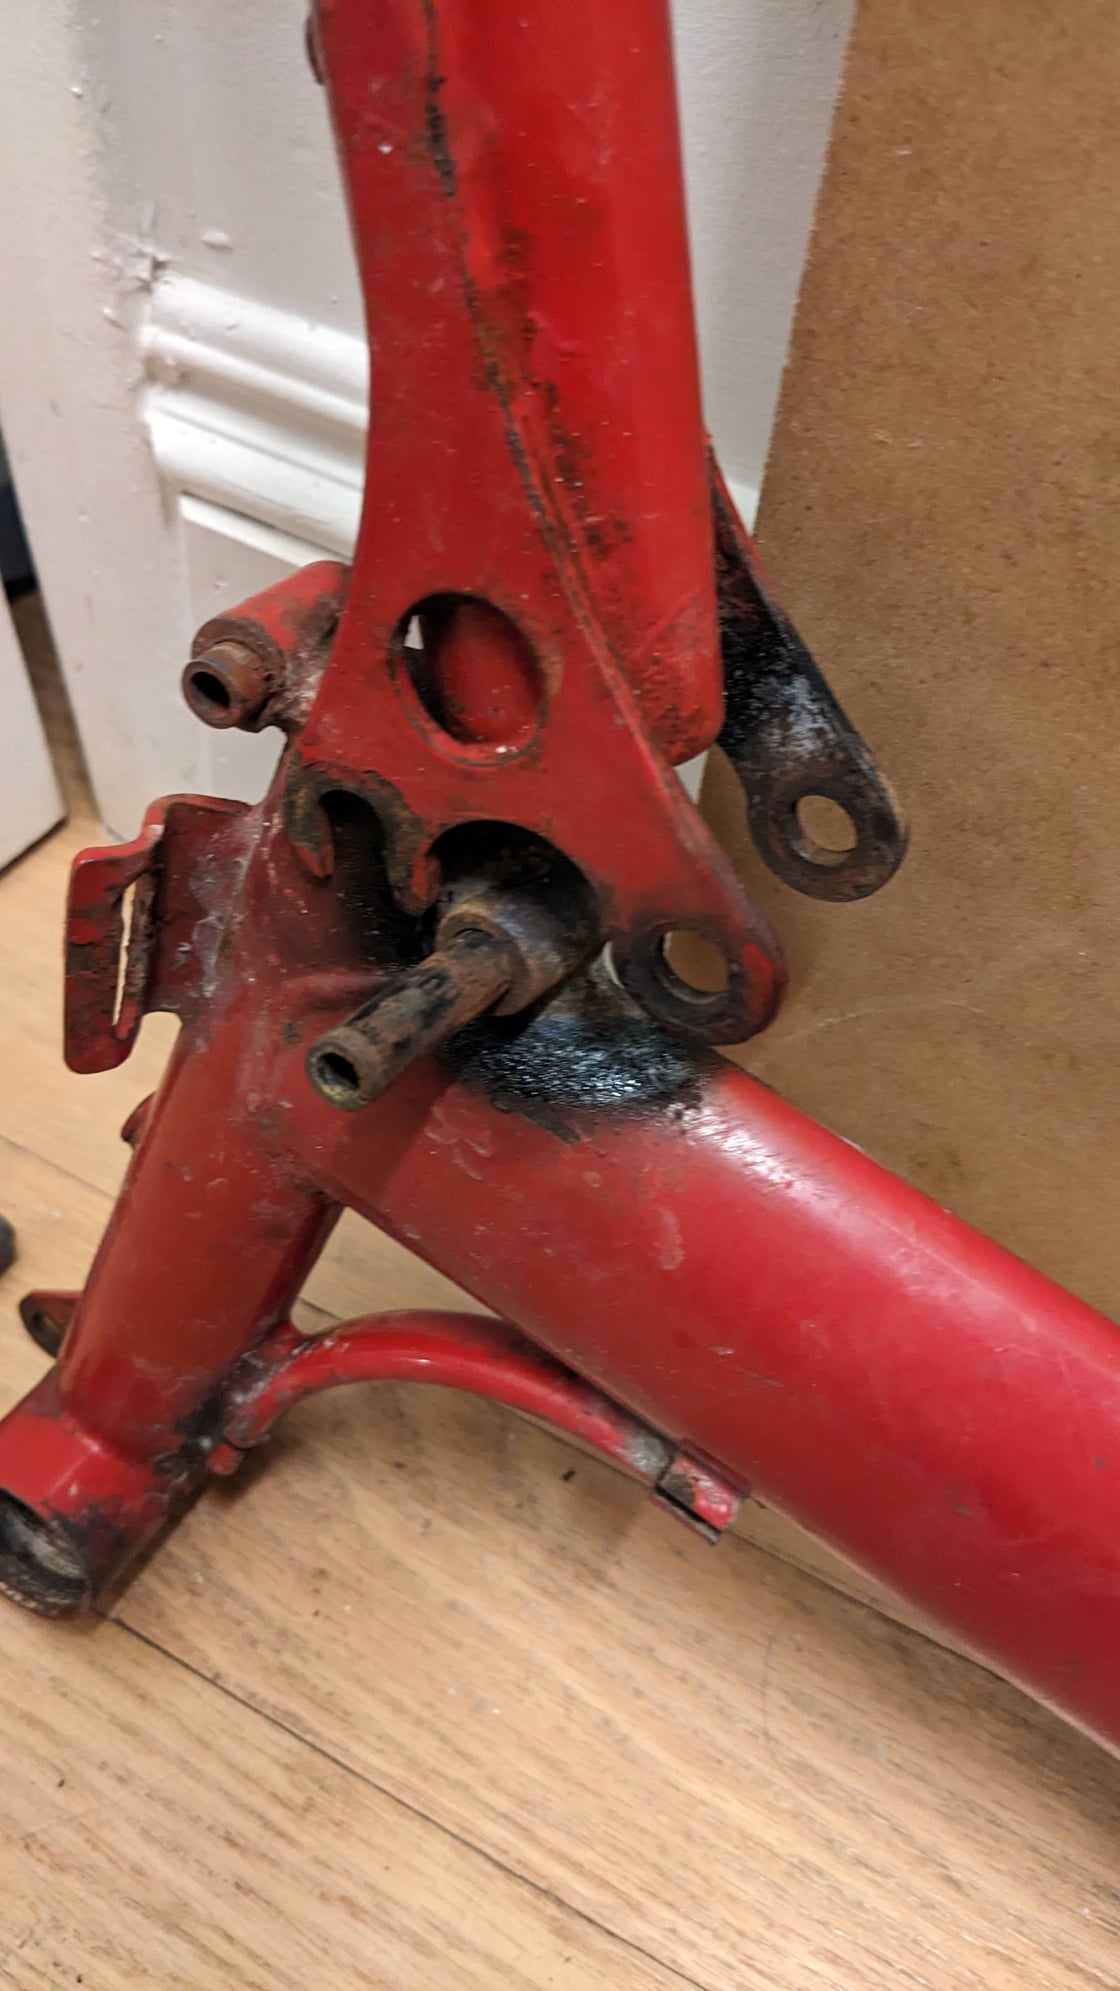
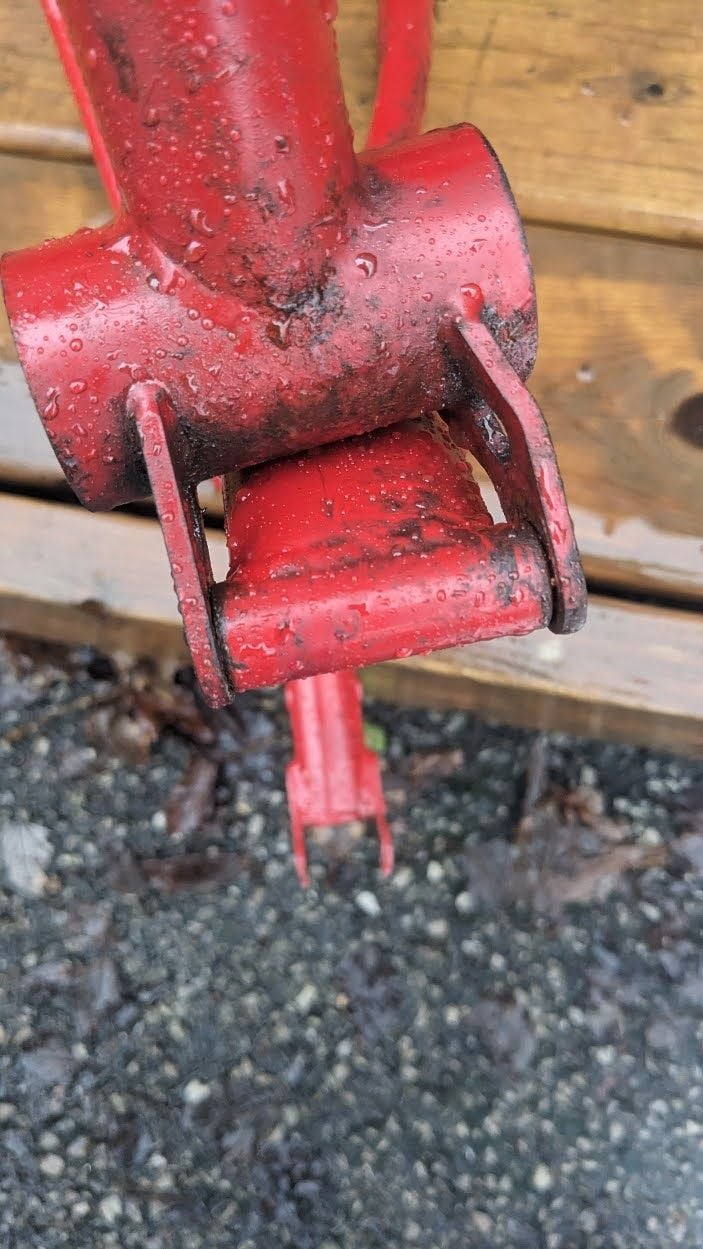
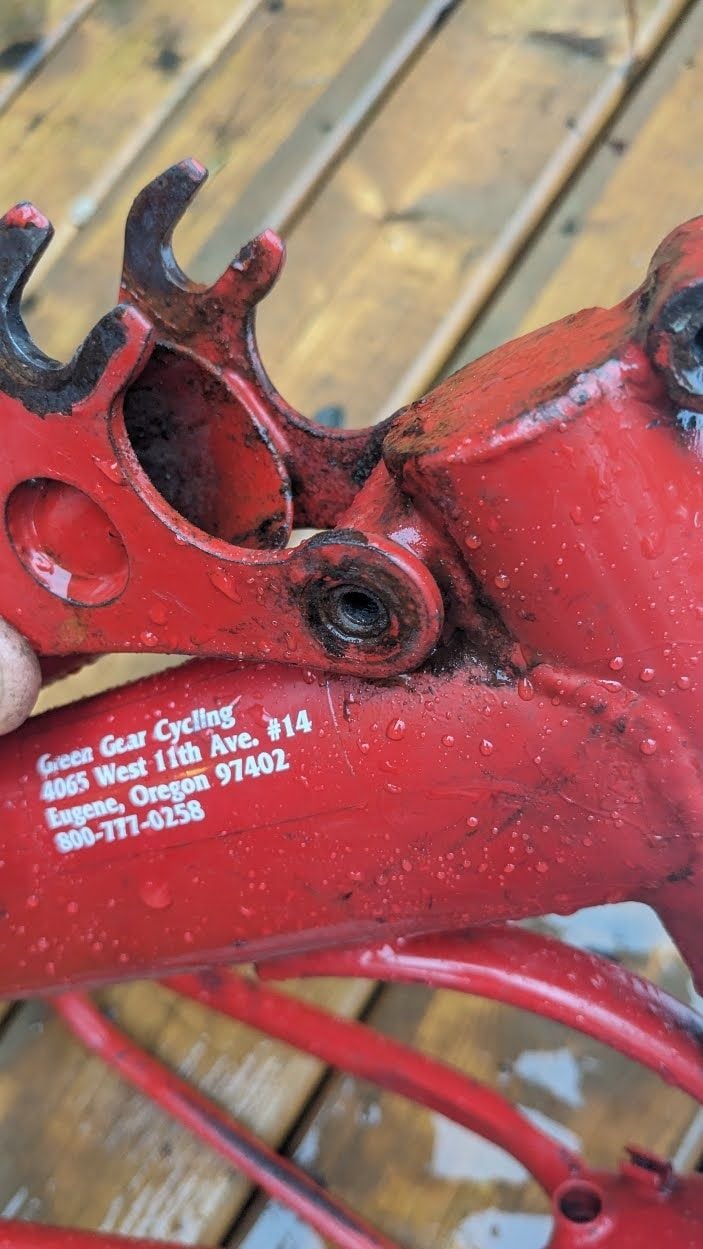
I am breaking down a Bike Friday folding bike frame for repainting.
a BF has two hinges and each of those hinges has a pin in the barrel which, if greased periodically will, to turn freely.
mine (new to me) evidently was not well maintained and neither pin would move.
after applying a great amount of heat (acetylene) and force (Arbor Press) one of the pins came free.
the other, so far is stuck fast.
here is what Sheldon Brown and John Allen say about Bike Friday hinge pins.
https://www.sheldonbrown.com/bike-friday-hinge.html
I am soaking the pin/barrel liberally and will continue to do so.
I thought about grinding off two flats on the exposed end that I could maybe grab in a vise or wrench but there is very little material there to work with
does anyone have suggestions for next steps.
So, Soak and Pray?
 12-24-23, 05:23 PM
#2

Senior Member
Join Date: Apr 2009
Location: New Rochelle, NY
Posts: 38,717
Bikes: too many bikes from 1967 10s (5x2)Frejus to a Sumitomo Ti/Chorus aluminum 10s (10x2), plus one non-susp mtn bike I use as my commuter
Mentioned: 140 Post(s)
Tagged: 1 Thread(s)
Quoted: 5788 Post(s)
Liked 2,580 Times
in
1,430 Posts
Before going nuts doing something unnecessary, consider whether and why you need remove the pin. In the photo, you have the frame apart, so it seems there's enough spring in the bracket to allow reassembly as is.
I'd simply clean it up, then mask it before painting.
If you want to get fancy, you could improve on the design by reaming the bracket and fitting a brass bushing to minimize wear.
I'd simply clean it up, then mask it before painting.
If you want to get fancy, you could improve on the design by reaming the bracket and fitting a brass bushing to minimize wear.
__________________
FB
Chain-L site
An ounce of diagnosis is worth a pound of cure.
Just because I'm tired of arguing, doesn't mean you're right.
�One accurate measurement is worth a thousand expert opinions� - Adm Grace Murray Hopper - USN
WARNING, I'm from New York. Thin skinned people should maintain safe distance.
FB
Chain-L site
An ounce of diagnosis is worth a pound of cure.
Just because I'm tired of arguing, doesn't mean you're right.
�One accurate measurement is worth a thousand expert opinions� - Adm Grace Murray Hopper - USN
WARNING, I'm from New York. Thin skinned people should maintain safe distance.
 12-24-23, 05:33 PM
#3
Full Member

Join Date: Oct 2017
Location: NW Florida
Posts: 389
Bikes: A Few
Mentioned: 9 Post(s)
Tagged: 0 Thread(s)
Quoted: 156 Post(s)
Liked 63 Times
in
27 Posts
Heat the barrel again, to dull red hot, take the flame away, then hold a candle or a piece of canning wax to the joint between pin and barrel.
The wax will wick into the joint - Let it cool and try to press again - Report back, and tell us if that works :~)
The wax will wick into the joint - Let it cool and try to press again - Report back, and tell us if that works :~)
12-24-23, 07:43 PM
#4
Senior Member
Join Date: Apr 2009
Location: New Rochelle, NY
Posts: 38,717
Bikes: too many bikes from 1967 10s (5x2)Frejus to a Sumitomo Ti/Chorus aluminum 10s (10x2), plus one non-susp mtn bike I use as my commuter
Mentioned: 140 Post(s)
Tagged: 1 Thread(s)
Quoted: 5788 Post(s)
Liked 2,580 Times
in
1,430 Posts
You're suggesting heating the frame to an annealing temperature, (>1,000F) then introducing wax despite it being at more than twice the wax's ignition point?
I agree that heating the frame to a wicking temp might work, but I doubt that it would be any better than wicking a light penetrating oil that would wick and flow at room temp.
However if one wants to do this or something similar, the proper procedure is to warm the area, add the wax (or whatever), then continue heating the part until the wax flows.
To the OP, be sure to wear eye and face protection before applying oil or wax to anything heated to 1k degrees.
Last edited by FBinNY; 12-24-23 at 07:52 PM.
Likes For FBinNY:
12-24-23, 08:39 PM
#5
Senior Member
Two possible solutions (both could work, if done correctly):
1. Create a significant temperature difference between the bushing and the pin: This can be done by heating the bushing (not to the point of being red hot) and then chilling only the pin quickly. The latter could be done by a piece of dry ice or carefully pouring liquid nitrogen only on the pin. Hopefully, the difference in thermal expansion at significantly different temp will give you an opportunity to quickly pull the pin out - ‘quick’ is the key here.
2. Rust is the problem, chemistry could be the solution, literally. Use 100% ethanol to penetrate the gap between the two surfaces, add a few drops of fairly concentrated hydrochloride acid (I’ll start with about 5 Normal), let it sit for a few min and test to see if it has dissolved the rust to loosen the pin. Once successful, wash everything with copious amounts of water. [Do take safety related precautions with acid, gloves, goggle, not breathing fumes etc. If unfamiliar with working concentrated acids, find a knowledgeable friend to help or just don’t do it.]
12-24-23, 09:06 PM
#6
Full Member
Join Date: Oct 2017
Location: NW Florida
Posts: 389
Bikes: A Few
Mentioned: 9 Post(s)
Tagged: 0 Thread(s)
Quoted: 156 Post(s)
Liked 63 Times
in
27 Posts
I've heated rusted parts like just that, and applied the wax to free them - I've never had it burst into flame or anything.
As long as you don't have the actual flame present, there shouldn't be a problem.
The wax works much better than penetrating oil when heating parts like this, as the oil just seems to vaporize before it penetrates much at all,
and penetrating oil certainly will catch fire, if you apply it while you're heating the part with a torch.
That being said, if you don't want to try the wax trick, then just heat and cool it over several cycles - Just doing that will often do it, if it's not too badly stuck.
If it's really rusted in, gentle heat won't do it - You really have to get it hot.
12-24-23, 10:23 PM
#7
Senior Member
I've heated rusted parts like just that, and applied the wax to free them - I've never had it burst into flame or anything.
As long as you don't have the actual flame present, there shouldn't be a problem.
The wax works much better than penetrating oil when heating parts like this, as the oil just seems to vaporize before it penetrates much at all,
and penetrating oil certainly will catch fire, if you apply it while you're heating the part with a torch.
That being said, if you don't want to try the wax trick, then just heat and cool it over several cycles - Just doing that will often do it, if it's not too badly stuck.
If it's really rusted in, gentle heat won't do it - You really have to get it hot.
As long as you don't have the actual flame present, there shouldn't be a problem.
The wax works much better than penetrating oil when heating parts like this, as the oil just seems to vaporize before it penetrates much at all,
and penetrating oil certainly will catch fire, if you apply it while you're heating the part with a torch.
That being said, if you don't want to try the wax trick, then just heat and cool it over several cycles - Just doing that will often do it, if it's not too badly stuck.
If it's really rusted in, gentle heat won't do it - You really have to get it hot.
Paraffin wax melts at much lower temp (ranging between 40C-~65C, depending on it chemical design). But the issue that will come into play is its boiling point, which if memory serves me right, is well under 400C. And steel does not glow red at 400C!
Something is amiss!
Repeatedly heating steel to have it glow and cooling it, might help you achieve your immediate goal but you would change the rigidity /strength of material greatly - it will wear much faster and two halves of your bicycle may end up with a separation you didn’t intend.
I guess, you could re-temper it, not difficult to do if you know how.
 12-25-23, 06:47 AM
#8
SE Wis
Join Date: Apr 2005
Location: Milwaukee, WI
Posts: 10,515
Bikes: '68 Raleigh Sprite, '02 Raleigh C500, '84 Raleigh Gran Prix, '91 Trek 400, 2013 Novara Randonee, 1990 Trek 970
Mentioned: 40 Post(s)
Tagged: 0 Thread(s)
Quoted: 2747 Post(s)
Liked 3,396 Times
in
2,056 Posts
Hollow pin? I'd have drilled that out long ago
12-25-23, 08:58 AM
#9
Senior Member
Join Date: Apr 2016
Posts: 1,228
Mentioned: 3 Post(s)
Tagged: 0 Thread(s)
Quoted: 499 Post(s)
Liked 434 Times
in
333 Posts
You could try heating it then squirt freeze aerosol through the pin and quickly try the press again. Or pneumatic hammer. Or drill it out. I suspect drilling is most likely to succeed.
12-25-23, 10:14 AM
#10
Senior Member
Thread Starter
Join Date: May 2008
Location: Toronto, Canada
Posts: 895
Bikes: (shortlist) Cyclops, Marinoni, Mariposa, Air Firday, Pocket Rocket Pro, NWT, SLX Fuso, Claude Pottie (France) x3, Masi Team 3v, Lemond Zurich, Bianchi OS
Mentioned: 2 Post(s)
Tagged: 0 Thread(s)
Quoted: 167 Post(s)
Liked 34 Times
in
27 Posts
but To correctly reassemble the rear section, two bolts threaded into the ends of the pin and clamp the flanges to the pin.
so: BOLT + FLANGES + PIN becomes effectively one piece. so the pin should be part of the middle section of the bike
so in order to rotate to fold and unfold the pin has to be loose in the barrel.
attached are photos of the hinges assembled but with the fixing nuts removed.
If the pin is not free to rotate outer bolts apparently will loosen up over time (and risk falling out completely
If I left the bolts slightly loose I could leave the pin as part of the rear section and just let the flanges rotate around the frozen pin.
But that is not the design I don't believe.
and Yes I would plan to replace these pins with the new and improved design Bike Friday apparently uses now.

 12-25-23, 12:15 PM
#11
SE Wis
Join Date: Apr 2005
Location: Milwaukee, WI
Posts: 10,515
Bikes: '68 Raleigh Sprite, '02 Raleigh C500, '84 Raleigh Gran Prix, '91 Trek 400, 2013 Novara Randonee, 1990 Trek 970
Mentioned: 40 Post(s)
Tagged: 0 Thread(s)
Quoted: 2747 Post(s)
Liked 3,396 Times
in
2,056 Posts
12-26-23, 11:49 AM
#12
Senior Member
Thread Starter
Join Date: May 2008
Location: Toronto, Canada
Posts: 895
Bikes: (shortlist) Cyclops, Marinoni, Mariposa, Air Firday, Pocket Rocket Pro, NWT, SLX Fuso, Claude Pottie (France) x3, Masi Team 3v, Lemond Zurich, Bianchi OS
Mentioned: 2 Post(s)
Tagged: 0 Thread(s)
Quoted: 167 Post(s)
Liked 34 Times
in
27 Posts
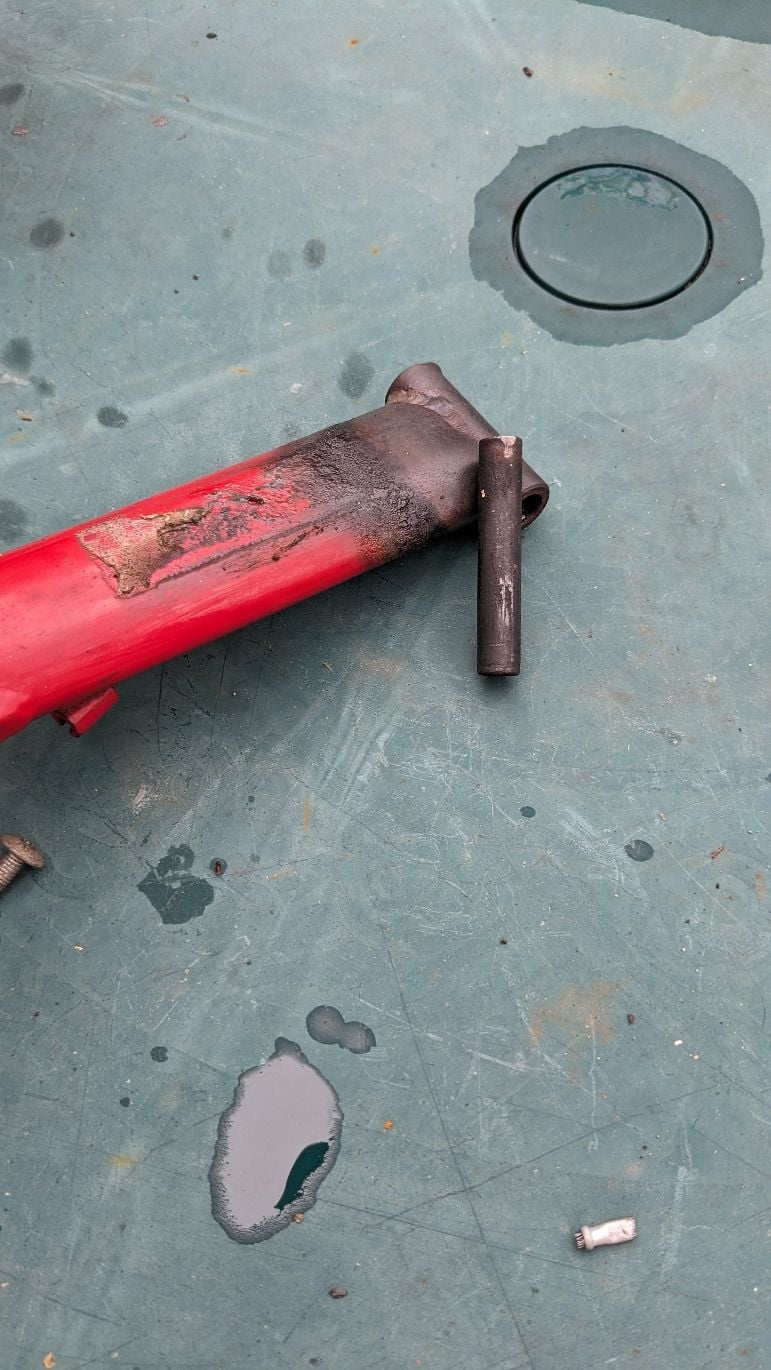
Success!!
After a day of soaking in motor oil i was finally able to bang this pin out, with a sledge hammer and anvil
I'll order replacement from BF.
Thank you all.
I'll order replacement from BF.
Thank you all.
Last edited by pstock; 12-26-23 at 06:37 PM.
