


Horizontal Drop - rear wheel forward slippage
 06-29-12, 10:28 AM
#26
Senior Member
Thread Starter
Join Date: Jul 2011
Location: Southern California
Posts: 376
Bikes: 2010 FUJI SL-1 Comp
Mentioned: 0 Post(s)
Tagged: 0 Thread(s)
Quoted: 1 Post(s)
Likes: 0
Liked 0 Times
in
0 Posts
The QR Skewer I'm using is actually came with the wheelset, and they had over 2500 together on another bike, so I'm fairly confident they work as a pair.
I didn't look at the drops closely last night because I don't have very good lighting. I also do not have tools which which I could accurately determine if they are parallel. They "look" parallel.
On inspection, I noticed a little nastiness on the inside of the drive-side drop-out. You can see where the serrated part of the locknut actually gouged the metal as it pulled forward. I can't imagine the type of force that would be required to cause that much damage. In all the incidents where the wheel has slipped, I don't recall hitting anything and although I may be a bit of a masher, I doubt I could have hammered on the pedals that hard.
 06-29-12, 11:07 AM
#27
Retro Grouch
Join Date: Oct 2007
Location: Santa Cruz
Posts: 2,210
Bikes: Yes
Mentioned: 0 Post(s)
Tagged: 0 Thread(s)
Quoted: 3 Post(s)
Likes: 0
Liked 1 Time
in
1 Post
I didn't make a superiority statement onespeedbiker - I simply noted that both will work and directed the attention to what is really important with QR's:
The ability to "bite".
(Steel serrated facings and steel serrated washers are what get it done.)
Try to read a little more slowly please...
=8-)
The ability to "bite".
(Steel serrated facings and steel serrated washers are what get it done.)
Try to read a little more slowly please...
=8-)
Exposed and non-exposed skewers will work either way...
 06-29-12, 11:19 AM
#28
Senior Member
Thread Starter
Join Date: Jul 2011
Location: Southern California
Posts: 376
Bikes: 2010 FUJI SL-1 Comp
Mentioned: 0 Post(s)
Tagged: 0 Thread(s)
Quoted: 1 Post(s)
Likes: 0
Liked 0 Times
in
0 Posts
Normal crescent wrench on a the Park lockring tool (I think it's the PR-5?). I don't own a torgue wrench. You can see in the pictures I posted earlier where the lockriing had come off while riding and scraped against the inside of the dropout.
06-29-12, 12:06 PM
#29

Senior Member

Join Date: Dec 2007
Location: San Jose, California
Posts: 3,504
Bikes: 2001 Tommasini Sintesi w/ Campagnolo Daytona 10 Speed
Mentioned: 5 Post(s)
Tagged: 0 Thread(s)
Quoted: 145 Post(s)
Likes: 0
Liked 35 Times
in
30 Posts
Perhaps I misunderstood Seems to me you are saying the two work equally well with either having "steel serrated facing ; my belief is that's not the case, the exterior QR, even with steel serrated facing, is inferior and will slip. Just my 2�, not trying to start pi$$ing contest.
Pissing contests get started often in three ways here on BikeForums:
1. People read something, jump on what ain't there, other person fires right back.
2. People make "never" statements where anyone with half a brain knows should not be made. Everyone else calls 'em on it.
3. Someone starts a new religion...try's to sell a new Kool-Aid...implying that everyone else should follow along. Everyone else points to a church on Mt. Everest and tells 'em to take a hike.
=8-)
__________________
5000+ wheels built since 1984...
Disclaimer:
1. I do not claim to be an expert in bicycle mechanics despite my experience.
2. I like anyone will comment in other areas.
3. I do not own the preexisting concepts of DISH and ERD.
4. I will provide information as I always have to others that I believe will help them protect themselves from unscrupulous mechanics.
5. My all time favorite book is:
Kahane, Howard. Logic and Contemporary Rhetoric: The Use of Reason in Everyday Life
06-29-12, 12:28 PM
#30
Mechanic/Tourist
The QR Skewer I'm using is actually came with the wheelset, and they had over 2500 together on another bike, so I'm fairly confident they work as a pair.
I didn't look at the drops closely last night because I don't have very good lighting. I also do not have tools which which I could accurately determine if they are parallel. They "look" parallel.
On inspection, I noticed a little nastiness on the inside of the drive-side drop-out. You can see where the serrated part of the locknut actually gouged the metal as it pulled forward. I can't imagine the type of force that would be required to cause that much damage. In all the incidents where the wheel has slipped, I don't recall hitting anything and although I may be a bit of a masher, I doubt I could have hammered on the pedals that hard.
Looking at the dropout face I'm thinking you may have a cyclical situation. There may have been an incident of some sort that damaged the dropout face enough to cause some slippage. Then each incident since then has added to the problem. Once again I will point out that there are limitations to what can be determine remotely - I can't tell from a photo how deep the damage is, nor can I check things in person. Nowhere do I see that you have taken this into a shop to have it checked. Although many of us here are quite experienced sometimes there's no substitute for hands-on.
06-29-12, 01:26 PM
#31
Senior Member
Join Date: Dec 2007
Location: San Jose, California
Posts: 3,504
Bikes: 2001 Tommasini Sintesi w/ Campagnolo Daytona 10 Speed
Mentioned: 5 Post(s)
Tagged: 0 Thread(s)
Quoted: 145 Post(s)
Likes: 0
Liked 35 Times
in
30 Posts
I'm looking at the second photo...
Best as I can tell, I see a hint that the rear right dropout in the vertical plane is bent inward toward the bicycle center line. The rear left dropout appears in the horizontal plane to have a touch inward bend as well...following the line of the chainstay a little.
Judging from the first photo, something happened back there in the past - lower end chain drop? Wheel slipped and settled as far forward as the point where the dropout is brazed to the stays? The adjuster angle suggests that in the past the dropout axle slot at one point was bent in or spread out and someone did a quick fix.
1. Make sure you have properly fitting skewers that have steel serrated facing for the end nut and the cam side.
2. Take bike to an LBS, have the rear dropout alignment checked. 5 minute job - T-handle shaped tools are used.
3. Have the rear wheel dish checked, install wheel, center between stays and secure. Then have LBS align the derailleur hanger against that dished and installed wheel. 5-10 minute job - swing arm type tool.
Make sure you follow everyone's instructions about using QRs.
1. Should hurt a tad when closing - that's tight.
2. QRs are not a PERMANENT affixing. Check before every ride.
=8-)
__________________
5000+ wheels built since 1984...
Disclaimer:
1. I do not claim to be an expert in bicycle mechanics despite my experience.
2. I like anyone will comment in other areas.
3. I do not own the preexisting concepts of DISH and ERD.
4. I will provide information as I always have to others that I believe will help them protect themselves from unscrupulous mechanics.
5. My all time favorite book is:
Kahane, Howard. Logic and Contemporary Rhetoric: The Use of Reason in Everyday Life
5000+ wheels built since 1984...
Disclaimer:
1. I do not claim to be an expert in bicycle mechanics despite my experience.
2. I like anyone will comment in other areas.
3. I do not own the preexisting concepts of DISH and ERD.
4. I will provide information as I always have to others that I believe will help them protect themselves from unscrupulous mechanics.
5. My all time favorite book is:
Kahane, Howard. Logic and Contemporary Rhetoric: The Use of Reason in Everyday Life
06-29-12, 02:21 PM
#32
Mechanic/Tourist
You could also consider completely removing the adjusters in order to have the axle ends sit on an undamaged portion of the dropout. they are only there to help in quickly centering the wheel when installing.
06-29-12, 03:22 PM
#33
Senior Member

The 1st photo actually doesn't snow much damage, it's the paint that's scraped off. The metal underneath is barely scratched. The optical illusion of having the camera-lens close to the dropout, but not perpendicular to the face makes it appear that the tip of the dropout is pinched in. But it's really not, the slot is close to parallel and as long as the wheel slides in, it's good.
The 2nd photo does appear to show that the dropouts may not be aligned parallel to each other from side-to-side. Without going to the shop and using the dropout-alignment tools, you can make a quick measurement to verify:
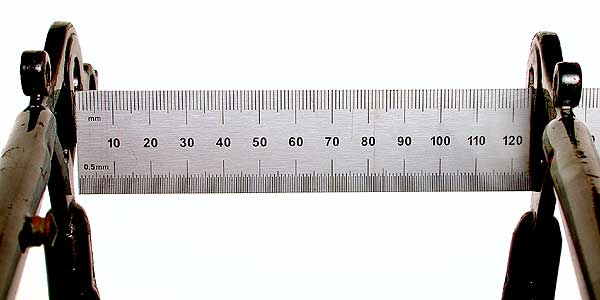
https://sheldonbrown.com/images/measure-spacing.jpg
https://sheldonbrown.com/frame-spacing.html
Take 4 measurements:
1. width at top of axle-slot in dropout, at the front
2. width at top of axle-slot, at the rear before the curve
3. width at bottom of axle-slot, at the front
4. width at bottom of axle-slot, at the rear before the curve
The variations in these measurements will tell you how square the dropouts are to each other.
To determine squareness or parallelogram alignment with BB, measure distance from centre of axle when mounted to centre of BB-spindle bolt on each side. Also do the "string test" and verify that the rear-triangle is in-plane with the seat-tube and head-tube. Although I prefer to clamp the string (with the wheel mounted) to the outer-dropout face with the QR. The string is clamped by the QR directly above centreline of the axle on each side
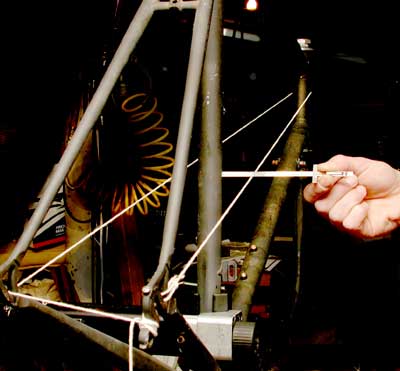
https://sheldonbrown.com/images/string-test.jpg
https://sheldonbrown.com/frame-spacing.html
The 2nd photo does appear to show that the dropouts may not be aligned parallel to each other from side-to-side. Without going to the shop and using the dropout-alignment tools, you can make a quick measurement to verify:
https://sheldonbrown.com/images/measure-spacing.jpg
https://sheldonbrown.com/frame-spacing.html
Take 4 measurements:
1. width at top of axle-slot in dropout, at the front
2. width at top of axle-slot, at the rear before the curve
3. width at bottom of axle-slot, at the front
4. width at bottom of axle-slot, at the rear before the curve
The variations in these measurements will tell you how square the dropouts are to each other.
To determine squareness or parallelogram alignment with BB, measure distance from centre of axle when mounted to centre of BB-spindle bolt on each side. Also do the "string test" and verify that the rear-triangle is in-plane with the seat-tube and head-tube. Although I prefer to clamp the string (with the wheel mounted) to the outer-dropout face with the QR. The string is clamped by the QR directly above centreline of the axle on each side
https://sheldonbrown.com/images/string-test.jpg
https://sheldonbrown.com/frame-spacing.html
06-29-12, 03:38 PM
#34
It's MY mountain

Join Date: Sep 2006
Location: Mt.Diablo
Posts: 10,002
Bikes: Klein, Merckx, Trek
Mentioned: 70 Post(s)
Tagged: 0 Thread(s)
Quoted: 4337 Post(s)
Liked 2,980 Times
in
1,617 Posts
Pissing contests get started often in three ways here on BikeForums:
1. People read something, jump on what ain't there, other person fires right back.
2. People make "never" statements where anyone with half a brain knows should not be made. Everyone else calls 'em on it.
3. Someone starts a new religion...try's to sell a new Kool-Aid...implying that everyone else should follow along. Everyone else points to a church on Mt. Everest and tells 'em to take a hike.
=8-)
06-29-12, 04:35 PM
#35
Senior Member
Thread Starter
Join Date: Jul 2011
Location: Southern California
Posts: 376
Bikes: 2010 FUJI SL-1 Comp
Mentioned: 0 Post(s)
Tagged: 0 Thread(s)
Quoted: 1 Post(s)
Likes: 0
Liked 0 Times
in
0 Posts
The 1st photo actually doesn't snow much damage, it's the paint that's scraped off. The metal underneath is barely scratched. The optical illusion of having the camera-lens close to the dropout, but not perpendicular to the face makes it appear that the tip of the dropout is pinched in. But it's really not, the slot is close to parallel and as long as the wheel slides in, it's good.
The 2nd photo does appear to show that the dropouts may not be aligned parallel to each other from side-to-side. Without going to the shop and using the dropout-alignment tools, you can make a quick measurement to verify:
The 2nd photo does appear to show that the dropouts may not be aligned parallel to each other from side-to-side. Without going to the shop and using the dropout-alignment tools, you can make a quick measurement to verify:
I measured between the drop in 6 spots - front, middle, and back x top and bottom. All 6 measurements were 127mm.
Re: comment about the adjuster angle - that adjuster is bent. I cannot make the adjustment from the outside - only using a flat-head from the inside (just discovered this). I tried to bend it back by hand, and although it's not straight, it's straighter. So I can't rule out that got bent during shipment or even leaning the bike up against something.
Thanks for the replies.
06-29-12, 06:25 PM
#36
Kid A

Join Date: Aug 2009
Location: Alexandria, VA
Posts: 1,778
Mentioned: 0 Post(s)
Tagged: 0 Thread(s)
Quoted: 3 Post(s)
Likes: 0
Liked 5 Times
in
5 Posts
Been there. I try to make sure both QR and hub nut have seriously serrated edges.
An almost guaranteed way to fix this is to replace the QR with a nutted axle. Yes, the enclosed cam, steel acorn nut QR skewers should hold the wheel in place -- but often the hub lock nuts don't have enough "bite" and this is where the slippage will often come from. The nutted axle provides such a solid connection that it will often override this lack of bite in the other nuts against the drop out.
Actually, if you do a search you'll likely run into my posts where I had this problem. I think that NY bike guy suggested that the nutted axle may work well. And it did.
You could also try star washers for grip, but I've not had good luck with them to be honest. Your best bet is to either replace the wheel lock nuts with more serrated ones (and keep trying the QR), or swap to a nutted axle. That's my opinion anyway -- don't sue, to each the their own, etc.
Last edited by TurbineBlade; 06-30-12 at 05:20 AM.
06-30-12, 05:15 AM
#37
Senior Member
Been there. I try to make sure both QR and hub nut have seriously serrated edges.
I've used these axle lock-nuts from my track-bike on several QR wheels people have brought me with slipping issues:

Problem solved.
 06-30-12, 06:27 AM
#38

Senior Member

Join Date: Mar 2005
Location: Pinole, CA, USA
Posts: 17,392
Mentioned: 24 Post(s)
Tagged: 0 Thread(s)
Quoted: 443 Post(s)
Likes: 0
Liked 27 Times
in
25 Posts
It looks to me like the cassette lock ring has been rubbing the inside of the dropout. I would look at hub spacing as the possible cause of the problem.
06-30-12, 09:53 AM
#39
bike whisperer

Join Date: Dec 2009
Location: Melbourne, Oz
Posts: 9,545
Bikes: https://weightweenies.starbike.com/forum/viewtopic.php?f=10&t=152015&p=1404231
Mentioned: 15 Post(s)
Tagged: 0 Thread(s)
Quoted: 1528 Post(s)
Liked 718 Times
in
510 Posts
Just going off the OP (I haven't bothered to read the thread), that's the first thing I'd look at; making the dropouts parallel. And likely the knurling on your locknut and/or QR nut is somewhat buggered.
__________________
Sheldon Brown's bike info ~~~ Park Tools repair help
Half-step triple, using double gear ~~~ 6400 STI rebuild walkthrough ~~~ Want 8/9/10s @126mm OLD? OCR. ~~~ Shimano cassette body overhaul ~~~ Ergopower Escape wear repair ~~~ PSA: drivetrain wear
List of US/Canada bike co-ops ~~~ Global list
Sheldon Brown's bike info ~~~ Park Tools repair help
Half-step triple, using double gear ~~~ 6400 STI rebuild walkthrough ~~~ Want 8/9/10s @126mm OLD? OCR. ~~~ Shimano cassette body overhaul ~~~ Ergopower Escape wear repair ~~~ PSA: drivetrain wear
List of US/Canada bike co-ops ~~~ Global list

