


Most cost effective wy of removing an older shimano crankset
 07-15-12, 02:57 PM
#1
Senior Member
Thread Starter
Join Date: Apr 2012
Posts: 415
Mentioned: 0 Post(s)
Tagged: 0 Thread(s)
Quoted: 0 Post(s)
Likes: 0
Liked 0 Times
in
0 Posts
Most cost effective way of removing an older shimano crankset
I purchased a new 5700 crank/bb. I also purchased the park tool bbt9 to install it
But it doesn't appear that this tool will work to remove my old crank as pictured here

So what's the cheapest way to get this crank off of my bike so I can install the new one? Thanks
But it doesn't appear that this tool will work to remove my old crank as pictured here
So what's the cheapest way to get this crank off of my bike so I can install the new one? Thanks
 07-15-12, 03:02 PM
#2
Senior Member

Join Date: Jul 2002
Posts: 6,956
Mentioned: 0 Post(s)
Tagged: 0 Thread(s)
Quoted: 0 Post(s)
Likes: 0
Liked 6 Times
in
5 Posts
Park Tool BBT-32 or BBT-22, or an equivalent clone. If you get the BBT-32, make sure you've got something suitable to drive it with, since it isn't a square-drive socket. Either of these is a versatile tool, good to have around if you work on bikes at all.
07-15-12, 03:10 PM
#4
自転車整備士
Join Date: Apr 2012
Location: Denver, Colorado USA
Posts: 885
Bikes: '86 Moots Mountaineer, '94 Salsa Ala Carte, '94 S-Works FSR, 1983 Trek 600 & 620
Mentioned: 0 Post(s)
Tagged: 0 Thread(s)
Quoted: 6 Post(s)
Likes: 0
Liked 3 Times
in
3 Posts
Park CCP-44.

Then you can use either the BBT-22 or -32 to remove the BB from the frame.
 07-15-12, 03:11 PM
#5
Senior Member
Join Date: Jun 2012
Posts: 208
Mentioned: 0 Post(s)
Tagged: 0 Thread(s)
Quoted: 0 Post(s)
Likes: 0
Liked 1 Time
in
1 Post
Remove the bolts securing the crankarms with an 8mm allen wrench, then use a splined crank puller (park or any other) to remove the crank... Then use the bottom-bracket tool that mechBgon mentioned to remove the bottom bracket, remembering that the drive-side is reverse thread.
Last edited by AlbertaBeef; 07-15-12 at 03:12 PM. Reason: Above guys beat me to the punch, lol...
07-15-12, 03:15 PM
#6

Senior Member
Join Date: Apr 2009
Location: New Rochelle, NY
Posts: 38,712
Bikes: too many bikes from 1967 10s (5x2)Frejus to a Sumitomo Ti/Chorus aluminum 10s (10x2), plus one non-susp mtn bike I use as my commuter
Mentioned: 140 Post(s)
Tagged: 1 Thread(s)
Quoted: 5781 Post(s)
Liked 2,577 Times
in
1,428 Posts
The crank requires an 8mm hex key to remove the bolt. I'm not sure from the photo if this is a one-key type where when you back off the bolt it becomes a crank puller and removes the crank, or if you also need a crank puller.
The BB appears to be conventional cup & spindle design which requires 2-3 tools.
Since you asked for the most cost effective method, I'd suggest passing on buying the tools which you won't need for the new crank, either try to borrow them or visit a local work-on-your-own-bike bike co-op, or pay a dealer a nominal to do it all for you.
If you were staying with cranks of similar design, it would be a different story.
__________________
FB
Chain-L site
An ounce of diagnosis is worth a pound of cure.
Just because I'm tired of arguing, doesn't mean you're right.
�One accurate measurement is worth a thousand expert opinions� - Adm Grace Murray Hopper - USN
WARNING, I'm from New York. Thin skinned people should maintain safe distance.
FB
Chain-L site
An ounce of diagnosis is worth a pound of cure.
Just because I'm tired of arguing, doesn't mean you're right.
�One accurate measurement is worth a thousand expert opinions� - Adm Grace Murray Hopper - USN
WARNING, I'm from New York. Thin skinned people should maintain safe distance.
07-15-12, 03:15 PM
#7
Senior Member
Thread Starter
Join Date: Apr 2012
Posts: 415
Mentioned: 0 Post(s)
Tagged: 0 Thread(s)
Quoted: 0 Post(s)
Likes: 0
Liked 0 Times
in
0 Posts
What about this

Or a tool that grabs from the outside of the cups... Like this

Or a tool that grabs from the outside of the cups... Like this
Last edited by JustinNY; 07-15-12 at 03:22 PM.
07-15-12, 03:31 PM
#9
Senior Member
Join Date: Jul 2004
Location: northern michigan
Posts: 13,317
Bikes: '77 Colnago Super, '76 Fuji The Finest, '88 Cannondale Criterium, '86 Trek 760, '87 Miyata 712
Mentioned: 19 Post(s)
Tagged: 0 Thread(s)
Quoted: 659 Post(s)
Liked 595 Times
in
313 Posts
This works just fine for my splined crankset (ISIS bottom bracket). It's worth every penny and will work on square taper cranksets, too.
07-15-12, 03:41 PM
#10
Senior Member
Thread Starter
Join Date: Apr 2012
Posts: 415
Mentioned: 0 Post(s)
Tagged: 0 Thread(s)
Quoted: 0 Post(s)
Likes: 0
Liked 0 Times
in
0 Posts
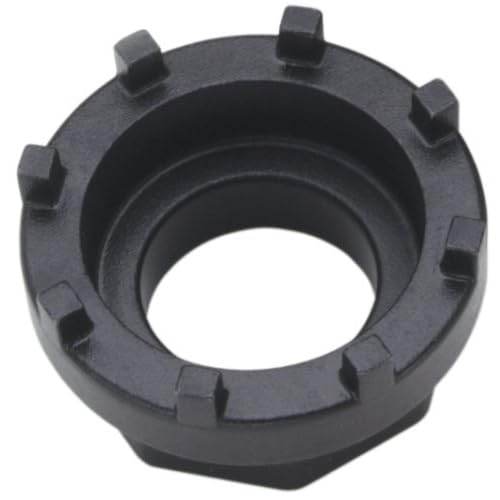
Ok so I pulled the crank bolts and I definitely need a crank puller. I'm still a little confused on the bbt22 because the BB has notches on the outside vs the 16 spline tool which grabs on the inside
07-15-12, 03:45 PM
#11
Senior Member
Join Date: Jun 2012
Posts: 208
Mentioned: 0 Post(s)
Tagged: 0 Thread(s)
Quoted: 0 Post(s)
Likes: 0
Liked 1 Time
in
1 Post
Also, check out the shimano tech doc - it shows quite clearly what I'm saying: https://techdocs.shimano.com/media/te...9830612167.pdf
Hope that helps,
07-15-12, 03:47 PM
#12
Senior Member
Thread Starter
Join Date: Apr 2012
Posts: 415
Mentioned: 0 Post(s)
Tagged: 0 Thread(s)
Quoted: 0 Post(s)
Likes: 0
Liked 0 Times
in
0 Posts
You definitely need the 16 spline. Look at the drive-side and you'll see no notches outside, they're only on the non-drive side. I believe Shimano designed the non-drive side with both splines and notches so you could ensure it was snug without removing the crankarm (using an old-school bottom bracket spanner) but it most definitely requires the 16-spline tool.
07-15-12, 03:56 PM
#13
Senior Member
Join Date: Jun 2012
Posts: 208
Mentioned: 0 Post(s)
Tagged: 0 Thread(s)
Quoted: 0 Post(s)
Likes: 0
Liked 1 Time
in
1 Post
1) 8mm allen/hex wrench to remove the bolts
2) Crank puller (Park CCP-44 is good, for sure)
3) Bottom Bracket tool like the BBT-22 - just remember drive side is reverse-thread.\\
FYI I like the BBT-22 because it gives the option of not only using a wrench, but using an impact socket wrench as well... Some BB's are a bugger to remove without an impact wrench. Hopefully not yours...
07-15-12, 04:14 PM
#14
Senior Member
Join Date: Aug 2005
Location: Pittsburgh, PA
Posts: 33,656
Bikes: '96 Litespeed Catalyst, '05 Litespeed Firenze, '06 Litespeed Tuscany, '20 Surly Midnight Special, All are 3x10. It is hilly around here!
Mentioned: 39 Post(s)
Tagged: 0 Thread(s)
Quoted: 2026 Post(s)
Likes: 0
Liked 1,096 Times
in
742 Posts
MechBgon needs to get another cup of coffee, ether that or new glasses, This is very uncharacteristically wrong.
The crank requires an 8mm hex key to remove the bolt. I'm not sure from the photo if this is a one-key type where when you back off the bolt it becomes a crank puller and removes the crank, or if you also need a crank puller.
The BB appears to be conventional cup & spindle design which requires 2-3 tools.
 First, it's not a self-extracting crank arm so the OP will indeed need a crank puller along with the 8 mm hex to remove the fixing bolts. Second, it's an Octalink cartridge bb, not at all a cup-and cone, so a Park BB-22 is the correct tool to remove it.
 Finally, for the OP, I do agree that the cheapest way to remove the current crank and bottom bracket is to take it to an LBS. The cost for the removal should be less than buying the tools for this one-time job. However, if you plan to reuse the crank and bottom bracket on another bike or have other bikes with similar cranks and either square taper or Octalink cartridge bottom brackets, then buying the tools is the way to go.
07-15-12, 04:18 PM
#15
Engineer
Join Date: May 2010
Location: Bucharest, Romania, Europe
Posts: 591
Bikes: 1989 Krapf (with Dura-ace) road bike, 1973 Sputnik (made by XB3) road bike , 1961 Peugeot fixed gear, 2010 Trek 4400
Mentioned: 1 Post(s)
Tagged: 0 Thread(s)
Quoted: 38 Post(s)
Likes: 0
Liked 0 Times
in
0 Posts
Are you blind? (not the OP but the rest) or am I?
That is a classic taper square crank. The rubbery plastic thing around the center inbus (allen) bolt is a dustcover that is covering the inner threads of the crank where you attach the crank-puller.
The BB is a cup-cone, with 6 splines on the lockring. a sliding cup and fixed cup.
Now back to the OP question:
For removing the crank: most effective is using a crank puller of any kind (there are from prices from 1$ to a some tens $) - or find a friend who has one. Other variations involve abuse to the crank like automotive gear pullers or grip the crank in a bench vice and punch/hammer on the spindle - both actions are not to be recommended.
For removing the BB: the left side lockring can be driven out by hammering a flat screwdriver in one of the splines (counter-clockwise to loosen) - no necessity of special tools. The sliding cup can be unthreaded by hand after the lockring is taken out (or by gaining a bit of help from the same flat screwdriver).
The fixed cup (right side) is a bugger most of the time and require either a large crescent wrench or a bench vice with sharp jaws and twist the frame around it. Remember the right cup (the fixed cup) is left threaded, so you must turn it clockwise to loosen it)
*I have one crankset strikingly similar with the one in picture
Last edited by Asi; 07-15-12 at 04:31 PM.
07-15-12, 04:21 PM
#16
Banned
Do I need a crank puller?.
then you don't have to own the tools
07-15-12, 04:31 PM
#17
Senior Member
Join Date: Jun 2012
Posts: 208
Mentioned: 0 Post(s)
Tagged: 0 Thread(s)
Quoted: 0 Post(s)
Likes: 0
Liked 1 Time
in
1 Post
Are you blind? (not the OP but the rest) or am I?
That is a classic taper square crank. The rubbery plastic thing around the center inbus (allen) bolt is a dustcover that is covering the inner threads of the crank where you attach the crank-puller.
The BB is a cup-cone, with 6 splines on the lockring. a sliding cup and fixed cup.
That is a classic taper square crank. The rubbery plastic thing around the center inbus (allen) bolt is a dustcover that is covering the inner threads of the crank where you attach the crank-puller.
The BB is a cup-cone, with 6 splines on the lockring. a sliding cup and fixed cup.
First, look closely and you'll see it's obviously 8 splines on the 'lockring' (not a lockring, it's a machined edge to the cup) not 6. This was part of the Shimano 105 5500 BB design.
Second, The OP has a full Shimano 105 5500 9 speed group - you can verify this by not only looking at the components but by reading his previous posts. If you look closely at his bottom bracket, and closely at the Shimano 105 5500 series bottom bracket, you'll see I'm correct in what I'm saying, as are the others that have said it's an Octolink bottom bracket.
Again, no offense but I have seen these multiple times, and this is not now, nor will it ever be, a square-taper bottom bracket. =)
Last edited by AlbertaBeef; 07-15-12 at 04:35 PM.
07-15-12, 04:39 PM
#18
Engineer
Join Date: May 2010
Location: Bucharest, Romania, Europe
Posts: 591
Bikes: 1989 Krapf (with Dura-ace) road bike, 1973 Sputnik (made by XB3) road bike , 1961 Peugeot fixed gear, 2010 Trek 4400
Mentioned: 1 Post(s)
Tagged: 0 Thread(s)
Quoted: 38 Post(s)
Likes: 0
Liked 0 Times
in
0 Posts
My bad, but for removing the splined part, hammering a flat screwdriver (or a rather blunt chisel, or punch, etc.) is still effective for both tightening and removing.
07-15-12, 11:13 PM
#20
Senior Member
Join Date: Jul 2002
Posts: 6,956
Mentioned: 0 Post(s)
Tagged: 0 Thread(s)
Quoted: 0 Post(s)
Likes: 0
Liked 6 Times
in
5 Posts
Ooops, I should've given a complete answer and mentioned the 8mm hex key and a crank puller. I was focusing on the BB itself. MORE. COFFEE!!!
07-16-12, 08:54 AM
#22
Senior Member
Join Date: Dec 2005
Posts: 7,848
Mentioned: 0 Post(s)
Tagged: 0 Thread(s)
Quoted: 1 Post(s)
Likes: 0
Liked 2 Times
in
2 Posts
Cost effective, right???  Everybody has a piece of wook moving around at home for sure, a hammer or a rock too... 2 or 3 hits and that will be lose right away. It might mark the crank but the op said cost effective
Everybody has a piece of wook moving around at home for sure, a hammer or a rock too... 2 or 3 hits and that will be lose right away. It might mark the crank but the op said cost effective
07-17-12, 04:28 AM
#25
Senior Member
Thread Starter
Join Date: Apr 2012
Posts: 415
Mentioned: 0 Post(s)
Tagged: 0 Thread(s)
Quoted: 0 Post(s)
Likes: 0
Liked 0 Times
in
0 Posts
I ended up buying the crank puller, I would like to sell the components I remove and thus would like to keep them in good condition. Hoping this proves more cost effective in the long run