


Restoring a 1986 Raleigh 753
 06-04-16, 11:19 AM
#51
Senior Member
Thread Starter
Join Date: May 2012
Posts: 746
Mentioned: 35 Post(s)
Tagged: 0 Thread(s)
Quoted: 117 Post(s)
Likes: 0
Liked 22 Times
in
18 Posts
Lovely bike and very close to what mine will be: just exchange red with blue. My frame is also 753r and has serial number SB8422, made on July 1, 1986.
 06-04-16, 11:30 AM
#52
Senior Member
Thread Starter
Join Date: May 2012
Posts: 746
Mentioned: 35 Post(s)
Tagged: 0 Thread(s)
Quoted: 117 Post(s)
Likes: 0
Liked 22 Times
in
18 Posts
Stress relief
I am for really considering doing the stress relief on the SR spider/crank arm, I have seem some pictures of various SR spiders that formed cracks at the spot Chombi indicated, and I was warned when I was doing the parts search for my first build. As handy as you seem to be, with these kind of things it should be an easy thing to accomplish, it is hardly noticeable when done correctly, and it is some peace of mind.
Looks like some right nice components you have gathered up, taking the time to find things that are just right marks you as a true enthusiast. And, damned handy with the bicycle tools, too.
Bill
Looks like some right nice components you have gathered up, taking the time to find things that are just right marks you as a true enthusiast. And, damned handy with the bicycle tools, too.
Bill
First SR crank? Be aware that they had cracking happen on some of these on the drive side, where the arm meets up with the two spider legs of crank.
It would be good to periodically inspect these areas for cracks when you service the bike. Cracking in that area is surprisingly not that uncommon for some similarly designed cranksets of that time, notably, the Mavic 630 series crank (not the starfish) was known to suffer cracking in exactly the same areas (as it is pretty much a designed - in stress riser). Some crank owners had been known to have used their Dremels
to "ease in" the corners to prevent cracking.
Great find. That is a beaut. I have seen many pics of SR cranks with hairline cracks at the arm/spider joint, but never a pic of an actual failure there (plenty at the pedal hole though.) And it doesn't need a dremel to chamfer the edge there, just a small hand file or fine wet sand paper around a nail will do.
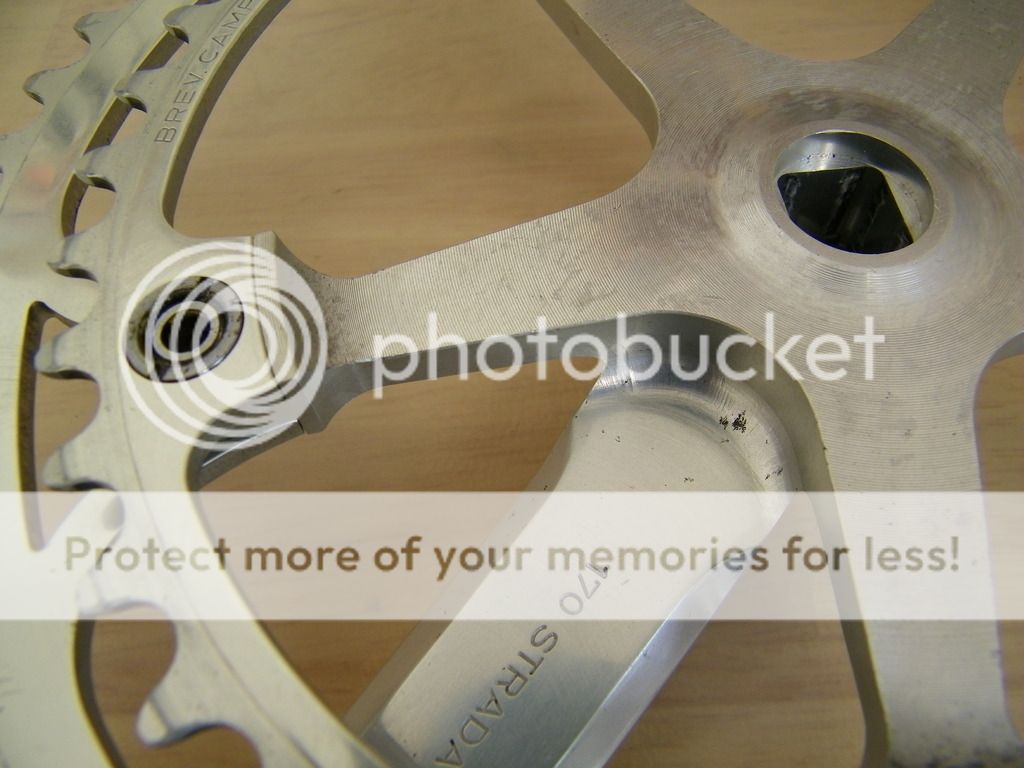
... the edge where the arm meets the spider is too sharp: it has not been chamfered and is a stress riser and a source of micro-cracking. An ounce of prevention is worth a pound of cure, so following the good advice above I rounded the edge with 1000 grit sandpaper and polished it thoroughly:
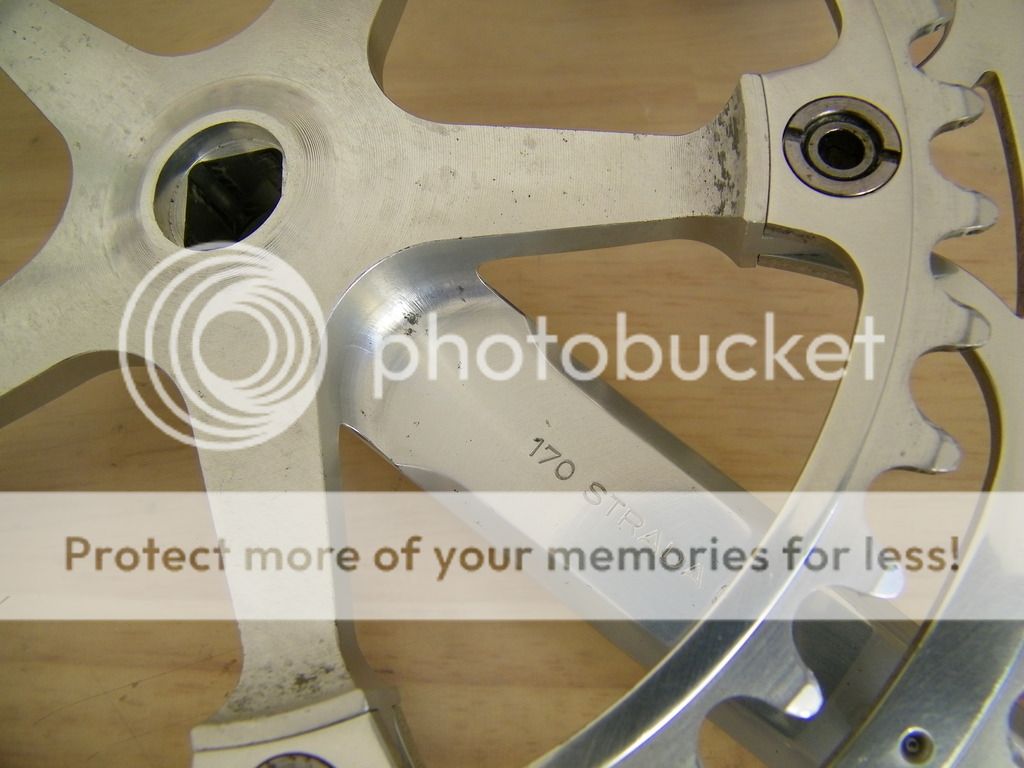
Hopefully this is sufficient to prevent a crack starting.
06-04-16, 12:21 PM
#53
Senior Member
Thread Starter
Join Date: May 2012
Posts: 746
Mentioned: 35 Post(s)
Tagged: 0 Thread(s)
Quoted: 117 Post(s)
Likes: 0
Liked 22 Times
in
18 Posts
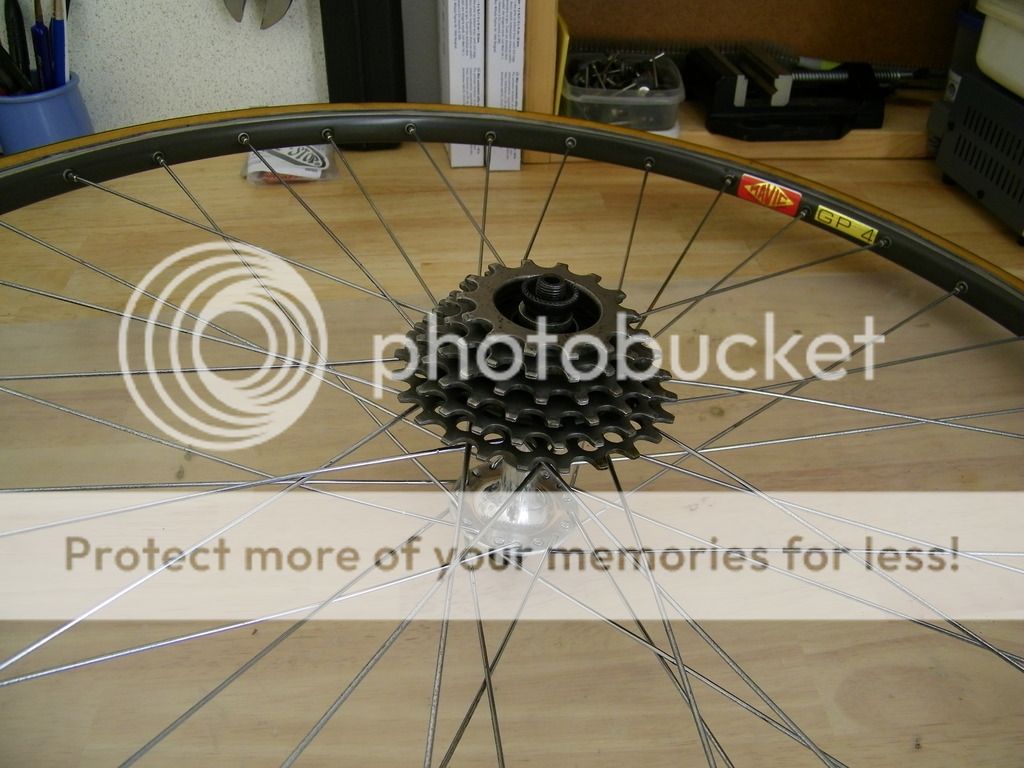
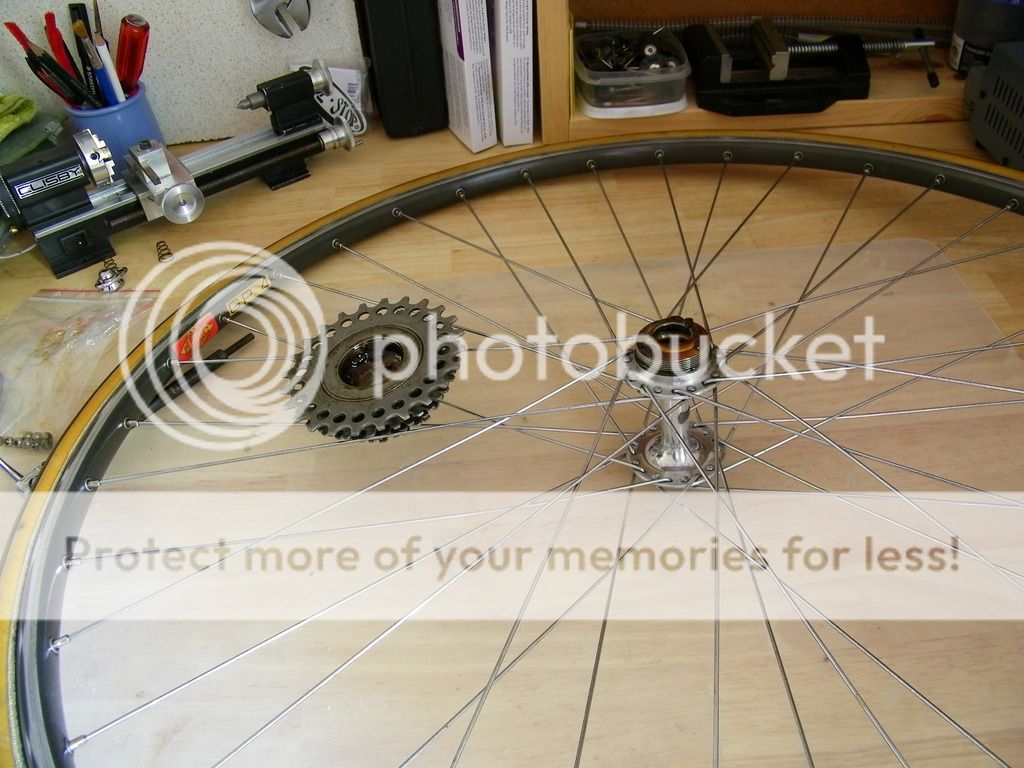
Wheelset
I bought a pair of wheels with Super Record hubs and Mavic GP4 rims for a good price:
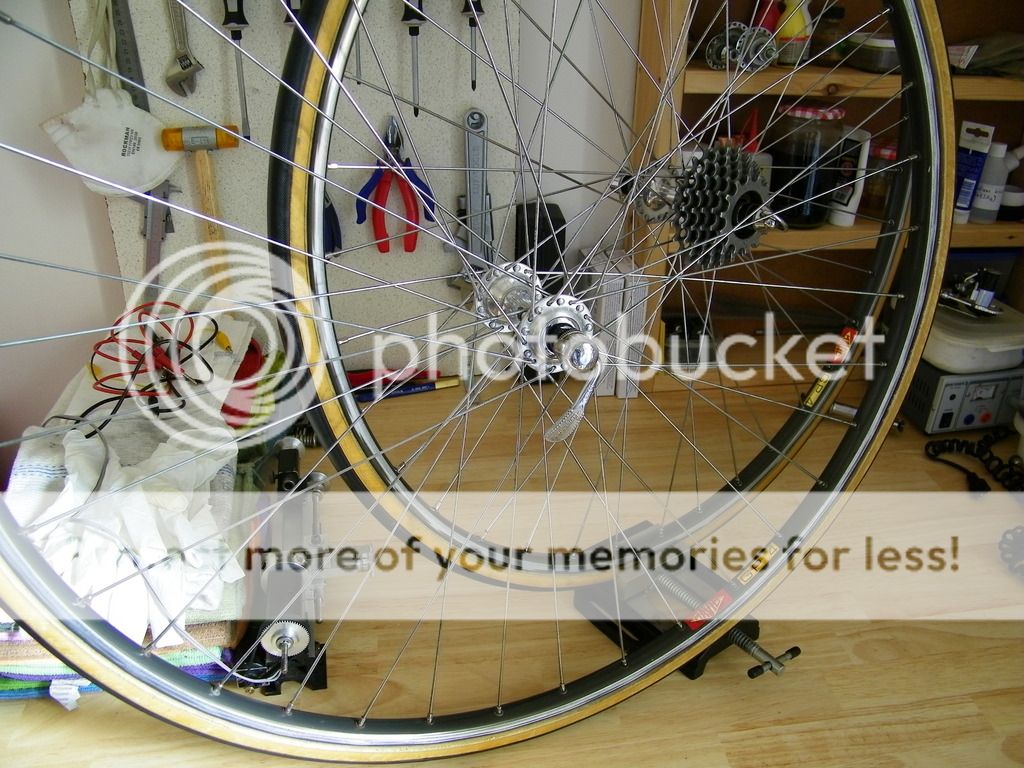
Unfortunately they were laced with Berg-Union chrome-plated spokes which have corroded. These were very pretty spokes but the constant flexing under riding would cause the chrome plating to flake off. This has happened here:
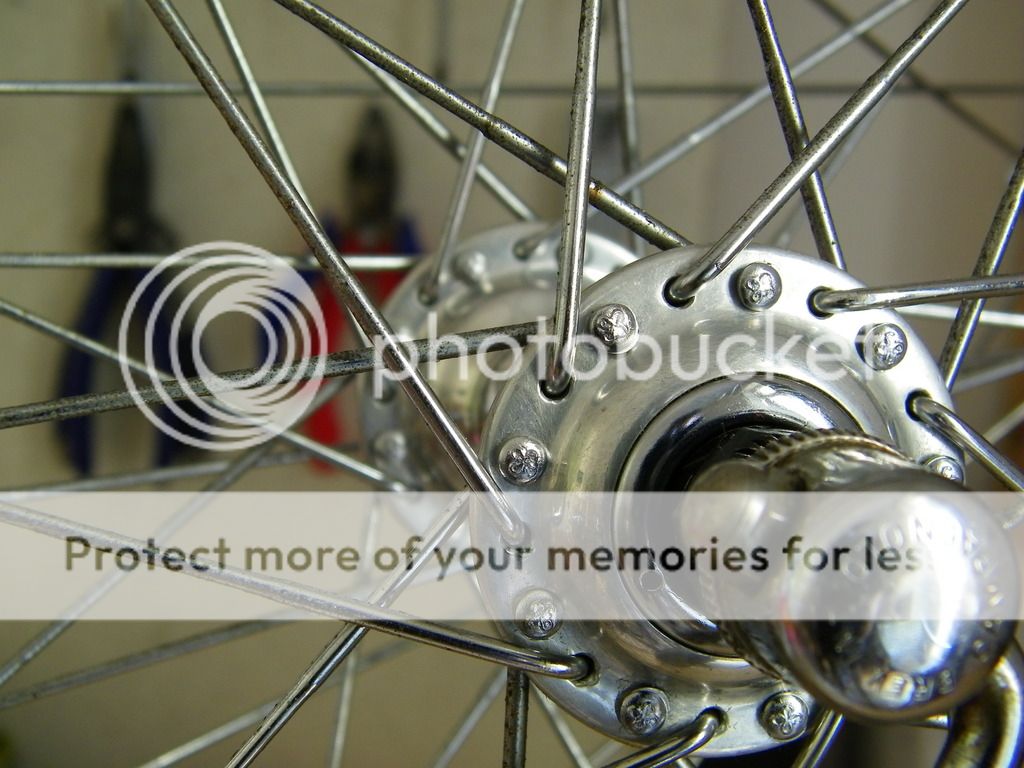
These will be replaced with period-correct NOS chromed Berg-Union spokes. Also, the Mavic GP4 rims are going to be substituted by NOS Galli Milano-Torino rims.
First the wheels have to be de-laced.
Unfortunately they were laced with Berg-Union chrome-plated spokes which have corroded. These were very pretty spokes but the constant flexing under riding would cause the chrome plating to flake off. This has happened here:
These will be replaced with period-correct NOS chromed Berg-Union spokes. Also, the Mavic GP4 rims are going to be substituted by NOS Galli Milano-Torino rims.
First the wheels have to be de-laced.
06-04-16, 12:36 PM
#54
Senior Member
Thread Starter
Join Date: May 2012
Posts: 746
Mentioned: 35 Post(s)
Tagged: 0 Thread(s)
Quoted: 117 Post(s)
Likes: 0
Liked 22 Times
in
18 Posts
Wheelset
The wheelset came with a six speed Regina Corsa (which I think is from the 1980s) in good condition; so I'll use it.
No vintage bike restorer should be without cone spanners and the correct freewheel remover. This is the two-notch Suntour type:
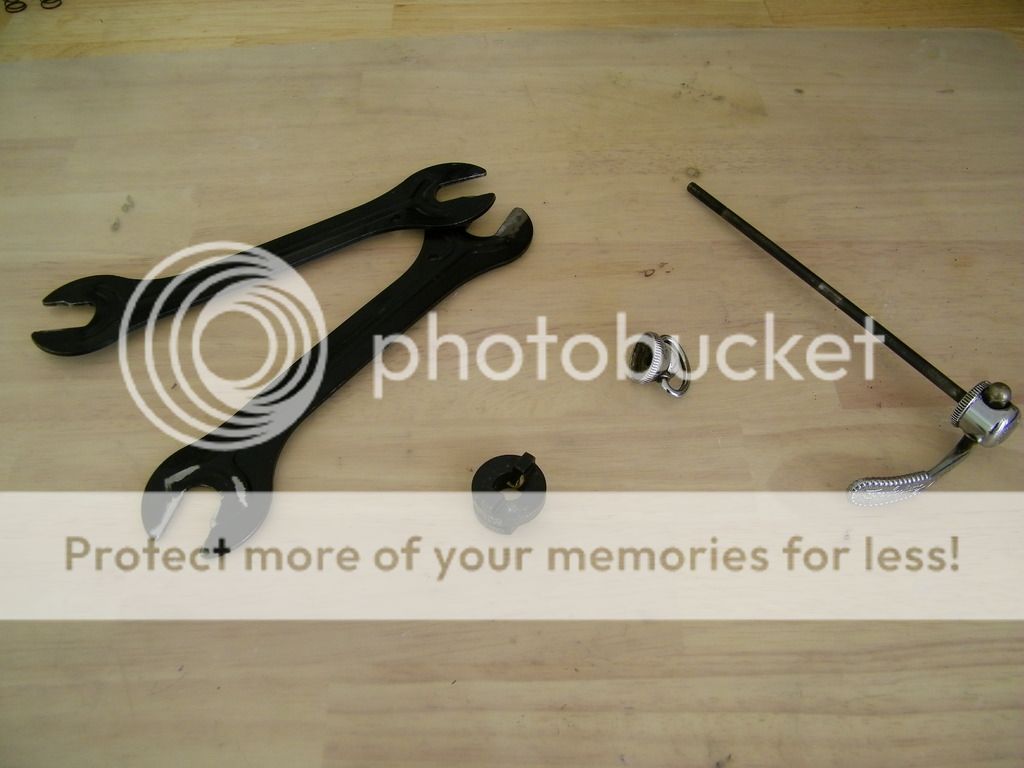
I'll brace the remover with the quick release skewer to stop it slipping off, and also use a heat gun (another useful item) to loosen the threads:
No vintage bike restorer should be without cone spanners and the correct freewheel remover. This is the two-notch Suntour type:
I'll brace the remover with the quick release skewer to stop it slipping off, and also use a heat gun (another useful item) to loosen the threads:
06-04-16, 12:38 PM
#55
Senior Member
Thread Starter
Join Date: May 2012
Posts: 746
Mentioned: 35 Post(s)
Tagged: 0 Thread(s)
Quoted: 117 Post(s)
Likes: 0
Liked 22 Times
in
18 Posts
Wheelset
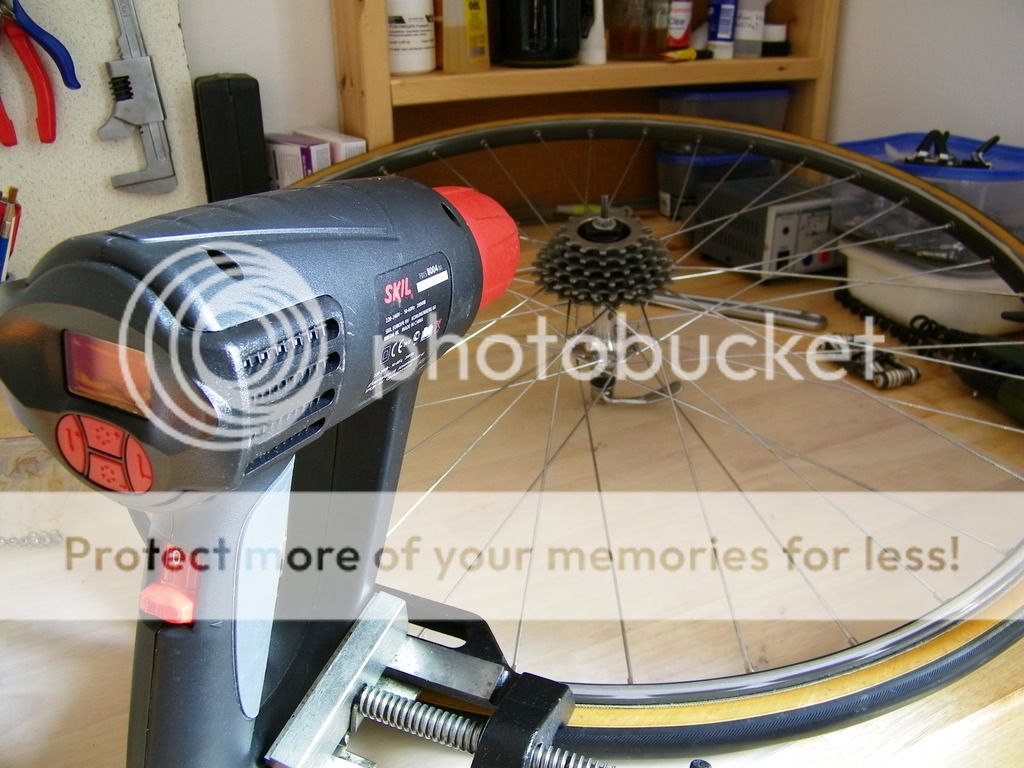
This required a lot of effort:
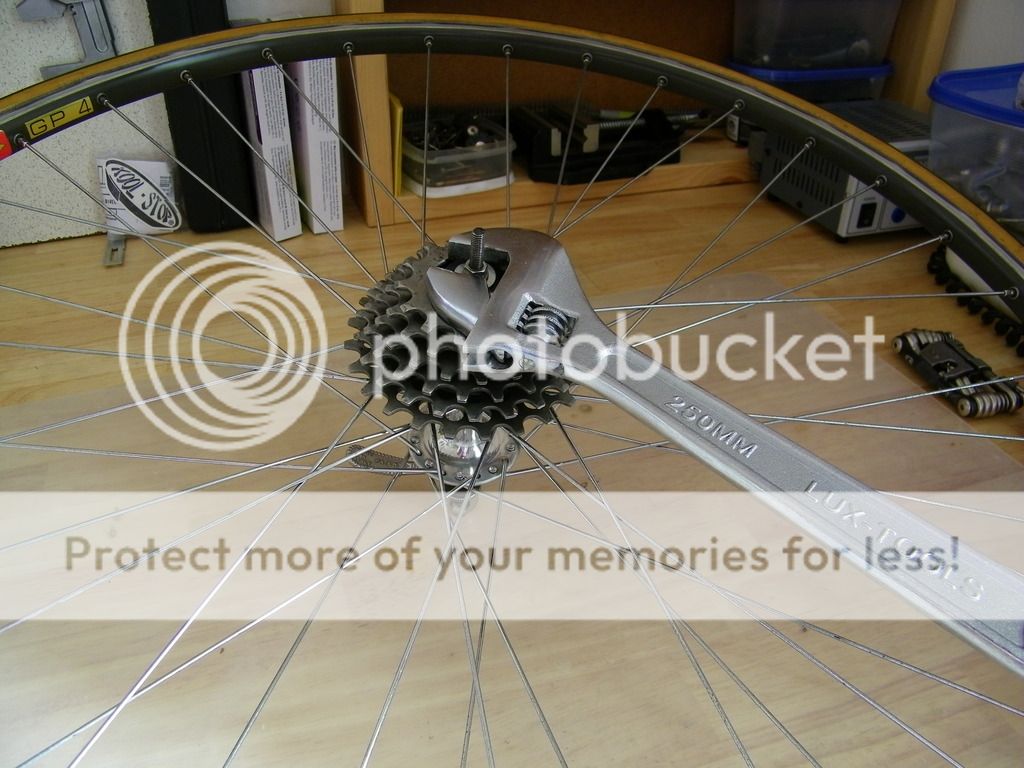
... but eventually yielded (after a bit of puffing, blowing and cussing):
I was pleased to see that the previous owner had used lots of grease on the threads to prevent galling.
... but eventually yielded (after a bit of puffing, blowing and cussing):
I was pleased to see that the previous owner had used lots of grease on the threads to prevent galling.
06-04-16, 04:07 PM
#56
Senior Member
Join Date: Mar 2014
Location: Hopkinton, MA
Posts: 1,538
Bikes: 1938 Raleigh Record Ace (2), 1938 Schwinn Paramount, 1961 Torpado, 1964? Frejus, 1980 Raleigh 753 Team Pro, Moulton, other stuff...
Mentioned: 11 Post(s)
Tagged: 0 Thread(s)
Quoted: 26 Post(s)
Likes: 0
Liked 11 Times
in
11 Posts
If the rims are good, and you don't have a use for them...
06-04-16, 07:08 PM
#57

Semper Fi
Join Date: Jan 2008
Posts: 12,942
Mentioned: 89 Post(s)
Tagged: 0 Thread(s)
Quoted: 1172 Post(s)
Liked 358 Times
in
241 Posts
Nice job on the crankset spider, looks like it came from Italy that way. I can understand why you are using a different rim, but those GP4 are some sweet riding bits, mine were thankfully in good condition, as are the spokes and bearings in the hubs (~Ofmega.)
06-09-16, 10:48 AM
#58
Senior Member
Thread Starter
Join Date: May 2012
Posts: 746
Mentioned: 35 Post(s)
Tagged: 0 Thread(s)
Quoted: 117 Post(s)
Likes: 0
Liked 22 Times
in
18 Posts
Shipping from Germany is probably not worth it! A set of NOS GP4 rims sold for �50.00 a few days ago: Mavic GP4 Tubular Rims | eBay
06-09-16, 10:51 AM
#59
Senior Member
Thread Starter
Join Date: May 2012
Posts: 746
Mentioned: 35 Post(s)
Tagged: 0 Thread(s)
Quoted: 117 Post(s)
Likes: 0
Liked 22 Times
in
18 Posts
I was hoping to find some blue anodized Mavic SSC rims but they were either in poor condition or absurdly expensive. The rims I bought haven't arrived yet, but they are also anodized blue and (so far as I can tell) well made.
06-09-16, 10:55 AM
#60
Senior Member
Thread Starter
Join Date: May 2012
Posts: 746
Mentioned: 35 Post(s)
Tagged: 0 Thread(s)
Quoted: 117 Post(s)
Likes: 0
Liked 22 Times
in
18 Posts
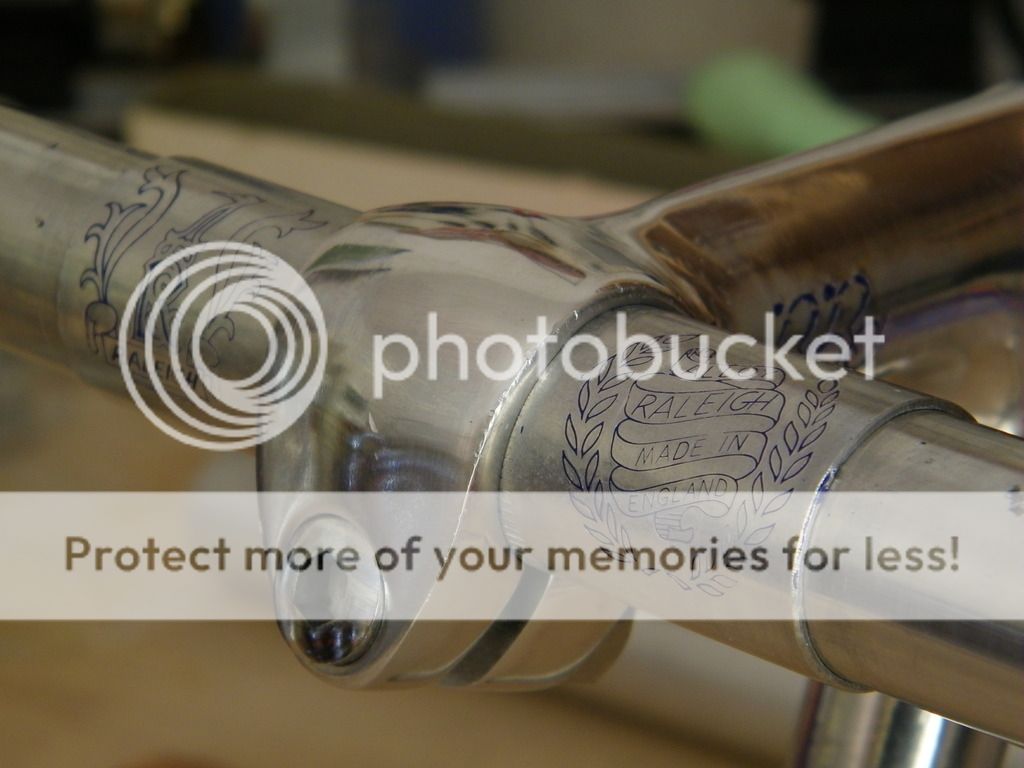
The handlebars arrived and I did some more work on The Fonz. They are made by Chambers & Churchill of Worcester for Raleigh. The Raleigh crest is nicely engraved but hard to discern so I picked it out with blue enamel paint and clear-coated:
06-09-16, 10:56 AM
#61
Senior Member
Join Date: Mar 2014
Location: Hopkinton, MA
Posts: 1,538
Bikes: 1938 Raleigh Record Ace (2), 1938 Schwinn Paramount, 1961 Torpado, 1964? Frejus, 1980 Raleigh 753 Team Pro, Moulton, other stuff...
Mentioned: 11 Post(s)
Tagged: 0 Thread(s)
Quoted: 26 Post(s)
Likes: 0
Liked 11 Times
in
11 Posts
06-09-16, 11:01 AM
#62
Senior Member
Thread Starter
Join Date: May 2012
Posts: 746
Mentioned: 35 Post(s)
Tagged: 0 Thread(s)
Quoted: 117 Post(s)
Likes: 0
Liked 22 Times
in
18 Posts
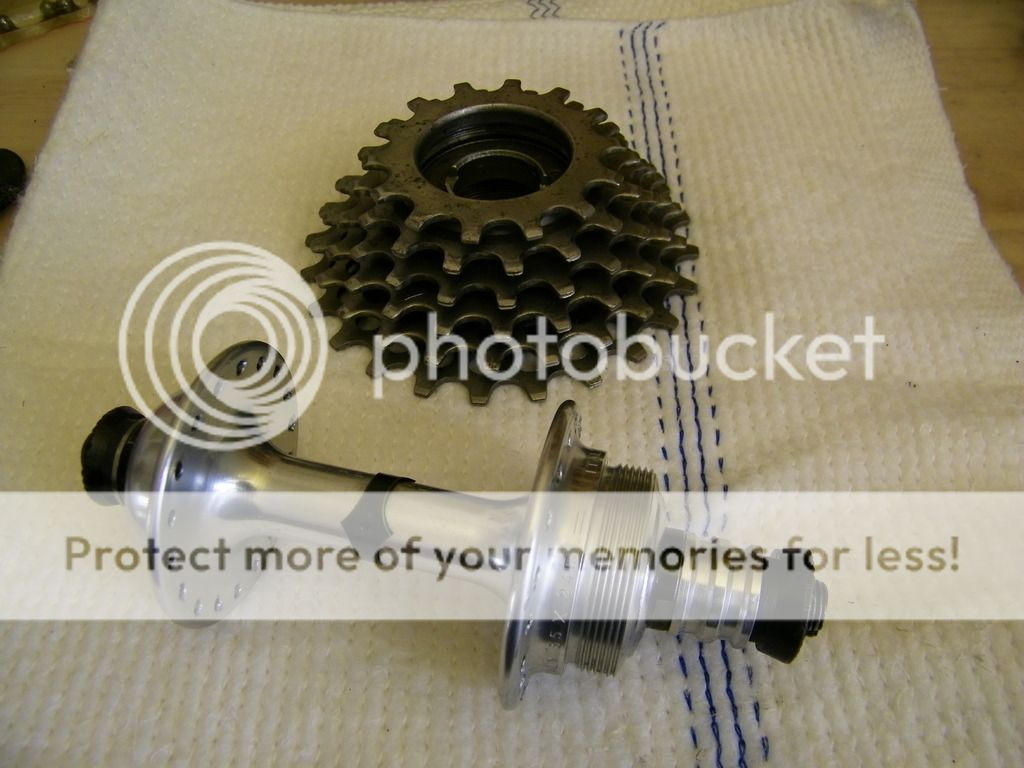
I de-bonded the tubulars and finally disassembled the wheelset. The hubs and freewheel were soaked in WD-40:
The rear axle had six assorted spacing washers on it which looked a bit messy:
The rear axle had six assorted spacing washers on it which looked a bit messy:
06-09-16, 11:07 AM
#63
Senior Member
Join Date: Oct 2013
Location: Connecticut
Posts: 3,448
Bikes: are fun!
Mentioned: 66 Post(s)
Tagged: 0 Thread(s)
Quoted: 466 Post(s)
Liked 862 Times
in
272 Posts
Nice work on the paintfill on the bars. I've done similar with acrylic, allowing some excess to be painted outside the engraving, set aside for a day or two to dry, then returning with goo gone to remove the excess. What's you technique? Looks like the paint is nice and crisp in the shallower parts. I've noticed that enamel can be much easier to work with than acrylic at the excess-removal stage.
06-09-16, 11:08 AM
#64
Senior Member
Join Date: May 2010
Location: Hurricane Alley , Florida
Posts: 3,903
Bikes: Treks (USA), Schwinn Paramount, Schwinn letour,Raleigh Team Professional, Gazelle GoldLine Racing, 2 Super Mondias, Carlton Professional.
Mentioned: 10 Post(s)
Tagged: 0 Thread(s)
Quoted: 78 Post(s)
Liked 30 Times
in
22 Posts
Nice Biba Stem. I use one too on my Pro.
 06-09-16, 11:10 AM
#65
Senior Member
Thread Starter
Join Date: May 2012
Posts: 746
Mentioned: 35 Post(s)
Tagged: 0 Thread(s)
Quoted: 117 Post(s)
Likes: 0
Liked 22 Times
in
18 Posts
So I mounted a short section of alloy bar in a little lathe:
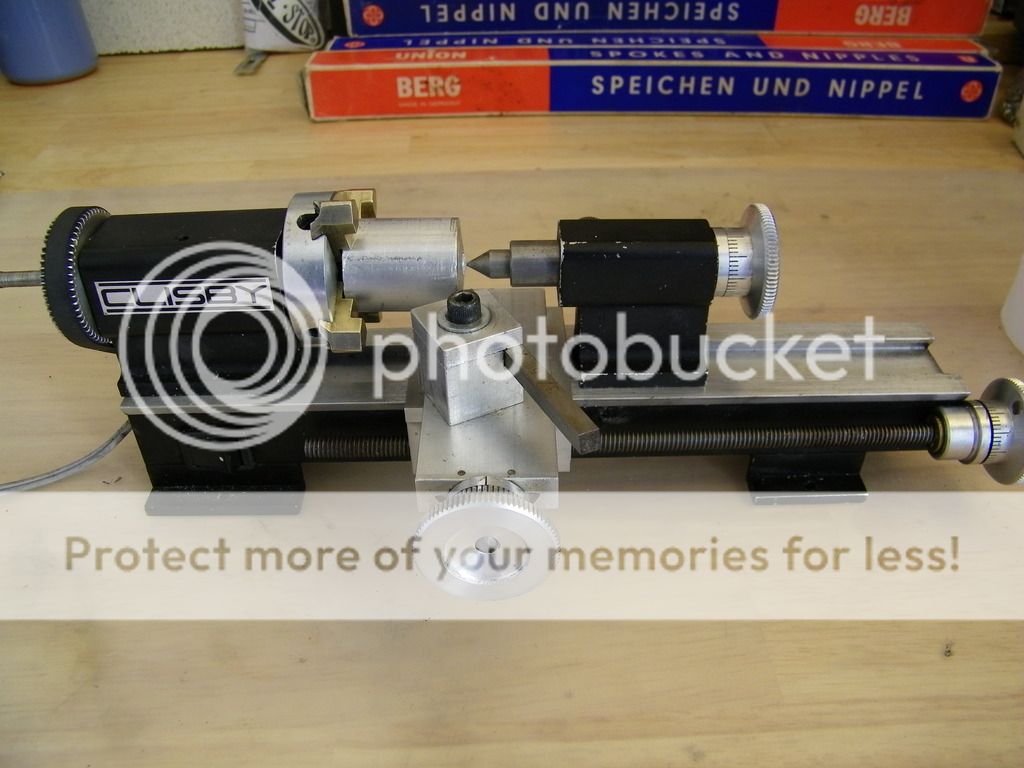
... and a while later, made a Campagnolo-esque spacer of the correct length:
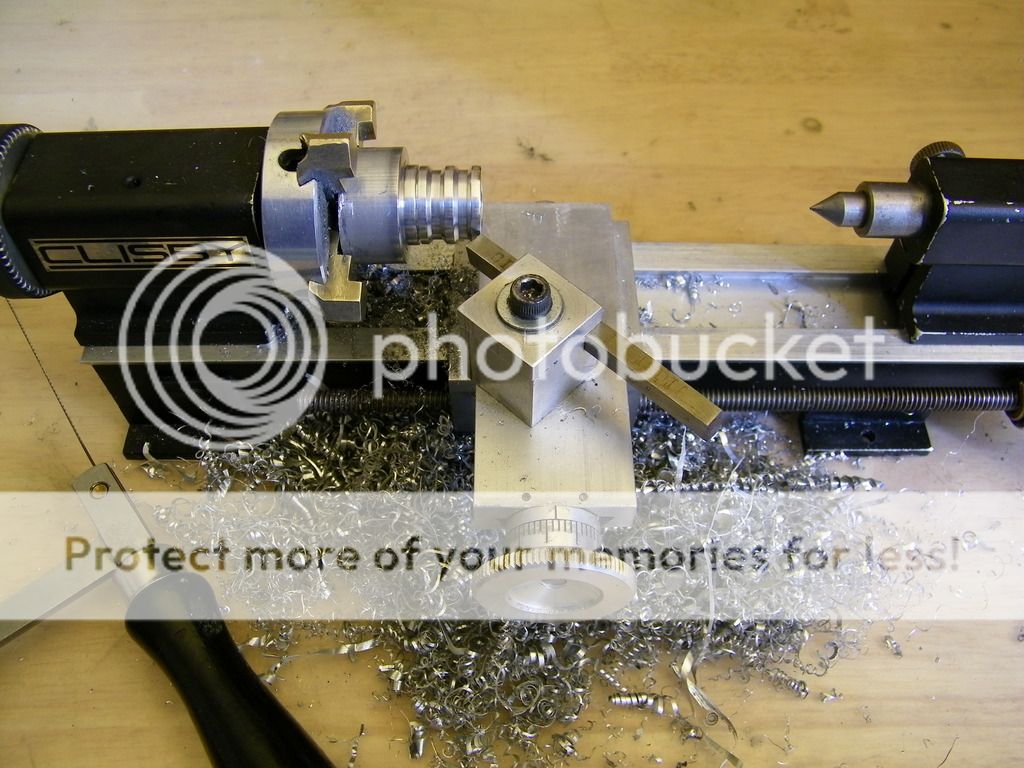
Aluminium bar is usually supplied in a soft state without having been heat-treated. I put the spacer in the oven at 180�C for 30 minutes to induce precipitation-hardening.
The hubs are ready for use and the Regina Corsa freewheel has been flushed with WD-40 and filled with oil:
... and a while later, made a Campagnolo-esque spacer of the correct length:
Aluminium bar is usually supplied in a soft state without having been heat-treated. I put the spacer in the oven at 180�C for 30 minutes to induce precipitation-hardening.
The hubs are ready for use and the Regina Corsa freewheel has been flushed with WD-40 and filled with oil:
06-09-16, 11:28 AM
#66

Senior Member
Join Date: Jul 2004
Location: Yukon, Canada
Posts: 8,759
Mentioned: 13 Post(s)
Tagged: 0 Thread(s)
Quoted: 113 Post(s)
Likes: 0
Liked 16 Times
in
14 Posts
Realsteel, love your build threads!
I think the difference in finish is more a result of the progression of time. Super record was introduced later and things like the seatposts were polished to a higher standard. I would also guess the metallurgy was improved to make a better matrix which took better to polishing.
I don't polish the anodized components (polish will do nothing more than a big of cleaner will do). The crank is one of them and I am certain there was no difference in the production of super record and nuovo record cranks arms. They are all just record crank arms with the appropriate rings added. The anodizing changed over time, I am less sure about that progression but there is varying degrees of satin like finish and more shiny finish but the cranks were always anodized. The reason the seatpost comes up so well is because they were never anodized so they polish well. I believe super record derailleurs were anodized on their silver parts, but I am not sure about nuovo record (it's been to long since I worked on one), likewise most of the later calipers were anodized but I think the earliest versions we not. Brake levers, also generally anodized.
To summarize, I think any difference you are noticing in super vs. nuovo record is due to the year of production rather than a difference in the treatment of components. I would guess that if you compared a same production year what was delivered as a super and nuovo record crank set side by side you would see little to no difference in the finish of the arms.
So far the Diamond Brite has not scratched any of the anodized surfaces I polished with it. It doesn't have the feel of a polishing compound at all, most of its action seems to be removing the usual black grime that builds up on aluminum surfaces. It was formulated for the diamond plate aluminum tool boxes that many US truck owners have on the beds of pick up trucks, Daws Industries owns the Better Built product line now, they started up here in Pensacola back in the mid 80s.
But, I do just as you recommend, gentle cleaning and light polishing with a clean microfiber cloth. It was a pleasant surprise to see how it turned out on the NR crankset, NR seat post, SR calipers and both NR derailleurs. The SR shift levers got clean enough, but that finish of the aluminum does not polish out to a shine, something in their anodization coating must have a duller appearance than the other components. Probably the nicest surprise for me was the NR seat post, that looks fantastic. I' posted pictures of it in the thread about the Medici build, but they aren't any kind of quality at all. I imagine that if I was bearing down hard, or attempted to use a power polishing wheel, the finish would be removed, or at least burned in its look, by the Diamond Brite.https://www.dawsbetterbuilt.com/shop...-brite-polish/
To me the SR components have a slightly brighter appearance than the NR things, one of the real Campagnolo experts can hopefully tell me it there is a difference in the annodization, or whatever the SR finish is. Or, if that is just how they are polished up at the factory.
Sorry for the hijack of your thread, back to our regularly scheduled programing.
Bill
I don't polish the anodized components (polish will do nothing more than a big of cleaner will do). The crank is one of them and I am certain there was no difference in the production of super record and nuovo record cranks arms. They are all just record crank arms with the appropriate rings added. The anodizing changed over time, I am less sure about that progression but there is varying degrees of satin like finish and more shiny finish but the cranks were always anodized. The reason the seatpost comes up so well is because they were never anodized so they polish well. I believe super record derailleurs were anodized on their silver parts, but I am not sure about nuovo record (it's been to long since I worked on one), likewise most of the later calipers were anodized but I think the earliest versions we not. Brake levers, also generally anodized.
To summarize, I think any difference you are noticing in super vs. nuovo record is due to the year of production rather than a difference in the treatment of components. I would guess that if you compared a same production year what was delivered as a super and nuovo record crank set side by side you would see little to no difference in the finish of the arms.
__________________
1 Super Record bike, 1 Nuovo Record bike, 1 Pista, 1 Road, 1 Cyclocross/Allrounder, 1 MTB, 1 Touring, 1 Fixed gear
1 Super Record bike, 1 Nuovo Record bike, 1 Pista, 1 Road, 1 Cyclocross/Allrounder, 1 MTB, 1 Touring, 1 Fixed gear
06-09-16, 11:31 AM
#67
Senior Member
Thread Starter
Join Date: May 2012
Posts: 746
Mentioned: 35 Post(s)
Tagged: 0 Thread(s)
Quoted: 117 Post(s)
Likes: 0
Liked 22 Times
in
18 Posts
Nice work on the paintfill on the bars. I've done similar with acrylic, allowing some excess to be painted outside the engraving, set aside for a day or two to dry, then returning with goo gone to remove the excess. What's you technique? Looks like the paint is nice and crisp in the shallower parts. I've noticed that enamel can be much easier to work with than acrylic at the excess-removal stage.
06-09-16, 11:35 AM
#68
Senior Member

Join Date: Aug 2009
Location: Berkeley, CA
Posts: 7,236
Bikes: '72 Cilo Pacer, '72 Gitane Gran Tourisme, '72 Peugeot PX10, '73 Speedwell Ti, '74 Peugeot UE-8, '75 Peugeot PR-10L, '80 Colnago Super, '85 De Rosa Pro, '86 Look Equipe 753, '86 Look KG86, '89 Parkpre Team, '90 Parkpre Team MTB, '90 Merlin
Mentioned: 87 Post(s)
Tagged: 0 Thread(s)
Quoted: 830 Post(s)
Liked 2,110 Times
in
553 Posts
Great thread! Those Raleigh bars are a nice compliment to the frame. Nice work on the custom hub spacer, too. (I confess to having tool envy! I need a lathe for something I'm sure.  ) Glad to see you are going to go with SR, which I think will look much nicer on this frame than the original owner's C-Record choice. Looking forward to seeing this built up.
) Glad to see you are going to go with SR, which I think will look much nicer on this frame than the original owner's C-Record choice. Looking forward to seeing this built up.
06-09-16, 03:13 PM
#69
If I own it, I ride it

Join Date: Nov 2005
Location: Cardinal Country
Posts: 5,579
Bikes: Lejeune(14), Raleigh, Raysport, Jan De Reus, Gazelle, Masi, B. Carr�(4), Springfield, Greg Lemond, Andre Bertin, Schwinn Paramount
Mentioned: 55 Post(s)
Tagged: 0 Thread(s)
Quoted: 591 Post(s)
Likes: 0
Liked 662 Times
in
311 Posts
Very true. And in later years, you are hard pressed to tell them from the famous SSC rims. They weigh virtually the same.
Last edited by CV-6; 06-09-16 at 06:49 PM.
06-09-16, 05:06 PM
#70
Senior Member

What size is the seatpost? My daughter's RTP (SB6703) of 753 Reynolds is 26.8mm.
06-09-16, 07:19 PM
#71
Semper Fi
Join Date: Jan 2008
Posts: 12,942
Mentioned: 89 Post(s)
Tagged: 0 Thread(s)
Quoted: 1172 Post(s)
Liked 358 Times
in
241 Posts
Realsteel, love your build threads!...snip To summarize, I think any difference you are noticing in super vs. nuovo record is due to the year of production rather than a difference in the treatment of components. I would guess that if you compared a same production year what was delivered as a super and nuovo record crank set side by side you would see little to no difference in the finish of the arms.
Realsteel, now you pull out a lathe and turn some spacers that look like something Campagnolo would use at a major show. Before that you hi-light those bars as neat as can be, along with a stem that is almost jewel like. Please don't stop your build threads, ever! I am beginning to enjoy feeling inadequate with my meager skills, and now I can live vicariously through yours, DDs and the others' here, builds.
Bill
__________________
Semper Fi, USMC, 1975-1977
I Can Do All Things Through Him, Who Gives Me Strength. Philippians 4:13
Semper Fi, USMC, 1975-1977
I Can Do All Things Through Him, Who Gives Me Strength. Philippians 4:13
Last edited by qcpmsame; 06-30-16 at 05:52 AM. Reason: Get correct name of contributor that helped me out.
06-30-16, 03:46 AM
#72
Senior Member
Thread Starter
Join Date: May 2012
Posts: 746
Mentioned: 35 Post(s)
Tagged: 0 Thread(s)
Quoted: 117 Post(s)
Likes: 0
Liked 22 Times
in
18 Posts
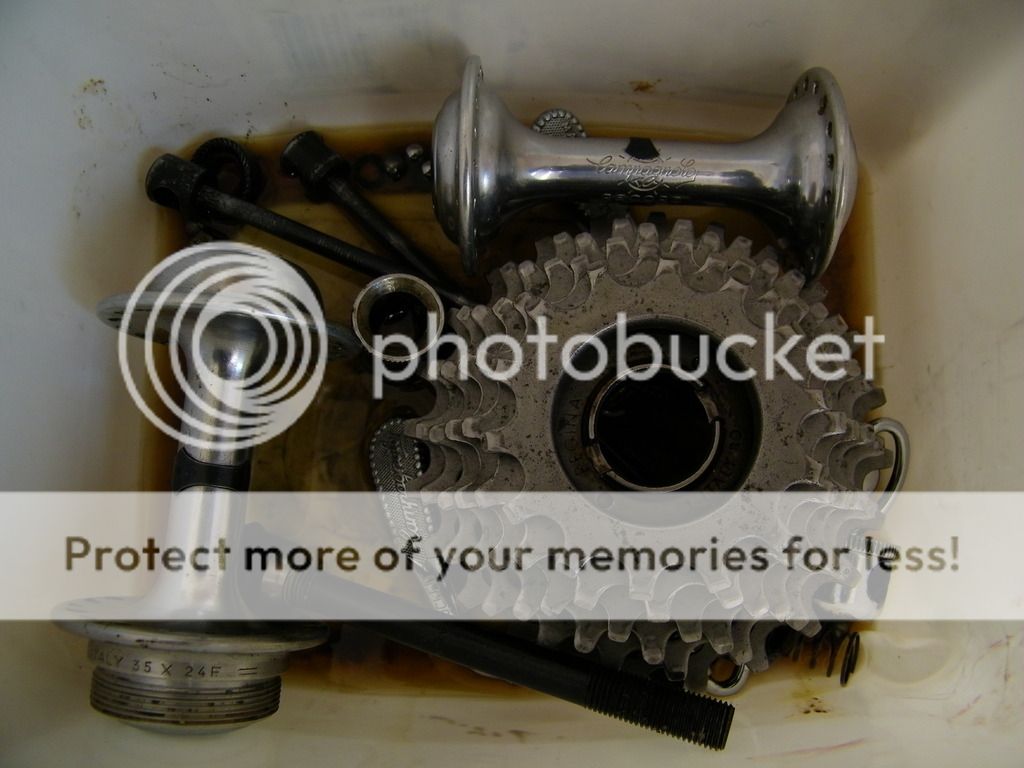
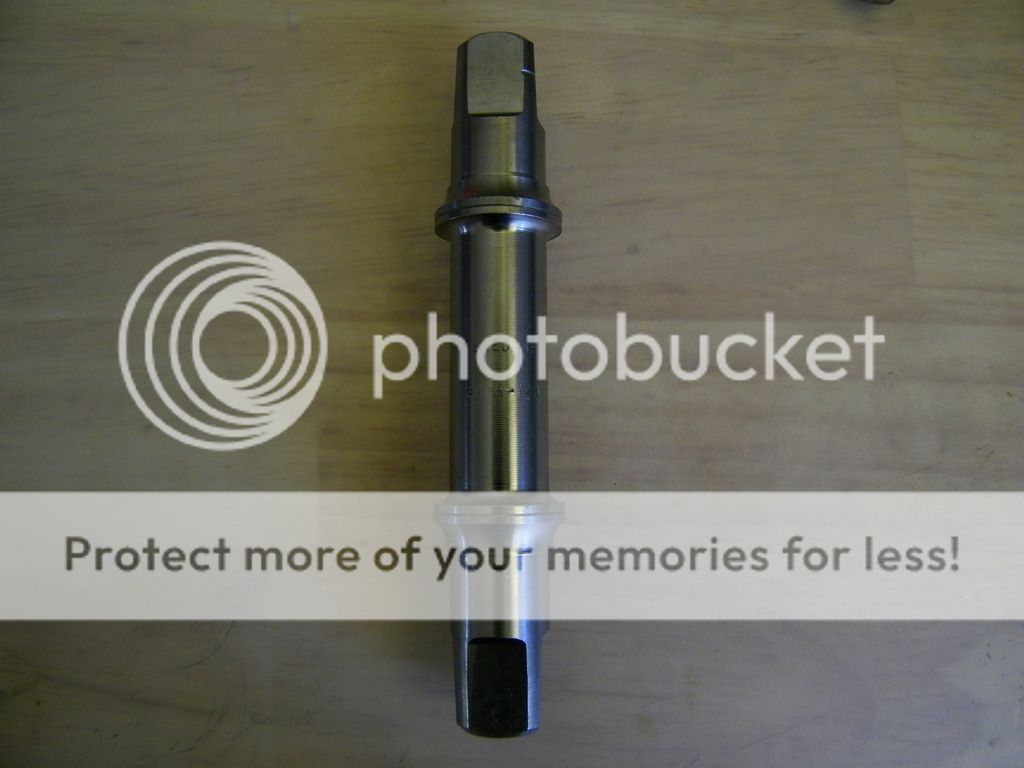
Bottom bracket
In the pursuit of lightness, I found an after-market titanium bottom bracket axle made by the, now defunct, Teledyne corporation of the US:
Teledyne also made complete bike frames out of titanium supposedly as a pretext for obtaining Soviet titanium for military projects.
Unlike the first-generation Campagnolo titanium axle, this one is solid and should not suffer from the early failures to which the Campy equivalent was prone. It's also beautifully machined and in mint condition.
06-30-16, 03:53 AM
#73
Senior Member
Thread Starter
Join Date: May 2012
Posts: 746
Mentioned: 35 Post(s)
Tagged: 0 Thread(s)
Quoted: 117 Post(s)
Likes: 0
Liked 22 Times
in
18 Posts
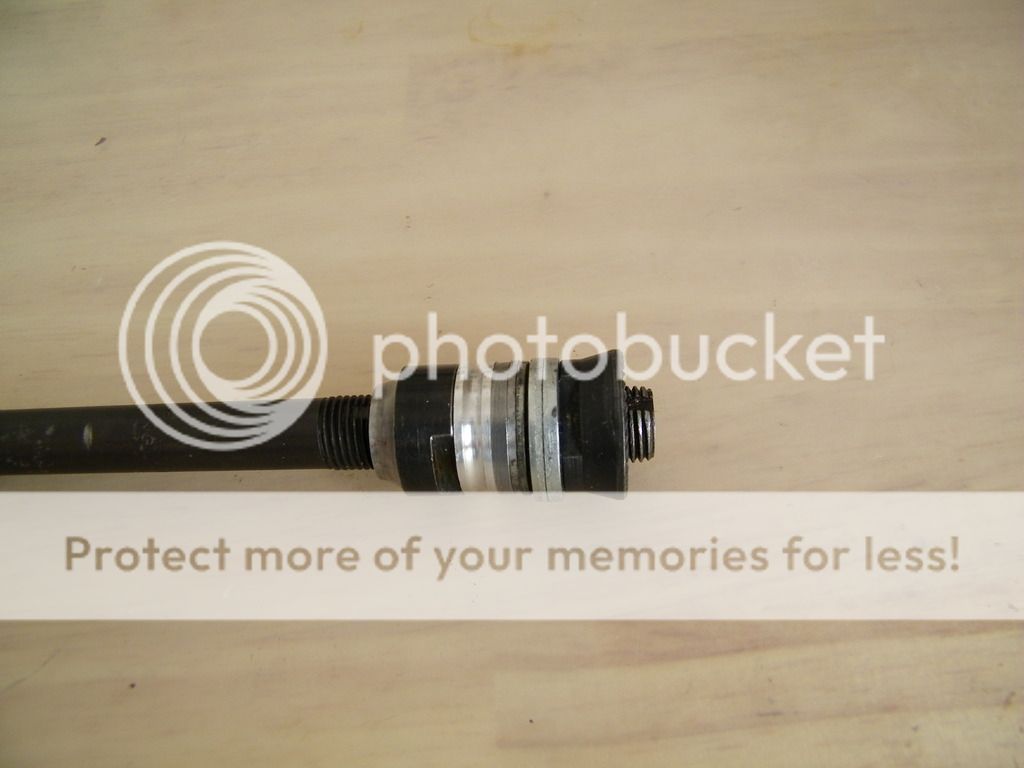
Bottom bracket
I also found a pair of Campagnolo alloy cups with hot-pressed steel bearing races:
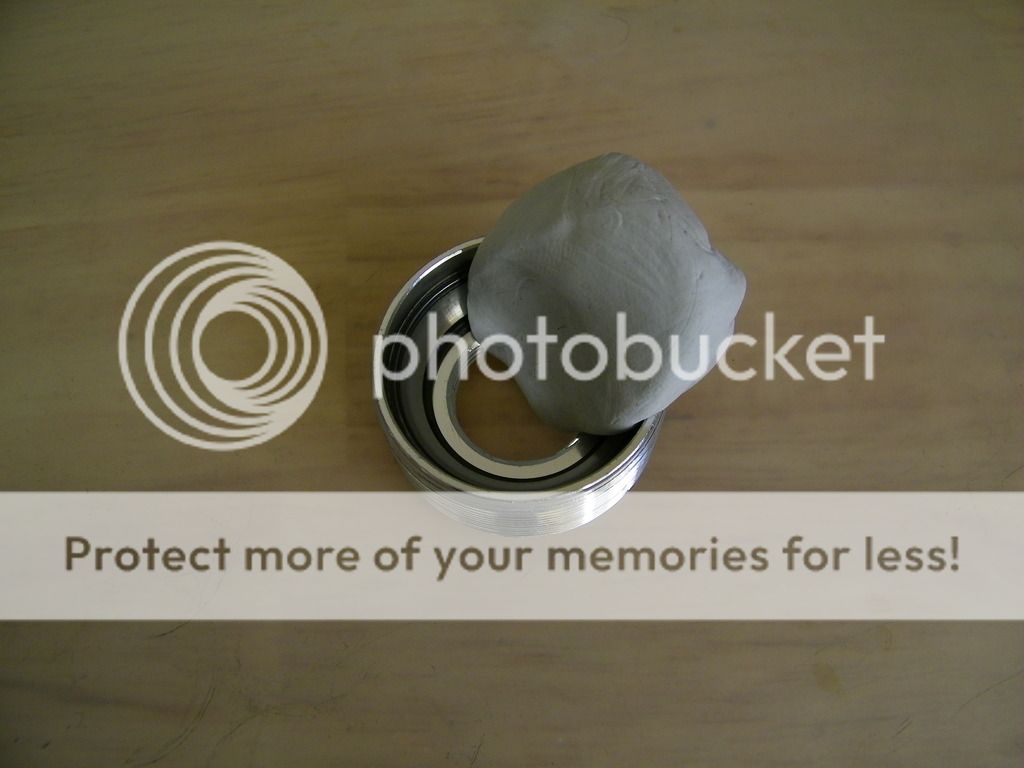
Here's a tip: I use mounting putty (known as Blu-tack in the UK, what do you call it in the US?) for removing road grit in hard-to-reach places, such as threading or bearing cups. Works rather well.
Here is the complete bottom bracket. I also found a pair of titanium crank bolts and washers:
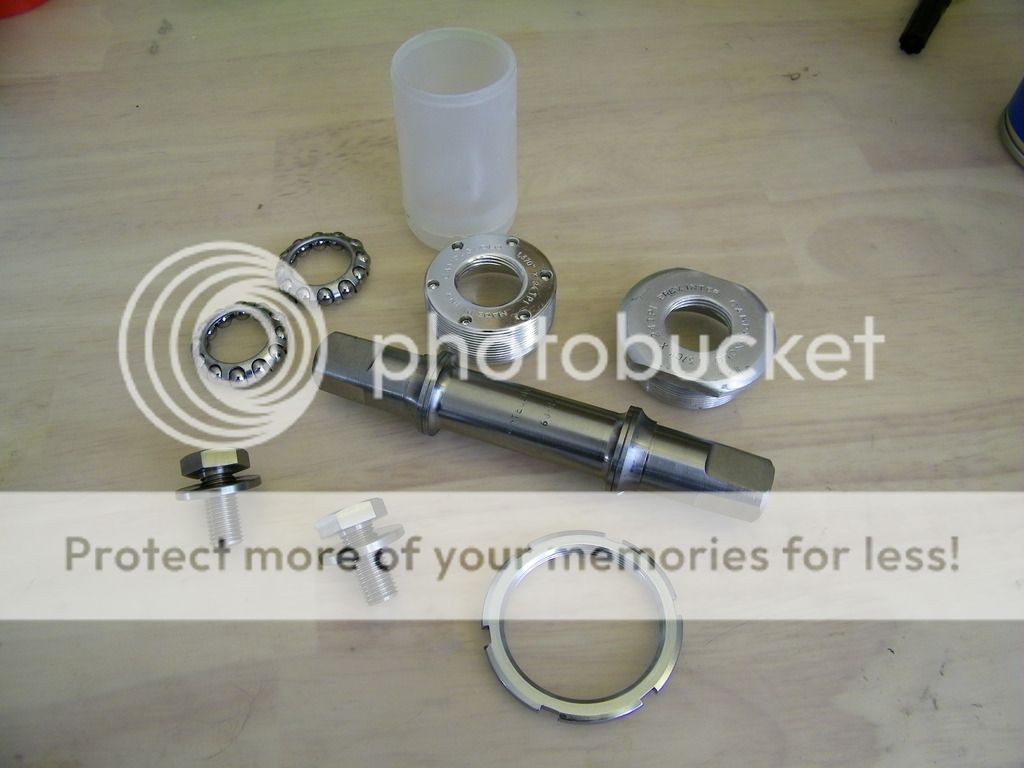
Including the bolts, it weighs 189 g -- probably about as light as a bottom bracket can be.
Here's a tip: I use mounting putty (known as Blu-tack in the UK, what do you call it in the US?) for removing road grit in hard-to-reach places, such as threading or bearing cups. Works rather well.
Here is the complete bottom bracket. I also found a pair of titanium crank bolts and washers:
Including the bolts, it weighs 189 g -- probably about as light as a bottom bracket can be.
06-30-16, 05:13 AM
#74
Senior Member
Thread Starter
Join Date: May 2012
Posts: 746
Mentioned: 35 Post(s)
Tagged: 0 Thread(s)
Quoted: 117 Post(s)
Likes: 0
Liked 22 Times
in
18 Posts
Brake levers
I found a pair of Super Record brake levers on eBay for the equivalent of $40. Unfortunately, one of them had hit the road rather hard (I hope the rider was OK):

Using a miniature sander, I ground down the scratches:
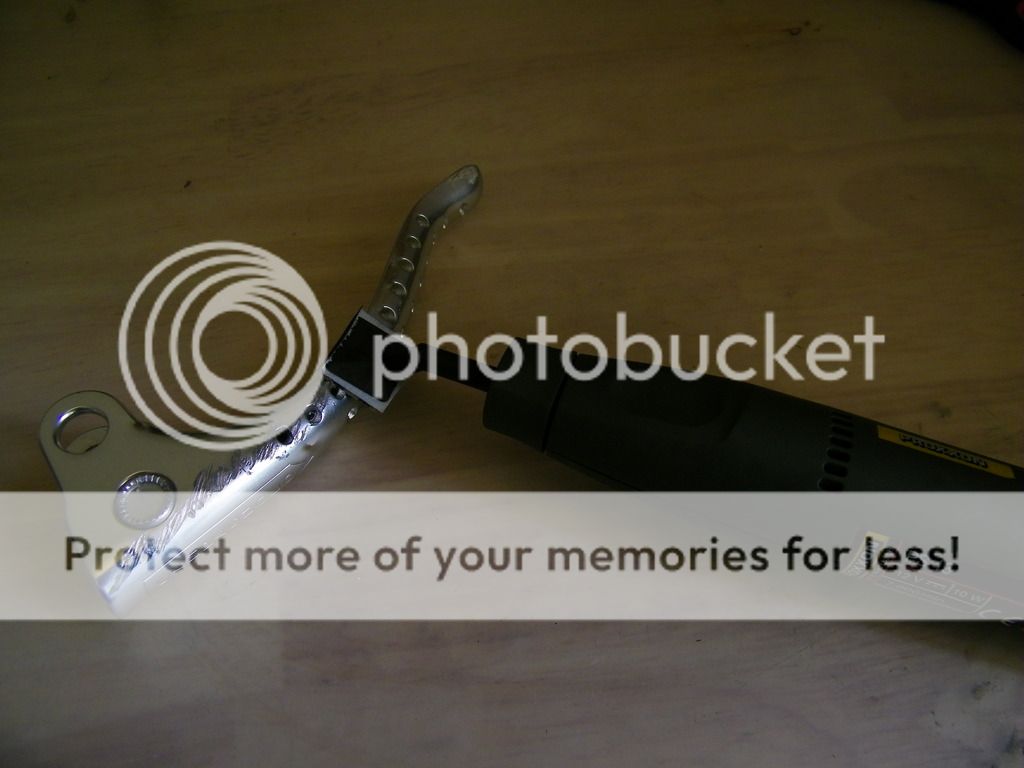
... and polished the affected surface to a high shine.
Using a miniature sander, I ground down the scratches:
... and polished the affected surface to a high shine.
06-30-16, 05:29 AM
#75
Senior Member
Thread Starter
Join Date: May 2012
Posts: 746
Mentioned: 35 Post(s)
Tagged: 0 Thread(s)
Quoted: 117 Post(s)
Likes: 0
Liked 22 Times
in
18 Posts
Anodizing
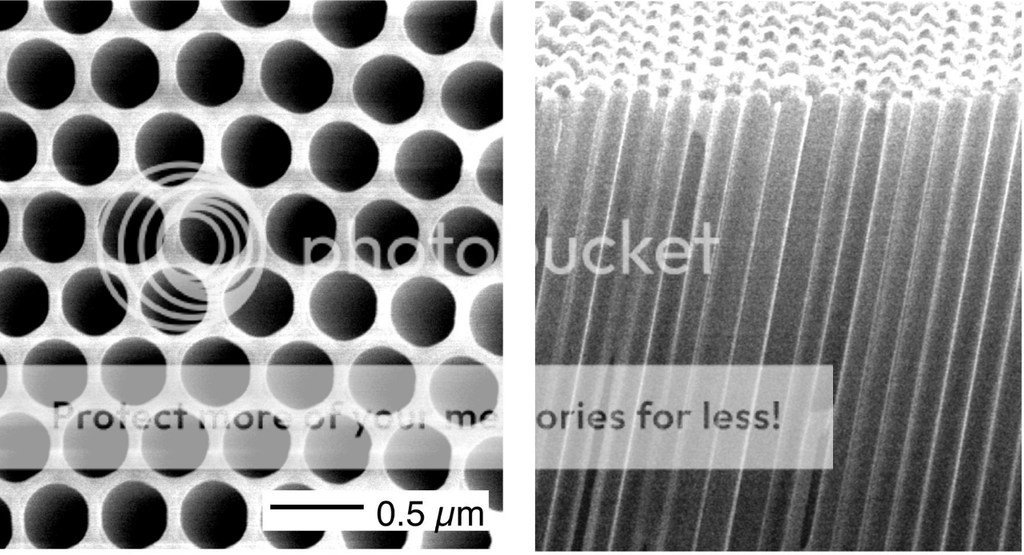
Almost all modern alloy parts are anodized. This is a process in which the surface is artificially oxidized. The oxide, alumina or Al2O3, grows in a honeycomb structure which forms tubes a few hundred nanometers across. This electron microscope image of anodizing was made by a former colleague of mine:
In practical terms, anodizing is fairly straight-forward, the trick is to polish the metal to a mirror shine and clean it meticulously. Normally sulphuric acid is used but I anodized the brake lever in sodium bisulphate (NaHSO4) because it's safer and I happened to have some:
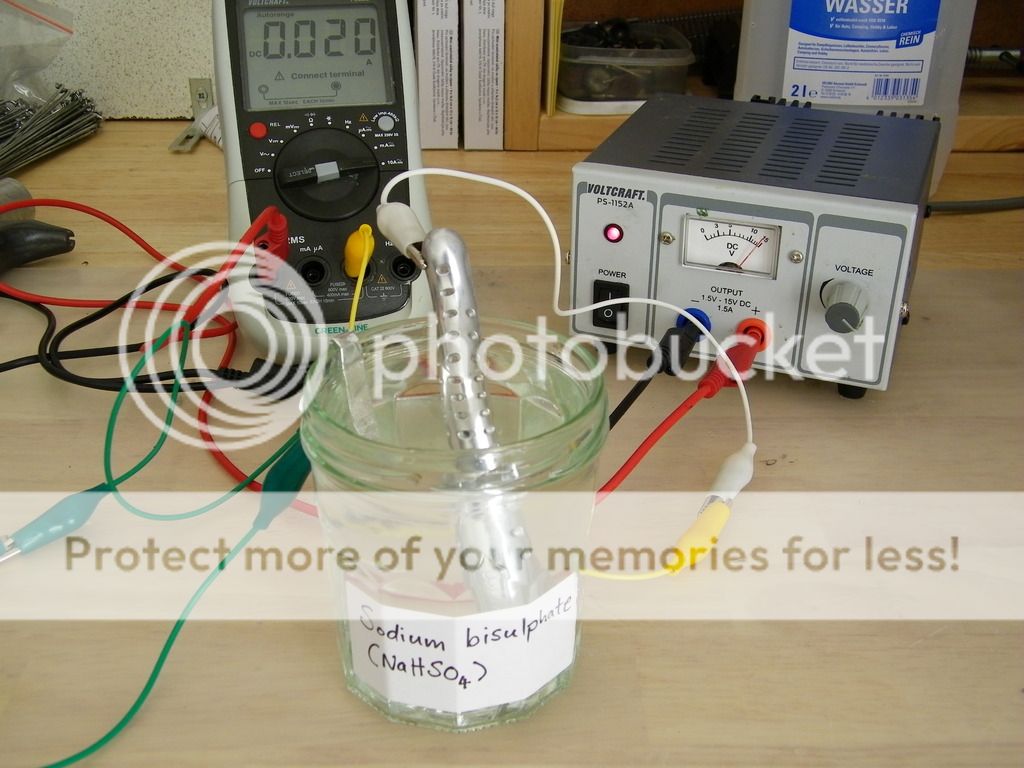
The lever was then boiled in distilled water for 30 minutes to seal the pores. Here is the finished article:
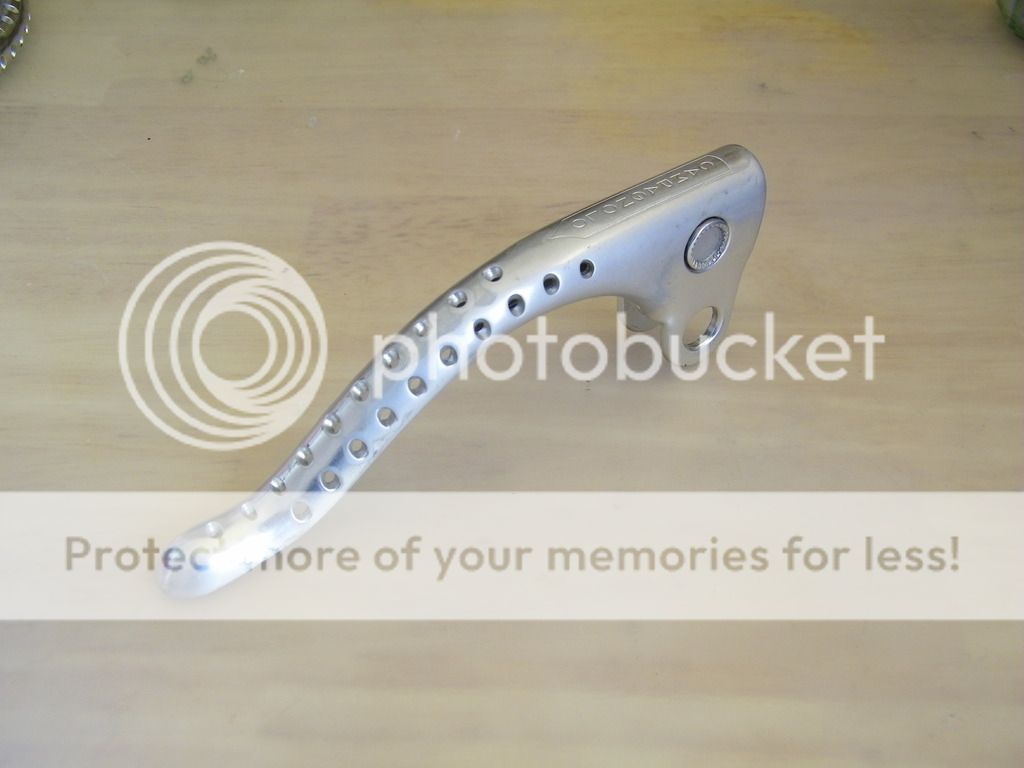
The surface is slightly different from the Campagnolo original: mine is a more satin finish as opposed to shiny. Campy is famous for the quality of its anodizing and possibly further chemically polished the alloy surface for that extra shine.
Anyway, you won't notice the difference at 30 mph.
In practical terms, anodizing is fairly straight-forward, the trick is to polish the metal to a mirror shine and clean it meticulously. Normally sulphuric acid is used but I anodized the brake lever in sodium bisulphate (NaHSO4) because it's safer and I happened to have some:
The lever was then boiled in distilled water for 30 minutes to seal the pores. Here is the finished article:
The surface is slightly different from the Campagnolo original: mine is a more satin finish as opposed to shiny. Campy is famous for the quality of its anodizing and possibly further chemically polished the alloy surface for that extra shine.
Anyway, you won't notice the difference at 30 mph.

