


Noob advice on 80's Shogun 300 resto
 10-30-16, 10:08 PM
#1
Junior Member
Thread Starter
Join Date: Oct 2016
Posts: 19
Mentioned: 0 Post(s)
Tagged: 0 Thread(s)
Quoted: 11 Post(s)
Likes: 0
Liked 0 Times
in
0 Posts
Noob advice on 80's Shogun 300 resto
Sup dudes,
First time poster, so please go easy.
I found a pretty decent Shogun 300 on my ride home tonight. The frame is CroMo and is in decent shape. Everything else needs replaced (or at least I want to replace it). Is this a foolish endeavor? I'm looking for a bike I wouldn't mind beating up, so don't want to drop a ton of coin on it.
The gears system is pretty shot, so I was thinking about putting a single speed wheel+crank on it. Is that reasonable to do? Will I end up in a spacer nightmare trying to compensate for the missing gears between the dropouts? Any advice appreciated. I would also appreciate crank/wheel brand recommendations.
The fork bearing races are pretty rusty too. The bearings feel "ok" but I see a ton of surface rust. I assume swapping them for new ones is a must. Anything I don't know here? Like Shoguns having some exotic size races?
Also, I live in a weird seasonal town in NJ. The closest LBS is like a 2 hour bus ride (no car). So I'm assuming I'll be sourcing most of the parts/tools online.
Thanks in advance,
Mac
 10-31-16, 04:31 AM
#3

Forum Moderator

Join Date: Jul 2007
Location: Kalamazoo MI
Posts: 20,652
Bikes: Fuji SL2.1 Carbon Di2 Cannondale Synapse Alloy 4 Trek Checkpoint ALR-5 Viscount Aerospace Pro Colnago Classic Rabobank Schwinn Waterford PMount Raleigh C50 Cromoly Hybrid Legnano Tipo Roma Pista
Mentioned: 59 Post(s)
Tagged: 0 Thread(s)
Quoted: 3093 Post(s)
Liked 6,608 Times
in
3,787 Posts
Thread moved from Mechanics to Classic & Vintage with 3 day forwarding.
10-31-16, 05:17 AM
#4

Old fart

Join Date: Nov 2004
Location: Appleton WI
Posts: 24,792
Bikes: Several, mostly not name brands.
Mentioned: 153 Post(s)
Tagged: 0 Thread(s)
Quoted: 3591 Post(s)
Liked 3,401 Times
in
1,935 Posts
I found a pretty decent Shogun 300 on my ride home tonight. The frame is CroMo and is in decent shape. [�] The gears system is pretty shot, so I was thinking about putting a single speed wheel+crank on it. Is that reasonable to do? Will I end up in a spacer nightmare trying to compensate for the missing gears between the dropouts? Any advice appreciated. I would also appreciate crank/wheel brand recommendations.
The fork bearing races are pretty rusty too. The bearings feel "ok" but I see a ton of surface rust. I assume swapping them for new ones is a must. Anything I don't know here? Like Shoguns having some exotic size races?
10-31-16, 10:18 AM
#5
Junior Member
Thread Starter
Join Date: Oct 2016
Posts: 19
Mentioned: 0 Post(s)
Tagged: 0 Thread(s)
Quoted: 11 Post(s)
Likes: 0
Liked 0 Times
in
0 Posts
Awesome, thanks.
The wheels aren't spinning freely. Not sure if they're bound up at the brakes or the bearings are shot yet. I also have to get the rusty chain off to check out the crank.
The wheels aren't spinning freely. Not sure if they're bound up at the brakes or the bearings are shot yet. I also have to get the rusty chain off to check out the crank.
10-31-16, 11:59 AM
#6
Senior Member

Join Date: May 2015
Location: Richmond VA area
Posts: 2,618
Bikes: '00 Koga Miyata Full Pro Oval Road bike.
Mentioned: 17 Post(s)
Tagged: 0 Thread(s)
Quoted: 475 Post(s)
Likes: 0
Liked 8 Times
in
7 Posts
The frame fits you, right? That's very important. As far as the wheels you'll obviously have to remove them and spin the axles to see what's up. And as the other poster mentioned, if you're just trying to get this thing rideable and want a SS, the easiest way is to pick a rear cog and permanently set the derailleur to it.
Btw you can find a ton of used parts on CL, which is where I've located most of my parts and frames for my builds. eBay too.
Btw you can find a ton of used parts on CL, which is where I've located most of my parts and frames for my builds. eBay too.
10-31-16, 12:27 PM
#7
Junior Member
Thread Starter
Join Date: Oct 2016
Posts: 19
Mentioned: 0 Post(s)
Tagged: 0 Thread(s)
Quoted: 11 Post(s)
Likes: 0
Liked 0 Times
in
0 Posts
The frame fits you, right? That's very important. As far as the wheels you'll obviously have to remove them and spin the axles to see what's up. And as the other poster mentioned, if you're just trying to get this thing rideable and want a SS, the easiest way is to pick a rear cog and permanently set the derailleur to it.
Btw you can find a ton of used parts on CL, which is where I've located most of my parts and frames for my builds. eBay too.
Btw you can find a ton of used parts on CL, which is where I've located most of my parts and frames for my builds. eBay too.
I pulled the chain off and loosened the brakes. The good news is that the wheels spin pretty freely with no play. Not like new, but good enough to cruise. Pretty straight to the eye too. They're ugly though.
The crank doesn't look so hot. It drags a bit right now, so I assume the bearings are boogered. Maybe I can clean it up, but I'm not sure until I get it out. I also notice that the "chain guard"* has a significant bend in it. (Not sure if that's called the "chain guard". It's the disc on the outside of the crank next to the largest gear. Picture attached.) I assume it's damage. Not sure if I could straighten it out without clobbering the gears. Thoughts on this?
The rear derailleur looks better than I thought. It functions smoothly, so I think a clean might be good enough to save it. Not sure if I want to go geared or SS yet though. I have no need for gears since my town is dead flat. I guess it will depend on the cost of replacing the crank (if this one isn't salvageable). Opinions welcomed.
10-31-16, 12:41 PM
#8
Junior Member
Thread Starter
Join Date: Oct 2016
Posts: 19
Mentioned: 0 Post(s)
Tagged: 0 Thread(s)
Quoted: 11 Post(s)
Likes: 0
Liked 0 Times
in
0 Posts
In the picture of the crank I just posted, you'll see a large slotted screw head that appears to be holding the crank arms on the axel (or maybe it's a dust cover). Is there a special tool to remove that? Or just a large screw driver? I'd hate to strip it.
10-31-16, 01:23 PM
#9
Senior Member

Join Date: Jul 2009
Location: Boston, MA
Posts: 1,541
Bikes: Bianchi Volpe, ANT 3-speed roadster, New Albion Privateer singlespeed, Raleigh One Way singlespeed, Raleigh Professional "retro roadie" rebuild, 198? Fuji(?) franken-5-speed, 1937 Raleigh Tourist, 1952 Raleigh Sports, 1966 Raleigh Sports step-through
Mentioned: 21 Post(s)
Tagged: 0 Thread(s)
Quoted: 248 Post(s)
Liked 27 Times
in
18 Posts
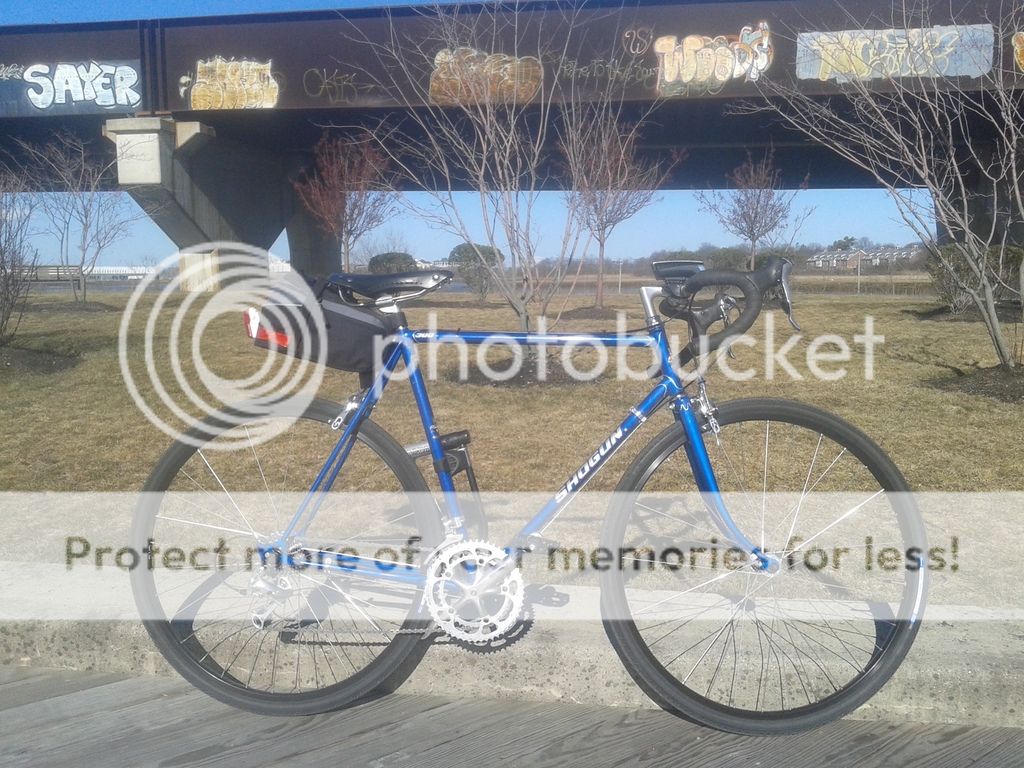
My Shogun 300:

 10-31-16, 01:45 PM
#11
Pedal to the medal
10-31-16, 01:46 PM
#12
Senior Member
Join Date: May 2015
Location: Richmond VA area
Posts: 2,618
Bikes: '00 Koga Miyata Full Pro Oval Road bike.
Mentioned: 17 Post(s)
Tagged: 0 Thread(s)
Quoted: 475 Post(s)
Likes: 0
Liked 8 Times
in
7 Posts
You can find a lot of tutorials on pulling a crank arm but to answer your question, that slotted piece is a dust cover as you guessed. You remove it with a screwdriver, and underneath you'll see the actual bolt holding the arm on. You have to remove the bolt first, then use a crank arm puller tool, which threads into the same threads as the cover. It pulls the arm off by pushing against the axle. You'll definitely need to buy or borrow that tool, as you'd never get the arms off without it, they're pressure fit onto the axle. It's not an expensive tool though, you can find Chinese versions for around $10-15 on eBay I'm pretty sure.
And yeah the frame sounds like it will fit you fine.
And yeah the frame sounds like it will fit you fine.
10-31-16, 02:59 PM
#13
Junior Member
Thread Starter
Join Date: Oct 2016
Posts: 19
Mentioned: 0 Post(s)
Tagged: 0 Thread(s)
Quoted: 11 Post(s)
Likes: 0
Liked 0 Times
in
0 Posts
10-31-16, 03:02 PM
#14
Junior Member
Thread Starter
Join Date: Oct 2016
Posts: 19
Mentioned: 0 Post(s)
Tagged: 0 Thread(s)
Quoted: 11 Post(s)
Likes: 0
Liked 0 Times
in
0 Posts
You can find a lot of tutorials on pulling a crank arm but to answer your question, that slotted piece is a dust cover as you guessed. You remove it with a screwdriver, and underneath you'll see the actual bolt holding the arm on. You have to remove the bolt first, then use a crank arm puller tool, which threads into the same threads as the cover. It pulls the arm off by pushing against the axle. You'll definitely need to buy or borrow that tool, as you'd never get the arms off without it, they're pressure fit onto the axle. It's not an expensive tool though, you can find Chinese versions for around $10-15 on eBay I'm pretty sure.
And yeah the frame sounds like it will fit you fine.
And yeah the frame sounds like it will fit you fine.
I'm pretty familiar with pullers for press fit pieces. I have a ton of experience restoring vintage motorbikes. First time bicycle refurb though. So I'll probably butcher the terminology.
 10-31-16, 03:36 PM
#15
Senior Member
Join Date: Jul 2009
Location: Boston, MA
Posts: 1,541
Bikes: Bianchi Volpe, ANT 3-speed roadster, New Albion Privateer singlespeed, Raleigh One Way singlespeed, Raleigh Professional "retro roadie" rebuild, 198? Fuji(?) franken-5-speed, 1937 Raleigh Tourist, 1952 Raleigh Sports, 1966 Raleigh Sports step-through
Mentioned: 21 Post(s)
Tagged: 0 Thread(s)
Quoted: 248 Post(s)
Liked 27 Times
in
18 Posts
Nothing is stock except the frame, fork, and the clamp-on cable stop on the chainstay. The wheels are 700C Sun CR18 rims laced to unbranded Formula hubs, with Panaracer Pasela PT 35mm tires. The brake/shift levers, derailleurs, and crank are all Shimano Ultegra (6500 9-speed), and the crank has RaceFace 53/39 rings on it. Pedals are Wellgo pinned BMX platforms. Brake calipers are Tektro R559s. Headset is a fairly standard Tange one that I don't remember the exact model of. Handlebar is a generic Dimension compact drop bar, and stem is from Origin8. Current seatpost and saddle (not pictured) are a Campagnolo 2-bolt post and a 1961 Brooks B17 Competition Standard (predecessor to the Professional), both from my grandfather's boxes of parts that'd been lying unused for years.
10-31-16, 03:49 PM
#16
Junior Member
Thread Starter
Join Date: Oct 2016
Posts: 19
Mentioned: 0 Post(s)
Tagged: 0 Thread(s)
Quoted: 11 Post(s)
Likes: 0
Liked 0 Times
in
0 Posts
Great info. Thanks a ton.
Spent the day stripping mine down and it looks ok. A few more rusty scrapes than I'd like, but I'm going to continue unless I find something major. I know it's blasphemy, but I do have a commercial grade paint sprayer I could lay down 2 component paint with. Might go that route if I can't contain the rust.
Hopefully I'll have some progress to report when the crank tools come. Thanks again, guys.
10-31-16, 04:00 PM
#17
Senior Member
Join Date: May 2015
Location: Richmond VA area
Posts: 2,618
Bikes: '00 Koga Miyata Full Pro Oval Road bike.
Mentioned: 17 Post(s)
Tagged: 0 Thread(s)
Quoted: 475 Post(s)
Likes: 0
Liked 8 Times
in
7 Posts
Great info. Thanks a ton.
Spent the day stripping mine down and it looks ok. A few more rusty scrapes than I'd like, but I'm going to continue unless I find something major. I know it's blasphemy, but I do have a commercial grade paint sprayer I could lay down 2 component paint with. Might go that route if I can't contain the rust.
Hopefully I'll have some progress to report when the crank tools come. Thanks again, guys.
Spent the day stripping mine down and it looks ok. A few more rusty scrapes than I'd like, but I'm going to continue unless I find something major. I know it's blasphemy, but I do have a commercial grade paint sprayer I could lay down 2 component paint with. Might go that route if I can't contain the rust.
Hopefully I'll have some progress to report when the crank tools come. Thanks again, guys.
A couple things; when you disassemble the bike dont go too crazy taking everything down to it's individual pieces. You probably already know better, but I say that because I regularily see people on CL selling bikes they've disassembled and were gonna restore. Except they diassembled each individual component as well - brakes and deralleurs completely diassembled, for instance. Then they realize putting it all back together would be a task even for a pro mechanic, lol. And now it's all for sale cheap.
The other thing is sure, go ahead and paint the bike if you like. Lot's of people have done home jobs - I'd do it myself if need be. It's not sacrilege at all. Just do the prep work like anything else. Or, if you're not really concerned just do it quick and easy. It just depends on what your goals are for the bike.

Last edited by exmechanic89; 10-31-16 at 04:05 PM.
10-31-16, 04:32 PM
#18
Junior Member
Thread Starter
Join Date: Oct 2016
Posts: 19
Mentioned: 0 Post(s)
Tagged: 0 Thread(s)
Quoted: 11 Post(s)
Likes: 0
Liked 0 Times
in
0 Posts
I dont think you'll have any problem, right terminology or not. It sounds like you're pretty mechanically skilled and along with the many tutorials online and this forum you should be fine.
A couple things; when you disassemble the bike dont go too crazy taking everything down to it's individual pieces. You probably already know better, but I say that because I regularily see people on CL selling bikes they've disassembled and were gonna restore. Except they diassembled each individual component as well - brakes and deralleurs completely diassembled, for instance. Then they realize putting it all back together would be a task even for a pro mechanic, lol. And now it's all for sale cheap.
The other thing is sure, go ahead and paint the bike if you like. Lot's of people have done home jobs - I'd do it myself if need be. It's not sacrilege at all. Just do the prep work like anything else. Or, if you're not really concerned just do it quick and easy. It just depends on what your goals are for the bike.
I've also been photographing the bits as I disassemble. That way I know the washer positions and such.
Speaking of, what do you guys do for torque values? Do the individual bikes have manuals or do you go by the nut size? I mainly work on Vespas and Lambretras. They have pretty specific torque guides, but that's only two manufacturers.
10-31-16, 04:55 PM
#19
Senior Member
Join Date: Mar 2013
Location: Maryland
Posts: 3,801
Bikes: Lots of English 3-speeds, a couple of old road bikes, 3 mountain bikes, 1 hybrid, and a couple of mash-ups
Mentioned: 53 Post(s)
Tagged: 0 Thread(s)
Quoted: 887 Post(s)
Liked 335 Times
in
225 Posts
I don't recall torque specs from that time frame. You sound as if you already know how to not eff it up.
Once the crank arms are installed, check them for tightness after the first few rides.
Once the crank arms are installed, check them for tightness after the first few rides.
10-31-16, 05:07 PM
#20
Senior Member
Join Date: Oct 2005
Location: Upper Left, USA
Posts: 1,915
Mentioned: 50 Post(s)
Tagged: 0 Thread(s)
Quoted: 634 Post(s)
Liked 444 Times
in
298 Posts
Most people don't worry about torque spec. You start to get a feel for what it needs. Is this the best way to do it? Maybe not, but a lot of your standard metal parts will be ok with just going by your internal torque wrench. The exception would be newer carbon parts. Some newer cranksets have torque specs written on them. Thomson stems need care with their faceplate bolts not to crack the faceplate (or used to at least). But, you won't be using any of those parts on this build.
10-31-16, 05:31 PM
#21
Senior Member
Join Date: May 2015
Location: Richmond VA area
Posts: 2,618
Bikes: '00 Koga Miyata Full Pro Oval Road bike.
Mentioned: 17 Post(s)
Tagged: 0 Thread(s)
Quoted: 475 Post(s)
Likes: 0
Liked 8 Times
in
7 Posts
Yep, totally agree with the last 2 posts. You can prolly look up the torque values but most people go by feel. As was pointed out it's not super important to get an exact value on most parts, unless talking carbon or titanium.
Keep us updated as your project moves along. I built up an '83 Univega Sportour last summer from a bare frame I got from 3speedslow here on the forums, and I've already put a couple of thousand miles on it. I also built an early 90's Stumpjumper mountain bike from a frame I got on CL which I also ride quite a bit. Lot's of satisfaction from doing your own work if you end up with something you ride a lot.
Keep us updated as your project moves along. I built up an '83 Univega Sportour last summer from a bare frame I got from 3speedslow here on the forums, and I've already put a couple of thousand miles on it. I also built an early 90's Stumpjumper mountain bike from a frame I got on CL which I also ride quite a bit. Lot's of satisfaction from doing your own work if you end up with something you ride a lot.
11-03-16, 11:58 PM
#22
Junior Member
Thread Starter
Join Date: Oct 2016
Posts: 19
Mentioned: 0 Post(s)
Tagged: 0 Thread(s)
Quoted: 11 Post(s)
Likes: 0
Liked 0 Times
in
0 Posts
I'd like to replace the ball bearings in the bottom bracket. They're probably fine, but there is light pitting on them and they're cheap. Does anyone know the size? I don't have digital calipers to figure it out.
Besides that, the tear down is complete. Ordered some bits and will reassemble next week.
Besides that, the tear down is complete. Ordered some bits and will reassemble next week.
11-04-16, 03:18 AM
#23
Senior Member
Join Date: Nov 2005
Location: NW Ohio
Posts: 3,423
Bikes: 1984 Miyata 310, 1986 Schwinn Sierra, 2011 Jamis Quest, 1980 Peugeot TH8 Tandem, 1992 Performance Parabola, 1987 Ross Mt. Hood, 1988 Schwinn LeTour, 1988 Trek 400T, 1981 Fuji S12-S LTD, 197? FW Evans
Mentioned: 24 Post(s)
Tagged: 0 Thread(s)
Quoted: 533 Post(s)
Liked 1,009 Times
in
517 Posts
Park Tools site has a list of torque values for most common stuff. I printed it out and refer to it often.
11-04-16, 07:00 AM
#24
Senior Member
Join Date: May 2015
Location: Richmond VA area
Posts: 2,618
Bikes: '00 Koga Miyata Full Pro Oval Road bike.
Mentioned: 17 Post(s)
Tagged: 0 Thread(s)
Quoted: 475 Post(s)
Likes: 0
Liked 8 Times
in
7 Posts
I'd like to replace the ball bearings in the bottom bracket. They're probably fine, but there is light pitting on them and they're cheap. Does anyone know the size? I don't have digital calipers to figure it out.
Besides that, the tear down is complete. Ordered some bits and will reassemble next week.
Besides that, the tear down is complete. Ordered some bits and will reassemble next week.
11-04-16, 07:30 AM
#25
Still learning

I'd like to replace the ball bearings in the bottom bracket. They're probably fine, but there is light pitting on them and they're cheap. Does anyone know the size? I don't have digital calipers to figure it out.
Besides that, the tear down is complete. Ordered some bits and will reassemble next week.
Besides that, the tear down is complete. Ordered some bits and will reassemble next week.