


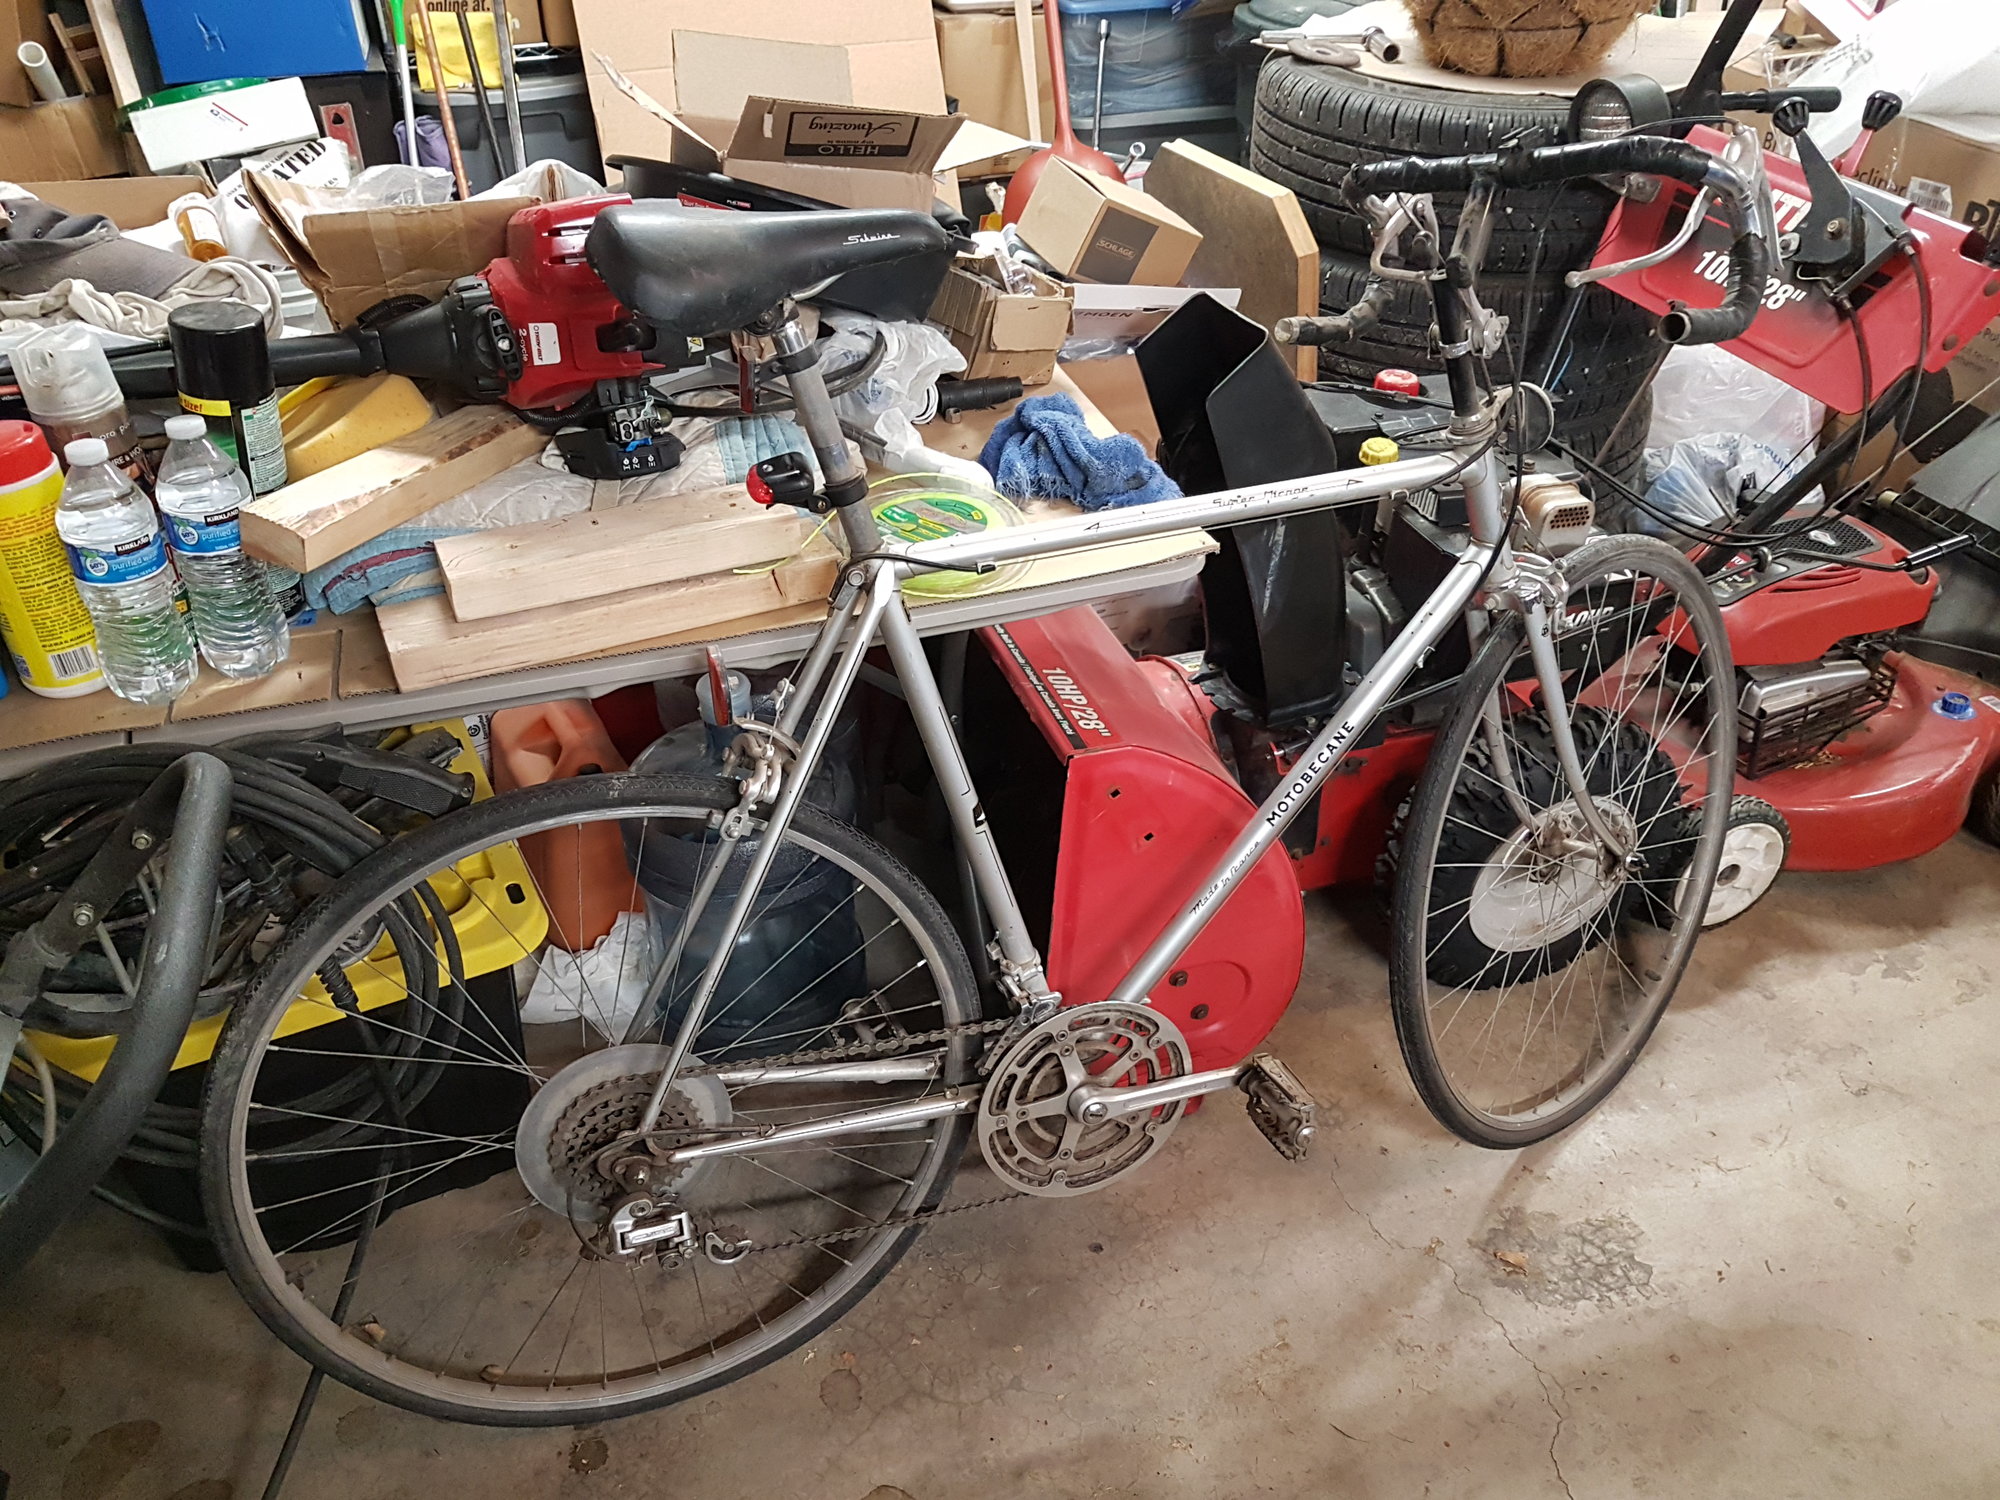
1976 Motobecane Super Mirage
 01-02-19, 01:49 PM
#1
Junior Member
Thread Starter

Join Date: Dec 2018
Posts: 119
Mentioned: 4 Post(s)
Tagged: 0 Thread(s)
Quoted: 74 Post(s)
Likes: 0
Liked 72 Times
in
21 Posts
1976 Motobecane Super Mirage
Hello everyone,
You may have seen my other thread expressing interest in finding an old road bike to build up and ride around. Recently my uncle let me know he had I could have sitting in his shed. From what I can gather it appears to be from 1976 as that was the first year of the Super Mirage and they switched from 1020 to 2040 tubing in 1977.
The original spec sheet is as follows:
Weight-27 LBS
Frame Size-19.5, 21, 23, 25
Tubing-Fully Lugged, 1020 light steel tubing
Lugs-BOCAMA Luxe
Fork-MOTOBECANE deluxe tubular with chrome plated crown and ends
Headset-MOTOBECANE
Handlebars-MOTOBECANE Randonneur bend
Stem-S.R. alloy with recessed bolt
Brakes-Weinmann 999 center pull, quick release extension levers
Derailleur-Sun Tour V.G.T Luxe with stem power shirters
Cluster-ATOM or MAEDA 14-32 with Huret spoke protector
Chain-SEDIS
Crankset-TOURNEY Luxe, alloy cotterless with alloy guard
Pedals-ATOM 440 alloy with reflectors
Wheels-WEINMANN alloy rims, MICHELIN high pressure tires
Hubs-NORMANDY alloy with quick release
Saddle-Racing padded black
Standard Equipment-Reflectors C.P.S.C. approved
Color-Silver blue, Flame red and silver
Unfortunately, my uncle was quite tall, and the headset and seatpost were swapped out for very tall steel ones.All of the cables and housing is old and in rough shape. Here is my to-do list so far:
-Clean everything up
-New seat and seatpost (the old one was removed easily, but is much too longer, and will not fit very far down into the frame)
-New stem and possibly handlebars
-Wrap handlebars
-All new cables
-New cable housing
-Service bottom bracket
-Tighten/true existing 27" wheels - the front wheel spokes feel very loose
-New tires (probably some tan wall Paselas)
-New Chain
I am completely new to all of this and have a few questions:
What work should I attempt myself, and what should I leave to the local bike shop?
Which parts on the list of standard components are poor quality compared to modern standards and should be swapped out for the greatest benefit without compromising the vintage nature of the bike?
I believe the stem on these older French bikes is 22mm rather than the standard 22.2mm. Any recommendations for a replacement?
The inside seatpost tube diameter measures 26mm on my dial caliper - are there any good light-weight replacements? I love the look of the fluted ones.
Do I need any special tools for any of the restoration work, or can I get by with the metric hex wrenches and sockets?
Should the cable housing be 5mm OD for the brakes and derailleurs?
I'll probably think of more questions as my first build progresses, but this should get me started.
Thank you very much for all your time and help, and to Mountaindave for his assistance in my other thread.
I'll keep this one updated as this project progresses.
 01-02-19, 02:16 PM
#2

Mr. Anachronism
Join Date: Jan 2013
Location: Somewhere west of Tobie's
Posts: 2,087
Bikes: fillet-brazed Chicago Schwinns, and some other stuff
Mentioned: 29 Post(s)
Tagged: 0 Thread(s)
Quoted: 526 Post(s)
Liked 256 Times
in
165 Posts
I remember your post, and I think you've acquired a great ol 'becane to work on. The original components are quite serviceable and dependable, provided they're not worn out. Consumables should all be replaced, per your list. You could cut the existing seat post down with a medium-sized tubing cutter, just remember to keep enough for proper insertion, and clean up the resulting lip with a file and/or emery cloth.
__________________
"My only true wisdom is in knowing I have none" -Socrates
"My only true wisdom is in knowing I have none" -Socrates
Last edited by Hudson308; 01-02-19 at 02:58 PM.
01-02-19, 02:28 PM
#3
se�or miembro

Join Date: Dec 2018
Location: Pac NW
Posts: 6,626
Bikes: '70s - '80s Campagnolo
Mentioned: 92 Post(s)
Tagged: 0 Thread(s)
Quoted: 3888 Post(s)
Liked 6,484 Times
in
3,208 Posts
What work should I attempt myself, and what should I leave to the local bike shop?
01-02-19, 04:45 PM
#4
Senior Member
Join Date: Jul 2004
Location: northern michigan
Posts: 13,317
Bikes: '77 Colnago Super, '76 Fuji The Finest, '88 Cannondale Criterium, '86 Trek 760, '87 Miyata 712
Mentioned: 19 Post(s)
Tagged: 0 Thread(s)
Quoted: 659 Post(s)
Liked 595 Times
in
313 Posts
Awesome classic bike! My entry to road biking was buying a ‘72 Mirage, weighed too much but very cool. About 7 years ago I bought a ‘79 Super Mirage and revived some memories. Enjoy the smoothness!
01-02-19, 05:59 PM
#5
Junior Member
Thread Starter
Join Date: Dec 2018
Posts: 119
Mentioned: 4 Post(s)
Tagged: 0 Thread(s)
Quoted: 74 Post(s)
Likes: 0
Liked 72 Times
in
21 Posts
What would be by best option for a replacement stem? Going on ebay and trying to locate an original Motobecane branded SR stem, or getting a new Nitto and attempting to reduce the outside diameter from 22.2 to 22mm? I'd prefer an era correct replacement if possible.
01-02-19, 06:08 PM
#6

feros ferio

Join Date: Jul 2000
Location: www.ci.encinitas.ca.us
Posts: 21,798
Bikes: 1959 Capo Modell Campagnolo; 1960 Capo Sieger (2); 1962 Carlton Franco Suisse; 1970 Peugeot UO-8; 1982 Bianchi Campione d'Italia; 1988 Schwinn Project KOM-10;
Mentioned: 44 Post(s)
Tagged: 0 Thread(s)
Quoted: 1393 Post(s)
Liked 1,325 Times
in
837 Posts
It is trivial to sand a 22.2mm stem to 22.0 -- been there ... done that a few times. As much as I like period-correct, I hate crashing due to failure of a metal fatigued vintage part even more.
__________________
"Far and away the best prize that life offers is the chance to work hard at work worth doing." --Theodore Roosevelt
Capo: 1959 Modell Campagnolo, S/N 40324; 1960 Sieger (2), S/N 42624, 42597
Carlton: 1962 Franco Suisse, S/N K7911
Peugeot: 1970 UO-8, S/N 0010468
Bianchi: 1982 Campione d'Italia, S/N 1.M9914
Schwinn: 1988 Project KOM-10, S/N F804069
01-02-19, 06:58 PM
#7
Senior Member
Join Date: Nov 2013
Location: Big Apple
Posts: 1,428
Bikes: yes
Mentioned: 17 Post(s)
Tagged: 0 Thread(s)
Quoted: 512 Post(s)
Likes: 0
Liked 409 Times
in
176 Posts
Before getting crazy about the stem, see if you can drop it down to fit you. It is definitely 22.0.
I bought a 76 Super Mirage at a garage sale about 40 years ago. Good, mid-range bike. Used it for everything from commuting to loaded touring. Tinkered the crap out of it over the years, before the frame got bent in a dooring incident. Got a 78 now, that I use as the errand schlepper.
One of the first things I'd consider doing is removing the so-called brake safety levers (if they're still on it). They regular levers will work fine with the pivot barrel extending out; If they bother you aesthetically, you can always replace the barrels, cut them down or just get levers (cheap used ones off eBay). I'd also replace the brake pads with Kool Stop Continental pads. If you're keeping the stem shifters, make sure you get the right cables; the cable heads are different. The derailleurs on it perform well, I'd leave them. Generally, I wouldn't get to crazy about replacing parts on a bike of this level. Just fix it up and ride it.
My 78

What I changed on it, was using some parts that were on the 76 and resting in the proverbial box of crap. The SR Laprade fluted seat post, the Suntour Bar Con shifters, Dia Compe side pull brakes and levers (I had to steal the centerpulls for another project). Got the Vetta seat for five bucks on eBay. Since it's just doing neighborhood errand duty, those are the cheapest Kenda tires I could find. The Blackburn racks, except for the add-ons were also used from the 76.
I bought a 76 Super Mirage at a garage sale about 40 years ago. Good, mid-range bike. Used it for everything from commuting to loaded touring. Tinkered the crap out of it over the years, before the frame got bent in a dooring incident. Got a 78 now, that I use as the errand schlepper.
One of the first things I'd consider doing is removing the so-called brake safety levers (if they're still on it). They regular levers will work fine with the pivot barrel extending out; If they bother you aesthetically, you can always replace the barrels, cut them down or just get levers (cheap used ones off eBay). I'd also replace the brake pads with Kool Stop Continental pads. If you're keeping the stem shifters, make sure you get the right cables; the cable heads are different. The derailleurs on it perform well, I'd leave them. Generally, I wouldn't get to crazy about replacing parts on a bike of this level. Just fix it up and ride it.
My 78
What I changed on it, was using some parts that were on the 76 and resting in the proverbial box of crap. The SR Laprade fluted seat post, the Suntour Bar Con shifters, Dia Compe side pull brakes and levers (I had to steal the centerpulls for another project). Got the Vetta seat for five bucks on eBay. Since it's just doing neighborhood errand duty, those are the cheapest Kenda tires I could find. The Blackburn racks, except for the add-ons were also used from the 76.
01-02-19, 07:59 PM
#8
Full Member
Join Date: Jul 2018
Location: Greenville, SC / Asheville, NC
Posts: 290
Bikes: '74 Raleigh Professional, '73 Raleigh Grand Prix, '84 Nishiki Medalist, '85 Gazelle Champion Mondial AB, '81 Peugeot Course, '79 Univega Gran Rally, '85 Torpado Super Strada
Mentioned: 4 Post(s)
Tagged: 0 Thread(s)
Quoted: 67 Post(s)
Likes: 0
Liked 10 Times
in
10 Posts
^This.
Just take your time and research how to do everything before starting, or learn from your mistakes like I continue to do. But, if you have the patience I advise the former.
Also, is the frame the correct size for you? As exciting as it is to build up/rehab a bike, nothing sucks more than to realize you put time and money into something that you can�t comfortably ride day-in day-out. Been there done that.
If you want/must get replacement period stuff, eBay is always an option. Just be sure to shop around and wait it out if stuff is grossly overpriced (it usually is).
Try to use any original components you can other than replacing consumables, if nothing else to keep initial cost down. Get the bike safe to ride and then decide what else, if anything you need to replace.
Post pics!
 01-03-19, 06:58 AM
#10
Full Member
Join Date: Jul 2018
Location: Greenville, SC / Asheville, NC
Posts: 290
Bikes: '74 Raleigh Professional, '73 Raleigh Grand Prix, '84 Nishiki Medalist, '85 Gazelle Champion Mondial AB, '81 Peugeot Course, '79 Univega Gran Rally, '85 Torpado Super Strada
Mentioned: 4 Post(s)
Tagged: 0 Thread(s)
Quoted: 67 Post(s)
Likes: 0
Liked 10 Times
in
10 Posts
That IS set up tall, crazy tall. Stem and seat post are definitely not original. It depends on your riding style and how YOU like the the bike set up, but a more period correct stem would be my choice. And chop or replace the seatpost. You can also find brand new vintage style posts with a little searching, if eBay isn�t helpful.
You asked about special tools. To regrease the wheel hubs and overhaul the bottom bracket, you�ll need a number of things. Crank puller, cone wrenches, freewheel remover tool, bottom bracket tool, basic wrench set, etc. etc. Do a little research to figure out exactly the size/type you need before buying.
Looking forward to seeing it fixed up, good luck!
Last edited by Raleigh74; 01-03-19 at 07:05 AM.
01-03-19, 08:37 AM
#11
Senior Member
Join Date: Feb 2018
Posts: 77
Bikes: 2019 Trek Emonda SLR7 Disc, 2017 Advocate Cycles Sand County, 2016 Surly Disc Trucker, 2011 Specialized Tarmac SL3 Expert Double, 1996 Sancineto, 1989 Cinelli Corsa "Mens Sana," 1985 Peugeot PGN-10 Galibier, 1974 Schwinn Paramount
Mentioned: 4 Post(s)
Tagged: 0 Thread(s)
Quoted: 26 Post(s)
Liked 45 Times
in
14 Posts
Do you have a local bicycle co-op? That provides a great mid-point between dropping it off at a shop (and learning nothing) and facing the task alone. The co-op where I volunteer adheres to a do-it-yourself (with assistance) attitude. Likely, they will have spare parts on hand for very cheap, the tools to do the work correctly, and you don't miss out on the knowledge!
01-03-19, 09:09 AM
#13
Senior Member
Join Date: Feb 2018
Posts: 77
Bikes: 2019 Trek Emonda SLR7 Disc, 2017 Advocate Cycles Sand County, 2016 Surly Disc Trucker, 2011 Specialized Tarmac SL3 Expert Double, 1996 Sancineto, 1989 Cinelli Corsa "Mens Sana," 1985 Peugeot PGN-10 Galibier, 1974 Schwinn Paramount
Mentioned: 4 Post(s)
Tagged: 0 Thread(s)
Quoted: 26 Post(s)
Liked 45 Times
in
14 Posts
A lot of it depends on where you're comfortable. I'm about 5'10", ride a 56cm frame, and I'm more comfortable on a 90mm stem or so (and with less slant). I might consider a 60mm stem if the frame was larger than what I should be on--something like a 58cm--and I'm looking to cheat the reach.
Also, brake cables take 5mm OD housing, shift cables take 4mm (to answer a question from your first post). The brake cables are slightly thicker to handle the increased stress.
Also, brake cables take 5mm OD housing, shift cables take 4mm (to answer a question from your first post). The brake cables are slightly thicker to handle the increased stress.
01-03-19, 09:53 AM
#14
Junior Member
Thread Starter
Join Date: Dec 2018
Posts: 119
Mentioned: 4 Post(s)
Tagged: 0 Thread(s)
Quoted: 74 Post(s)
Likes: 0
Liked 72 Times
in
21 Posts
Before getting crazy about the stem, see if you can drop it down to fit you. It is definitely 22.0.
I bought a 76 Super Mirage at a garage sale about 40 years ago. Good, mid-range bike. Used it for everything from commuting to loaded touring. Tinkered the crap out of it over the years, before the frame got bent in a dooring incident. Got a 78 now, that I use as the errand schlepper.
One of the first things I'd consider doing is removing the so-called brake safety levers (if they're still on it). They regular levers will work fine with the pivot barrel extending out; If they bother you aesthetically, you can always replace the barrels, cut them down or just get levers (cheap used ones off eBay). I'd also replace the brake pads with Kool Stop Continental pads. If you're keeping the stem shifters, make sure you get the right cables; the cable heads are different. The derailleurs on it perform well, I'd leave them. Generally, I wouldn't get to crazy about replacing parts on a bike of this level. Just fix it up and ride it.
My 78
What I changed on it, was using some parts that were on the 76 and resting in the proverbial box of crap. The SR Laprade fluted seat post, the Suntour Bar Con shifters, Dia Compe side pull brakes and levers (I had to steal the centerpulls for another project). Got the Vetta seat for five bucks on eBay. Since it's just doing neighborhood errand duty, those are the cheapest Kenda tires I could find. The Blackburn racks, except for the add-ons were also used from the 76.
01-03-19, 09:56 AM
#15
Junior Member
Thread Starter
Join Date: Dec 2018
Posts: 119
Mentioned: 4 Post(s)
Tagged: 0 Thread(s)
Quoted: 74 Post(s)
Likes: 0
Liked 72 Times
in
21 Posts
That IS set up tall, crazy tall. Stem and seat post are definitely not original. It depends on your riding style and how YOU like the the bike set up, but a more period correct stem would be my choice. And chop or replace the seatpost. You can also find brand new vintage style posts with a little searching, if eBay isn�t helpful.
You asked about special tools. To regrease the wheel hubs and overhaul the bottom bracket, you�ll need a number of things. Crank puller, cone wrenches, freewheel remover tool, bottom bracket tool, basic wrench set, etc. etc. Do a little research to figure out exactly the size/type you need before buying.
Looking forward to seeing it fixed up, good luck!
01-03-19, 09:58 AM
#16
Junior Member
Thread Starter
Join Date: Dec 2018
Posts: 119
Mentioned: 4 Post(s)
Tagged: 0 Thread(s)
Quoted: 74 Post(s)
Likes: 0
Liked 72 Times
in
21 Posts
Do you have a local bicycle co-op? That provides a great mid-point between dropping it off at a shop (and learning nothing) and facing the task alone. The co-op where I volunteer adheres to a do-it-yourself (with assistance) attitude. Likely, they will have spare parts on hand for very cheap, the tools to do the work correctly, and you don't miss out on the knowledge!
01-03-19, 09:59 AM
#17
Junior Member
Thread Starter
Join Date: Dec 2018
Posts: 119
Mentioned: 4 Post(s)
Tagged: 0 Thread(s)
Quoted: 74 Post(s)
Likes: 0
Liked 72 Times
in
21 Posts
A lot of it depends on where you're comfortable. I'm about 5'10", ride a 56cm frame, and I'm more comfortable on a 90mm stem or so (and with less slant). I might consider a 60mm stem if the frame was larger than what I should be on--something like a 58cm--and I'm looking to cheat the reach.
Also, brake cables take 5mm OD housing, shift cables take 4mm (to answer a question from your first post). The brake cables are slightly thicker to handle the increased stress.
Also, brake cables take 5mm OD housing, shift cables take 4mm (to answer a question from your first post). The brake cables are slightly thicker to handle the increased stress.
01-03-19, 10:29 AM
#18
Senior Member
Join Date: Nov 2013
Location: Big Apple
Posts: 1,428
Bikes: yes
Mentioned: 17 Post(s)
Tagged: 0 Thread(s)
Quoted: 512 Post(s)
Likes: 0
Liked 409 Times
in
176 Posts
As far as the handlebars go, brake levers generally can fit handlebars of different diameters, because the mounting bands compress as you tighten them.
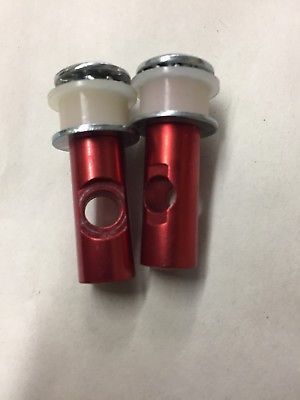
You obviously need a new stem and seatpost for that bike.
Non safety lever barrel
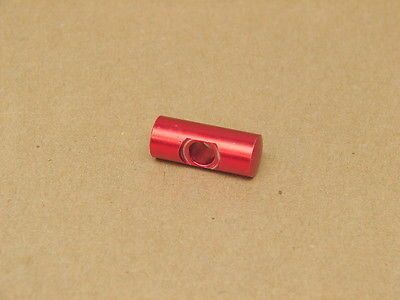
Safety lever barrel
 01-03-19, 10:59 AM
#19
Zip tie Karen
Join Date: Aug 2009
Location: Fair Oaks Ranch, TX
Posts: 7,004
Bikes: '13 Motobecane Fantom29 HT, '16 Motobecane Turino Pro Disc, '18 Velobuild VB-R-022, '21 Tsunami SNM-100
Mentioned: 26 Post(s)
Tagged: 0 Thread(s)
Quoted: 1465 Post(s)
Liked 1,542 Times
in
806 Posts
You can remove the safety levers, scribe a line on the barrel to show how much of the protruding end to remove, and then cut them with a dremel and cutting wheel, or a hacksaw (if you're careful and have a bench vise). Then touch up with a metal file. Purchase the Cane Creek replacement hoods to cover the lever body. Looks better that way and is more comfortable to boot.
01-03-19, 11:13 AM
#20
Bad example
Join Date: Nov 2015
Location: Seattle and Reims
Posts: 3,068
Bikes: Peugeot: AO-8 1973, PA-10 1971, PR-10 1973, Sante 1988; Masi Gran Criterium 1975, Stevenson Tourer 1980, Stevenson Criterium 1981, Schwinn Paramount 1972, Rodriguez 2006, Gitane Federal ~1975, Holdsworth Pro, Follis 172 ~1973, Bianchi '62
Mentioned: 36 Post(s)
Tagged: 0 Thread(s)
Quoted: 825 Post(s)
Liked 212 Times
in
96 Posts
Nice bike. I have an older Mirage (with steel rims) that is an enjoyable ride despite the wheels. I am sure the aluminum rims on your bike will improve things even more.
With respect to your seat post and stem, I suggest that you get a suitable seat post first, and set the seat at the right height and fore-aft placement. Then calculate what length of stem you will need for the bike to fit your torso. As for the seat post, make absolutely sure that the diameter is in fact 26 mm and hunt around on eBay for a nice used one, or on Amazon for a new one. I have used Kalloy posts on my French bikes, and they look a bit clunky but work well and can be found in unusual diameters. But they are not the only choice!
For the stem, measure that as well. The old French standard was 22 mm diameter, but the more modern standard is 22.2 mm. Motob�cane started using the modern standards sooner than the other French manufacturers, so your existing post might be 22.2, but in any case you need to check. It is pretty easy to sand down a modern post to fit (I have done it a few times) but it is possible to find a French post on eBay as well. Oh, and measure the bars as well where they fit inside the stem. French bars typically were 25 mm in diameter at the clamp, which is smaller than modern bars.
If you choose to remove the suicide levers, you can easily just hacksaw off the extension on the barrel. I have done that for several old Dia-Compe and Weinmann levers.
Finally, consider getting a set of Suntour Handlebar end shifters (aka Barcons). They are much nicer than stem shifters.
__________________
Keeping Seattle�s bike shops in business since 1978
Keeping Seattle�s bike shops in business since 1978
01-03-19, 12:59 PM
#21
Full Member
Join Date: Jul 2018
Location: Greenville, SC / Asheville, NC
Posts: 290
Bikes: '74 Raleigh Professional, '73 Raleigh Grand Prix, '84 Nishiki Medalist, '85 Gazelle Champion Mondial AB, '81 Peugeot Course, '79 Univega Gran Rally, '85 Torpado Super Strada
Mentioned: 4 Post(s)
Tagged: 0 Thread(s)
Quoted: 67 Post(s)
Likes: 0
Liked 10 Times
in
10 Posts
With respect to your seat post and stem, I suggest that you get a suitable seat post first, and set the seat at the right height and fore-aft placement. Then calculate what length of stem you will need for the bike to fit your torso. As for the seat post, make absolutely sure that the diameter is in fact 26 mm and hunt around on eBay for a nice used one, or on Amazon for a new one.
01-03-19, 04:04 PM
#23
Junior Member
Thread Starter
Join Date: Dec 2018
Posts: 119
Mentioned: 4 Post(s)
Tagged: 0 Thread(s)
Quoted: 74 Post(s)
Likes: 0
Liked 72 Times
in
21 Posts
I get even more confused since Sheldon Brown's sight lists it as 28mm for French bikes.
01-03-19, 05:39 PM
#24
Bad example
Join Date: Nov 2015
Location: Seattle and Reims
Posts: 3,068
Bikes: Peugeot: AO-8 1973, PA-10 1971, PR-10 1973, Sante 1988; Masi Gran Criterium 1975, Stevenson Tourer 1980, Stevenson Criterium 1981, Schwinn Paramount 1972, Rodriguez 2006, Gitane Federal ~1975, Holdsworth Pro, Follis 172 ~1973, Bianchi '62
Mentioned: 36 Post(s)
Tagged: 0 Thread(s)
Quoted: 825 Post(s)
Liked 212 Times
in
96 Posts
I took my measurement from the inside of the seatpost tube, not of the post itself. I'd imagine the post would have to be a slightly narrower diameter. I looked at the post that was in there and didn't see any markings other than max depth - I'll have to check again.
I get even more confused since Sheldon Brown's sight lists it as 28mm for French bikes.
I get even more confused since Sheldon Brown's sight lists it as 28mm for French bikes.
__________________
Keeping Seattle�s bike shops in business since 1978
Keeping Seattle�s bike shops in business since 1978
01-03-19, 08:05 PM
#25
se�or miembro
Join Date: Dec 2018
Location: Pac NW
Posts: 6,626
Bikes: '70s - '80s Campagnolo
Mentioned: 92 Post(s)
Tagged: 0 Thread(s)
Quoted: 3888 Post(s)
Liked 6,484 Times
in
3,208 Posts