


I felt brave. So I took the drill to my Cannondale ST
 03-15-19, 08:52 PM
#1

Rustbelt Rider
Thread Starter

Join Date: Oct 2008
Location: Canton, OH
Posts: 9,104
Bikes: 1990 Trek 1420 - 1978 Raleigh Professional - 1973 Schwinn Collegiate - 1974 Schwinn Suburban
Mentioned: 20 Post(s)
Tagged: 0 Thread(s)
Quoted: 261 Post(s)
Liked 372 Times
in
177 Posts
I felt brave. So I took the drill to my Cannondale ST
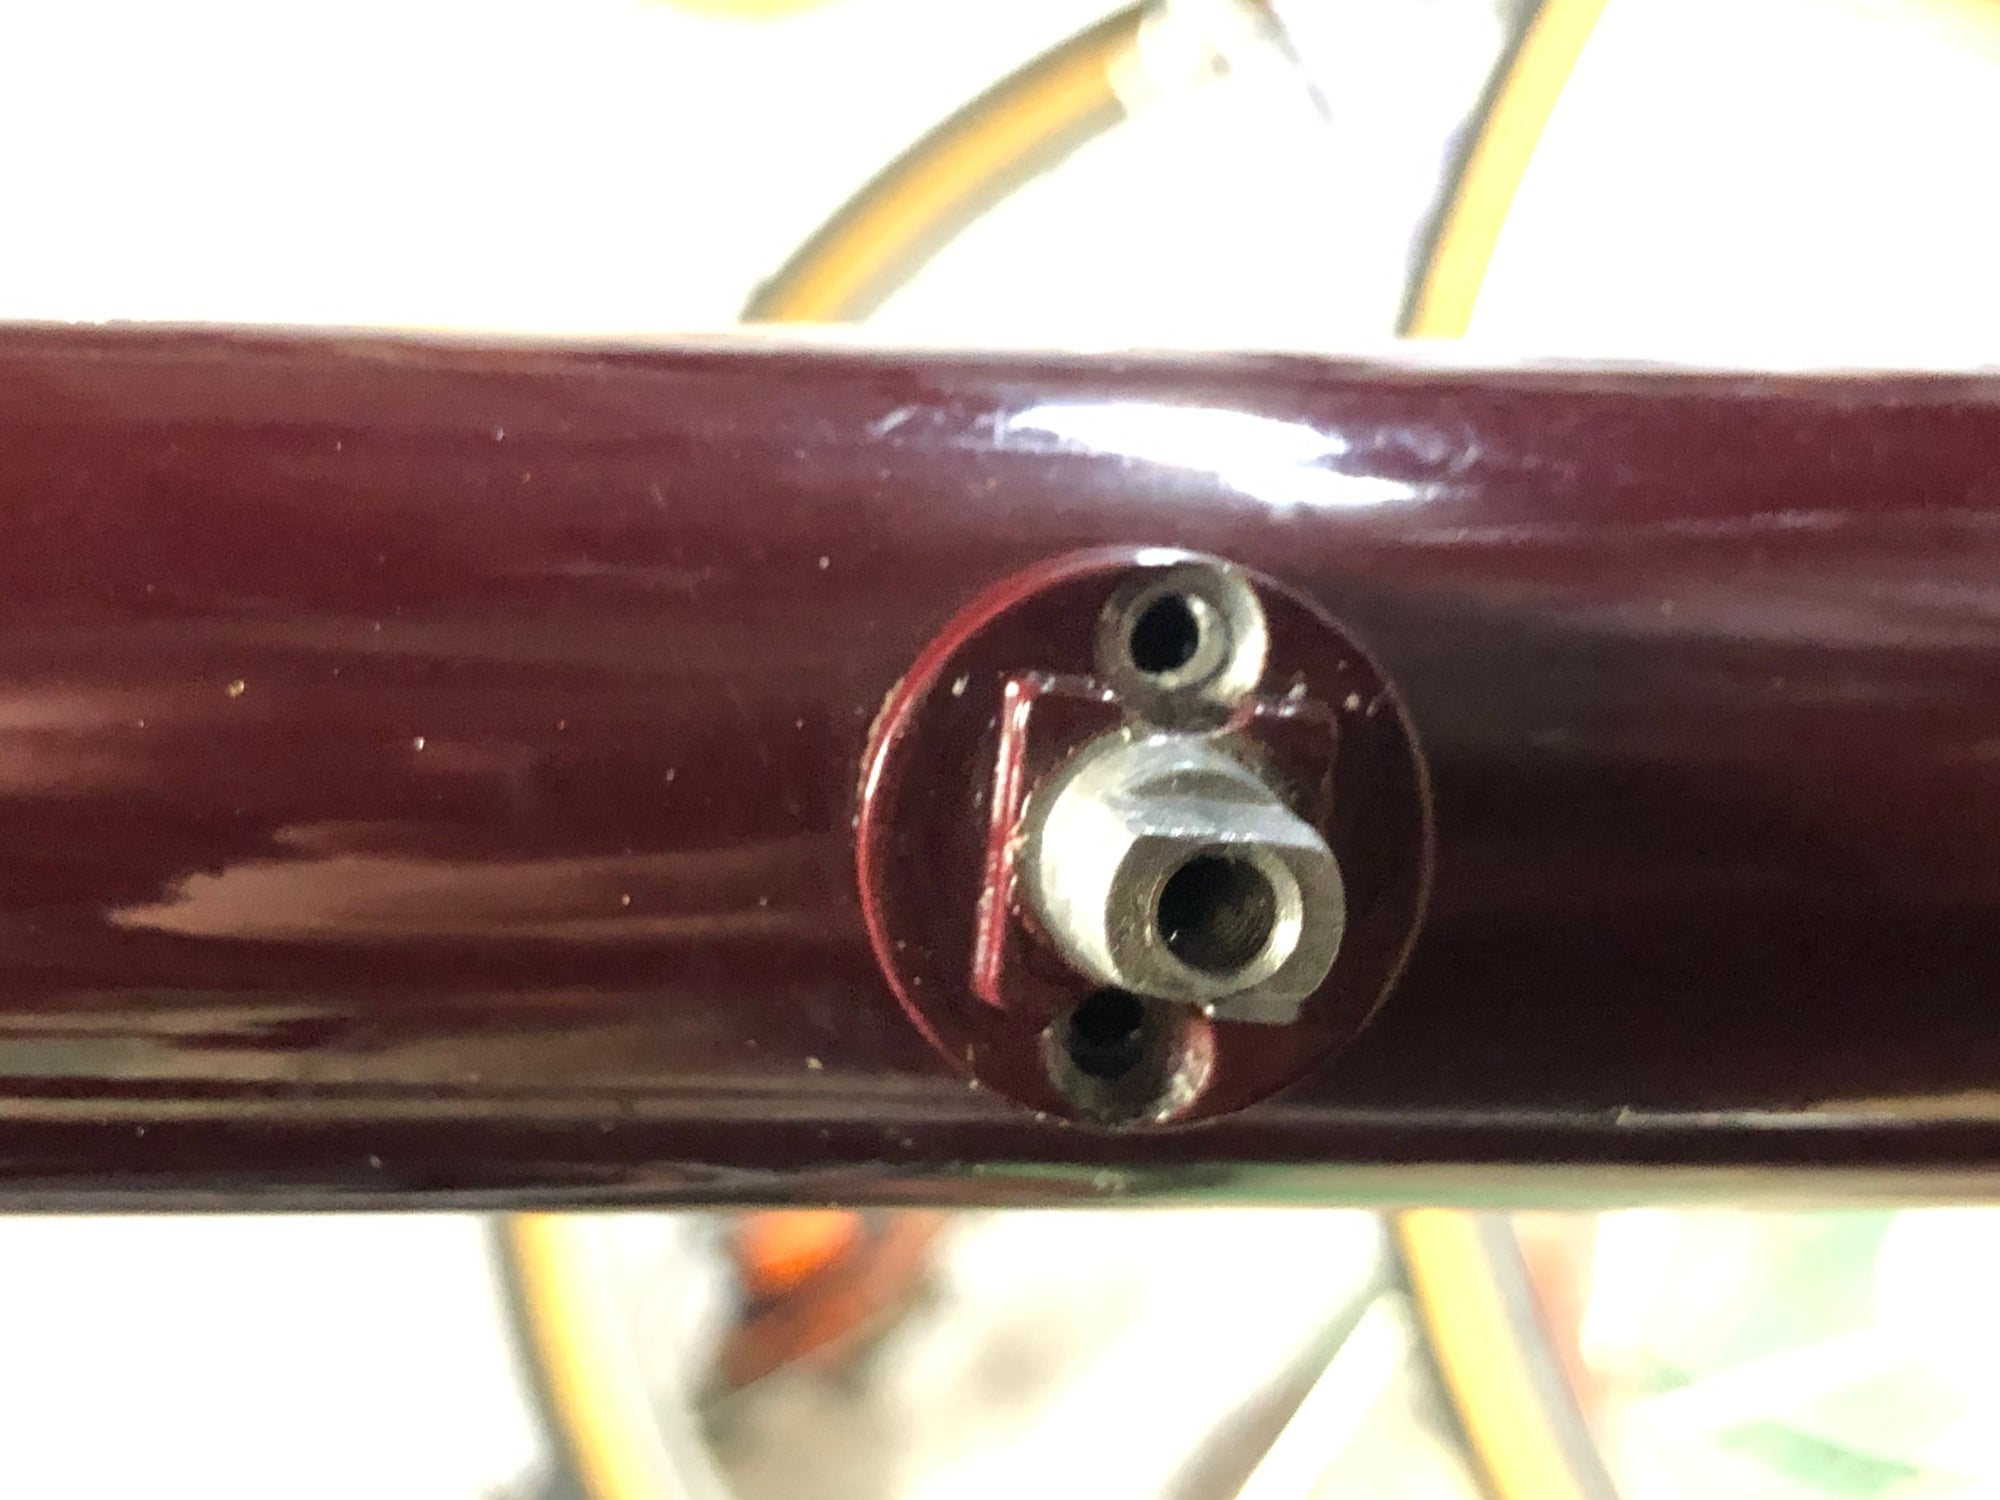


Some if you may have seen my 1983 Cannondale ST with a problematic shifter boss. The boss was riveted to the frame, and they had become loose. Against the advice of others, I drilled the rivets out tonight.
The good news: the frame material is in good shape and should be able to accept new rivets.
So... what do I do now?
 03-15-19, 08:59 PM
#2

www.theheadbadge.com

Join Date: Sep 2005
Location: Southern Florida
Posts: 28,513
Bikes: https://www.theheadbadge.com
Mentioned: 124 Post(s)
Tagged: 0 Thread(s)
Quoted: 2422 Post(s)
Liked 4,393 Times
in
2,092 Posts
Edited to note importance of epoxy as mentioned below.
Epoxy. Install new rivets. Reassemble. Ride.
-Kurt
Epoxy. Install new rivets. Reassemble. Ride.
-Kurt
__________________


Last edited by cudak888; 03-16-19 at 09:36 AM.
03-15-19, 09:04 PM
#3
Senior Member

Join Date: Jan 2015
Location: Los Angeles
Posts: 4,704
Bikes: 82 Medici, 2011 Richard Sachs, 2011 Milwaukee Road
Mentioned: 55 Post(s)
Tagged: 0 Thread(s)
Quoted: 1949 Post(s)
Liked 2,010 Times
in
1,109 Posts
My LBS, to be trusted, uses epoxy.
03-15-19, 09:13 PM
#4
www.theheadbadge.com
Join Date: Sep 2005
Location: Southern Florida
Posts: 28,513
Bikes: https://www.theheadbadge.com
Mentioned: 124 Post(s)
Tagged: 0 Thread(s)
Quoted: 2422 Post(s)
Liked 4,393 Times
in
2,092 Posts
03-15-19, 09:30 PM
#5
Senior Member
Join Date: Jun 2006
Posts: 20,305
Mentioned: 130 Post(s)
Tagged: 0 Thread(s)
Quoted: 3464 Post(s)
Liked 2,829 Times
in
1,995 Posts
I’m inclined to go two part adhesive and rivets... not hardware store rivets but something from Aircraft spruce and specialty.
03-15-19, 09:41 PM
#6
Senior Member

Join Date: Nov 2014
Location: Eugene, Oregon, USA
Posts: 27,547
Mentioned: 217 Post(s)
Tagged: 0 Thread(s)
Quoted: 18373 Post(s)
Liked 4,508 Times
in
3,351 Posts
You could probably use the epoxy as above, but back it up with a simple pair of pop rivets. I don't know how well it would recess though. Perhaps you could shape the rivet a bit before putting it in.
03-16-19, 05:35 AM
#7
Hump, what hump?

Join Date: Dec 2003
Location: SC midlands
Posts: 1,934
Bikes: See signature
Mentioned: 12 Post(s)
Tagged: 0 Thread(s)
Quoted: 337 Post(s)
Liked 227 Times
in
145 Posts
Assuming the residue is adhesive, it looks like there wasn't enough used during assembly. A Monday morning build, perhaps? 
Good on ya for manning up!
Good on ya for manning up!
__________________
2010 AB T1X ** 2010 Cannondale SIX-5 ** 1993 Cannondale RS900 ** 1988 Bottecchia Team Record ** 1989 Bianchi Brava ** 1988 Nishiki Olympic ** 1987 Centurion Ironman Expert(2) ** 1985 DeRosa Professional SLX ** 1982 Colnago Super ** 1982 Basso Gap ** 198? Ciocc Competition SL ** 19?? Roberts Audax ** 198? Brian Rourke ** 1982 Mercian Olympic ** 1970 Raleigh Professional MK I ** 1952 Raleigh Sports
2010 AB T1X ** 2010 Cannondale SIX-5 ** 1993 Cannondale RS900 ** 1988 Bottecchia Team Record ** 1989 Bianchi Brava ** 1988 Nishiki Olympic ** 1987 Centurion Ironman Expert(2) ** 1985 DeRosa Professional SLX ** 1982 Colnago Super ** 1982 Basso Gap ** 198? Ciocc Competition SL ** 19?? Roberts Audax ** 198? Brian Rourke ** 1982 Mercian Olympic ** 1970 Raleigh Professional MK I ** 1952 Raleigh Sports
03-16-19, 08:44 AM
#8
Senior Member

Mcmaster Carr sells all kinds of rivets incl. stainless. I would try a dry run by riveting the boss to a piece of scrap and see how the head fits. Then proceed with epoxy and rivets.
https://www.mcmaster.com/rivets
https://www.mcmaster.com/rivets
03-16-19, 09:31 AM
#9
Senior Member
Someone has to say it. JB Weld. It's usually the best epoxy you can buy at the local hardware store. Good enough for this app. The adhesive is doing most of the work on this joint. Rivet is basically a clamp for gluing. Even so, belt and suspenders never hurts, and I like the idea of a stainless rivet.
Clean clean clean first. Remove all the old adhesive and abrade the surface until it is fresh and shiny. Glue immediately before it flashes over with oxide. You can't see it, but aluminum starts oxidizing as soon as it is exposed - in seconds.
Clean clean clean first. Remove all the old adhesive and abrade the surface until it is fresh and shiny. Glue immediately before it flashes over with oxide. You can't see it, but aluminum starts oxidizing as soon as it is exposed - in seconds.
03-16-19, 09:42 AM
#10
Senior Member
Someone has to say it. JB Weld. It's usually the best epoxy you can buy at the local hardware store. Good enough for this app. The adhesive is doing most of the work on this joint. Rivet is basically a clamp for gluing. Even so, belt and suspenders never hurts, and I like the idea of a stainless rivet.
Clean clean clean first. Remove all the old adhesive and abrade the surface until it is fresh and shiny. Glue immediately before it flashes over with oxide. You can't see it, but aluminum starts oxidizing as soon as it is exposed - in seconds.
Clean clean clean first. Remove all the old adhesive and abrade the surface until it is fresh and shiny. Glue immediately before it flashes over with oxide. You can't see it, but aluminum starts oxidizing as soon as it is exposed - in seconds.
03-16-19, 10:52 AM
#11
Senior Member
you could also tap and just put a screw in. easy peasy- the epoxy would act like lock tight and hold it all together even if the threading is only 2 turns in the thin wall. like above, its really just to hold the epoxy on to dry.
 03-16-19, 01:59 PM
#13
Partially Sane.
Join Date: Jan 2016
Location: Sunny Sacramento.
Posts: 3,559
Bikes: Soma Saga, pre-disc
Mentioned: 22 Post(s)
Tagged: 0 Thread(s)
Quoted: 972 Post(s)
Likes: 0
Liked 643 Times
in
468 Posts
Wow, you have cojones of steel (or aluminum, if you prefer). 😲 It looks to have worked out fine though, congrats. 👍 I know my '85 has some fairly primitive looking areas, compared to later years, so I can imagine your first year frame is similar, or more so. 🤔
One of us should grab some pics of stuff, like the rear rack braze-ons, for example. Definitely not like later ones. 😉
One of us should grab some pics of stuff, like the rear rack braze-ons, for example. Definitely not like later ones. 😉
03-16-19, 02:28 PM
#14
Rustbelt Rider
Thread Starter
Join Date: Oct 2008
Location: Canton, OH
Posts: 9,104
Bikes: 1990 Trek 1420 - 1978 Raleigh Professional - 1973 Schwinn Collegiate - 1974 Schwinn Suburban
Mentioned: 20 Post(s)
Tagged: 0 Thread(s)
Quoted: 261 Post(s)
Liked 372 Times
in
177 Posts
Thanks for all the advice everyone. I think I will give the JB weld a shot. I�m nervous about the pop rivets because I have no experience with them. The screw idea is tempting for that reason. I may go to a local grainger and see if someone there with know how can help me.
03-16-19, 02:32 PM
#15
Senior Member
Join Date: Jun 2018
Location: SW Ohio
Posts: 2,397
Mentioned: 93 Post(s)
Tagged: 0 Thread(s)
Quoted: 1104 Post(s)
Liked 1,825 Times
in
878 Posts
I had a Cannondale in the 80s and it had a piece of all thread that went thru the frame that the shifter bosses threaded on to. Or, I'm senile.
EDIT
No, I'm not senile.

EDIT
No, I'm not senile.
Last edited by nomadmax; 03-16-19 at 02:38 PM.
03-16-19, 02:33 PM
#16
Rustbelt Rider
Thread Starter
Join Date: Oct 2008
Location: Canton, OH
Posts: 9,104
Bikes: 1990 Trek 1420 - 1978 Raleigh Professional - 1973 Schwinn Collegiate - 1974 Schwinn Suburban
Mentioned: 20 Post(s)
Tagged: 0 Thread(s)
Quoted: 261 Post(s)
Liked 372 Times
in
177 Posts
Wow, you have cojones of steel (or aluminum, if you prefer). 😲 It looks to have worked out fine though, congrats. 👍 I know my '85 has some fairly primitive looking areas, compared to later years, so I can imagine your first year frame is similar, or more so. 🤔
One of us should grab some pics of stuff, like the rear rack braze-ons, for example. Definitely not like later ones. 😉
One of us should grab some pics of stuff, like the rear rack braze-ons, for example. Definitely not like later ones. 😉
You are correct about the early frame. They didn�t go to much effort to clean up the welds. Either way, I think it�s an object of beauty!
 03-16-19, 03:31 PM
#18
www.theheadbadge.com
Join Date: Sep 2005
Location: Southern Florida
Posts: 28,513
Bikes: https://www.theheadbadge.com
Mentioned: 124 Post(s)
Tagged: 0 Thread(s)
Quoted: 2422 Post(s)
Liked 4,393 Times
in
2,092 Posts
-Kurt
__________________
 03-17-19, 04:21 AM
#20
Senior Member
Join Date: Sep 2017
Location: Eastern Shore, MD
Posts: 2,107
Bikes: Road ready: 1993 Koga Miyata City Liner Touring Hybrid, 1989 Centurion Sport DLX, "I Blame GP" Bridgestone CB-1. Projects: Yea, I got a problem....
Mentioned: 24 Post(s)
Tagged: 0 Thread(s)
Quoted: 753 Post(s)
Liked 737 Times
in
422 Posts
Just wanted to throw in 2 cents. The couple times I used epoxy on aluminum, I was useing West System. Their manual and website have allsorts of techniques and products for allsorts of projects. For aluminum I always used an acid etch as the surface prep. They sell this. They also have a new epoxy called G Flex which I have only used for glueing plastics but I believe would be the choice for this application. "West System" can be bought at "West Marine". I would check "Hamilton Marine" for mail order my self. I am sure that. Aircraft Spruce has more specific Epoxy systems for aluminum aircraft.
Cliff note version: Use an acid etch as part of surface prep for epoxy on aluminum.
Cliff note version: Use an acid etch as part of surface prep for epoxy on aluminum.
03-17-19, 07:39 AM
#21
Senior Member
Join Date: Jun 2006
Posts: 20,305
Mentioned: 130 Post(s)
Tagged: 0 Thread(s)
Quoted: 3464 Post(s)
Liked 2,829 Times
in
1,995 Posts
The acid etch is to remove the oxide layer, aluminum actually has to be fabricated very soon after cleaning, it oxidizes readily.
03-17-19, 09:51 AM
#22
Mr. Anachronism
Join Date: Jan 2013
Location: Somewhere west of Tobie's
Posts: 2,087
Bikes: fillet-brazed Chicago Schwinns, and some other stuff
Mentioned: 29 Post(s)
Tagged: 0 Thread(s)
Quoted: 526 Post(s)
Liked 256 Times
in
165 Posts
Someone has to say it. JB Weld. It's usually the best epoxy you can buy at the local hardware store. Good enough for this app. The adhesive is doing most of the work on this joint. Rivet is basically a clamp for gluing. Even so, belt and suspenders never hurts, and I like the idea of a stainless rivet.
Clean clean clean first. Remove all the old adhesive and abrade the surface until it is fresh and shiny. Glue immediately before it flashes over with oxide. You can't see it, but aluminum starts oxidizing as soon as it is exposed - in seconds.
Clean clean clean first. Remove all the old adhesive and abrade the surface until it is fresh and shiny. Glue immediately before it flashes over with oxide. You can't see it, but aluminum starts oxidizing as soon as it is exposed - in seconds.
I would also tap the holes and use flathead stainless bolts (available at most Ace Hardware stores) instead of rivets, unless you go through the trouble of getting some nice stainless flat head rivets from McMaster.
Either way, test fit the bolts/rivets before epoxy application, to ensure the heads are recessed enough to clear the shifter parts.
__________________
"My only true wisdom is in knowing I have none" -Socrates
"My only true wisdom is in knowing I have none" -Socrates
03-17-19, 10:09 AM
#23
Senior Member
Join Date: Apr 2014
Location: Back in Lincoln Sq, Chicago...🙄
Posts: 1,609
Bikes: '84 Miyata 610 �91 Cannondale ST600,'83 Trek 720 �84 Trek 520, 620, �91 Miyata 1000LT, '79 Trek 514, '78 Trek 706, '73 Raleigh Int. frame.
Mentioned: 13 Post(s)
Tagged: 0 Thread(s)
Quoted: 685 Post(s)
Liked 370 Times
in
219 Posts
Terrifying huh?! Taking a power drill to a frame like this! Nicely done!! Looks like everyone's covered your options, so I'll just say good luck, and, you got this!
There's nothing like riding a bike around after you've had it's guts in your hands.

There's nothing like riding a bike around after you've had it's guts in your hands.
03-17-19, 10:14 AM
#24
Senior Member
03-17-19, 11:16 AM
#25
Partially Sane.
Join Date: Jan 2016
Location: Sunny Sacramento.
Posts: 3,559
Bikes: Soma Saga, pre-disc
Mentioned: 22 Post(s)
Tagged: 0 Thread(s)
Quoted: 972 Post(s)
Likes: 0
Liked 643 Times
in
468 Posts
Aha, I mentioned seeing one of these assemblies some time back, but noone replied. Probably figured I missed my meds or something. 😁 I'm pretty sure it was in Seattle, and I just happened to go into a bike shop, where one was being fiddled with. 😉