


Stuck, crossthreaded BB.
 01-14-22, 04:24 PM
#1
Senior Member
Thread Starter

Join Date: Sep 2021
Posts: 718
Mentioned: 4 Post(s)
Tagged: 0 Thread(s)
Quoted: 261 Post(s)
Liked 346 Times
in
204 Posts
Stuck, crossthreaded BB.
I have this 80s Galaxy 2 10 speed that I am planning to repair and upgrade to square taper cranks. I could not get the BB shells out as the notches have ramped edges and the tool slides out under any pressure. The threads are also severely crossthreaded (probably from factory).

I am planning on putting in a Sunlite threadles BB, do you guys think this BB will work with my bike?
I am planning on putting in a Sunlite threadles BB, do you guys think this BB will work with my bike?
 01-14-22, 04:35 PM
#2

Mad bike riding scientist

Join Date: Nov 2004
Location: Denver, CO
Posts: 27,359
Bikes: Some silver ones, a red one, a black and orange one, and a few titanium ones
Mentioned: 152 Post(s)
Tagged: 1 Thread(s)
Quoted: 6218 Post(s)
Liked 4,214 Times
in
2,362 Posts
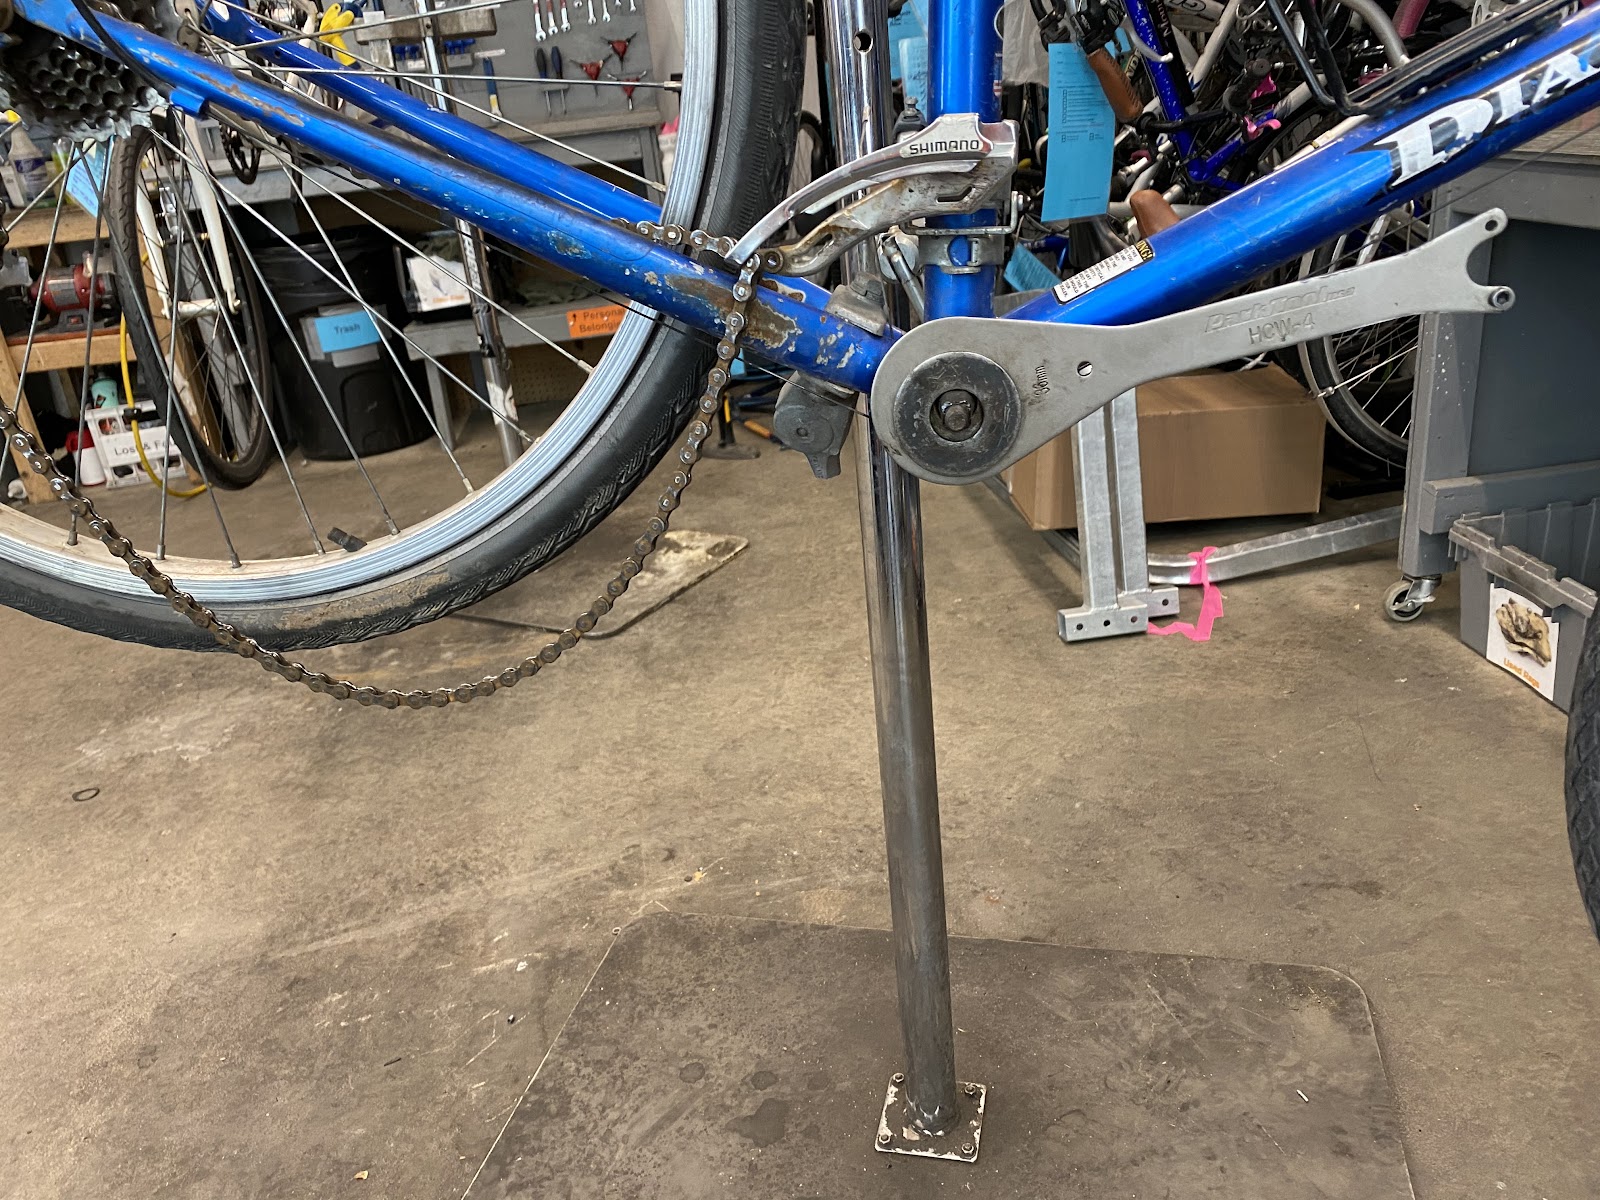
The is my homemade tool is for removing the fixed cup on the bottom bracket. It’s aimed more at the fixed cup side but it would work for the adjustable cup side as well and allow you to get more leverage on the tool without it camming out of the cup. Instead of the Park HCW-4, use an HCW-11.
Since you have a cottered crank, you’ll need the crank arm to hold the tool in place. Use the nondrive arm and turn it around to give you more room.
Tool Assembly
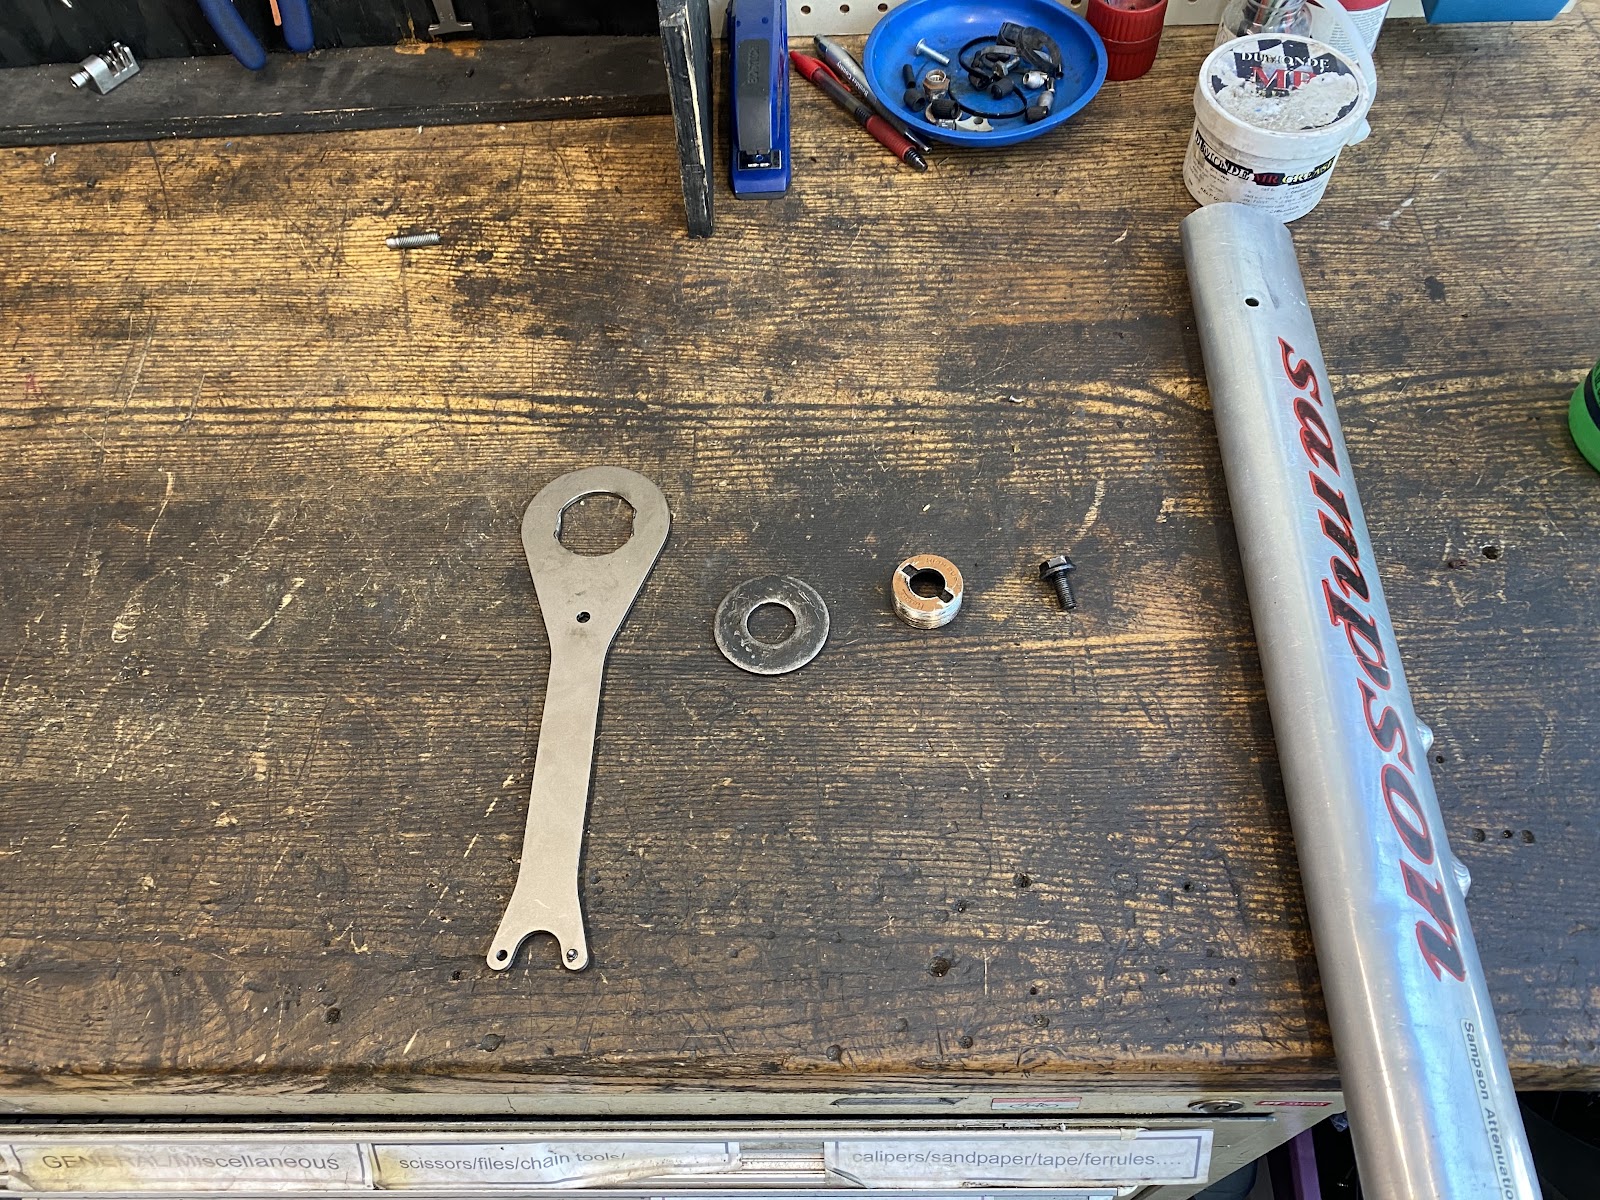
The parts for the nutted spindle needed are shown here. Most everything can be found in just about any shop. The large fender washer is probably the only thing you’ll have to go to a hardware store for.
A large fender washer, an adjustable cup, and the spindle nut are needed. Another washer may be needed to get the spacing right. The order of assembly follows
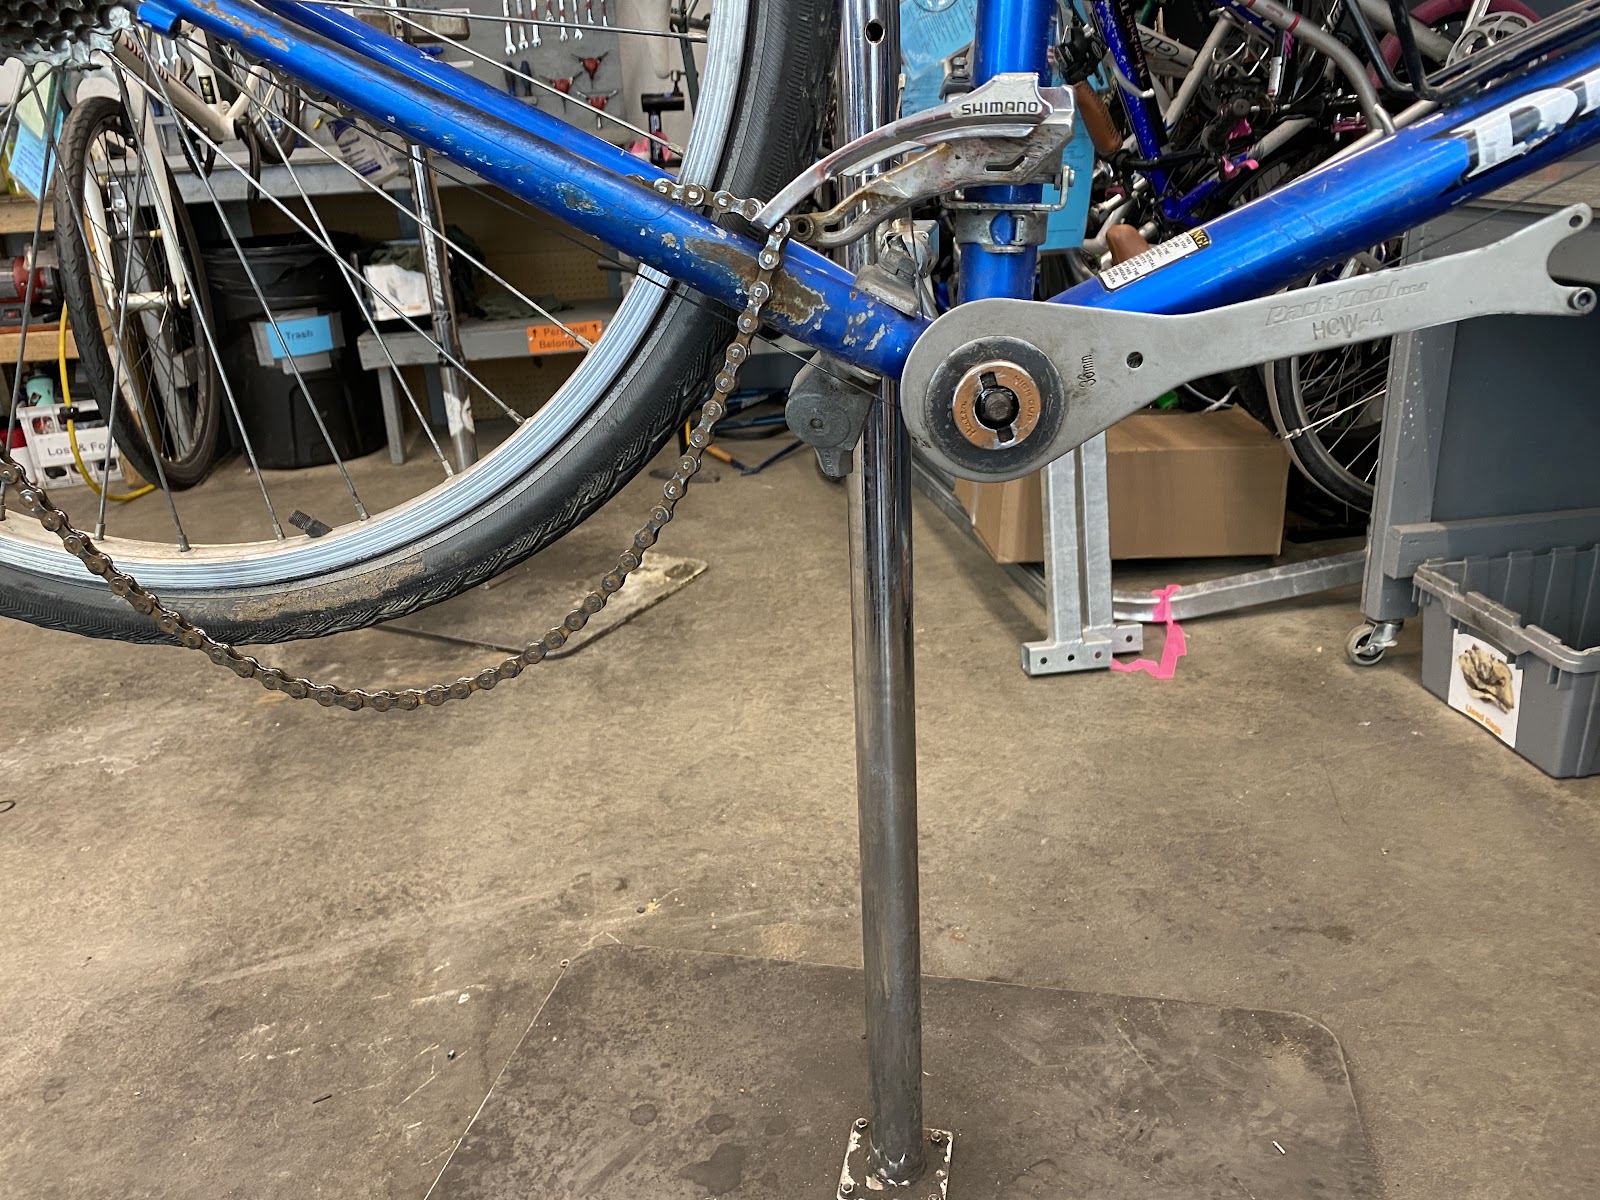

From above it should look like this

Turn the wrench as usual. If more leverage is needed, a cheater bar is needed.

For bolted spindles, the order of assembly is the same except a bolt is needed.

This method is much easier to use than other methods I’ve used. The spindle stabilizes the wrench and turns with it much like a cartridge bearing does. It makes it easier to remove the fixed cup and results in less blood spilled.
Since you have a cottered crank, you’ll need the crank arm to hold the tool in place. Use the nondrive arm and turn it around to give you more room.
Tool Assembly
The parts for the nutted spindle needed are shown here. Most everything can be found in just about any shop. The large fender washer is probably the only thing you’ll have to go to a hardware store for.
A large fender washer, an adjustable cup, and the spindle nut are needed. Another washer may be needed to get the spacing right. The order of assembly follows
From above it should look like this
Turn the wrench as usual. If more leverage is needed, a cheater bar is needed.
For bolted spindles, the order of assembly is the same except a bolt is needed.
This method is much easier to use than other methods I’ve used. The spindle stabilizes the wrench and turns with it much like a cartridge bearing does. It makes it easier to remove the fixed cup and results in less blood spilled.
__________________
Stuart Black
Plan Epsilon Around Lake Michigan in the era of Covid
Old School�When It Wasn�t Ancient bikepacking
Gold Fever Three days of dirt in Colorado
Pokin' around the Poconos A cold ride around Lake Erie
Dinosaurs in Colorado A mountain bike guide to the Purgatory Canyon dinosaur trackway
Solo Without Pie. The search for pie in the Midwest.
Picking the Scablands. Washington and Oregon, 2005. Pie and spiders on the Columbia River!
01-14-22, 04:37 PM
#3
Senior Member
Thread Starter
Join Date: Sep 2021
Posts: 718
Mentioned: 4 Post(s)
Tagged: 0 Thread(s)
Quoted: 261 Post(s)
Liked 346 Times
in
204 Posts
The is my homemade tool is for removing the fixed cup on the bottom bracket. It�s aimed more at the fixed cup side but it would work for the adjustable cup side as well and allow you to get more leverage on the tool without it camming out of the cup. Instead of the Park HCW-4, use an HCW-11.
Since you have a cottered crank, you�ll need the crank arm to hold the tool in place. Use the nondrive arm and turn it around to give you more room.
Tool Assembly
The parts for the nutted spindle needed are shown here. Most everything can be found in just about any shop. The large fender washer is probably the only thing you�ll have to go to a hardware store for.
A large fender washer, an adjustable cup, and the spindle nut are needed. Another washer may be needed to get the spacing right. The order of assembly follows
From above it should look like this
Turn the wrench as usual. If more leverage is needed, a cheater bar is needed.
For bolted spindles, the order of assembly is the same except a bolt is needed.
This method is much easier to use than other methods I�ve used. The spindle stabilizes the wrench and turns with it much like a cartridge bearing does. It makes it easier to remove the fixed cup and results in less blood spilled.
Likes For TPL:
01-14-22, 07:01 PM
#5
Senior Member
Join Date: Aug 2007
Location: Locust NC
Posts: 714
Bikes: 1992, Cannondale R900. 1991 Paramount pdg
Mentioned: 1 Post(s)
Tagged: 0 Thread(s)
Quoted: 62 Post(s)
Liked 172 Times
in
66 Posts
A crude way that will work is a vice grip and a long bar. Putting the arm back on and shimming it to the vice grip will help.
Ed
Ed
Likes For EddyR:
01-14-22, 08:17 PM
#6
Bike Butcher of Portland

Join Date: Jul 2014
Location: Portland, OR
Posts: 11,634
Bikes: It's complicated.
Mentioned: 1299 Post(s)
Tagged: 0 Thread(s)
Quoted: 4678 Post(s)
Liked 5,795 Times
in
2,281 Posts
I bought a Raleigh International a few years ago, didn't notice that the fixed and adjustable cups were on the wrong side. How that happened is beyond me, but obviously I wanted to remove them. I used an angle grinder to carefully make some flats on both sides of the adjustable cup, filed them down square, and clamped it on my big vise. I was able to unscrew it. The fixed cup came out the same way, since it already had flats on it.
__________________
If someone tells you that you have enough bicycles and you don't need any more, stop talking to them. You don't need that kind of negativity in your life.
If someone tells you that you have enough bicycles and you don't need any more, stop talking to them. You don't need that kind of negativity in your life.
Likes For gugie:
01-14-22, 08:52 PM
#7

Senior Member
Join Date: Jun 2006
Posts: 20,305
Mentioned: 130 Post(s)
Tagged: 0 Thread(s)
Quoted: 3464 Post(s)
Liked 2,828 Times
in
1,995 Posts
Likes For repechage:
01-14-22, 09:02 PM
#8
Senior Member
Join Date: Nov 2013
Location: Near Pottstown, PA: 30 miles NW of Philadelphia
Posts: 2,186
Bikes: 2 Trek Mtn, Cannondale R600 road, 6 vintage road bikes
Mentioned: 83 Post(s)
Tagged: 0 Thread(s)
Quoted: 472 Post(s)
Liked 1,028 Times
in
404 Posts
I recently used the cyccommute approach shown above on the NDS for loosing an adjustable cup lock ring. 'Twas a very neglected bike and the lock ring was very tight/frozen/corroded on. I needed a lot of force and those thin wrenches slip off that thin ring quite easily. Used the same type large washer and spare adj cup but c-clamped the wrench to the washer. Snugged it all down with the crank bolt and grunted. The lock ring came loose without any slipping nor damage to the notches. Nice technique.
01-14-22, 10:32 PM
#9
Senior Member

Join Date: Apr 2007
Location: Thunder Bay, Ontario, Canada - burrrrr!
Posts: 11,674
Bikes: 1958 Rabeneick 120D, 1968 Legnano Gran Premio, 196? Torpado Professional, 2000 Marinoni Piuma
Mentioned: 210 Post(s)
Tagged: 0 Thread(s)
Quoted: 1372 Post(s)
Likes: 0
Liked 1,751 Times
in
938 Posts
Though it would ruin the threads on the cross threaded cup, I would try to fit a 12" pipe wrench on the protruding threaded section and remove the cup. Might not be enough to grab, but that would be my first attempt. I have done it before on a bottom bracket and very hard to remove freewheel hub. The bb cup was shot, once removed, the the hardened freewheel hub was still useable.
__________________
"98% of the bikes I buy are projects".
"98% of the bikes I buy are projects".
Likes For randyjawa:
01-14-22, 11:37 PM
#10
Master Parts Rearranger

Join Date: Mar 2015
Location: Portlandia's Kuiper Belt, OR
Posts: 4,402
Bikes: 1982 Trek 720 - 1985 Trek 620 - 1984 Trek 620 - 1980 Trek 510 - Other luminaries past and present
Mentioned: 221 Post(s)
Tagged: 0 Thread(s)
Quoted: 1556 Post(s)
Liked 2,024 Times
in
989 Posts
Old and/or original three piece BBs on medium and low end bikes are the worst to deal with because their owners often don't take care of them. Nearly 40 years down the road, we get the gift of it being seized. [This is not to say that highly desirable bikes don't also suffer that fate. They do, and the stakes are considerably higher if failure or damage is incurred] As that is the non drive side cup, the protruding threads are there to accommodate a lock ring (that isn't present--don't know if it came like that to you). There is a specific spanner that properly interfaces with that cup's slots. You could certainly search online or see if a shop has it. If you haven't run some PB Blaster or other penetrating lubricant (aka not WD-40, but if it's all ya got, it's free to try) and let it sit for a day or two, you could give that a shot. Now, if you don't really have a place to work on your bike that lets those fumes and smells properly ventilate, that makes it tricky.
The 'sandwich' methods of gently clamping/holding the tool to the BB cup with big washers etc (for me it's washers and a left side crank arm) works beautifully, as does (if possible/not harming non-aero routed brake cables) flipping the bike upside down and putting it on the ground. For heavy BB work like this, I always put the bike on the ground (rubber side down), that way any gorilla-level efforts (usually in the downward direction) are naturally dealt with by the bike (like a rider's weight or pedaling force). When it's on the stand, one can bend and/or crimp the tubing if one is really going to town. It's also not as solid, so you can't really lean on it or hit with your weight or any tools without risking damage. Upside down and on the ground gets you stability, and a whole bunch of tubes not in your way. I've done this for recalcitrant pedal removal as well.
The 'sandwich' methods of gently clamping/holding the tool to the BB cup with big washers etc (for me it's washers and a left side crank arm) works beautifully, as does (if possible/not harming non-aero routed brake cables) flipping the bike upside down and putting it on the ground. For heavy BB work like this, I always put the bike on the ground (rubber side down), that way any gorilla-level efforts (usually in the downward direction) are naturally dealt with by the bike (like a rider's weight or pedaling force). When it's on the stand, one can bend and/or crimp the tubing if one is really going to town. It's also not as solid, so you can't really lean on it or hit with your weight or any tools without risking damage. Upside down and on the ground gets you stability, and a whole bunch of tubes not in your way. I've done this for recalcitrant pedal removal as well.
Likes For RiddleOfSteel:
01-15-22, 08:18 AM
#11
Senior Member
Join Date: Feb 2020
Posts: 2,817
Mentioned: 49 Post(s)
Tagged: 0 Thread(s)
Quoted: 1106 Post(s)
Likes: 0
Liked 1,326 Times
in
782 Posts
I have this 80s Galaxy 2 10 speed that I am planning to repair and upgrade to square taper cranks. I could not get the BB shells out as the notches have ramped edges and the tool slides out under any pressure. The threads are also severely crossthreaded (probably from factory).
b) use a Dremel with a cutoff wheel and cut two flats out of the exposed sides, put it and the frame in a vice. Clamp it like you mean it, your flats are likely not perfectly square.
01-15-22, 08:26 AM
#12
Passista
Join Date: Jul 2005
Posts: 7,597
Bikes: 1998 Pinarello Asolo, 1992 KHS Monta�a pro, 1980 Raleigh DL-1, IGH Hybrid, IGH Utility
Mentioned: 5 Post(s)
Tagged: 0 Thread(s)
Quoted: 866 Post(s)
Liked 721 Times
in
396 Posts
If all of the above fails, you could weld some scrap to the cup and hold it on a vise. This will damage the paint though.
Likes For Reynolds:
01-15-22, 09:42 AM
#13
Senior Member

Join Date: Aug 2015
Posts: 3,293
Mentioned: 39 Post(s)
Tagged: 0 Thread(s)
Quoted: 1140 Post(s)
Liked 1,736 Times
in
957 Posts
One other destructive method would be to cut or grind the cup perpendicularly down to the threads on the inside, clamp and collapse, that would pop it off the thread and could be pulled from there.
Likes For Mr. 66:
01-15-22, 10:16 AM
#14
Mad bike riding scientist
Join Date: Nov 2004
Location: Denver, CO
Posts: 27,359
Bikes: Some silver ones, a red one, a black and orange one, and a few titanium ones
Mentioned: 152 Post(s)
Tagged: 1 Thread(s)
Quoted: 6218 Post(s)
Liked 4,214 Times
in
2,362 Posts
Not sure what you mean by �cafes�.
__________________
Stuart Black
Plan Epsilon Around Lake Michigan in the era of Covid
Old School�When It Wasn�t Ancient bikepacking
Gold Fever Three days of dirt in Colorado
Pokin' around the Poconos A cold ride around Lake Erie
Dinosaurs in Colorado A mountain bike guide to the Purgatory Canyon dinosaur trackway
Solo Without Pie. The search for pie in the Midwest.
Picking the Scablands. Washington and Oregon, 2005. Pie and spiders on the Columbia River!
Likes For cyccommute:
01-15-22, 10:33 AM
#15
Edumacator
Join Date: Jan 2018
Location: Goose Creek, SC
Posts: 6,797
Bikes: '87 Crestdale, '87 Basso Gap, '92 Rossin Performance EL-OS, 1990 VanTuyl, 1980s Losa, 1985 Trek 670, 1982 AD SLE, 1987 PX10, etc...
Mentioned: 59 Post(s)
Tagged: 0 Thread(s)
Quoted: 2436 Post(s)
Liked 3,119 Times
in
1,962 Posts
The cottered attachment does not lend itself to bolting it down. Are both cups cross threaded and stuck?
In that case a pair of gigantic vice grips or pipe wrench are probably your only bets. If you can get the NDS cup off, you could use the method suggested above for the fixed cup.
In that case a pair of gigantic vice grips or pipe wrench are probably your only bets. If you can get the NDS cup off, you could use the method suggested above for the fixed cup.
__________________
1987 Crest Cannondale, 1987 Basso Gap, 1992 Rossin Performance EL, 1990ish Van Tuyl, 1985 Trek 670, 1982 AD SLE, 2003 Pinarello Surprise, 1990ish MBK Atlantique, 1987 Peugeot Competition, 1987 Nishiki Tri-A, 1981 Faggin, 1996 Cannondale M500, 1984 Mercian, 1982 AD SuperLeicht, 1985 Massi (model unknown), 1988 Daccordi Griffe , 1989 Fauxsin MTB, 1981 Ciocc Mockba, 1992 Bianchi Giro, 1977 Colnago Super
1987 Crest Cannondale, 1987 Basso Gap, 1992 Rossin Performance EL, 1990ish Van Tuyl, 1985 Trek 670, 1982 AD SLE, 2003 Pinarello Surprise, 1990ish MBK Atlantique, 1987 Peugeot Competition, 1987 Nishiki Tri-A, 1981 Faggin, 1996 Cannondale M500, 1984 Mercian, 1982 AD SuperLeicht, 1985 Massi (model unknown), 1988 Daccordi Griffe , 1989 Fauxsin MTB, 1981 Ciocc Mockba, 1992 Bianchi Giro, 1977 Colnago Super
 01-15-22, 10:42 AM
#16

Senior Member
Join Date: Dec 2005
Posts: 17,155
Mentioned: 481 Post(s)
Tagged: 0 Thread(s)
Quoted: 3808 Post(s)
Liked 6,681 Times
in
2,609 Posts
Apply 50/50 mix of acetone and automatic transmission fluid.
Wait 24 hours.
Wail on that cup with a punch and large hammer.
Wait 24 hours.
Wail on that cup with a punch and large hammer.
01-15-22, 02:05 PM
#18
Master Parts Rearranger
Join Date: Mar 2015
Location: Portlandia's Kuiper Belt, OR
Posts: 4,402
Bikes: 1982 Trek 720 - 1985 Trek 620 - 1984 Trek 620 - 1980 Trek 510 - Other luminaries past and present
Mentioned: 221 Post(s)
Tagged: 0 Thread(s)
Quoted: 1556 Post(s)
Liked 2,024 Times
in
989 Posts
 01-15-22, 04:00 PM
#19
Senior Member
Join Date: May 2019
Location: Bloomington, IN
Posts: 2,947
Bikes: Paramount, Faggin, Ochsner, Ciocc, Basso
Mentioned: 116 Post(s)
Tagged: 0 Thread(s)
Quoted: 1303 Post(s)
Liked 1,910 Times
in
1,140 Posts
Grant,
The pics posted are of an adjustable cup side. Cyclocommute sent the right info on removing the fixed cup and then using a bolt and nut assembly aka Sheldon Brown method to remove the adjustable cup. I have some specialty tools here that I use for this type of repair but they are a bit pricey. I suggest the method mentioned above to remove the BB from the fixed side first. Smiles, MH
The pics posted are of an adjustable cup side. Cyclocommute sent the right info on removing the fixed cup and then using a bolt and nut assembly aka Sheldon Brown method to remove the adjustable cup. I have some specialty tools here that I use for this type of repair but they are a bit pricey. I suggest the method mentioned above to remove the BB from the fixed side first. Smiles, MH
Likes For Mad Honk:
01-15-22, 05:22 PM
#20
Edumacator
Join Date: Jan 2018
Location: Goose Creek, SC
Posts: 6,797
Bikes: '87 Crestdale, '87 Basso Gap, '92 Rossin Performance EL-OS, 1990 VanTuyl, 1980s Losa, 1985 Trek 670, 1982 AD SLE, 1987 PX10, etc...
Mentioned: 59 Post(s)
Tagged: 0 Thread(s)
Quoted: 2436 Post(s)
Liked 3,119 Times
in
1,962 Posts
Pictures of the DS/fixed cup would be helpful. As others mentioned above, this might be a BB you remove in backwards order...fixed then adjustable. The fixed should have flats to hold with a wrench, whereas the adjustable will simply have to be yanked out with a thread crushing wrench of sorts...
__________________
1987 Crest Cannondale, 1987 Basso Gap, 1992 Rossin Performance EL, 1990ish Van Tuyl, 1985 Trek 670, 1982 AD SLE, 2003 Pinarello Surprise, 1990ish MBK Atlantique, 1987 Peugeot Competition, 1987 Nishiki Tri-A, 1981 Faggin, 1996 Cannondale M500, 1984 Mercian, 1982 AD SuperLeicht, 1985 Massi (model unknown), 1988 Daccordi Griffe , 1989 Fauxsin MTB, 1981 Ciocc Mockba, 1992 Bianchi Giro, 1977 Colnago Super
1987 Crest Cannondale, 1987 Basso Gap, 1992 Rossin Performance EL, 1990ish Van Tuyl, 1985 Trek 670, 1982 AD SLE, 2003 Pinarello Surprise, 1990ish MBK Atlantique, 1987 Peugeot Competition, 1987 Nishiki Tri-A, 1981 Faggin, 1996 Cannondale M500, 1984 Mercian, 1982 AD SuperLeicht, 1985 Massi (model unknown), 1988 Daccordi Griffe , 1989 Fauxsin MTB, 1981 Ciocc Mockba, 1992 Bianchi Giro, 1977 Colnago Super
01-15-22, 08:28 PM
#21
Senior Member
Join Date: Jan 2004
Location: Madison, WI USA
Posts: 6,154
Mentioned: 50 Post(s)
Tagged: 0 Thread(s)
Quoted: 2363 Post(s)
Liked 1,749 Times
in
1,191 Posts
^^^^^ +1, start on the fixed side if it's any less effed than the adjustable side. For that matter, with the spindle out, there may be less stress (or side force or whatever you'd call it) on the adjustable cup and it may become less recalcitrant to come out.
01-15-22, 08:39 PM
#22
Senior Member
Thread Starter
Join Date: Sep 2021
Posts: 718
Mentioned: 4 Post(s)
Tagged: 0 Thread(s)
Quoted: 261 Post(s)
Liked 346 Times
in
204 Posts
Pictures of the DS/fixed cup would be helpful. As others mentioned above, this might be a BB you remove in backwards order...fixed then adjustable. The fixed should have flats to hold with a wrench, whereas the adjustable will simply have to be yanked out with a thread crushing wrench of sorts...
01-15-22, 08:56 PM
#23
Mad bike riding scientist
Join Date: Nov 2004
Location: Denver, CO
Posts: 27,359
Bikes: Some silver ones, a red one, a black and orange one, and a few titanium ones
Mentioned: 152 Post(s)
Tagged: 1 Thread(s)
Quoted: 6218 Post(s)
Liked 4,214 Times
in
2,362 Posts
Grant,
The pics posted are of an adjustable cup side. Cyclocommute sent the right info on removing the fixed cup and then using a bolt and nut assembly aka Sheldon Brown method to remove the adjustable cup. I have some specialty tools here that I use for this type of repair but they are a bit pricey. I suggest the method mentioned above to remove the BB from the fixed side first. Smiles, MH
The pics posted are of an adjustable cup side. Cyclocommute sent the right info on removing the fixed cup and then using a bolt and nut assembly aka Sheldon Brown method to remove the adjustable cup. I have some specialty tools here that I use for this type of repair but they are a bit pricey. I suggest the method mentioned above to remove the BB from the fixed side first. Smiles, MH
__________________
Stuart Black
Plan Epsilon Around Lake Michigan in the era of Covid
Old School�When It Wasn�t Ancient bikepacking
Gold Fever Three days of dirt in Colorado
Pokin' around the Poconos A cold ride around Lake Erie
Dinosaurs in Colorado A mountain bike guide to the Purgatory Canyon dinosaur trackway
Solo Without Pie. The search for pie in the Midwest.
Picking the Scablands. Washington and Oregon, 2005. Pie and spiders on the Columbia River!
01-15-22, 09:01 PM
#24
Mad bike riding scientist
Join Date: Nov 2004
Location: Denver, CO
Posts: 27,359
Bikes: Some silver ones, a red one, a black and orange one, and a few titanium ones
Mentioned: 152 Post(s)
Tagged: 1 Thread(s)
Quoted: 6218 Post(s)
Liked 4,214 Times
in
2,362 Posts
I don�t know that you need to go with the threadless bottom bracket. Even with a cross threaded bottom bracket, it�s fairly easy to have the threads chased to straighten them out. A cartridge bottom bracket is a good way to go but threaded is probably better.
__________________
Stuart Black
Plan Epsilon Around Lake Michigan in the era of Covid
Old School�When It Wasn�t Ancient bikepacking
Gold Fever Three days of dirt in Colorado
Pokin' around the Poconos A cold ride around Lake Erie
Dinosaurs in Colorado A mountain bike guide to the Purgatory Canyon dinosaur trackway
Solo Without Pie. The search for pie in the Midwest.
Picking the Scablands. Washington and Oregon, 2005. Pie and spiders on the Columbia River!
Stuart Black
Plan Epsilon Around Lake Michigan in the era of Covid
Old School�When It Wasn�t Ancient bikepacking
Gold Fever Three days of dirt in Colorado
Pokin' around the Poconos A cold ride around Lake Erie
Dinosaurs in Colorado A mountain bike guide to the Purgatory Canyon dinosaur trackway
Solo Without Pie. The search for pie in the Midwest.
Picking the Scablands. Washington and Oregon, 2005. Pie and spiders on the Columbia River!
01-15-22, 09:42 PM
#25
Senior Member
Join Date: May 2019
Location: Bloomington, IN
Posts: 2,947
Bikes: Paramount, Faggin, Ochsner, Ciocc, Basso
Mentioned: 116 Post(s)
Tagged: 0 Thread(s)
Quoted: 1303 Post(s)
Liked 1,910 Times
in
1,140 Posts
In the case that both sides are of the same design I would use a semi deep socket that will fit over the spindle but would engage the removal tool (or two one on each side) and then use a c-clamp to hold the tool in place. And then use a wrench and if needed a cheater bar. Smiles, MH