


Frame rust removal and painting...help!
 08-22-07, 04:48 PM
#1

Jet Jockey
Thread Starter

Frame rust removal and painting...help!
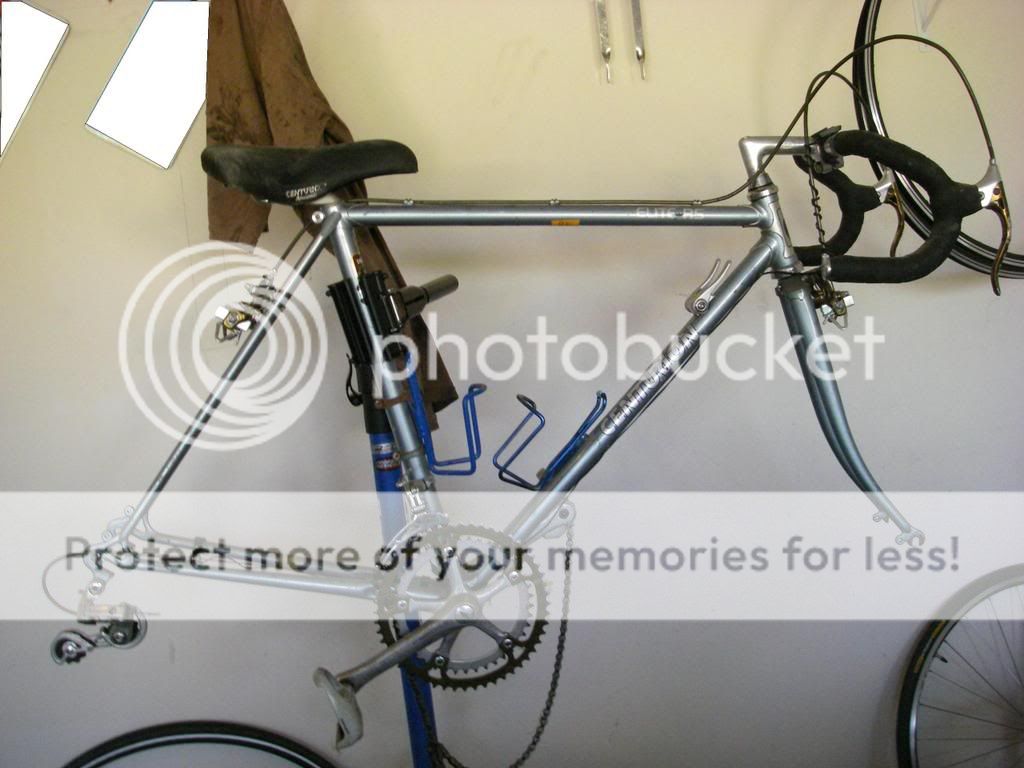
I've written about my "new" Centurion...but now I'm looking for some specific advice on the rust. (Hopefully someone can help.)
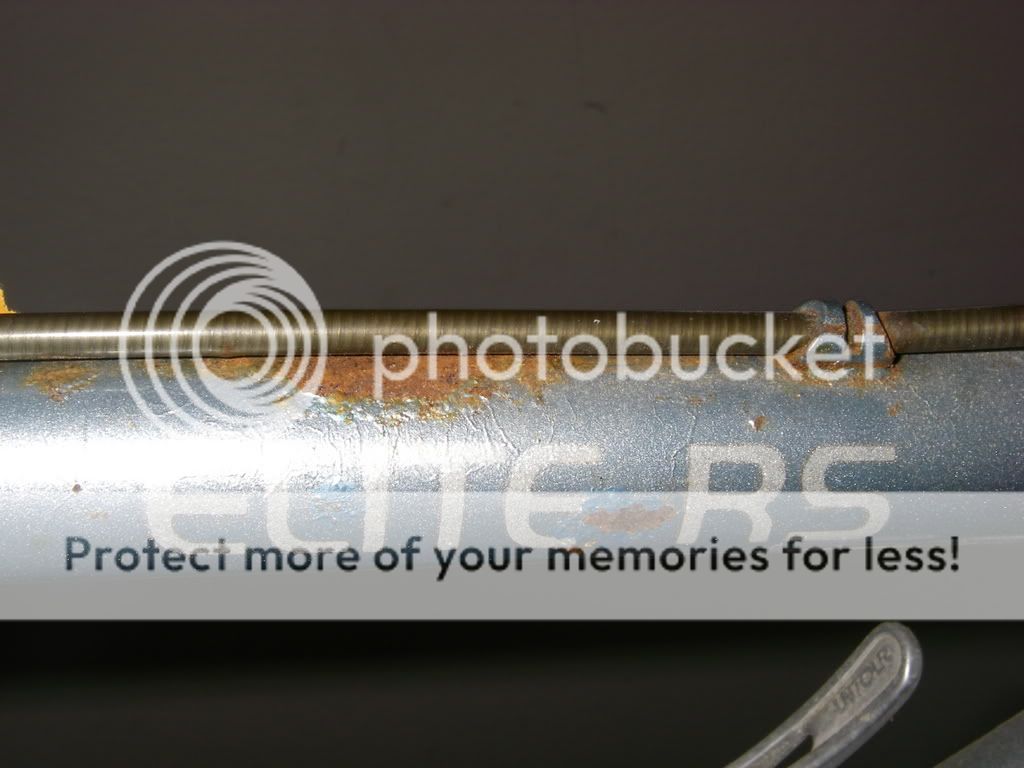
Reference the images below...I need to get rid of this rust, and paint the frame. I thought about sending out to Spectrum...but the $600 quote has me wincing a little bit. $300 was one thing...but at $600 I could buy a Rivendell frame.
I don't know who else does the work.
So...
Sandpaper? Steel wool? Acid?
What kind of paint? Should I strip it all, or should I just do a "patch" job with the damage that I see?
I really need some advice on this, or some pointers. The thought of doing the paint myself is appealing, but I've read that the cost of materials would be even more prohibitive than sending out. Can anyone tell me if that's true?
__________________
Good night...and good luck
Good night...and good luck


 08-22-07, 05:10 PM
#3
Senior Member
Join Date: Oct 2004
Posts: 5,250
Mentioned: 0 Post(s)
Tagged: 0 Thread(s)
Quoted: 2 Post(s)
Likes: 0
Liked 7 Times
in
7 Posts
I like to keep my old bikes as original as possible. And, I'm lazy. And, I'm cheap. So, here is the lazy, cheap solution:
I rub the rusty areas with heavy-duty paper towels, to get the loose rust off. Then, rub some more to get off any loose or flaking paint. Then I rub the rust areas with a paper towel dampened with rubbing alcohol to get off grease and oil. Then, I touch up the rust area with clear nail polish.
Using this method, I have not had any rust spots get larger or worse. And, the clear nail polish is not as obvious as my misguided attempts to cover the rust with either paint or nail polish that seemed to match the original color.
Why don't I use steel wool or something to get down to "bright" steel? On my bikes, the typical rust area is the size of a dime, or smaller. If I tried to get down to bright metal, I would end up removing some of the "good" paint around the rusty area, and making the damaged area larger.
Second, after I rub off the loose rust, I look at the surface closely. Usually, it appears that I'm looking at primer, or the "bonded" coating that most bike companies were using on steel tubes in the 80's and 90's. The rust I've removed is surface rust that did not penetrate into the steel tube.
Removing the protective primer or bonded rust-proof coating from a steel tube so that "bright" steel is exposed is more likely to allow "deep" rusting and pitting than if you remove only the surface rust, and put a air-tight sealer over the primer. (At least, that is what a lazy guy tells himself to justify doing this the lazy way).
Last edited by alanbikehouston; 08-22-07 at 05:23 PM.
08-22-07, 06:10 PM
#4
Senior Member
Join Date: Mar 2007
Location: Saskatchewan
Posts: 2,465
Mentioned: 0 Post(s)
Tagged: 0 Thread(s)
Quoted: 3 Post(s)
Likes: 0
Liked 6 Times
in
5 Posts
I bought a cheap sandblaster for $20.
My buddy is going to supply the blasting medium for about $25. He uses this medium to remove paint from light gauge metal and guarantees it won't hurt my frame.
Then I am going to get it powdercoated for $60.
There are cheaper ways to do it.
My buddy is going to supply the blasting medium for about $25. He uses this medium to remove paint from light gauge metal and guarantees it won't hurt my frame.
Then I am going to get it powdercoated for $60.
There are cheaper ways to do it.
08-22-07, 06:27 PM
#5
Jet Jockey
Thread Starter
alan,
That's interesting. Unfortunately as you can see, my damage is more widespread than the area of a dime.
rico,
$60 for powdercoat? Wow! Like I said, Spectrum is quoting me $600 right now.
That's interesting. Unfortunately as you can see, my damage is more widespread than the area of a dime.
rico,
$60 for powdercoat? Wow! Like I said, Spectrum is quoting me $600 right now.
__________________
Good night...and good luck
Good night...and good luck
08-22-07, 07:02 PM
#6
Senior Member

Join Date: Jul 2000
Location: Snowy midwest
Posts: 5,391
Mentioned: 0 Post(s)
Tagged: 0 Thread(s)
Quoted: 4 Post(s)
Likes: 0
Liked 1 Time
in
1 Post
To repaint a bicycle, you have to have the time, talent, energy, and desire to totally disassemble the bike and rebuild it completely. If you have not done it, I can tell you it is a LOT of work. It is a true labor of love.
If you do it, I would suggest having it powder coated. I have heard of guys having it done for as little as $60.00 including sandblasting the paint and rust off. Of course, color choices would be limited, but it would sure be worth it both from a cost, time, effort, and durability standpoint. In fact, if you can find a place to sandblast the frame for $25.00 or so, absolutely do that and then paint it yourself if you don't want to powdercoat.
Painting the bike yourself will cost you around $50.00 including the chemicals and materials to strip the bike, sand it, prime it, and paint it with hardware-store grade automotive paint.
If you strip it, use a strong commercial stripper. Forget the environmentally safe stripper. That crap doesn't work. No wonder it is environmentally safe - it's $18.00/gallon jello.
Anyway, strip off the paint with the stripper and steel wool. Next, you have to get the rust off. You can try using Brillo pads. That might do the trick. Then, you might consider using rust converter on the rusted areas.
Rinse the bike in solvent to clean. Allow to dry, and coat with a good sandable primer. Sand, and re-coat until the rust blemishes are gone.
Wash with dishsoap and rinse, allow to dry, and then paint. GOOD LUCK! If there is any grease or oil or other mystery particulate on the surface to be painted, you will get a halo effect where the paint is repelled from the surface. GOD that is maddening. Spray painting is an art. You have to keep the can moving and about ten inches from the surface. Practice on junk first until you get the hang of it. Nothing is worse than going through all that work and then have your paint job run and sag.
Give the bike at least three good coats. Five is better. That will take all of three full sized cans of spray paint. Do not give it clear coat. Clear coat might lift the base paint and ruin your work.
Decorate your bike with decals or pinstriping.
Ride you bike on it's post-paint maiden voyage to your favorite coffee shop or library. Return home and find scratches on your new paint job. Swear to yourself that you will never go through that again.
Cheers. Good luck. Let us know how it goes.
08-22-07, 07:48 PM
#7
Guest
Posts: n/a
Mentioned: Post(s)
Tagged: Thread(s)
Quoted: Post(s)
08-22-07, 07:51 PM
#8
Jet Jockey
Thread Starter
mike,
I've built a couple of bikes before...so I don't mind the wrenching. It's a hobby.
I WISH I could find a powdercoat quote even as low as $300. So far, like I mentioned, I'm coming in close to $600. That's why I'm starting to look into how to do it myself.
I appreciate your post...it gives me some more things to think about. Thanks!
Dr. Deltron,
Thank you for weighing in on this...I'll certainly keep that in mind as I'm trying to figure out the best way to go about refurbishing this frame. A frame painted by the famed Dr. Deltron would certainly be something to write on this board about!
Cheers!
__________________
Good night...and good luck
Good night...and good luck
08-22-07, 08:13 PM
#9
Guest
Posts: n/a
Mentioned: Post(s)
Tagged: Thread(s)
Quoted: Post(s)
 08-22-07, 08:39 PM
#10
Senior Member
Join Date: Jul 2000
Location: Snowy midwest
Posts: 5,391
Mentioned: 0 Post(s)
Tagged: 0 Thread(s)
Quoted: 4 Post(s)
Likes: 0
Liked 1 Time
in
1 Post
mike,
I've built a couple of bikes before...so I don't mind the wrenching. It's a hobby.
I WISH I could find a powdercoat quote even as low as $300. So far, like I mentioned, I'm coming in close to $600. That's why I'm starting to look into how to do it myself.
I appreciate your post...it gives me some more things to think about. Thanks!
Dr. Deltron,
Thank you for weighing in on this...I'll certainly keep that in mind as I'm trying to figure out the best way to go about refurbishing this frame. A frame painted by the famed Dr. Deltron would certainly be something to write on this board about!
Cheers!
I've built a couple of bikes before...so I don't mind the wrenching. It's a hobby.
I WISH I could find a powdercoat quote even as low as $300. So far, like I mentioned, I'm coming in close to $600. That's why I'm starting to look into how to do it myself.
I appreciate your post...it gives me some more things to think about. Thanks!
Dr. Deltron,
Thank you for weighing in on this...I'll certainly keep that in mind as I'm trying to figure out the best way to go about refurbishing this frame. A frame painted by the famed Dr. Deltron would certainly be something to write on this board about!
Cheers!
Anyway, it can be done as a home-shop project. I have done it many times with good results - and a couple with bad results too. Contact me if you have questions.
Good luck.
08-22-07, 08:43 PM
#11
Jet Jockey
Thread Starter
Thanks mike,
Putting it together with new grease and a few new parts is the "easy" part of this. But, like I said, I'm trying to sort out the rust/paint thing.
I ride a Brooks on my primary commuter, and I'm already working on convincing the wife why this old/new bike will require a B17 with copper rivets of its very own.
__________________
Good night...and good luck
Good night...and good luck
08-22-07, 09:18 PM
#12
Dropped

Where are you looking? Bicycle specific paintshops? Look locally. There are many car/motorcycle paintshops that would willingly do it. True, it's better to get someone who understands bicycle frames, lugwork, etc., but that doesn't mean you can't find someone locally who can do a decent job for less than $200 probably (blast and powdercoat). As Dr. Deltron has said in past threads, it's also advisable to get a clearcoat (or two?) over the powdercoat, which will be an additional cost.
I think Dr. Deltron will do a powdercoat for less than a PAINT job, but don't quote me on that.
I think Dr. Deltron will do a powdercoat for less than a PAINT job, but don't quote me on that.
08-22-07, 09:30 PM
#13
Junk Collector
Join Date: Jun 2005
Location: Chicago IL
Posts: 973
Bikes: 1987 Schwinn Circuit, 2012 Colnago M10, 1990 Schwinn CrissCross
Mentioned: 3 Post(s)
Tagged: 0 Thread(s)
Quoted: 34 Post(s)
Likes: 0
Liked 2 Times
in
2 Posts
But make your photos more bigger!
 I wanna see details!!!
For rust like that. I'd:
Strip; treat rust areas (whatever means necessary); Phosphate etch; Epoxy primer; Sealer; Color; Clear (probably a polyurethane clear rather than an acrylic urethane).
08-22-07, 10:11 PM
#14

Se�or Member

Join Date: Oct 2004
Location: Hardy, VA
Posts: 17,923
Bikes: Mostly English - predominantly Raleighs
Mentioned: 70 Post(s)
Tagged: 0 Thread(s)
Quoted: 1491 Post(s)
Liked 1,090 Times
in
638 Posts

I am now officially "stoked"! I've no doubt that looks even more magnificent live. I will be more than pleased to take/post higher res pictures of it in all it's glory once it makes the long journey home. Looks like it's time to re-wrap the bars and figure out the cabling scheme for brifters.
__________________
In search of what to search for.
In search of what to search for.
08-23-07, 05:30 AM
#15
59'er

Join Date: Oct 2005
Location: Alexandria, IN
Posts: 3,307
Bikes: LeMond Maillot Jaune, Vintage Trek 520 (1985), 1976 Schwinn Voyageur 2, Miyata 1000 (1985)
Mentioned: 1 Post(s)
Tagged: 0 Thread(s)
Quoted: 3 Post(s)
Likes: 0
Liked 7 Times
in
3 Posts
Do you have surface rust inside the tubes? If so; I've had great luck soaking the frame in Oxalic acid.
__________________

 08-23-07, 06:57 AM
#17
Senior Member
Join Date: Mar 2007
Location: Saskatchewan
Posts: 2,465
Mentioned: 0 Post(s)
Tagged: 0 Thread(s)
Quoted: 3 Post(s)
Likes: 0
Liked 6 Times
in
5 Posts
I use the same product on bikes that I use when I paint a vehicle. Its called Gone.
Simply wipe it on and let it dry. A good slathering of this stuff and you will have no fish eye effect.
08-23-07, 09:34 AM
#18
Jet Jockey
Thread Starter
I pulled the seatpost out the other night. Smooth and without a spot of rust. I looked inside and as far as I could see only grey steel.
__________________
Good night...and good luck
Good night...and good luck
08-23-07, 10:08 AM
#19
Jet Jockey
Thread Starter
By the way...sandblasting.
Potentially harmful or not?
Potentially harmful or not?
__________________
Good night...and good luck
Good night...and good luck
08-23-07, 10:28 AM
#20
Guest
Posts: n/a
Mentioned: Post(s)
Tagged: Thread(s)
Quoted: Post(s)
Weeeell, yes and no.
If the finish you are trying to remove is POWDERCOAT, then YES, could easily damage the frame.
Remove powdercoat with environmentally unfriendly chemical paint & epoxy remover.
If the old finish is paint, you can blast it off. Be careful in selecting a blaster company to do it. I used to have to bring my own #60 mesh sand, mainly because pro blasters aren't allowed to use such a fine grade of sand for environmental reasons. But their blasters are generally overpowered for bike frame stripping, so they have to be quick & careful.
I have now refined my techniques. I start with a chemical stripping. Then I use my new 100 lb capacity pressure snadblaster to clean cable guides, rusty spots and other deatailed areas.
Then, PRIMER IMMEDIATELY!! Blasted steel starts rusting very quickly. Don't blast on foggy days!
I say PRESSURE blaster because the cheap siphon feed types will take FOREVER to clean a frame!
Oh, and some folks will recommend walnut shells as blast media, but it's 20X more expensive than SAND!
I get a 100 lb bag of sand for $8. Walnut shells are 50 lbs for $50 + $50 shipping.
Takes about 40-50 lbs of sand to do a frame/fork.
The sand is sold as Lapis Luster, and actually comes from the sand plant on the beach, right down the road from my house. I don't know how wide they distribute it though.
Hope that helps!
08-24-07, 04:08 AM
#21
Senior Member
Join Date: Apr 2007
Location: Melbourne, Australia
Posts: 112
Mentioned: 0 Post(s)
Tagged: 0 Thread(s)
Quoted: 0 Post(s)
Likes: 0
Liked 0 Times
in
0 Posts
I am interested in the treatment of the purple frame. I have just picked up at side of road an 80s cro-moly road frame, it also has bits on the bottom tube where the shifters mount. Do I just tape over these before spraying? I am planning on ust popping the shifters back on at the end, even tho the bike will be a single speed townie.
Also, it looks like you have painted inside the bottom bracket bit. Is that right or is that just the light? Am i meant to cover that bit inside in tape so it does not get any paint on the thread?
With thanks, Cal.
08-24-07, 09:26 AM
#22
Guest
Posts: n/a
Mentioned: Post(s)
Tagged: Thread(s)
Quoted: Post(s)
Sorry the 100k pics don't show details too well, but in the pic of the front end, you can kind of see the whole shift boss is white. (color of the first coat of primer)
In the picture of the whole frame, you can see the white primer in the BB and the seattube.
The picture of the BB was taken before I unmasked it, the other two pics were after I removed the tape.
As a note, I sandblasted the frame lightly, including the BB & seattube. This cleans all the gook and crud from those areas. Then the primer is sprayed, including some in the seat tube & BB. The Mil thickness is not sufficient to cause problems in either area. THEN I mask all that needs masking and paint from there.
2nd note. This one makes me laugh! So I have to add my remedy. I dropped off a frame at a LBS to be built. I had apparently forgotten to unmask the seattube. The guys at the shop said they spent HOURS trying to get the tape out!

Sooo, to GET the tape out. I use a #11 Xacto blade to carefully get under the edge of the tape at the seat collar. Then, take a longish pair of tweezers and slide one leg between the tape and the seat tube. Push that leg in carefully as far as you can get it. Now just twist the tweezers like you would open a can of sardines. The tape rolls right around the tweezers and comes out in one piece.
08-24-07, 03:43 PM
#23
Senior Member
Join Date: Apr 2007
Location: Melbourne, Australia
Posts: 112
Mentioned: 0 Post(s)
Tagged: 0 Thread(s)
Quoted: 0 Post(s)
Likes: 0
Liked 0 Times
in
0 Posts
I do. I actually mask the square BASE of the shifter boss. I see alot of frames painted where the painter only masked the cylindrical part, and not the base. Being a mechanic as well, I know that there is a little plate that goes onto the boss first. It has a square hole that fits over the square base of the boss. If there is paint on the square part of the boss, then the plate won't go on nearly as cleanly.
Sorry the 100k pics don't show details too well, but in the pic of the front end, you can kind of see the whole shift boss is white. (color of the first coat of primer)
I did! But there is tape covering the threads! And be sure to use blue (or green) painters tape, and NOT the 99 cents-per-roll tan tape! I also tape inside the seat tube.
In the picture of the whole frame, you can see the white primer in the BB and the seattube.
The picture of the BB was taken before I unmasked it, the other two pics were after I removed the tape.
As a note, I sandblasted the frame lightly, including the BB & seattube. This cleans all the gook and crud from those areas. Then the primer is sprayed, including some in the seat tube & BB. The Mil thickness is not sufficient to cause problems in either area. THEN I mask all that needs masking and paint from there.
2nd note. This one makes me laugh! So I have to add my remedy. I dropped off a frame at a LBS to be built. I had apparently forgotten to unmask the seattube. The guys at the shop said they spent HOURS trying to get the tape out!
Sooo, to GET the tape out. I use a #11 Xacto blade to carefully get under the edge of the tape at the seat collar. Then, take a longish pair of tweezers and slide one leg between the tape and the seat tube. Push that leg in carefully as far as you can get it. Now just twist the tweezers like you would open a can of sardines. The tape rolls right around the tweezers and comes out in one piece.
08-25-07, 01:11 AM
#24
Senior Member
Join Date: Feb 2007
Location: Seattle
Posts: 64
Bikes: Basso, Holdsworth Nouvo Record, Italvega Nuovo Record, Gitane TdF, Bridgestone (700, RB-2), Shogun tour, Univega Sportour, Raleigh Competition
Mentioned: 0 Post(s)
Tagged: 0 Thread(s)
Quoted: 0 Post(s)
Likes: 0
Liked 0 Times
in
0 Posts
Overall the bike looks pretty good. I've gone with model paints (you could get a fair match with silver and blue) to do the touch up. On spots like that I use a small screwdriver point or awl to take off the rust and bad paint surrounding it. No sanding as I use the paint to build up even with the edge of the original paint. Very little expense and you can always repaint later.
08-25-07, 04:37 AM
#25
.
Join Date: Aug 2005
Location: Rocket City, No'ala
Posts: 12,760
Bikes: 2014 Trek Domane 5.2, 1985 Pinarello Treviso, 1990 Gardin Shred, 2006 Bianchi San Jose
Mentioned: 3 Post(s)
Tagged: 0 Thread(s)
Quoted: 62 Post(s)
Likes: 0
Liked 28 Times
in
13 Posts
I recommend using a caustic based solution to remove rust after you've sanded the frame down. Acid can cause problems if not completely removed. Oxalic acid chelates the rust; I've used it to remove iron deposits from quartz crystals.
Get some Red Devil lye, mix it with water, apply to frame. If you can immerse the frame, so much the better. Hot water speeds the reaction. Rinse, rinse, rinse some more, then be ready to prime as soon as possible. Use framesaver on the inside of the frame. I've used lye solutions to derust engine blocks.
Rinsing the frame with water that has a bit of dishwasher machine detergent in it will help prevent "flash rusting" but still prime that frame asap.