


For the love of English 3 speeds...
 01-12-19, 07:32 AM
Full Member
Join Date: Apr 2018
Location: Hitsville USA
Posts: 261
Bikes: 50s, 60s, 70s Nottingham/Worksop bikes, becanes, Gitane, Bertin, Lion of Sochaux
Mentioned: 6 Post(s)
Tagged: 0 Thread(s)
Quoted: 145 Post(s)
Liked 120 Times
in
75 Posts
I'm selling my '65 sports 21" ( as I also have a '63). All original, fully serviced including all bearings replaced/repacked, SA AW hub completely disassembled, fully cleaned, polished, waxed but I'm here in Detroit. Not sure if allowed to post link ; on local CL as intended to sell locally but may consider shipping. I can sympathize with you as I had to drive >300mile round trip as no local supply. As far as I an tell , in those days , this was resolutely schwinn country. Cheers, Steve
 01-12-19, 08:40 AM

On the road

Join Date: Aug 2005
Location: New England
Posts: 2,171
Bikes: Old Schwinns and old Raleighs
Mentioned: 35 Post(s)
Tagged: 0 Thread(s)
Quoted: 373 Post(s)
Liked 847 Times
in
323 Posts
This is how I mount mine as well. That's why I prefer the older style with the longer trigger. Apparently, SA was aware of the problem of their triggers getting bent from leaning bikes against walls back in 1939 as they issued this recommendation for "Flick trigger" mounting. They advise mounting them far back on the handlebar to what I consider an inconvenient position. Things got even worse when Raleigh introduced their "light alloy prop stand" in 1954. These are notoriously tippy and today, bent window triggers are common. I think this was the motivation for the short trigger, through body mounting bolt version in the mid 50s. Mine are mounted in the convenient position, but I always use the far more stable alloy ESGE kick stands on my bikes.

__________________
Classic American and British Roadsters, Utility Bikes, and Sporting Bikes (1935-1979):
https://bikeshedva.blogspot.com/
Classic American and British Roadsters, Utility Bikes, and Sporting Bikes (1935-1979):
https://bikeshedva.blogspot.com/
01-12-19, 09:40 AM
Senior Member

Join Date: Jan 2015
Posts: 3,240
Mentioned: 103 Post(s)
Tagged: 0 Thread(s)
Quoted: 1299 Post(s)
Likes: 0
Liked 103 Times
in
85 Posts
That's a great picture from the early days of the flick shifter. Sturmey had the earlier bar-mounted "barrel" shifter, but the flick was a jump forward for them from the quadrant. Today, the quadrant shifter (and the barrel shifter) sell for high prices, but the old "upside down flick shifter" is still the best shifter Sturmey produced. The 1940s-50s era ones are my favorites (though my avatar is an old quadrant, go figure).
https://www.flickr.com/photos/150931...57686501575124
__________________
Inflate Hard
Inflate Hard
01-12-19, 01:07 PM
Senior Member
Join Date: Apr 2012
Location: Toronto
Posts: 2,572
Bikes: 1971 Hercules, 1978 Raleigh Superbe, 1978 Raleigh Tourist, 1964 Glider 3 Speed, 1967 Raleigh Sprite 5 Speed, 1968 Hercules AMF 3 Speed, 1972 Raleigh Superbe, 1976 Raleigh Superbe, 1957 Flying Pigeon, 1967 Dunelt 3 Speed
Mentioned: 57 Post(s)
Tagged: 0 Thread(s)
Quoted: 1028 Post(s)
Liked 443 Times
in
288 Posts
I have some more detailed pictures, from all sides of this style shifter on my SA Shifters Flickr album.
https://www.flickr.com/photos/150931...57686501575124
https://www.flickr.com/photos/150931...57686501575124
01-14-19, 09:36 AM
Senior Member

Join Date: Mar 2014
Location: Southport, North Carolina, USA & Pevensey, East Sussex, UK
Posts: 309
Bikes: 1)1992 Trek 970, 2)2010 Trek 6500, 3)1973 Colnago Super, 4)1955 Freddie Grubb Meteor. 5)1993 Airborne Ti-Hag Titanium. 6)1936 BSA 602DX Roadster. 7)1957 Philips P2 Sports. 8)1955 Dayton Roadmaster. 9)1948 Humber Clubman. 10) 1949 Sunbeam WA3 Wayfarer
Mentioned: 5 Post(s)
Tagged: 0 Thread(s)
Quoted: 157 Post(s)
Liked 85 Times
in
34 Posts
1957 Ladies P2 Sports Roadster Serial No K651746
Just acquired this 1957 Philips Step Thru Ladies bicycle with Sturmey Archer 3 Speed. It is definitely pre 1960 when Philips were take-over by Raleigh as the Badges state made in Birmingham which would be the Philips Factory in Credenda Works in Smethwick. After Raleigh took over it changed to Nottingham. I don't know where this bike has been but it is in remarkable condition and should clean up well needing no refinishing at all just a good clean and wax polish, maybe new brake and 3 Speed cables.
My wife is going to love this bike!!!!.
I cannot believe how little the bike has suffered considering its age, the paintwork has only minor damage typical on a bike used for a few years only. It must have been stored in a very dry place. for example, the inside on the mudguards had a small amount of dirt which when wiped off revealed the paint full intact, I removed the Chrome Nose from the front mudguard to de rust the inside. Everything dismantled easily and a couple of days soaking in white vinegar has cleaned all the chrome and removed any rust.
The headstock, pedals and bottom bracket bearings were completely dried out with the remains of the grease falling out as dust, fortunately it has not been ridden in this condition as the bearing surfaces are all good and will be re-used with new balls.
The brake cables are beyond redemption however and replacements are unobtainable in my searches so far here in USA but in February I return to the UK and I expect my local bike shop there will be able to find some with correct nipples. I have already found a NOS 3 Speed cable and replacement Sturmey Archer gear changer as the one on the bike has been badly bent & damaged from leaning against a wall as illustrated in recent discussion above.
I have compounded the frame and the paint which was flat and dull has come up well and nows has a shine, I was careful not to damage the transfers so those areas are not a shiny as areas that had none but I am happy with how it looks. I plan to clear lacquer the painted parts which should improve its looks and protect the paint and transfers. I will also inject the frame with 'J. P. Weigles - Bicycle Frame Saver' as the climate here in North Carolina is very humid and it will prevent internal corrosion of the frame.
The wheels I have not touched yet but they only have minor pitting of the chrome rims and hubs are in nice condition. I will deal with them when I come back to USA in May/June
Ready to start dismantling
The Paint was dull, compounded as much as I dare without losing transfers.
Headstock polished up OK.
These were partially lost when I received the bike.
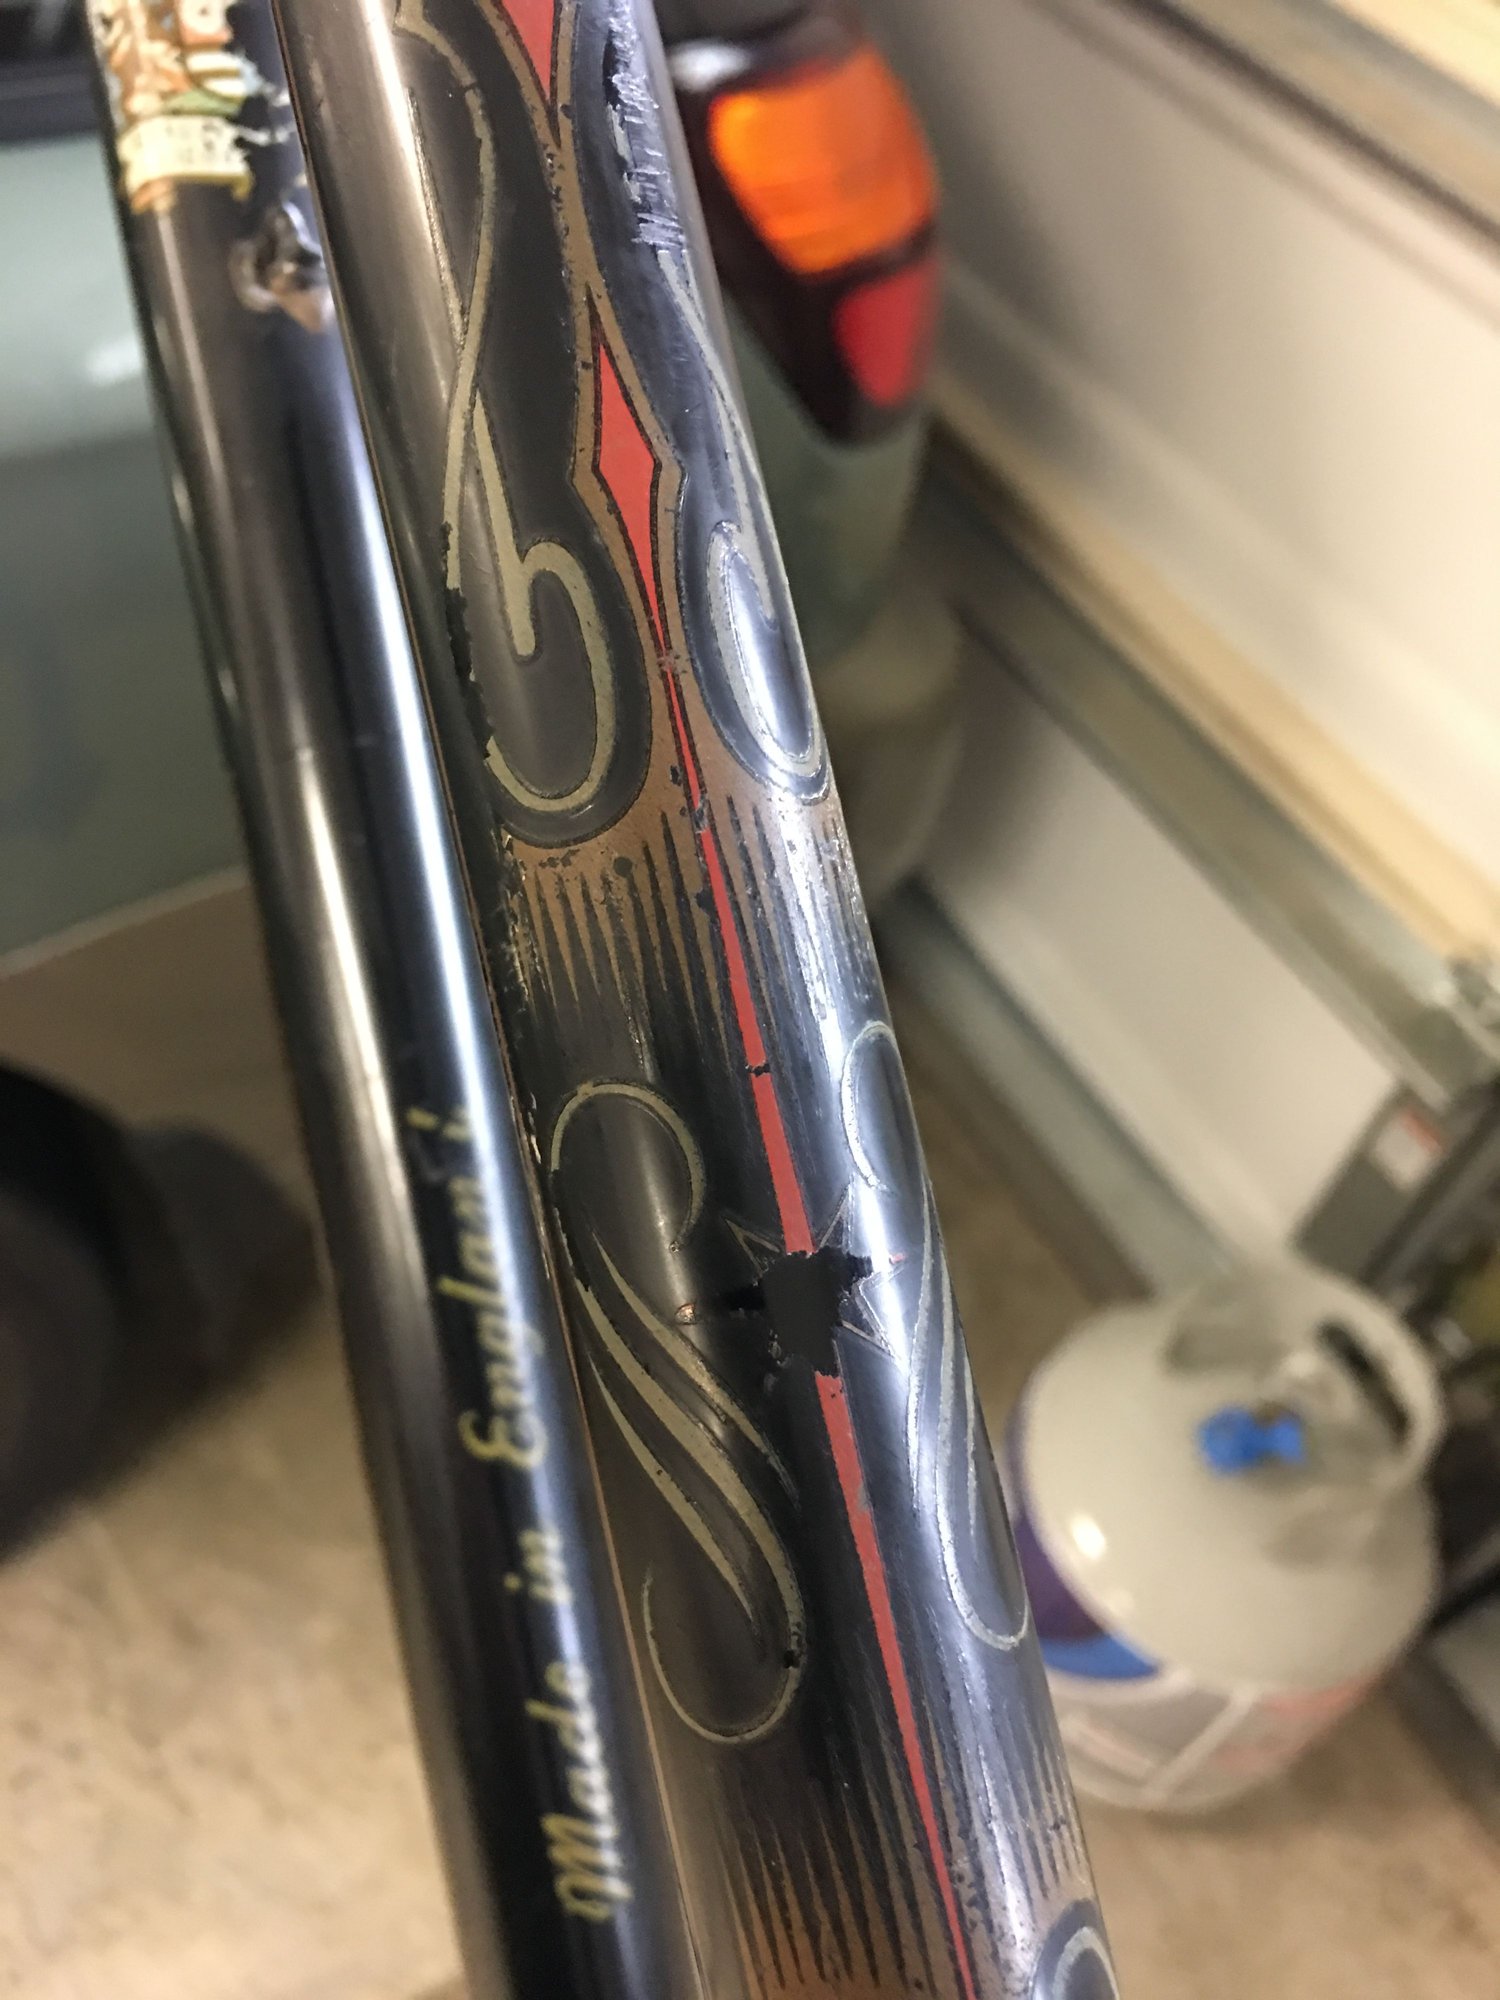
Down tube transfer survived very light compounding OK.
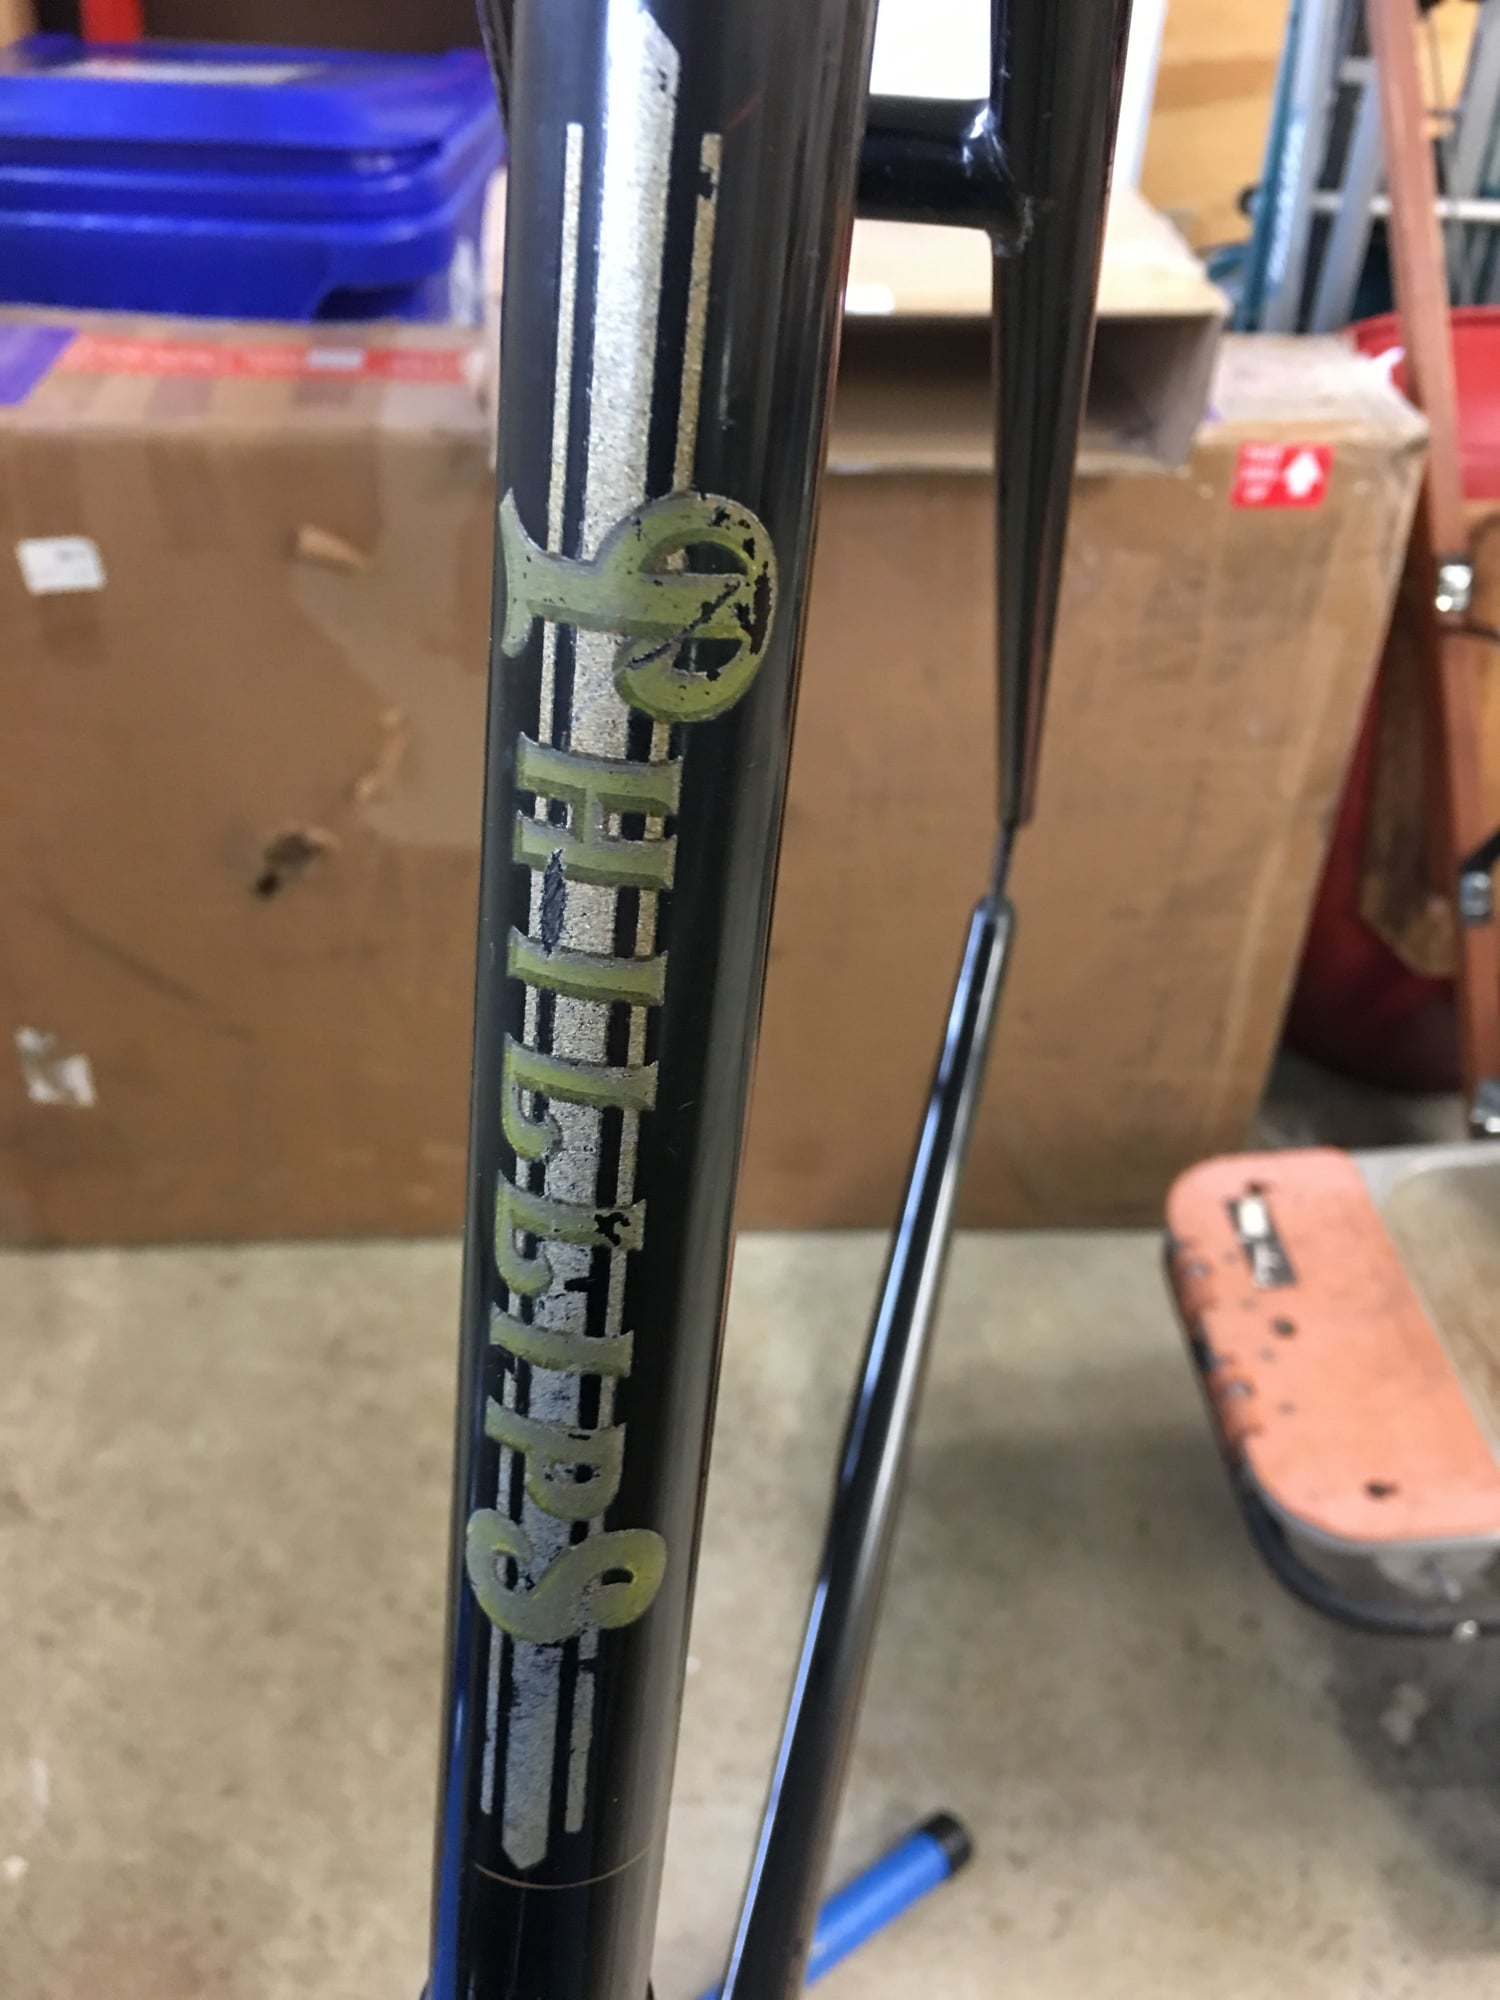
As also the Philips Transfer.
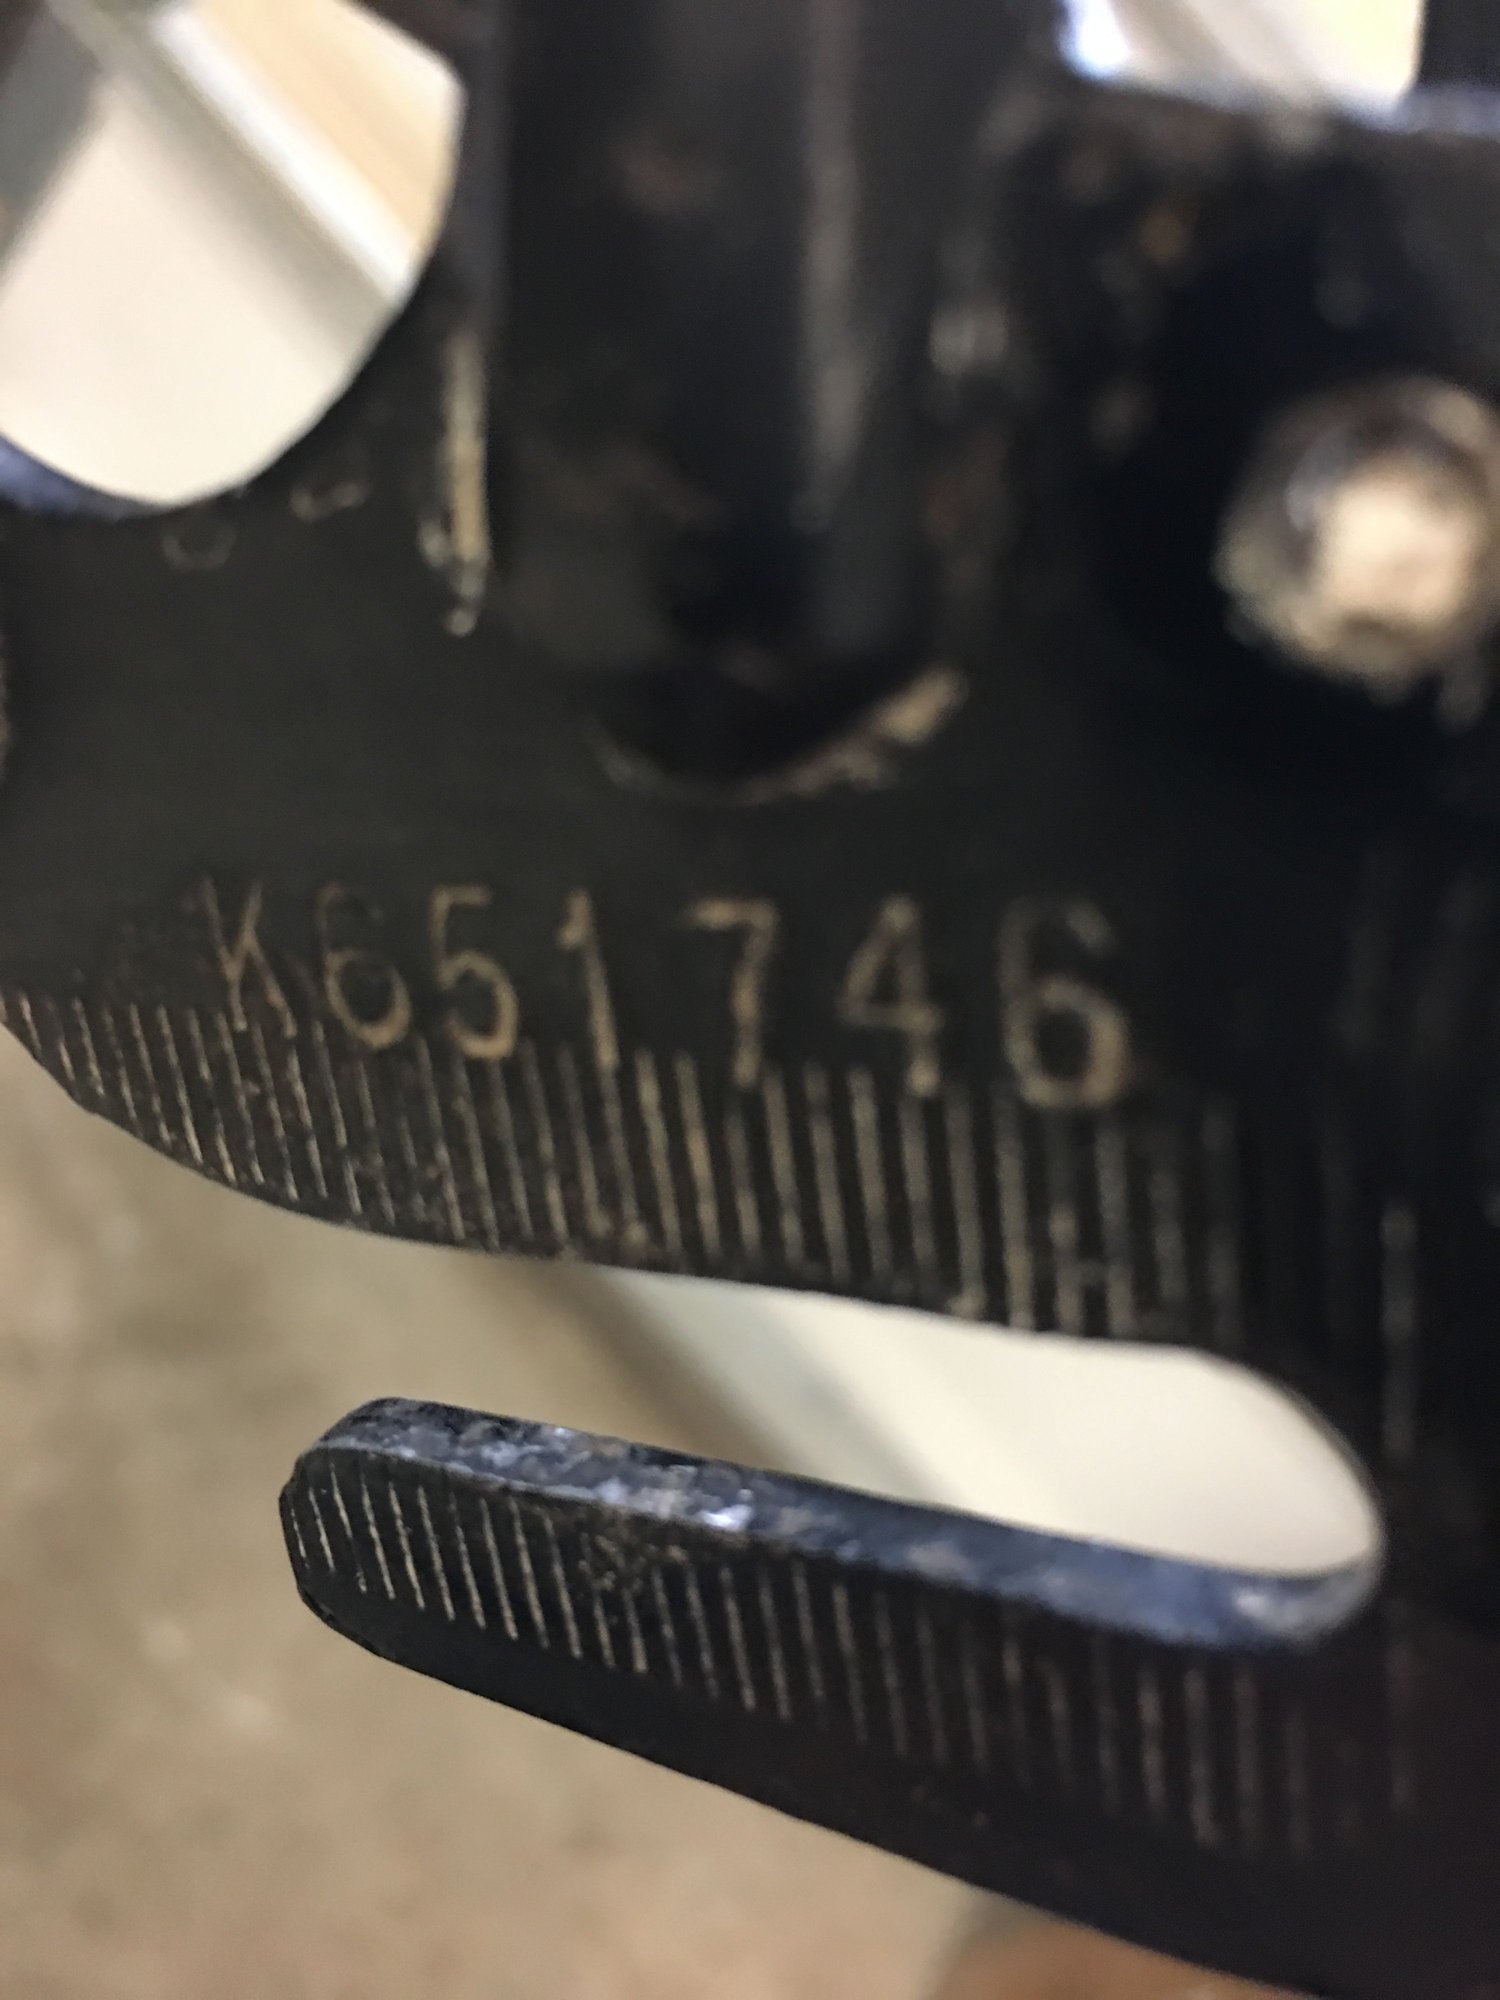
Serial Number K651746.
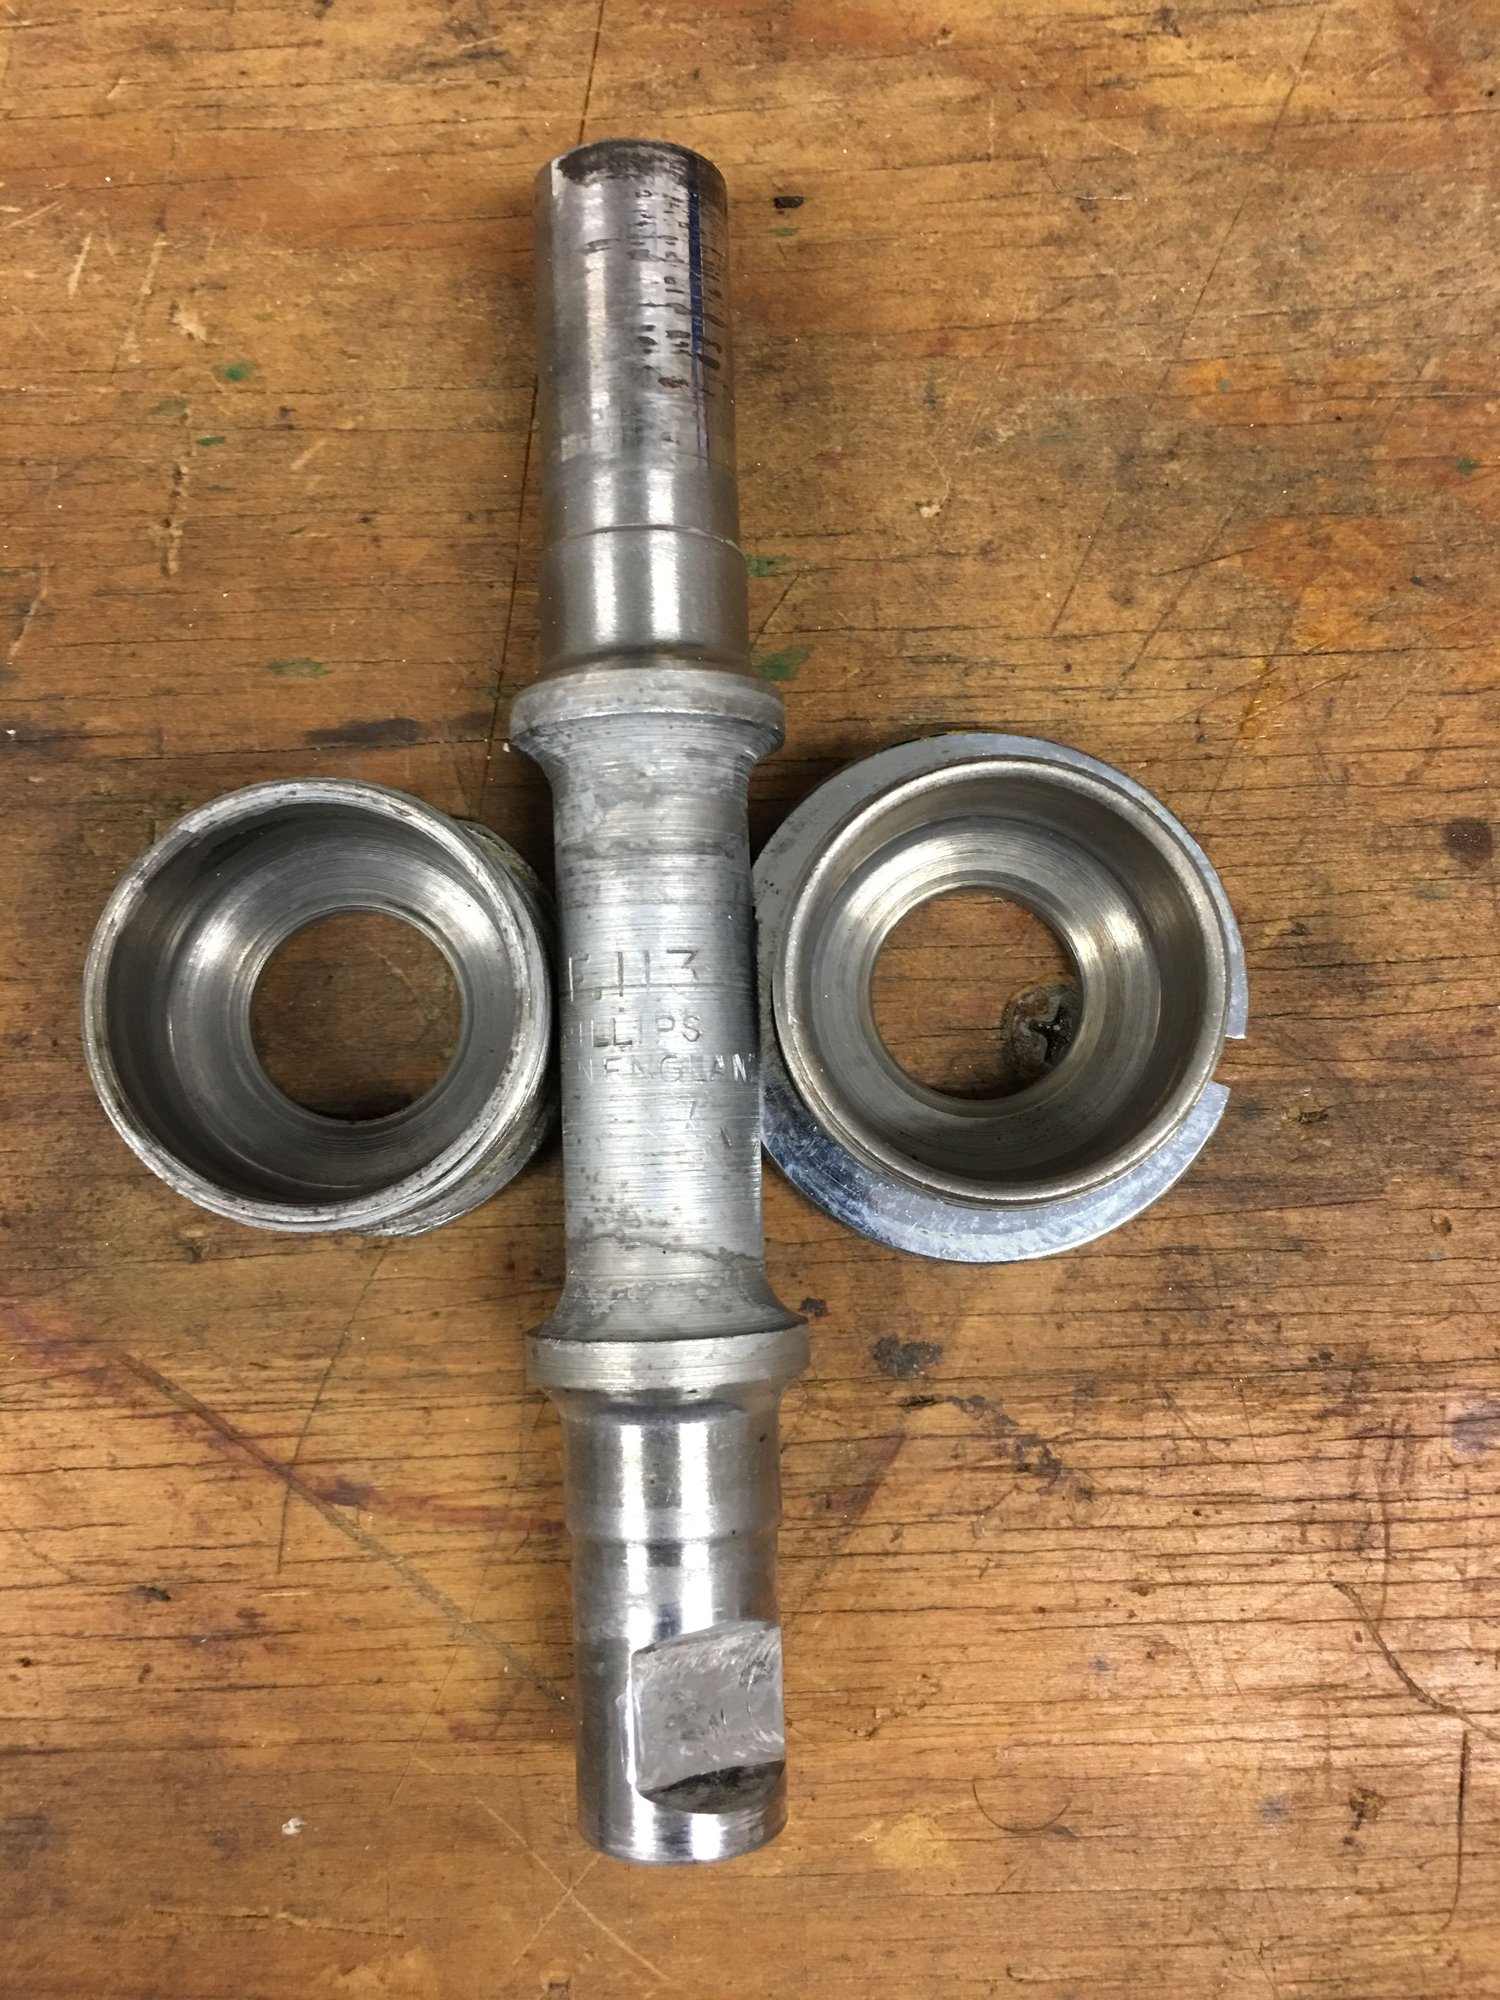
Bottom Bracket (dry as a bone) surprisingly is fine and re usable. Original Philips axle.
The chrome has survived in remarkable condition, 2 days in white vinegar has removed corrosion.

mudguards & chain guard ready for compounding have virtually no rust, inside or out.
01-14-19, 04:49 PM
Senior Member
Join Date: Jan 2015
Posts: 3,240
Mentioned: 103 Post(s)
Tagged: 0 Thread(s)
Quoted: 1299 Post(s)
Likes: 0
Liked 103 Times
in
85 Posts
That looks like it's going to turn out really nice. Good job! Sometimes getting the correct cables can be tricky. Custom cables can be made if you have any problems finding originals.
__________________
Inflate Hard
Inflate Hard
01-14-19, 06:52 PM
Senior Member
Join Date: Apr 2012
Location: Toronto
Posts: 2,572
Bikes: 1971 Hercules, 1978 Raleigh Superbe, 1978 Raleigh Tourist, 1964 Glider 3 Speed, 1967 Raleigh Sprite 5 Speed, 1968 Hercules AMF 3 Speed, 1972 Raleigh Superbe, 1976 Raleigh Superbe, 1957 Flying Pigeon, 1967 Dunelt 3 Speed
Mentioned: 57 Post(s)
Tagged: 0 Thread(s)
Quoted: 1028 Post(s)
Liked 443 Times
in
288 Posts
I have now stripped this bicycle to last nut & bolt (except wheels). I checked the Philips Catalogue in Veteran Cycle Club's Library for 1957 and established the bike is a P2 Ladies Sports Light Roadster (The Mens version was a P1) On inspection I have found there is a problem with the SW 3 Speed which is missing the 'telltale' and needs to be dismantled to clean and inspect anyway so I will know more once it is apart. I have obtained two further 1957 SW Hubs, one in apparent good condition and one not so but can be raided for spare parts, I also found a NOS Telltale and gear change spindle on eBay which is on its way currently (I was amazed to find this).
I cannot believe how little the bike has suffered considering its age, the paintwork has only minor damage typical on a bike used for a few years only. It must have been stored in a very dry place. for example, the inside on the mudguards had a small amount of dirt which when wiped off revealed the paint full intact, I removed the Chrome Nose from the front mudguard to de rust the inside. Everything dismantled easily and a couple of days soaking in white vinegar has cleaned all the chrome and removed any rust.
The headstock, pedals and bottom bracket bearings were completely dried out with the remains of the grease falling out as dust, fortunately it has not been ridden in this condition as the bearing surfaces are all good and will be re-used with new balls.
The brake cables are beyond redemption however and replacements are unobtainable in my searches so far here in USA but in February I return to the UK and I expect my local bike shop there will be able to find some with correct nipples. I have already found a NOS 3 Speed cable and replacement Sturmey Archer gear changer as the one on the bike has been badly bent & damaged from leaning against a wall as illustrated in recent discussion above.
I have compounded the frame and the paint which was flat and dull has come up well and nows has a shine, I was careful not to damage the transfers so those areas are not a shiny as areas that had none but I am happy with how it looks. I plan to clear lacquer the painted parts which should improve its looks and protect the paint and transfers. I will also inject the frame with 'J. P. Weigles - Bicycle Frame Saver' as the climate here in North Carolina is very humid and it will prevent internal corrosion of the frame.
The wheels I have not touched yet but they only have minor pitting of the chrome rims and hubs are in nice condition. I will deal with them when I come back to USA in May/June
Ready to start dismantling
The Paint was dull, compounded as much as I dare without losing transfers.
Headstock polished up OK.
These were partially lost when I received the bike.
Down tube transfer survived very light compounding OK.
As also the Philips Transfer.
Serial Number K651746.
Bottom Bracket (dry as a bone) surprisingly is fine and re usable. Original Philips axle.
The chrome has survived in remarkable condition, 2 days in white vinegar has removed corrosion.
mudguards & chain guard ready for compounding have virtually no rust, inside or out.
Didn't know about the vinegar trick..
I'll give it a try.
01-14-19, 08:11 PM
Senior Member
Join Date: Jan 2015
Posts: 3,240
Mentioned: 103 Post(s)
Tagged: 0 Thread(s)
Quoted: 1299 Post(s)
Likes: 0
Liked 103 Times
in
85 Posts
Yes, vinegar is another step milder than Evapo-rust and is the only thing I would use to get rust stains off a shifter faceplate. The chrome there is very fragile. Never use abrasives. It's not the usual type of chrome plating. It's almost like it was printed on somehow. The back of the plate is bare brass and even the embossed areas aren't plated. If the color comes off, you can see there's no plating underneath. By the way, I can repair that shifter. If the bend is towards the back, the repair won't be noticeable. If the bend is forward and the faceplate is bent, it gets more tricky. A soft bend in the faceplate might smooth out, but there's no way to get a crease looking flat again. The colors in the embossed areas can be replaced.
__________________
Inflate Hard
Inflate Hard
01-14-19, 08:50 PM
Senior Member
Join Date: Apr 2012
Location: Toronto
Posts: 2,572
Bikes: 1971 Hercules, 1978 Raleigh Superbe, 1978 Raleigh Tourist, 1964 Glider 3 Speed, 1967 Raleigh Sprite 5 Speed, 1968 Hercules AMF 3 Speed, 1972 Raleigh Superbe, 1976 Raleigh Superbe, 1957 Flying Pigeon, 1967 Dunelt 3 Speed
Mentioned: 57 Post(s)
Tagged: 0 Thread(s)
Quoted: 1028 Post(s)
Liked 443 Times
in
288 Posts
Yes, vinegar is another step milder than Evapo-rust and is the only thing I would use to get rust stains off a shifter faceplate. The chrome there is very fragile. Never use abrasives. It's not the usual type of chrome plating. It's almost like it was printed on somehow. The back of the plate is bare brass and even the embossed areas aren't plated. If the color comes off, you can see there's no plating underneath. By the way, I can repair that shifter. If the bend is towards the back, the repair won't be noticeable. If the bend is forward and the faceplate is bent, it gets more tricky. A soft bend in the faceplate might smooth out, but there's no way to get a crease looking flat again. The colors in the embossed areas can be replaced.
01-15-19, 02:07 PM
Senior Member
Join Date: Mar 2014
Location: Southport, North Carolina, USA & Pevensey, East Sussex, UK
Posts: 309
Bikes: 1)1992 Trek 970, 2)2010 Trek 6500, 3)1973 Colnago Super, 4)1955 Freddie Grubb Meteor. 5)1993 Airborne Ti-Hag Titanium. 6)1936 BSA 602DX Roadster. 7)1957 Philips P2 Sports. 8)1955 Dayton Roadmaster. 9)1948 Humber Clubman. 10) 1949 Sunbeam WA3 Wayfarer
Mentioned: 5 Post(s)
Tagged: 0 Thread(s)
Quoted: 157 Post(s)
Liked 85 Times
in
34 Posts
Yes, vinegar is another step milder than Evapo-rust and is the only thing I would use to get rust stains off a shifter faceplate. The chrome there is very fragile. Never use abrasives. It's not the usual type of chrome plating. It's almost like it was printed on somehow. The back of the plate is bare brass and even the embossed areas aren't plated. If the color comes off, you can see there's no plating underneath. By the way, I can repair that shifter. If the bend is towards the back, the repair won't be noticeable. If the bend is forward and the faceplate is bent, it gets more tricky. A soft bend in the faceplate might smooth out, but there's no way to get a crease looking flat again. The colors in the embossed areas can be replaced.
What I need to do is determine what is the correct shifter for this bike, there seems to be plenty around of various vintages so I will research this area, though I hardly think the shifter on the bike was replaced at any point in the past.
01-15-19, 02:29 PM
Senior Member
Join Date: Mar 2014
Location: Southport, North Carolina, USA & Pevensey, East Sussex, UK
Posts: 309
Bikes: 1)1992 Trek 970, 2)2010 Trek 6500, 3)1973 Colnago Super, 4)1955 Freddie Grubb Meteor. 5)1993 Airborne Ti-Hag Titanium. 6)1936 BSA 602DX Roadster. 7)1957 Philips P2 Sports. 8)1955 Dayton Roadmaster. 9)1948 Humber Clubman. 10) 1949 Sunbeam WA3 Wayfarer
Mentioned: 5 Post(s)
Tagged: 0 Thread(s)
Quoted: 157 Post(s)
Liked 85 Times
in
34 Posts
This is pretty close but they are sloppy in the hand lever and the cable is thinner 1.5mm so does not locate well in the outgoing slot. The original cable is 2mm Dial. My local bike dealer says my original cables are closer to Motorcycle cables, that might be route to explore.
I think perhaps I will stand a better chance in UK where these bikes are more common so I will give that a try and if I fail I will have to use what is available here which will work but is a sloppy rather than a tight fit which grates with me. Your suggestion re 'custom cables' I might explore if all else fails.
Last edited by PeterLYoung; 01-15-19 at 02:30 PM. Reason: adding text
01-15-19, 05:32 PM
Senior Member
Join Date: Mar 2018
Location: Brooklyn, NY
Posts: 660
Bikes: 1983 Trek 600, 1972 Raleigh Sports Step Thru, 1963 Rudge Sports, 2007 Dahon MuP8, Dahon Speed, Public Mixte 8-speed IGH, mid-70s Peugeot Mixte AW conversion, Riv Platypus
Mentioned: 0 Post(s)
Tagged: 0 Thread(s)
Quoted: 350 Post(s)
Liked 24 Times
in
17 Posts
Hello again! Wow, this thread is a busy place. I've been lurking but not posted for a long time. I met a little discouragement on my three-speed projects is why. But: maybe prospects have improved and a three-speed project that's been postponed for, like, two years might get underway again soon. Also, I did finally sort out the shifting problems with my Rudge, by resetting and tightening the pulley and fulcrum stop. I also broke down the hub again but I have a feeling that was unnecessary. What I'm happy about is I took off the fenders and chainguard and added a rear rack and new rubber grips and entered the bike into daily commuter and around-the-city service. Not on rain days, of course. Also I opened up the bottom bracket and cleaned it up from the non-drive side and poked in new grease with a stir stick. The cotter pin on the drive side is frozen and would need to be drilled to remove it, and I don't feel like doing that just yet. I bought a little original lockring wrench, sized to fit a mini saddle bag, off ebay. It was pricey for what it is but with the help of a few taps of a hammer I can get enough torque to tighten sufficiently or loosen the lock ring. Here's a picture--not a beauty pageant winner but neither a garage queen. Maybe in the spring CR18s. Right now I'm keeping my fingers crossed for a resumption of work on Three-Speed Project X.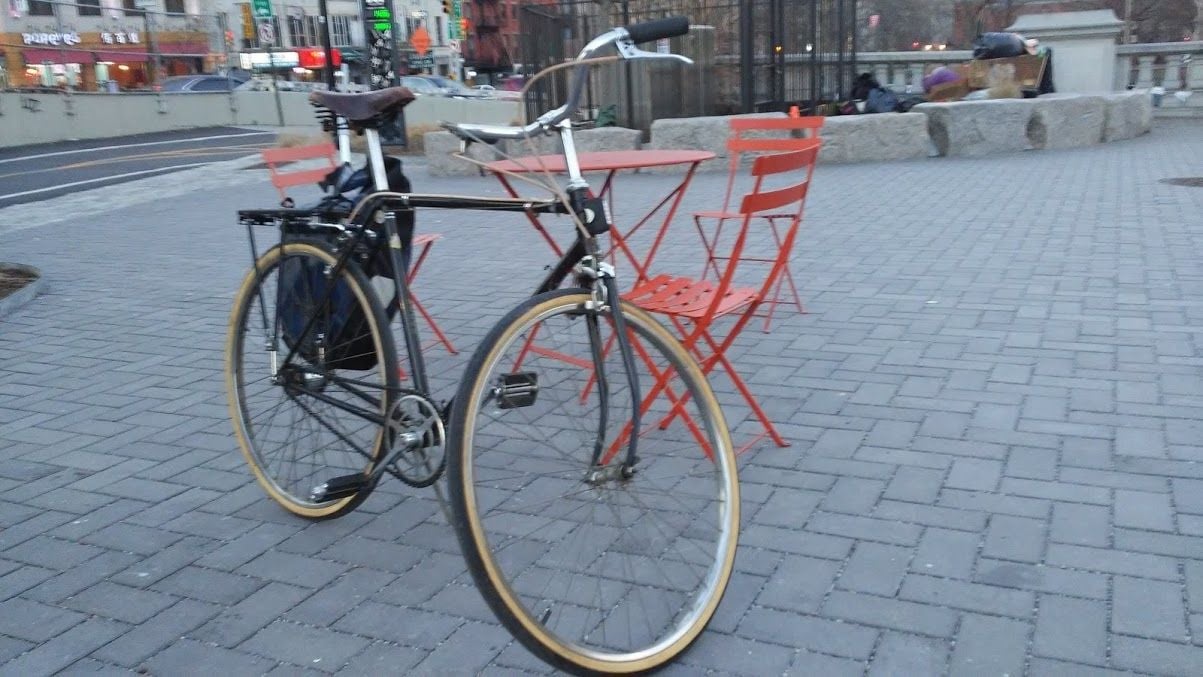
01-15-19, 05:35 PM
Senior Member
Join Date: Mar 2018
Location: Brooklyn, NY
Posts: 660
Bikes: 1983 Trek 600, 1972 Raleigh Sports Step Thru, 1963 Rudge Sports, 2007 Dahon MuP8, Dahon Speed, Public Mixte 8-speed IGH, mid-70s Peugeot Mixte AW conversion, Riv Platypus
Mentioned: 0 Post(s)
Tagged: 0 Thread(s)
Quoted: 350 Post(s)
Liked 24 Times
in
17 Posts
PS It continues to amaze and even chagrin me somewhat the nice old Raleighs many of you folks can pick up in second cities for such reasonable prices. Here, you can't get a rideable Sports for under $150, that I can see, and even at that price if it has steel rims they will be pretty rusted out.
01-16-19, 12:39 PM
Senior Member
A couple vintage 3 speeds on CL here locally (St. Louis, MO)
https://stlouis.craigslist.org/bik/d/saint-louis-the-aberdale-feather/6778432576.html
https://stlouis.craigslist.org/bik/d/saint-ann-1930s-to-40s-dunelt-bicycle/6772024492.html
https://stlouis.craigslist.org/bik/d/saint-louis-the-aberdale-feather/6778432576.html
https://stlouis.craigslist.org/bik/d/saint-ann-1930s-to-40s-dunelt-bicycle/6772024492.html
01-17-19, 09:48 AM
Senior Member
Join Date: Mar 2018
Location: Brooklyn, NY
Posts: 660
Bikes: 1983 Trek 600, 1972 Raleigh Sports Step Thru, 1963 Rudge Sports, 2007 Dahon MuP8, Dahon Speed, Public Mixte 8-speed IGH, mid-70s Peugeot Mixte AW conversion, Riv Platypus
Mentioned: 0 Post(s)
Tagged: 0 Thread(s)
Quoted: 350 Post(s)
Liked 24 Times
in
17 Posts
This must have been covered already, but I can't remember the answer. When the SA hubs came from the factory, was there grease on the bearings or did SA intend for those to be lubed by oil dripped into the oil port? I use grease on the bearings when I service a hub. Can't see the harm.
01-17-19, 10:12 AM
Senior Member
Join Date: Mar 2014
Location: Southport, North Carolina, USA & Pevensey, East Sussex, UK
Posts: 309
Bikes: 1)1992 Trek 970, 2)2010 Trek 6500, 3)1973 Colnago Super, 4)1955 Freddie Grubb Meteor. 5)1993 Airborne Ti-Hag Titanium. 6)1936 BSA 602DX Roadster. 7)1957 Philips P2 Sports. 8)1955 Dayton Roadmaster. 9)1948 Humber Clubman. 10) 1949 Sunbeam WA3 Wayfarer
Mentioned: 5 Post(s)
Tagged: 0 Thread(s)
Quoted: 157 Post(s)
Liked 85 Times
in
34 Posts
This must have been covered already, but I can't remember the answer. When the SA hubs came from the factory, was there grease on the bearings or did SA intend for those to be lubed by oil dripped into the oil port? I use grease on the bearings when I service a hub. Can't see the harm.
01-17-19, 10:24 AM
Senior Member
Join Date: Mar 2014
Location: Southport, North Carolina, USA & Pevensey, East Sussex, UK
Posts: 309
Bikes: 1)1992 Trek 970, 2)2010 Trek 6500, 3)1973 Colnago Super, 4)1955 Freddie Grubb Meteor. 5)1993 Airborne Ti-Hag Titanium. 6)1936 BSA 602DX Roadster. 7)1957 Philips P2 Sports. 8)1955 Dayton Roadmaster. 9)1948 Humber Clubman. 10) 1949 Sunbeam WA3 Wayfarer
Mentioned: 5 Post(s)
Tagged: 0 Thread(s)
Quoted: 157 Post(s)
Liked 85 Times
in
34 Posts
Hello again! Wow, this thread is a busy place. I've been lurking but not posted for a long time. I met a little discouragement on my three-speed projects is why. But: maybe prospects have improved and a three-speed project that's been postponed for, like, two years might get underway again soon. Also, I did finally sort out the shifting problems with my Rudge, by resetting and tightening the pulley and fulcrum stop. I also broke down the hub again but I have a feeling that was unnecessary. What I'm happy about is I took off the fenders and chainguard and added a rear rack and new rubber grips and entered the bike into daily commuter and around-the-city service. Not on rain days, of course. Also I opened up the bottom bracket and cleaned it up from the non-drive side and poked in new grease with a stir stick. The cotter pin on the drive side is frozen and would need to be drilled to remove it, and I don't feel like doing that just yet. I bought a little original lockring wrench, sized to fit a mini saddle bag, off ebay. It was pricey for what it is but with the help of a few taps of a hammer I can get enough torque to tighten sufficiently or loosen the lock ring. Here's a picture--not a beauty pageant winner but neither a garage queen. Maybe in the spring CR18s. Right now I'm keeping my fingers crossed for a resumption of work on Three-Speed Project X.
1) Soak with WD40 or similar for several days allowing time for the oil to soak right through.
2) Get the Bottom Bracket resting on a decent block of wood so it is firmly supported.
3) Loosen the nut so there is a gap around 1/32" to 1/16" under the nut.
4) Get a good quality 3/8" socket extension about 8" to 10" long and a 4lb Club Hammer.
5) Place the female end of the socket extension over the nut, it will centre on the nut if slightly dished and this allows a well placed sharp blow without risk to bike or you.
6) Once it has moved keep loosening the nut a turn or two at a time and giving it sharp blows until the cotter pin comes out.
I have done this many times and it has always ultimately worked without damaging the cotter pin. If you try to hit the nut itself with the bike on its tires it cushions the blow making it less effective plus you are liable to bend the threaded part of the cotter pin.
01-17-19, 10:30 AM
Senior Member
Join Date: Mar 2018
Location: Brooklyn, NY
Posts: 660
Bikes: 1983 Trek 600, 1972 Raleigh Sports Step Thru, 1963 Rudge Sports, 2007 Dahon MuP8, Dahon Speed, Public Mixte 8-speed IGH, mid-70s Peugeot Mixte AW conversion, Riv Platypus
Mentioned: 0 Post(s)
Tagged: 0 Thread(s)
Quoted: 350 Post(s)
Liked 24 Times
in
17 Posts
Regarding your jammed in Cotter Pin. You may already have done all these things but I will at risk of teaching 'Grandma to suck eggs' state the following;
1) Soak with WD40 or similar for several days allowing time for the oil to soak right through.
2) Get the Bottom Bracket resting on a decent block of wood so it is firmly supported.
3) Loosen the nut so there is a gap around 1/32" to 1/16" under the nut.
4) Get a good quality 3/8" socket extension about 8" to 10" long and a 4lb Club Hammer.
5) Place the female end of the socket extension over the nut, it will centre on the nut if slightly dished and this allows a well placed sharp blow without risk to bike or you.
6) Once it has moved keep loosening the nut a turn or two at a time and giving it sharp blows until the cotter pin comes out.
I have done this many times and it has always ultimately worked without damaging the cotter pin. If you try to hit the nut itself with the bike on its tires it cushions the blow making it less effective plus you are liable to bend the threaded part of the cotter pin.
01-17-19, 11:12 AM
Senior Member
Join Date: Mar 2018
Location: Brooklyn, NY
Posts: 660
Bikes: 1983 Trek 600, 1972 Raleigh Sports Step Thru, 1963 Rudge Sports, 2007 Dahon MuP8, Dahon Speed, Public Mixte 8-speed IGH, mid-70s Peugeot Mixte AW conversion, Riv Platypus
Mentioned: 0 Post(s)
Tagged: 0 Thread(s)
Quoted: 350 Post(s)
Liked 24 Times
in
17 Posts
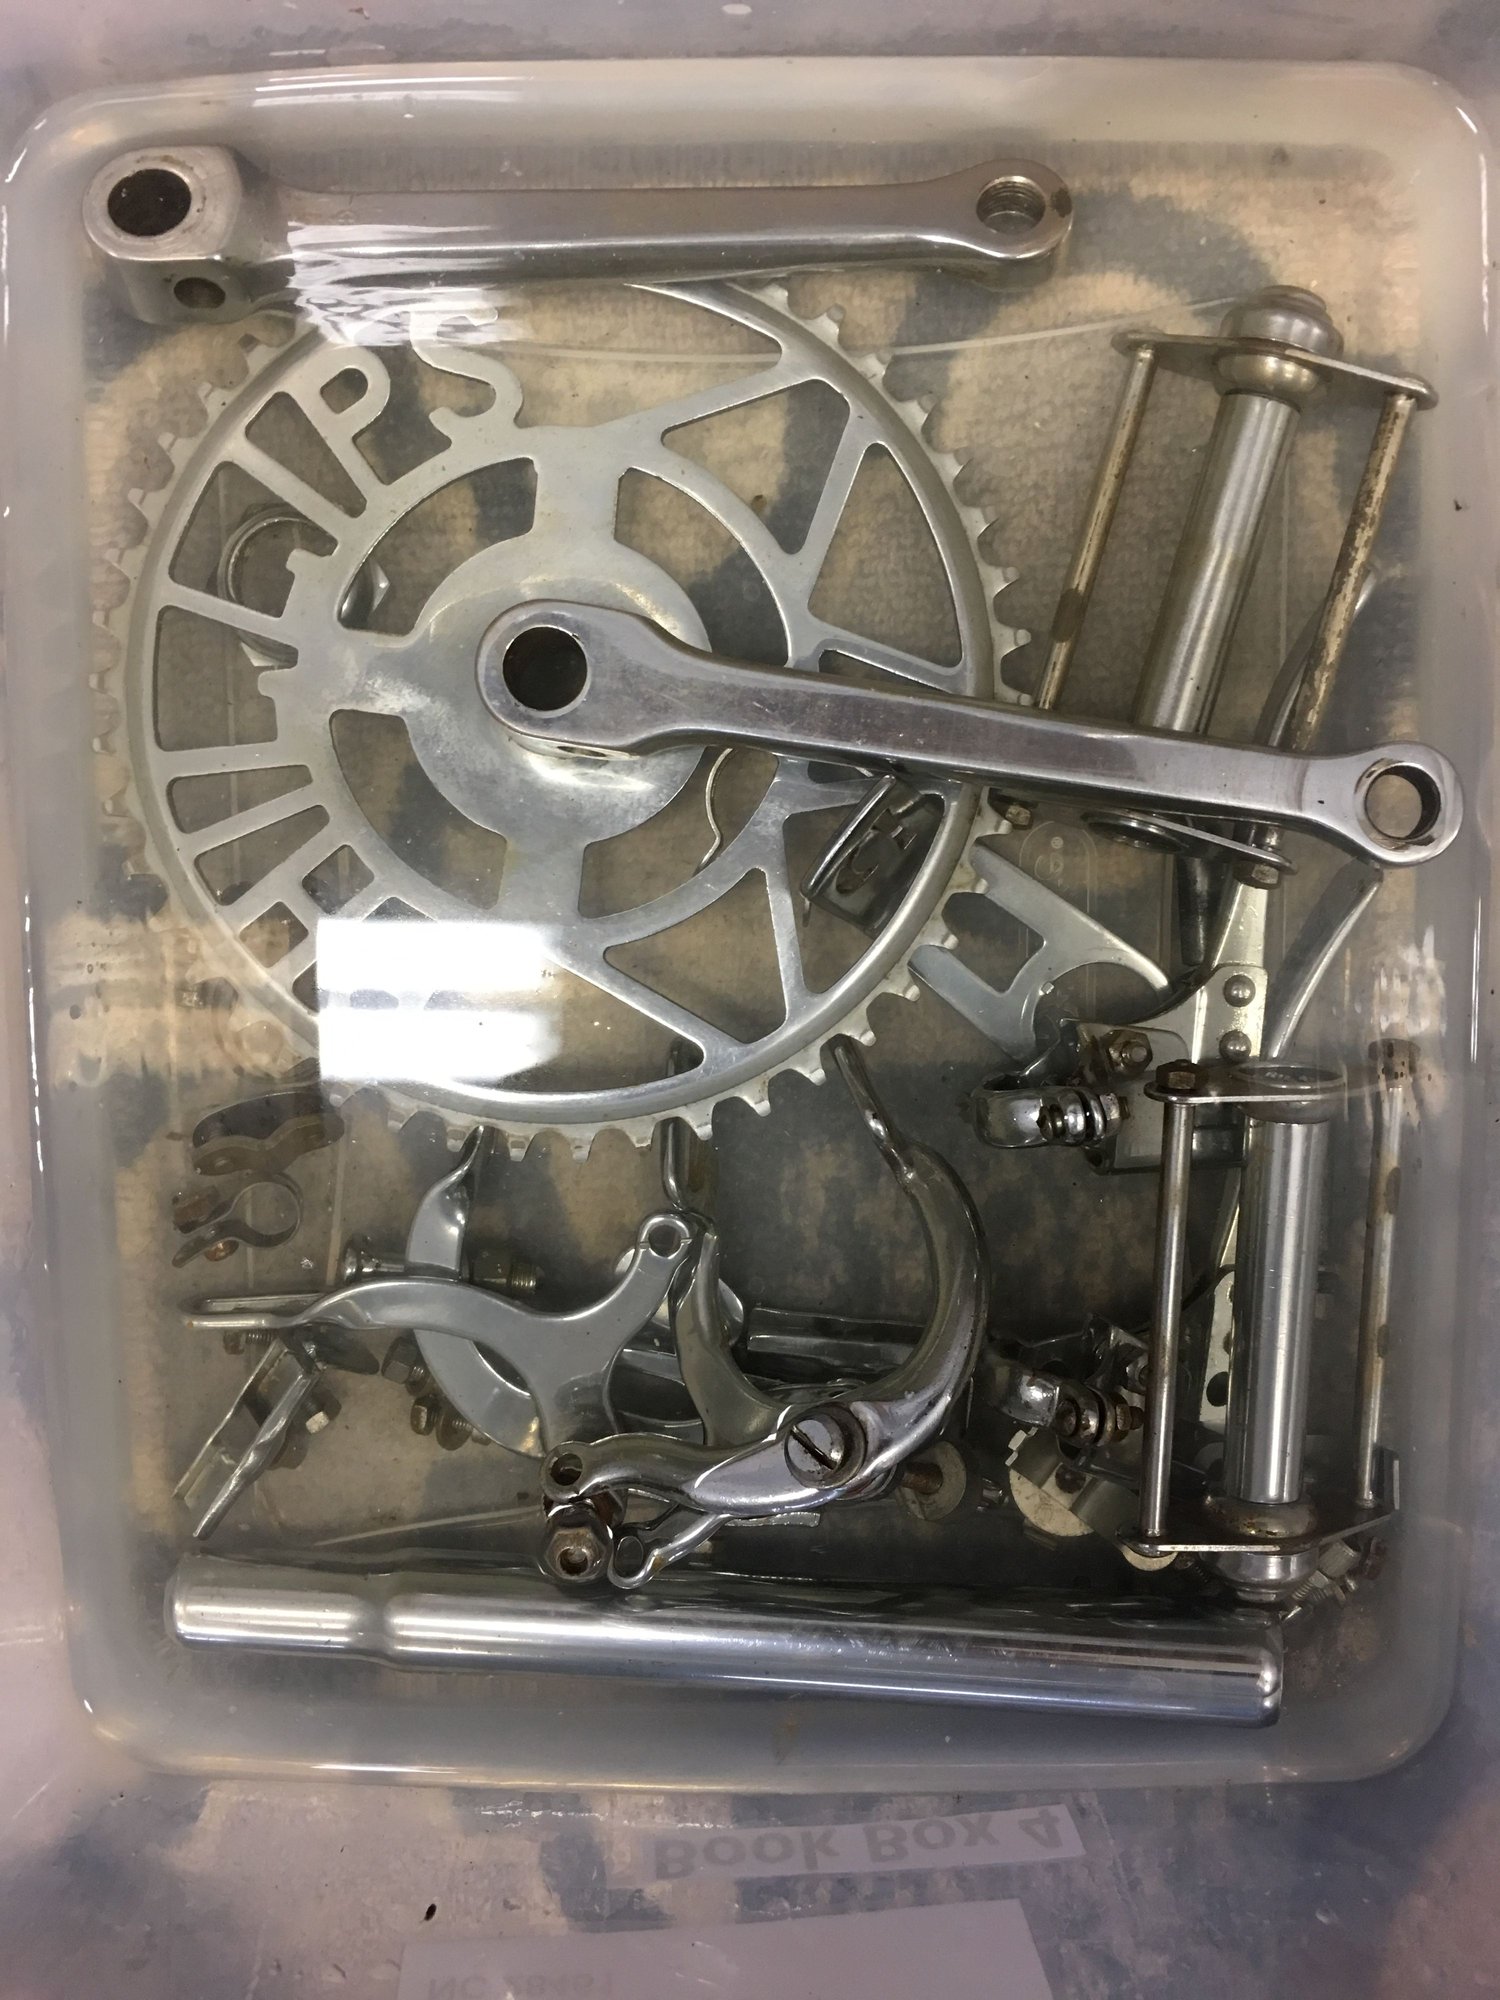
Product of my latest scavenging, from an abandoned blue step thru. A 5 am visit to avoid witnesses and The Man. It's bad enough the bikes go to the crusher; I rescue the hubs when I can. It's remarkable the exposure they can take and you open them and clean and lube and they're like good as new. Even the cogs and spacers and they're right out there. Some durable steel. This one a 40 spoke AW stamped '72.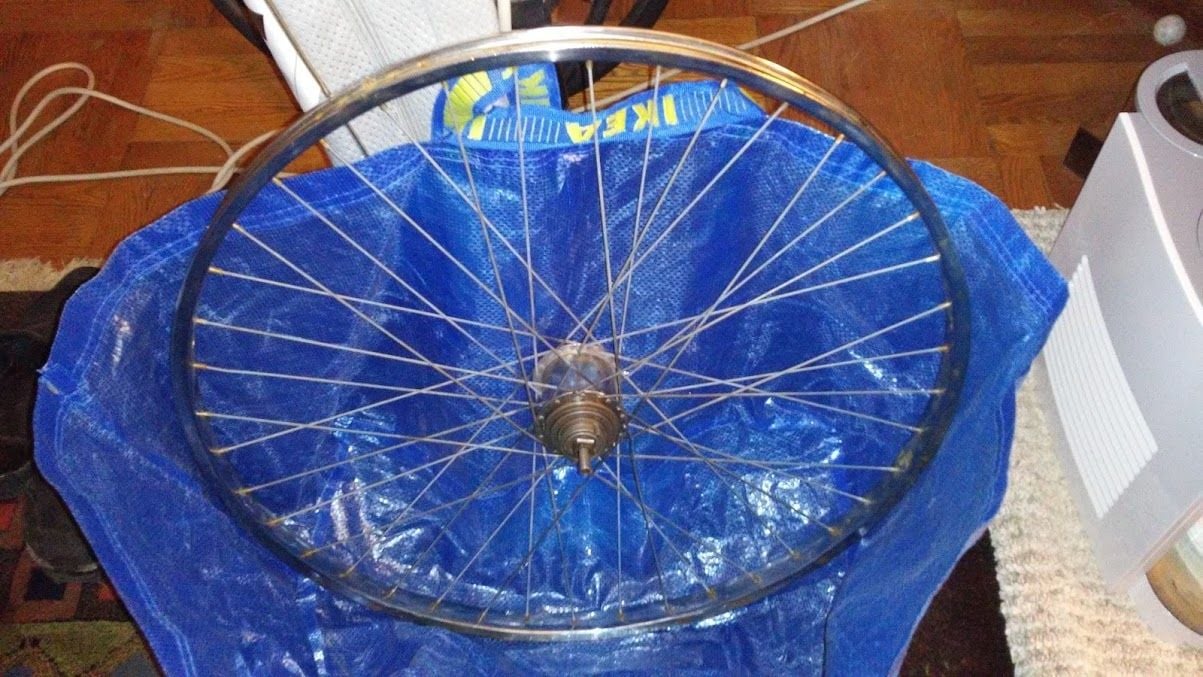
01-17-19, 12:26 PM
Senior Member
Join Date: Mar 2014
Location: Southport, North Carolina, USA & Pevensey, East Sussex, UK
Posts: 309
Bikes: 1)1992 Trek 970, 2)2010 Trek 6500, 3)1973 Colnago Super, 4)1955 Freddie Grubb Meteor. 5)1993 Airborne Ti-Hag Titanium. 6)1936 BSA 602DX Roadster. 7)1957 Philips P2 Sports. 8)1955 Dayton Roadmaster. 9)1948 Humber Clubman. 10) 1949 Sunbeam WA3 Wayfarer
Mentioned: 5 Post(s)
Tagged: 0 Thread(s)
Quoted: 157 Post(s)
Liked 85 Times
in
34 Posts
Regards
01-17-19, 12:37 PM
Senior Member

Join Date: Dec 2012
Location: St. Paul, MN
Posts: 1,597
Bikes: Too many 3-speeds, Jones Plus LWB
Mentioned: 12 Post(s)
Tagged: 0 Thread(s)
Quoted: 359 Post(s)
Liked 265 Times
in
119 Posts
Kanolabs.com has something called Kroil. Get a can. You'll regret using it indoors- its kinda stinky. Its roughly 1000x more able to free stuck hardware than WD40 (which I still use but not if damaging the hardware is a thing).
https://www.kanolabs.com/
C clamps can work but a good cotter press works better. The thing about using a hammer is there's a good chance the cotter pin will be destroyed and you also risk the bearings and cups of the bottom bracket! A cotter press is mandatory if you wish to install a cotter pin (the nut is only there to retain it once pressed into place), which is what you might want to do if you get one removed

Replacement cotter pins of the same quality as the originals are getting a lot harder to find, so it really is a good idea to retain the old one and reuse it. A good cotter press makes that possible. Bikesmith Designs (Mark Stonich) makes an excellent press (recently updated to allow it to work on a wider range of cranks):
BikeSmith Design and Fabrication
Once you get used to using a press, you will find that cottered cranks are pretty well thought out and easy to set up, unlike many more modern cranks!
01-17-19, 01:11 PM
Senior Member
Join Date: Mar 2018
Location: Brooklyn, NY
Posts: 660
Bikes: 1983 Trek 600, 1972 Raleigh Sports Step Thru, 1963 Rudge Sports, 2007 Dahon MuP8, Dahon Speed, Public Mixte 8-speed IGH, mid-70s Peugeot Mixte AW conversion, Riv Platypus
Mentioned: 0 Post(s)
Tagged: 0 Thread(s)
Quoted: 350 Post(s)
Liked 24 Times
in
17 Posts
The difficulty in the end is I live in an apartment in Brooklyn. I don't have a workshop. No bench or vise. I have tools but no 4-lb hammer. I did my best with what I had--Blaster penetrating catalyst spray from Home Depot (which I've found to be pretty good), something like the socket extension, and the crank propped up on wood, and a regular hammer. And the adventure with the C-clamp. I do have a drill, which is what I'll use if it becomes necessary (like if a Rudge Hand chainring comes my way for cheap, ha ha). But working from the non-drive side I got the BB quite well cleaned out and poked in plenty of fresh grease. It's smooth so I'm counting my blessings. It's the CR18s that are the tempting next step. Maybe even go 700c? I don't think I'd go back to the original steel fenders anyway.
01-17-19, 02:01 PM
ambulatory senior
Join Date: Dec 2016
Location: Peoria Il
Posts: 5,998
Bikes: Austro Daimler modified by Gugie! Raleigh Professional and lots of other bikes.
Mentioned: 76 Post(s)
Tagged: 0 Thread(s)
Quoted: 1955 Post(s)
Liked 3,661 Times
in
1,679 Posts
Product of my latest scavenging, from an abandoned blue step thru. A 5 am visit to avoid witnesses and The Man. It's bad enough the bikes go to the crusher; I rescue the hubs when I can. It's remarkable the exposure they can take and you open them and clean and lube and they're like good as new. Even the cogs and spacers and they're right out there. Some durable steel. This one a 40 spoke AW stamped '72.
01-17-19, 02:12 PM
Senior Member
Join Date: Mar 2013
Location: Maryland
Posts: 3,800
Bikes: Lots of English 3-speeds, a couple of old road bikes, 3 mountain bikes, 1 hybrid, and a couple of mash-ups
Mentioned: 53 Post(s)
Tagged: 0 Thread(s)
Quoted: 887 Post(s)
Liked 335 Times
in
225 Posts
The difficulty in the end is I live in an apartment in Brooklyn. I don't have a workshop. No bench or vise. I have tools but no 4-lb hammer. I did my best with what I had--Blaster penetrating catalyst spray from Home Depot (which I've found to be pretty good), something like the socket extension, and the crank propped up on wood, and a regular hammer. And the adventure with the C-clamp. I do have a drill, which is what I'll use if it becomes necessary (like if a Rudge Hand chainring comes my way for cheap, ha ha). But working from the non-drive side I got the BB quite well cleaned out and poked in plenty of fresh grease. It's smooth so I'm counting my blessings. It's the CR18s that are the tempting next step. Maybe even go 700c? I don't think I'd go back to the original steel fenders anyway.
Edit: I forgot to mention that you may also tap lightly on the crank arm with a wooden or plastic mallet.
Last edited by dweenk; 01-17-19 at 02:17 PM.
01-17-19, 02:24 PM
Senior Member
Join Date: Mar 2018
Location: Brooklyn, NY
Posts: 660
Bikes: 1983 Trek 600, 1972 Raleigh Sports Step Thru, 1963 Rudge Sports, 2007 Dahon MuP8, Dahon Speed, Public Mixte 8-speed IGH, mid-70s Peugeot Mixte AW conversion, Riv Platypus
Mentioned: 0 Post(s)
Tagged: 0 Thread(s)
Quoted: 350 Post(s)
Liked 24 Times
in
17 Posts