What I learned from a triple-crank conversion (cottered cranks, Italian BB, more).
Subscribe
brianinc-ville
Senior Member
close

05-02-26
- Join DateNov 2006
- LocationGreenville, NC
- Posts:1,399
-
iTrader Positive Feedback0
-
iTrader Feedback Score(0)
-
Likes:122
-
Liked:62 Times in 45 Posts
After screwing up pretty much everything I could screw up on my last bike project, I thought I might try to save other newbie mechanics from some trouble.
Experienced mechanics, prepare to laugh. Historical purists and sensitive souls had better stop reading now – it gets ugly. And thanks to everybody on this forum who helped me along the way.
So: I live in a very flat place (eastern North Carolina), and I’m planning a tour with my wife in hilly Vermont and NY State this summer. My first choice: buy new touring bikes, or put some low gears on the bikes we’ve already got? I live in a small and non-bike-oriented city, so there wasn’t much on the used market here. After a bit of shopping, I decided to convert the gearing. How hard could it be?
I started with my wife’s bike: a 1961 (or maybe ’62…my mom’s memory isn’t quite clear) Atala that my grandfather bought new for my mom, so that she could go on a youth hostel trip on Cape Cod as a teenager.
Here’s what it looked like when I started:

And here’s what it looked like when I finished the conversion:
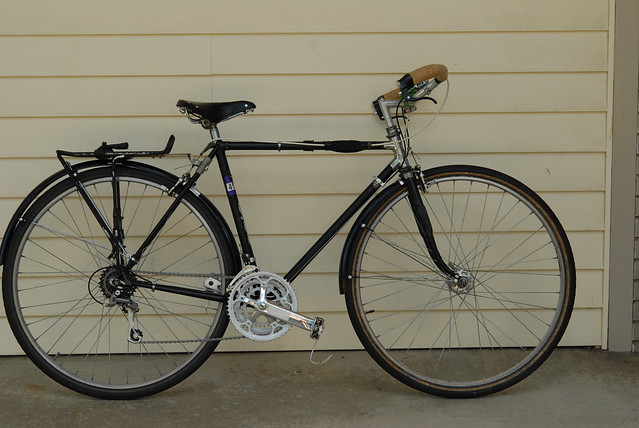
[More photos here.]
My mom’s younger brother then had it through the ‘70s, ‘80s, and ‘90s, at some point during which he gave it the awful black paintjob which is currently flaking off (better paint is in the plans, but not immediately). Around 2003 my uncle passed it on to my wife, at which point I had the original Campy hubs laced to 700c Sun CR-18 rims, put some 38mm tires on it, swapped the drop bars for flipped Nitto moustache bars (and reversed brake levers), and put a 14-28 (five-speed) freewheel in place of the corn-cob it had apparently been sold with. She’s been riding it ever since, around town and on short trips. “Since it fits her well and she likes it, why not just slap a triple crankset on it?,” I thought.
Challenge 1: the cottered Simplex crankset (with 49-46 chainrings).

Having mashed crank cotters on other bikes to the point where they had to be drilled out, I knew better than to force it. This time, when the cotters didn’t want to come out (using a BikeSmith cotter press), I soaked them with PB Blaster and let it sit for two weeks, then tried it again. That did it.
Once the cranks were off, I took the left bottom bracket cup off. The original Campagnolo Italian bottom bracket is really quite wonderful – probably the smoothest BB I’ve got. But they don’t make triple cranksets for cottered spindles, so at the very least the BB spindle would have to change.
Challenge 2: How long should the new BB spindle be? That turns out to be nearly impossible to figure out without some trial and error, even if you know what you’re doing. I didn’t. I hadn’t bothered to measure the front chainline before I took the crankset off; even if I had, it’s pretty hard to figure out what combination of spindle and crankset will actually yield the chainline you want. In this case, it turned out to be particularly tricky because of…
Challenge 3: really narrow rear spacing. I hadn’t actually measured it before, but the rear spacing on this bike is 120mm. Really, more like 118. The rear chainline is about 38mm. [By the way: if you don’t have a pair of good measuring calipers, get one.] That means the triple crankset up front has to get really, really close to the frame, with a very precise fit – there’s no room for error. Before I started, I didn’t understand why this would matter. Honestly, knowing what I now know, I probably wouldn’t try it again. It’s even more difficult to do because of…
Challenge 4: The right chainstay on a C&V road bike isn’t made to accommodate a granny gear. Somehow, I had never really noticed how the chainstays on mountain bikes curve in toward the bottom bracket in order to accommodate a small inboard chainring.

Here's the Atala; not sure if you can see the difference.

On a road bike like this one, the chainstays are straight; the cutaway is made for an inboard chainring of at least 40 teeth. It’s useless for a smaller chainring. So, the inside chainring of a triple crankset is going to sit further out on the spindle than the inside gear of a double crankset would, meaning that the outside ring of the triple crankset is going to be way further out than the outside ring of a double would be. In other words, this chainstay design will put the crankset pretty far out from the frame, which is exactly what the narrow rear spacing can’t accommodate.
So, I took some guesses about how long the spindle should be, and decided on, probably, 118mm. I started looking for spindles for 70mm (Italian) BB shells on eBay. I quickly encountered…
Challenge 5: vintage BB spindles are expensive and difficult to find, at this point. Well, heck, I thought. Why not just buy a cartridge BB? They’re readily available, cheaper, easier to install, and easier to maintain, right? Well, to install it I’d need to take out the right-side BB cup, and …
Challenge 6: the @#$%^ fixed BB cup won’t come out. PB Blaster, weeks of waiting…nothing. Took it to my LBS, who did get it out, though not without some swearing.
OK! At this point, I thought, it should be easy. I ordered a 118mm Shimano cartridge BB and cheap 4-bolt Lasko crankset from an eBay seller. Ready to go.
Challenge 7: the cartridge bottom bracket won’t thread in. The left side fit just fine, but the right side went in a couple of threads and stopped. Same thing happened when I took the left-side cup and tried to thread it in on the right. I wondered whether, perhaps, I was wrong about what size the BB shell was – like, maybe it was French? I didn’t have a French BB on hand, but I did have an English one, which was way too small. So, I was sure it was Italian. And yet it wouldn’t fit. At this point, I did the dumb thing: I forced it. Leading to…
Challenge 8: mashed bb shell threads. Damn. I went back to my LBS in shame, but they couldn’t help me; it turns out that nobody in my 3-LBS town has an Italian BB thread cutter. I had to make a special trip over to Raleigh, 85 miles away, to get it done. But, gotta say, mad props to Oak City Cycling Project, who are friends of C&V in that town. They were confused at first, too, because it seemed like the BB was too big for the shell. Turns out, it was. Lesson learned: 50-year-old Campy and recent Shimano tolerances don’t necessarily match. So, they cut the threads in for a “normal” Italian size, at which point the 118mm Shimano BB fit fine. I guess the original Campy cup is never going back in now, but it’s too late to worry about that. Then…
Challenge 9: The chainline is nowhere close to right. I ordered two more cranksets: a vintage Takagi, and a new FSA. With the 118mm BB, none of them worked. The Lasko was way too far out from the frame; the FSA was a little bit too far out; the Takagi, though, wouldn’t even fit all the way on the spindle, because its granny gear was so far to the inside, relative to the crank arm. I’ll call this…
Challenge 10: the horizontal position of the chainrings on cranksets is not at all standardized, and nobody will tell you the measurement. Seriously, this seems like the most important measurement you could know about when you’re trying to fit cranks to your frame, but it’s never listed. For the record, on the Lasko cranks, the inmost chainring is almost exactly plane with the spindle hole on the inside of the crank arm. On the FSA crank, the inner chainring is 5mm to the inside of the spindle hole on the crank arm. And on the Takagi, it’s 14mm. And then, in addition to that, different cranks (even different JIS cranks) seem to have different-sized spindle holes, and of course those holes expand a little bit each time the crank is mounted. The upshot of which is that it’s really difficult to predict how close a given crankset will sit, relative to the frame.
When I ordered the FSA crankset, I called BikeWagon and got them to measure that horizontal offset distance; they thought I was crazy, but they did it, and I’m grateful. I figured out that with a slightly shorter bottom bracket spindle, it would probably fit. I ordered a 113mm Shimano cartridge BB, which thankfully went in with no problems.
Then I put on the FSA crankset: perfect. In fact, the small chainring is so close to the chainstay that a dime will not fit between them, but it doesn’t touch. It looks Frankenbikey, but that’s kind of a given. With 52t/42t/30t chainrings, and a 5-speed 14t-28t freewheel, it’s got a bottom gear of 29.3 inches and a top gear of 101.5 inches. The chainline is now exactly right – the middle chainring lines up with the middle cog in the rear. But wow, was it a royal pain to get it that way.
So, I set it up with friction thumb shifters instead of the original downtube shifters (not too difficult), and a vintage Suntour rear RD and new low-end Shimano FD replacing the original Campy Gran Sport front and rear. Which alerted me to…
Challenge 11: most modern cable housing won’t fit in vintage Campy clamp-on housing stops. I got some 4mm housing and ferrules, but the ferrules were way too big for the stops. The proper way to fix this problem would be to order some step-down ferrules. But they’re hella expensive for what they are, and at this point I was getting impatient. I had a whole jar of thin-walled 5mm ferrules. So, I snipped them with sheet-metal shears, then ground down the edges with a Dremel, making sure to leave no sharp bits that could rub on a cable. Then I sanded down the cable housing itself just a little bit. The fit is now excellent – no wiggles!

After about three months of messing around, the whole setup worked well. Success! So, I put some fenders on, which led to the final challenge…
Challenge 12: small-framed bikes with fenders are prone to toe overlap. With the 700-38c tires, the fork clearance is really, really tight. The rear fender fits OK; the front fender just wouldn’t fit under the fork. So, I cut it off just ahead of the mounting bracket, fashioned an aluminum clip to keep it splayed out where I cut it, and fit it on.

Meanwhile, I had been using the original pedals with some Velo Orange half-clips. Unfortunately, even though the new cranks are the same length as the originals (170mm), the toe strike is pretty bad. Fortunately, my wife prefers to ride without foot retention anyway. So, I took the toe clips off, and while she still occasionally hits a toe on the fender when turning at slow speeds, without clips it’s not a big deal.
Done! My wife has a pretty nice touring bike, and I’ve got some new skills. In retrospect, I probably would have been better off just paying up for a factory-built touring bike, or else converting a hybrid bike for the purpose. But here it is. I hope this write-up is useful for somebody, at some point!
Experienced mechanics, prepare to laugh. Historical purists and sensitive souls had better stop reading now – it gets ugly. And thanks to everybody on this forum who helped me along the way.
So: I live in a very flat place (eastern North Carolina), and I’m planning a tour with my wife in hilly Vermont and NY State this summer. My first choice: buy new touring bikes, or put some low gears on the bikes we’ve already got? I live in a small and non-bike-oriented city, so there wasn’t much on the used market here. After a bit of shopping, I decided to convert the gearing. How hard could it be?
I started with my wife’s bike: a 1961 (or maybe ’62…my mom’s memory isn’t quite clear) Atala that my grandfather bought new for my mom, so that she could go on a youth hostel trip on Cape Cod as a teenager.
Here’s what it looked like when I started:
And here’s what it looked like when I finished the conversion:
[More photos here.]
My mom’s younger brother then had it through the ‘70s, ‘80s, and ‘90s, at some point during which he gave it the awful black paintjob which is currently flaking off (better paint is in the plans, but not immediately). Around 2003 my uncle passed it on to my wife, at which point I had the original Campy hubs laced to 700c Sun CR-18 rims, put some 38mm tires on it, swapped the drop bars for flipped Nitto moustache bars (and reversed brake levers), and put a 14-28 (five-speed) freewheel in place of the corn-cob it had apparently been sold with. She’s been riding it ever since, around town and on short trips. “Since it fits her well and she likes it, why not just slap a triple crankset on it?,” I thought.
Challenge 1: the cottered Simplex crankset (with 49-46 chainrings).
Having mashed crank cotters on other bikes to the point where they had to be drilled out, I knew better than to force it. This time, when the cotters didn’t want to come out (using a BikeSmith cotter press), I soaked them with PB Blaster and let it sit for two weeks, then tried it again. That did it.
Once the cranks were off, I took the left bottom bracket cup off. The original Campagnolo Italian bottom bracket is really quite wonderful – probably the smoothest BB I’ve got. But they don’t make triple cranksets for cottered spindles, so at the very least the BB spindle would have to change.
Challenge 2: How long should the new BB spindle be? That turns out to be nearly impossible to figure out without some trial and error, even if you know what you’re doing. I didn’t. I hadn’t bothered to measure the front chainline before I took the crankset off; even if I had, it’s pretty hard to figure out what combination of spindle and crankset will actually yield the chainline you want. In this case, it turned out to be particularly tricky because of…
Challenge 3: really narrow rear spacing. I hadn’t actually measured it before, but the rear spacing on this bike is 120mm. Really, more like 118. The rear chainline is about 38mm. [By the way: if you don’t have a pair of good measuring calipers, get one.] That means the triple crankset up front has to get really, really close to the frame, with a very precise fit – there’s no room for error. Before I started, I didn’t understand why this would matter. Honestly, knowing what I now know, I probably wouldn’t try it again. It’s even more difficult to do because of…
Challenge 4: The right chainstay on a C&V road bike isn’t made to accommodate a granny gear. Somehow, I had never really noticed how the chainstays on mountain bikes curve in toward the bottom bracket in order to accommodate a small inboard chainring.
Here's the Atala; not sure if you can see the difference.
On a road bike like this one, the chainstays are straight; the cutaway is made for an inboard chainring of at least 40 teeth. It’s useless for a smaller chainring. So, the inside chainring of a triple crankset is going to sit further out on the spindle than the inside gear of a double crankset would, meaning that the outside ring of the triple crankset is going to be way further out than the outside ring of a double would be. In other words, this chainstay design will put the crankset pretty far out from the frame, which is exactly what the narrow rear spacing can’t accommodate.
So, I took some guesses about how long the spindle should be, and decided on, probably, 118mm. I started looking for spindles for 70mm (Italian) BB shells on eBay. I quickly encountered…
Challenge 5: vintage BB spindles are expensive and difficult to find, at this point. Well, heck, I thought. Why not just buy a cartridge BB? They’re readily available, cheaper, easier to install, and easier to maintain, right? Well, to install it I’d need to take out the right-side BB cup, and …
Challenge 6: the @#$%^ fixed BB cup won’t come out. PB Blaster, weeks of waiting…nothing. Took it to my LBS, who did get it out, though not without some swearing.
OK! At this point, I thought, it should be easy. I ordered a 118mm Shimano cartridge BB and cheap 4-bolt Lasko crankset from an eBay seller. Ready to go.
Challenge 7: the cartridge bottom bracket won’t thread in. The left side fit just fine, but the right side went in a couple of threads and stopped. Same thing happened when I took the left-side cup and tried to thread it in on the right. I wondered whether, perhaps, I was wrong about what size the BB shell was – like, maybe it was French? I didn’t have a French BB on hand, but I did have an English one, which was way too small. So, I was sure it was Italian. And yet it wouldn’t fit. At this point, I did the dumb thing: I forced it. Leading to…
Challenge 8: mashed bb shell threads. Damn. I went back to my LBS in shame, but they couldn’t help me; it turns out that nobody in my 3-LBS town has an Italian BB thread cutter. I had to make a special trip over to Raleigh, 85 miles away, to get it done. But, gotta say, mad props to Oak City Cycling Project, who are friends of C&V in that town. They were confused at first, too, because it seemed like the BB was too big for the shell. Turns out, it was. Lesson learned: 50-year-old Campy and recent Shimano tolerances don’t necessarily match. So, they cut the threads in for a “normal” Italian size, at which point the 118mm Shimano BB fit fine. I guess the original Campy cup is never going back in now, but it’s too late to worry about that. Then…
Challenge 9: The chainline is nowhere close to right. I ordered two more cranksets: a vintage Takagi, and a new FSA. With the 118mm BB, none of them worked. The Lasko was way too far out from the frame; the FSA was a little bit too far out; the Takagi, though, wouldn’t even fit all the way on the spindle, because its granny gear was so far to the inside, relative to the crank arm. I’ll call this…
Challenge 10: the horizontal position of the chainrings on cranksets is not at all standardized, and nobody will tell you the measurement. Seriously, this seems like the most important measurement you could know about when you’re trying to fit cranks to your frame, but it’s never listed. For the record, on the Lasko cranks, the inmost chainring is almost exactly plane with the spindle hole on the inside of the crank arm. On the FSA crank, the inner chainring is 5mm to the inside of the spindle hole on the crank arm. And on the Takagi, it’s 14mm. And then, in addition to that, different cranks (even different JIS cranks) seem to have different-sized spindle holes, and of course those holes expand a little bit each time the crank is mounted. The upshot of which is that it’s really difficult to predict how close a given crankset will sit, relative to the frame.
When I ordered the FSA crankset, I called BikeWagon and got them to measure that horizontal offset distance; they thought I was crazy, but they did it, and I’m grateful. I figured out that with a slightly shorter bottom bracket spindle, it would probably fit. I ordered a 113mm Shimano cartridge BB, which thankfully went in with no problems.
Then I put on the FSA crankset: perfect. In fact, the small chainring is so close to the chainstay that a dime will not fit between them, but it doesn’t touch. It looks Frankenbikey, but that’s kind of a given. With 52t/42t/30t chainrings, and a 5-speed 14t-28t freewheel, it’s got a bottom gear of 29.3 inches and a top gear of 101.5 inches. The chainline is now exactly right – the middle chainring lines up with the middle cog in the rear. But wow, was it a royal pain to get it that way.
So, I set it up with friction thumb shifters instead of the original downtube shifters (not too difficult), and a vintage Suntour rear RD and new low-end Shimano FD replacing the original Campy Gran Sport front and rear. Which alerted me to…
Challenge 11: most modern cable housing won’t fit in vintage Campy clamp-on housing stops. I got some 4mm housing and ferrules, but the ferrules were way too big for the stops. The proper way to fix this problem would be to order some step-down ferrules. But they’re hella expensive for what they are, and at this point I was getting impatient. I had a whole jar of thin-walled 5mm ferrules. So, I snipped them with sheet-metal shears, then ground down the edges with a Dremel, making sure to leave no sharp bits that could rub on a cable. Then I sanded down the cable housing itself just a little bit. The fit is now excellent – no wiggles!
After about three months of messing around, the whole setup worked well. Success! So, I put some fenders on, which led to the final challenge…
Challenge 12: small-framed bikes with fenders are prone to toe overlap. With the 700-38c tires, the fork clearance is really, really tight. The rear fender fits OK; the front fender just wouldn’t fit under the fork. So, I cut it off just ahead of the mounting bracket, fashioned an aluminum clip to keep it splayed out where I cut it, and fit it on.
Meanwhile, I had been using the original pedals with some Velo Orange half-clips. Unfortunately, even though the new cranks are the same length as the originals (170mm), the toe strike is pretty bad. Fortunately, my wife prefers to ride without foot retention anyway. So, I took the toe clips off, and while she still occasionally hits a toe on the fender when turning at slow speeds, without clips it’s not a big deal.
Done! My wife has a pretty nice touring bike, and I’ve got some new skills. In retrospect, I probably would have been better off just paying up for a factory-built touring bike, or else converting a hybrid bike for the purpose. But here it is. I hope this write-up is useful for somebody, at some point!
Senior Member
Oh the trials of fitting non standardized systems together. I have lots of fun with frankenbikes but when you put in a few decades of age difference it gets even more fun. Guess its like climbing a mountain because its there. Next time you know to go round. 


SJX426
Senior Member
close

05-16-26
- Join DateMay 2008
- LocationFredericksburg, Va
- Posts:10,106
-
iTrader Positive Feedback0
-
iTrader Feedback Score(0)
-
Likes:2,625
-
Liked:2,762 Times in 1,344 Posts
Kudo's! N+1 is often too easy! Challenges can be fun though they can take you down a rat hole. Nice recovery!

pastorbobnlnh
Freewheel Medic
close


06-01-26
- Join DateOct 2005
- LocationAn Island on the Coast of GA!
- Posts:13,572
-
iTrader Positive Feedback0
-
iTrader Feedback Score(0)
-
Likes:5,420
-
Liked:3,315 Times in 1,421 Posts
Quote:
...With 52t/42t/30t chainrings, and a 5-speed 14t-28t freewheel, it’s got a bottom gear of 29.3 inches and a top gear of 101.5 inches.
(Imagine this is a spooky mysterious voice you might hear in a dream or when you awake in the middle of the night Originally Posted by brianinc-ville
So: I live in a very flat place (eastern North Carolina), and I’m planning a tour with my wife in hilly Vermont and NY State this summer. ...With 52t/42t/30t chainrings, and a 5-speed 14t-28t freewheel, it’s got a bottom gear of 29.3 inches and a top gear of 101.5 inches.
 ) "Come to the other side! Come to New Hampshire!"

Seriously, not knowing you or your wife's climbing abilities, let me recommend lower gearing. At least go to a 26T or 28T granny, but I'd also encourage a 30T or 32T bailout cog. I realize you are limited with a 5 speed freewheel, but trust me there are times when the grades in this region justifies a low-low gear.

Getting back to the build: Well done and I know your pain and frustrations! Having converted several vintage bikes which never imagined anything more than a half step double, the triple conversion can be very challenging. In the end you sorted it all out and learned so much along the way. Have fun in Northern Appalachia this summer!

Senior Member
well done, i had some similar issues with my raleigh grand prix, the raleigh threading made it tough to find a suitable replacement for the bottom bracket, luckily my coop had a spindle that worked with the cups. my chain line isn't the greatest , but i wasn't about to drop big bucks on the velo orange deal... maybe some day

Ex Pres
Cat 6
close
06-01-26
- Join DateDec 2007
- LocationMountain Brook, AL
- Posts:7,524
-
iTrader Positive Feedback0
-
iTrader Feedback Score(0)
-
Likes:719
-
Liked:236 Times in 143 Posts
Without a decent hill around, it may be tough to test, but have you tried to see if that small chainring is going to rub the stay under climbing pressure?

The Golden Boy
Extraordinary Magnitude
close
05-31-26
- Join DateAug 2009
- LocationWaukesha WI
- Posts:14,085
-
iTrader Positive Feedback0
-
iTrader Feedback Score(0)
-
Likes:3,206
-
Liked:2,141 Times in 1,171 Posts
This sounds like every project I attempt!
As much as I know "there's no such thing as a 10 minute job," I still go into stuff thinking "this'll be 10 minutes..."
As much as I know "there's no such thing as a 10 minute job," I still go into stuff thinking "this'll be 10 minutes..."

John E
feros ferio
close

05-31-26
- Join DateJul 2000
- Locationwww.ci.encinitas.ca.us
- Posts:22,413
-
iTrader Positive Feedback0
-
iTrader Feedback Score(0)
-
Likes:9,889
-
Liked:1,878 Times in 1,148 Posts
Thank you for a fabulous writeup. I hope you kept those 49-46 Simplex rings, the three 3-to-6-bolt adapters, and the 9 bolts. There is a small, but dedicated, market for them on eBay.
brianinc-ville
Senior Member
close
05-02-26
- Join DateNov 2006
- LocationGreenville, NC
- Posts:1,399
-
iTrader Positive Feedback0
-
iTrader Feedback Score(0)
-
Likes:122
-
Liked:62 Times in 45 Posts
Quote:
) "Come to the other side! Come to New Hampshire!"
Seriously, not knowing you or your wife's climbing abilities, let me recommend lower gearing. At least go to a 26T or 28T granny, but I'd also encourage a 30T or 32T bailout cog. I realize you are limited with a 5 speed freewheel, but trust me there are times when the grades in this region justifies a low-low gear.
Originally Posted by pastorbobnlnh
(Imagine this is a spooky mysterious voice you might hear in a dream or when you awake in the middle of the night ) "Come to the other side! Come to New Hampshire!" Seriously, not knowing you or your wife's climbing abilities, let me recommend lower gearing. At least go to a 26T or 28T granny, but I'd also encourage a 30T or 32T bailout cog. I realize you are limited with a 5 speed freewheel, but trust me there are times when the grades in this region justifies a low-low gear.
Pastorbob, I hear you; on this trip, anyway, I don't think we'll be heading too far away from Lake Champlain, so the climbs shouldn't be too extreme. I hope. Anyway, I'll be dragging a Burley trailer, so she shouldn't have to carry much. Am I a nice guy, or what?
The triple conversion on my '84 Peugeot was much easier, by the way -- no need to mess with the bottom bracket, which is good, 'cause it's Swiss.
")
As for the Atala, I'd like to put on a smaller granny, but I'd worry that it wouldn't clear the chainstay. And frankly, I don't want to take that crankset off again unless I totally have to. A bigger rear cog would be nice, at some point -- have you got a 5-speed freewheel with a 30 or 32t on it?
brianinc-ville
Senior Member
close
05-02-26
- Join DateNov 2006
- LocationGreenville, NC
- Posts:1,399
-
iTrader Positive Feedback0
-
iTrader Feedback Score(0)
-
Likes:122
-
Liked:62 Times in 45 Posts
Quote:
Yes, definitely. This bike may well get restored to something like its original state, eventually. We shall see.Originally Posted by John E
Thank you for a fabulous writeup. I hope you kept those 49-46 Simplex rings, the three 3-to-6-bolt adapters, and the 9 bolts. There is a small, but dedicated, market for them on eBay.

bikemig
Senior Member
close


06-01-26
- Join DateApr 2012
- LocationMiddle Earth (aka IA)
- Posts:21,829
-
iTrader Positive Feedback0
-
iTrader Feedback Score(0)
-
Likes:8,677
-
Liked:5,782 Times in 2,960 Posts
Great write up. Everyone here who has changed out components on old bike has been through some level of what you described. But your story takes the cake so to speak. Good for you for sticking with it and making the project work.
Senior Member
Quote:
Thanks for writing this up, I'm sure your pics and story will be valuable for others attempting similar projects. I share Ex Pres's concern about the tight clearance between granny ring and chainstay. Definitely test it before going on tour. From your description, it seems like it would be easy (ha!) to compromise on the perfect chainline to get a bit more clearance for the granny ring. I think the imperfect chainline will work better with a modern 8-speed chain instead of a vintage chain.Originally Posted by Ex Pres
Without a decent hill around, it may be tough to test, but have you tried to see if that small chainring is going to rub the stay under climbing pressure?

JohnDThompson
Old fart
close
06-01-26
- Join DateNov 2004
- LocationAppleton WI
- Posts:26,404
-
iTrader Positive Feedback0
-
iTrader Feedback Score(0)
-
Likes:404
-
Liked:5,339 Times in 2,924 Posts
Quote:
As well as the cottered Campagnolo bottom bracket.Originally Posted by John E
Thank you for a fabulous writeup. I hope you kept those 49-46 Simplex rings, the three 3-to-6-bolt adapters, and the 9 bolts. There is a small, but dedicated, market for them on eBay.

noglider
aka Tom Reingold
close
06-01-26
- Join DateJan 2009
- LocationNew York, NY, and High Falls, NY, USA
- Posts:44,320
-
iTrader Positive Feedback0
-
iTrader Feedback Score(0)
-
Likes:7,355
-
Liked:6,605 Times in 3,525 Posts
"The great thing about standards is that there are so many to choose from."
brianinc-ville
Senior Member
close
05-02-26
- Join DateNov 2006
- LocationGreenville, NC
- Posts:1,399
-
iTrader Positive Feedback0
-
iTrader Feedback Score(0)
-
Likes:122
-
Liked:62 Times in 45 Posts
Quote:
I've tested it on the little hills (ravines, actually) that we have around here, and it's OK so far. We're going for a 30-mile practice ride tomorrow, so we'll see what happens. It might not be a bad idea to acquire a 1mm Italian BB spacer ring, just in case.Originally Posted by rowebr
Thanks for writing this up, I'm sure your pics and story will be valuable for others attempting similar projects. I share Ex Pres's concern about the tight clearance between granny ring and chainstay. Definitely test it before going on tour. From your description, it seems like it would be easy (ha!) to compromise on the perfect chainline to get a bit more clearance for the granny ring. I think the imperfect chainline will work better with a modern 8-speed chain instead of a vintage chain.
rccardr
aka: Dr. Cannondale
close

06-01-26
- Join DateJul 2009
- Posts:8,684
-
iTrader Positive Feedback0
-
iTrader Feedback Score(0)
-
Likes:6,391
-
Liked:6,390 Times in 1,856 Posts
Great story telling, and reminds me why I have a box full of bottom brackets.
Ex Pres
Cat 6
close
06-01-26
- Join DateDec 2007
- LocationMountain Brook, AL
- Posts:7,524
-
iTrader Positive Feedback0
-
iTrader Feedback Score(0)
-
Likes:719
-
Liked:236 Times in 143 Posts
Quote:
And lacking that, you can use an English one (same as freewheel)- cut to allow it to spread.Originally Posted by brianinc-ville
..... It might not be a bad idea to acquire a 1mm Italian BB spacer ring, just in case.
pastorbobnlnh
Freewheel Medic
close
06-01-26
- Join DateOct 2005
- LocationAn Island on the Coast of GA!
- Posts:13,572
-
iTrader Positive Feedback0
-
iTrader Feedback Score(0)
-
Likes:5,420
-
Liked:3,315 Times in 1,421 Posts
Quote:
The triple conversion on my '84 Peugeot was much easier, by the way -- no need to mess with the bottom bracket, which is good, 'cause it's Swiss.
As for the Atala, I'd like to put on a smaller granny, but I'd worry that it wouldn't clear the chainstay. And frankly, I don't want to take that crankset off again unless I totally have to. A bigger rear cog would be nice, at some point -- have you got a 5-speed freewheel with a 30 or 32t on it?
Let me see what I can slap together and offer. Originally Posted by brianinc-ville
Pastorbob, I hear you; on this trip, anyway, I don't think we'll be heading too far away from Lake Champlain, so the climbs shouldn't be too extreme. I hope. Anyway, I'll be dragging a Burley trailer, so she shouldn't have to carry much. Am I a nice guy, or what? The triple conversion on my '84 Peugeot was much easier, by the way -- no need to mess with the bottom bracket, which is good, 'cause it's Swiss.
As for the Atala, I'd like to put on a smaller granny, but I'd worry that it wouldn't clear the chainstay. And frankly, I don't want to take that crankset off again unless I totally have to. A bigger rear cog would be nice, at some point -- have you got a 5-speed freewheel with a 30 or 32t on it?

JohnDThompson
Old fart
close
06-01-26
- Join DateNov 2004
- LocationAppleton WI
- Posts:26,404
-
iTrader Positive Feedback0
-
iTrader Feedback Score(0)
-
Likes:404
-
Liked:5,339 Times in 2,924 Posts
Quote:
You can use a standard spacer, or even a Sturmey-Archer cog spacer. If you have trouble fitting it over the slightly larger Italian cup, simply snip the ring so you can spread it enough to fit.Originally Posted by brianinc-ville
It might not be a bad idea to acquire a 1mm Italian BB spacer ring, just in case.
Ol Danl
Full Member
close
06-01-26
- Join DateDec 2004
- LocationChattanooga, Tn
- Posts:310
-
iTrader Positive Feedback0
-
iTrader Feedback Score(0)
-
Likes:342
-
Liked:26 Times in 14 Posts
I've re-read your story, and looked at your pictures again -- did you discuss the front derailleur? Did the original work with the triple crankset? I've had trouble getting some fd's to fit with the rear fender, and then, when I found one that fit, it wouldn't reach the big chainring.
brianinc-ville
Senior Member
close
05-02-26
- Join DateNov 2006
- LocationGreenville, NC
- Posts:1,399
-
iTrader Positive Feedback0
-
iTrader Feedback Score(0)
-
Likes:122
-
Liked:62 Times in 45 Posts
Quote:
Ol Danl -- I didn't try the original Campy Gran Sport FD with the new crankset; I picked up, to be honest, the cheapest new Shimano triple FD I could find on eBay. I'm not even sure what model it is. [EDIT: its an FD-TY05.] It works fine. It's nowhere near the fender. Note that I have no truck with index shifting (though I think my wife wishes I would).Originally Posted by Ol Danl
I've re-read your story, and looked at your pictures again -- did you discuss the front derailleur? Did the original work with the triple crankset? I've had trouble getting some fd's to fit with the rear fender, and then, when I found one that fit, it wouldn't reach the big chainring.


The only issue (not much of an issue) was re-routing the cable from the downtube clamp to the derailleur, since it doesn't have a cable guide on the bottom of the bottom bracket. The original Campy derailleur had a short piece of coiled-wire housing routed on top of the bottom bracket; I replaced it with a longer piece of modern lined housing going under the bottom bracket. With a kickstand clamped onto the chainstays (I feel like the kickstand is pretty essential for touring), the arc of the cable housing is a little tighter than I'd like, but it works.
Also, the roads are really sandy where I live. That's just a fact of life.

[QUOTE=brianinc-ville;16887042]...I'd like to put on a smaller granny, but I'd worry that it wouldn't clear the chainstay.QUOTE]
Not sure I understand this, because in my experience installing a smaller granny ring always provides more clearance to the chainstay, not less.
PM me if you want any information on bike routes in Vermont. I've lived here for 40 years, ridden a lot, and lead bike tours for a company called Discovery Bicycle Tours (used to be called Bike Vermont until last year).
By the way, pay no attention to Pastor Bob's contention that the riding in New Hampshire is better than the riding in Vermont. He's an exemplary human being and knows everything about freewheels, but he's sadly deluded in that one respect.