


Just another hobby milling machine set up for tube mitering &stuff
 04-13-23, 11:49 PM
#1

blahblahblah chrome moly
Thread Starter

Join Date: Apr 2009
Location: Seattle
Posts: 1,987
Mentioned: 92 Post(s)
Tagged: 0 Thread(s)
Quoted: 1173 Post(s)
Liked 2,569 Times
in
1,073 Posts
Just another hobby milling machine set up for tube mitering &stuff
Mitered my first tube today. Not really starting a frame yet, but it's an actual miter on a tube I'll put in my actual first frame, later. I found and marked the butts with my butt sniffer, and notched that bad boy 'just like downtown'. Pleased with the setup, totally rigid, no chatter. I was a bit aggressive with the feed, I thought � "why not give it a test, what's the worst that can happen?" (Don't answer that.) But then it cut so smoothly, I realized I could have pushed it harder. This is Columbus SL, which is not hardened and not very thinwall, so yes it was an easy test.
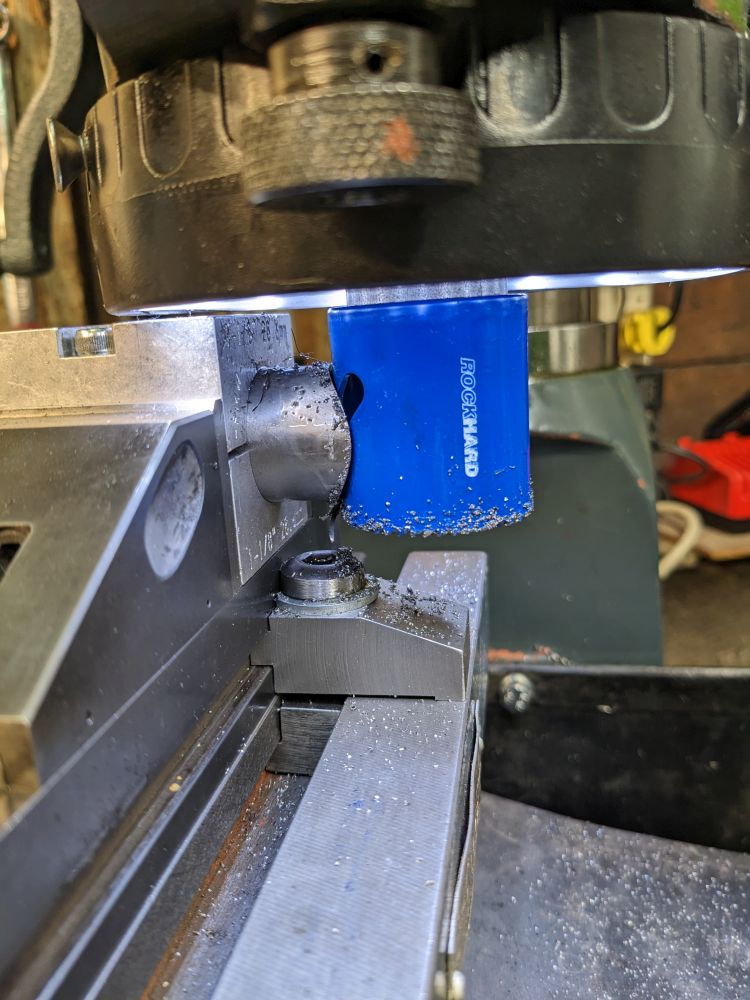
40 mm cutter, ~250 rpm, 0.9 mm (.036") CrMo tubing (not heat treated). A little cutting oil, which might not be necessary for these saws in this steel, but if it makes the cutter last a little longer, I don't mind the oil. What do y'all do? Dry (with cheap expendable cutters), or oil, mist, flood?? I've mitered Ti 3/2.5 dry, and the cutters lasted fine, and it was nice not to have to degrease the tubes so much. But I have a feeling using these on harder steels is going to need oil.
Nothing you all haven't seen before, but if you're bored enough you can look at the pics of me welding the stand for the mill, setting it up, anchoring it to the wall, tramming the head, and getting it ready for tube mitering. Flickr album here
Comments please � tell me what I did wrong!
Mark B

Likes For bulgie:
04-14-23, 07:10 AM
#2


Randomhead
Join Date: Aug 2008
Location: Happy Valley, Pennsylvania
Posts: 24,396
Mentioned: 0 Post(s)
Tagged: 0 Thread(s)
Quoted: 4 Post(s)
Liked 3,696 Times
in
2,517 Posts
Only wrong thing I can see is you need to trim that thumbnail.
I spent some time looking for a ring light for my mill and finally gave up. The one you have looks perfect, where did you get it?
I spent some time looking for a ring light for my mill and finally gave up. The one you have looks perfect, where did you get it?
Last edited by unterhausen; 04-14-23 at 09:51 AM.
04-14-23, 09:06 AM
#3
Senior Member
Join Date: Feb 2012
Location: Rochester, NY
Posts: 18,073
Bikes: Stewart S&S coupled sport tourer, Stewart Sunday light, Stewart Commuting, Stewart Touring, Co Motion Tandem, Stewart 3-Spd, Stewart Track, Fuji Finest, Mongoose Tomac ATB, GT Bravado ATB, JCP Folder, Stewart 650B ATB
Mentioned: 0 Post(s)
Tagged: 0 Thread(s)
Quoted: 4201 Post(s)
Liked 3,857 Times
in
2,305 Posts
Mark- Do you have an angle vise? Or will you cock the tube and block in the mill vise? Do you support the other end of the tube? Get any vibration out there? I should check out your Flicker Andy
Andy
edit- As usual I talked before doing the homework. I viewed the Flicker album and I like that angle plate. I've thought of getting one like yours too but my current angle vise is working well enough.
Andyedit- As usual I talked before doing the homework. I viewed the Flicker album and I like that angle plate. I've thought of getting one like yours too but my current angle vise is working well enough.
__________________
AndrewRStewart
AndrewRStewart
Last edited by Andrew R Stewart; 04-14-23 at 09:13 AM.
04-14-23, 02:52 PM
#4
blahblahblah chrome moly
Thread Starter
Join Date: Apr 2009
Location: Seattle
Posts: 1,987
Mentioned: 92 Post(s)
Tagged: 0 Thread(s)
Quoted: 1173 Post(s)
Liked 2,569 Times
in
1,073 Posts
04-14-23, 03:20 PM
#5
blahblahblah chrome moly
Thread Starter
Join Date: Apr 2009
Location: Seattle
Posts: 1,987
Mentioned: 92 Post(s)
Tagged: 0 Thread(s)
Quoted: 1173 Post(s)
Liked 2,569 Times
in
1,073 Posts
Mark- Do you have an angle vise? Or will you cock the tube and block in the mill vise? Do you support the other end of the tube? Get any vibration out there? I should check out your Flicker Andy
edit- As usual I talked before doing the homework. I viewed the Flicker album and I like that angle plate. I've thought of getting one like yours too but my current angle vise is working well enough.
Andyedit- As usual I talked before doing the homework. I viewed the Flicker album and I like that angle plate. I've thought of getting one like yours too but my current angle vise is working well enough.
For clocking the two miters to each other, I just clamp tube blocks to both ends of the tube while they're sitting on a flattish surface. Doesn't need to be high precision (e.g. granite), it's not that sensitive, a wood table that's not totally hacked can do it. Watch to see how the tube blocks move when you tighten the clamp bolts, that can pull them out of parallel, but not a big problem if you're aware of it.
For measuring to the cut line, I scribe with trammel points. Make a Sharpie line to use as layout dye, then scribe through that for good visibility. Machinists scoff at milling to a scribe line, but it's good enough for bike frames, I'm sure you'll agree.
Mark B
Last edited by bulgie; 04-14-23 at 03:57 PM.
04-14-23, 04:50 PM
#6
blahblahblah chrome moly
Thread Starter
Join Date: Apr 2009
Location: Seattle
Posts: 1,987
Mentioned: 92 Post(s)
Tagged: 0 Thread(s)
Quoted: 1173 Post(s)
Liked 2,569 Times
in
1,073 Posts
I see a similar 10x7" tilt table as cheap as $102 and free shipping (ebay link) - how do they do it? I got mine used, and it was a little more than that. I can't vouch for the quality of that ebay table but it's probably about the same as my India-made one.
04-15-23, 05:31 AM
#7
Senior Member
Join Date: Jan 2013
Location: South Jersey
Posts: 2,266
Mentioned: 18 Post(s)
Tagged: 0 Thread(s)
Quoted: 714 Post(s)
Liked 800 Times
in
475 Posts
I think most people obsess a bit too much about rigidity in machine mitering. I've always cut mine like this and never had an issue with the saw grabbing and wrecking the tube. I cut them dry and feed slowly with the downfeed handwheel.

Likes For dsaul:
04-15-23, 07:56 AM
#8
Randomhead
Join Date: Aug 2008
Location: Happy Valley, Pennsylvania
Posts: 24,396
Mentioned: 0 Post(s)
Tagged: 0 Thread(s)
Quoted: 4 Post(s)
Liked 3,696 Times
in
2,517 Posts
Before I fixed my lathe, I tried mitering on it and the problem I had was the tube grabbing and breaking teeth off the saw. Tube was fine
04-15-23, 08:24 AM
#9
Senior Member
Join Date: Feb 2012
Location: Rochester, NY
Posts: 18,073
Bikes: Stewart S&S coupled sport tourer, Stewart Sunday light, Stewart Commuting, Stewart Touring, Co Motion Tandem, Stewart 3-Spd, Stewart Track, Fuji Finest, Mongoose Tomac ATB, GT Bravado ATB, JCP Folder, Stewart 650B ATB
Mentioned: 0 Post(s)
Tagged: 0 Thread(s)
Quoted: 4201 Post(s)
Liked 3,857 Times
in
2,305 Posts
I've ruined a tube end a couple of times when a hole saw grabbed the thinwall tube. Both times I fed the hole saw in too fast. Now with the finer toothed saws I use (the same as Mark's) and feed care I have no more issues.
Mark's method of holding and marking out the tube is much the same as I use. Andy
Mark's method of holding and marking out the tube is much the same as I use. Andy
__________________
AndrewRStewart
AndrewRStewart
04-15-23, 03:05 PM
#10
blahblahblah chrome moly
Thread Starter
Join Date: Apr 2009
Location: Seattle
Posts: 1,987
Mentioned: 92 Post(s)
Tagged: 0 Thread(s)
Quoted: 1173 Post(s)
Liked 2,569 Times
in
1,073 Posts
So, on to the next huge controversy, which way to tilt the tube? Start the cut on the long side or the short side? I've done both and both seem to have advantages.. Here's my mockup of a 60� DT-HT miter done as plus-30� and minus-30�. The top pic is the one I'm calling "plus". You can see I need more stickout of the arbor for clearance. In the minus direction, I could choke up on the arbor, all the way up to the collet for a bit more rigidity. Maybe the extra rigidity isn't needed, but it's never a bad thing in milling. (In a bike frame yes, in a milling machine no.)
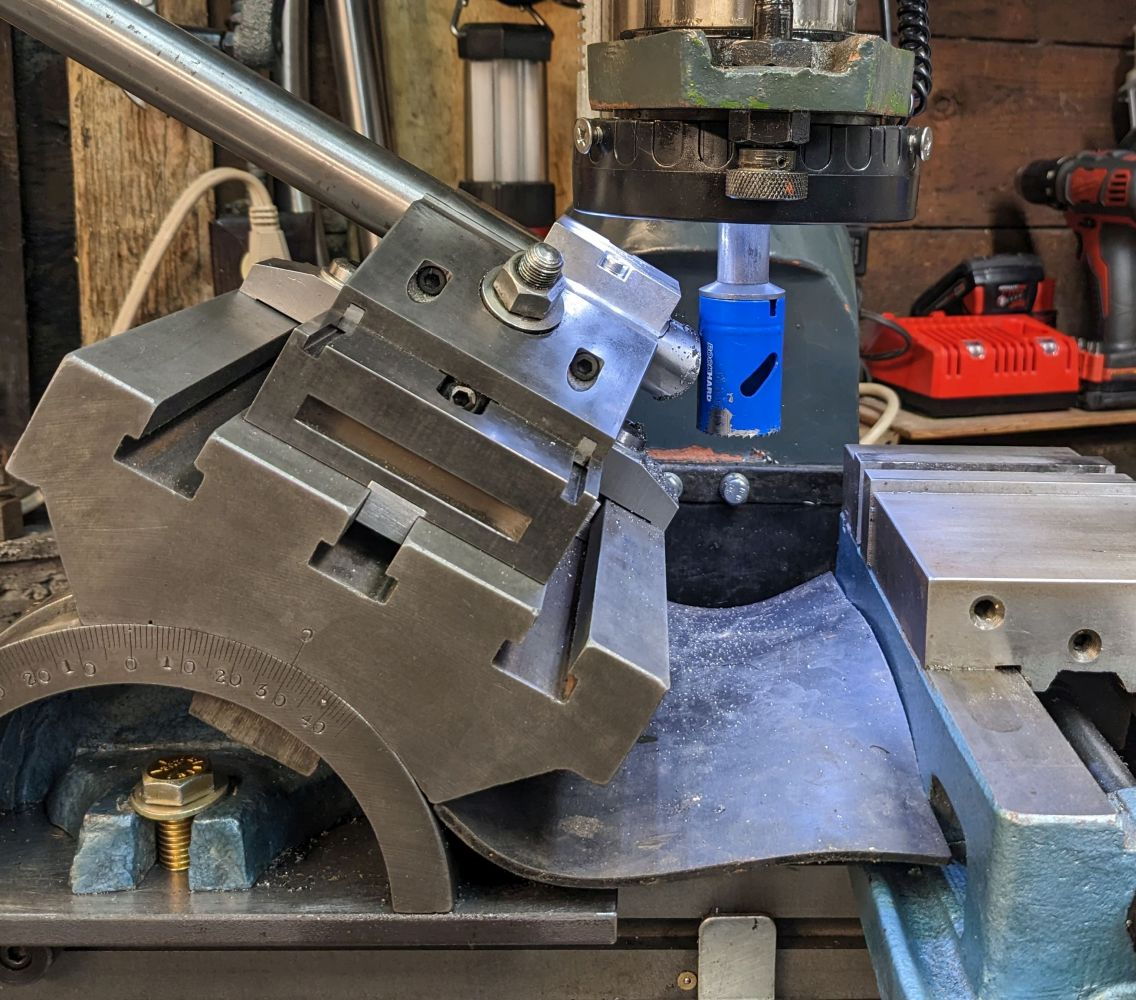

I guess with the vise remaining flat on the mill table, the minus direction isn't really do-able — the far end of the tube will hit the table. But that's no disadvantage if you wanted to cut in the plus direction anyway.
Although I worked at 6 different framebuilding operations, I've never had to set one up myself before, so I'm just now thinking through a lot of this stuff I just took for granted before. I feel like a beginner.
Mark B
04-15-23, 03:58 PM
#11
Senior Member
Join Date: Feb 2012
Location: Rochester, NY
Posts: 18,073
Bikes: Stewart S&S coupled sport tourer, Stewart Sunday light, Stewart Commuting, Stewart Touring, Co Motion Tandem, Stewart 3-Spd, Stewart Track, Fuji Finest, Mongoose Tomac ATB, GT Bravado ATB, JCP Folder, Stewart 650B ATB
Mentioned: 0 Post(s)
Tagged: 0 Thread(s)
Quoted: 4201 Post(s)
Liked 3,857 Times
in
2,305 Posts
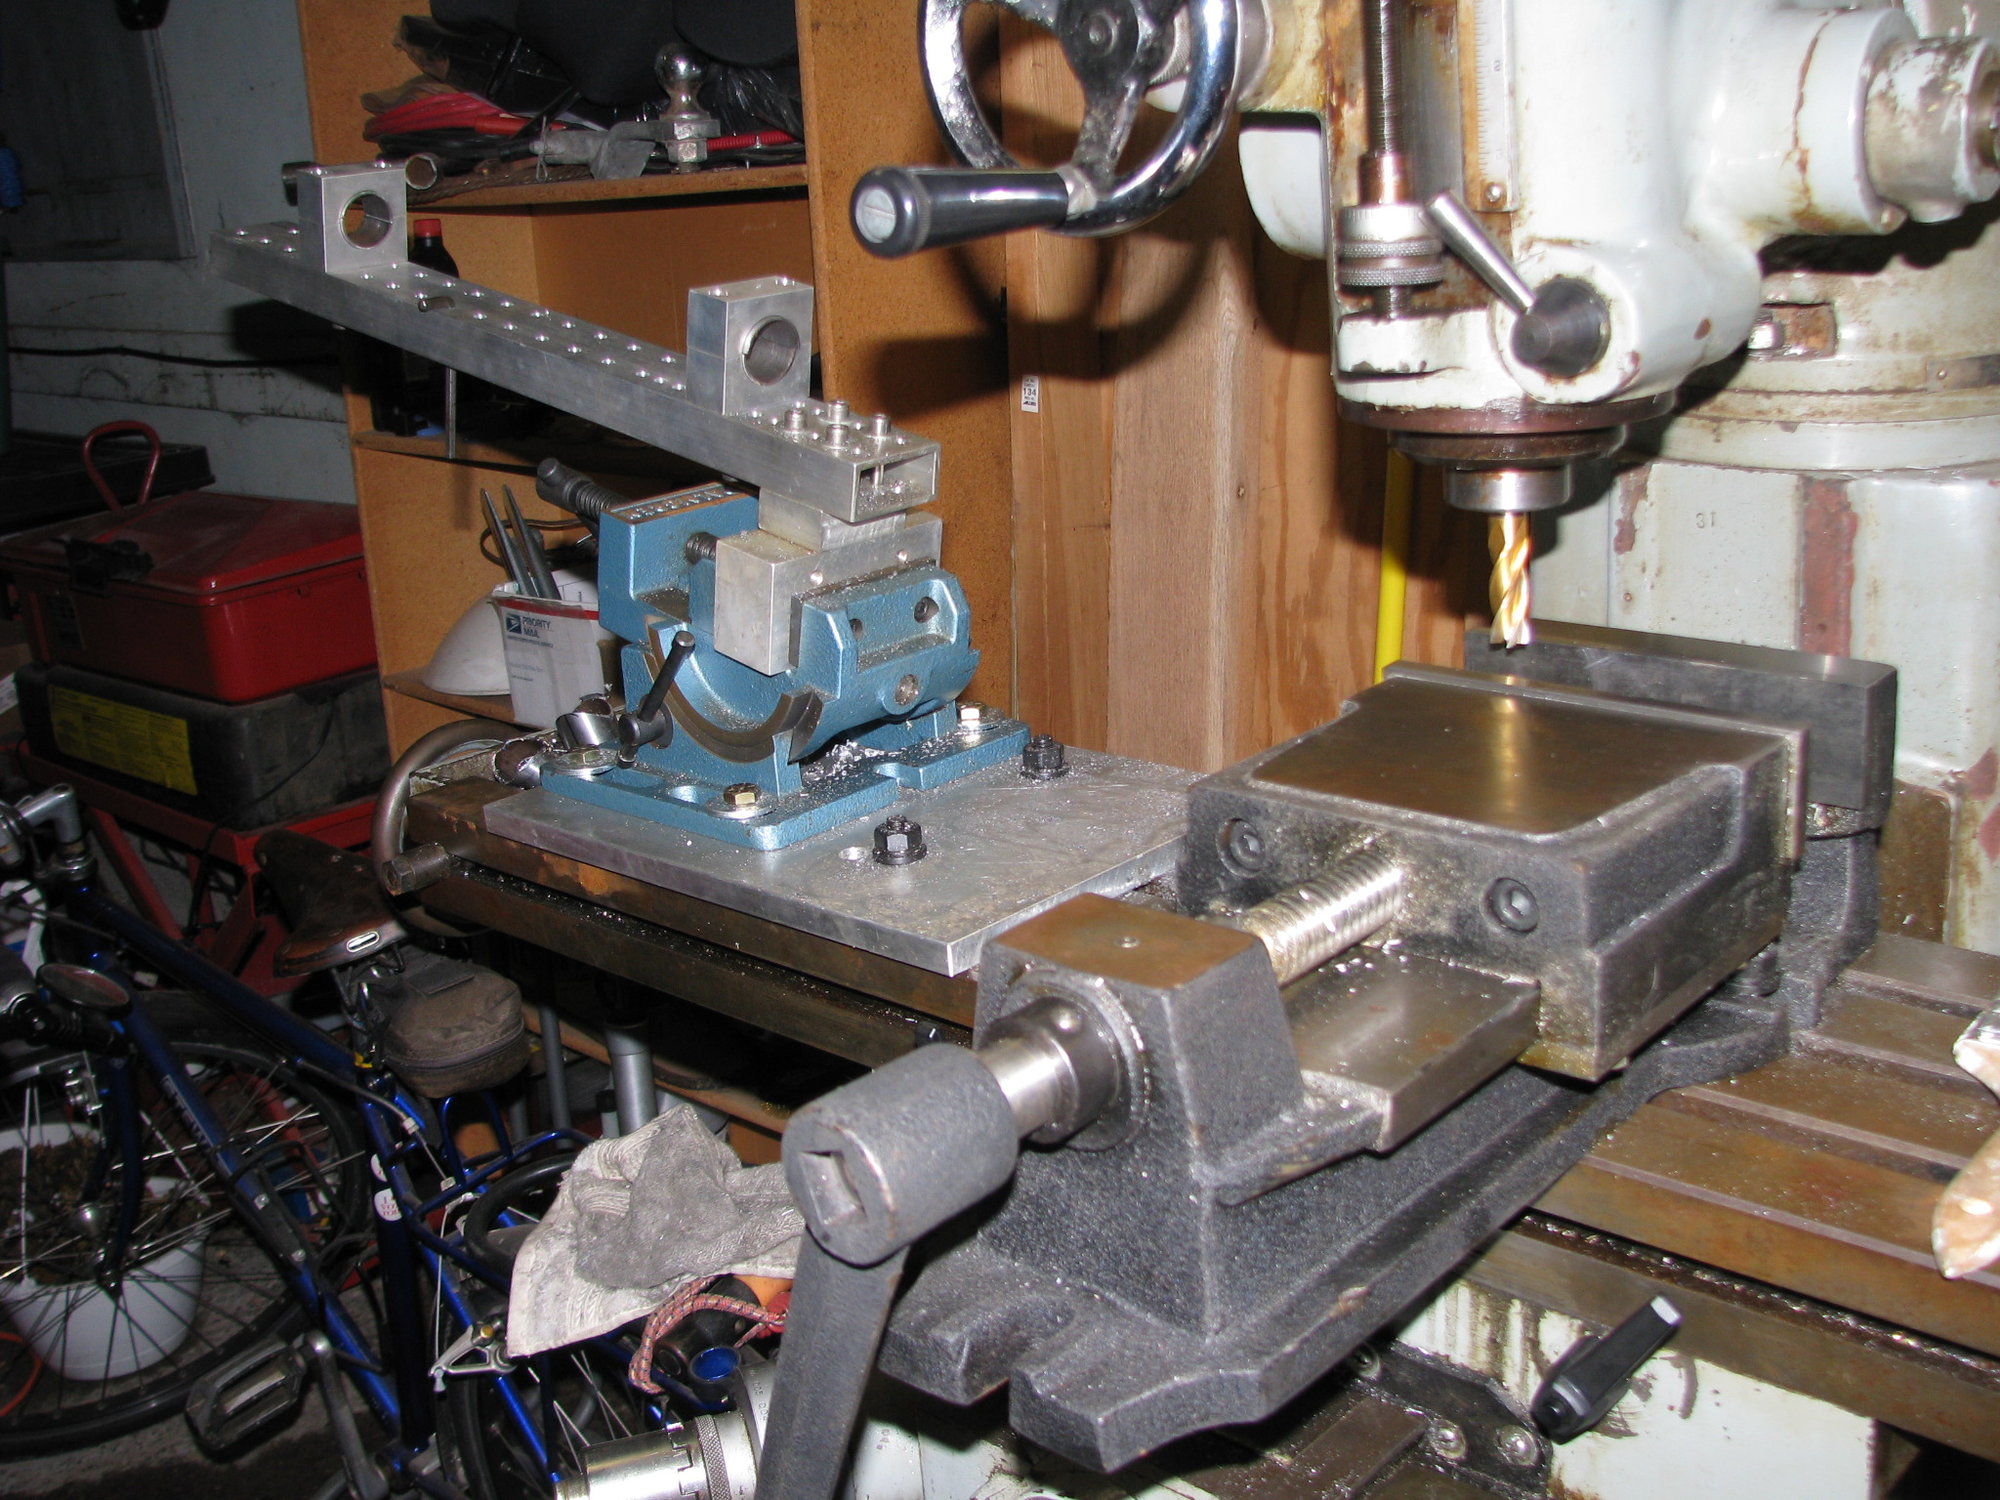
I have a bunch of long hole saw arbors (and a few shorties). I got mine from Paragon. Here's a shot of my set up. Actually I have replaced the tube holding beam with a refined version but is otherwise the same. I place a tube clamp mid tube to clock the cuts. Andy
__________________
AndrewRStewart
AndrewRStewart
04-16-23, 08:01 AM
#12
Randomhead
Join Date: Aug 2008
Location: Happy Valley, Pennsylvania
Posts: 24,396
Mentioned: 0 Post(s)
Tagged: 0 Thread(s)
Quoted: 4 Post(s)
Liked 3,696 Times
in
2,517 Posts
I always wanted one of those tilting vises, but they cost too much for me. I like Mark's table. I should get one since the head on my mill doesn't tilt at all.
04-16-23, 08:37 AM
#13
Senior Member
Join Date: Feb 2012
Location: Rochester, NY
Posts: 18,073
Bikes: Stewart S&S coupled sport tourer, Stewart Sunday light, Stewart Commuting, Stewart Touring, Co Motion Tandem, Stewart 3-Spd, Stewart Track, Fuji Finest, Mongoose Tomac ATB, GT Bravado ATB, JCP Folder, Stewart 650B ATB
Mentioned: 0 Post(s)
Tagged: 0 Thread(s)
Quoted: 4201 Post(s)
Liked 3,857 Times
in
2,305 Posts
Eric- Aggreed that a nice tilting vise is pricy. This one came to me in a round about way, part of a larger tooling purchase that the seller had from their relative. The current low cost offers are quite rough in construction compared to this one and "name brand" ones are many hundreds of $. As I do use my mill for non mitering stuff routinely I leave the head trammed.
Here in the loosing out Rust Belt I see frequent for sale ads for old tooling. Right now in my area, between FB Marketplace and Craig's List, there are 3 lathes and a few mills offered. Were anyone in our building community ever want help with a Rochester region purchase I'm willing. Andy
Here in the loosing out Rust Belt I see frequent for sale ads for old tooling. Right now in my area, between FB Marketplace and Craig's List, there are 3 lathes and a few mills offered. Were anyone in our building community ever want help with a Rochester region purchase I'm willing. Andy
__________________
AndrewRStewart
AndrewRStewart
04-16-23, 10:58 AM
#14
Randomhead
Join Date: Aug 2008
Location: Happy Valley, Pennsylvania
Posts: 24,396
Mentioned: 0 Post(s)
Tagged: 0 Thread(s)
Quoted: 4 Post(s)
Liked 3,696 Times
in
2,517 Posts
I wonder how bad the cheap tilting tables are
04-16-23, 01:53 PM
#15
blahblahblah chrome moly
Thread Starter
Join Date: Apr 2009
Location: Seattle
Posts: 1,987
Mentioned: 92 Post(s)
Tagged: 0 Thread(s)
Quoted: 1173 Post(s)
Liked 2,569 Times
in
1,073 Posts
eBay's return policy is pretty buyer-friendly, so you could take one "on approval".
My guess is, it might need to be "fettled in" to be good enough. De-burred, smoothed, cleaned and lubed as a minimum, maybe low-quality fasteners replaced with high-strength. The $100 one I linked to earlier has a worm-screw crank to set the angle and I'm pretty sure I would just remove all that. It's not going to work great and it just slows you down when changing the angle by a large amount. My India version has no such screw and I don't miss it. Unless the fixture you bolt to it weighs hundreds, the table itself is easy to move by hand, with rubber mallet for the fine-adjust.
I've heard the cheap Chinese machine tools referred to as DIY kits. All (or most of) the parts you need to make your own tilt table...
04-17-23, 05:29 AM
#16
Senior Member
Join Date: Aug 2007
Location: Evanston, IL
Posts: 5,093
Bikes: many
Mentioned: 63 Post(s)
Tagged: 0 Thread(s)
Quoted: 1444 Post(s)
Liked 1,392 Times
in
760 Posts
[QUOTE=Andrew R Stewart;22861332]Here in the loosing out Rust Belt I see frequent for sale ads for old tooling. Right now in my area, between FB Marketplace and Craig's List, there are 3 lathes and a few mills offered./QUOTE]
Subscribe to BidSpotter.com (check the machining box). Holy Moly! I get several emails a day for machinery auctions all across the country. Most of it is way too big (and expensive) for hobbyist needs (lots of CNC machine centers, for instance), but the occasional old Bridgeport mill floats past as well. Still, it's rather fun to window shop.
Subscribe to BidSpotter.com (check the machining box). Holy Moly! I get several emails a day for machinery auctions all across the country. Most of it is way too big (and expensive) for hobbyist needs (lots of CNC machine centers, for instance), but the occasional old Bridgeport mill floats past as well. Still, it's rather fun to window shop.
 04-17-23, 08:00 AM
#17
Randomhead
Join Date: Aug 2008
Location: Happy Valley, Pennsylvania
Posts: 24,396
Mentioned: 0 Post(s)
Tagged: 0 Thread(s)
Quoted: 4 Post(s)
Liked 3,696 Times
in
2,517 Posts
I have seen this too, but I have seen some teardowns of things like lathe chucks or mill vises that can't be fixed economically. I'm not sure if these tilting tables are in that category. Probably not exciting enough to get someone to tear one down on youtube so I can know if it's worth it. The fact that it's driven by a handle is bad news, I think.
04-17-23, 05:11 PM
#18
blahblahblah chrome moly
Thread Starter
Join Date: Apr 2009
Location: Seattle
Posts: 1,987
Mentioned: 92 Post(s)
Tagged: 0 Thread(s)
Quoted: 1173 Post(s)
Liked 2,569 Times
in
1,073 Posts
I have seen this too, but I have seen some teardowns of things like lathe chucks or mill vises that can't be fixed economically. I'm not sure if these tilting tables are in that category. Probably not exciting enough to get someone to tear one down on youtube so I can know if it's worth it. The fact that it's driven by a handle is bad news, I think.
Plus there's the liberal ebay return policy. Seems pretty risk-free to me. Oh, I guess you might find out much later that the casting is weak, if you over-tighten one of the T-nuts and blow out a section of the slot. Seen that happen on some mill tables, so sad. So maybe assume the iron is weak, and keep the clamping force moderate. The way to determine the best clamping force is tighten 'til it breaks, then back off a quarter-turn.

Mark B
04-17-23, 05:54 PM
#19
Randomhead
Join Date: Aug 2008
Location: Happy Valley, Pennsylvania
Posts: 24,396
Mentioned: 0 Post(s)
Tagged: 0 Thread(s)
Quoted: 4 Post(s)
Liked 3,696 Times
in
2,517 Posts
That's similar to the way I put on tubeless tires. Inflate it until it blows off the rim and then let 10 psi out.
Likes For unterhausen:
04-18-23, 10:59 AM
#20
Randomhead
Join Date: Aug 2008
Location: Happy Valley, Pennsylvania
Posts: 24,396
Mentioned: 0 Post(s)
Tagged: 0 Thread(s)
Quoted: 4 Post(s)
Liked 3,696 Times
in
2,517 Posts
modern day internet is really creepy. I haven't gone looking at tilting tables, but somehow amazon is sending me emails about them.
Likes For unterhausen:
04-20-23, 09:08 PM
#21
framebuilder
I'll present one of my miter set ups as food for thought for those that might be considering how to miter on some kind of vertical milling machine. Over the years I went through a variety of plans until I settled on this one. I also have a Anvil mitering set up on my 2nd vertical mill for students to use. When I was apprenticing at Ellis Briggs in England in 1975 we hand mitered. Later we discovered that EB at one time had a lathe set up to machine miter. The truth is that hand mitering is the fastest method if speed is the primary objective. I liked the idea of machine mitering to get the greatest accuracy. I first did it on a lathe when I got back to the States and tried several methods after that on my mills until I made a deal with an engineer to design one for me. I think he came up with a couple of brilliant ideas.
if I was starting out again and had a mill and was on a budget, I would begin with 2 long pieces of 80/20. One piece would lay flat on the mill bed to hold the basic structure and assorted pieces and the other one would pivot to the chosen angle while holding the tube. The tube itself would be held with 2 paragon aluminum blocks on each end of the tube. These blocks would attach to the pivoting piece of 80/20. That way the miters stay in phase and they are well supported as the cutter is turning.
My engineer had an eye bolt attached to the pivot of the 2 pieces. On the end of the eyebolt was a nut that pushed against a pivoting block. This both held the pivoting 80/20 piece in place as well as allowed the angle to slightly change if the nut was rotated a small amount. This solves 2 problems associated with mitering fixtures. First is that it holds the angle securely (nothing moves when the holding nut is loosened) and second it allows for easy and precise angle changes by turning the nut a small amount.
The 2 pieces of 80/20 could be held in some angled position with two slip tubes at the back using a system like a seat post into a seat tube. They could be marked for angles if one wasn't using some other common means like a digital angle device.

my mitering fixture attached to my Bridgeport vertical mill

this picture shows the details of how an eyelet can adjust and hold the angle of the part of the fixture that holds the tube. You can see that there are 5 pivot points on my fixture.
if I was starting out again and had a mill and was on a budget, I would begin with 2 long pieces of 80/20. One piece would lay flat on the mill bed to hold the basic structure and assorted pieces and the other one would pivot to the chosen angle while holding the tube. The tube itself would be held with 2 paragon aluminum blocks on each end of the tube. These blocks would attach to the pivoting piece of 80/20. That way the miters stay in phase and they are well supported as the cutter is turning.
My engineer had an eye bolt attached to the pivot of the 2 pieces. On the end of the eyebolt was a nut that pushed against a pivoting block. This both held the pivoting 80/20 piece in place as well as allowed the angle to slightly change if the nut was rotated a small amount. This solves 2 problems associated with mitering fixtures. First is that it holds the angle securely (nothing moves when the holding nut is loosened) and second it allows for easy and precise angle changes by turning the nut a small amount.
The 2 pieces of 80/20 could be held in some angled position with two slip tubes at the back using a system like a seat post into a seat tube. They could be marked for angles if one wasn't using some other common means like a digital angle device.
my mitering fixture attached to my Bridgeport vertical mill
this picture shows the details of how an eyelet can adjust and hold the angle of the part of the fixture that holds the tube. You can see that there are 5 pivot points on my fixture.
04-26-23, 04:26 PM
#22
Senior Member
Join Date: Aug 2012
Location: Seattle
Posts: 507
Mentioned: 0 Post(s)
Tagged: 0 Thread(s)
Quoted: 103 Post(s)
Liked 144 Times
in
88 Posts
I use the same approach as David above. I figure the fewer parts between the table and the cutter means the fewer parts to get mis-aligned or flex or whatever. I minimize the stick out of the tube in the blocks - one at each end of the tube, clocked on the surface plate - and the arbor from the collet. Then I try to get the tube block toward the center of the vice but otherwise seem to have success with this approach. Also, I always worry that I run out of room on my little mill if I start stacking fixtures but it's the same as Andrews so, maybe I'm overthinking that part.
__________________
https://www.flickr.com/photos/54319503@N05/
https://www.draper-cycles.com
https://www.flickr.com/photos/54319503@N05/
https://www.draper-cycles.com
04-26-23, 05:32 PM
#23
Randomhead
Join Date: Aug 2008
Location: Happy Valley, Pennsylvania
Posts: 24,396
Mentioned: 0 Post(s)
Tagged: 0 Thread(s)
Quoted: 4 Post(s)
Liked 3,696 Times
in
2,517 Posts
The single tube block method looks pretty good. I know a lot of people use that method. The thing that interests me in the tilting table is that since the head on my mill doesn't tilt, there are a lot of things I have to fixture and the tilting table takes care of that. Although Doug's suggestion of an extrusion-based fixture got me thinking.
04-27-23, 08:06 AM
#24
framebuilder
I prefer moving the fixture to get a chosen angle instead of moving the head. It always seems when moving the head, the center position changes slightly and the cut is then not centered anymore on the miter after an angle change. I also like micro adjusting the angle on the fixture. The concept the engineer that designed my fixture came up with not only allows micro adjustment but also holds it stable and steady while the change is being made. Moving the nut on the eyebolt slightly with a wrench makes changing angles easy and precise.
Likes For Doug Fattic:
05-11-23, 03:36 PM
#25
Newbie
So... I cheaped out on miter fixturing to get going... A pair of Wilton magnetic v-block jaws in the mill vise, Then, rotate the head. Works great! Not even a little bit elegant Especially the blue painters tape attachment for tapered stays! 
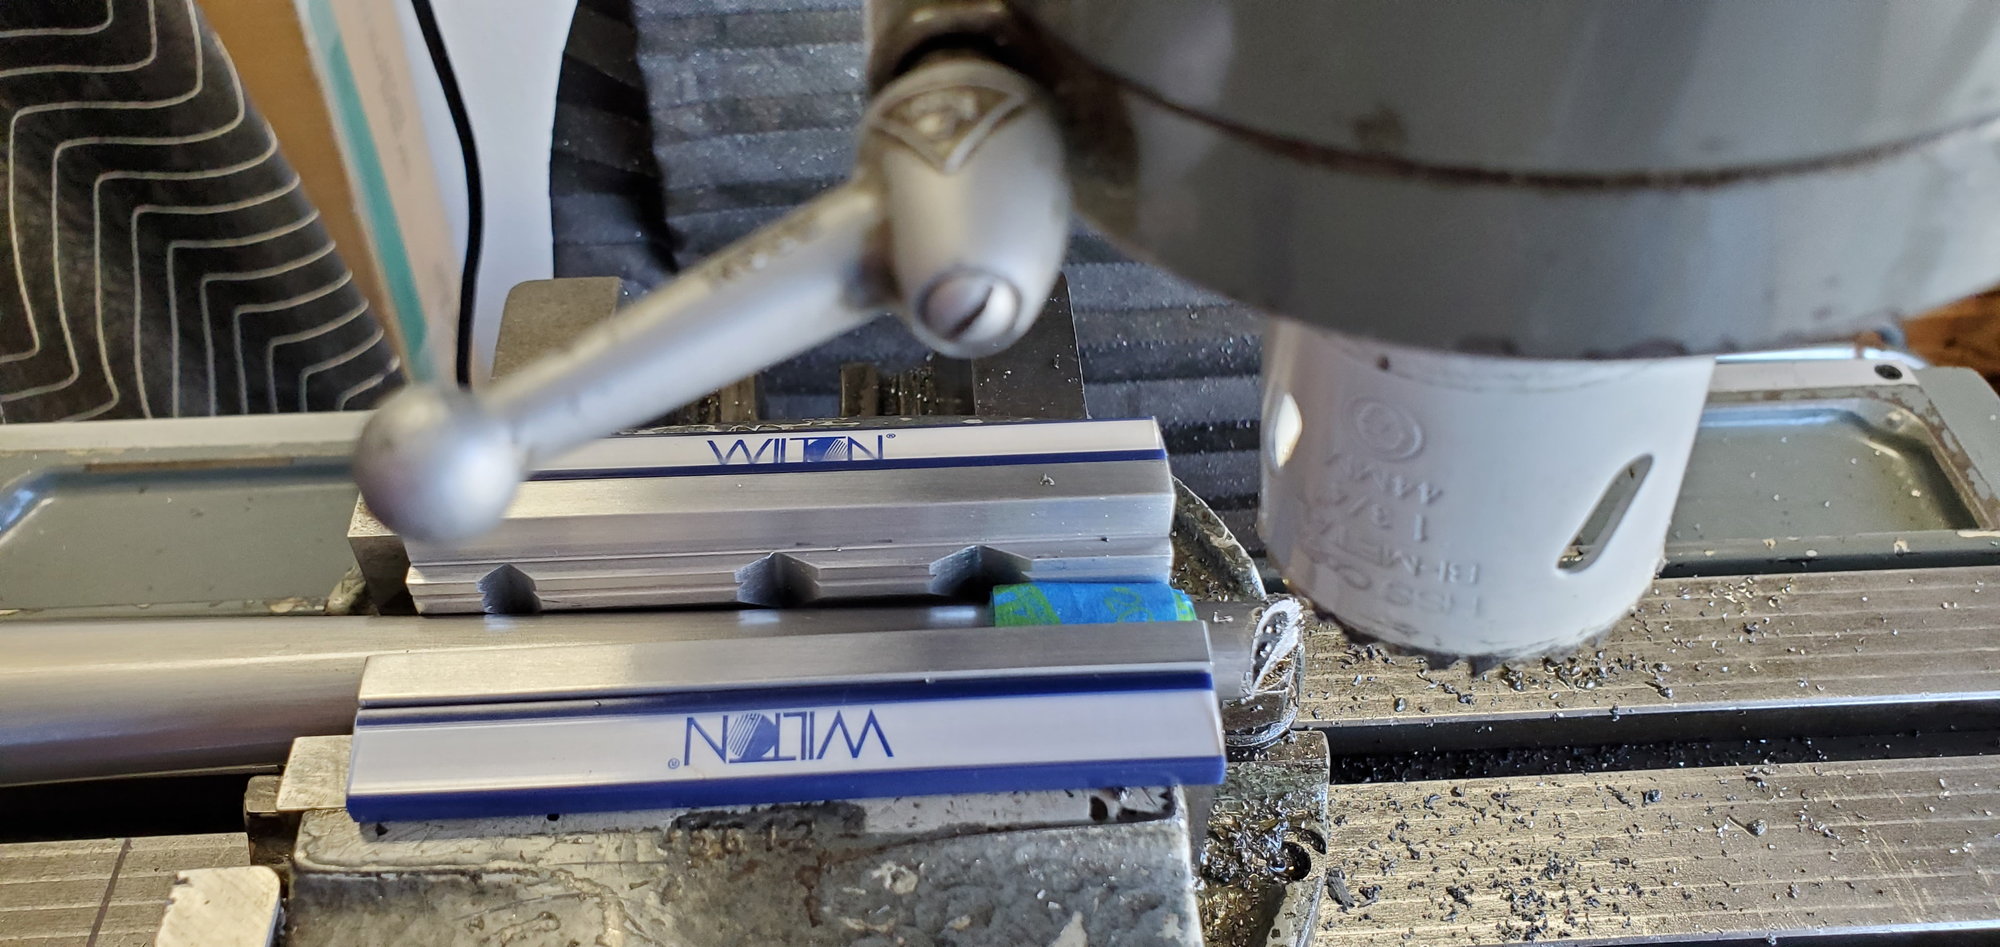

I think they were ~$55 at McMaster...
Especially the blue painters tape attachment for tapered stays! I think they were ~$55 at McMaster...
