


I thought this was really interesting: The Jiggernaut
 02-22-12, 11:52 AM
#1
Senior Member
Thread Starter
Join Date: Oct 2009
Location: Minneapolis
Posts: 2,470
Bikes: -1973 Motobecane Mirage -197? Velosolex L'Etoile -'71 Raleigh Super Course
Mentioned: 0 Post(s)
Tagged: 0 Thread(s)
Quoted: 0 Post(s)
Likes: 0
Liked 2 Times
in
2 Posts
I thought this was really interesting: The Jiggernaut
Usual disclaimer applies
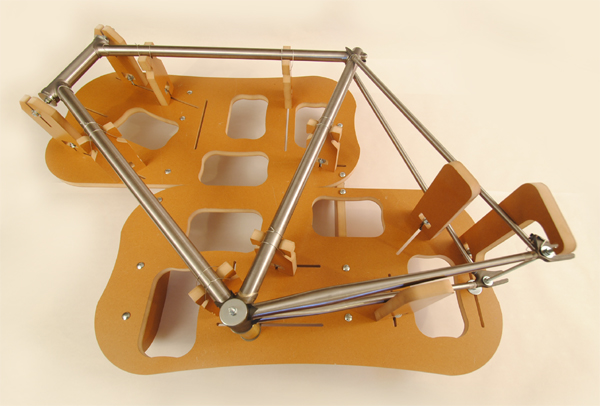
Pretty clearly not for the production professional, but for the serious hobbyist who wants to try his/her hand at framebuilding, it seems like a nifty and affordable way to keep everything lined up.
Pretty clearly not for the production professional, but for the serious hobbyist who wants to try his/her hand at framebuilding, it seems like a nifty and affordable way to keep everything lined up.
 02-22-12, 12:12 PM
#2


Randomhead
Join Date: Aug 2008
Location: Happy Valley, Pennsylvania
Posts: 24,385
Mentioned: 0 Post(s)
Tagged: 0 Thread(s)
Quoted: 4 Post(s)
Liked 3,686 Times
in
2,509 Posts
that is neat, but the v blocks point the wrong direction
02-22-12, 01:09 PM
#3
Senior Member
Thread Starter
Join Date: Oct 2009
Location: Minneapolis
Posts: 2,470
Bikes: -1973 Motobecane Mirage -197? Velosolex L'Etoile -'71 Raleigh Super Course
Mentioned: 0 Post(s)
Tagged: 0 Thread(s)
Quoted: 0 Post(s)
Likes: 0
Liked 2 Times
in
2 Posts
LOL someone put it together backward
02-22-12, 01:20 PM
#4
Randomhead
Join Date: Aug 2008
Location: Happy Valley, Pennsylvania
Posts: 24,385
Mentioned: 0 Post(s)
Tagged: 0 Thread(s)
Quoted: 4 Post(s)
Liked 3,686 Times
in
2,509 Posts
Strangely, that seems to be the prevailing direction for commercial jigs. HJ, Sputnik, Bike Machinery and Bringhelli are wrong-handed. Anvil even sells a model that's backwards.
02-22-12, 02:38 PM
#5

Framebuilder
Join Date: Dec 2007
Posts: 570
Mentioned: 0 Post(s)
Tagged: 0 Thread(s)
Quoted: 8 Post(s)
Likes: 0
Liked 0 Times
in
0 Posts
Hmm, it always seemed normal that my Nortac jig has the ht facing left...maybe because all the coolest builders are left handed?
Last edited by Live Wire; 02-22-12 at 02:41 PM.
02-22-12, 04:03 PM
#6
Senior Member
Join Date: Feb 2012
Location: Rochester, NY
Posts: 18,052
Bikes: Stewart S&S coupled sport tourer, Stewart Sunday light, Stewart Commuting, Stewart Touring, Co Motion Tandem, Stewart 3-Spd, Stewart Track, Fuji Finest, Mongoose Tomac ATB, GT Bravado ATB, JCP Folder, Stewart 650B ATB
Mentioned: 0 Post(s)
Tagged: 0 Thread(s)
Quoted: 4193 Post(s)
Liked 3,837 Times
in
2,295 Posts
Interesting that you can see a gap between the left chain stay and the plate used to keep the two stays parallel. Not sure how much advantage the cut outs are in the main plate. I wouldn't read much into whichever way it "faces". That it doesn't seem to have a way to hold it vertically and get better access to the right side is more my concern. Having said all this, as a set up and tacking jig it will likely work well. With a good flat surface and alignment tools the frames could be good enough straight. Andy.
 02-22-12, 04:19 PM
#7
framebuilder
Fixtures have the head tube to the left because that is the direction most likely to be used when aligning a frame on a flat table. Neither the left or right face of a bb shell will be exactly perpendicular to its threads after the tubes have been brazed in and even if it has been refaced. Most likely a builder will choose to put the derailleur side down on the alignment post because of the preference to have the drive side the most aligned with the tubes. I deliberately designed my fixtures with the head tube facing left. Of course not everyone uses the drive side face of a bottom bracket shell as their alignment reference like I do. Don at Anvil started making some of his fixtures facing left because of the request from framebuilders for this reason.
One the one hand I can see the value of a modestly priced fixture for the hobby builder. It looks fairly well thought out. On the other hand – after spending thousands of hours designing them myself – I can see its deficiencies. For one thing I never believe it is possible to get an accurate rear triangle (where the wheels are dead center in the frame) when it is built in a non professional fixture. It can work okay as a reference for determining lengths but not for holding the rear dropouts accurately enough for brazing so the rear wheel exactly centers. That needs to be done either outside with a true wheel or if things are brazed in the fixture, with one that is really well machined.
I would also want a fixture to have reference data like angles and bb drops and where the center of the front wheel is going to be. I want to miter my tubes to the accuracy of the frame design on the fixture and not use my mitered tubes to set the fixture. Of course there are a number of ways to build a frame so this fixture might work well for somebody else's method. I do give them props for a clever design even if it is one I wouldn't want to use myself.
02-22-12, 04:49 PM
#8
Randomhead
Join Date: Aug 2008
Location: Happy Valley, Pennsylvania
Posts: 24,385
Mentioned: 0 Post(s)
Tagged: 0 Thread(s)
Quoted: 4 Post(s)
Liked 3,686 Times
in
2,509 Posts
this is kind of a throwback fixture to the ways they used to be made in the '70s. My first jig had very similar setup except with round tube clamps -- it was also wrong-handed. Of course, back then all the tubes were round and they were all the same size unless you managed to get some of the Reynolds 531 tandem tubing. As Andy and Doug have noted, the rear triangle part of the jig in the OP seems destined to build crooked bikes. I never finished designing the rear triangle portion of my first jig so I would build the rear triangle by measuring everything about a million times.
02-23-12, 10:39 AM
#10
Randomhead
Join Date: Aug 2008
Location: Happy Valley, Pennsylvania
Posts: 24,385
Mentioned: 0 Post(s)
Tagged: 0 Thread(s)
Quoted: 4 Post(s)
Liked 3,686 Times
in
2,509 Posts
not a chopper, camera angle
02-23-12, 02:22 PM
#11
Old fart

Join Date: Nov 2004
Location: Appleton WI
Posts: 24,776
Bikes: Several, mostly not name brands.
Mentioned: 153 Post(s)
Tagged: 0 Thread(s)
Quoted: 3582 Post(s)
Liked 3,394 Times
in
1,928 Posts
But where's the fork jig?
02-23-12, 09:11 PM
#12
Senior Member
Join Date: Feb 2012
Location: Rochester, NY
Posts: 18,052
Bikes: Stewart S&S coupled sport tourer, Stewart Sunday light, Stewart Commuting, Stewart Touring, Co Motion Tandem, Stewart 3-Spd, Stewart Track, Fuji Finest, Mongoose Tomac ATB, GT Bravado ATB, JCP Folder, Stewart 650B ATB
Mentioned: 0 Post(s)
Tagged: 0 Thread(s)
Quoted: 4193 Post(s)
Liked 3,837 Times
in
2,295 Posts
John- This is for those who don't frequent the frame Builders List- This jig could fixture a fork with a straight steerer. Using the rear axle rod respaced for a fork and two of the tube blocks postioned (maybe with a new mounting hole or two). The HJ Universal jig can be used this way too. Andy.
02-24-12, 04:25 AM
#13
Grumpy Young Coot
Join Date: Aug 2009
Posts: 121
Mentioned: 0 Post(s)
Tagged: 0 Thread(s)
Quoted: 0 Post(s)
Likes: 0
Liked 0 Times
in
0 Posts
Does anyone know of a better option in the sub 500 buck range? I've seen some do it yourself designs, but lathe access would bump the price up for me a bit. I could do something simple and similar with 8020, but there's something nice about just not worrying too much about design for one little corner of this first bike project.
I'm pretty tempted. It seems like you could tack one side of the rear triangle in it to get the initial length and angle right, then do the "measure everything 2000 times" thing to get the other side to line up correctly... or at least correctly enough for a newbie. Thoughts?
I'm pretty tempted. It seems like you could tack one side of the rear triangle in it to get the initial length and angle right, then do the "measure everything 2000 times" thing to get the other side to line up correctly... or at least correctly enough for a newbie. Thoughts?
02-24-12, 04:34 AM
#14
Grumpy Young Coot
Join Date: Aug 2009
Posts: 121
Mentioned: 0 Post(s)
Tagged: 0 Thread(s)
Quoted: 0 Post(s)
Likes: 0
Liked 0 Times
in
0 Posts
...and just noticed that the delivery date is May for the Jig itself, not March like the t-shirt. Damn, I'm pretty sure I'm not that patient.
02-24-12, 07:17 AM
#15
Junior Mint
The best option is to buy some tube blocks or V-blocks and build without a jig. I've built a few this way and all have come out straight enough that my eye can't detect any skew. (N.B. I haven't built a fork without a jig, but I assume I could. My homemade jig took only a couple of hours and involved no machining.)
In my limited circle of hobbyist frame builders, there seems to be a ratio of jigs to built frames of > 1. I strongly encourage people like me, who only have built, and only are building, a few frames, to just do it. Dive in. Forget the jig.
Let creativity and angle iron be your jig.
In my limited circle of hobbyist frame builders, there seems to be a ratio of jigs to built frames of > 1. I strongly encourage people like me, who only have built, and only are building, a few frames, to just do it. Dive in. Forget the jig.
Let creativity and angle iron be your jig.
02-24-12, 07:50 AM
#16
Randomhead
Join Date: Aug 2008
Location: Happy Valley, Pennsylvania
Posts: 24,385
Mentioned: 0 Post(s)
Tagged: 0 Thread(s)
Quoted: 4 Post(s)
Liked 3,686 Times
in
2,509 Posts
Does anyone know of a better option in the sub 500 buck range? I've seen some do it yourself designs, but lathe access would bump the price up for me a bit. I could do something simple and similar with 8020, but there's something nice about just not worrying too much about design for one little corner of this first bike project.
sig-worthy

Last edited by unterhausen; 02-24-12 at 07:53 AM.
02-24-12, 09:34 AM
#17
Member

Join Date: Dec 2007
Location: Berkeley, CA
Posts: 35
Mentioned: 0 Post(s)
Tagged: 0 Thread(s)
Quoted: 0 Post(s)
Likes: 0
Liked 0 Times
in
0 Posts
https://www.flickr.com/photos/smudgemo/6900168371/
02-24-12, 10:25 AM
#18
Senior Member
When I started out I machined a rear triangle jig and a fork jig. Just that was roughly $500 in materials. Well I don't use them anymore. As long as you understand what alignment is, you can get away with Tees, straight-edges, wheels, v-blocks and a flat surface, as shown above. Nice tools Smudgemo.
02-24-12, 09:30 PM
#20
Senior Member
Thread Starter
Join Date: Oct 2009
Location: Minneapolis
Posts: 2,470
Bikes: -1973 Motobecane Mirage -197? Velosolex L'Etoile -'71 Raleigh Super Course
Mentioned: 0 Post(s)
Tagged: 0 Thread(s)
Quoted: 0 Post(s)
Likes: 0
Liked 2 Times
in
2 Posts
Well, I did some PMing around on FB and it turns out that this is being marketed by a friend of a friend of a friend of an ex of a friend of a friend. Couple-three weeks when my finances get a little better, I might buy one. maybe.
maybe I need to learn to braze first.
maybe I need to learn to braze first.
02-24-12, 10:34 PM
#21
Senior Member
Join Date: Feb 2012
Location: Rochester, NY
Posts: 18,052
Bikes: Stewart S&S coupled sport tourer, Stewart Sunday light, Stewart Commuting, Stewart Touring, Co Motion Tandem, Stewart 3-Spd, Stewart Track, Fuji Finest, Mongoose Tomac ATB, GT Bravado ATB, JCP Folder, Stewart 650B ATB
Mentioned: 0 Post(s)
Tagged: 0 Thread(s)
Quoted: 4193 Post(s)
Liked 3,837 Times
in
2,295 Posts
Cpt blght- I teaching a coworker how to build a frame currently. After 3 (about 3 hour each) sessions we're still on basic brazing. Soon we'll progress to sleeve/flow brazing then practice drop out/stay joints. All the time he's cutting and filing his own practice joints. By the time he's ready to cut bike tubing he'll be ready for the real stuff and understand why good brazing is critical. Andy.
02-25-12, 01:42 AM
#22
Grumpy Young Coot
Join Date: Aug 2009
Posts: 121
Mentioned: 0 Post(s)
Tagged: 0 Thread(s)
Quoted: 0 Post(s)
Likes: 0
Liked 0 Times
in
0 Posts
Thanks for the feedback guys, much appreciated!
I don't have a lot of options when it comes to a flat surface that I can use at techshop... they'd choke on their tongues if they saw me near the surface plate with a torch (as someone mentioned above). The table used for the oxy is pretty much just a big sheet of steel that's also used for grinders, so it's pretty bashed and dinged.
I think 80/20 is probably going to be it. I'll do a simple beam jig just to tack, and then go from there.
Thanks!
02-25-12, 07:30 AM
#23
Senior Member

Join Date: Sep 2008
Location: Collegeville, PA
Posts: 1,350
Bikes: Ruckelshaus Randonneur, Specialized Allez (early 90's, steel), Ruckelshaus Path Bomber currently being built
Mentioned: 1 Post(s)
Tagged: 0 Thread(s)
Quoted: 4 Post(s)
Likes: 0
Liked 1 Time
in
1 Post
I started a Wordpress site that has a number of examples of homebuilt jigs:
https://framejig.wordpress.com/
https://framejig.wordpress.com/
02-25-12, 09:26 AM
#24
Senior Member
Join Date: Feb 2012
Location: Rochester, NY
Posts: 18,052
Bikes: Stewart S&S coupled sport tourer, Stewart Sunday light, Stewart Commuting, Stewart Touring, Co Motion Tandem, Stewart 3-Spd, Stewart Track, Fuji Finest, Mongoose Tomac ATB, GT Bravado ATB, JCP Folder, Stewart 650B ATB
Mentioned: 0 Post(s)
Tagged: 0 Thread(s)
Quoted: 4193 Post(s)
Liked 3,837 Times
in
2,295 Posts
Veryredbike- Shielding the surface plate with metal sheets or (horrors) asbestos sheets is common when tacking on a plate. But the flame really doesn't harm the plate as long as one isn't too directed or lingering. Not that this would convince the QC guys! Really any reasonably flat surface can serve as the "jig" using v blocks. The precision flat surface can be saved for the aligning purposes which involves no heat. That's why this Jiggernaut is actually a cool tool for newbies, as long as they understand that alignment comes from other steps then the jigging. Andy.
02-25-12, 11:34 AM
#25
Senior Member
Join Date: Feb 2012
Location: Rochester, NY
Posts: 18,052
Bikes: Stewart S&S coupled sport tourer, Stewart Sunday light, Stewart Commuting, Stewart Touring, Co Motion Tandem, Stewart 3-Spd, Stewart Track, Fuji Finest, Mongoose Tomac ATB, GT Bravado ATB, JCP Folder, Stewart 650B ATB
Mentioned: 0 Post(s)
Tagged: 0 Thread(s)
Quoted: 4193 Post(s)
Liked 3,837 Times
in
2,295 Posts
On looking at this jig's tube blocks I see that they also have Vees cut on the block's sides (which would hold the tube on the tubes' top or bottoms). What I wonder is whether the tube blocks are two piece so that the two additional vees are still to be positioned on the blocks' ends OR can the head tube, shell and rear axle rod all be adjusted to a closer to the board centerline (and lining up with the side of block vees)?
This is a very interesting jig, just wish it had a few small changes. Like a straight edge to reference the tube angles from. maybe a backing plate on the other side of the vertical spines, which would then swerve as a stiffener and a good mounting point for a work stand clamp. Andy.
This is a very interesting jig, just wish it had a few small changes. Like a straight edge to reference the tube angles from. maybe a backing plate on the other side of the vertical spines, which would then swerve as a stiffener and a good mounting point for a work stand clamp. Andy.

