


Tube Mitre's tools
 05-23-12, 01:53 PM
#1
Junior Member
Thread Starter
Join Date: May 2012
Posts: 21
Mentioned: 0 Post(s)
Tagged: 0 Thread(s)
Quoted: 0 Post(s)
Likes: 0
Liked 0 Times
in
0 Posts
Tube Mitre's tools
Folks,
I just found this site and looking forward to seeing what othere builders are doing.
I am new and bulding some BMX race frames. One problem that I am having is getting my mitres to be completely 90 degrees apart.
What are some tools you use to assure these cuts are exactly like you need?
Any advise is welcomed!
 05-23-12, 02:02 PM
#2


Randomhead
Join Date: Aug 2008
Location: Happy Valley, Pennsylvania
Posts: 24,396
Mentioned: 0 Post(s)
Tagged: 0 Thread(s)
Quoted: 4 Post(s)
Liked 3,696 Times
in
2,517 Posts
not sure I really understand why you want 90 degrees between miters, but the cheapest way to make sure the miters are lined up is to draw a line on the tube and work off of that. For machine made miters, the next step up is to get some tube blocks, for example Paragon Machine Works sells some. Then you can use the tube blocks to make sure the miters are aligned. One way to use them is to use a level when setting up.
Tell us more about how you are making the miters. Files?
Tell us more about how you are making the miters. Files?
05-23-12, 02:10 PM
#3
Junior Member
Thread Starter
Join Date: May 2012
Posts: 21
Mentioned: 0 Post(s)
Tagged: 0 Thread(s)
Quoted: 0 Post(s)
Likes: 0
Liked 0 Times
in
0 Posts
For example: On a bottom tube bottom bracket and the head tube. The center line of the mitre's need to be perpendicular. (Because the connecting ends are perpendicular) While the Top Tube needs to have two mitre's that are on the same center line. It just makes for better alignment. It is very critical when you have a top tube with a bend also. Both mitre's need to be inline with the bend for proper alignment.
05-23-12, 03:00 PM
#4

Senior Member
Join Date: Feb 2012
Location: Rochester, NY
Posts: 18,073
Bikes: Stewart S&S coupled sport tourer, Stewart Sunday light, Stewart Commuting, Stewart Touring, Co Motion Tandem, Stewart 3-Spd, Stewart Track, Fuji Finest, Mongoose Tomac ATB, GT Bravado ATB, JCP Folder, Stewart 650B ATB
Mentioned: 0 Post(s)
Tagged: 0 Thread(s)
Quoted: 4201 Post(s)
Liked 3,857 Times
in
2,305 Posts
Many builders, when starting out, will just eyeball the HT and shell (or tube subbing for shell) to confirm the miters being in phase. Some also clamp a tube block to the tube and work off it's flat top to index the miter. Andy.
05-23-12, 06:41 PM
#5
Randomhead
Join Date: Aug 2008
Location: Happy Valley, Pennsylvania
Posts: 24,396
Mentioned: 0 Post(s)
Tagged: 0 Thread(s)
Quoted: 4 Post(s)
Liked 3,696 Times
in
2,517 Posts
when I do a miter by hand, I use templates that have centerlines on them to match up with a centerline on the tube. You can use the template guide at Nova and it has lines every 90 degrees.
On straight tubes, I often just use a sharpie to mark the centerline. If you are doing a curved tube, you might need a way to hold a scribe or sharpie a tube radius off of a flat surface. It's probably better to use layout fluid (like ****m) and a scribe.
On straight tubes, I often just use a sharpie to mark the centerline. If you are doing a curved tube, you might need a way to hold a scribe or sharpie a tube radius off of a flat surface. It's probably better to use layout fluid (like ****m) and a scribe.
05-24-12, 03:30 AM
#6
Grumpy Young Coot
Join Date: Aug 2009
Posts: 121
Mentioned: 0 Post(s)
Tagged: 0 Thread(s)
Quoted: 0 Post(s)
Likes: 0
Liked 0 Times
in
0 Posts
when I do a miter by hand, I use templates that have centerlines on them to match up with a centerline on the tube. You can use the template guide at Nova and it has lines every 90 degrees.
On straight tubes, I often just use a sharpie to mark the centerline. If you are doing a curved tube, you might need a way to hold a scribe or sharpie a tube radius off of a flat surface. It's probably better to use layout fluid (like ****m) and a scribe.
On straight tubes, I often just use a sharpie to mark the centerline. If you are doing a curved tube, you might need a way to hold a scribe or sharpie a tube radius off of a flat surface. It's probably better to use layout fluid (like ****m) and a scribe.
05-24-12, 07:07 AM
#7
Senior Member
For the top tube mitres, I have two pieces of "U" channel (actually square tubing chopped up) with pivots to fix dummy tubes (with diameters corresponding to the head and seat tubes) at the desired angles, and resting on a flat surface. I mitre the head tube side, draw a centreline and start the other side. The set up allows me to check the phase and angle as I cut the second mitre. I leave the tube a bit longer to allow for corrections.
For the downtube, I have big v-blocks that I can lay on their sides, so that the centreline of tubes, of any diameters, are always at the same height. I first cut the HT mitre. Then I set up the head tube on one block and phase the downtube to it, then start the BB mitre, which then is regularly checked with the (faced) shell or dummy tube (if lugged).
Using the blocks it's easy to scribe the phased centrelines on the main tubes.
Edit. How to phase the mitres with the tube's bend I wouldn't know
Last edited by tuz; 05-24-12 at 07:54 AM.
05-24-12, 01:06 PM
#8
Grumpy Young Coot
Join Date: Aug 2009
Posts: 121
Mentioned: 0 Post(s)
Tagged: 0 Thread(s)
Quoted: 0 Post(s)
Likes: 0
Liked 0 Times
in
0 Posts
05-24-12, 02:22 PM
#9
Randomhead
Join Date: Aug 2008
Location: Happy Valley, Pennsylvania
Posts: 24,396
Mentioned: 0 Post(s)
Tagged: 0 Thread(s)
Quoted: 4 Post(s)
Liked 3,696 Times
in
2,517 Posts
assuming a bent main triangle tube which will have the bend in a plane, the height gauge has to be set exactly to the centerline. Otherwise the bend will be out of plane. Bent rear triangle parts either have to be laboriously fitted by hand or cut on a fixture. Marking them is not easy.
05-24-12, 09:28 PM
#10
Member

Join Date: Dec 2007
Location: Berkeley, CA
Posts: 35
Mentioned: 0 Post(s)
Tagged: 0 Thread(s)
Quoted: 0 Post(s)
Likes: 0
Liked 0 Times
in
0 Posts
I'm guilty of suggesting the height gauge, but that was for a straight tube where all you need is a continuous line somewhere near the highest spot on the tube.
05-24-12, 09:49 PM
#11
Grumpy Young Coot
Join Date: Aug 2009
Posts: 121
Mentioned: 0 Post(s)
Tagged: 0 Thread(s)
Quoted: 0 Post(s)
Likes: 0
Liked 0 Times
in
0 Posts
assuming a bent main triangle tube which will have the bend in a plane, the height gauge has to be set exactly to the centerline. Otherwise the bend will be out of plane. Bent rear triangle parts either have to be laboriously fitted by hand or cut on a fixture. Marking them is not easy.
05-25-12, 05:53 AM
#12
Randomhead
Join Date: Aug 2008
Location: Happy Valley, Pennsylvania
Posts: 24,396
Mentioned: 0 Post(s)
Tagged: 0 Thread(s)
Quoted: 4 Post(s)
Liked 3,696 Times
in
2,517 Posts
we don't know if the OP has a height gage or not, he hasn't told us his methods. I have never built a bike with bent tubes because they were always too froo-froo for me. I have some in the works though. I am not sure the height gauge I have will work for marking those, and I haven't worked out my method for mitering them yet either.
05-28-12, 09:25 PM
#13
Junior Member
Thread Starter
Join Date: May 2012
Posts: 21
Mentioned: 0 Post(s)
Tagged: 0 Thread(s)
Quoted: 0 Post(s)
Likes: 0
Liked 0 Times
in
0 Posts
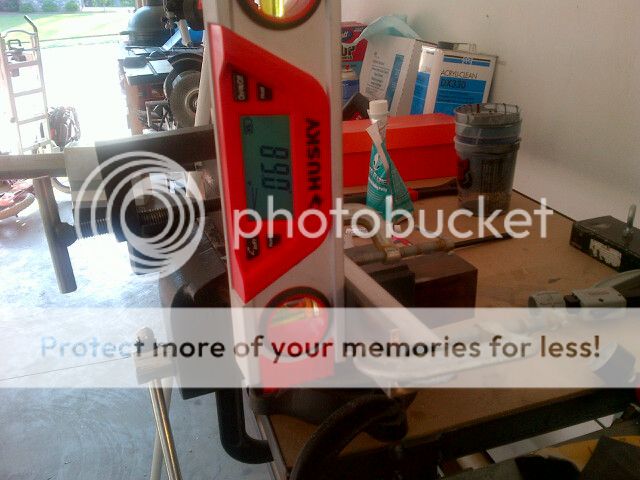
Sorry for abandoning this post. I forgot I never came back in. After posting i went back to the garage and solved the problem. I took a couple pcs of angle steel and a couple C clamps and a good digital level.
As seen in the first picture. I laid the angle tube flat and on top of the two angles and clamped the one main angle to the tube. This assured me that the one angle was parallel with the bend and the other angle was 90 degrees with the bend.
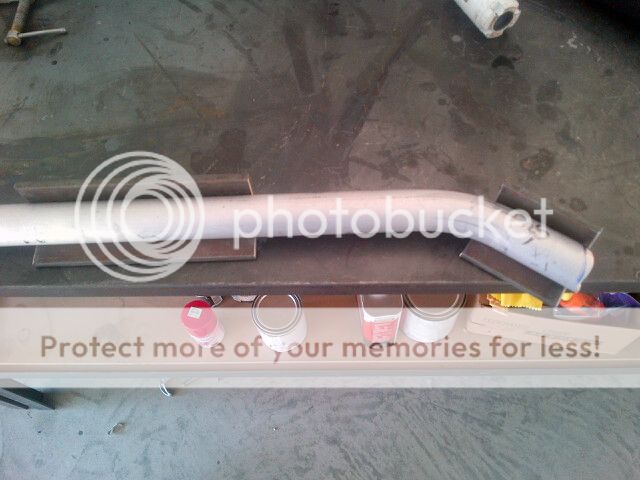
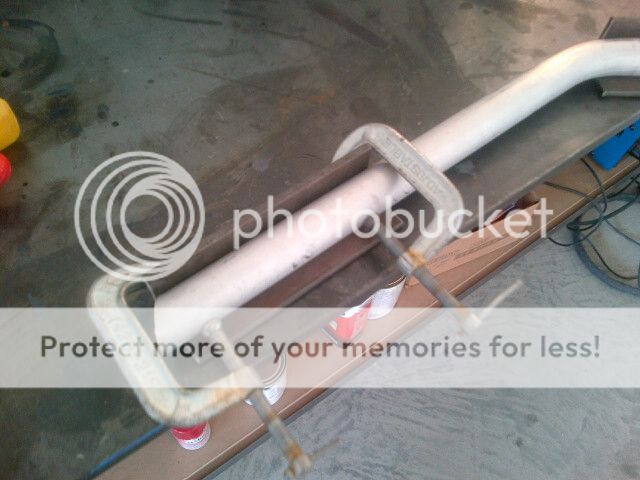
Then I could just attach my digital level to the two planes and manualy rotate the tube until I hit the 90 degree or 0 degree mark depending the end that I am cutting out.
It is handy because you can just put it at zero before you ever make a cut and you know you are 90 degree's for the 2nd cut just by rotating and reading the level.
As seen in the first picture. I laid the angle tube flat and on top of the two angles and clamped the one main angle to the tube. This assured me that the one angle was parallel with the bend and the other angle was 90 degrees with the bend.
Then I could just attach my digital level to the two planes and manualy rotate the tube until I hit the 90 degree or 0 degree mark depending the end that I am cutting out.
It is handy because you can just put it at zero before you ever make a cut and you know you are 90 degree's for the 2nd cut just by rotating and reading the level.
Last edited by ggodwin; 05-28-12 at 09:31 PM.
05-28-12, 09:35 PM
#14
Junior Member
Thread Starter
Join Date: May 2012
Posts: 21
Mentioned: 0 Post(s)
Tagged: 0 Thread(s)
Quoted: 0 Post(s)
Likes: 0
Liked 0 Times
in
0 Posts
BTW - I am using the JD Square Notchmaster as my notcher tool. It works really well.
https://www.youtube.com/watch?v=9h7To...eature=related
https://www.youtube.com/watch?v=9h7To...eature=related
05-28-12, 11:10 PM
#15
Randomhead
Join Date: Aug 2008
Location: Happy Valley, Pennsylvania
Posts: 24,396
Mentioned: 0 Post(s)
Tagged: 0 Thread(s)
Quoted: 4 Post(s)
Liked 3,696 Times
in
2,517 Posts
that's the method people use with tubing blocks. They are a little more convenient because you don't need clamps.
05-29-12, 06:08 AM
#18
Junior Member
Thread Starter
Join Date: May 2012
Posts: 21
Mentioned: 0 Post(s)
Tagged: 0 Thread(s)
Quoted: 0 Post(s)
Likes: 0
Liked 0 Times
in
0 Posts
05-29-12, 02:44 PM
#19
Randomhead
Join Date: Aug 2008
Location: Happy Valley, Pennsylvania
Posts: 24,396
Mentioned: 0 Post(s)
Tagged: 0 Thread(s)
Quoted: 4 Post(s)
Liked 3,696 Times
in
2,517 Posts
I'm guessing that Alex Meade will make them for you out of steel, but they aren't a standard product

Thread
Thread Starter
Forum
Replies
Last Post
stockae92
Road Cycling
10
05-23-17 05:52 PM
RunningBulldog
Framebuilders
21
08-23-13 06:10 PM
