


Blade bending blocks
 03-06-13, 05:41 PM
#1

Senior Member
Thread Starter

Join Date: Mar 2012
Location: santa barbara CA
Posts: 1,087
Mentioned: 1 Post(s)
Tagged: 0 Thread(s)
Quoted: 96 Post(s)
Liked 30 Times
in
21 Posts
Blade bending blocks
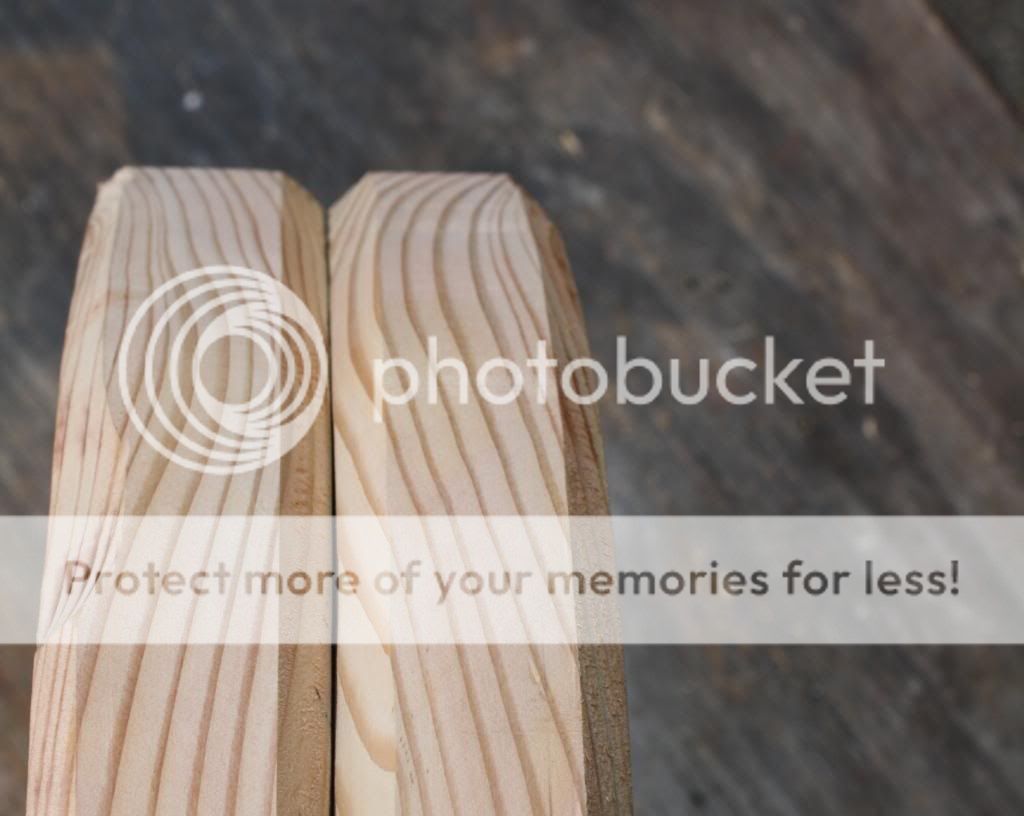
I'm making a couple of radius blade bending blocks, using very dry/old 2x doug fir I had on hand, run through the planer, screwed 2 pieces together and cut on bandsaw as one unit, will screw and glue the 2 pieces together after cutting the chamfer. Pretty much a blatant copy of several seen on different sites. I'm not sure how deep the V(two 45 chamfers) should be. With the bit set at a 5/16" depth its 5/8 wide, pics show it on some scrap, is this likely to function OK for both blades and stays? I'm making 6", 9" and 11" radius blocks, depending on how they work I may dupliate using maple(or not).
thanks, Brian
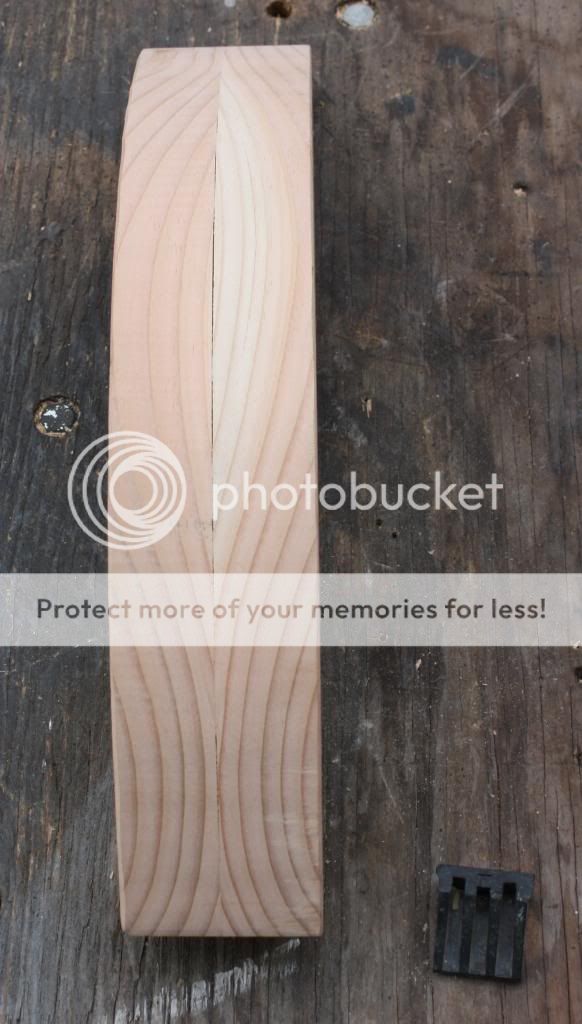
scrap block chamfers, 5/16" deep, 5/8" wide
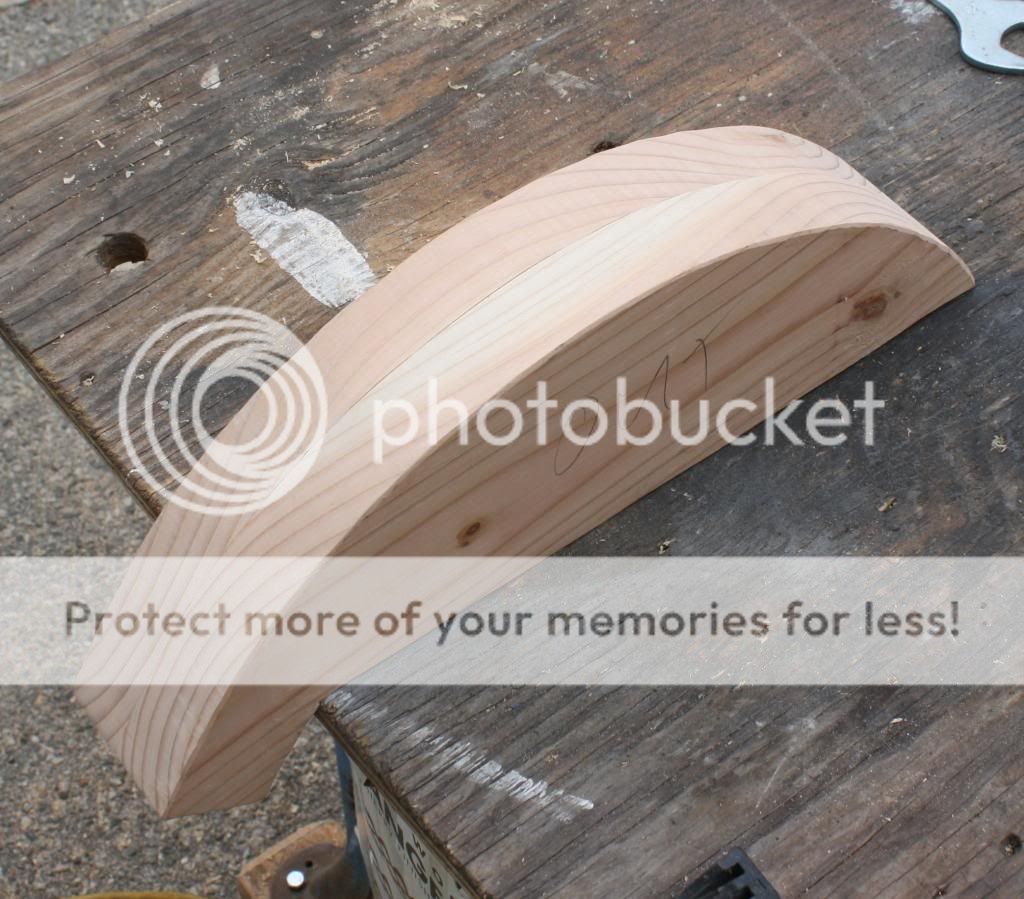
the 9" "blank" still screwed together from bandsaw and oscillating drum sander
thanks, Brian
scrap block chamfers, 5/16" deep, 5/8" wide
the 9" "blank" still screwed together from bandsaw and oscillating drum sander
__________________
Brian
Brian
Last edited by calstar; 03-06-13 at 05:56 PM.
 03-06-13, 05:59 PM
#2


Randomhead
Join Date: Aug 2008
Location: Happy Valley, Pennsylvania
Posts: 24,396
Mentioned: 0 Post(s)
Tagged: 0 Thread(s)
Quoted: 4 Post(s)
Liked 3,696 Times
in
2,517 Posts
I think that may be a little on the small side for fork blades, although I have bent some really nice blades on blocks with no groove at all. Also ruined some 531SL blades on those same blocks, so YMMV
McMaster part 22835T41 is the slick roller to get. LINK
McMaster part 22835T41 is the slick roller to get. LINK
Last edited by unterhausen; 03-06-13 at 06:02 PM.
03-06-13, 06:07 PM
#3
Senior Member

Join Date: Sep 2009
Location: EagleRiver AK
Posts: 1,306
Mentioned: 0 Post(s)
Tagged: 0 Thread(s)
Quoted: 28 Post(s)
Likes: 0
Liked 60 Times
in
33 Posts
Looks pretty good. Perhaps take a 1/2 round file and make the V- groove slightly rounded so that there is a bit more surface contact (less concentrated pressure point) between the tube and block. Only reason I see to perhaps make the V-groove deeper & wider is if you want to be able to S-bend oval chainstays, the flat sides of oval CS probably would not fit down within your groove.
03-06-13, 08:26 PM
#4
Senior Member
Join Date: Apr 2011
Posts: 73
Mentioned: 0 Post(s)
Tagged: 0 Thread(s)
Quoted: 0 Post(s)
Likes: 0
Liked 2 Times
in
1 Post
What are you using at the business end to hold the blade, what are you using for leverage, and how are you stabilizing it for the process?
__________________
cforestryan.com
cforestryan.com
03-06-13, 09:14 PM
#5
Senior Member
Join Date: Jul 2011
Posts: 2,441
Mentioned: 0 Post(s)
Tagged: 0 Thread(s)
Quoted: 33 Post(s)
Likes: 0
Liked 4 Times
in
3 Posts
Those last three questions are key. When I do it I cut the curve on the end grain, it has way higher resistance to deformation than the side grain. I make the groove with a molding plane, but I am a wood guy and have that kind of stuff. Whole thing takes a few seconds.
03-06-13, 09:41 PM
#6
Senior Member
Join Date: Feb 2012
Location: Rochester, NY
Posts: 18,081
Bikes: Stewart S&S coupled sport tourer, Stewart Sunday light, Stewart Commuting, Stewart Touring, Co Motion Tandem, Stewart 3-Spd, Stewart Track, Fuji Finest, Mongoose Tomac ATB, GT Bravado ATB, JCP Folder, Stewart 650B ATB
Mentioned: 0 Post(s)
Tagged: 0 Thread(s)
Quoted: 4204 Post(s)
Liked 3,861 Times
in
2,309 Posts
03-06-13, 11:02 PM
#7
Senior Member
Thread Starter
Join Date: Mar 2012
Location: santa barbara CA
Posts: 1,087
Mentioned: 1 Post(s)
Tagged: 0 Thread(s)
Quoted: 96 Post(s)
Liked 30 Times
in
21 Posts
and found a lot of nice pics to look at. There are several ways to go, check out the link. I'll post pics of the finished bender when its done.
Brian
__________________
Brian
Brian
03-06-13, 11:06 PM
#8
Senior Member
Thread Starter
Join Date: Mar 2012
Location: santa barbara CA
Posts: 1,087
Mentioned: 1 Post(s)
Tagged: 0 Thread(s)
Quoted: 96 Post(s)
Liked 30 Times
in
21 Posts
thanks, Brian
__________________
Brian
Brian
03-06-13, 11:18 PM
#9

Decrepit Member

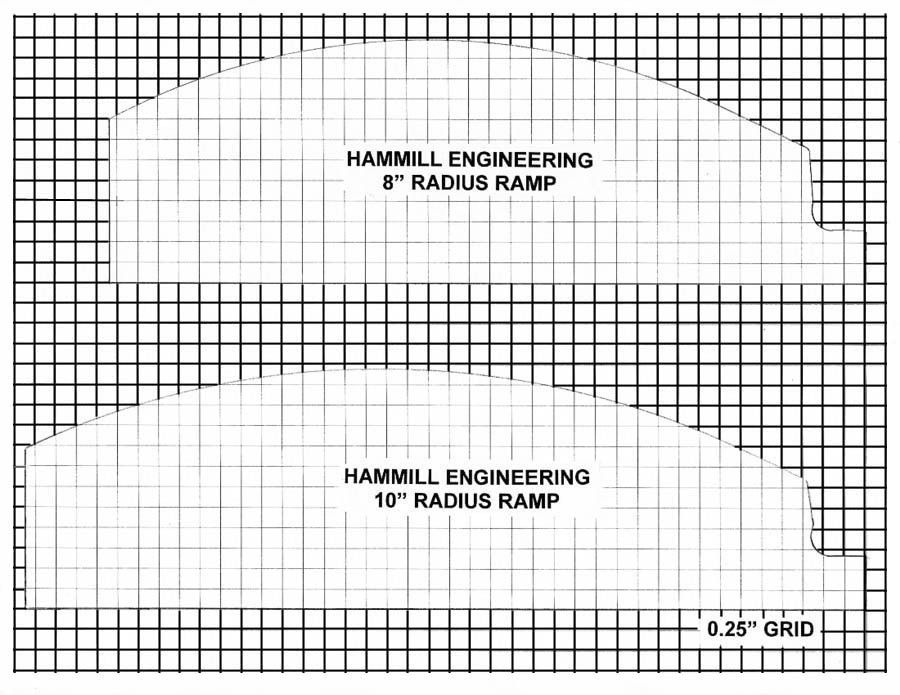
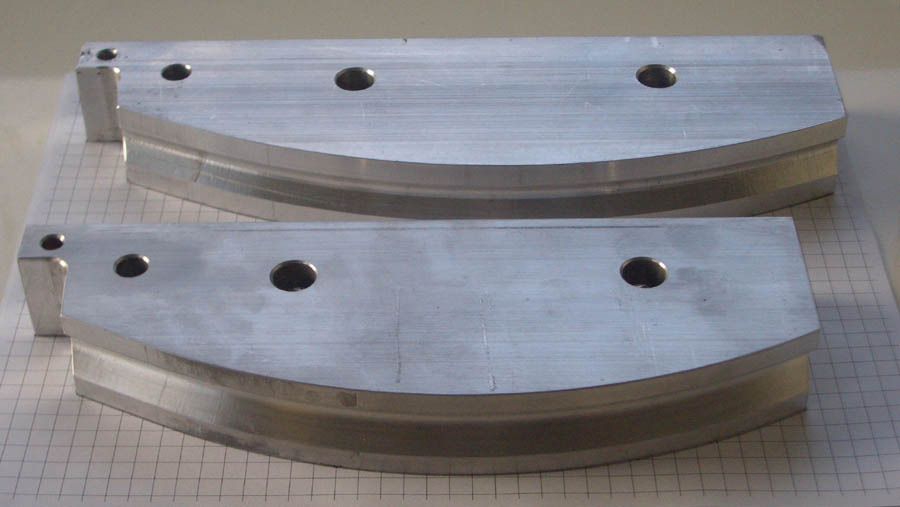
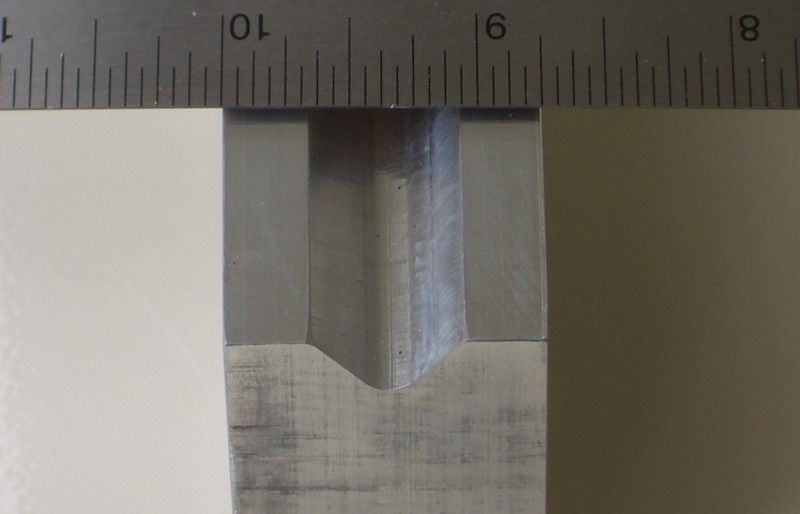
If it's any help, here are the profiles for the Hammill Engineering 8" radius and 10" radius ramps along with a couple of photos. The V groove is 1/4" deep and 5/8" wide at the surface.
 03-07-13, 10:54 AM
#10
Senior Member
Thread Starter
Join Date: Mar 2012
Location: santa barbara CA
Posts: 1,087
Mentioned: 1 Post(s)
Tagged: 0 Thread(s)
Quoted: 96 Post(s)
Liked 30 Times
in
21 Posts
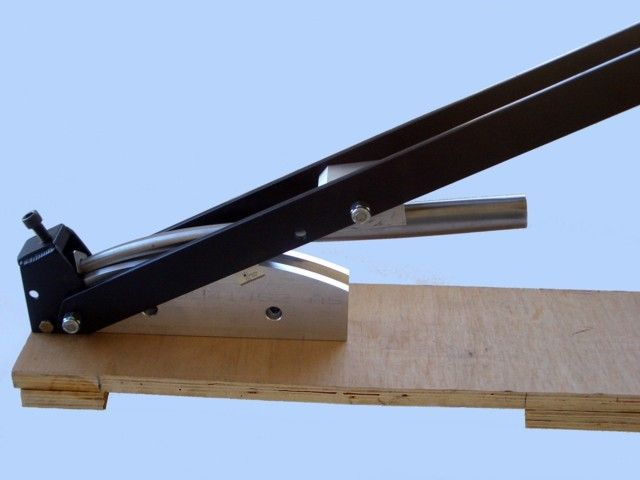
Stan, thanks for the pics. The alu must be about 1" thick if the groove is 5/8 wide, correct? I like the Hmmil's placement of the lever pivot, my browsing/research indicates placement is critical for mechanical advantage(pretty obvious), as well as not having the "roller" go past the end of the tube before its bent to the desired radius. It looks like the Hammil does not use a roller but a block, what is the profile of the block contact side?
unterhausen:
"I think that may be a little on the small side for fork blades, although I have bent some really nice blades on blocks with no groove at all. Also ruined some 531SL blades on those same blocks, so YMMV
McMaster part 22835T41 is the slick roller to get."
The pic of the groove on my wood block is the same width as the Hammil(5/8"), it looks a lot smaller because the net after planing the two 2x pieces is 3 1/8 so comparativley it looks really small. The 22835T41 groove width is 7/8 so itseems I'm in the ballpark. Do you know if the block/mandrel groove and the wheel groove is generally the same on these benders?
thanks, Brian
__________________
Brian
Brian
03-07-13, 12:57 PM
#11
Decrepit Member
Stan, thanks for the pics. The alu must be about 1" thick if the groove is 5/8 wide, correct? I like the Hmmil's placement of the lever pivot, my browsing/research indicates placement is critical for mechanical advantage(pretty obvious), as well as not having the "roller" go past the end of the tube before its bent to the desired radius. It looks like the Hammil does not use a roller but a block, what is the profile of the block contact side?
The ramp grove is actually 9/16" wide at the surface, not 5/8" as I first stated (sloppy measurement the first time).
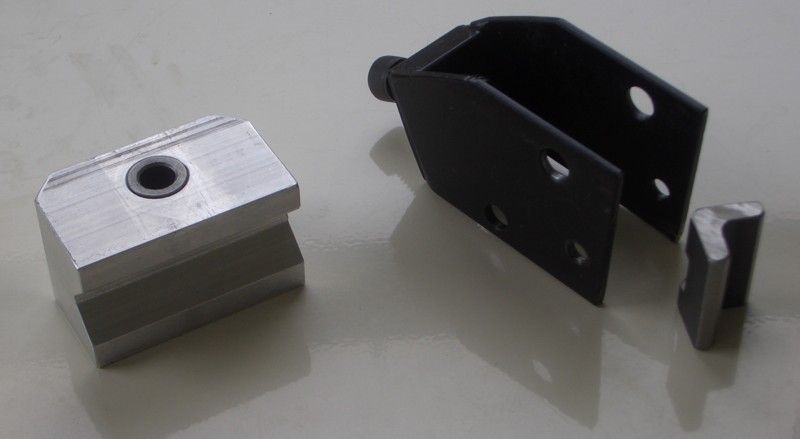
The anchor at the dropout end is a welded piece with a piece of angle iron that has a flattened area on the ouside of the angle for the end of a bolt that is screwed down on the angle-iron to keep the fork blade solidly anchored.
 03-07-13, 01:13 PM
#12
Decrepit Member
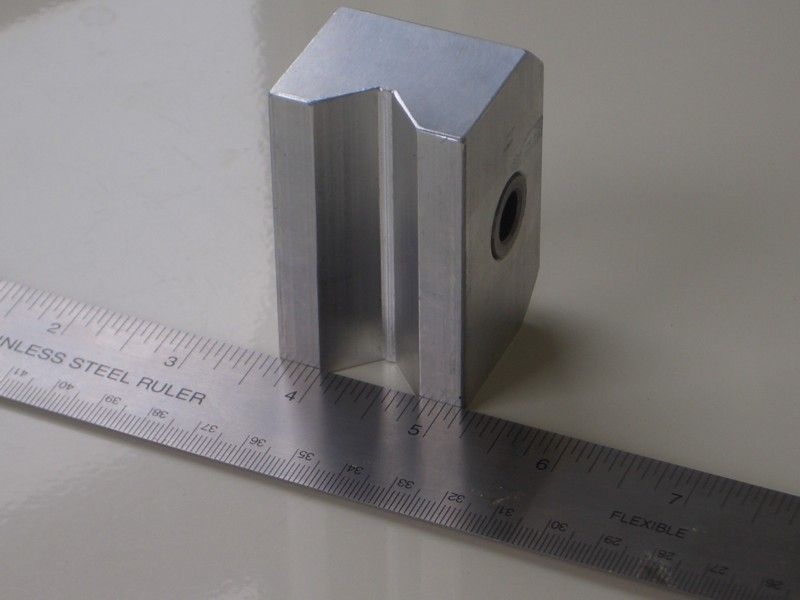
Here's an end-on view of the ramp.
03-07-13, 01:30 PM
#13
Randomhead
Join Date: Aug 2008
Location: Happy Valley, Pennsylvania
Posts: 24,396
Mentioned: 0 Post(s)
Tagged: 0 Thread(s)
Quoted: 4 Post(s)
Liked 3,696 Times
in
2,517 Posts
I would take a fork blade and run it around the groove and make sure it would never rest on the top edges of the groove. I think that's the only issue I would worry about.
03-07-13, 03:28 PM
#14
Senior Member
I'm making a couple of radius blade bending blocks, using very dry/old 2x doug fir I had on hand, run through the planer, screwed 2 pieces together and cut on bandsaw as one unit, will screw and glue the 2 pieces together after cutting the chamfer. Pretty much a blatant copy of several seen on different sites. I'm not sure how deep the V(two 45 chamfers) should be. With the bit set at a 5/16" depth its 5/8 wide, pics show it on some scrap, is this likely to function OK for both blades and stays? I'm making 6", 9" and 11" radius blocks, depending on how they work I may dupliate using maple(or not).
thanks, Brian
scrap block chamfers, 5/16" deep, 5/8" wide the 9" "blank" still screwed together from bandsaw and oscillating drum sander
thanks, Brian
scrap block chamfers, 5/16" deep, 5/8" wide the 9" "blank" still screwed together from bandsaw and oscillating drum sander
/K
03-07-13, 03:49 PM
#15
Senior Member

Join Date: Apr 2010
Location: vermont
Posts: 3,081
Bikes: Many
Mentioned: 8 Post(s)
Tagged: 0 Thread(s)
Quoted: 5 Post(s)
Likes: 0
Liked 10 Times
in
10 Posts
I have to do this also in the next couple of weeks. I think I have one or two aluminum castings made for that purpose.
03-07-13, 03:59 PM
#16
Randomhead
Join Date: Aug 2008
Location: Happy Valley, Pennsylvania
Posts: 24,396
Mentioned: 0 Post(s)
Tagged: 0 Thread(s)
Quoted: 4 Post(s)
Liked 3,696 Times
in
2,517 Posts
I intend to adapt my blade bender to my Diacro. The hold down on the Diacro is awesome, not sure if the Diacro really will end up working that well for bending blades though.
03-07-13, 04:42 PM
#17
Senior Member
Thread Starter
Join Date: Mar 2012
Location: santa barbara CA
Posts: 1,087
Mentioned: 1 Post(s)
Tagged: 0 Thread(s)
Quoted: 96 Post(s)
Liked 30 Times
in
21 Posts

Kissler
"Looks like about the radius for old school "continental" style fork blades. How are you going to hold down the tips?"
Yes, from whay I've read/browsed the 9"(+-) will produce that style, and the smaller radius more of a "French tip" with the bend mostly near the tips.
I googled bicycle fork bender https://isearch.avg.com/search?q=+bic...=hdr&sap_acp=1
and found a lot of framebuilder sites(mostly flicker)with nice pics to look at. There are several ways to go regarding the cap, check out the link. Probably copy something like the Hammil cap, looks basic and doable for me.
Another question for the forumites, is dry lube or wax ever used when using this type of bender? If not why?
thanks, Brian
__________________
Brian
Brian
Last edited by calstar; 03-07-13 at 05:11 PM.
03-07-13, 07:32 PM
#18
Senior Member

Why does that not surprise me?
[I]Kissler
"Looks like about the radius for old school "continental" style fork blades. How are you going to hold down the tips?"
[/I]Yes, from whay I've read/browsed the 9"(+-) will produce that style, and the smaller radius more of a "French tip" with the bend mostly near the tips.
I googled bicycle fork bender https://isearch.avg.com/search?q=+bic...=hdr&sap_acp=1
and found a lot of framebuilder sites(mostly flicker)with nice pics to look at. There are several ways to go regarding the cap, check out the link. Probably copy something like the Hammil cap, looks basic and doable for me.
Another question for the forumites, is dry lube or wax ever used when using this type of bender? If not why?
thanks, Brian
As for wax or lube, not used by most I think since there's no sliding contact of bender and tubing being bent.
03-07-13, 08:31 PM
#19
Decrepit Member
Using lube has never occurred to me; I'm not sure why one would want to.
One of the most important things to me when bending blades is ensuring the major axis of the blade ellipse is perfectly aligned with the bottom of the ramp vee groove. My first attempt was about 2� off, and I had to throw it away because when the blade was fitted to the crown, it had an ugly toe-in at the dropout. Since then, I've used the crown to position the blade in the groove, making sure the face of the crown is at a right angle to the side of the ramp before bending the blade.

One of the most important things to me when bending blades is ensuring the major axis of the blade ellipse is perfectly aligned with the bottom of the ramp vee groove. My first attempt was about 2� off, and I had to throw it away because when the blade was fitted to the crown, it had an ugly toe-in at the dropout. Since then, I've used the crown to position the blade in the groove, making sure the face of the crown is at a right angle to the side of the ramp before bending the blade.
03-07-13, 10:54 PM
#20
Senior Member
Join Date: Jul 2011
Posts: 2,441
Mentioned: 0 Post(s)
Tagged: 0 Thread(s)
Quoted: 33 Post(s)
Likes: 0
Liked 4 Times
in
3 Posts
The molding plane I use is a "round" I try to fit the profile, not support the sides, as wood is probably not up to that unless you want to spend a lot of time supporting the sides of the wooden die.
"Since then, I've used the crown to position the blade in the groove, making sure the face of the crown is at a right angle to the side of the ramp before bending the blade."
If I step up from the wood system I have now, I would want to go to a side by side such as they use in factories, the fork is completed, and then the bend is put in. It just seems so superior. But it is a large commitment to make one's own, and I don't know where one buys them, if they are made at all today.
03-08-13, 09:53 AM
#21
Senior Member
Join Date: Feb 2012
Location: Rochester, NY
Posts: 18,081
Bikes: Stewart S&S coupled sport tourer, Stewart Sunday light, Stewart Commuting, Stewart Touring, Co Motion Tandem, Stewart 3-Spd, Stewart Track, Fuji Finest, Mongoose Tomac ATB, GT Bravado ATB, JCP Folder, Stewart 650B ATB
Mentioned: 0 Post(s)
Tagged: 0 Thread(s)
Quoted: 4204 Post(s)
Liked 3,861 Times
in
2,309 Posts
03-08-13, 08:51 PM
#22
Senior Member
Join Date: Apr 2011
Posts: 73
Mentioned: 0 Post(s)
Tagged: 0 Thread(s)
Quoted: 0 Post(s)
Likes: 0
Liked 2 Times
in
1 Post
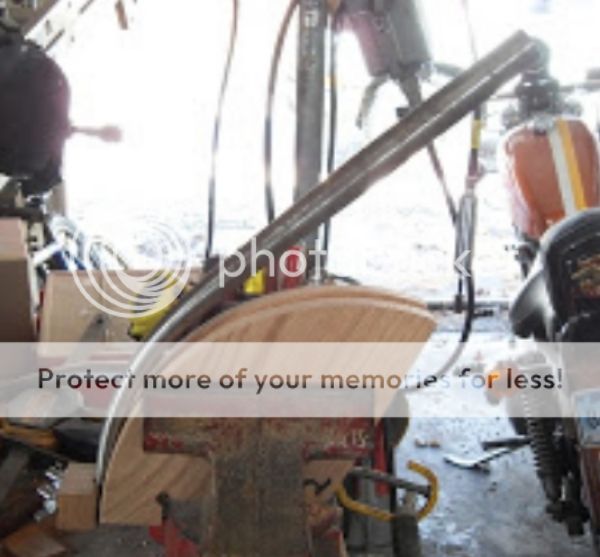
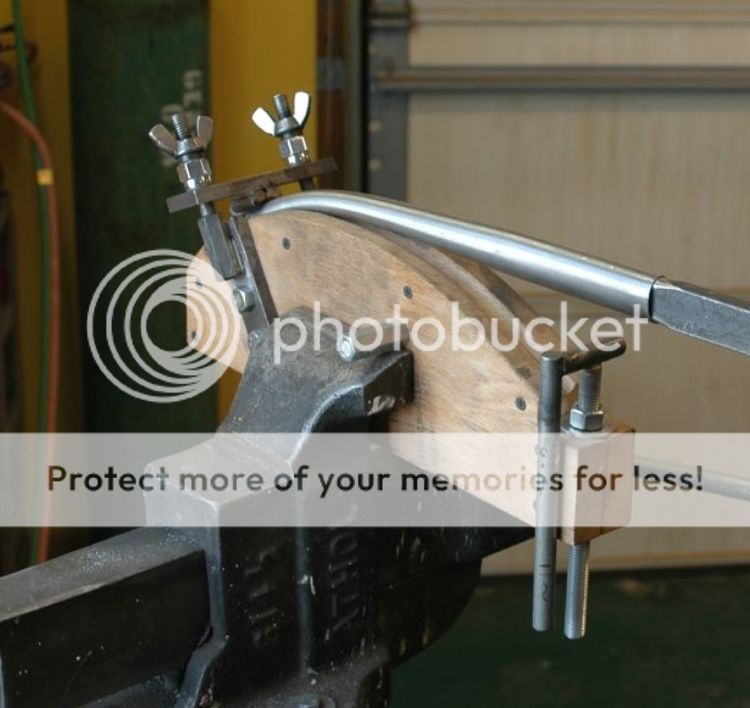
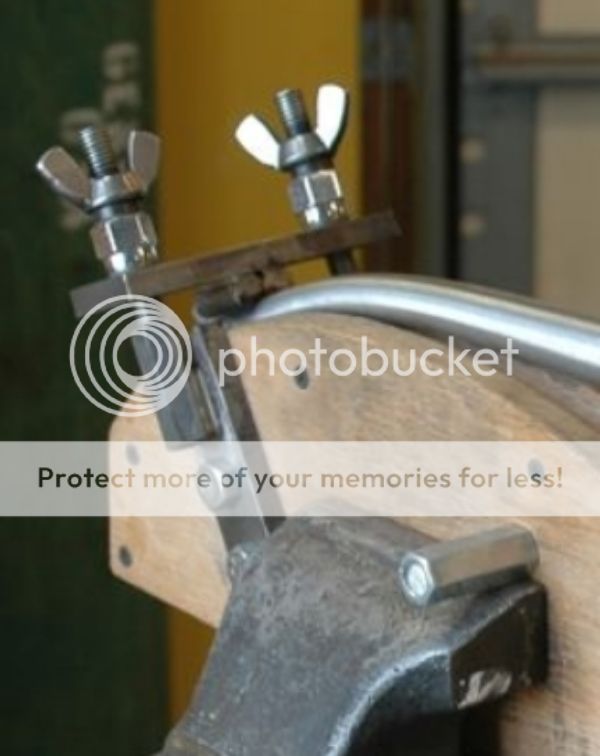
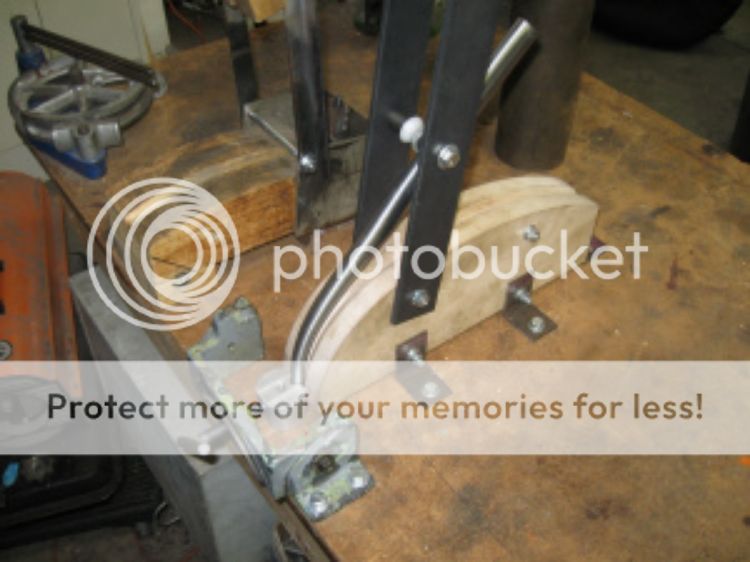
Mine works pretty well, but I'd still make some changes. It's two oak stair treads glued together and formed with a combination of my table saw, dynafile, and big ass rat tail file. Having it up on the wall is nice since it's out of the way. I got a wheel from McMaster Carr I think, then fabbed the rest up. I use a U shape piece of steel with a nut through it as a hold down, then slide a curved piece of a section of gas pipe in for support. I could take better photos, but this is all I found looking through my pages. I use a piece of rod as a stop which is adjustable according to it's placement by holes I drill. Simple and works. Before I made this one I went through about 3 that ended up breaking. Aside from the green wheel, everything came from Lowe's or Home Depot, I can't remember which.

__________________
cforestryan.com
cforestryan.com
03-08-13, 10:17 PM
#23
Senior Member
Thread Starter
Join Date: Mar 2012
Location: santa barbara CA
Posts: 1,087
Mentioned: 1 Post(s)
Tagged: 0 Thread(s)
Quoted: 96 Post(s)
Liked 30 Times
in
21 Posts
Mine works pretty well, but I'd still make some changes. It's two oak stair treads glued together and formed with a combination of my table saw, dynafile, and big ass rat tail file. Having it up on the wall is nice since it's out of the way. I got a wheel from McMaster Carr I think, then fabbed the rest up. I use a U shape piece of steel with a nut through it as a hold down, then slide a curved piece of a section of gas pipe in for support. I could take better photos, but this is all I found looking through my pages. I use a piece of rod as a stop which is adjustable according to it's placement by holes I drill. Simple and works. Before I made this one I went through about 3 that ended up breaking. Aside from the green wheel, everything came from Lowe's or Home Depot, I can't remember which.
__________________
Brian
Brian
03-08-13, 11:16 PM
#24
Senior Member
Join Date: Feb 2012
Location: Rochester, NY
Posts: 18,081
Bikes: Stewart S&S coupled sport tourer, Stewart Sunday light, Stewart Commuting, Stewart Touring, Co Motion Tandem, Stewart 3-Spd, Stewart Track, Fuji Finest, Mongoose Tomac ATB, GT Bravado ATB, JCP Folder, Stewart 650B ATB
Mentioned: 0 Post(s)
Tagged: 0 Thread(s)
Quoted: 4204 Post(s)
Liked 3,861 Times
in
2,309 Posts
It seems that there are a few different methods of levers. The stick something in the end of the blade and try not to have any distortion. The lever arm pivoting near the blade's tip with the pressure plate/roller/vee block at the blade's top. The lever arm pivoting close to the center of the form's radius with a roller that contacts the blade close to the form.
Any thoughts/comments/experience? Andy.
Any thoughts/comments/experience? Andy.
03-09-13, 09:59 AM
#25
Senior Member
Thread Starter
Join Date: Mar 2012
Location: santa barbara CA
Posts: 1,087
Mentioned: 1 Post(s)
Tagged: 0 Thread(s)
Quoted: 96 Post(s)
Liked 30 Times
in
21 Posts
Here are a few examples with and without attached bending levers:
Nicola
clever and simple stop, David Kirk
separate hold down piece, apparantly he already had it so incorporated it into the bender
and links to benders on flicker:
https://www.flickr.com/photos/2253878...ol-730314@N21/
https://www.flickr.com/photos/4935356...n/photostream/
Nicola
clever and simple stop, David Kirk
separate hold down piece, apparantly he already had it so incorporated it into the bender
and links to benders on flicker:
https://www.flickr.com/photos/2253878...ol-730314@N21/
https://www.flickr.com/photos/4935356...n/photostream/
__________________
Brian
Brian
Last edited by calstar; 03-09-13 at 11:41 AM.