


Making your bike glow down the road...
 11-10-11 | 02:28 PM
#1

Thread Starter
Commander, UFO Bike
Joined: Dec 2008
Posts: 1,438
Likes: 23
From: Subject to change
Bikes: Giant, Trek
Making your bike glow down the road...
I'm known locally for my bike's reflective properties... I take a bike that looks like this:
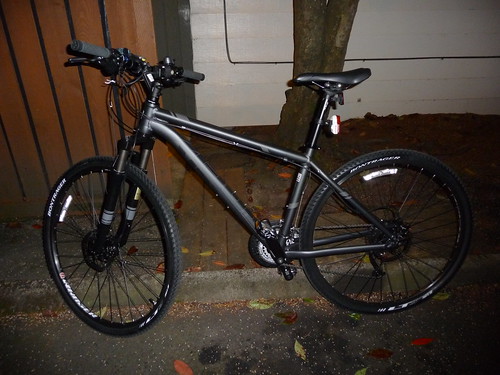
2011 Trek Montare (near stock condition)
and make it look like this:
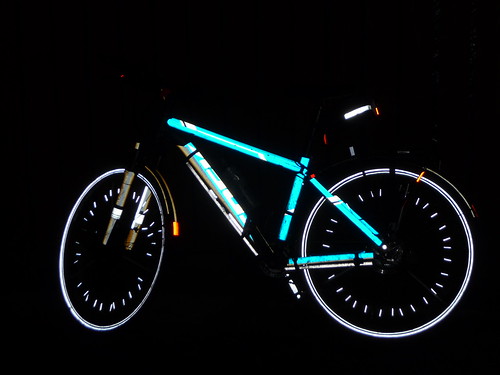
2011 Trek Montare (Using Avery blue, white, black reflective films, and Lightweights for Wheels)
If anybody's looking to do it themselves, here's a quick little primer on how to do it...
First locate your reflective material. For the large areas, I've been using Avery and 3M Scotchlight self-adhesive reflective films for years now, but my supplier is shifting to another product from Oracal. It's as good as the Avery product they say, and it's cheaper (15" wide $14USD/yd, 24" wide $24USD/yd(ish)). It comes in a number of colors, and has a 1yd/color minimum purchase (3 colors = 3 yards = lots of coverage).

For my bikes, I've come to the decision that the 24" wide material is a LOT more effective (especially when you're doing your first bike).
For the spokes, I use lightweights for wheels ($15USD/set of 75 pieces).
I've also been known to use conspicuity (or reflective) tape ($7USD/set of Ten 2" x 12" strips) from Harbor Freight Tools, on things like my bike pump, inside my cranks, and the back of my helmet.
You'll need some tools, such as good scissors, an X-acto knife (or two) with a few new #11 blades, a cutting surface, a metal ruler, a hair drier, some Goo Gone, rubber gloves, safety glasses, rags, and a sharpie pen.
When applying these products, it's important to have the surface clean and dry, so your bike gets a nice bath and a rubdown (or air dry) before you get started.
My latest method to capture detail is to start with outlining the small stuff first. I cut thin (sacrificial) strips (1/16" wide or so) of a different color than the main area, then carefully apply it to the detail I want to keep. Remember the more detail you want to keep, the harder and longer this process will take (Keep It Simple Stupid applies). When finished outlining, cut strips of the main color, and apply it over the area. Using your fingernails, firmly press the main color into the edges of the outlining material, this will guide you as you trim the material with the X-acto. Peel back the material that's overlapping the detail, then using the Goo Gone (with proper safety gear), remove any residue from the detail area. Then apply the detail color over it's area, and again with the fingernails, X-acto, and Goo Gone.
Do not try to wrap the entire tube in a single piece of film, it won't work cleanly, and you'll end up wasting a lot of material (if you want a nice finish). I find that strips that are not much more than 1/3 the circumference work best. For best results, start at the lower (say right) side, then switch to the other (left) side, then from the top (I like a little overlap). This eliminates areas where water may catch and possibly cause failure of the adhesive (or catch dirt and make the joints more visible). Any bubbles that get trapped under the film can be dealt with by simply lancing them with a sharp X-acto blade.
A hair drier helps make the films flexible when going around odd shapes. Using scraps, and the sharpie can help you make cutting patterns for things like lettering.

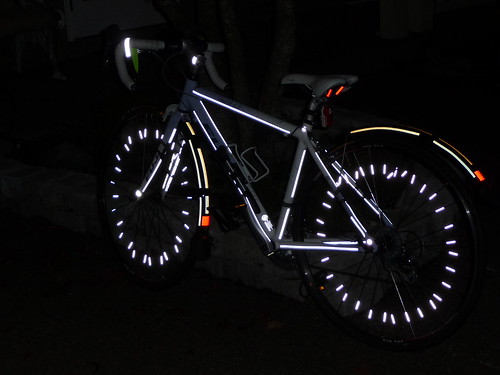
2004 Giant Rainier (using 3M blue and white Scotchlight films)
Some time and effort, and you can end up with a really convincing application that doesn't stand out in day, but has a remarkable effect at night.
And remember, you don't have to go all out to make a bike glow...
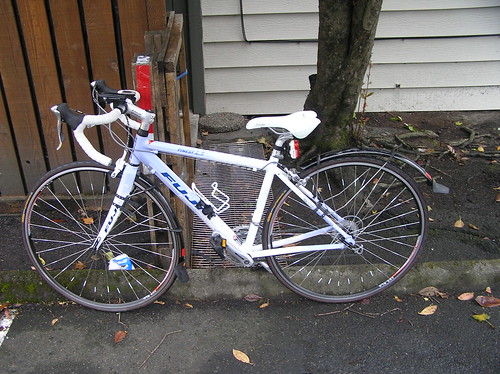
Mom's 2008 Fuji Finest 2.0 (Using Avery white, and black reflective films)
Be Seeing You!
K'Tesh
2011 Trek Montare (near stock condition)
and make it look like this:
2011 Trek Montare (Using Avery blue, white, black reflective films, and Lightweights for Wheels)
If anybody's looking to do it themselves, here's a quick little primer on how to do it...
First locate your reflective material. For the large areas, I've been using Avery and 3M Scotchlight self-adhesive reflective films for years now, but my supplier is shifting to another product from Oracal. It's as good as the Avery product they say, and it's cheaper (15" wide $14USD/yd, 24" wide $24USD/yd(ish)). It comes in a number of colors, and has a 1yd/color minimum purchase (3 colors = 3 yards = lots of coverage).
For my bikes, I've come to the decision that the 24" wide material is a LOT more effective (especially when you're doing your first bike).
For the spokes, I use lightweights for wheels ($15USD/set of 75 pieces).
I've also been known to use conspicuity (or reflective) tape ($7USD/set of Ten 2" x 12" strips) from Harbor Freight Tools, on things like my bike pump, inside my cranks, and the back of my helmet.
You'll need some tools, such as good scissors, an X-acto knife (or two) with a few new #11 blades, a cutting surface, a metal ruler, a hair drier, some Goo Gone, rubber gloves, safety glasses, rags, and a sharpie pen.
When applying these products, it's important to have the surface clean and dry, so your bike gets a nice bath and a rubdown (or air dry) before you get started.
My latest method to capture detail is to start with outlining the small stuff first. I cut thin (sacrificial) strips (1/16" wide or so) of a different color than the main area, then carefully apply it to the detail I want to keep. Remember the more detail you want to keep, the harder and longer this process will take (Keep It Simple Stupid applies). When finished outlining, cut strips of the main color, and apply it over the area. Using your fingernails, firmly press the main color into the edges of the outlining material, this will guide you as you trim the material with the X-acto. Peel back the material that's overlapping the detail, then using the Goo Gone (with proper safety gear), remove any residue from the detail area. Then apply the detail color over it's area, and again with the fingernails, X-acto, and Goo Gone.
Do not try to wrap the entire tube in a single piece of film, it won't work cleanly, and you'll end up wasting a lot of material (if you want a nice finish). I find that strips that are not much more than 1/3 the circumference work best. For best results, start at the lower (say right) side, then switch to the other (left) side, then from the top (I like a little overlap). This eliminates areas where water may catch and possibly cause failure of the adhesive (or catch dirt and make the joints more visible). Any bubbles that get trapped under the film can be dealt with by simply lancing them with a sharp X-acto blade.
A hair drier helps make the films flexible when going around odd shapes. Using scraps, and the sharpie can help you make cutting patterns for things like lettering.
2004 Giant Rainier (using 3M blue and white Scotchlight films)
Some time and effort, and you can end up with a really convincing application that doesn't stand out in day, but has a remarkable effect at night.
And remember, you don't have to go all out to make a bike glow...
Mom's 2008 Fuji Finest 2.0 (Using Avery white, and black reflective films)
Be Seeing You!
K'Tesh
Last edited by K'Tesh; 12-05-11 at 12:58 PM.
 11-10-11 | 05:36 PM
#3
xtrajack
Joined: Aug 2008
Posts: 2,058
Likes: 0
From: Maine
Bikes: Kona fire mountain/xtracycle,Univega landrover fs,Nishiki custom sport Ross professional super gran tour Schwinn Mesa (future Xtracycle donor bike)
I am thinking about doing this to my Xtracycle. The key word here is thinking about it. Or I might just get a new battery and charger for my DLG.


 11-10-11 | 09:45 PM
#6

Senior Member
Joined: Dec 2010
Posts: 1,965
Likes: 6
From: Falls City, OR
Bikes: 2012 Salsa Fargo 2, Rocky Mountain Fusion, circa '93
Thanks for the reminder, K'tesh. I was wondering if I would be able to find the previous threads where you show how you do that.
Do you add anything reflective to a rain jacket? I got the one made in Portland (sorry forget the name) but I would like a little more reflection on the back and maybe the sleeves. Without stitching holes through what ever makes it waterproof.
Do you add anything reflective to a rain jacket? I got the one made in Portland (sorry forget the name) but I would like a little more reflection on the back and maybe the sleeves. Without stitching holes through what ever makes it waterproof.
11-10-11 | 10:16 PM
#7

Senior Member
Joined: Feb 2006
Posts: 808
Likes: 16
From: Beaverton, OR
Bikes: It's the motor, not the bike, right?
Very cool. I saw the story on riding safely in the dark that featured your bike in a local bike blog today. If I see you riding around I'll definitely know its you.
11-11-11 | 02:16 AM
#9
Thread Starter
Commander, UFO Bike
Joined: Dec 2008
Posts: 1,438
Likes: 23
From: Subject to change
Bikes: Giant, Trek
Man that's bright! Photos from 'Be Safe, Been Seen' event
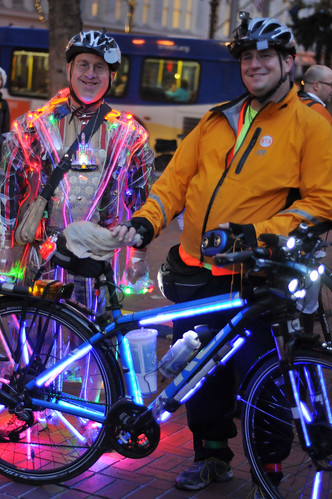
I'm the guy in yellow
If you see me, please introduce yourself, I've been wondering if I've seen you around.
Thanks for the reminder, K'tesh. I was wondering if I would be able to find the previous threads where you show how you do that.
Do you add anything reflective to a rain jacket? I got the one made in Portland (sorry forget the name) but I would like a little more reflection on the back and maybe the sleeves. Without stitching holes through what ever makes it waterproof.
Do you add anything reflective to a rain jacket? I got the one made in Portland (sorry forget the name) but I would like a little more reflection on the back and maybe the sleeves. Without stitching holes through what ever makes it waterproof.
If you want to post there, I strongly recommend you read the Newbie forum carefully.
My current coat doesn't have additional reflective elements added. I added reflective material to my old Columbia coat, by carefully taking a reflective vest apart. I used Fabri-Tak cement (available at fabric shops) to glue the reflective material to the cuffs, and the areas (inside and out) near the front zipper. Later, I used the reflective strip I removed from a used up commuter tire to add "piping" to the sleeves. To do the cuffs, I stretched the cuff over a piece of PVC pipe to take out the wrinkles, glued the material, then let it dry before removing the pipe.
11-11-11 | 02:19 AM
#10
Thread Starter
Commander, UFO Bike
Joined: Dec 2008
Posts: 1,438
Likes: 23
From: Subject to change
Bikes: Giant, Trek
11-11-11 | 05:26 AM
#11

On a Mission from God
Joined: Oct 2009
Posts: 2,009
Likes: 5
From: Thibodaux, LA
Bikes: '10 Surly LHT, Rat-rod Klunker, '82 Peugeot PH12 Centennial
Thanks for bringing this back up, K'Tesh, I'm about do redo my LHT's reflective stripes (several got mangled in the accident) and I'll see if I can get enough time to cut them, apply them, and post up pics. I need to do my new helmet, too.
Good job, man! Where's the photon torpedo launcher?
Good job, man! Where's the photon torpedo launcher?


 I've been meaning to turn my new Troll into Reflecto-Bike IV.
11-11-11 | 12:40 PM
I've been meaning to turn my new Troll into Reflecto-Bike IV.
11-11-11 | 12:40 PM
#15
Senior Member
Joined: Feb 2006
Posts: 808
Likes: 16
From: Beaverton, OR
Bikes: It's the motor, not the bike, right?
You mean this one?
Man that's bright! Photos from 'Be Safe, Been Seen' event
I'm the guy in yellow
If you see me, please introduce yourself, I've been wondering if I've seen you around.
Man that's bright! Photos from 'Be Safe, Been Seen' event
I'm the guy in yellow
If you see me, please introduce yourself, I've been wondering if I've seen you around.
Happy trails.
11-11-11 | 01:15 PM
#16
Thread Starter
Commander, UFO Bike
Joined: Dec 2008
Posts: 1,438
Likes: 23
From: Subject to change
Bikes: Giant, Trek
Fair question... So, I'll answer all three at once.

2011 Trek Montare (the streamers are reflective strips pulled from old commuting tires (and added as a joke))

2004 Giant Rainier
2008 Fuji Finest 2.0
2011 Trek Montare (the streamers are reflective strips pulled from old commuting tires (and added as a joke))
2004 Giant Rainier
2008 Fuji Finest 2.0
Last edited by K'Tesh; 11-11-11 at 01:21 PM.
11-11-11 | 01:17 PM
#17
Thread Starter
Commander, UFO Bike
Joined: Dec 2008
Posts: 1,438
Likes: 23
From: Subject to change
Bikes: Giant, Trek
You honestly didn't think I'd give out ALL my secrets did you?
Last edited by K'Tesh; 11-11-11 at 01:48 PM.
 11-11-11 | 04:38 PM
#20
Thread Starter
Commander, UFO Bike
Joined: Dec 2008
Posts: 1,438
Likes: 23
From: Subject to change
Bikes: Giant, Trek
The Lightweights for wheels are self-adhesive stickers that are pre-cut for you. The package has an alignment guide included. You clean the spokes, then using the guide and a sharpie, you mark the location of the stickers. Then apply.
If your are referring to the lights that you see in my wheels, they are part of my flux-capacitor system that I designed... When using flux-capacitors, it is very important to remember to bring fuel for the return trip.
Retro-reflective treatments cost roughly $25USD/color. For detail work (including the lettering) Fast Signs (in Beaverton) bid the Trek job at $250 in labor. If I was doing something like the Rainier, I'd be wanting a figure about like that. For a job like my Mom's bike, and I'd say $30(+materials) would be fair.
Last edited by K'Tesh; 11-12-11 at 02:56 PM.
11-11-11 | 07:48 PM
#21
Senior Member
Joined: Jul 2011
Posts: 6,144
Likes: 4
From: cherry hill, nj
so you can buy the tape just for the spokes? And the reflective tape for the frame?
Amazing idea.
In your signature pic, you are wearing a lot of reflective stuff too. Did you hae to modify and add more reflective stuff to your clothing?
Amazing idea.
In your signature pic, you are wearing a lot of reflective stuff too. Did you hae to modify and add more reflective stuff to your clothing?
11-11-11 | 08:28 PM
#22
Thread Starter
Commander, UFO Bike
Joined: Dec 2008
Posts: 1,438
Likes: 23
From: Subject to change
Bikes: Giant, Trek
On my coat you see in the pic, I added all but the narrow band of reflectivity seen under my armpit, in the center shot. Again, using fabri-tac glue instead of sewing.
Last edited by K'Tesh; 11-11-11 at 08:35 PM.
11-12-11 | 01:36 PM
#24

I let the dogs out
Joined: Apr 2011
Posts: 1,934
Likes: 2
From: Boulder, CO
Bikes: 2011 Fuji Roubaix 1.0, 2003 Ti Merlin Solis, & 1994 Raleigh MT200
I did my bike with some reflective tape from Ace hardware. Got a roll of white, a roll of red, and a roll of red and white striped.
12-01-11 | 10:48 PM
#25
Senior Member
Joined: Oct 2011
Posts: 501
Likes: 0
From: currently NYC area, previously, Bay Area
Bikes: 1974 Raleigh Grand Prix
Is there any online source for a smallish amounts of reflective tape in different colors, especially white, red and yellow/green, or better yet, as an assortmen/sampler?
Last edited by christ0ph; 12-02-11 at 07:15 AM.