


Lotus Aero cleanup/ service advice please
 03-24-24, 01:58 AM
#1
Newbie
Thread Starter
Lotus Aero cleanup/ service advice please
Hi,
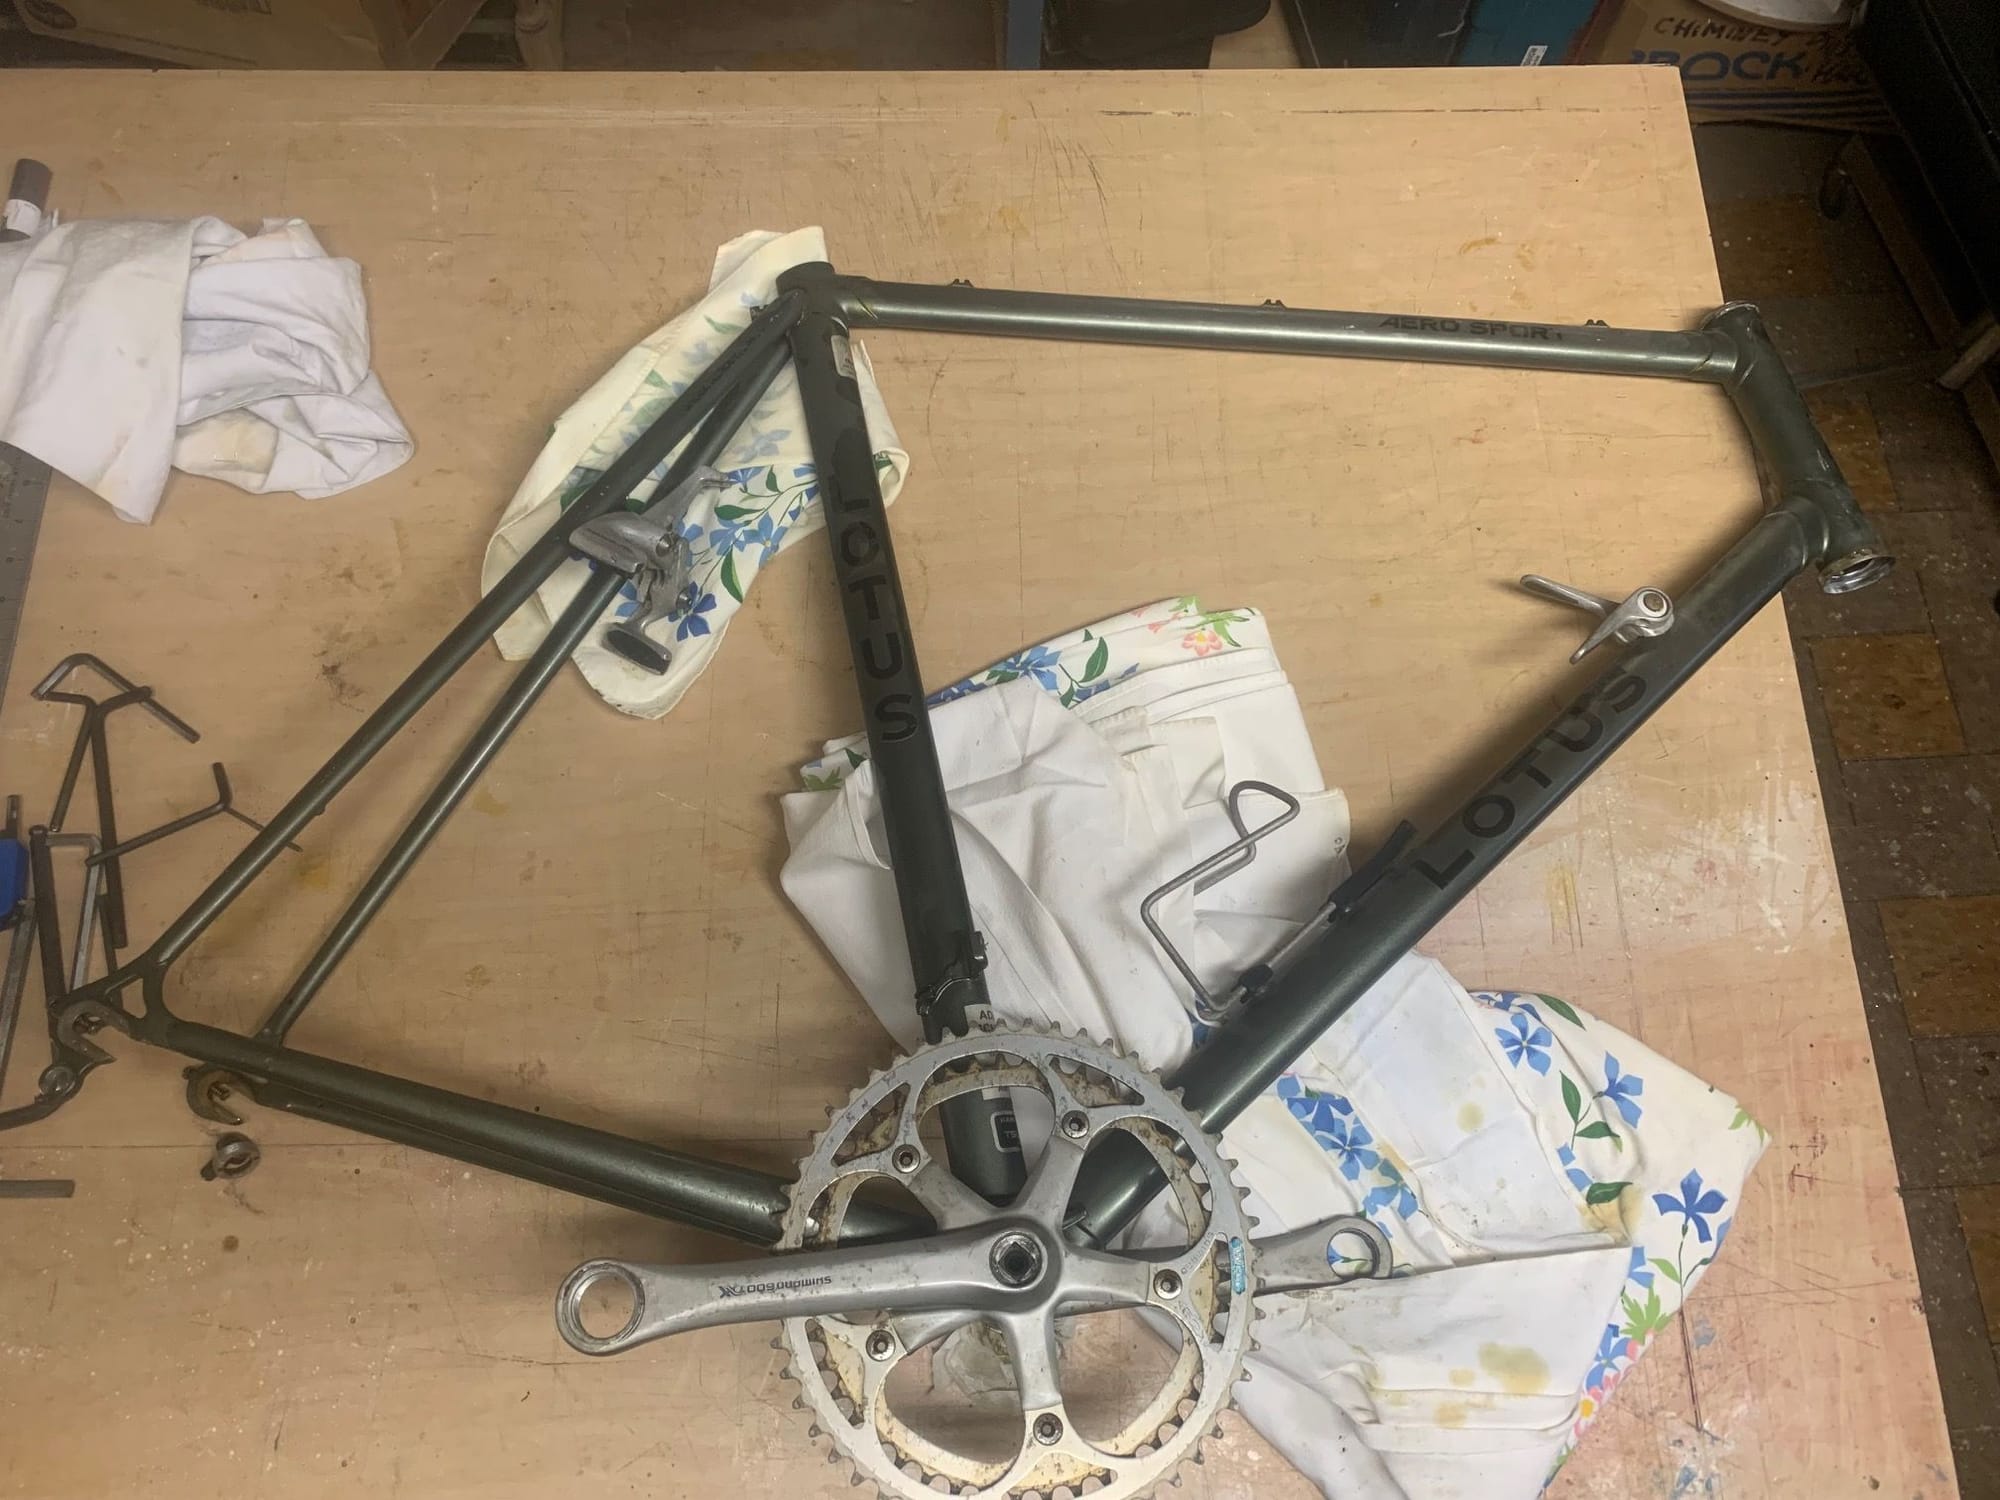
I decided to embark on this projet for a family bike likely from early 90's. Cool bike though not as cool as the SUper Aero published in this forum.
I am a fledgling bike mechanic. I'll try not to mess up the bike. I cannot wait to shine up those cool heavy "Aero" parts. the frame has pocs on it but I guess I'll just clean it up ans see. a darkish green sort of metallic hue. I'll use online videos for instruction. I dont care about flipping it, we will ride it, but if anyone has anidea about its value i'm curious. I have all parts except the saddle.
One thing I could not find is documentation for the Shimano 600 AX group set- or at least not this one detail: how to disassemble the crank arms. I got the crank bolt and lockring off on DS: allen key plus a small lockring which I do not have the pin spanner for so I used a nail and gently tapped it out: counter clockwise to remove.
My problem: on the Non Driveside the lockring won't budge in either direction, and I am wary to go harder on it until I am certain of the direction. The allen bolt on this side comes loose the same way as the ds. But of course it stops when it hits the said lockring. Any ideas?? Also:
Sorry no pics just yet. the forum wont yet allow me to post them.Thanks in advance!
Peter
I decided to embark on this projet for a family bike likely from early 90's. Cool bike though not as cool as the SUper Aero published in this forum.
I am a fledgling bike mechanic. I'll try not to mess up the bike. I cannot wait to shine up those cool heavy "Aero" parts. the frame has pocs on it but I guess I'll just clean it up ans see. a darkish green sort of metallic hue. I'll use online videos for instruction. I dont care about flipping it, we will ride it, but if anyone has anidea about its value i'm curious. I have all parts except the saddle.
One thing I could not find is documentation for the Shimano 600 AX group set- or at least not this one detail: how to disassemble the crank arms. I got the crank bolt and lockring off on DS: allen key plus a small lockring which I do not have the pin spanner for so I used a nail and gently tapped it out: counter clockwise to remove.
My problem: on the Non Driveside the lockring won't budge in either direction, and I am wary to go harder on it until I am certain of the direction. The allen bolt on this side comes loose the same way as the ds. But of course it stops when it hits the said lockring. Any ideas?? Also:
- will i need a special too to service the bb?
- any other ideas/advice much appreciated.
Sorry no pics just yet. the forum wont yet allow me to post them.Thanks in advance!
Peter
Last edited by Peterparis; 03-24-24 at 02:14 AM. Reason: errors

Likes For Peterparis:
03-24-24, 02:07 AM
#2
Senior Member
I don't know those parts specifically, but isn't the lockring to allow pulling the crank off without a crank tool, from the bolt head pushing on the inside of the lockring? And if so, why are you removing the lockrings?
03-24-24, 02:15 AM
#3
Newbie
Thread Starter
I call it a lockring but technically it might have another name. It's threaded in. It def prevents the allen bolt from being removed if
i cannot get it out. So I am taking out these rings to ultimately service the BB.
By the way the lockring and allen head look just like this
ultegra and old Ultegra- they wont let me post url's either!
i cannot get it out. So I am taking out these rings to ultimately service the BB.
By the way the lockring and allen head look just like this
ultegra and old Ultegra- they wont let me post url's either!
Last edited by Peterparis; 03-24-24 at 02:20 AM. Reason: add to
03-24-24, 02:57 AM
#4

Bianchi Goddess

Join Date: Apr 2009
Location: Shady Pines Retirement Fort Wayne, In
Posts: 27,908
Bikes: Too many to list here check my signature.
Mentioned: 194 Post(s)
Tagged: 2 Thread(s)
Quoted: 2949 Post(s)
Liked 2,970 Times
in
1,515 Posts
I call it a lockring but technically it might have another name. It's threaded in. It def prevents the allen bolt from being removed if
i cannot get it out. So I am taking out these rings to ultimately service the BB.
By the way the lockring and allen head look just like this
ultegra and old Ultegra- they wont let me post url's either!
i cannot get it out. So I am taking out these rings to ultimately service the BB.
By the way the lockring and allen head look just like this
ultegra and old Ultegra- they wont let me post url's either!
Good Morning and welcome to the forums. As Duragrouch pointed out you very well have a self extractor on that crankset. While a great idea they can, just like regular dust caps, get gunned up and refuse to budge.The whole idea behind is you can install and remove the crankset with just an allen or hex wrench. I like them and use them on lots of bikes, but if you ride in a dusty dirty area or in the rain alot they can get gunky.
As the name implies this extracts the crank from the BB spindle. As you loosen the bolt it backs out into the retaining ring and pushes against that to 'pull' the crank arm off. I'd turn the NDS one back until it's snug and spray some kind of lube in there, and then try and take it off with the bolt. It will get prettty stiff and then come loose.

Here's how it is set up and works. If you already have the driveside one out, clean everything up and simply reinstall it with a touch of lube around the brass washer.
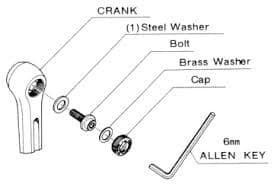
This is more or less the correct tool for removing the "cap" it is also use to hold the nut on the chainring bolts.

A Lotus Aero with a 600 AX group sounds more like early '80s to me. If you upload photos into an album we should be able to see them and usually someone will share them for you.
Hope this helps. Welcome to a fun, frustrating and addicting hobby

PS yes you will need special tools to get the BB bearings out. I generally encourage a novice mechanic to seek a bike shop's assistance to loosen the lock ring and adjustable cup. Personally I feel you your better off leaving the "fixed cup" (right side) inplace and cleaning the best you can from the other side. Then get the shop to adjust and tighten when you put it back together. No sense buying special tools you may only use once.
__________________
�One morning you wake up, the girl is gone, the bikes are gone, all that's left behind is a pair of old tires and a tube of tubular glue, all squeezed out"
Sugar "Kane" Kowalczyk
�One morning you wake up, the girl is gone, the bikes are gone, all that's left behind is a pair of old tires and a tube of tubular glue, all squeezed out"
Sugar "Kane" Kowalczyk
Last edited by Bianchigirll; 03-24-24 at 04:49 AM.
Likes For Bianchigirll:
03-24-24, 07:28 AM
#5
Newbie
Thread Starter
Bianchigirl,
Thanks so much! It never occurred to me that the ring would be what the bolt pushes on to self extract. Cool!
I actually have some tools where i live in europe but this is a USA job (visiting family) and I could potentially spring for the BB tools and bring them back. I have some experience tightening around bearings to get them just right, mostly hubs. I think I can handle it. Of course I wont know till I am faced with it, and the funny thing is the LBS where it was purchased by my brother still exists (Trek dealer now) and it would be fun to bring it back there for a little work 40 years later!!
This is a great forum. the one thing I didn't understand is about uploading photos into an album... I tried to upload into my post but there was a 10 post wall... is there another method?
Likes For Peterparis:

Likes For daverup:
03-24-24, 07:44 AM
#7
Bianchi Goddess
Join Date: Apr 2009
Location: Shady Pines Retirement Fort Wayne, In
Posts: 27,908
Bikes: Too many to list here check my signature.
Mentioned: 194 Post(s)
Tagged: 2 Thread(s)
Quoted: 2949 Post(s)
Liked 2,970 Times
in
1,515 Posts
Peterparis GREAT! Glad I could help. Where are you visiting? We're everywhere, someone may eba few blocks away with the tools and willingness to help
__________________
�One morning you wake up, the girl is gone, the bikes are gone, all that's left behind is a pair of old tires and a tube of tubular glue, all squeezed out"
Sugar "Kane" Kowalczyk
�One morning you wake up, the girl is gone, the bikes are gone, all that's left behind is a pair of old tires and a tube of tubular glue, all squeezed out"
Sugar "Kane" Kowalczyk
Likes For daverup:
03-24-24, 11:56 AM
#9
Newbie
Thread Starter
Bianchigirl- wow community based tool sharing would be awesome! I'm in Huntington, Long Island, NY. Let me know if that exists. Tools would be great, but thats a big ask. I'll probably just identify what's needed and go buy at REI if they have at LBS. Seems like 20 - 30 bucks should do it. I need to get some polishing wheels and for my dad's grinder as well..
A big wrench for one side seems enough, on the other side, the tool which seems needed is something like Park Tool HCW-5..
Cheers!!
A big wrench for one side seems enough, on the other side, the tool which seems needed is something like Park Tool HCW-5..
Cheers!!
03-24-24, 02:14 PM
#10
Bianchi Goddess
Join Date: Apr 2009
Location: Shady Pines Retirement Fort Wayne, In
Posts: 27,908
Bikes: Too many to list here check my signature.
Mentioned: 194 Post(s)
Tagged: 2 Thread(s)
Quoted: 2949 Post(s)
Liked 2,970 Times
in
1,515 Posts
Very cool bike
__________________
�One morning you wake up, the girl is gone, the bikes are gone, all that's left behind is a pair of old tires and a tube of tubular glue, all squeezed out"
Sugar "Kane" Kowalczyk
�One morning you wake up, the girl is gone, the bikes are gone, all that's left behind is a pair of old tires and a tube of tubular glue, all squeezed out"
Sugar "Kane" Kowalczyk
Likes For Bianchigirll:
03-24-24, 06:05 PM
#11
Edumacator
Join Date: Jan 2018
Location: Goose Creek, SC
Posts: 6,972
Bikes: '87 Crestdale, '87 Basso Gap, '92 Rossin Performance EL-OS, 1990 VanTuyl, 1980s Losa, 1985 Trek 670, 1982 AD SLE, 1987 PX10, etc...
Mentioned: 59 Post(s)
Tagged: 0 Thread(s)
Quoted: 2498 Post(s)
Liked 3,241 Times
in
2,045 Posts
Bianchigirl- wow community based tool sharing would be awesome! I'm in Huntington, Long Island, NY. Let me know if that exists. Tools would be great, but thats a big ask. I'll probably just identify what's needed and go buy at REI if they have at LBS. Seems like 20 - 30 bucks should do it. I need to get some polishing wheels and for my dad's grinder as well..
A big wrench for one side seems enough, on the other side, the tool which seems needed is something like Park Tool HCW-5..
Cheers!!
A big wrench for one side seems enough, on the other side, the tool which seems needed is something like Park Tool HCW-5..
Cheers!!
__________________
1987 Crest Cannondale, 1987 Basso Gap, 1992 Rossin Performance EL, 1990ish Van Tuyl, 1985 Trek 670, 2003 Pinarello Surprise, 1990ish MBK Atlantique, 1987 Peugeot Competition, 1987 Nishiki Tri-A, 1981 Faggin, 1996 Cannondale M500, 1984 Mercian, 1982 AD SuperLeicht, 1985 Massi (model unknown), 1988 Daccordi Griffe , 1989 Fauxsin MTB, 1981 Ciocc Mockba, 1992 Bianchi Giro, 1977 Colnago Super, 1971 Raleigh International, 1998 Corratec Ap & Dun, 1991 Peugeot Slimestone
1987 Crest Cannondale, 1987 Basso Gap, 1992 Rossin Performance EL, 1990ish Van Tuyl, 1985 Trek 670, 2003 Pinarello Surprise, 1990ish MBK Atlantique, 1987 Peugeot Competition, 1987 Nishiki Tri-A, 1981 Faggin, 1996 Cannondale M500, 1984 Mercian, 1982 AD SuperLeicht, 1985 Massi (model unknown), 1988 Daccordi Griffe , 1989 Fauxsin MTB, 1981 Ciocc Mockba, 1992 Bianchi Giro, 1977 Colnago Super, 1971 Raleigh International, 1998 Corratec Ap & Dun, 1991 Peugeot Slimestone
03-24-24, 07:56 PM
#12
Senior Member
Bianchigirl- wow community based tool sharing would be awesome! I'm in Huntington, Long Island, NY. Let me know if that exists. Tools would be great, but thats a big ask. I'll probably just identify what's needed and go buy at REI if they have at LBS. Seems like 20 - 30 bucks should do it. I need to get some polishing wheels and for my dad's grinder as well..
A big wrench for one side seems enough, on the other side, the tool which seems needed is something like Park Tool HCW-5..
Cheers!!
A big wrench for one side seems enough, on the other side, the tool which seems needed is something like Park Tool HCW-5..
Cheers!!
- The cup or bearing on the left (non-drive-side) of the bike is RIGHT HAND THREAD (normal; righty-tighty, lefty-loosey).
- The cup or bearing on the right (drive-side) of the bike is LEFT HAND THREAD, left rotation (anti-clockwise) tightens, right rotation (clockwise) loosens.
This helps keep the bearings tight. This assumes you have a BSA*/English BB shell standard, the most common.
There are more rare BB designs (such as "Italian") where the right cup is right hand thread, and they have a habit of coming loose.
* Birmingham Small Arms (Birmingham, UK); Guns, bicycles, motorcycles, etc.
There's a recent thread on here regarding various proper torques, including bottom brackets, let me find it... here it is, it contains a link from Park Tool, you may want to bookmark that:
General Torque Specifications form Park Tool
Likes For Duragrouch:
03-25-24, 06:21 AM
#13
Freewheel Medic

Join Date: Oct 2005
Location: An Island on the Coast of GA!
Posts: 12,902
Bikes: Snazzy* Schwinns, Classy Cannondales & a Super Pro Aero Lotus (* Ed.)
Mentioned: 141 Post(s)
Tagged: 0 Thread(s)
Quoted: 1463 Post(s)
Liked 2,220 Times
in
973 Posts
Peterparis this is the first time I've seen the Lotus Aero Sport, so thank you for posting and welcome to C&V. I'm looking forward to your restoration.
I own the Aero Super Sport which is equipped with the Dura Ace AX group. If by chance you are in need of brake lever hoods, I recently purchased these reproductions from a seller and BF member who resides in Poland. He has them available in several colors.
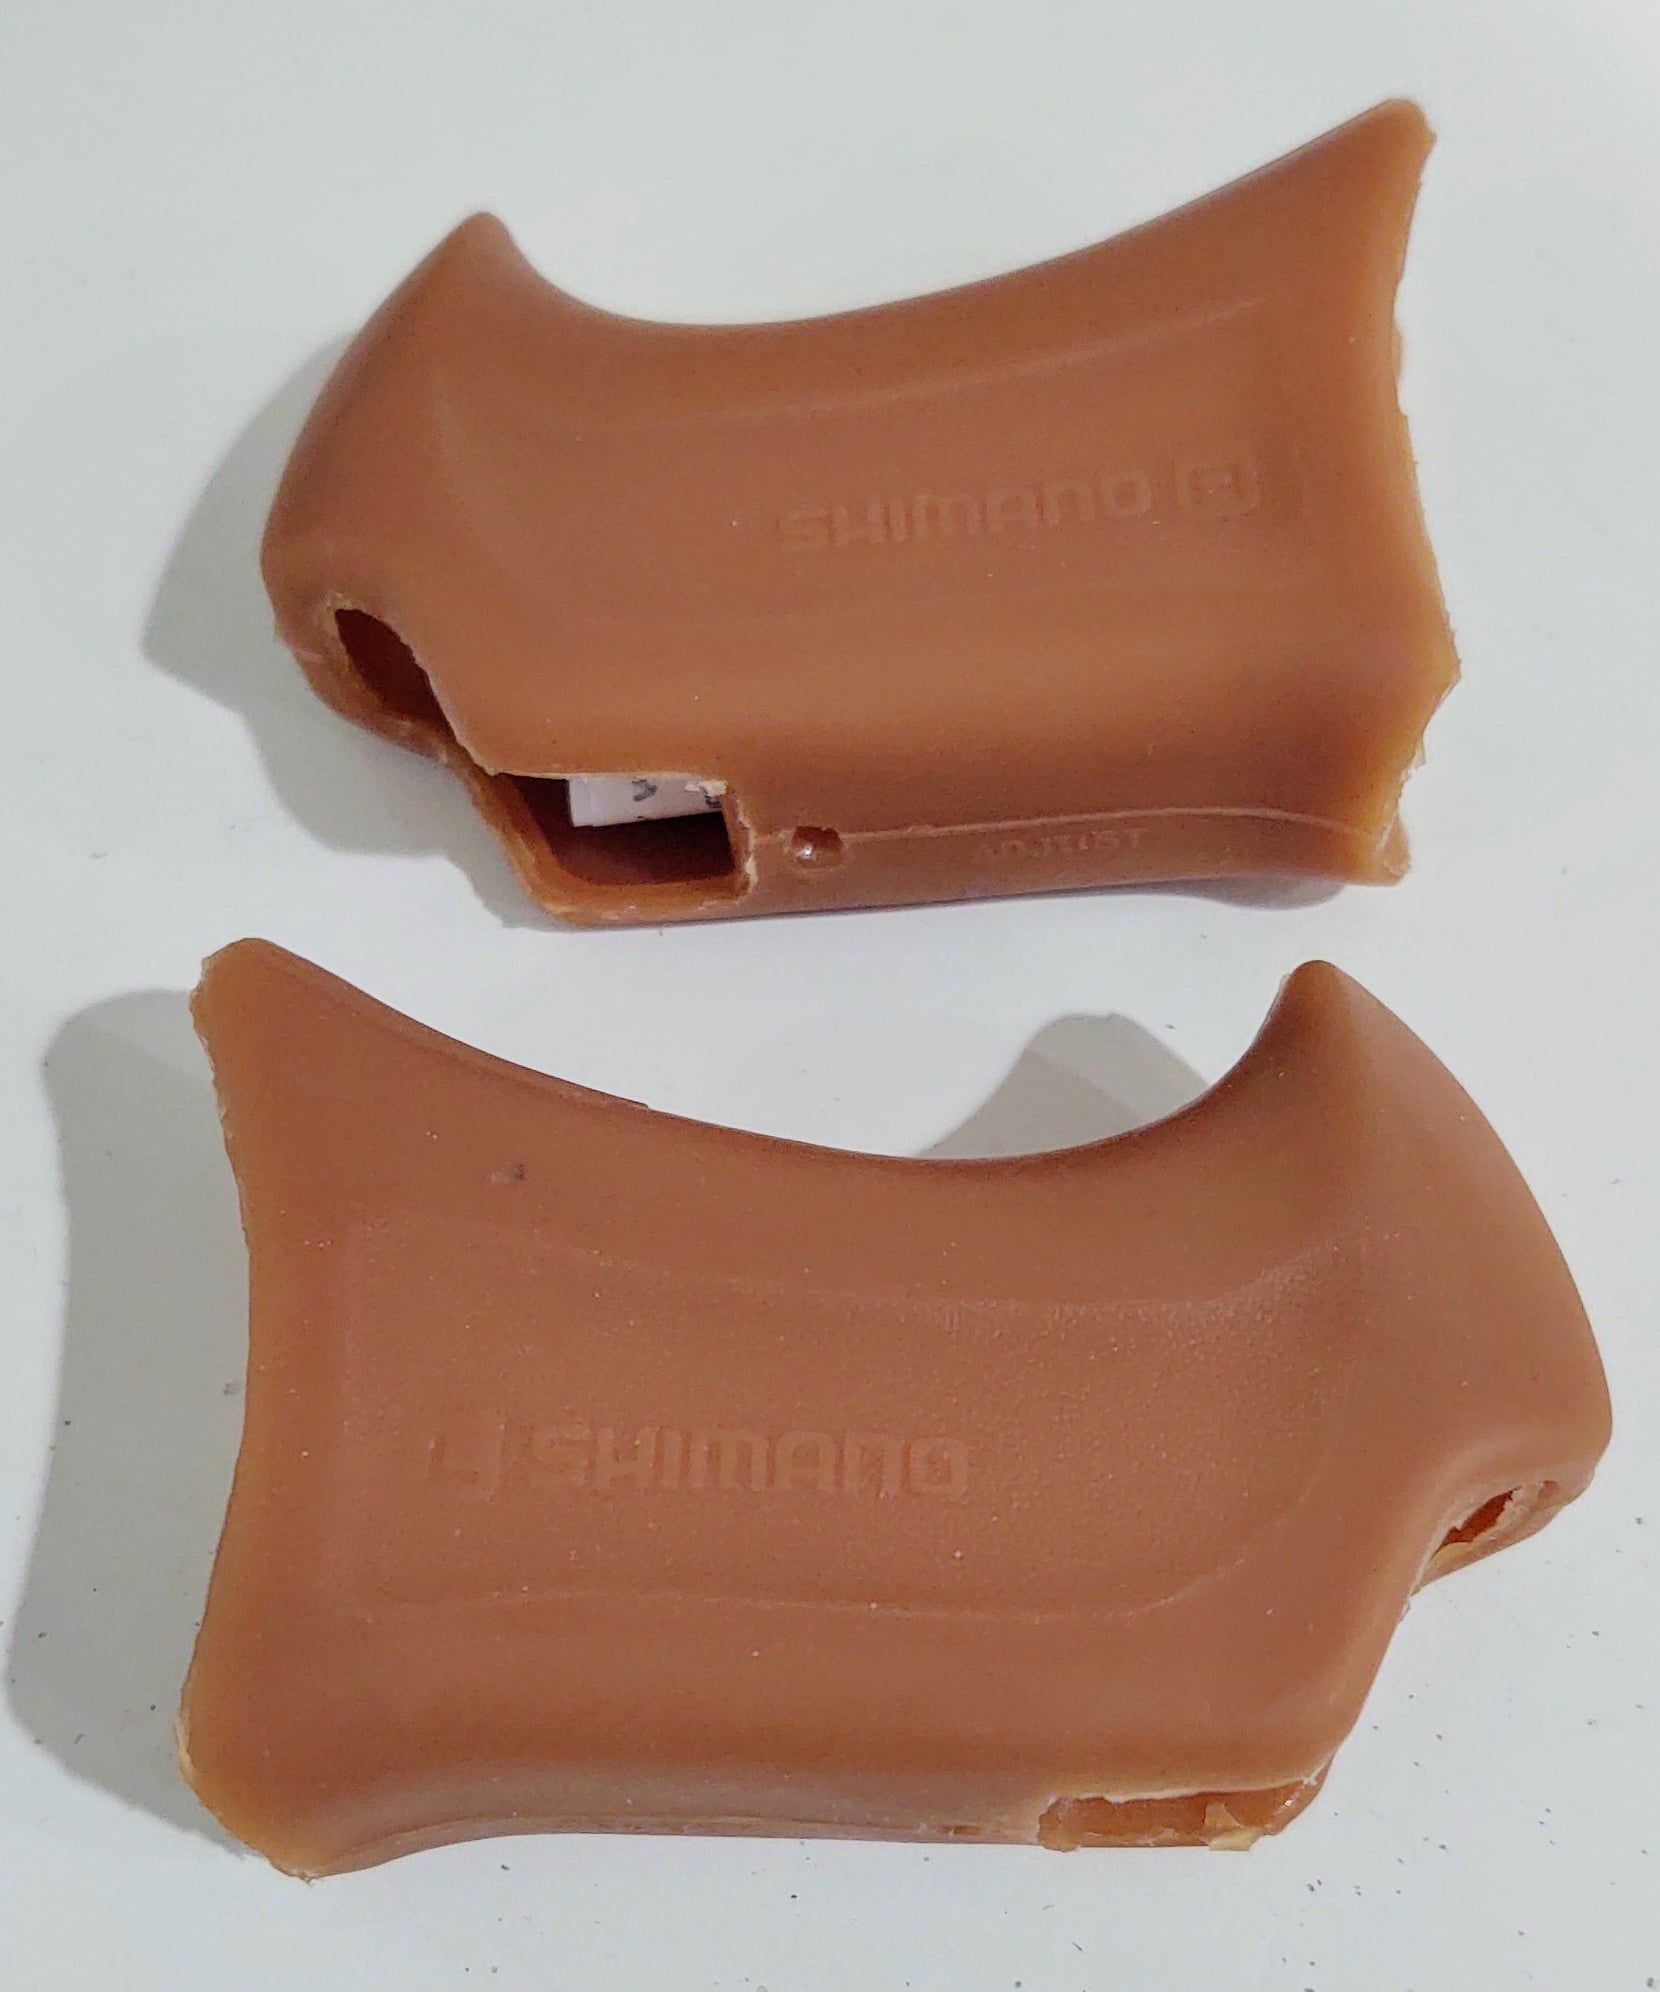
Sold by BF member bike-vintage.eu on website www.racevelo.com
I own the Aero Super Sport which is equipped with the Dura Ace AX group. If by chance you are in need of brake lever hoods, I recently purchased these reproductions from a seller and BF member who resides in Poland. He has them available in several colors.
Sold by BF member bike-vintage.eu on website www.racevelo.com
__________________
Bob
Enjoying the GA coast all year long!
Thanks for visiting my website: www.freewheelspa.com
Bob
Enjoying the GA coast all year long!
Thanks for visiting my website: www.freewheelspa.com
Likes For pastorbobnlnh:
03-25-24, 11:18 AM
#14
Klaatu..Verata..Necktie?
Join Date: May 2007
Location: SF Bay Area
Posts: 18,123
Bikes: Litespeed Ultimate, Ultegra; Canyon Endurace, 105; Battaglin MAX, Chorus; Bianchi 928 Veloce; Ritchey Road Logic, Dura Ace; Cannondale R500 RX100; Schwinn Circuit, Sante; Lotus Supreme, Dura Ace
Mentioned: 41 Post(s)
Tagged: 0 Thread(s)
Quoted: 10504 Post(s)
Liked 12,037 Times
in
6,164 Posts
If you have a Dura Ace or 600 AX headset with the scalloped nuts, you can find tools that will work with them on Ebay. The originals will run you about $80, but there are much cheaper reproductions. If you buy the latter, be prepared to take a file to the edges to get them to fit smoothly.
The Dyna Drive pedals are very cool but one issue you may have is finding seals to replace the originals if they're shot. Also, they're clip-and-strap, which is fine if you can work with them. Personally, I never got comfortable with mine, so I got the adapters and run PD-7401 Dura Ace clipless pedals on my Lotus Supreme (which has the Dura Ace EX groupset, which has a lot of overlap with AX).
I thought about putting together a Dura Ace AX bike, but between having to find one of the Aero framesets, and finding all the components, I decided against.
__________________
"Don't take life so serious-it ain't nohow permanent."
"Everybody's gotta be somewhere." - Eccles
"Don't take life so serious-it ain't nohow permanent."
"Everybody's gotta be somewhere." - Eccles

Likes For genejockey:
03-25-24, 06:47 PM
#15
Newbie
Thread Starter
Hi,
Report: Bad news!
The nds extracted fine, but the ds stripped out the CAP threads on the crank spider...
Oh, well. I guess logically, the spider is still useful, but a new technique needed to remove it to service the BB. By the way the bb seems not turning optimally, otherwise I could just leave it. I may do that in the short run. I'll drop by the lbs tomorrow to see what they suggest unless I get some other advice from here. I hope my faux pas isn't too cringe-worhty... arrrgh!!
This is a repose to all- I am being careful not to over post since there are limits!
@ Duragrouch- thanks for the BB heads up and link.
@astorbobnlnh Thanks for those (oddly medical looking) hood covers!!
@ genejockey Thanks for permission to not go" purist" on the pedals (Still I want to try em out, they are like good sculpture!!!).
Onwards!
Peter
Report: Bad news!
The nds extracted fine, but the ds stripped out the CAP threads on the crank spider...
Oh, well. I guess logically, the spider is still useful, but a new technique needed to remove it to service the BB. By the way the bb seems not turning optimally, otherwise I could just leave it. I may do that in the short run. I'll drop by the lbs tomorrow to see what they suggest unless I get some other advice from here. I hope my faux pas isn't too cringe-worhty... arrrgh!!
This is a repose to all- I am being careful not to over post since there are limits!
@ Duragrouch- thanks for the BB heads up and link.
@astorbobnlnh
Thanks for those (oddly medical looking) hood covers!!@ genejockey
Thanks for permission to not go" purist" on the pedals (Still I want to try em out, they are like good sculpture!!!).Onwards!
Peter
03-25-24, 07:08 PM
#16
Senior Member
You might be able to salvage the crank if they make a "Helicoil" in that thread size. Helicoils save stripped threads; You drill or bore out the threads to a certain size, then retap it with a special tap, then insert the helicoil, with a special wrench that engages a crosswise end on the first thread of it and pulls inward on it to reduce it's diameter so it all screws in, then smack the wrench axially to break off the cross piece, and your done. Really smart system. The helicoil looks like a coil spring but with the raw material looking like a diamond cross-section; The outside of the diamond screws perfectly into the new tapped thread size, and the inside of the diamond is the former cap thread size. Some applications use helicoils right from the OEM manufacturer, especially with aluminum parts, because the helicoil is stainless steel, so offers a thread surface that is harder and more durable, and stronger because the aluminum threads are now at a larger diameter so more thread area. Aluminum engine heads that strip the spark plug threads, they helicoil. Looking on wiki now, they show that and other solutions:
https://en.m.wikipedia.org/wiki/Threaded_insert
Last edited by Duragrouch; 03-25-24 at 07:16 PM.
03-25-24, 07:08 PM
#17
Senior Member

Hi,
Report: Bad news!
The nds extracted fine, but the ds stripped out the CAP threads on the crank spider...
Oh, well. I guess logically, the spider is still useful, but a new technique needed to remove it to service the BB. By the way the bb seems not turning optimally, otherwise I could just leave it. I may do that in the short run. I'll drop by the lbs tomorrow to see what they suggest unless I get some other advice from here. I hope my faux pas isn't too cringe-worhty... arrrgh!!
This is a repose to all- I am being careful not to over post since there are limits!
@ Duragrouch- thanks for the BB heads up and link.
@astorbobnlnh Thanks for those (oddly medical looking) hood covers!!
@ genejockey Thanks for permission to not go" purist" on the pedals (Still I want to try em out, they are like good sculpture!!!).
Onwards!
Peter
Report: Bad news!
The nds extracted fine, but the ds stripped out the CAP threads on the crank spider...
Oh, well. I guess logically, the spider is still useful, but a new technique needed to remove it to service the BB. By the way the bb seems not turning optimally, otherwise I could just leave it. I may do that in the short run. I'll drop by the lbs tomorrow to see what they suggest unless I get some other advice from here. I hope my faux pas isn't too cringe-worhty... arrrgh!!
This is a repose to all- I am being careful not to over post since there are limits!
@ Duragrouch- thanks for the BB heads up and link.
@astorbobnlnh
Thanks for those (oddly medical looking) hood covers!!@ genejockey
Thanks for permission to not go" purist" on the pedals (Still I want to try em out, they are like good sculpture!!!).Onwards!
Peter
__________________
Check out www.djcatnap.com for articles on vintage Japanese & French bicycle restorations, components and history.
Check out www.djcatnap.com for articles on vintage Japanese & French bicycle restorations, components and history.
Likes For Catnap:
03-25-24, 07:21 PM
#18
Senior Member
https://www.southernhighrollers.com/...s_of_all_time/
Last edited by Duragrouch; 03-25-24 at 07:25 PM.
03-25-24, 08:42 PM
#19
Klaatu..Verata..Necktie?
Join Date: May 2007
Location: SF Bay Area
Posts: 18,123
Bikes: Litespeed Ultimate, Ultegra; Canyon Endurace, 105; Battaglin MAX, Chorus; Bianchi 928 Veloce; Ritchey Road Logic, Dura Ace; Cannondale R500 RX100; Schwinn Circuit, Sante; Lotus Supreme, Dura Ace
Mentioned: 41 Post(s)
Tagged: 0 Thread(s)
Quoted: 10504 Post(s)
Liked 12,037 Times
in
6,164 Posts
If it's the one I'm thinking of, a fork with tapered legs, it's often called a bonking stick because auto mechanics often use it to hit on whatever needs hitting. I'd be careful with that on the non-drive side, to not damage the end face of the bottom bracket shell, they might have a big slotted washer to slip in there to protect things. On the drive side, I think the BB fixed cup or cartridge end should protect the BB shell end face, but a protector washer never hurts.
https://www.southernhighrollers.com/...s_of_all_time/
https://www.southernhighrollers.com/...s_of_all_time/
__________________
"Don't take life so serious-it ain't nohow permanent."
"Everybody's gotta be somewhere." - Eccles
"Don't take life so serious-it ain't nohow permanent."
"Everybody's gotta be somewhere." - Eccles
03-25-24, 08:46 PM
#20
Senior Member
In a nearly identical situation (but mine was the NDS crank), I used a pair of drill chuck removal wedges They're about the right size and if you hit them on one side then the other it keeps them square. *tap tap, tap tap, tap CLANG!!* as the crank comes flying off the spindle.
I very rarely used such, more R8 and 5C collets.
03-26-24, 05:07 AM
#21
Senior Member
Join Date: Nov 2013
Location: Near Pottstown, PA: 30 miles NW of Philadelphia
Posts: 2,193
Bikes: 2 Trek Mtn, Cannondale R600 road, 6 vintage road bikes
Mentioned: 83 Post(s)
Tagged: 0 Thread(s)
Quoted: 476 Post(s)
Liked 1,079 Times
in
410 Posts
I only have those time savers on one bike and I put those cranks on so I know they are well lubed and not seized. My other bike�s cranks are old fashion and reliable.
03-26-24, 06:27 AM
#22
Senior Member
Join Date: Nov 2005
Location: NW Ohio
Posts: 3,445
Bikes: 1984 Miyata 310, 1986 Schwinn Sierra, 2011 Jamis Quest, 1980 Peugeot TH8 Tandem, 1992 Performance Parabola, 1987 Ross Mt. Hood, 1988 Schwinn LeTour, 1988 Trek 400T, 1981 Fuji S12-S LTD, 197? FW Evans
Mentioned: 24 Post(s)
Tagged: 0 Thread(s)
Quoted: 541 Post(s)
Liked 1,036 Times
in
532 Posts
If it's the one I'm thinking of, a fork with tapered legs, it's often called a bonking stick because auto mechanics often use it to hit on whatever needs hitting. I'd be careful with that on the non-drive side, to not damage the end face of the bottom bracket shell, they might have a big slotted washer to slip in there to protect things. On the drive side, I think the BB fixed cup or cartridge end should protect the BB shell end face, but a protector washer never hurts.
https://www.southernhighrollers.com/...s_of_all_time/
https://www.southernhighrollers.com/...s_of_all_time/
Southern High Rollers needs to update the last tip to reflect the times. You might have a quarter, but good luck finding a phone book or a phone booth.
 03-26-24, 07:35 PM
#23
Newbie
Thread Starter
[QUOTE=With the cap removed, then the bolt, I could use a proper crank extractor tool, fully engaging the threads, and remove the crank. Worth the trouble.[/QUOTE]
Does this mean that with the bolt removed, a regular extractor tool can be used to remove the spider?
regarding the feeling you had, I should have had it too- there was just too much force going into the allen key with no result... live and learn.. sigh..
Cheers!
Does this mean that with the bolt removed, a regular extractor tool can be used to remove the spider?
regarding the feeling you had, I should have had it too- there was just too much force going into the allen key with no result... live and learn.. sigh..
Cheers!
03-26-24, 08:18 PM
#24
Newbie
Thread Starter
The post I wish I had found earlier...
seems to suggest I can change the bolt type on this crankset? or in anycase not use the self extracing "mode" it was orignally designed for. After, I can glue the stripped cap back in place for looks...
@ Duragrouch, the helicoil idea as i understand it would perhaps require more material than is present on the Spider in the area where the tap would widen the hole???
Cheers!!
03-26-24, 10:04 PM
#25
Senior Member
I�ve faced this before too but I got lucky. Something about it gave me pause, probably didn�t like the feel of it. I decided to remove the extraction cap from the crank first. Nice convenience but a dangerous feature. It appears that the cranks themselves are fully threaded but those caps only engage the first few threads. MUCH weaker and they threaten to strip out those threads if the cranks are stuck on. With the cap removed, then the bolt, I could use a proper crank extractor tool, fully engaging the threads, and remove the crank. Worth the trouble.
I only have those time savers on one bike and I put those cranks on so I know they are well lubed and not seized. My other bike�s cranks are old fashion and reliable.
I only have those time savers on one bike and I put those cranks on so I know they are well lubed and not seized. My other bike�s cranks are old fashion and reliable.