


Huffy + Campagnolo Super Record = The Ultimate C&V Sacrilege build
 03-31-23, 01:54 AM
#551
Junior Member
Quick question for ya. I don't mind zipping away metal on the Huffy at all, but removing the stiffing bend for the brake bridge and changing the leverage point by extending the arm for the brakes - I'm not an engineer, but is there any concern for torqueing or flexing the brake bridge too much?
That 90 degree bend...its pretty tall, and it already has a small hole in it (for a fender bolt?) ...I wonder what the possibility of enlarging that hole and having that extender in the shape of a circular rod and extending it through that hole to get the benefit of the stiffener brace? Or perhaps keep the squarish shape, but reduce the thickness right before the end of the bridge, and slide it through the stiffener brace after cutting a rectangular hole in it? Just thinking out loud.
Edit: Not great with words so here is what was in my head, drawn out:
This would allow the adapter to have the benefit of no side-to-side sway (which was the original intent of the cutout, to keep it locked in place) but allows the down bend of the bridge to cradle the adapter as well to gain a better leverage point and stiffen the whole thing up. Only detractor is I'm not sure you could get the entire thickness of the adapter as-is. You'd have to thin the adapter down a bit on that end and then use a spacer to gain back the original height of the recessed brake bolt, which still could be easily done, and even recess a small lip for a spacer to set down in so it doesn't wander.
Sorry I'm complicating things I'll go to bed now
How about having the thinner section towards the top to attach to the bridge with the thicker portion for the caliper? No shim or washer for the center bolt might be possible?
The thinner section should be stiff enough if the thick section is butted up against the bridge as it will be clamped to the bridge which minimizes flexing.
Whichever way you go with it make sure that you have a smooth as possible small radius at the inside corner to avoid creating any stress risers.
The hole through the bridge should also have rounded edges so it will not molest the aluminum.
Re: Photo of fork with wheel. Is the brake bolt hole aligned and centered? Aging mind along with degrading eyesight is not an always reliable combination.
Last edited by stoneageyosh; 03-31-23 at 02:22 AM.
 03-31-23, 06:57 AM
#552

The Huffmeister
Thread Starter

Join Date: Jul 2008
Location: The Le Grande HQ
Posts: 2,741
Bikes: '79 Trek 938, '86 Jim Merz Allez SE, '90 Miyata 1000, '68 PX-10, '80 PXN-10, '73 Super Course, '87 Guerciotti, '83 Trek 600, '80 Huffy Le Grande
Mentioned: 45 Post(s)
Tagged: 0 Thread(s)
Quoted: 1227 Post(s)
Liked 3,561 Times
in
1,412 Posts
Don’t think that the rectangular hole would reduce the bridge stiffness enough to worry about as the shape, thickness and width are probably adequate.
How about having the thinner section towards the top to attach to the bridge with the thicker portion for the caliper? No shim or washer for the center bolt might be possible?
The thinner section should be stiff enough if the thick section is butted up against the bridge as it will be clamped to the bridge which minimizes flexing.
Whichever way you go with it make sure that you have a smooth as possible small radius at the inside corner to avoid creating any stress risers.
The hole through the bridge should also have rounded edges so it will not molest the aluminum.
Re: Photo of fork with wheel. Is the brake bolt hole aligned and centered? Aging mind along with degrading eyesight is not an always reliable combination.
Oooh, this is a good suggestion - just reverse the design. I like that. I like it because that means that with all the hard work Mad Honk has been putting into it, he wouldn't really have to change anything on the brake mount side, as he has already got that squared away. Really, it would just be trimming up the mounting block, which I think he was still working on.
I hear you on the rounding off on the corners - agreed, no need to create stress risers Really, this piece is going to be pretty short - probably somewhere around maybe an 1.25 - 1.5" OAL. The distance is somewhere around .8" for the drop, and then of course excess material for the hole surrounds. That means that there will be relatively little of the 'larger' stubby end sticking out from the brake bridge...really it is going to be about enough to mount the brake, and that's it.
I love it when a plan comes together! Mad Honk, let us know if this small suggestion for a slightly thinner mounting block (to allow use of the brake bridge as additional stablizer) jives with your work. Because it simply means removing more material from the brake bridge mounting side of the adapter, hopefully that would make it approachable. Always easier to add more on than take more off!
EDIT: I actually did measure that brake bridge 'drop' (meaning that 90 degree support for rigidity that is facing the back wheel) yesterday with my digital caliper. It has a small hole in it, with a little material below that hole. Total distance from the flat inside top of the bridge, to the bottom of the hole, was .6". The distance from the bottom of that small hole, to the very bottom of the support tab was .133". Therefore, it allows for a potential thickness of .46" for a tab, bar, or piece of round stock to be inserted through it. Now, the tab doesn't have to be that thick, but that is right around the thickness that would cover over that small hole. One could go thinner and have that hole still be there at the bottom, if we wanted a little more meat on the bridge piece, structurally. Here is a quick mockup to illustrate what I'm talking about -
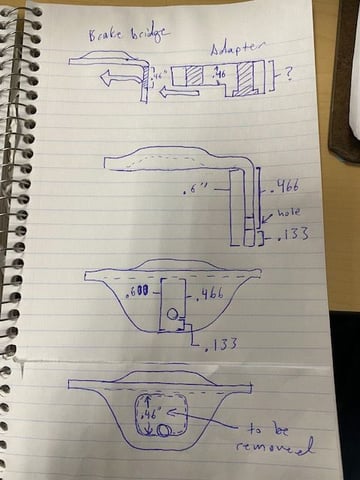
The size of the reinforcement tab is a little exaggerated, but y'all get the gist.
Last edited by AdventureManCO; 03-31-23 at 07:25 AM.
Likes For AdventureManCO:
03-31-23, 10:38 AM
#553
Senior Member
Join Date: Apr 2014
Location: Back in Lincoln Sq, Chicago...🙄
Posts: 1,609
Bikes: '84 Miyata 610 �91 Cannondale ST600,'83 Trek 720 �84 Trek 520, 620, �91 Miyata 1000LT, '79 Trek 514, '78 Trek 706, '73 Raleigh Int. frame.
Mentioned: 13 Post(s)
Tagged: 0 Thread(s)
Quoted: 685 Post(s)
Liked 370 Times
in
219 Posts
I love this forum! I read the first five or so pages of the thread, and then came to the end here, and it looks like you guys are designing flying saucers! Guess I just have to review the whole thing, and I can�t wait!
03-31-23, 10:44 AM
#554
Junior Member
This is a classic case of the KISS Principle. Have to keep it simple for folks whose intelligence could be subject to scrutiny by rational people. Participants in this exercise are more likely the former.
Edit: To clarify that there is little if anything that could be considered rational about putting Super Record on a Huffy. So . . . considering my history with Campagnolo there are former colleagues that would call me nuts for even considering such an exercise.
Edit: To clarify that there is little if anything that could be considered rational about putting Super Record on a Huffy. So . . . considering my history with Campagnolo there are former colleagues that would call me nuts for even considering such an exercise.
Last edited by stoneageyosh; 03-31-23 at 11:14 AM.
03-31-23, 11:08 AM
#555
I don't know.

Join Date: May 2003
Location: South Meriden, CT
Posts: 2,015
Bikes: '90 B'stone RB-1, '92 B'stone RB-2, '89 SuperGo Access Comp, '03 Access 69er, '23 Trek 520, '14 Ritchey Road Logic, '09 Kestrel Evoke, '08 Windsor Tourist, '17 Surly Wednesday, '89 Centurion Accordo, '15 CruX, '17 Ridley X-Night, '89 Marinoni
Mentioned: 2 Post(s)
Tagged: 0 Thread(s)
Quoted: 317 Post(s)
Liked 853 Times
in
446 Posts
I'm thinking AMCO is irrationally intelligent?
03-31-23, 11:16 AM
#556
Junior Member
Might be the other way around.
Edit: Gotta admit that this is rather entertaining, trying to do something that will raise some irebrows in a sort of elegant way.
Edit: Gotta admit that this is rather entertaining, trying to do something that will raise some irebrows in a sort of elegant way.
Last edited by stoneageyosh; 03-31-23 at 11:30 AM.
Likes For stoneageyosh:
03-31-23, 11:55 AM
#557
Senior Member
Join Date: May 2019
Location: Bloomington, IN
Posts: 2,951
Bikes: Paramount, Faggin, Ochsner, Ciocc, Basso
Mentioned: 117 Post(s)
Tagged: 0 Thread(s)
Quoted: 1304 Post(s)
Liked 1,912 Times
in
1,142 Posts
I am trying to make this project into a first step toward gaining players for the BOC game.
Smiles, MH
 03-31-23, 12:07 PM
#558
Senior Member
Join Date: May 2019
Location: Bloomington, IN
Posts: 2,951
Bikes: Paramount, Faggin, Ochsner, Ciocc, Basso
Mentioned: 117 Post(s)
Tagged: 0 Thread(s)
Quoted: 1304 Post(s)
Liked 1,912 Times
in
1,142 Posts
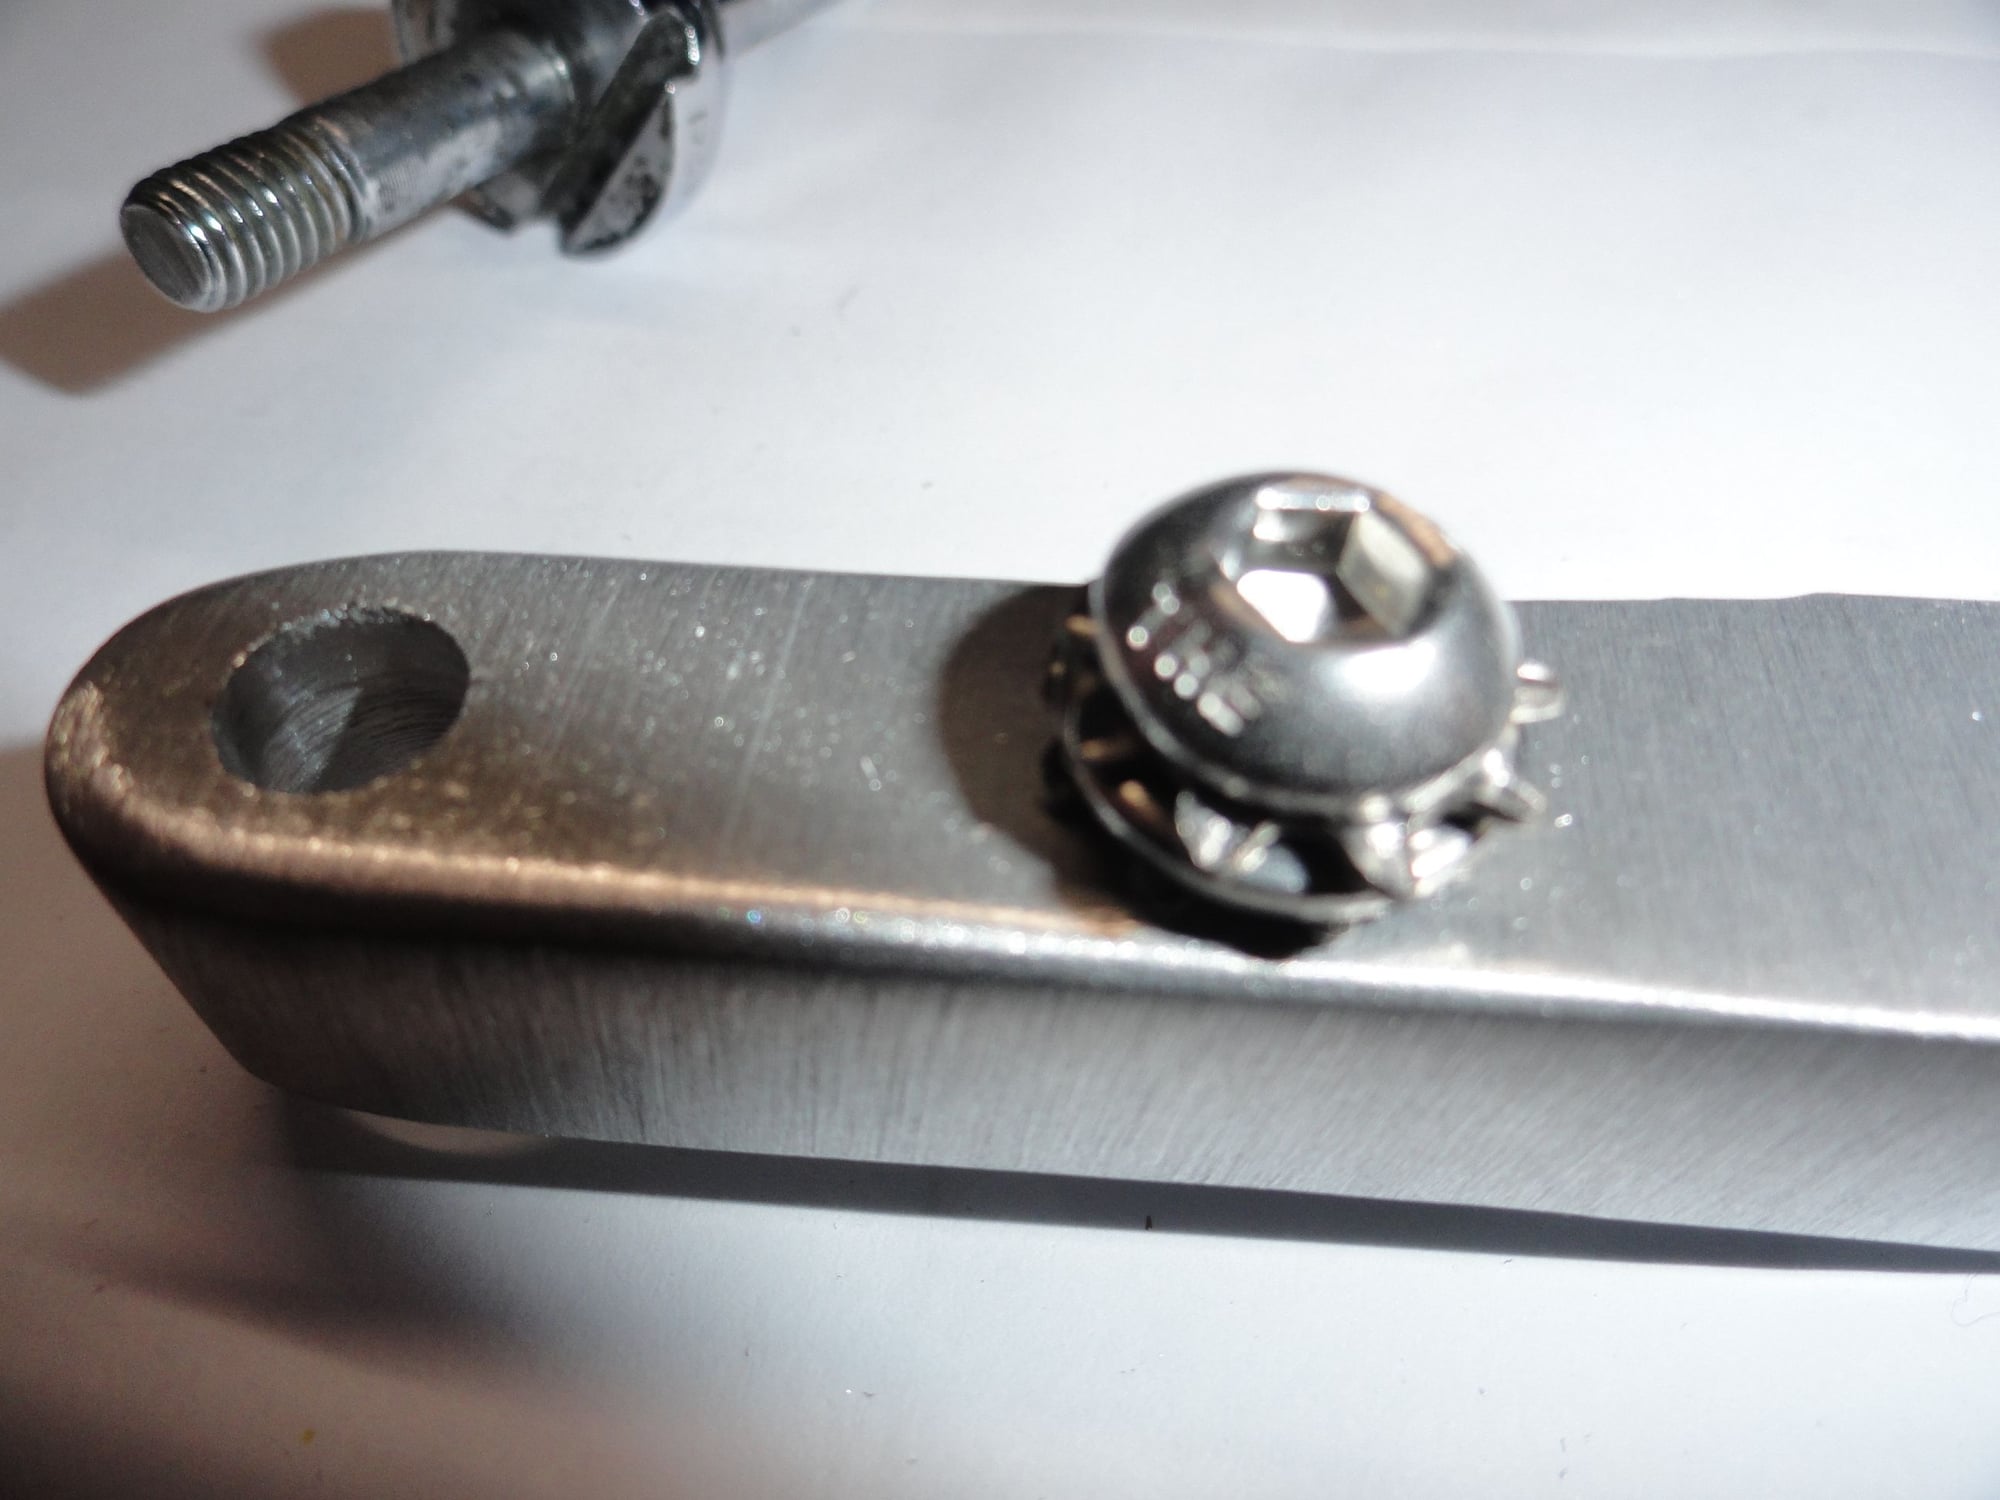
Friday afternoon and the work has begun again. I am skipping doing taxes for a day. This is version one with a drop distance of .8". The Stainless steel bolt will hold this piece in the bridge at the original brake bolt hole. The darker 6 X 1mm bolt is just a placeholder for where the SR brake bolt will attach. The two washers will go under the raised portion of the original bridge. One spacer washer with a star washer to hold the extender in place.
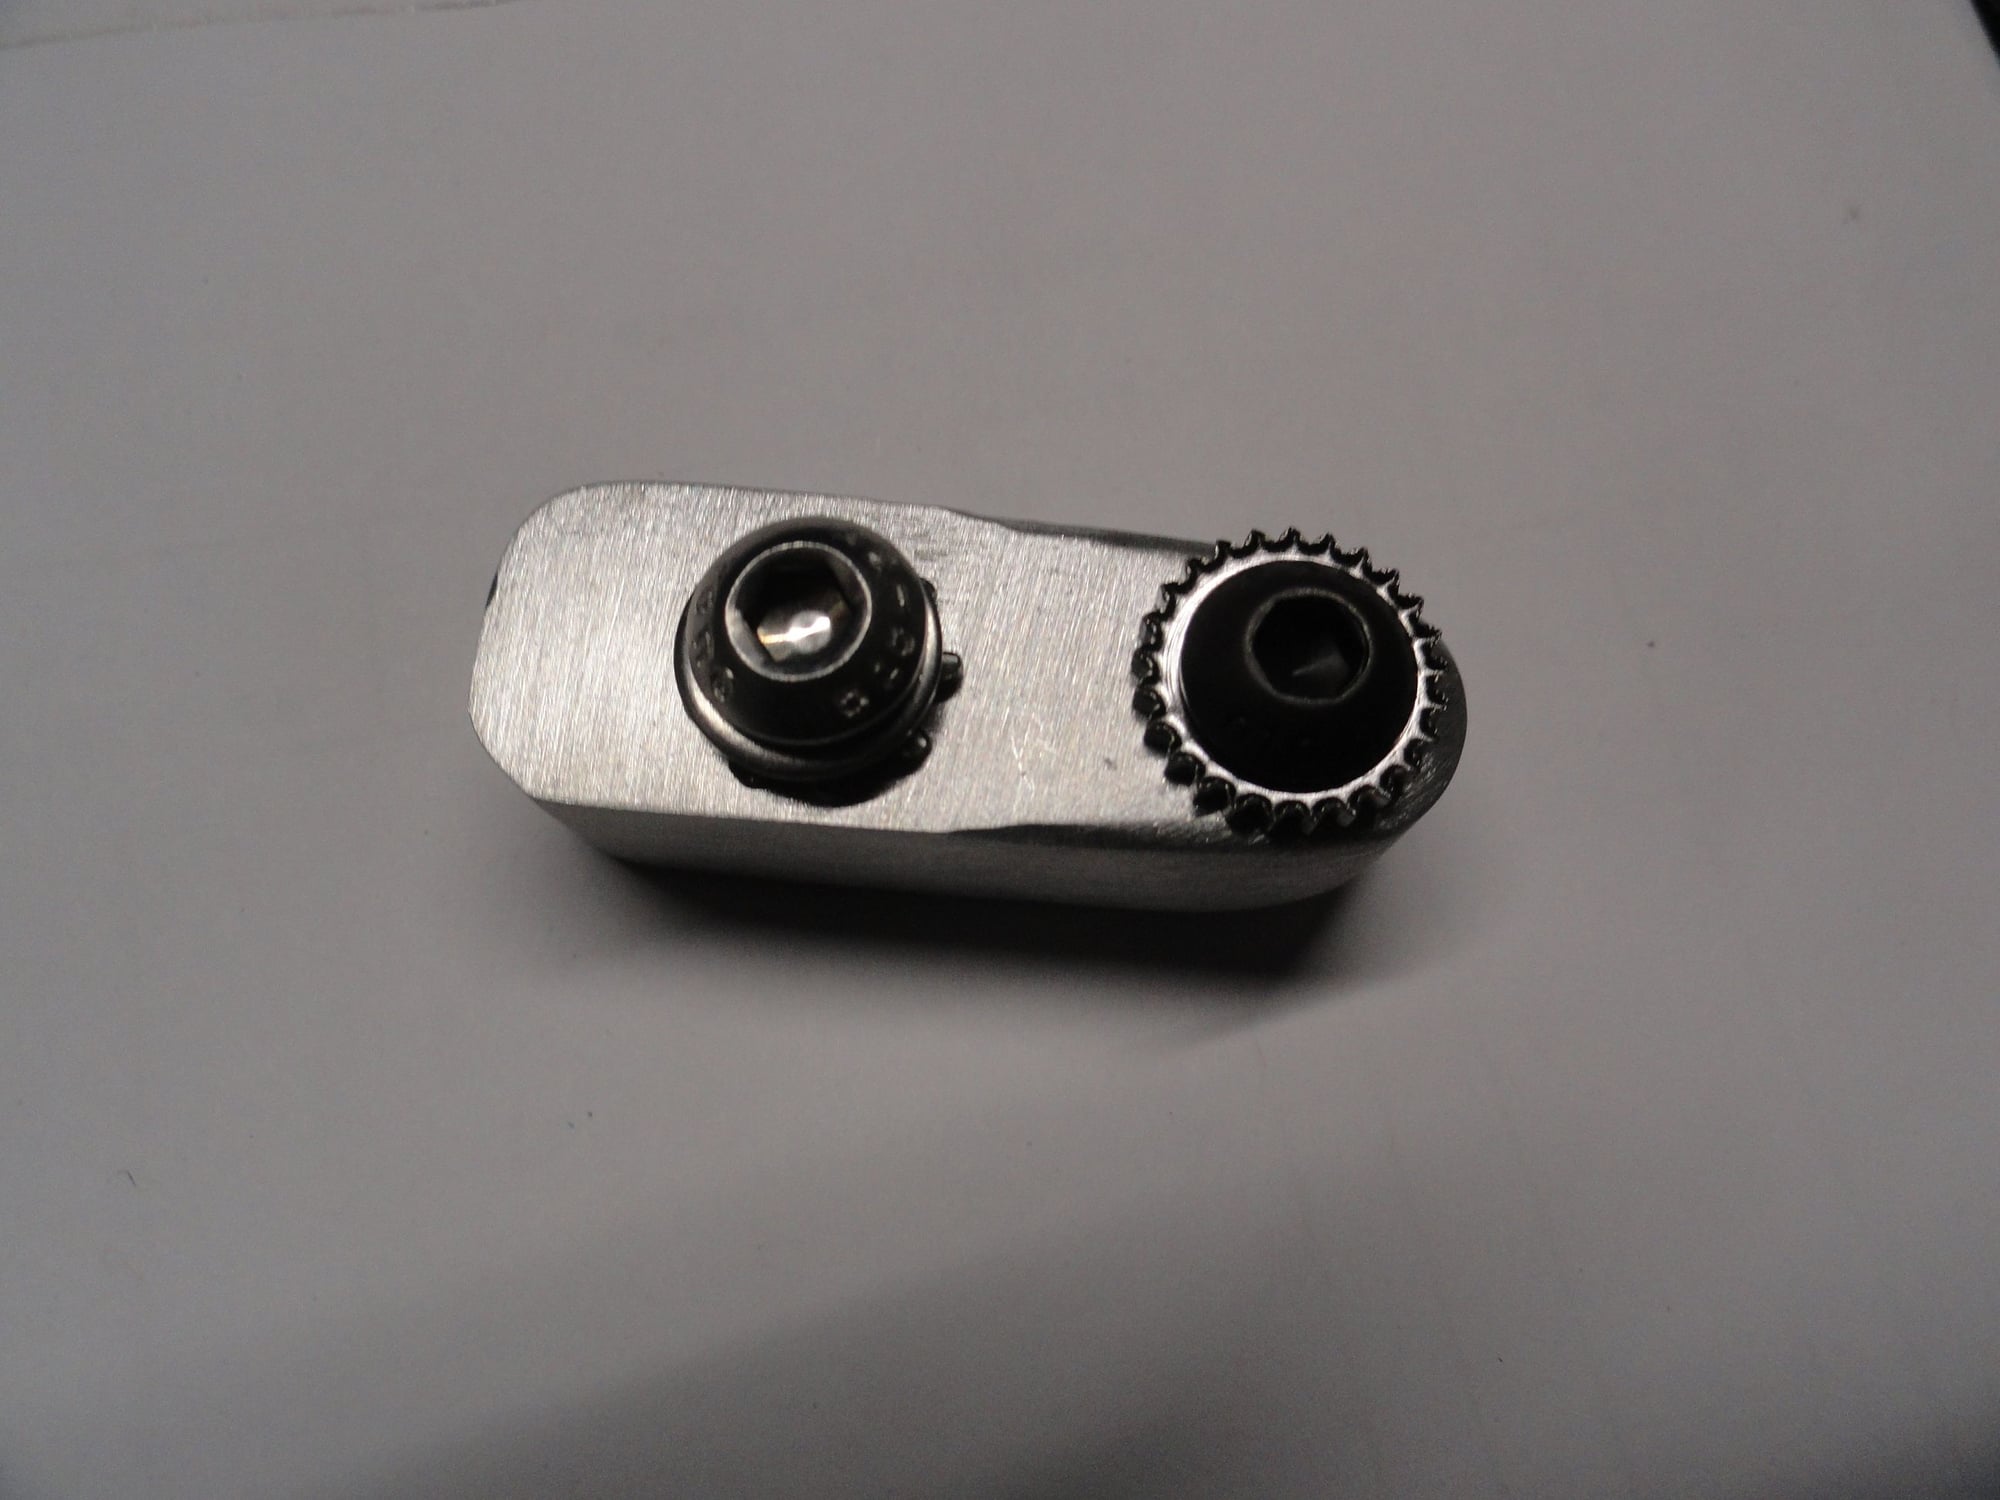
Top view of the extender with bolts in place.
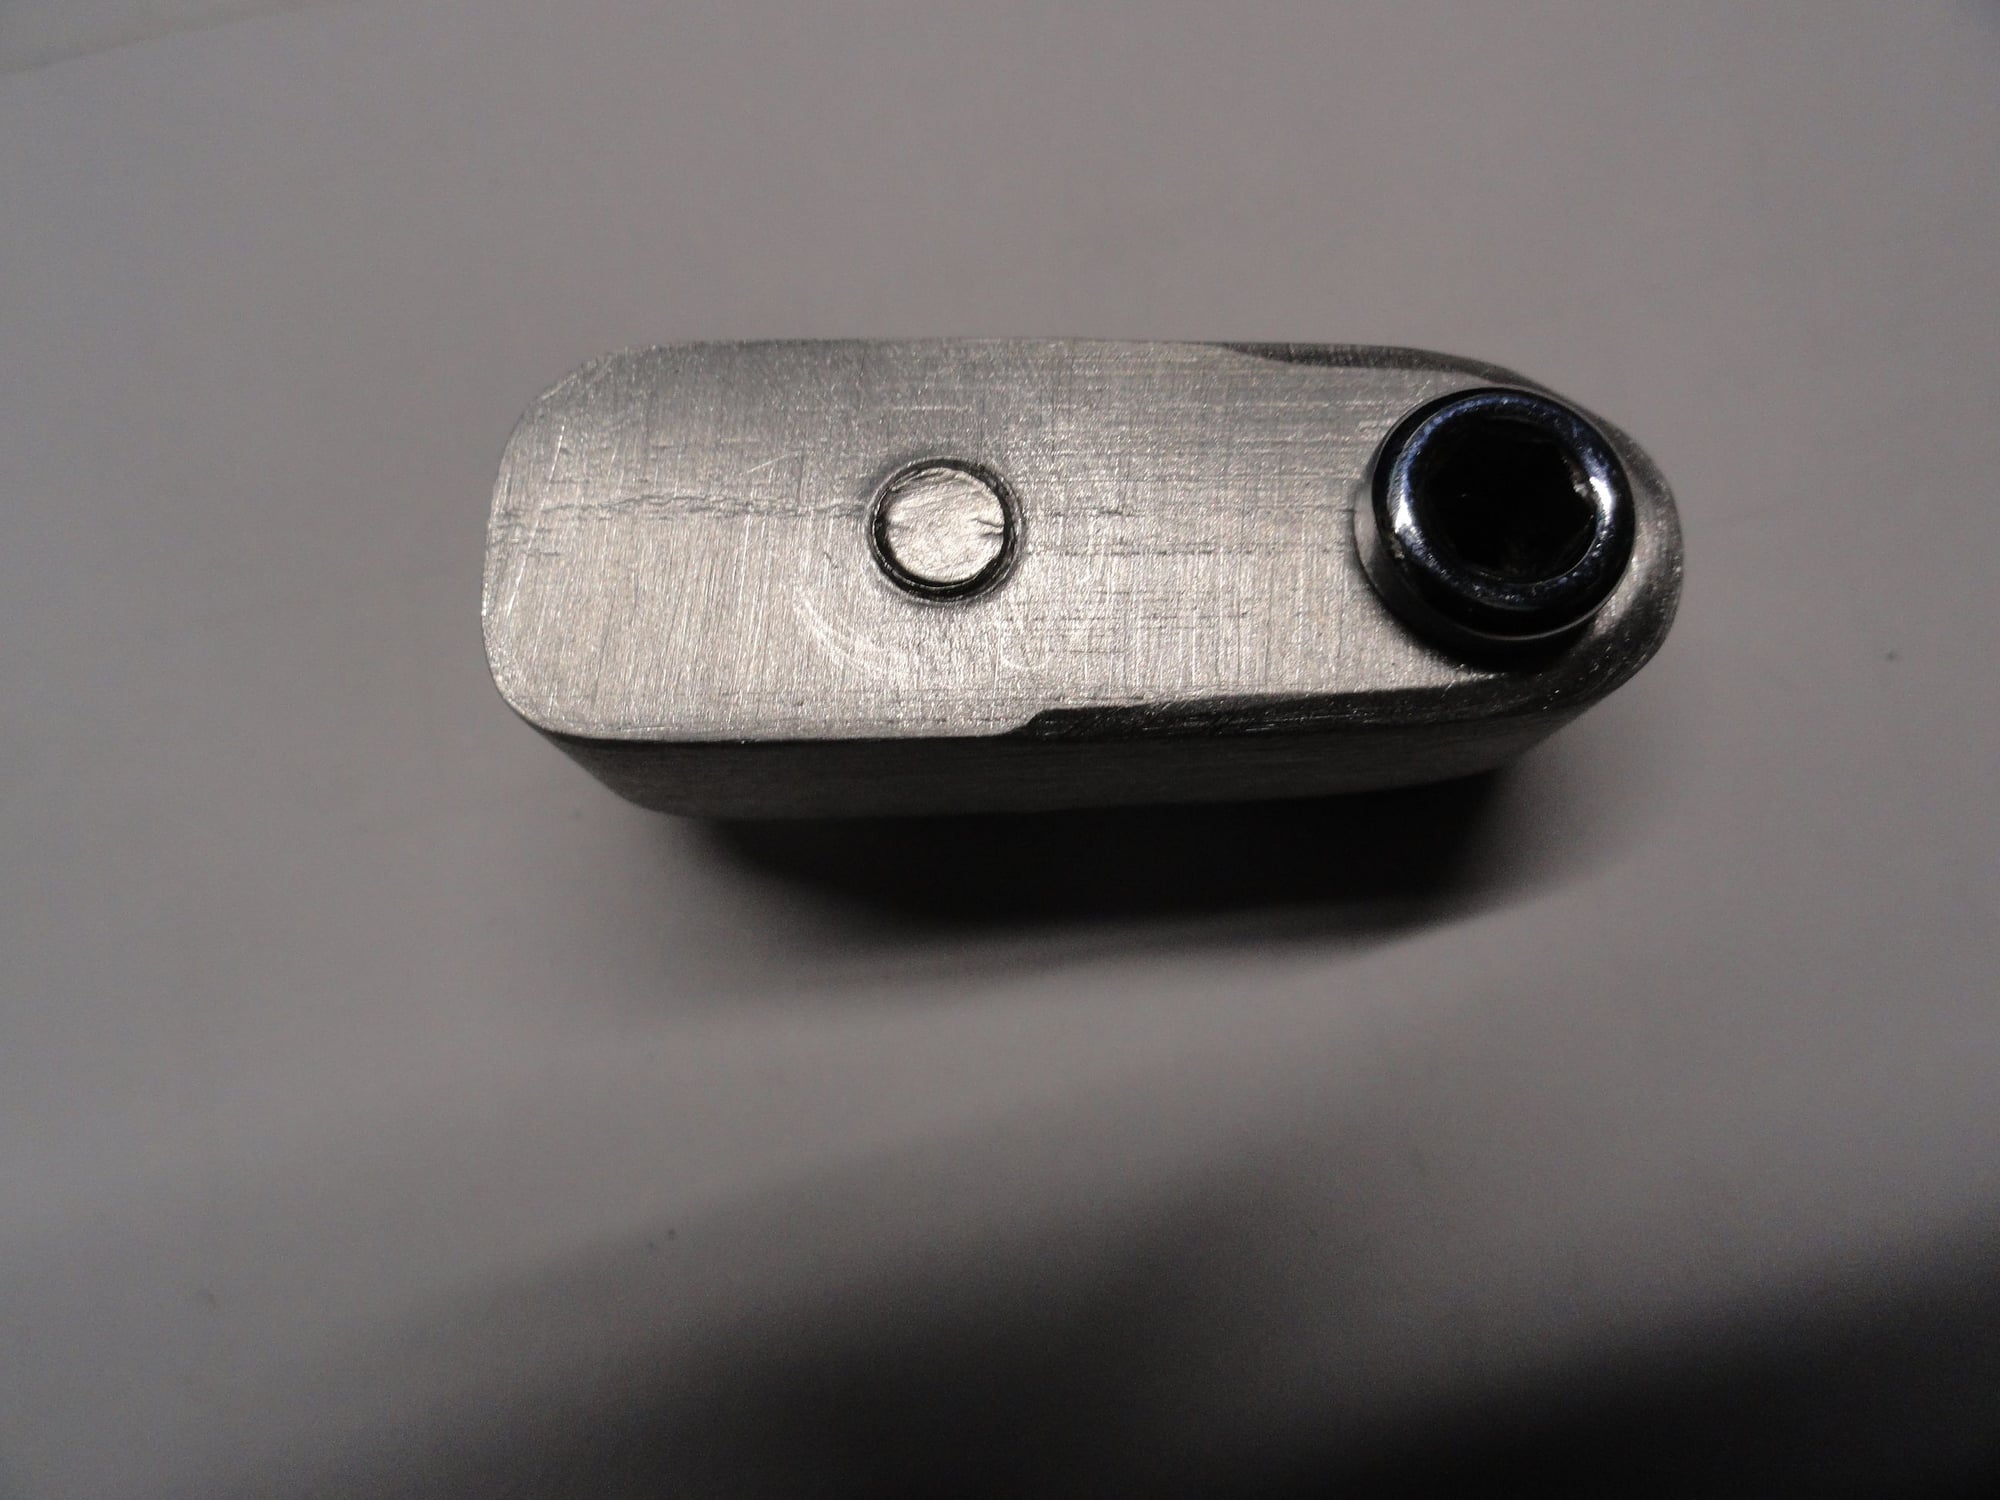
Bottom view of extended with stainless bolt on left and recessed nut on right.
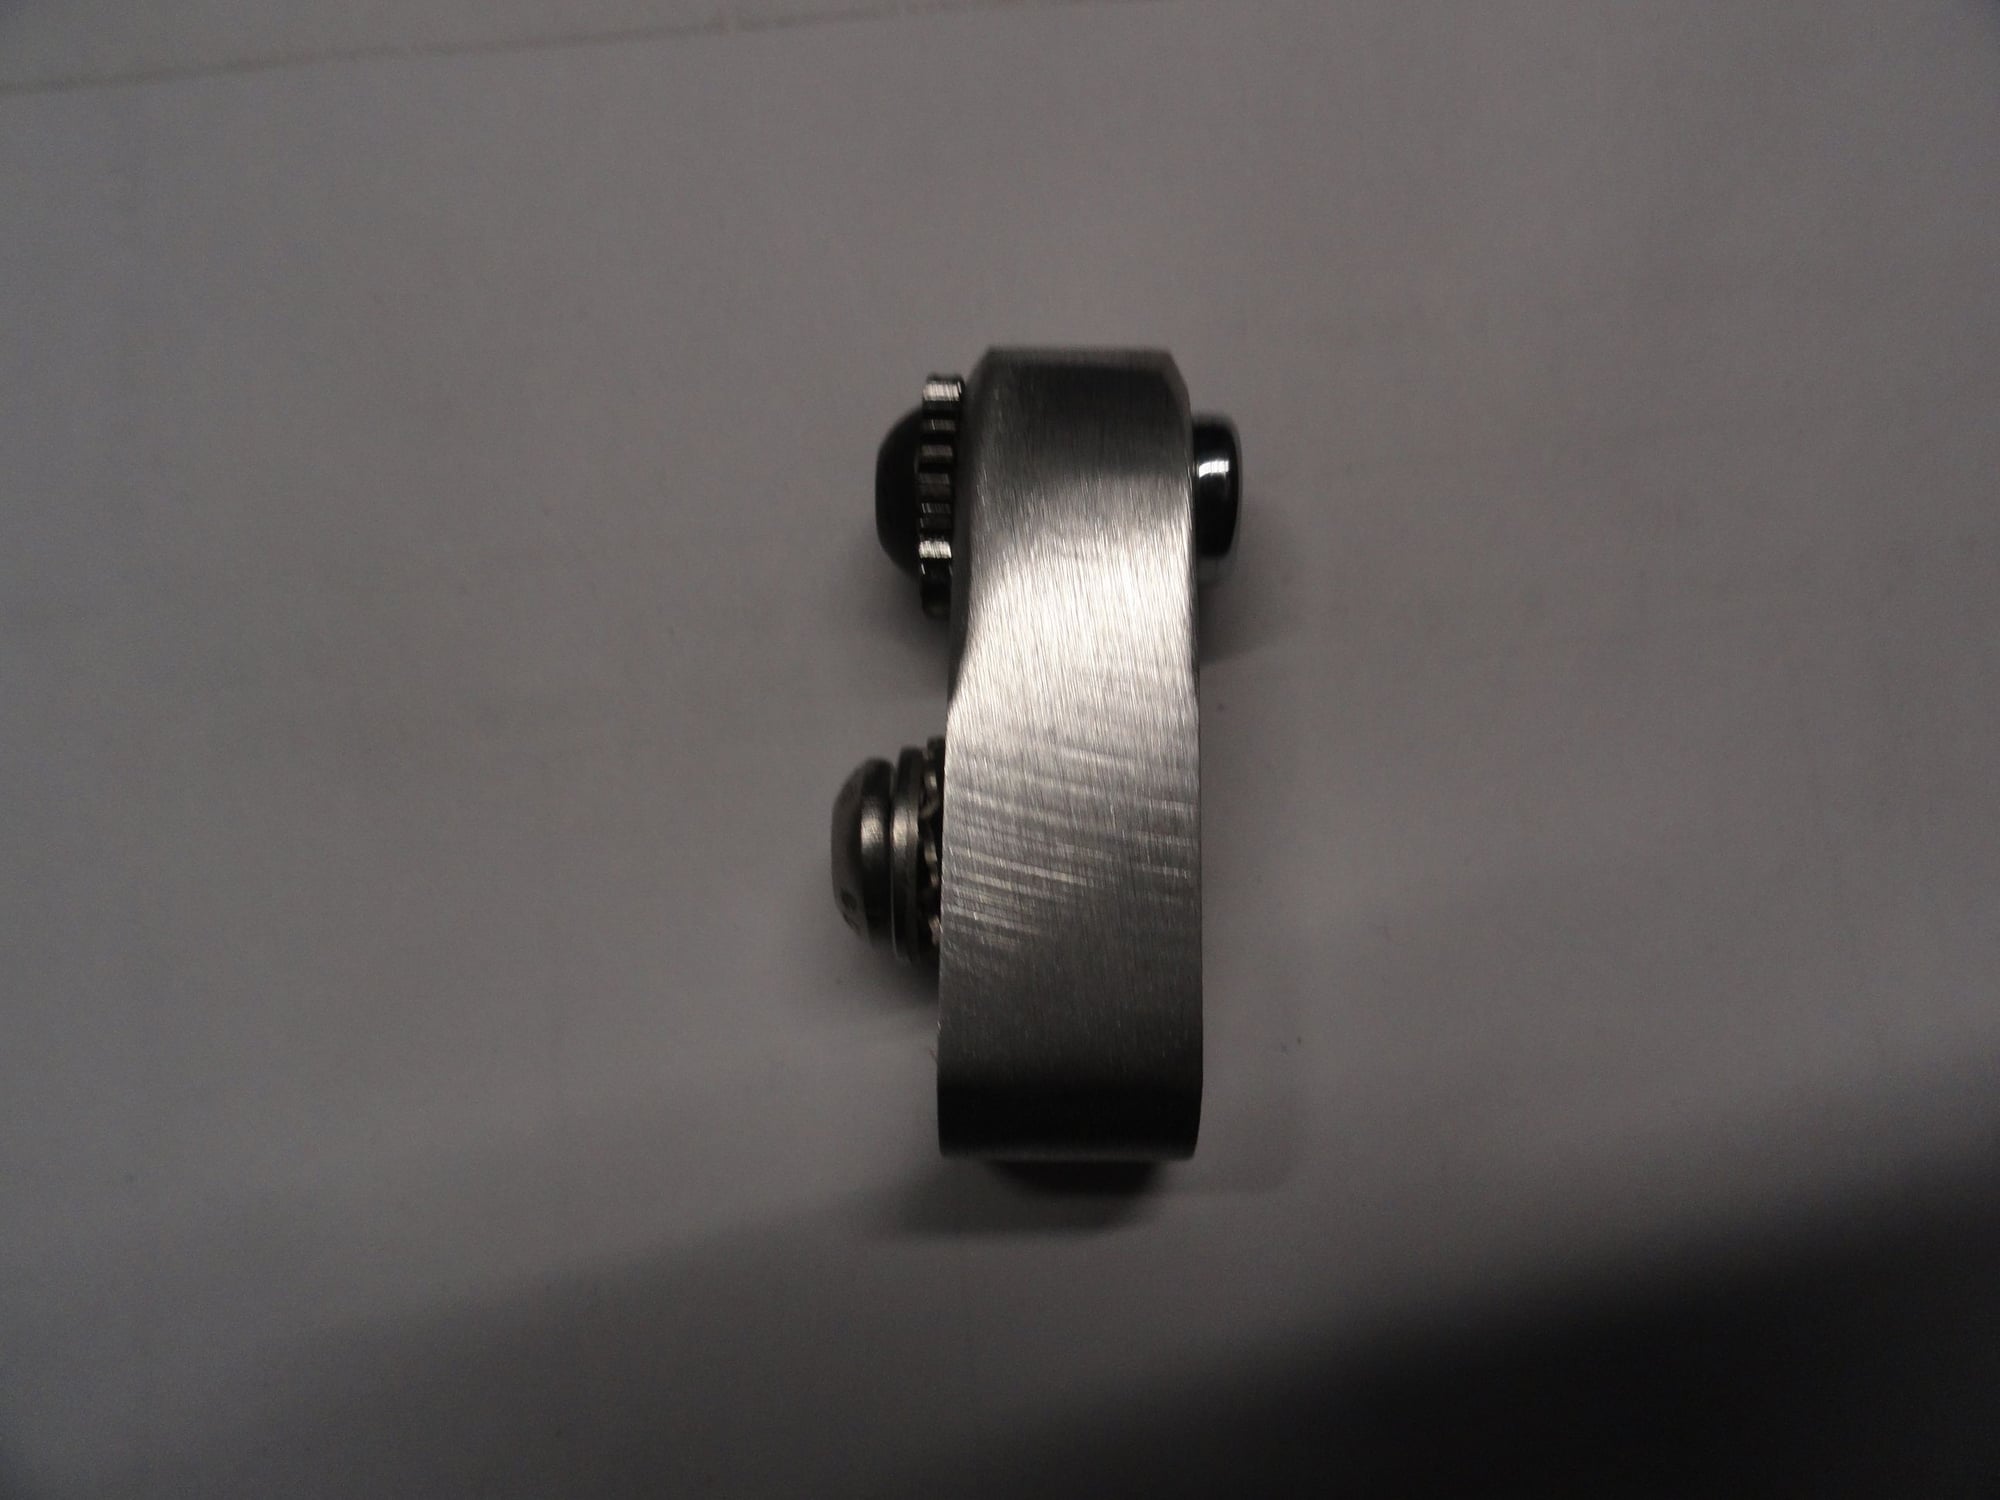
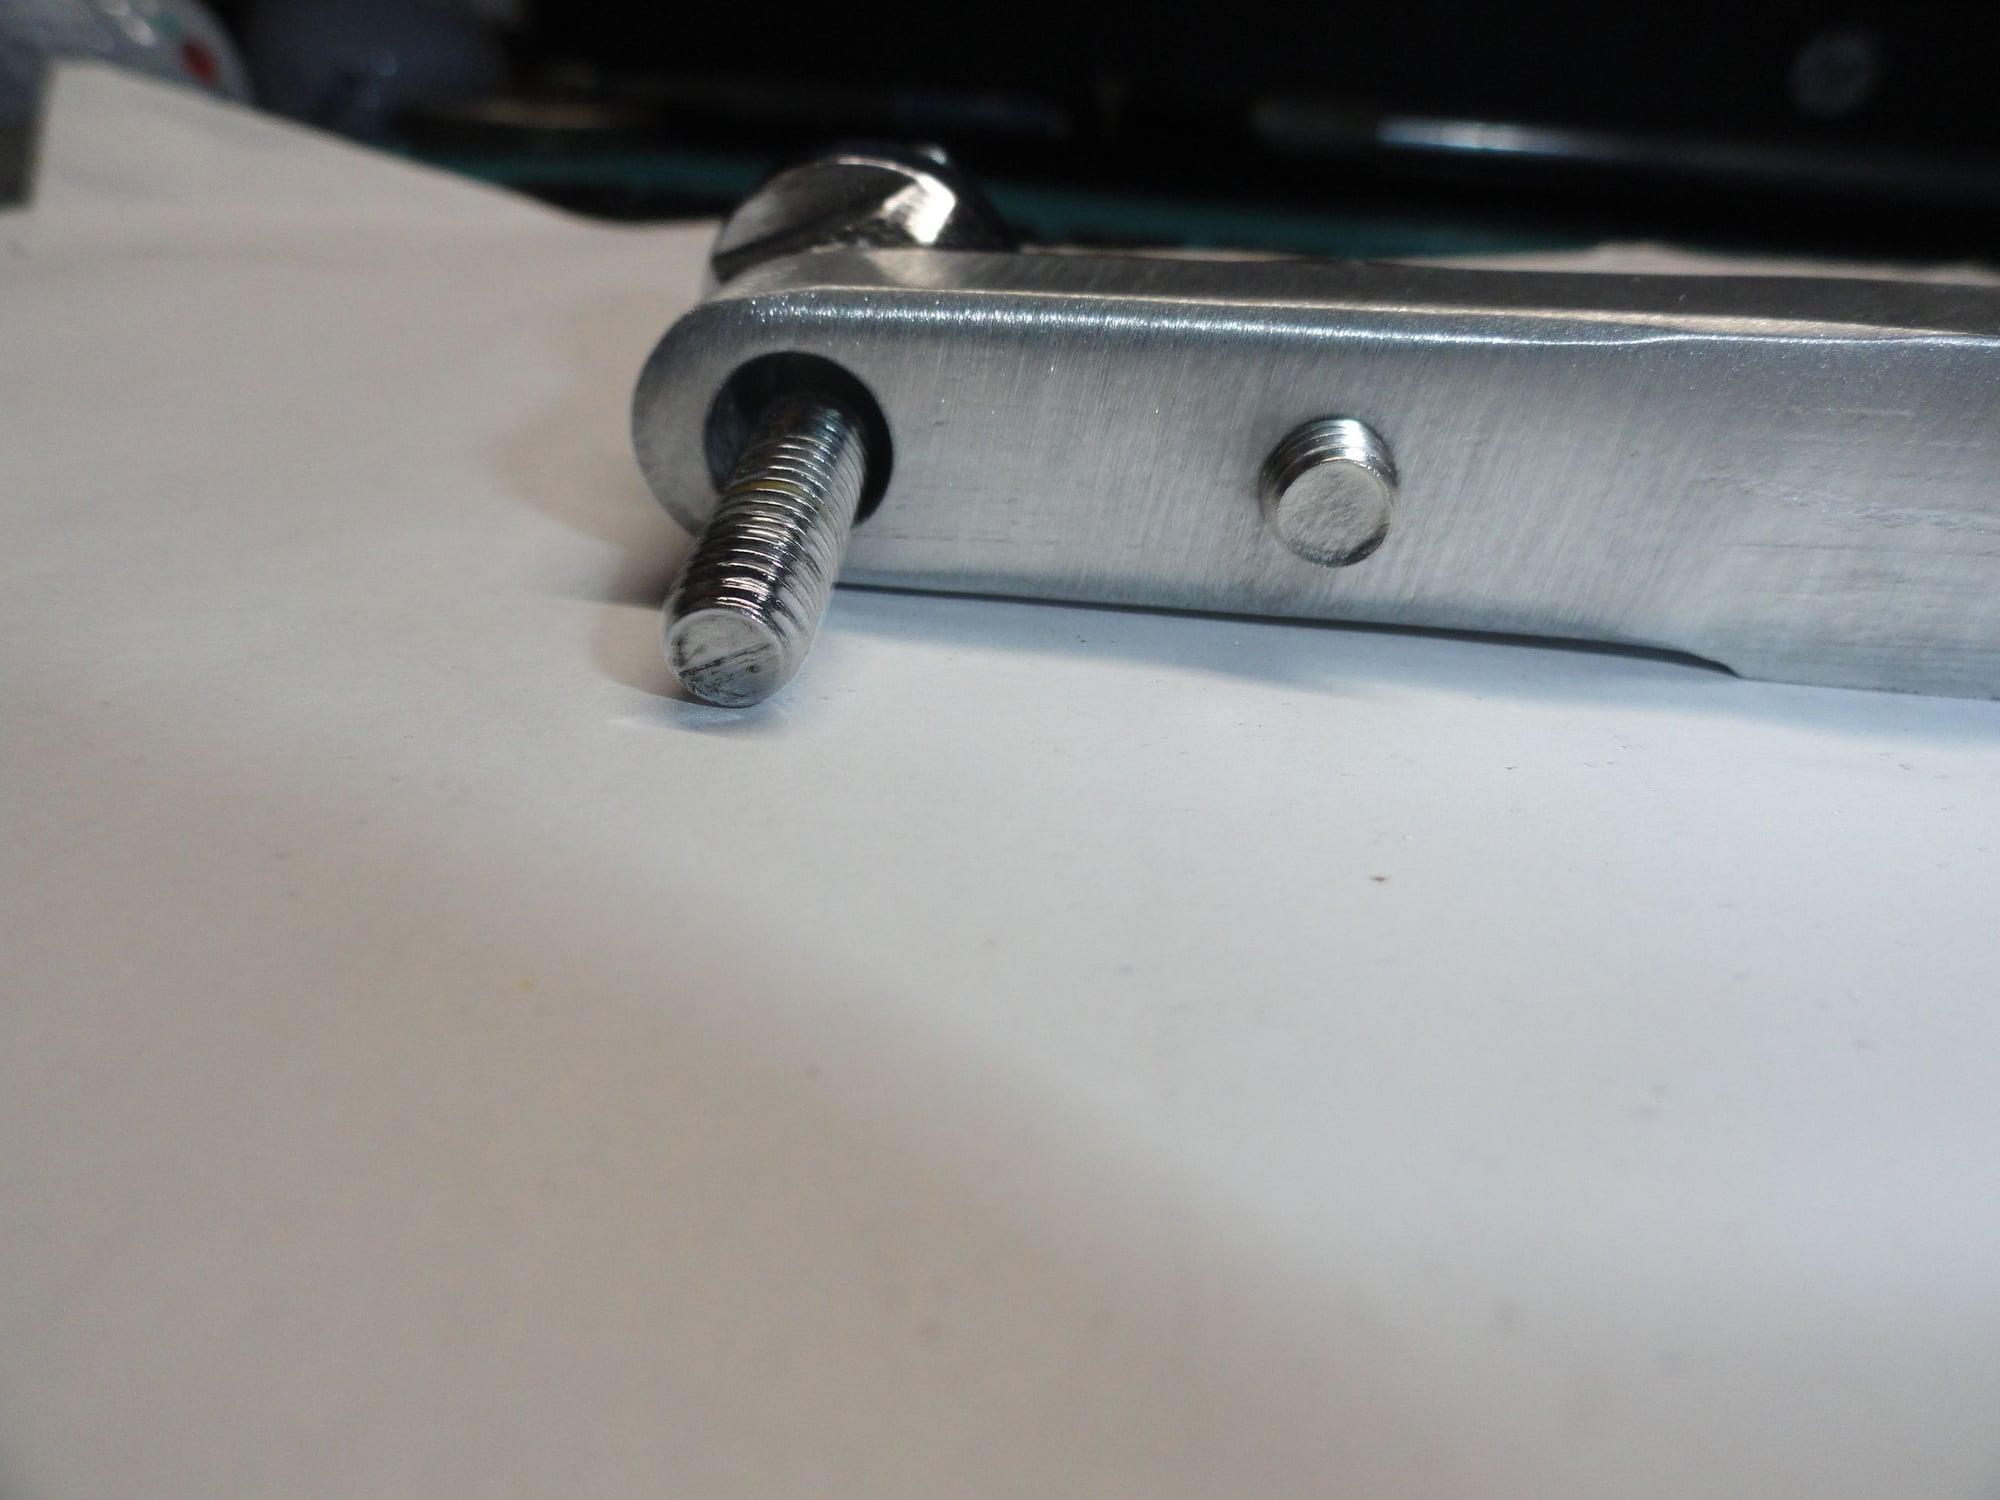
Side view of the extender. There should be more than enough material to hold the bridge stable in the frame.

other side view. Same applies to the material involved.
Top view of the extender with bolts in place.
Bottom view of extended with stainless bolt on left and recessed nut on right.
Side view of the extender. There should be more than enough material to hold the bridge stable in the frame.
other side view. Same applies to the material involved.
Likes For Mad Honk:
03-31-23, 12:23 PM
#559
Senior Member
Join Date: May 2019
Location: Bloomington, IN
Posts: 2,951
Bikes: Paramount, Faggin, Ochsner, Ciocc, Basso
Mentioned: 117 Post(s)
Tagged: 0 Thread(s)
Quoted: 1304 Post(s)
Liked 1,912 Times
in
1,142 Posts
After going back to the pictures of the bridge it appears we may need to remove a bit of the top section of the bridge to allow for the brake bolt to seat properly. The space is kind of small so a bit of small round cut out may be needed for clearance. If so the extender may as well go into a square sided cut out on the lower side. Smiles, MH
03-31-23, 03:10 PM
#560
Edumacator
Join Date: Jan 2018
Location: Goose Creek, SC
Posts: 6,829
Bikes: '87 Crestdale, '87 Basso Gap, '92 Rossin Performance EL-OS, 1990 VanTuyl, 1980s Losa, 1985 Trek 670, 1982 AD SLE, 1987 PX10, etc...
Mentioned: 59 Post(s)
Tagged: 0 Thread(s)
Quoted: 2442 Post(s)
Liked 3,137 Times
in
1,976 Posts
Friday afternoon and the work has begun again. I am skipping doing taxes for a day. This is version one with a drop distance of .8". The Stainless steel bolt will hold this piece in the bridge at the original brake bolt hole. The darker 6 X 1mm bolt is just a placeholder for where the SR brake bolt will attach. The two washers will go under the raised portion of the original bridge. One spacer washer with a star washer to hold the extender in place.
Top view of the extender with bolts in place.
Bottom view of extended with stainless bolt on left and recessed nut on right.
Side view of the extender. There should be more than enough material to hold the bridge stable in the frame.
other side view. Same applies to the material involved.
Top view of the extender with bolts in place.
Bottom view of extended with stainless bolt on left and recessed nut on right.
Side view of the extender. There should be more than enough material to hold the bridge stable in the frame.
other side view. Same applies to the material involved.
__________________
1987 Crest Cannondale, 1987 Basso Gap, 1992 Rossin Performance EL, 1990ish Van Tuyl, 1985 Trek 670, 1982 AD SLE, 2003 Pinarello Surprise, 1990ish MBK Atlantique, 1987 Peugeot Competition, 1987 Nishiki Tri-A, 1981 Faggin, 1996 Cannondale M500, 1984 Mercian, 1982 AD SuperLeicht, 1985 Massi (model unknown), 1988 Daccordi Griffe , 1989 Fauxsin MTB, 1981 Ciocc Mockba, 1992 Bianchi Giro, 1977 Colnago Super
1987 Crest Cannondale, 1987 Basso Gap, 1992 Rossin Performance EL, 1990ish Van Tuyl, 1985 Trek 670, 1982 AD SLE, 2003 Pinarello Surprise, 1990ish MBK Atlantique, 1987 Peugeot Competition, 1987 Nishiki Tri-A, 1981 Faggin, 1996 Cannondale M500, 1984 Mercian, 1982 AD SuperLeicht, 1985 Massi (model unknown), 1988 Daccordi Griffe , 1989 Fauxsin MTB, 1981 Ciocc Mockba, 1992 Bianchi Giro, 1977 Colnago Super
Likes For jdawginsc:
03-31-23, 03:51 PM
#561
Senior Member
Join Date: May 2019
Location: Bloomington, IN
Posts: 2,951
Bikes: Paramount, Faggin, Ochsner, Ciocc, Basso
Mentioned: 117 Post(s)
Tagged: 0 Thread(s)
Quoted: 1304 Post(s)
Liked 1,912 Times
in
1,142 Posts
No real work involved today, just fussing around with drop bolt for a Campy SR brake. So I took the bar stock and downsized it a bit side to side. Marked it for a .9" extender and got busy finishing it. Drilling, taping, and more drilling to get the blank correct. Then some rounding of edges and shaping of the metal to get a nice product. I had a longer 6 X 1 mm button head bolt so I added a few washers for spacers if needed to fill the void in the Huffy bridge. A square cut out will still be needed but this one is a bit smaller in side dimensions, but the height needed to be the same for the depth of the recessed nut. It will be possible to add a few washers in the brake pivot bolt to raise the caliper to the height of the original bridge but should not be necessary. I am going to cut this one off after I hear from AMCO about the possible need to brace the bar against the end of the bridge. Pics of Version 2:
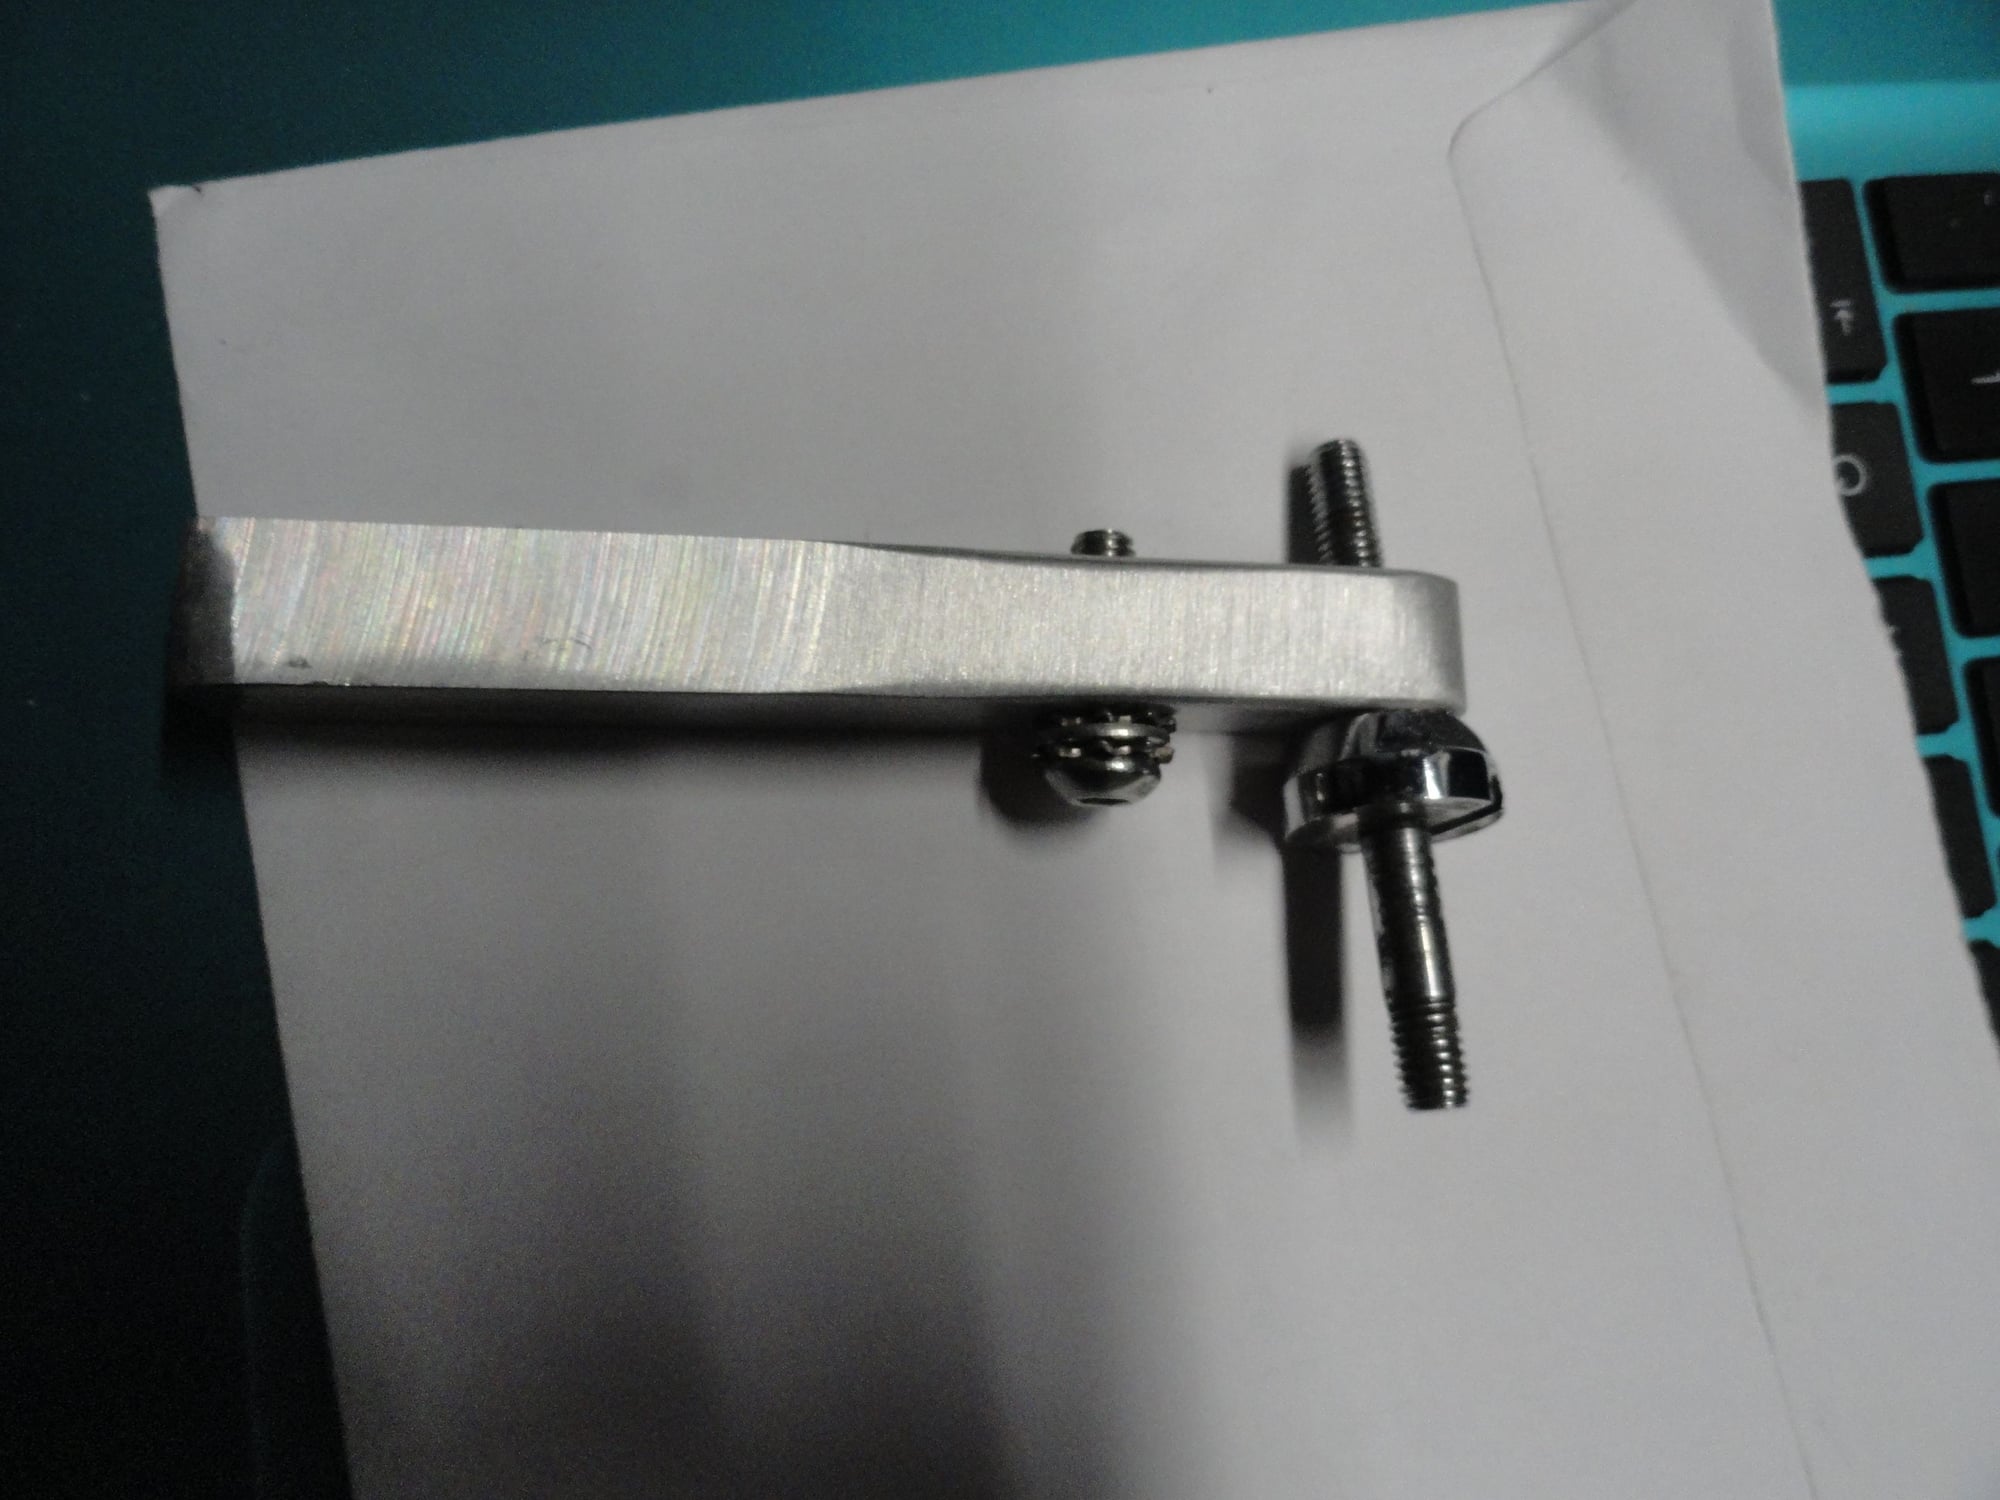
Side view of v2 with longer attaching bolt and brake pivot in place
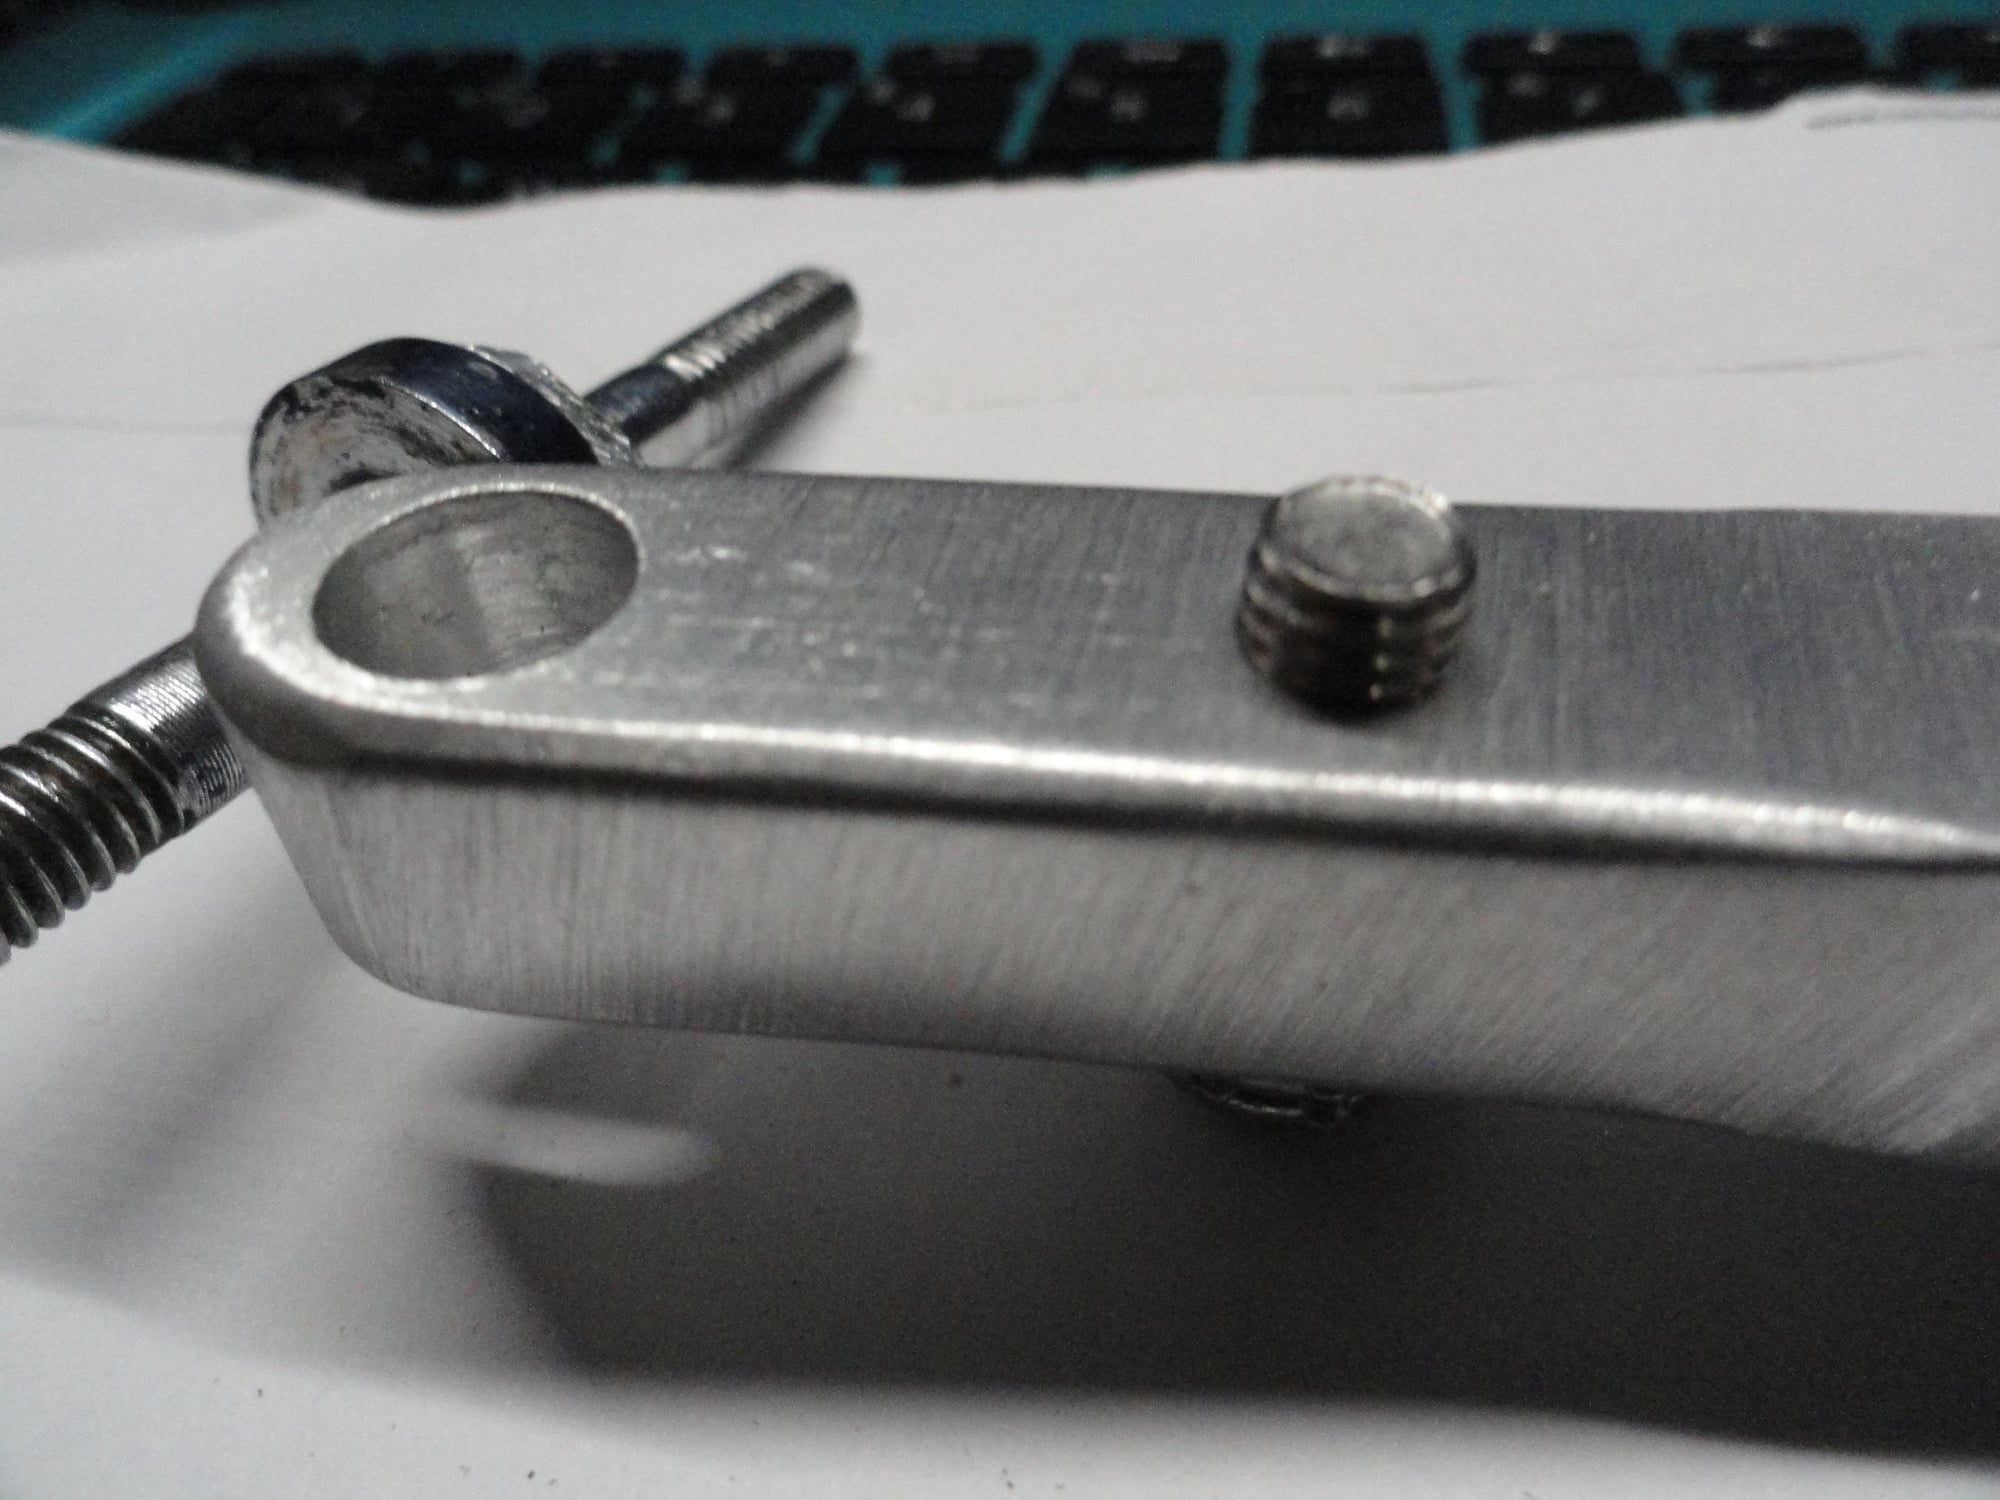
Hole drilled for the recessed nut, and satin finish to the aluminum piece.
The look from the top of the extender. Spacing is .9" from C to C.
Room for the pivot bolt but just barely enough to hold the backing plate tight to the extender.
AMCO, gimme a call so I can finish these and get them in the mail. Kurt, Looks like there will be enough left over for that drop bolt you asked for. Lemme know. Smiles, MH
Side view of v2 with longer attaching bolt and brake pivot in place
Hole drilled for the recessed nut, and satin finish to the aluminum piece.
The look from the top of the extender. Spacing is .9" from C to C.
Room for the pivot bolt but just barely enough to hold the backing plate tight to the extender.
AMCO, gimme a call so I can finish these and get them in the mail. Kurt, Looks like there will be enough left over for that drop bolt you asked for. Lemme know. Smiles, MH
03-31-23, 04:31 PM
#562
The Huffmeister
Thread Starter
Join Date: Jul 2008
Location: The Le Grande HQ
Posts: 2,741
Bikes: '79 Trek 938, '86 Jim Merz Allez SE, '90 Miyata 1000, '68 PX-10, '80 PXN-10, '73 Super Course, '87 Guerciotti, '83 Trek 600, '80 Huffy Le Grande
Mentioned: 45 Post(s)
Tagged: 0 Thread(s)
Quoted: 1227 Post(s)
Liked 3,561 Times
in
1,412 Posts
Don’t think that the rectangular hole would reduce the bridge stiffness enough to worry about as the shape, thickness and width are probably adequate.
How about having the thinner section towards the top to attach to the bridge with the thicker portion for the caliper? No shim or washer for the center bolt might be possible?
The thinner section should be stiff enough if the thick section is butted up against the bridge as it will be clamped to the bridge which minimizes flexing.
Whichever way you go with it make sure that you have a smooth as possible small radius at the inside corner to avoid creating any stress risers.
The hole through the bridge should also have rounded edges so it will not molest the aluminum.
Re: Photo of fork with wheel. Is the brake bolt hole aligned and centered? Aging mind along with degrading eyesight is not an always reliable combination.
How about having the thinner section towards the top to attach to the bridge with the thicker portion for the caliper? No shim or washer for the center bolt might be possible?
The thinner section should be stiff enough if the thick section is butted up against the bridge as it will be clamped to the bridge which minimizes flexing.
Whichever way you go with it make sure that you have a smooth as possible small radius at the inside corner to avoid creating any stress risers.
The hole through the bridge should also have rounded edges so it will not molest the aluminum.
Re: Photo of fork with wheel. Is the brake bolt hole aligned and centered? Aging mind along with degrading eyesight is not an always reliable combination.
Oh, and your eyesight is not failing you this time around lol
That hole is very much off-center. I'm chalking it up to a simple matter of 'disgruntled worker sabotage from working too many weekends' syndrome
 03-31-23, 04:33 PM
#563
The Huffmeister
Thread Starter
Join Date: Jul 2008
Location: The Le Grande HQ
Posts: 2,741
Bikes: '79 Trek 938, '86 Jim Merz Allez SE, '90 Miyata 1000, '68 PX-10, '80 PXN-10, '73 Super Course, '87 Guerciotti, '83 Trek 600, '80 Huffy Le Grande
Mentioned: 45 Post(s)
Tagged: 0 Thread(s)
Quoted: 1227 Post(s)
Liked 3,561 Times
in
1,412 Posts
No real work involved today, just fussing around with drop bolt for a Campy SR brake. So I took the bar stock and downsized it a bit side to side. Marked it for a .9" extender and got busy finishing it. Drilling, taping, and more drilling to get the blank correct. Then some rounding of edges and shaping of the metal to get a nice product. I had a longer 6 X 1 mm button head bolt so I added a few washers for spacers if needed to fill the void in the Huffy bridge. A square cut out will still be needed but this one is a bit smaller in side dimensions, but the height needed to be the same for the depth of the recessed nut. It will be possible to add a few washers in the brake pivot bolt to raise the caliper to the height of the original bridge but should not be necessary. I am going to cut this one off after I hear from AMCO about the possible need to brace the bar against the end of the bridge. Pics of Version 2:
Side view of v2 with longer attaching bolt and brake pivot in place
Hole drilled for the recessed nut, and satin finish to the aluminum piece.
The look from the top of the extender. Spacing is .9" from C to C.
Room for the pivot bolt but just barely enough to hold the backing plate tight to the extender.
AMCO, gimme a call so I can finish these and get them in the mail. Kurt, Looks like there will be enough left over for that drop bolt you asked for. Lemme know. Smiles, MH
Can I call this weekend?
03-31-23, 04:35 PM
#564
The Huffmeister
Thread Starter
Join Date: Jul 2008
Location: The Le Grande HQ
Posts: 2,741
Bikes: '79 Trek 938, '86 Jim Merz Allez SE, '90 Miyata 1000, '68 PX-10, '80 PXN-10, '73 Super Course, '87 Guerciotti, '83 Trek 600, '80 Huffy Le Grande
Mentioned: 45 Post(s)
Tagged: 0 Thread(s)
Quoted: 1227 Post(s)
Liked 3,561 Times
in
1,412 Posts
03-31-23, 04:59 PM
#565
The Huffmeister
Thread Starter
Join Date: Jul 2008
Location: The Le Grande HQ
Posts: 2,741
Bikes: '79 Trek 938, '86 Jim Merz Allez SE, '90 Miyata 1000, '68 PX-10, '80 PXN-10, '73 Super Course, '87 Guerciotti, '83 Trek 600, '80 Huffy Le Grande
Mentioned: 45 Post(s)
Tagged: 0 Thread(s)
Quoted: 1227 Post(s)
Liked 3,561 Times
in
1,412 Posts
All geniuses are like that. I hear Mozart had a messy room and toilet humor. If he was alive today, he would ABSOLUTELY have ridden a Huffy...if Huffy was HQ'd in Vienna.
Lol...well, as dumb and extravagant as this project has been, I'm truly genuinely excited to see how the bike changes w/ the Super Record and other high end parts. That's why I rode it 100+ miles, to get a true sense of how it was before any changes were made.
03-31-23, 05:01 PM
#566
The Huffmeister
Thread Starter
Join Date: Jul 2008
Location: The Le Grande HQ
Posts: 2,741
Bikes: '79 Trek 938, '86 Jim Merz Allez SE, '90 Miyata 1000, '68 PX-10, '80 PXN-10, '73 Super Course, '87 Guerciotti, '83 Trek 600, '80 Huffy Le Grande
Mentioned: 45 Post(s)
Tagged: 0 Thread(s)
Quoted: 1227 Post(s)
Liked 3,561 Times
in
1,412 Posts
After going back to the pictures of the bridge it appears we may need to remove a bit of the top section of the bridge to allow for the brake bolt to seat properly. The space is kind of small so a bit of small round cut out may be needed for clearance. If so the extender may as well go into a square sided cut out on the lower side. Smiles, MH
03-31-23, 05:03 PM
#567
The Huffmeister
Thread Starter
Join Date: Jul 2008
Location: The Le Grande HQ
Posts: 2,741
Bikes: '79 Trek 938, '86 Jim Merz Allez SE, '90 Miyata 1000, '68 PX-10, '80 PXN-10, '73 Super Course, '87 Guerciotti, '83 Trek 600, '80 Huffy Le Grande
Mentioned: 45 Post(s)
Tagged: 0 Thread(s)
Quoted: 1227 Post(s)
Liked 3,561 Times
in
1,412 Posts
03-31-23, 05:27 PM
#568
Senior Member
Join Date: May 2019
Location: Bloomington, IN
Posts: 2,951
Bikes: Paramount, Faggin, Ochsner, Ciocc, Basso
Mentioned: 117 Post(s)
Tagged: 0 Thread(s)
Quoted: 1304 Post(s)
Liked 1,912 Times
in
1,142 Posts
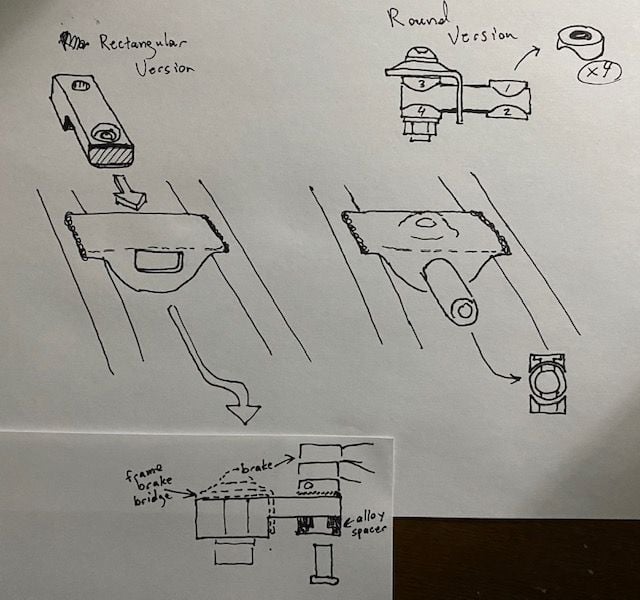
Quick question for ya. I don't mind zipping away metal on the Huffy at all, but removing the stiffing bend for the brake bridge and changing the leverage point by extending the arm for the brakes - I'm not an engineer, but is there any concern for torqueing or flexing the brake bridge too much?
That 90 degree bend...its pretty tall, and it already has a small hole in it (for a fender bolt?) ...I wonder what the possibility of enlarging that hole and having that extender in the shape of a circular rod and extending it through that hole to get the benefit of the stiffener brace? Or perhaps keep the squarish shape, but reduce the thickness right before the end of the bridge, and slide it through the stiffener brace after cutting a rectangular hole in it? Just thinking out loud.
Edit: Not great with words so here is what was in my head, drawn out:
This would allow the adapter to have the benefit of no side-to-side sway (which was the original intent of the cutout, to keep it locked in place) but allows the down bend of the bridge to cradle the adapter as well to gain a better leverage point and stiffen the whole thing up. Only detractor is I'm not sure you could get the entire thickness of the adapter as-is. You'd have to thin the adapter down a bit on that end and then use a spacer to gain back the original height of the recessed brake bolt, which still could be easily done, and even recess a small lip for a spacer to set down in so it doesn't wander.
Sorry I'm complicating things I'll go to bed now
That 90 degree bend...its pretty tall, and it already has a small hole in it (for a fender bolt?) ...I wonder what the possibility of enlarging that hole and having that extender in the shape of a circular rod and extending it through that hole to get the benefit of the stiffener brace? Or perhaps keep the squarish shape, but reduce the thickness right before the end of the bridge, and slide it through the stiffener brace after cutting a rectangular hole in it? Just thinking out loud.
Edit: Not great with words so here is what was in my head, drawn out:
This would allow the adapter to have the benefit of no side-to-side sway (which was the original intent of the cutout, to keep it locked in place) but allows the down bend of the bridge to cradle the adapter as well to gain a better leverage point and stiffen the whole thing up. Only detractor is I'm not sure you could get the entire thickness of the adapter as-is. You'd have to thin the adapter down a bit on that end and then use a spacer to gain back the original height of the recessed brake bolt, which still could be easily done, and even recess a small lip for a spacer to set down in so it doesn't wander.
Sorry I'm complicating things I'll go to bed now
03-31-23, 08:02 PM
#569
The Huffmeister
Thread Starter
Join Date: Jul 2008
Location: The Le Grande HQ
Posts: 2,741
Bikes: '79 Trek 938, '86 Jim Merz Allez SE, '90 Miyata 1000, '68 PX-10, '80 PXN-10, '73 Super Course, '87 Guerciotti, '83 Trek 600, '80 Huffy Le Grande
Mentioned: 45 Post(s)
Tagged: 0 Thread(s)
Quoted: 1227 Post(s)
Liked 3,561 Times
in
1,412 Posts
I am having second thoughts about this design change. If the aluminum block is thinned out it might be subject to a break in the thinned portion making the extender a more dangerous part. I honestly think that the extra metal in the aluminum block will actually enhance the original brake bridge stability. The larger block of metal will act as a bigger bit of metal holding the brake in place therefore more stable. Just my thoughts. Smiles, MH
I think what your saying is important (to keep it thick enough), but also reap the advantage of utilizing the strength of the bridge reinforcement tab.
I'm happy to not make any decisions until I have the part in hand and can take a look see at it. Having things in the flesh have a way of chaning the perspective.
Thank you for all your hard work!!
03-31-23, 08:03 PM
#570
The Huffmeister
Thread Starter
Join Date: Jul 2008
Location: The Le Grande HQ
Posts: 2,741
Bikes: '79 Trek 938, '86 Jim Merz Allez SE, '90 Miyata 1000, '68 PX-10, '80 PXN-10, '73 Super Course, '87 Guerciotti, '83 Trek 600, '80 Huffy Le Grande
Mentioned: 45 Post(s)
Tagged: 0 Thread(s)
Quoted: 1227 Post(s)
Liked 3,561 Times
in
1,412 Posts
So, Huff-fam,
Shall we attach our first permanent bit of 'Brev. Campagnolo' to the bike tonight for all the naysayers?
Shall we attach our first permanent bit of 'Brev. Campagnolo' to the bike tonight for all the naysayers?
Last edited by AdventureManCO; 03-31-23 at 08:09 PM.
03-31-23, 08:51 PM
#571
Full Member

Join Date: Sep 2020
Location: Sacramento, CA
Posts: 401
Bikes: 2017 Sage Skyline, 2015 Co-Motion Periscope Tandem, 2012 Soma Smoothie, 2006 Kona Jake, 1986 Miyata Nine Twelve, 1977 Peugeot UO18c, 1977 Peugeot PRN10, 1974 Allegro Schweitzermeister Model 76, 1972 Hugo Rickert Spezial
Mentioned: 7 Post(s)
Tagged: 0 Thread(s)
Quoted: 116 Post(s)
Liked 601 Times
in
191 Posts
Likes For Sactown_Albert:
03-31-23, 10:00 PM
#572
The Huffmeister
Thread Starter
Join Date: Jul 2008
Location: The Le Grande HQ
Posts: 2,741
Bikes: '79 Trek 938, '86 Jim Merz Allez SE, '90 Miyata 1000, '68 PX-10, '80 PXN-10, '73 Super Course, '87 Guerciotti, '83 Trek 600, '80 Huffy Le Grande
Mentioned: 45 Post(s)
Tagged: 0 Thread(s)
Quoted: 1227 Post(s)
Liked 3,561 Times
in
1,412 Posts
'Imagine'...

Sing along with me. Improved lyrics below...
Imagine Campy on a Huffy
It's easy if you try,
No heavy parts among us
Never a nice frame to buy
Imagine all the people
Collecting Huffys today...yoohoo, hoo hoo
Imagine there's no Italians,
It isnt hard to do,
Nothing to scrimp and save for,
And no French bikes too,
Imagine all the people
Getting bikes for cheap...
Imagine no 3 piece cranks,
I wonder if you can,
No need for speed or status,
A dept bike store clan,
Imagine all the people
Sharing all the gaspipe
You may say I'm a dreamer,
Yep I'm definitely the only one,
I hope some day you'll join me,
And the world will be a heavy one.
Stay tuned folks...there are plans in Frankenstein's laboratory tonight...
Last edited by AdventureManCO; 03-31-23 at 11:01 PM.
03-31-23, 11:32 PM
#573
Junior Member
Yes, Doctor Watson, it seems that the deviant mastermind behind this atrocious scheme has inadvertently revealed his true family lineage!
Likes For stoneageyosh:
04-01-23, 01:13 AM
#574
The Huffmeister
Thread Starter
Join Date: Jul 2008
Location: The Le Grande HQ
Posts: 2,741
Bikes: '79 Trek 938, '86 Jim Merz Allez SE, '90 Miyata 1000, '68 PX-10, '80 PXN-10, '73 Super Course, '87 Guerciotti, '83 Trek 600, '80 Huffy Le Grande
Mentioned: 45 Post(s)
Tagged: 0 Thread(s)
Quoted: 1227 Post(s)
Liked 3,561 Times
in
1,412 Posts
Well well, the Huffente project has suffered its first major setback. I mean, not super major, but definitely less than ideal, one might say.
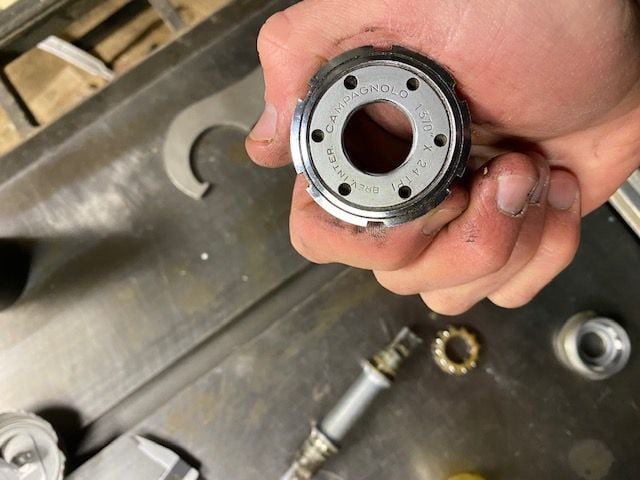
I tried threading the Campy BB cups onto the O.M.A.S. bottom bracket adapter and almost destroyed the adapter. But I'm not entirely sure why, or how.
So, the Campy bottom bracket has steel cups - they look clean. The O.M.A.S. threads are a little jankified, but more towards the inside. I used a toothpick to get down in the threads and make sure everything was clean.
Both the bottom bracket cups and the adapter are 1.370 x 24tpi, and both have it written right on the parts as well, so we know we are compatible.
However, threading on the cups (on both sides) was extraordinarily difficult. I am used to difficult (I mean, I ride a Huffy, hellooooo!), but something was wrong (like riding a Huffy). I first started on the drive side, and it would thread perfectly fine about 3 turns in, and then start binding a bit. I thought maybe there were a few burrs here and then, so I used some anti-seize and went to town. It was only after I was at the threshold of using near all my might to turn that little cup, with that tiny little surface for the BB wrench to grab it, that I thought no, no...no further, something is amiss. Thankfully, the wrench never slipped (whew!)
Now, I know what you and everyone else on the planet is thinking----- c r o s s t h r e a d e d ----- but I'm fairly certain, about 95%, that wasn't the case. The cups looked completely flat and in parallel with the adapter, and we got a few turns of thread-to-thread contact before things started getting tight. I also double checked to make sure that we had the correct cups on the correct sides, since our DS is left-hand threaded, of course.
That being said, I took it about halfway on the DS before I backed off and decided it would be unwise to continue. Sadly, unscrewing it provided the lovely sound of mashing, grinding aluminum and the threads suffered. I should have plenty of bite once I figure out the issue, but for now the project is at a standstill until I can get ahold of a tap and die set in this size to chase these threads. Obviously something was wrong and it needs to be done the right way before continuing. Now, I haven't looked at prices yet of one of these tap and die sets in a 1.370 x24, but they are probably a zillion dollars and hard to find. Good news is that the bb cups being Campy, it gives me some street cred if I need to go somewhere and ask to use someone else's as they will not have to touch anything Huffy (except guilt by association).
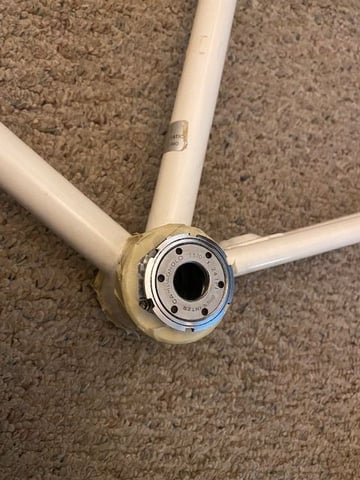
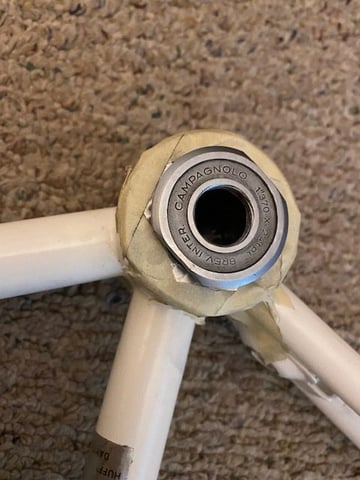
Besides this lame piece of news, I will make another post that will highlight the main success of tonight - the Huffy's bottom bracket, which will really be the star of the show, so it is fitting that it is in a place where nobody will ever see it.
I tried threading the Campy BB cups onto the O.M.A.S. bottom bracket adapter and almost destroyed the adapter. But I'm not entirely sure why, or how.
So, the Campy bottom bracket has steel cups - they look clean. The O.M.A.S. threads are a little jankified, but more towards the inside. I used a toothpick to get down in the threads and make sure everything was clean.
Both the bottom bracket cups and the adapter are 1.370 x 24tpi, and both have it written right on the parts as well, so we know we are compatible.
However, threading on the cups (on both sides) was extraordinarily difficult. I am used to difficult (I mean, I ride a Huffy, hellooooo!), but something was wrong (like riding a Huffy). I first started on the drive side, and it would thread perfectly fine about 3 turns in, and then start binding a bit. I thought maybe there were a few burrs here and then, so I used some anti-seize and went to town. It was only after I was at the threshold of using near all my might to turn that little cup, with that tiny little surface for the BB wrench to grab it, that I thought no, no...no further, something is amiss. Thankfully, the wrench never slipped (whew!)
Now, I know what you and everyone else on the planet is thinking----- c r o s s t h r e a d e d ----- but I'm fairly certain, about 95%, that wasn't the case. The cups looked completely flat and in parallel with the adapter, and we got a few turns of thread-to-thread contact before things started getting tight. I also double checked to make sure that we had the correct cups on the correct sides, since our DS is left-hand threaded, of course.
That being said, I took it about halfway on the DS before I backed off and decided it would be unwise to continue. Sadly, unscrewing it provided the lovely sound of mashing, grinding aluminum and the threads suffered. I should have plenty of bite once I figure out the issue, but for now the project is at a standstill until I can get ahold of a tap and die set in this size to chase these threads. Obviously something was wrong and it needs to be done the right way before continuing. Now, I haven't looked at prices yet of one of these tap and die sets in a 1.370 x24, but they are probably a zillion dollars and hard to find. Good news is that the bb cups being Campy, it gives me some street cred if I need to go somewhere and ask to use someone else's as they will not have to touch anything Huffy (except guilt by association).
Besides this lame piece of news, I will make another post that will highlight the main success of tonight - the Huffy's bottom bracket, which will really be the star of the show, so it is fitting that it is in a place where nobody will ever see it.
Last edited by AdventureManCO; 04-01-23 at 07:18 AM.
04-01-23, 01:26 AM
#575
The Huffmeister
Thread Starter
Join Date: Jul 2008
Location: The Le Grande HQ
Posts: 2,741
Bikes: '79 Trek 938, '86 Jim Merz Allez SE, '90 Miyata 1000, '68 PX-10, '80 PXN-10, '73 Super Course, '87 Guerciotti, '83 Trek 600, '80 Huffy Le Grande
Mentioned: 45 Post(s)
Tagged: 0 Thread(s)
Quoted: 1227 Post(s)
Liked 3,561 Times
in
1,412 Posts
yaaaay Campy stuff
This side is almost impossible turn when it gets tight...which it did
Something is not right...
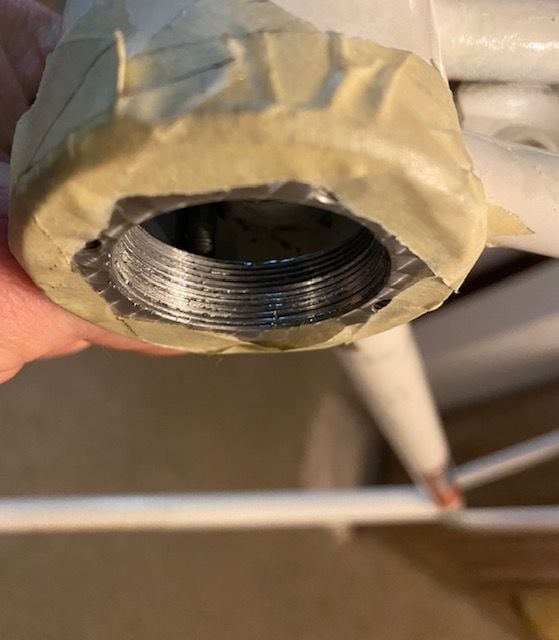
Don't worry, it looks worse in person
Wow, so...ouch.

Time to fine that tap and die and get crackin.
EDIT: lol I'm hosed

This is just ONE side and still doesn't include the tool
EDIT EDIT: Screw that - let me call some bike shops around the area and see if they have the tools and can chase some threads.
Last edited by AdventureManCO; 04-01-23 at 02:02 AM.