


Removing French BB fixed cup
 06-25-21, 03:31 PM
#26
Senior Member
Join Date: Oct 2015
Location: PDX
Posts: 13,047
Bikes: Merz x 5 + Specialized Merz Allez x 2, Strawberry/Newlands/DiNucci/Ti x3, Gordon, Fuso/Moulton x2, Bornstein, Paisley,1958-74 Paramounts x3, 3rensho, 74 Moto TC, 73-78 Raleigh Pro's x5, Marinoni x2, 1960 Cinelli SC, 1980 Bianchi SC, PX-10 X 2
Mentioned: 267 Post(s)
Tagged: 0 Thread(s)
Quoted: 4513 Post(s)
Liked 6,388 Times
in
3,673 Posts
In case I muck things up or otherwise cannot continue using the original BB: anyone have any experience with Velo Orange French threaded sealed cartridge? They claim it will work, although their spindle is JIS and my Stronglight crank is ISO. Sheldon Brown offers some advice on making a spindle length adjustment when mixing these standards.
You're not likely to ruin the threads in the BB but the cup may be a different story, I would encourage you to get this sorted, take your time, patience is key.
This is why I came up with my method, do no harm, all these old pieces are not expendable in my view, if extra care is needed to make them live on, so be it.

The JIS/ISO thing is a very moving target and not hard to solve if you have a few spindles to mix and match to get it right. This far down the line, some arm tapers will be stretched to where it doesn't matter, many think it never did as long as the arm goes on a reasonable amount, maybe 60-75%, just spitballen and ymmv.
A trip to the co-op might yield the spindles to work with, I save all that I get for fitting purposes even if they are pitted and unusable.
 06-25-21, 04:17 PM
#27
Senior Member
Join Date: Oct 2015
Location: PDX
Posts: 13,047
Bikes: Merz x 5 + Specialized Merz Allez x 2, Strawberry/Newlands/DiNucci/Ti x3, Gordon, Fuso/Moulton x2, Bornstein, Paisley,1958-74 Paramounts x3, 3rensho, 74 Moto TC, 73-78 Raleigh Pro's x5, Marinoni x2, 1960 Cinelli SC, 1980 Bianchi SC, PX-10 X 2
Mentioned: 267 Post(s)
Tagged: 0 Thread(s)
Quoted: 4513 Post(s)
Liked 6,388 Times
in
3,673 Posts
The first time that I had to deal with a very tight eight-sided fixed cup I wondered why they increased the # of flats, which only serves to increase the local stress where the wrench applies force!, and which increases the tendency for the wrench to slip and round off the corners of the cup.
So I was going to make an eight-sided wrench from 1/8" flat stock.
I also wondered if by chance some standard size of twelve-pointed wrench or socket might just happen to engage the flats/corners really well.
I tried a 1-1/2" socket and got my answer!
I also tried a 1-7/16" size, which would not fit on the cup.
Anyway, this has been my go-to method ever since.
I went down this road a couple of times but didn't find a socket that was tight enough for me to warrant them.
06-25-21, 04:55 PM
#28
Senior Member
Join Date: Mar 2016
Location: GTA
Posts: 51
Bikes: Jack Taylor Tandem, Oscar Egg Routier
Mentioned: 1 Post(s)
Tagged: 0 Thread(s)
Quoted: 21 Post(s)
Likes: 0
Liked 16 Times
in
11 Posts
There were numerous dimensions used on the drive side French bottom brackets. Above and below 36mm. Many were not mm increments so it is best to measure carefully. A Inch+ fractional wrench may be the best fit.
Find the correct size flat wrench. Google will help with that.
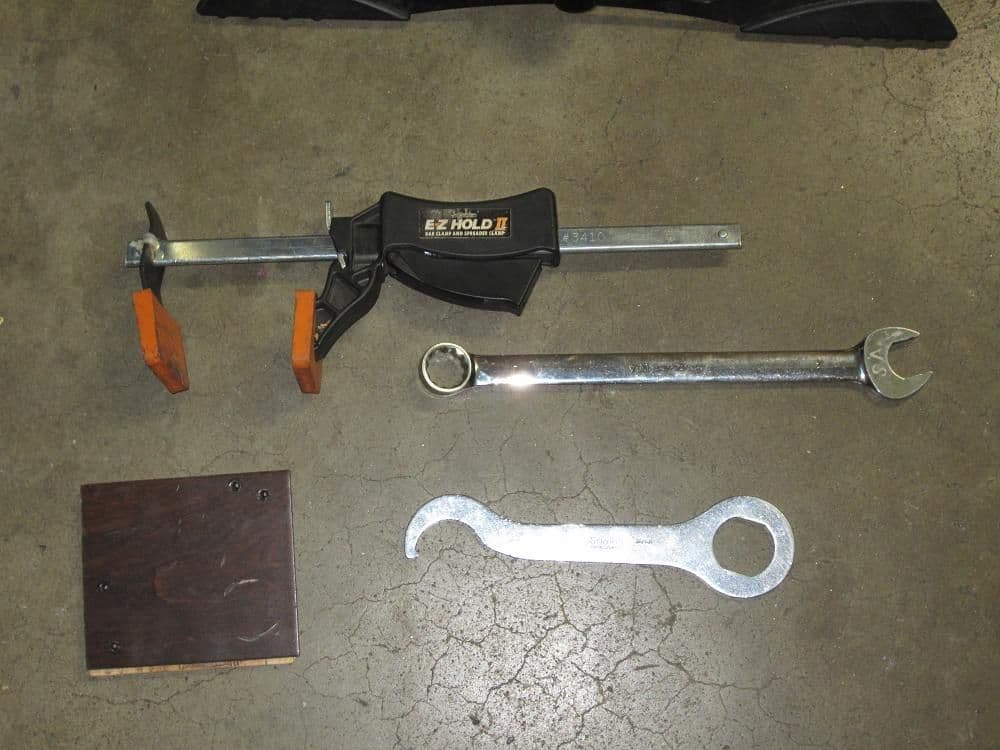
Then follow Merziac's method with the piece of wood or hardwood flooring material and the clamp. I use a similar method and it always works for me.
They will normally be from very tight to extremely tight.
Reid
Find the correct size flat wrench. Google will help with that.
Then follow Merziac's method with the piece of wood or hardwood flooring material and the clamp. I use a similar method and it always works for me.
They will normally be from very tight to extremely tight.
Reid
06-25-21, 05:19 PM
#29

Old fart

Join Date: Nov 2004
Location: Appleton WI
Posts: 24,790
Bikes: Several, mostly not name brands.
Mentioned: 153 Post(s)
Tagged: 0 Thread(s)
Quoted: 3590 Post(s)
Liked 3,401 Times
in
1,935 Posts
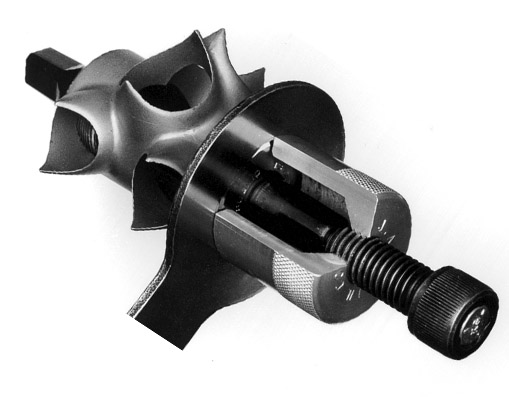
The VAR-30 is the preferred tool for those cups. The jaws are available in several styles; 30/2 is the one that fits those Stronglight cups. Otherwise, the Sheldon Brown bolt method should work once you're determined whether you're dealing with French or Swiss thread.
Likes For JohnDThompson:
06-25-21, 06:48 PM
#30
Senior Member
Join Date: Feb 2020
Posts: 2,820
Mentioned: 49 Post(s)
Tagged: 0 Thread(s)
Quoted: 1106 Post(s)
Likes: 0
Liked 1,328 Times
in
784 Posts
Of course, if you DO have a spanner of the correct size, it's better to use that - secured to the cup; the simplest way is to do that to just use a suitable washer and spacer and hold it on with the bolt/nut on the end of the axle; you can do more cumbersome things with C-clamps and such but the bolt/washer/spacer is really easy to set up - all the bits are held in place by the bolt even when they are loose. Plus they are so small you can keep them in your toolkit (I keep mine bolted through the BB spanner itself; the bolt and nut and extra washers are for cups on cottered axles, where the axle really has to come out before you remove the fixed cup).
But as you are without the correctly-sized spanner no method of holding it on will help; vice it is.
06-25-21, 07:47 PM
#31
Passista
Join Date: Jul 2005
Posts: 7,599
Bikes: 1998 Pinarello Asolo, 1992 KHS Monta�a pro, 1980 Raleigh DL-1, IGH Hybrid, IGH Utility
Mentioned: 5 Post(s)
Tagged: 0 Thread(s)
Quoted: 868 Post(s)
Liked 721 Times
in
396 Posts
The VAR-30 is the preferred tool for those cups. The jaws are available in several styles; 30/2 is the one that fits those Stronglight cups. Otherwise, the Sheldon Brown bolt method should work once you're determined whether you're dealing with French or Swiss thread.
06-25-21, 08:44 PM
#32
Full Member
I recently had to install a TA fixed cup, it is 38mm with 8 flats. I picked up a new Milwaukee 12” adjustable spanner, it wasn’t too expensive. The engagement with the cup was very good as the jaw joints are new and snug and I feel confident with the installation. I’ve installed a few dozen bbs over the years and feel this was tightened sufficiently. I am a mechanical engineer and have worked on a variety of machines over the years. Ordinary I would shun adjustable wrenches for this type of work, but in this instance I was good with it. The proper tool(s) would be preferred but I offer this as an option if others aren’t easily available.
It’s good to use some kind of retainer as mentioned to keep the wrench on the cup flats: clamp or threaded rod with nuts or whatever. It’s also helpful to have the bb shell supported right under it and to work the wrench to load against that support.
It’s good to use some kind of retainer as mentioned to keep the wrench on the cup flats: clamp or threaded rod with nuts or whatever. It’s also helpful to have the bb shell supported right under it and to work the wrench to load against that support.
06-25-21, 11:10 PM
#33
Friendship is Magic

Join Date: Nov 2010
Location: Sacramento, CA
Posts: 22,985
Bikes: old ones
Mentioned: 304 Post(s)
Tagged: 0 Thread(s)
Quoted: 26425 Post(s)
Liked 10,381 Times
in
7,209 Posts
Alright maybe this is a dumb question but here goes: Why would a RH thread (as on this BB) unscrew itself on the drive side? It screws in clockwise. You pedal forward clockwise. What am I missing? It seems the potential problem would be on the other side: pedal direction counter-clockwise, BB RH threads unscrew counter-clockwise.
Precession (mechanical)
06-26-21, 12:06 AM
#34
Senior Member
Join Date: Jan 2008
Location: Beaverton, OR
Posts: 14,744
Bikes: Yes
Mentioned: 525 Post(s)
Tagged: 0 Thread(s)
Quoted: 3230 Post(s)
Liked 3,868 Times
in
1,439 Posts
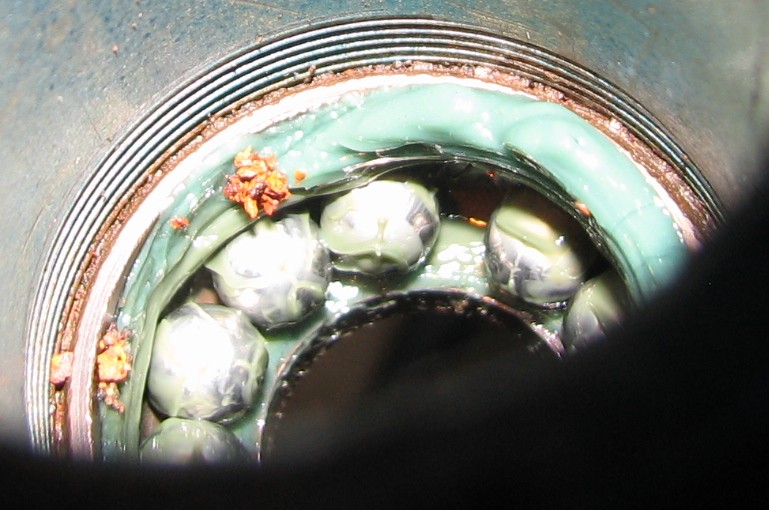
If you take a picture from the non-drive side with the proper lighting, you may be able to see enough threads to judge which way they go. I did this once years ago, but I don�t remember how. It looks like I took it at an angle and used the flash. This one was English threaded. You can see the end of a thread at the 12 o�clock position.
__________________
My Bikes
My Bikes
06-26-21, 12:19 AM
#35
Senior Member
Join Date: Jan 2004
Location: Madison, WI USA
Posts: 6,157
Mentioned: 50 Post(s)
Tagged: 0 Thread(s)
Quoted: 2364 Post(s)
Liked 1,751 Times
in
1,193 Posts
^^^^ Stick a tiny LED flex light in through the drive side,
06-26-21, 04:04 AM
#36
Senior Member
Join Date: Feb 2020
Posts: 2,820
Mentioned: 49 Post(s)
Tagged: 0 Thread(s)
Quoted: 1106 Post(s)
Likes: 0
Liked 1,328 Times
in
784 Posts
Ordinary I would shun adjustable wrenches for this type of work, but in this instance I was good with it. The proper tool(s) would be preferred but I offer this as an option if others aren’t easily available.
It’s good to use some kind of retainer as mentioned to keep the wrench on the cup flats: clamp or threaded rod with nuts or whatever. It’s also helpful to have the bb shell supported right under it and to work the wrench to load against that support.
It’s good to use some kind of retainer as mentioned to keep the wrench on the cup flats: clamp or threaded rod with nuts or whatever. It’s also helpful to have the bb shell supported right under it and to work the wrench to load against that support.
The first is that the sides of the jaws are usually tapered, which means that when you tighten whatever arrangement you have for clamping it to the frame, either the clamping force is offset from the centreline of the axle and the end of the spanner handle is angled outwards, or the jaws do not engage the whole of the flats.
The second is that the spanner is wider that the flats. This means that even if you do have it parallel to the cup face when you exert force on the end of the spanner that force is still offset relative to the centre of the flat.
Either one of these mean that when you DO exert force, it has a component that wants to move the spanner off the cup.
Which leads to the real problem with tight fixed cups. It's not that they are tight, it's that the spanner slips off when you really give it some welly. Proper fixed cup spanners are the same thickness as the cup flats, so when they are clamped correctly to the cup there is no component pushing the spanner off the cup; tight? No trouble, just get a longer lever.
Last edited by oneclick; 06-26-21 at 04:08 AM.
Likes For oneclick:
06-26-21, 06:25 AM
#37
Old fart
Join Date: Nov 2004
Location: Appleton WI
Posts: 24,790
Bikes: Several, mostly not name brands.
Mentioned: 153 Post(s)
Tagged: 0 Thread(s)
Quoted: 3590 Post(s)
Liked 3,401 Times
in
1,935 Posts
 06-26-21, 06:29 AM
#38
Old fart
Join Date: Nov 2004
Location: Appleton WI
Posts: 24,790
Bikes: Several, mostly not name brands.
Mentioned: 153 Post(s)
Tagged: 0 Thread(s)
Quoted: 3590 Post(s)
Liked 3,401 Times
in
1,935 Posts
https://www.steintool.com/portfolio-...-wrench-clamp/
06-26-21, 06:47 AM
#39
Le savonnier

Join Date: Sep 2016
Location: Oregon
Posts: 1,422
Bikes: I can count 'em on one hand
Mentioned: 62 Post(s)
Tagged: 0 Thread(s)
Quoted: 729 Post(s)
Liked 602 Times
in
274 Posts
I have exactly the same issue right now with my PX10: 38mm fixed cup on BB is last part to be removed from frame. Went to Harbor Freight, Home Depot, Ace Hardware, etc. looking for a 38mm wrench. Only one to be found was part of a set for $100 at Harbor Freight. Didn't want to spend $100 for one wrench, especially since I wasn't sure the purchase would be good enough with thick wrench on narrow flats.
In my case, I will be replacing the BB with the Velo Orange French BB, so I'm not really concerned with damaging it, although I'd rather not. Bigger concern is that I'm a horrible, impatient mechanic with only basic tools and no vice for some of the methods described here. It's enough to shake my love of French bikes and buy something reasonable, standard, and predictable; you know, things the Japanese excel at.
The VAR-30 tool that JohnDThompson mentions makes sense: the right tool for the job. Appeals to my somewhat OCD nature when it comes to these matters. Everything else is a hack. I can't believe no one else has created a simple solution for this, but then again, the market for repair/restoration of vintage French bikes is probably too small. Does this Stein Tool do the job?
EDIT: JohnDThompson answered my question.
06-26-21, 07:14 AM
#40

Disraeli Gears

This is what I meant by taking a photo to determine the thread direction. Andy_K , I presume we're looking at a left-hand threaded (French or Italian) EDIT: (English or Swiss!) fixed cup, since it appears to unscrew clockwise from the exterior?
If you take a picture from the non-drive side with the proper lighting, you may be able to see enough threads to judge which way they go. I did this once years ago, but I don’t remember how. It looks like I took it at an angle and used the flash. This one was English threaded. You can see the end of a thread at the 12 o’clock position.

Last edited by Charles Wahl; 06-27-21 at 09:21 AM.
06-26-21, 07:25 AM
#41
Senior Member

Join Date: Apr 2012
Location: Middle Earth (aka IA)
Posts: 20,435
Bikes: A bunch of old bikes and a few new ones
Mentioned: 178 Post(s)
Tagged: 0 Thread(s)
Quoted: 5888 Post(s)
Liked 3,471 Times
in
2,079 Posts
I have exactly the same issue right now with my PX10: 38mm fixed cup on BB is last part to be removed from frame. Went to Harbor Freight, Home Depot, Ace Hardware, etc. looking for a 38mm wrench. Only one to be found was part of a set for $100 at Harbor Freight. Didn't want to spend $100 for one wrench, especially since I wasn't sure the purchase would be good enough with thick wrench on narrow flats.
In my case, I will be replacing the BB with the Velo Orange French BB, so I'm not really concerned with damaging it, although I'd rather not. Bigger concern is that I'm a horrible, impatient mechanic with only basic tools and no vice for some of the methods described here. It's enough to shake my love of French bikes and buy something reasonable, standard, and predictable; you know, things the Japanese excel at.
The VAR-30 tool that JohnDThompson mentions makes sense: the right tool for the job. Appeals to my somewhat OCD nature when it comes to these matters. Everything else is a hack. I can't believe no one else has created a simple solution for this, but then again, the market for repair/restoration of vintage French bikes is probably too small. Does this Stein Tool do the job?
EDIT: JohnDThompson answered my question.
In my case, I will be replacing the BB with the Velo Orange French BB, so I'm not really concerned with damaging it, although I'd rather not. Bigger concern is that I'm a horrible, impatient mechanic with only basic tools and no vice for some of the methods described here. It's enough to shake my love of French bikes and buy something reasonable, standard, and predictable; you know, things the Japanese excel at.
The VAR-30 tool that JohnDThompson mentions makes sense: the right tool for the job. Appeals to my somewhat OCD nature when it comes to these matters. Everything else is a hack. I can't believe no one else has created a simple solution for this, but then again, the market for repair/restoration of vintage French bikes is probably too small. Does this Stein Tool do the job?
EDIT: JohnDThompson answered my question.
By the way, I have a 70s era Mercier 300 in the build queue. It came to me with a VO bottom bracket and a stronglight 99 crank. The two worked well together.
Last edited by bikemig; 06-26-21 at 07:29 AM.
06-26-21, 08:05 AM
#42
Full Member
Two things I like about this spanner over a fixed wrench. First, the fit is a snug line fit with the adjustable wrench to the cup whereas a fixed wrench fit will only be as good as the precision of the wrench and cup flats fabrication and condition. Second, the handle allows applying a good load easier than most fixed wrenches cut from sheet stock.
No question there are better tools than the adjustable I used. My brother has an old VAR or similar tool that I�ve borrowed for other bikes. For this instance I found that the adjustable worked well.
Likes For 73StellaSX76:
06-26-21, 09:01 AM
#43
Senior Member
Thread Starter
The stein tool is great and well worth owning. The problem is the spanner. I've had good luck with a 15 inch crescent which will set you back considerably less than a $100 (post 32). The back up is the Sheldon Brown tool described above (post 5).
By the way, I have a 70s era Mercier 300 in the build queue. It came to me with a VO bottom bracket and a stronglight 99 crank. The two worked well together.
By the way, I have a 70s era Mercier 300 in the build queue. It came to me with a VO bottom bracket and a stronglight 99 crank. The two worked well together.
06-26-21, 09:07 AM
#44
Senior Member
Thread Starter
The stein tool is great and well worth owning. The problem is the spanner. I've had good luck with a 15 inch crescent which will set you back considerably less than a $100 (post 32). The back up is the Sheldon Brown tool described above (post 5).
By the way, I have a 70s era Mercier 300 in the build queue. It came to me with a VO bottom bracket and a stronglight 99 crank. The two worked well together.
By the way, I have a 70s era Mercier 300 in the build queue. It came to me with a VO bottom bracket and a stronglight 99 crank. The two worked well together.

This usually gets a discussion going with the debate about who's method is the best one.
Seems odd to me as I have never had a fixed cup that was not standard size, I have several wrenches but my go to is my Sugino that I have had for 45 years, it never fails me.
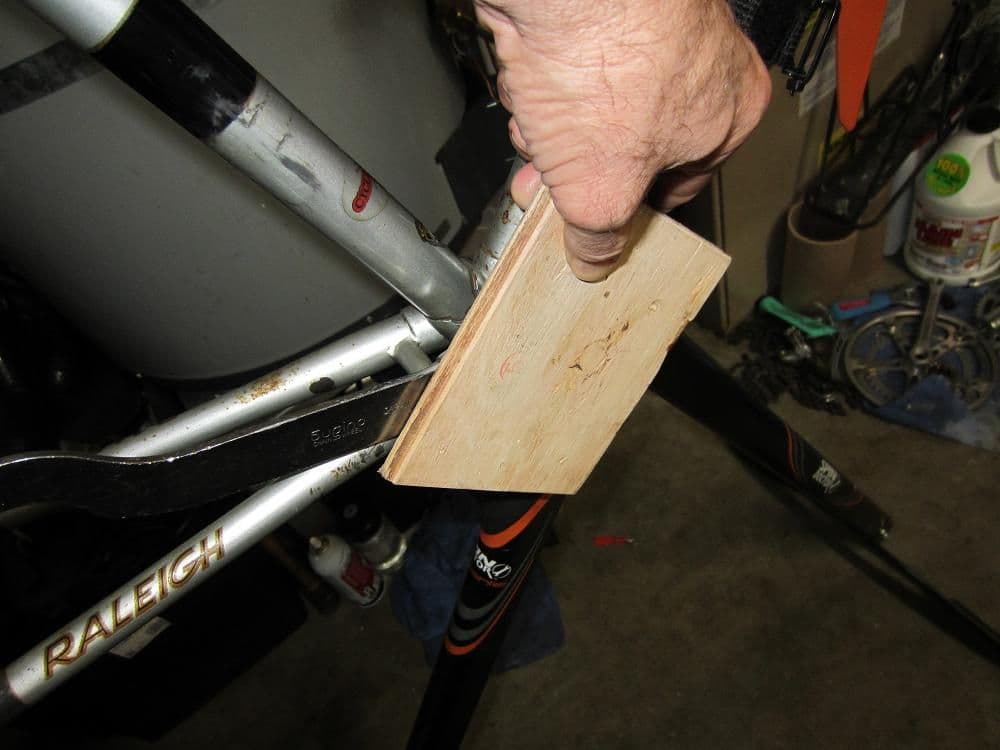
I have a foolproof process that never fails or damages any tools, parts, frames or flesh, period.
It requires a couple of things that are very common aside from a proper wrench.
The direction in the pics is off depending on direction you're going but with this it doesn't matter, if you're going the wrong way it will "crack" loose then you reverse direction and spin it off, easy, peasy.

Likes For TullySteve:
06-26-21, 10:33 AM
#45
Senior Member
Join Date: Oct 2015
Location: PDX
Posts: 13,047
Bikes: Merz x 5 + Specialized Merz Allez x 2, Strawberry/Newlands/DiNucci/Ti x3, Gordon, Fuso/Moulton x2, Bornstein, Paisley,1958-74 Paramounts x3, 3rensho, 74 Moto TC, 73-78 Raleigh Pro's x5, Marinoni x2, 1960 Cinelli SC, 1980 Bianchi SC, PX-10 X 2
Mentioned: 267 Post(s)
Tagged: 0 Thread(s)
Quoted: 4513 Post(s)
Liked 6,388 Times
in
3,673 Posts
Home Depot might have an open end which would be my first choice over a Crescent, Pawn shops or used tool shop would be other places to try also.
Another thing not well shown in the pics is that the BB needs to be well supported when you really have to lean on it, my stand cradles it so it works, you can do it on the floor as well.
Also not shown is a 4ft. thinwall pipe that I use on very stuck cups. Like I said before, I have never failed to get a fixed cup out and just as important, I have never damaged a frame as well.
06-26-21, 11:02 AM
#46
Disraeli Gears
TullySteve: My mid-70s Peugeot PX-10 has what looks to be the same cup as you've pictured, so it's almost certainly a Stronglight, French threaded; but I'd still try to check from the inside of the BB shell, per Andy_K's photo.
Those VAR and Stein tools are fine for a shop, who wants the fastest, most elegant way to deal with such problems -- but they're basically doing the same thing as Sheldon Brown's 5/8" bolt and nut, with smaller washers (even lock washers) inside the cup, and fender washers (large diameter) outside the cup. You can do as St. Sheldon recommends, and tighten the whole array until the cup breaks free (on different sides, internally or externally, for left- and right-hand threading), in which case the biggest problem is if you need to be tightening the bolt head inside, using a socket that will clear the BB shell, as for a right-hand thread (i.e. French or Italian).
Or: you can simply use the Sheldon tool to enforce/maintain a cup wrench's engagement onto the cup flats (as in the Stein example above). If you don't wish to buy a 38 mm wrench, then you could try a really large adjustable ("Crescent") wrench, at least 12", preferably larger. Sandwiching that with the bolt and washers should maintain purchase. Unfortunately, an adjustable wrench doesn't have the hook opposite the business end, so you can't extend the lever arm using @merziac 's employment of a suitably robust (Snap-On!?) combination wrench as a "cheater" bar -- but you can use a pipe over the adjustable wrench handle (though not recommended by tool manufacturers for such a wrench). I have had success whanging on the end of the cup wrench with a suitably large rubber mallet to prevail in loosening the cup; though I've only done it with right-hand thread cups, probably not tightened as much as many French and Italian ones are, and only with one of the narrow flat "bike-specific" 36 mm types -- YMMV.
Two suggestions:
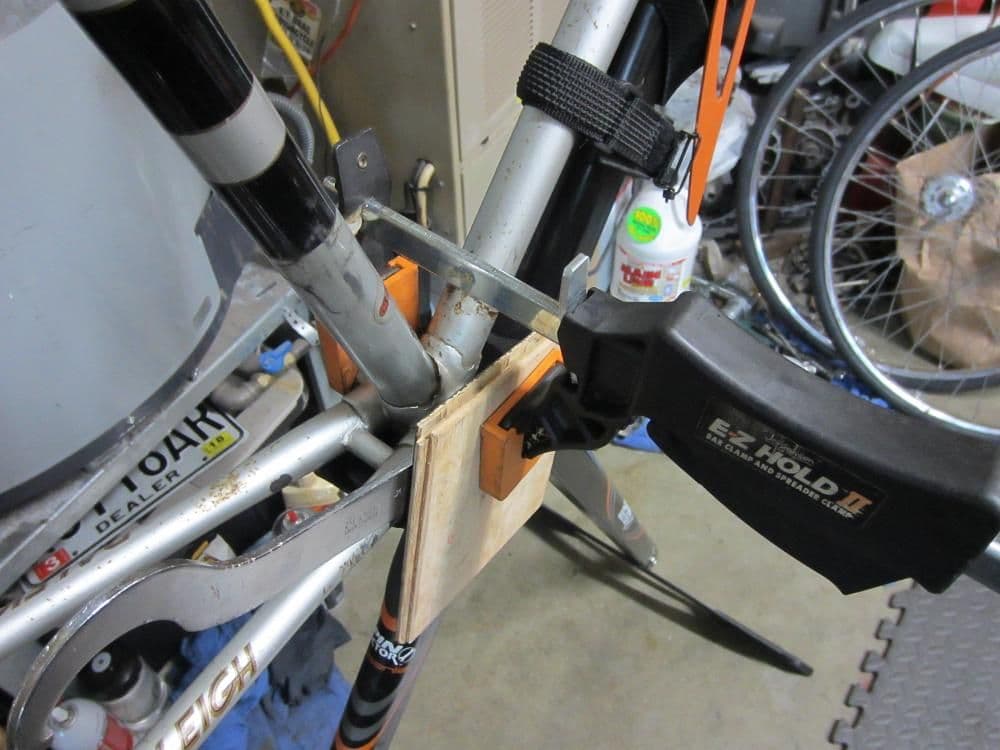
1. It's important to do this with the BB shell firmly supported, and the rest of the frame not unduly stressed. As you can see in merziac's example, he has the frame lashed to a sturdy tube, and is using the down tube as the bike-side "lever" that's maintaining the BB shell in a fixed position, to take the torque of removal. His example is a left-hand thread Raleigh, so what's shown with the cheater in place is apparently "tightening" configuration, while the last photo would be "removal" mode.
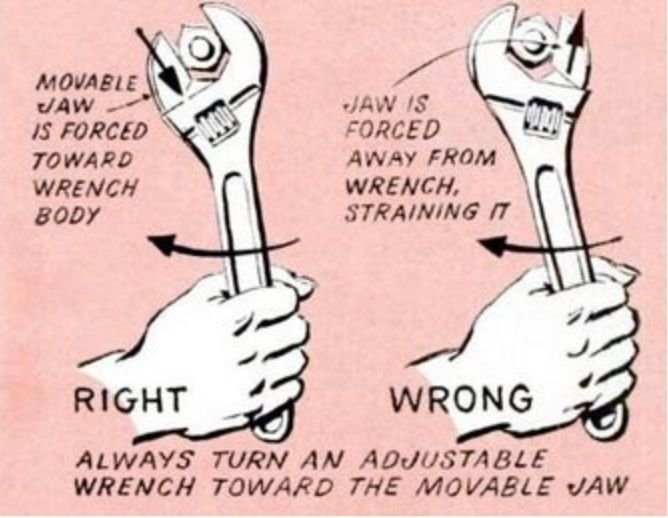
2. If using an adjustable wrench, there is a "correct" way to orient it, so as not to load the moving jaw (the weakest part) so that it's being pulled out of the wrench body: always apply force "against" the edge of the handle on the fixed jaw's side:
I hope that helps.
Those VAR and Stein tools are fine for a shop, who wants the fastest, most elegant way to deal with such problems -- but they're basically doing the same thing as Sheldon Brown's 5/8" bolt and nut, with smaller washers (even lock washers) inside the cup, and fender washers (large diameter) outside the cup. You can do as St. Sheldon recommends, and tighten the whole array until the cup breaks free (on different sides, internally or externally, for left- and right-hand threading), in which case the biggest problem is if you need to be tightening the bolt head inside, using a socket that will clear the BB shell, as for a right-hand thread (i.e. French or Italian).
Or: you can simply use the Sheldon tool to enforce/maintain a cup wrench's engagement onto the cup flats (as in the Stein example above). If you don't wish to buy a 38 mm wrench, then you could try a really large adjustable ("Crescent") wrench, at least 12", preferably larger. Sandwiching that with the bolt and washers should maintain purchase. Unfortunately, an adjustable wrench doesn't have the hook opposite the business end, so you can't extend the lever arm using @merziac 's employment of a suitably robust (Snap-On!?) combination wrench as a "cheater" bar -- but you can use a pipe over the adjustable wrench handle (though not recommended by tool manufacturers for such a wrench). I have had success whanging on the end of the cup wrench with a suitably large rubber mallet to prevail in loosening the cup; though I've only done it with right-hand thread cups, probably not tightened as much as many French and Italian ones are, and only with one of the narrow flat "bike-specific" 36 mm types -- YMMV.
Two suggestions:
1. It's important to do this with the BB shell firmly supported, and the rest of the frame not unduly stressed. As you can see in merziac's example, he has the frame lashed to a sturdy tube, and is using the down tube as the bike-side "lever" that's maintaining the BB shell in a fixed position, to take the torque of removal. His example is a left-hand thread Raleigh, so what's shown with the cheater in place is apparently "tightening" configuration, while the last photo would be "removal" mode.
2. If using an adjustable wrench, there is a "correct" way to orient it, so as not to load the moving jaw (the weakest part) so that it's being pulled out of the wrench body: always apply force "against" the edge of the handle on the fixed jaw's side:
I hope that helps.
Last edited by Charles Wahl; 06-26-21 at 11:07 AM.
Likes For Charles Wahl:
06-26-21, 11:23 AM
#47
Le savonnier
Join Date: Sep 2016
Location: Oregon
Posts: 1,422
Bikes: I can count 'em on one hand
Mentioned: 62 Post(s)
Tagged: 0 Thread(s)
Quoted: 729 Post(s)
Liked 602 Times
in
274 Posts
06-26-21, 12:53 PM
#48
Senior Member
Join Date: Apr 2012
Location: Middle Earth (aka IA)
Posts: 20,435
Bikes: A bunch of old bikes and a few new ones
Mentioned: 178 Post(s)
Tagged: 0 Thread(s)
Quoted: 5888 Post(s)
Liked 3,471 Times
in
2,079 Posts
That's exactly the setup I will be using after the fixed cup is off: VO bottom bracket with Stronglight 99 (so I can achieve a compact double) to replace the Stronglight 93. Do you know if your spindle is 118mm or 120mm? Based on what @verktyg said here, when I order the VO BB, I'm going with 120mm to replace the 118mm original.
 . I didn't set this up. It worked for the PO of the bike though. I dunno if I'd trust it though.
06-26-21, 01:01 PM
. I didn't set this up. It worked for the PO of the bike though. I dunno if I'd trust it though.
06-26-21, 01:01 PM
#49
Senior Member
Join Date: Oct 2015
Location: PDX
Posts: 13,047
Bikes: Merz x 5 + Specialized Merz Allez x 2, Strawberry/Newlands/DiNucci/Ti x3, Gordon, Fuso/Moulton x2, Bornstein, Paisley,1958-74 Paramounts x3, 3rensho, 74 Moto TC, 73-78 Raleigh Pro's x5, Marinoni x2, 1960 Cinelli SC, 1980 Bianchi SC, PX-10 X 2
Mentioned: 267 Post(s)
Tagged: 0 Thread(s)
Quoted: 4513 Post(s)
Liked 6,388 Times
in
3,673 Posts
@Charles Wahl
The pics are just for setup, yep, Snap-on, mainly have their wrenches and sockets, not cheap as we know but well worth their weight when push comes to shove.
Their "Flank Drive Plus" are a miracle and have saved my bacon more times than I can count, they have taken nuts and bolts off that were rounded off by Vise-Grips, they are worth every penny.
I also have a 4ft. thinwall pipe for a real cheater that can overpower anything so far.
06-26-21, 01:06 PM
#50
Senior Member
Join Date: Oct 2015
Location: PDX
Posts: 13,047
Bikes: Merz x 5 + Specialized Merz Allez x 2, Strawberry/Newlands/DiNucci/Ti x3, Gordon, Fuso/Moulton x2, Bornstein, Paisley,1958-74 Paramounts x3, 3rensho, 74 Moto TC, 73-78 Raleigh Pro's x5, Marinoni x2, 1960 Cinelli SC, 1980 Bianchi SC, PX-10 X 2
Mentioned: 267 Post(s)
Tagged: 0 Thread(s)
Quoted: 4513 Post(s)
Liked 6,388 Times
in
3,673 Posts
The safe part is key, once you have this locked down, you can really get after it without the trepidation that can screw things up, lean in, crack it loose, done.