


Handlebar bag rack finished today
 11-27-23, 11:12 AM
#26

Bike Butcher of Portland

Join Date: Jul 2014
Location: Portland, OR
Posts: 11,657
Bikes: It's complicated.
Mentioned: 1301 Post(s)
Tagged: 0 Thread(s)
Quoted: 4692 Post(s)
Liked 5,839 Times
in
2,298 Posts
In 1/4", even 0.028" wall can be bent with a standard tube-bender like the common Ridgid 394, usually available under $40 used on ebay, example here That's all you need to get started if you want to DIY in your garage.
Downside of the cheap Ridgid is only one radius available, you can't make and swap in your own dies. And if you want to bend say 5/16" tube, then you have to buy a whole 'nuther bender. But they're so cheap, just buy more benders if you want to use different tube diameters. A real bender like a Di-Acro with a selection of tube diameters and bend radiuses will set you back a couple grand.
Don't get the super-cheap Ridgid #456 bender that bends 3 different tube diameters � it's for aluminum, brass and other soft materials, not strong enough for Cr-Mo steel.
I mostly work in stainless steel to avoid the cost and hassle of chrome plating, but recently made a rack out of 3/8" CrMo with this bender. It's damn hard to bend with my litle $10 tool, but I'm just barely able to do it. Note that this bender makes as tight a bend as a given tubing diameter can take. You can search for "tubing minimum bend radius" for rules of thumb, as well as engineering analysis of why this is so.
I've got a box full of scrap while learning how to use my meager tools. Measure once, cut twice, buy more material...
Jim, neat idea to use that quick release pin! Bag ejection on bumpy roads is a real thing.
__________________
If someone tells you that you have enough bicycles and you don't need any more, stop talking to them. You don't need that kind of negativity in your life.
If someone tells you that you have enough bicycles and you don't need any more, stop talking to them. You don't need that kind of negativity in your life.

Likes For gugie:
11-27-23, 11:29 AM
#27
Full Member
 11-27-23, 11:59 AM
#28
Senior Member
Join Date: Nov 2013
Location: Southern California
Posts: 1,470
Mentioned: 14 Post(s)
Tagged: 0 Thread(s)
Quoted: 802 Post(s)
Liked 760 Times
in
413 Posts
Beautiful rack, and inspirational. I hope to make a similar rack for my road bike within the next couple years.
Is it possible to talk a little about how you made the fork clamps? Thanks.
Is it possible to talk a little about how you made the fork clamps? Thanks.
Last edited by Piff; 11-27-23 at 12:11 PM.
11-27-23, 01:47 PM
#29
blahblahblah chrome moly

Join Date: Apr 2009
Location: Seattle
Posts: 2,025
Mentioned: 93 Post(s)
Tagged: 0 Thread(s)
Quoted: 1199 Post(s)
Liked 2,629 Times
in
1,098 Posts
Well, whether it's really an option depends on your luck finding someone willing to make it. I doubt Jim is offering to sell these (Jim,please correct me if that's wrong).
Most other builders will be put off by the challenge of making those clamps, which are clamping to the blade where it's still oval and tapering. I expect that is very finicky work, unless Jim has some shortcut. It definitely can't be done without the builder having your fork in his hands, because every fork will be slightly different at that point.
I would caution any wannabee rack builders to go a more standard way for your first few racks, don't try Jim's way until you have achieved mastery!
Likes For bulgie:
11-27-23, 02:06 PM
#30
Senior Member
Join Date: Oct 2015
Location: PDX
Posts: 13,126
Bikes: Merz x 5 + Specialized Merz Allez x 2, Strawberry/Newlands/DiNucci/Ti x3, Gordon, Fuso/Moulton x2, Bornstein, Paisley,1958-74 Paramounts x3, 3rensho, 74 Moto TC, 73-78 Raleigh Pro's x5, Marinoni x2, 1960 Cinelli SC, 1980 Bianchi SC, PX-10 X 2
Mentioned: 269 Post(s)
Tagged: 0 Thread(s)
Quoted: 4533 Post(s)
Liked 6,440 Times
in
3,704 Posts
Well, whether it's really an option depends on your luck finding someone willing to make it. I doubt Jim is offering to sell these (Jim,please correct me if that's wrong).
Most other builders will be put off by the challenge of making those clamps, which are clamping to the blade where it's still oval and tapering. I expect that is very finicky work, unless Jim has some shortcut. It definitely can't be done without the builder having your fork in his hands, because every fork will be slightly different at that point.
I would caution any wannabee rack builders to go a more standard way for your first few racks, don't try Jim's way until you have achieved mastery!
Most other builders will be put off by the challenge of making those clamps, which are clamping to the blade where it's still oval and tapering. I expect that is very finicky work, unless Jim has some shortcut. It definitely can't be done without the builder having your fork in his hands, because every fork will be slightly different at that point.
I would caution any wannabee rack builders to go a more standard way for your first few racks, don't try Jim's way until you have achieved mastery!
Its been interesting to see other builders have an epiphany while looking at mine and we're talking serious, long respected ones.
 11-27-23, 06:50 PM
#31
Full Member
My frame and fork have been PC'd recently, now they need re-doing

 11-27-23, 07:47 PM
#32
Full Member
Thread Starter

Join Date: May 2023
Location: Big Sur California
Posts: 220
Bikes: 1946 Holdsworth Cyclone, 1969 Cinelli SC, 1972 Raleigh Pro, 1973 Merz road bike, 1974 Alex Singer Sportif, 1974 Merz track bike, 1975 Teledyne Titan, 1976 Ritchey road bike, 1977 DiNucci built Merz track bike, 1977 (?) Exxon Graftek, many more!
Mentioned: 19 Post(s)
Tagged: 0 Thread(s)
Quoted: 139 Post(s)
Liked 1,433 Times
in
175 Posts
It would also be notable to understand the reasoning for doing it this way despite the challenge, maybe @Portlandjim will expound on it for us.
Its been interesting to see other builders have an epiphany while looking at mine and we're talking serious, long respected ones.
Its been interesting to see other builders have an epiphany while looking at mine and we're talking serious, long respected ones.
Well, whether it's really an option depends on your luck finding someone willing to make it. I doubt Jim is offering to sell these (Jim,please correct me if that's wrong).
Most other builders will be put off by the challenge of making those clamps, which are clamping to the blade where it's still oval and tapering. I expect that is very finicky work, unless Jim has some shortcut. It definitely can't be done without the builder having your fork in his hands, because every fork will be slightly different at that point.
I would caution any wannabee rack builders to go a more standard way for your first few racks, don't try Jim's way until you have achieved mastery!
Most other builders will be put off by the challenge of making those clamps, which are clamping to the blade where it's still oval and tapering. I expect that is very finicky work, unless Jim has some shortcut. It definitely can't be done without the builder having your fork in his hands, because every fork will be slightly different at that point.
I would caution any wannabee rack builders to go a more standard way for your first few racks, don't try Jim's way until you have achieved mastery!


. Check out this story from Bicycle World, it mentions my racks.
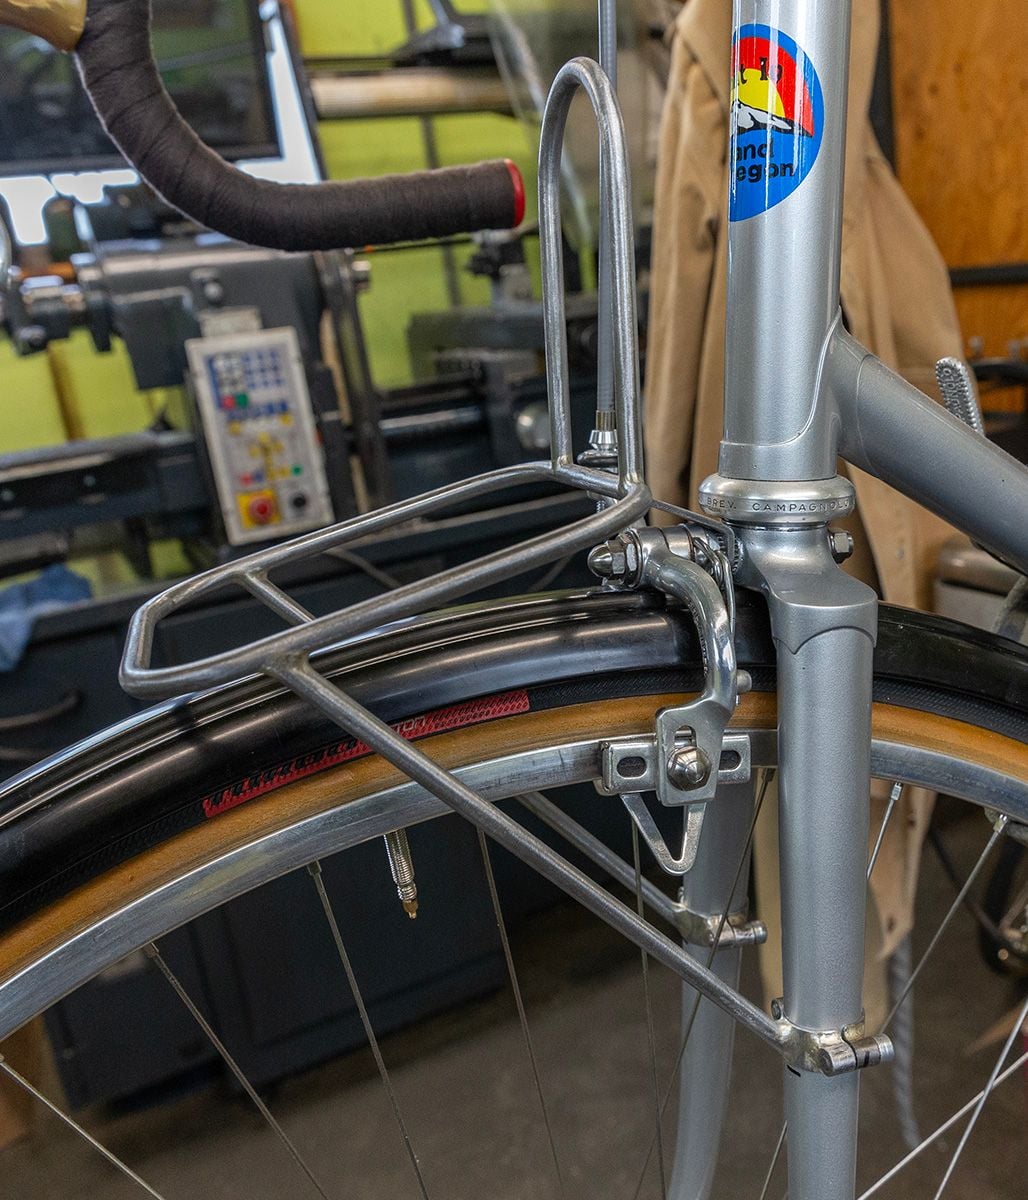
Mark is correct in his comments about the clamps. I figured out the taper of the fork tubing, this is tricky as the tube is also flattened. Then I made the tube that goes around the fork tube out of thick tubing, the inner and outer are taped using my CNC lathe. This tube is ovalized to match the fork at the mounting location. The threaded barrels are brazed on to this tube using a fixture to ensure that they are postioned correctly, then each clamp is slit using a saw in my milling machine. Getting these clamps onto the rack struts in the correct position is done off the fork in this case, the fork was painted which meant on brazing with the clamps in position is out. All this work has to be done as a one off, it's very time consuming.
Last edited by Portlandjim; 11-27-23 at 08:15 PM.

Likes For Portlandjim:
11-27-23, 09:13 PM
#33

Senior Member
Join Date: Jun 2006
Posts: 20,305
Mentioned: 130 Post(s)
Tagged: 0 Thread(s)
Quoted: 3464 Post(s)
Liked 2,834 Times
in
1,998 Posts
Well, whether it's really an option depends on your luck finding someone willing to make it. I doubt Jim is offering to sell these (Jim,please correct me if that's wrong).
Most other builders will be put off by the challenge of making those clamps, which are clamping to the blade where it's still oval and tapering. I expect that is very finicky work, unless Jim has some shortcut. It definitely can't be done without the builder having your fork in his hands, because every fork will be slightly different at that point.
I would caution any wannabee rack builders to go a more standard way for your first few racks, don't try Jim's way until you have achieved mastery!
Most other builders will be put off by the challenge of making those clamps, which are clamping to the blade where it's still oval and tapering. I expect that is very finicky work, unless Jim has some shortcut. It definitely can't be done without the builder having your fork in his hands, because every fork will be slightly different at that point.
I would caution any wannabee rack builders to go a more standard way for your first few racks, don't try Jim's way until you have achieved mastery!
I looked at those keenly to see how an almost as strong, visually simpler way could be fashioned, might be possible, maybe not.
11-27-23, 10:40 PM
#34
Full Member

Join Date: Jun 2022
Location: San Diego, California USA
Posts: 357
Bikes: 1974 Masi GC, 1982 Trek 728 (aka 720), 1992 Trek Multitrack 750
Mentioned: 0 Post(s)
Tagged: 0 Thread(s)
Quoted: 123 Post(s)
Liked 225 Times
in
142 Posts
nkk
What a beautiful rack!
But those fork clamps are the bomb, absolutely sublime.
Way to go!
What a beautiful rack!
But those fork clamps are the bomb, absolutely sublime.
Way to go!
11-28-23, 08:11 AM
#35
Senior Member
Join Date: Jun 2006
Posts: 20,305
Mentioned: 130 Post(s)
Tagged: 0 Thread(s)
Quoted: 3464 Post(s)
Liked 2,834 Times
in
1,998 Posts
With the Legend of Turbo Cotton tires.
11-28-23, 08:18 AM
#36
Senior Member
Join Date: Jun 2006
Posts: 20,305
Mentioned: 130 Post(s)
Tagged: 0 Thread(s)
Quoted: 3464 Post(s)
Liked 2,834 Times
in
1,998 Posts
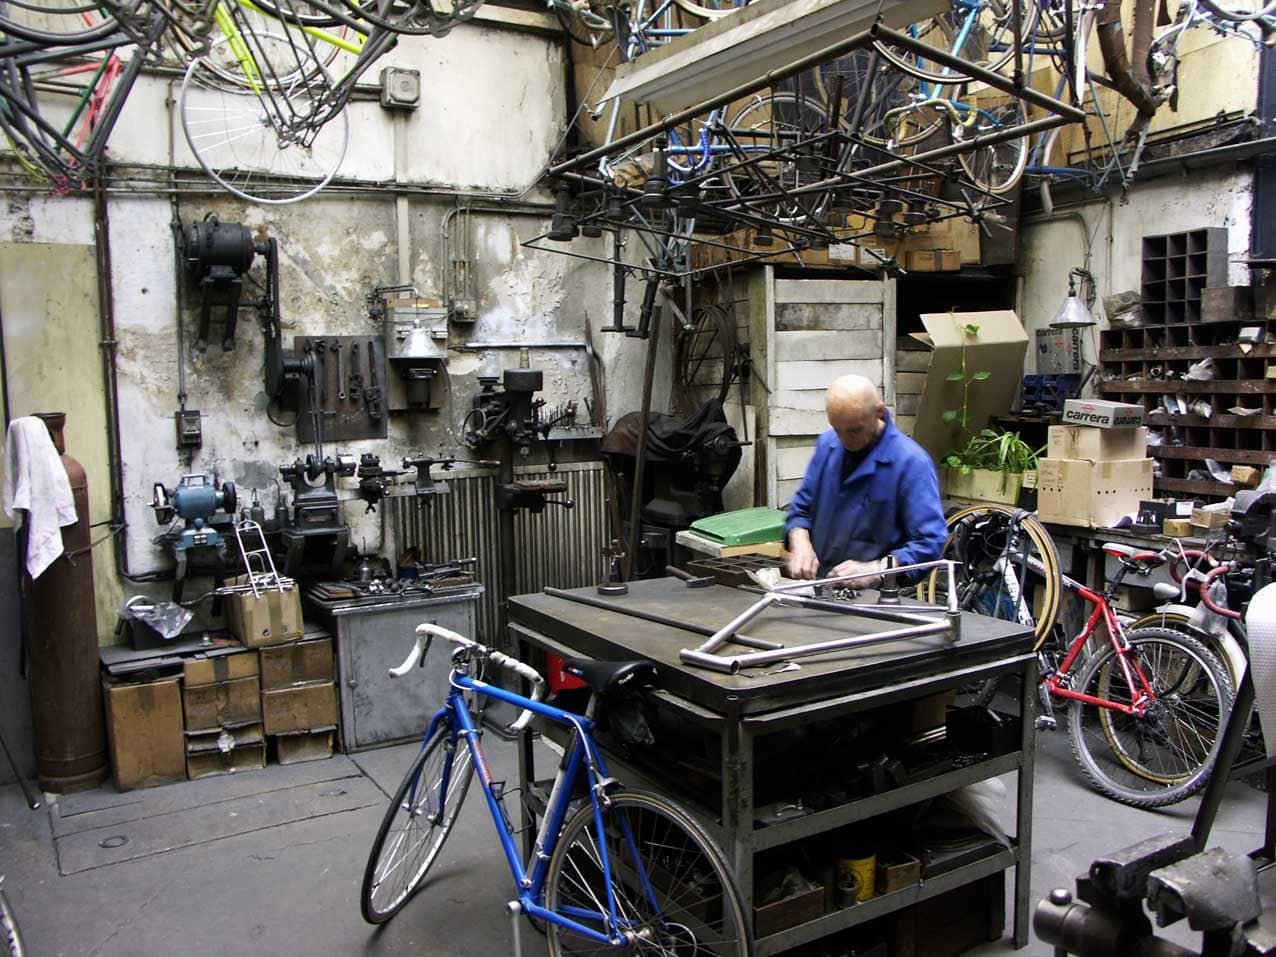
this shop has great natural light as the roof is glass, used to fill the space of the light and air shaft of the surrounding building.
C.N.C. Also had a space similar, also in Paris.
11-28-23, 03:40 PM
#37
Full Member
Thread Starter
Join Date: May 2023
Location: Big Sur California
Posts: 220
Bikes: 1946 Holdsworth Cyclone, 1969 Cinelli SC, 1972 Raleigh Pro, 1973 Merz road bike, 1974 Alex Singer Sportif, 1974 Merz track bike, 1975 Teledyne Titan, 1976 Ritchey road bike, 1977 DiNucci built Merz track bike, 1977 (?) Exxon Graftek, many more!
Mentioned: 19 Post(s)
Tagged: 0 Thread(s)
Quoted: 139 Post(s)
Liked 1,433 Times
in
175 Posts
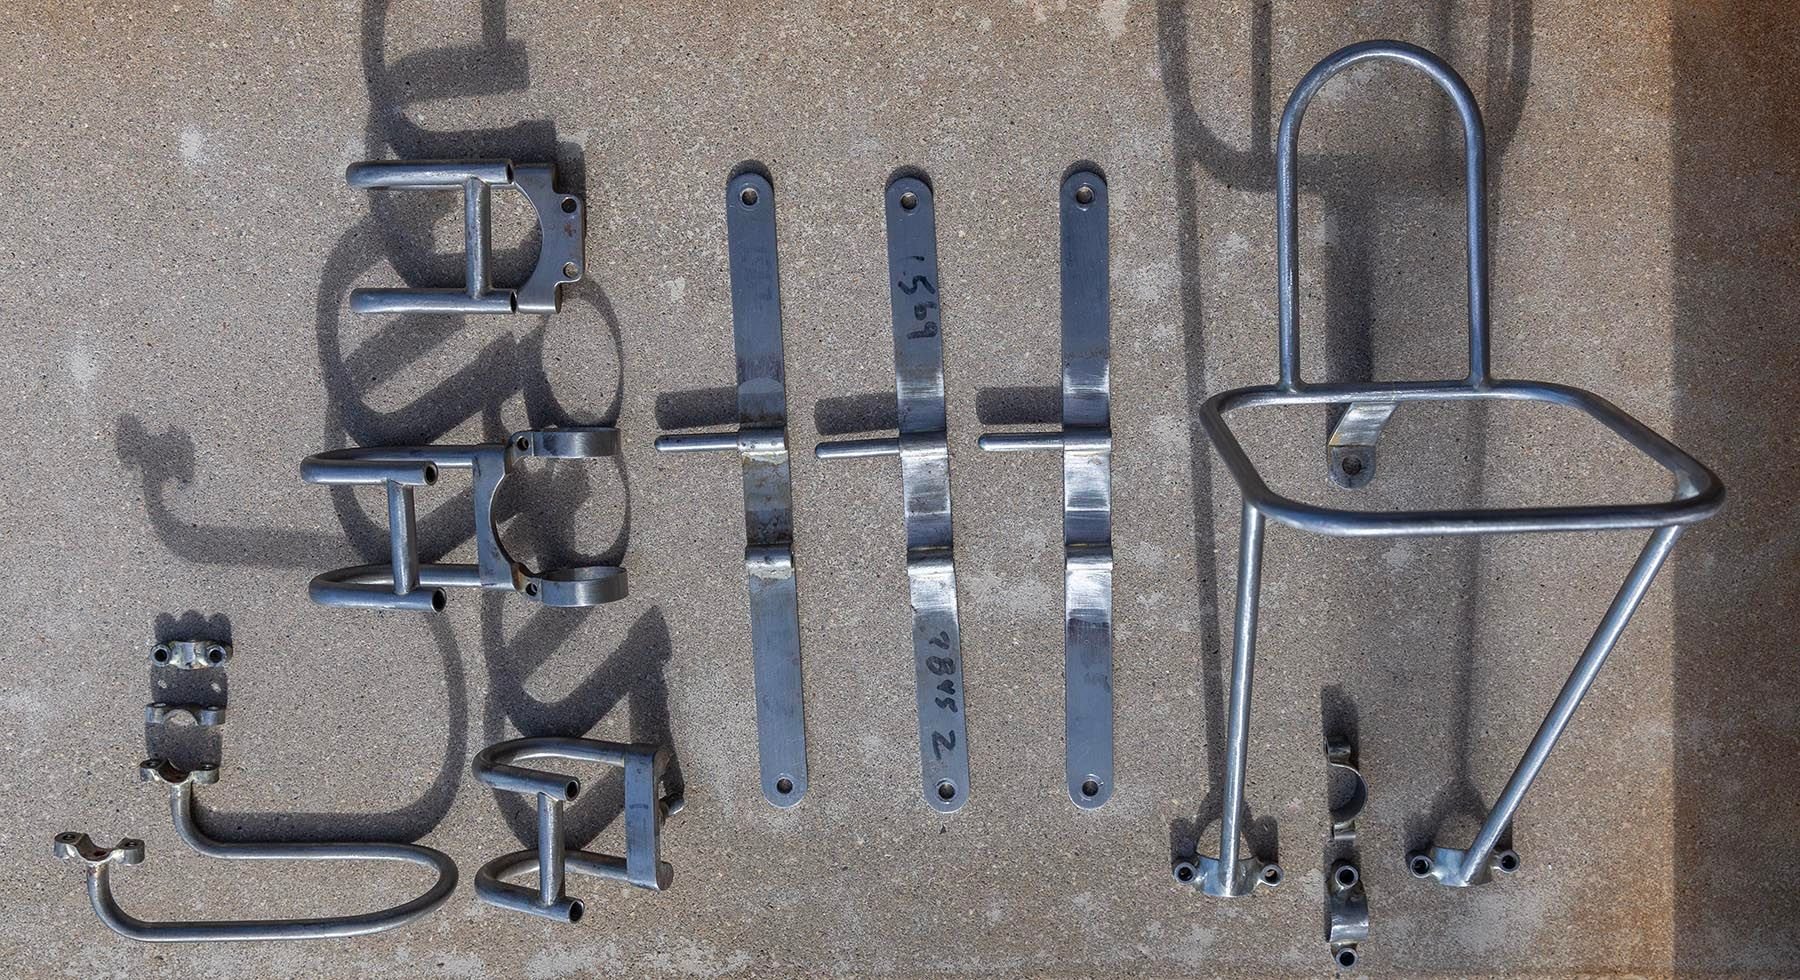

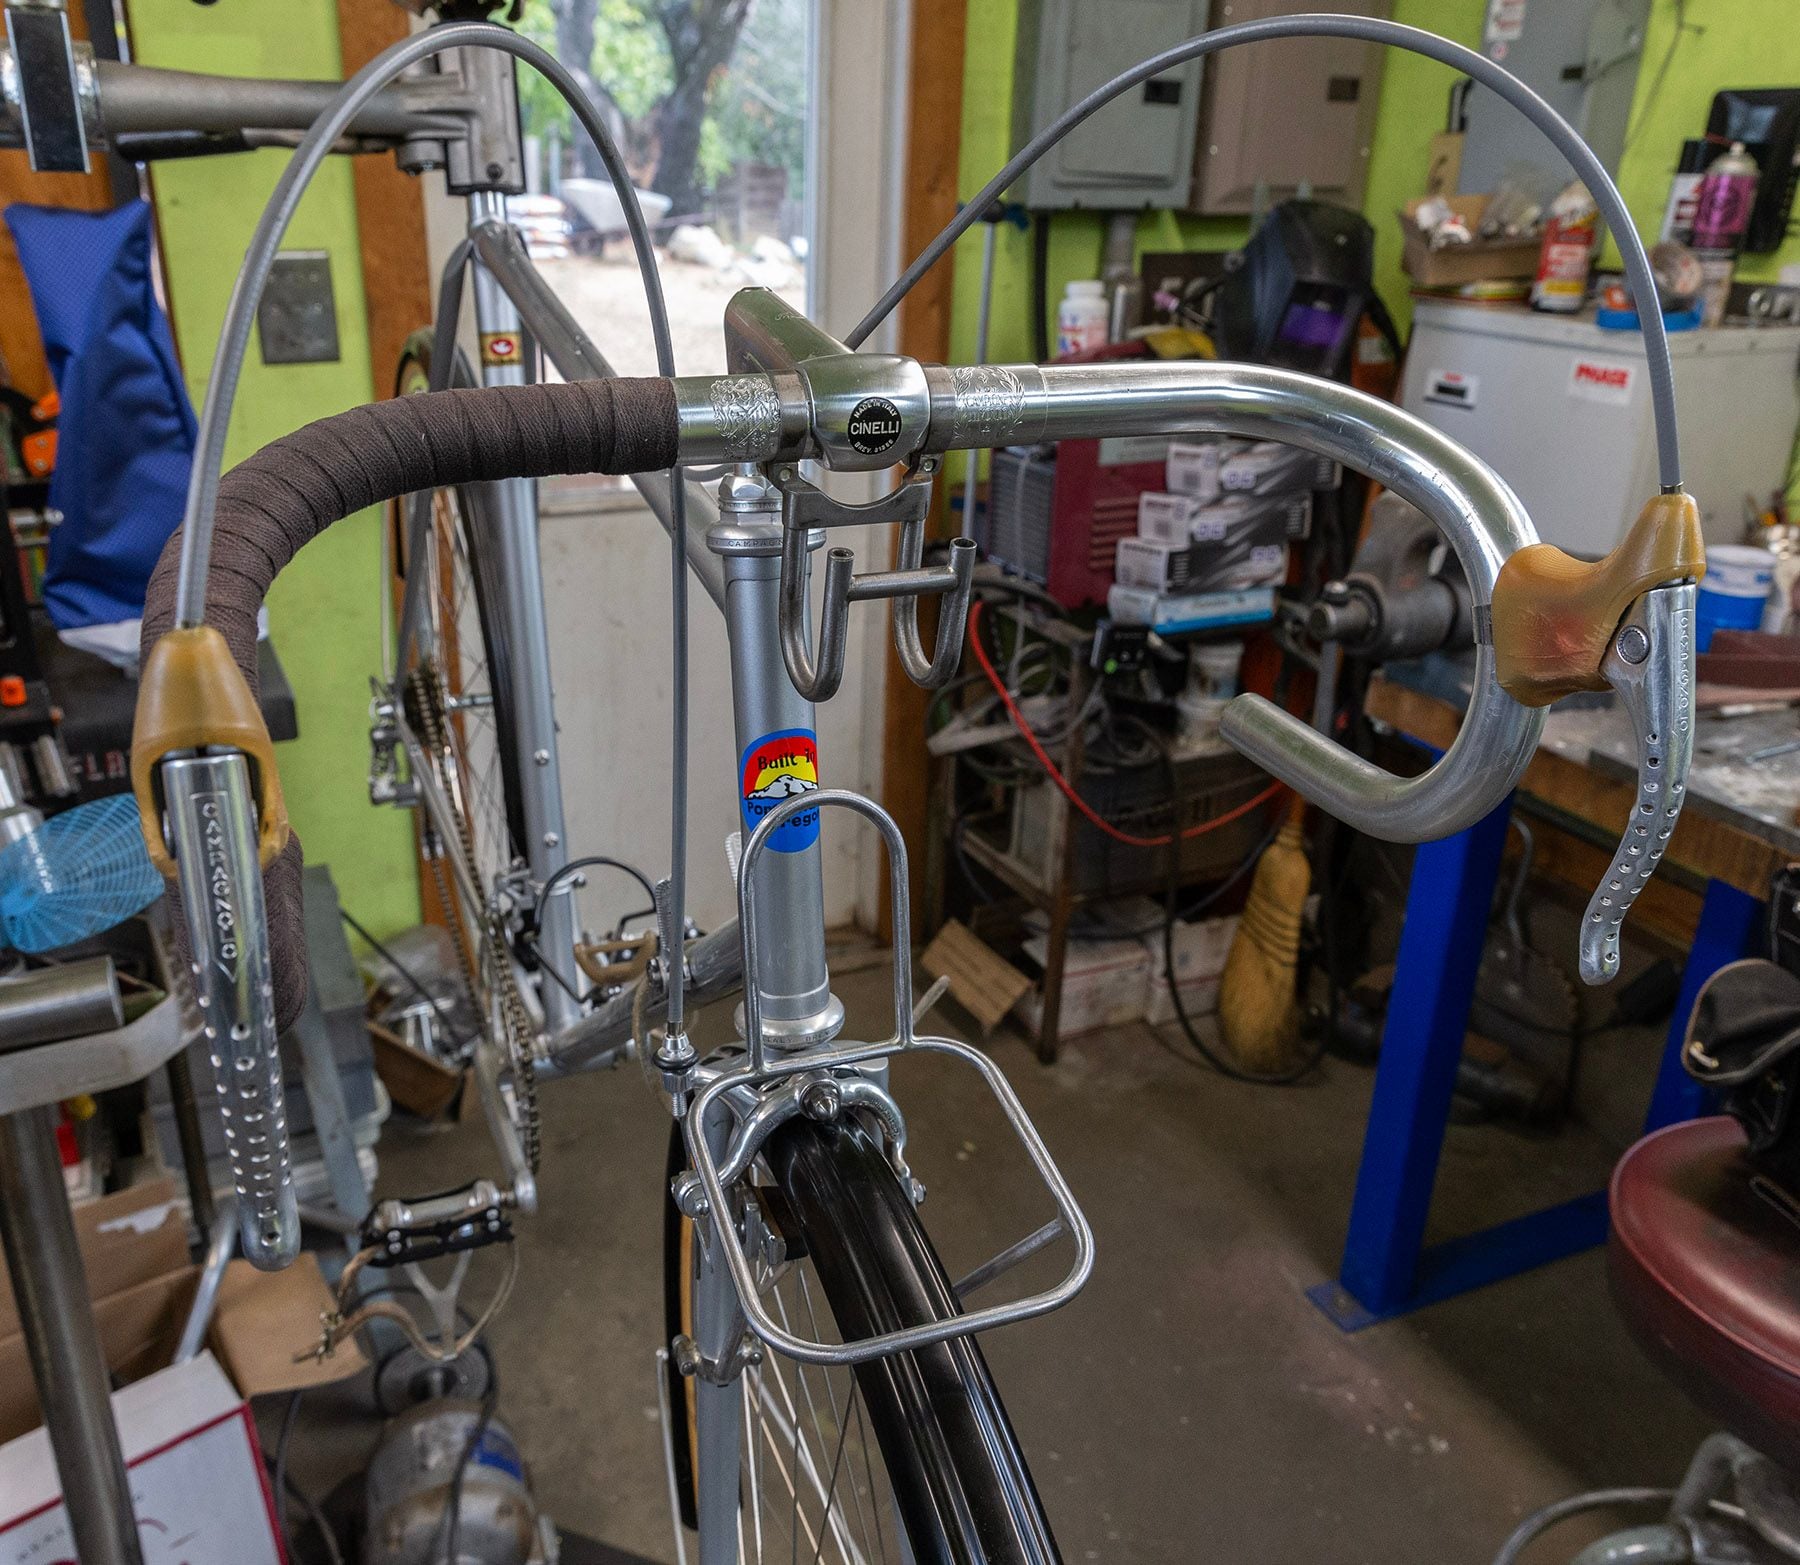
I have the HB bag mounting parts for 3 bikes ready for the plating shop. I've decided to use Electroless Nickel Plating, with a glass bead blasted base. All 3 of the handlebar decaleur mounts are different, because the stems are different. The one in the middle clamps onto the bars, I'm using a Cinelli 1R stem so no clamp bolt. The one with a stud is for a 1A stem, the other one is for my Singer. These decaleur parts are fiendishly difficult to make, at least the way I did them is! The small "U" shaped tube thing mounts onto a Merz front rack, this allows the French style handlebar bag to be mounted.
Likes For Portlandjim:
11-28-23, 04:02 PM
#38
Senior Member
Join Date: Jun 2006
Posts: 20,305
Mentioned: 130 Post(s)
Tagged: 0 Thread(s)
Quoted: 3464 Post(s)
Liked 2,834 Times
in
1,998 Posts
Detailed parts. No economies of scale there other than task memory
11-28-23, 04:58 PM
#39
Full Member
Thread Starter
Join Date: May 2023
Location: Big Sur California
Posts: 220
Bikes: 1946 Holdsworth Cyclone, 1969 Cinelli SC, 1972 Raleigh Pro, 1973 Merz road bike, 1974 Alex Singer Sportif, 1974 Merz track bike, 1975 Teledyne Titan, 1976 Ritchey road bike, 1977 DiNucci built Merz track bike, 1977 (?) Exxon Graftek, many more!
Mentioned: 19 Post(s)
Tagged: 0 Thread(s)
Quoted: 139 Post(s)
Liked 1,433 Times
in
175 Posts
The pin and receiver tolerance is a killer, diameter (ID and OD), the spacing distance and parallelism on both parts. Because these parts are brazed, they don't stay where they should be after they cool. There is zero market for these parts in any case. Every bicycle is different, with a different stem position and design. Almost a requirement that to be any good they must be one off custom designs. One reason those old "constructeur" bicycles cost so much.
11-28-23, 06:56 PM
#40
blahblahblah chrome moly
Join Date: Apr 2009
Location: Seattle
Posts: 2,025
Mentioned: 93 Post(s)
Tagged: 0 Thread(s)
Quoted: 1199 Post(s)
Liked 2,629 Times
in
1,098 Posts
Speaking of finicky designs I wouldn't want to have to mass-produce, here's mine, made to fit a '50s French bike:
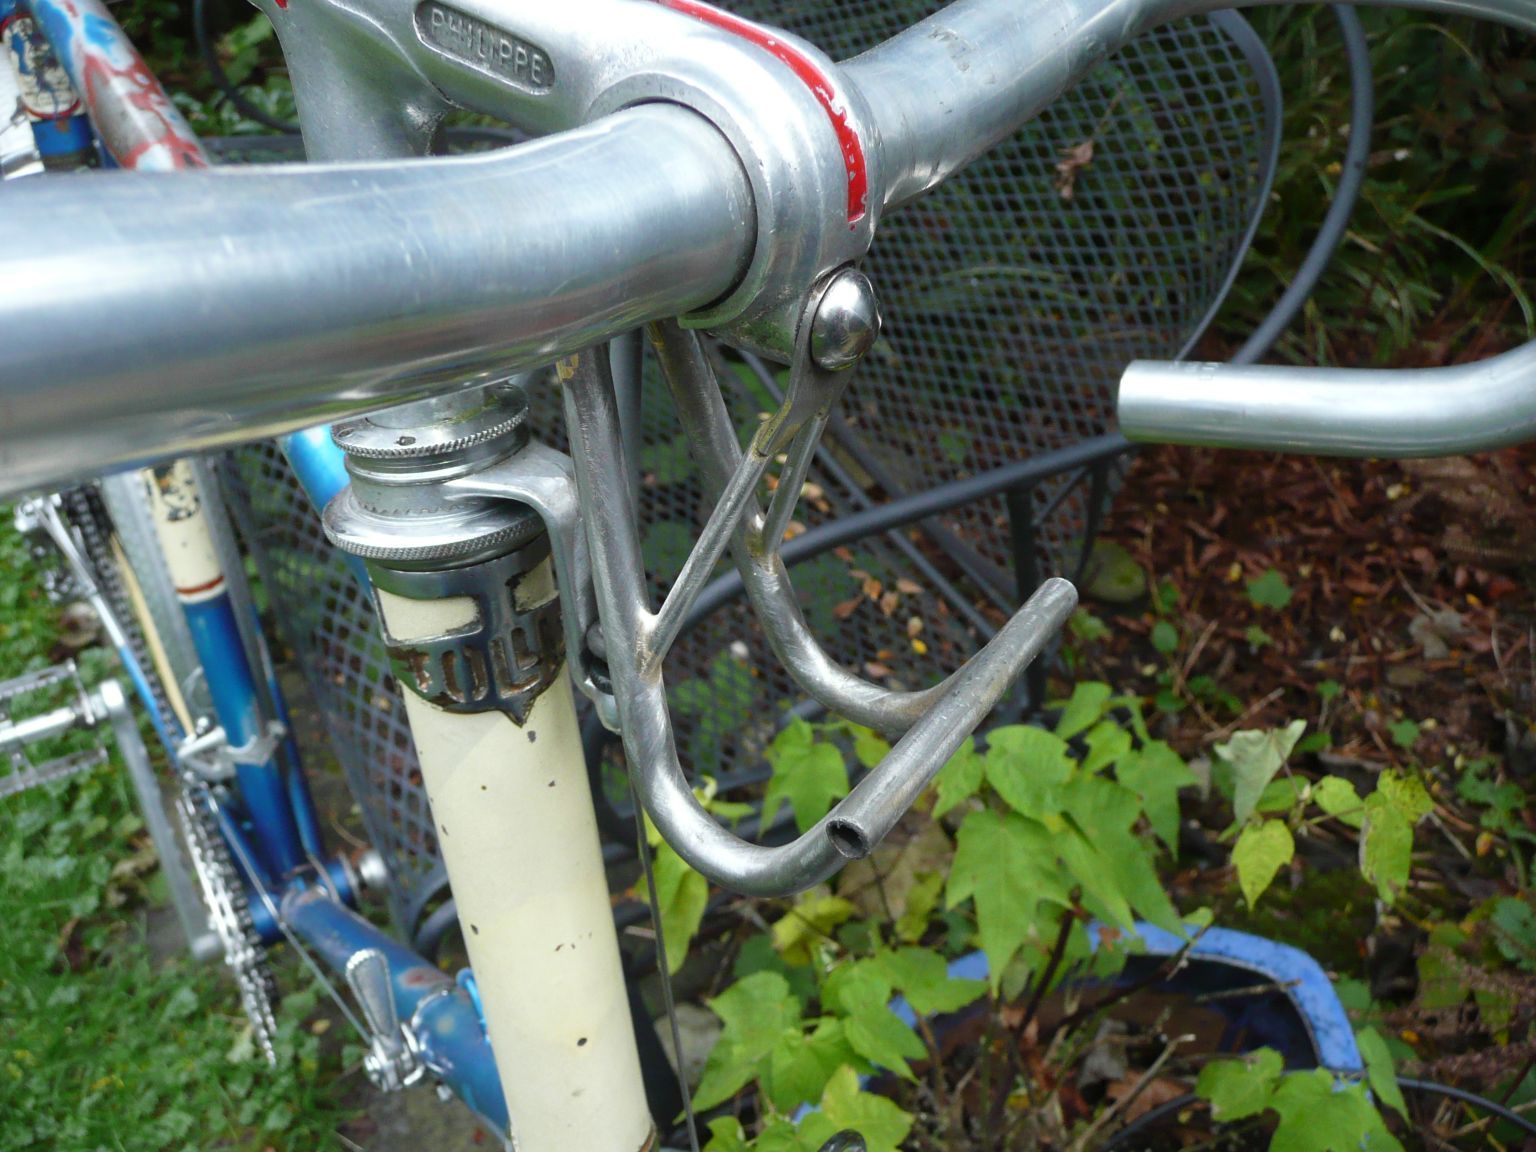
Because it attaches to both the front and the back end of the bar-clamp bolt, it's triangulated = very stiff and strong.
The part that bolts to the bag is from a Berthoud decaleur. But I didn't like that way they used a solid-steel pin, the full length of the bag, to join it to the stem-side piece. (solid steel = heavy!)
So I drilled it out to fit a 3/16" thinwall stainless steel tube to replace the solid pin. It fits more snugly than the Berthoud pin too, reducing the slop. Berthouds flop around a little and even rattle on washboard; mine has no noticeable slop while riding. On mine, the SS tube has a springy flare at the end that snaps into place, no other retention needed. The Berthoud needs a spit-ring or safety-pin, which you have to remove and then keep track of (not lose) while the bag is off.

This all started because someone gave me a Berthoud decaleur for free. Fixing the things I didn't like about it ended up being more work than just making my own decaleur frm scratch. The only Berthoud parts left are the two tubes that bolt to the back of the bag. But now that it's done, I do like it.
Next I'd like to make a Routens-style, like the one Jamie Swan made for himself. Simpler and easier to make, but also pretty excellent in use.
Mark B
Because it attaches to both the front and the back end of the bar-clamp bolt, it's triangulated = very stiff and strong.
The part that bolts to the bag is from a Berthoud decaleur. But I didn't like that way they used a solid-steel pin, the full length of the bag, to join it to the stem-side piece. (solid steel = heavy!)
So I drilled it out to fit a 3/16" thinwall stainless steel tube to replace the solid pin. It fits more snugly than the Berthoud pin too, reducing the slop. Berthouds flop around a little and even rattle on washboard; mine has no noticeable slop while riding. On mine, the SS tube has a springy flare at the end that snaps into place, no other retention needed. The Berthoud needs a spit-ring or safety-pin, which you have to remove and then keep track of (not lose) while the bag is off.
This all started because someone gave me a Berthoud decaleur for free. Fixing the things I didn't like about it ended up being more work than just making my own decaleur frm scratch. The only Berthoud parts left are the two tubes that bolt to the back of the bag. But now that it's done, I do like it.
Next I'd like to make a Routens-style, like the one Jamie Swan made for himself. Simpler and easier to make, but also pretty excellent in use.
Mark B
12-13-23, 10:14 AM
#41
Full Member
Thread Starter
Join Date: May 2023
Location: Big Sur California
Posts: 220
Bikes: 1946 Holdsworth Cyclone, 1969 Cinelli SC, 1972 Raleigh Pro, 1973 Merz road bike, 1974 Alex Singer Sportif, 1974 Merz track bike, 1975 Teledyne Titan, 1976 Ritchey road bike, 1977 DiNucci built Merz track bike, 1977 (?) Exxon Graftek, many more!
Mentioned: 19 Post(s)
Tagged: 0 Thread(s)
Quoted: 139 Post(s)
Liked 1,433 Times
in
175 Posts

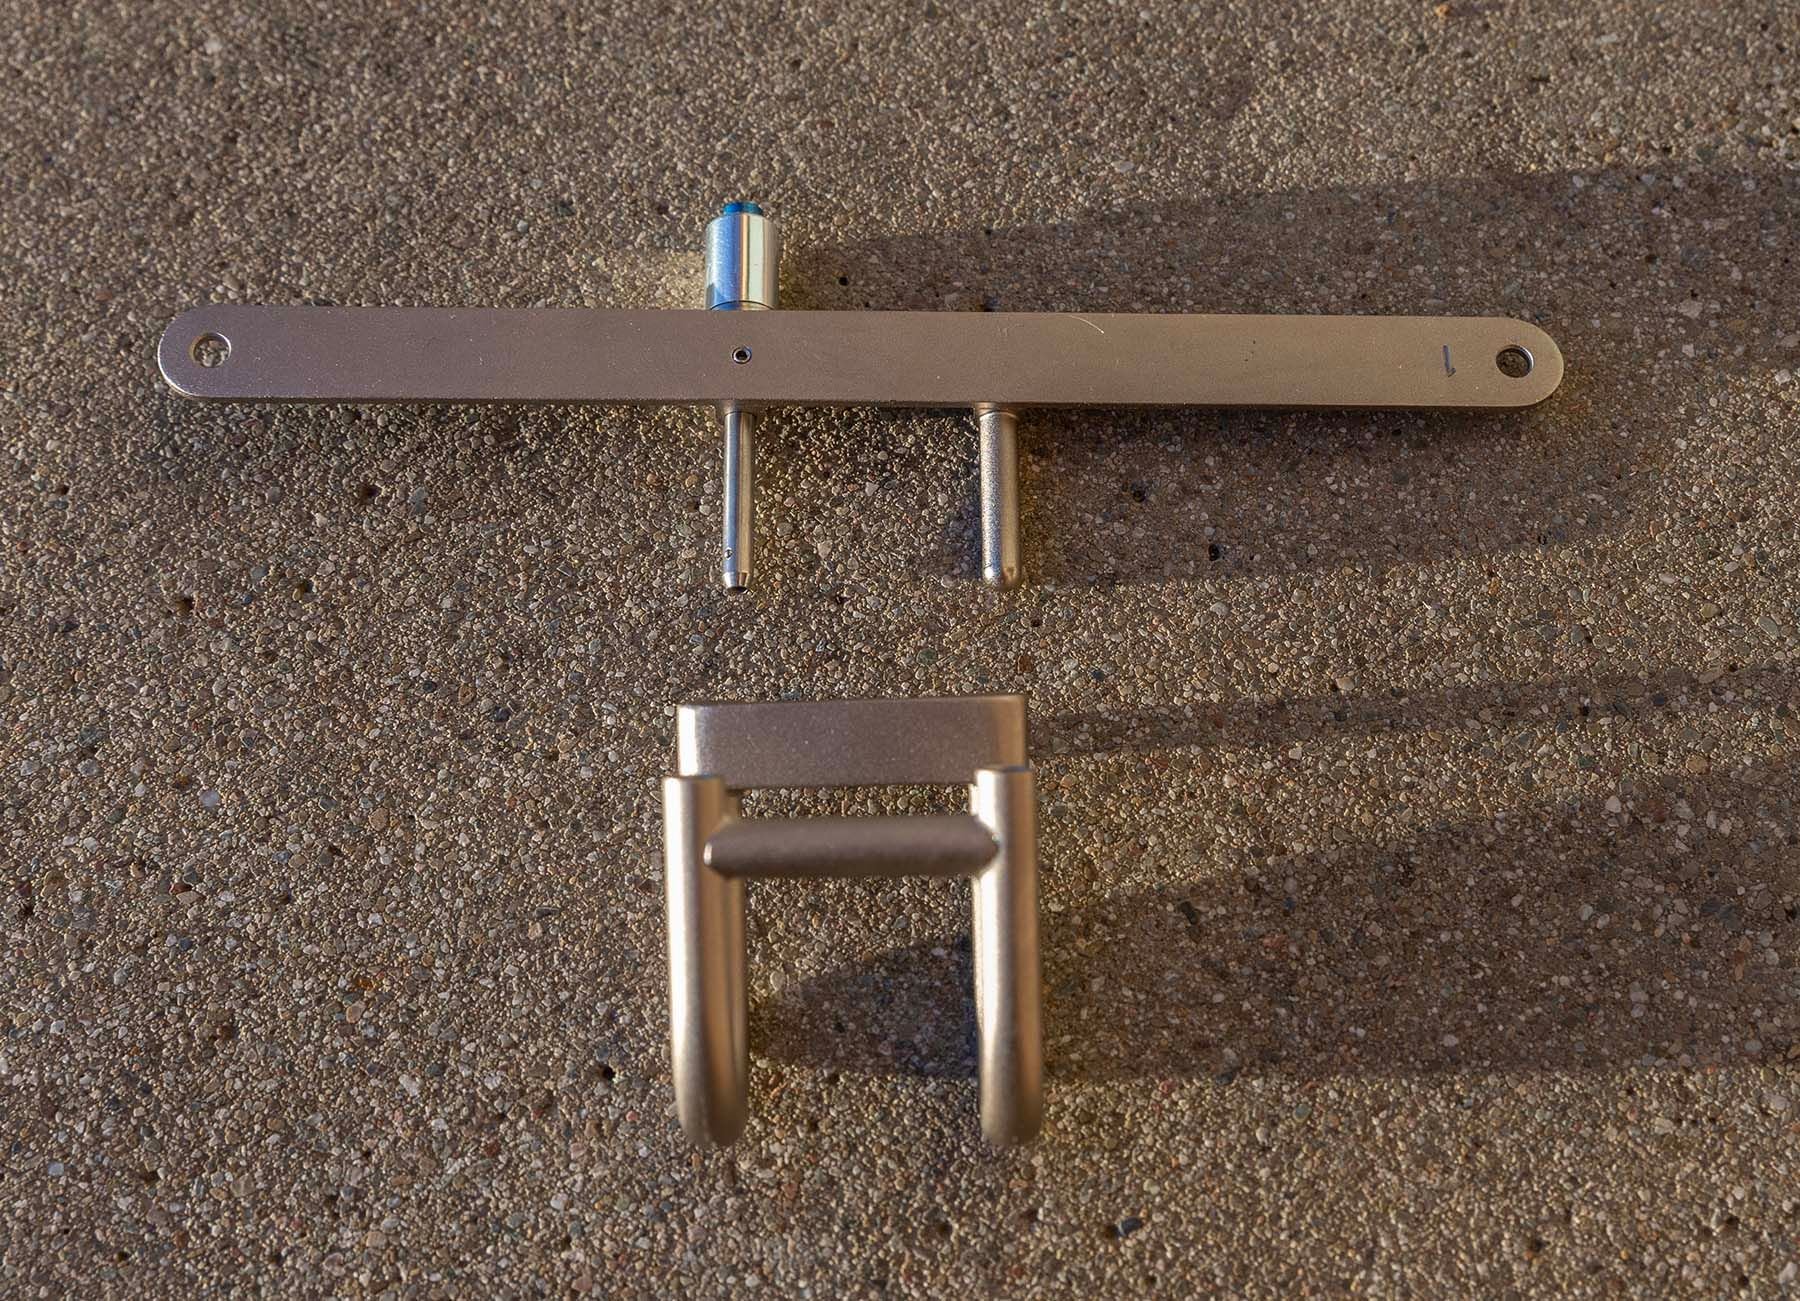
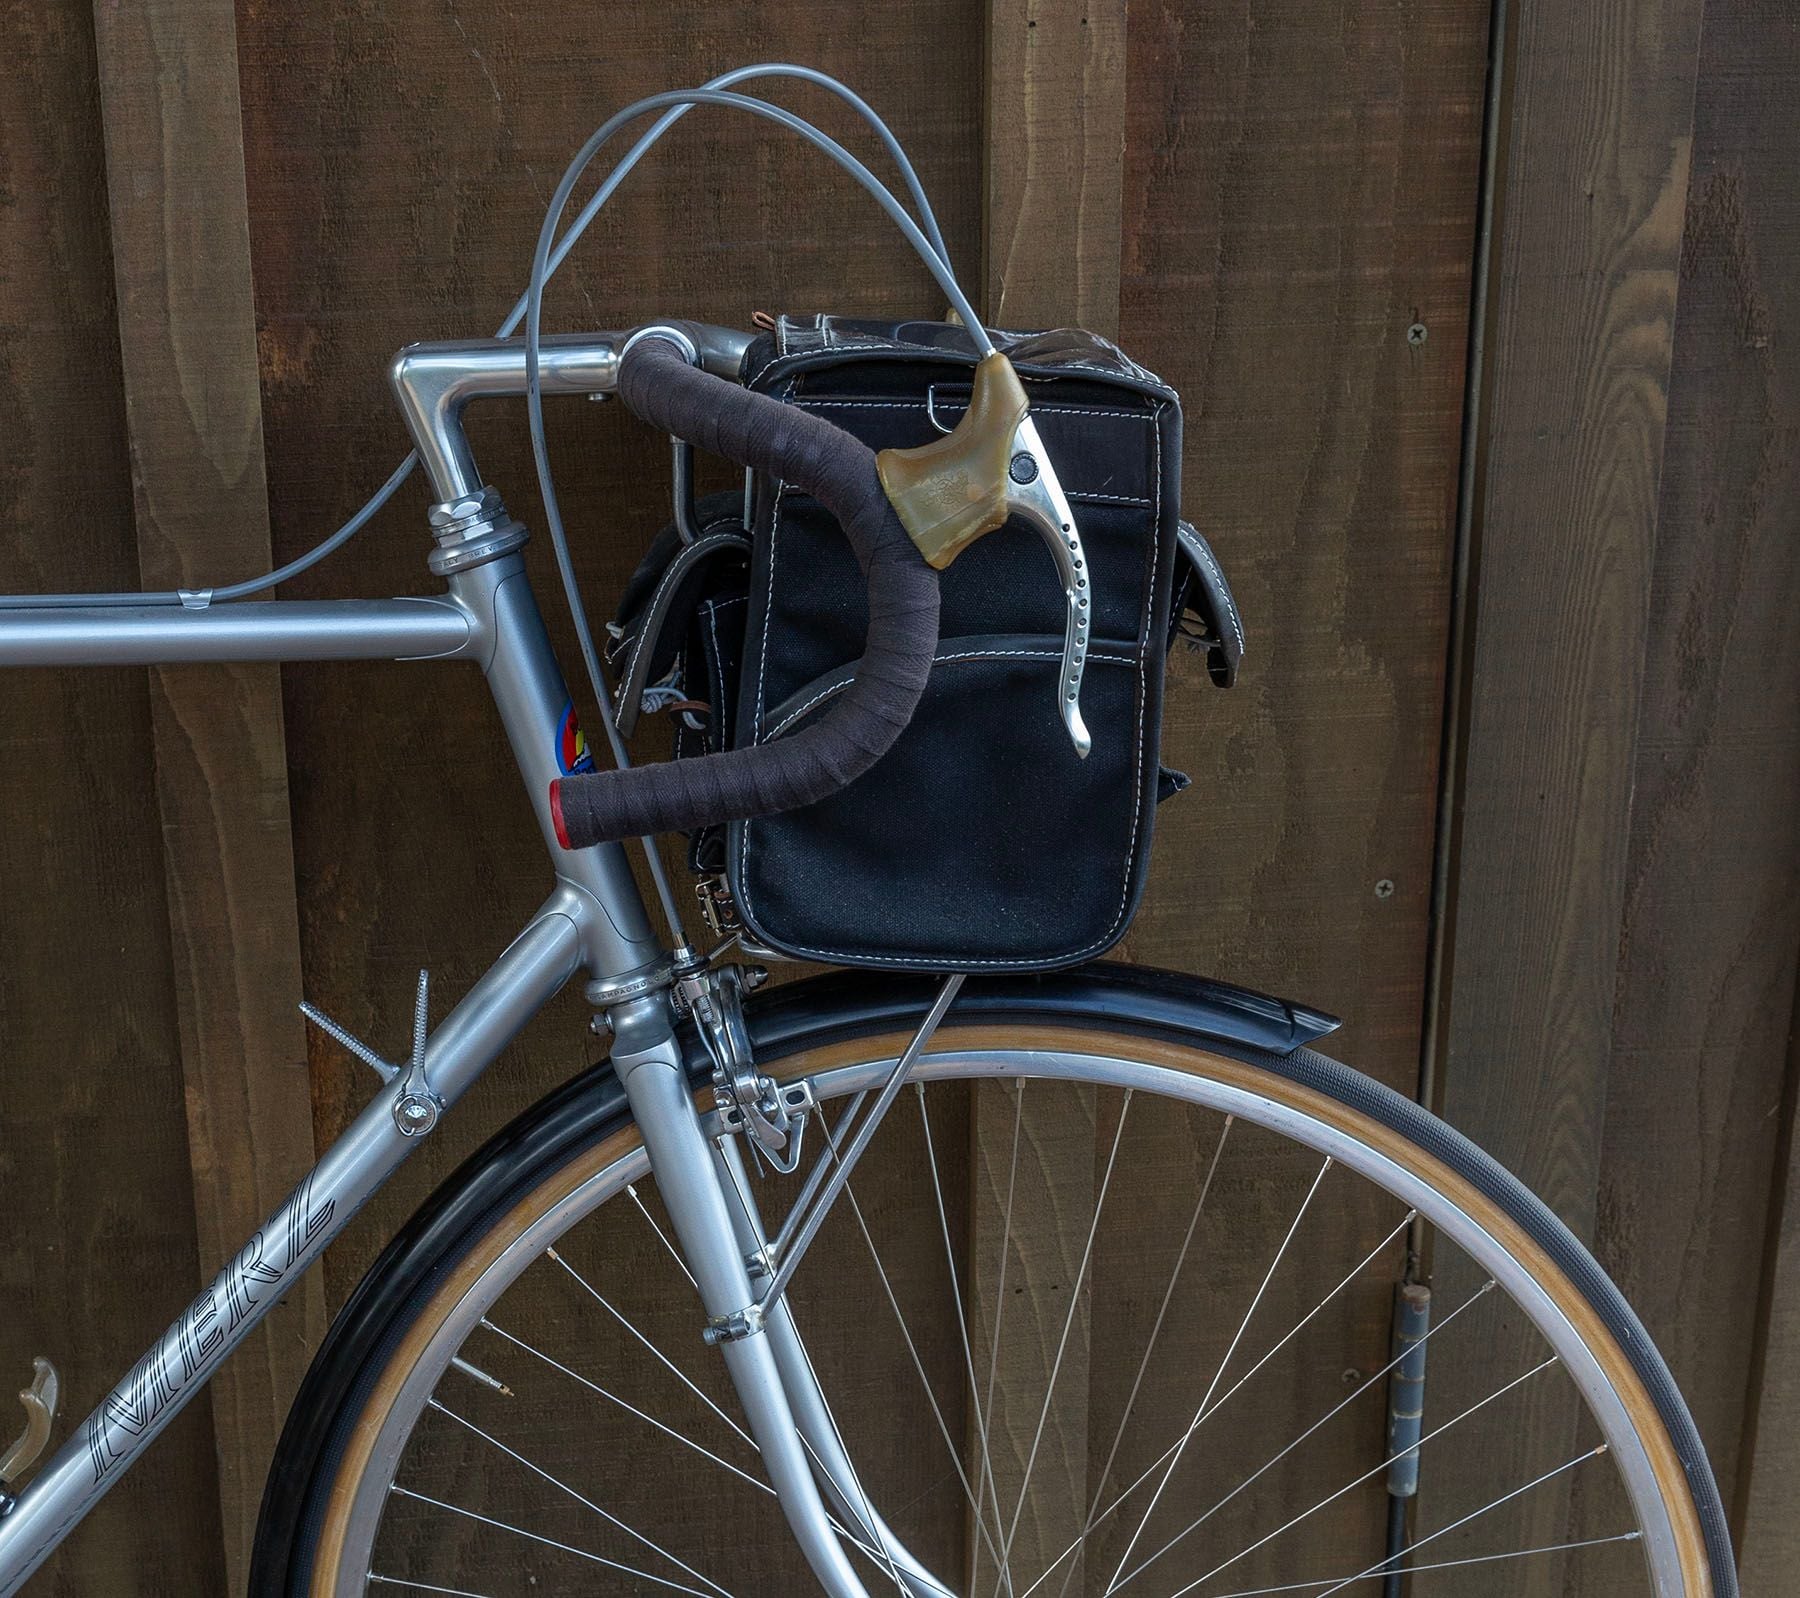
I got my front bag parts back from the plating shop on Monday. I decided to use electroless nickel plating, with a fine grit blasted prep. The color has a brown tint, it's not going to be confused with chrome plating. The reason I went with this finish was mostly because it is very thin, I chose the coating to be 0.0002". The pins need to fit into the receiver with no binding if the bag is to be removed without issues. It turns out that this plating is very slippery, the pins go in and out perfectly. Chrome plating builds up on the edges and can change the fit on threads. It's also very expensive, especially if you choose a first class shop. Electroless nickel is not cheap either, but it's less than chrome. It's also very good for resisting rust. This Decaluer is made for a Cinelli 1A stem. Pressing the blue button lets the 2 balls to move inside the pin, allowing the bag to be easily lifted upward. The "U" shaped tube that the detent pin goes in has been machined before it's bent, so that the detent balls open without any up and down play. The alignment of all these parts must be close to perfect, not easy to do for brazed assemblies.
Last edited by Portlandjim; 12-13-23 at 10:18 AM.
Likes For Portlandjim:
12-13-23, 10:34 AM
#42
Senior Member
Join Date: Apr 2011
Location: Maryland, USA
Posts: 2,464
Bikes: Drysdale/Gitane/Zeus/Masi/Falcon/Palo Alto/Raleigh/Legnano
Mentioned: 34 Post(s)
Tagged: 0 Thread(s)
Quoted: 993 Post(s)
Liked 658 Times
in
415 Posts
Lovely work, and that from someone with a major aversion to racks & bags on my bikes.
So, do you do your own plating? Is that practical in a non-commercial application?
There is one chrome shop within a sane drive of me and, if it closes, I could see that being a problem.
There is one chrome shop within a sane drive of me and, if it closes, I could see that being a problem.
__________________
Larry:1958 Drysdale, 1961 Gitane Gran Sport, 1974 Zeus track, 1988 Masi Gran Corsa, 1974 Falcon, 1980 Palo Alto, 1973 Raleigh Gran Sport, 1974 Legnano. Susan: 1976 Windsor Profesional.
Larry:1958 Drysdale, 1961 Gitane Gran Sport, 1974 Zeus track, 1988 Masi Gran Corsa, 1974 Falcon, 1980 Palo Alto, 1973 Raleigh Gran Sport, 1974 Legnano. Susan: 1976 Windsor Profesional.
12-13-23, 10:52 AM
#43
Full Member
Thread Starter
Join Date: May 2023
Location: Big Sur California
Posts: 220
Bikes: 1946 Holdsworth Cyclone, 1969 Cinelli SC, 1972 Raleigh Pro, 1973 Merz road bike, 1974 Alex Singer Sportif, 1974 Merz track bike, 1975 Teledyne Titan, 1976 Ritchey road bike, 1977 DiNucci built Merz track bike, 1977 (?) Exxon Graftek, many more!
Mentioned: 19 Post(s)
Tagged: 0 Thread(s)
Quoted: 139 Post(s)
Liked 1,433 Times
in
175 Posts
Electroless nickel plating is not something for the home tinkerer to tackle. One can purchase DYI electroplating kits, I just found this source for example: https://caswellplating.com/electropl...ting-kits.html
I don't want anything to do with working with toxic chemicals myself. Chrome plating in California will be gone early next year from what I've heard. It's so expensive now, it really doesn't make sense to chrome plate bicycle parts. It's almost always less expensive to just purchase NOS or nice used parts. Jim Merz
I don't want anything to do with working with toxic chemicals myself. Chrome plating in California will be gone early next year from what I've heard. It's so expensive now, it really doesn't make sense to chrome plate bicycle parts. It's almost always less expensive to just purchase NOS or nice used parts. Jim Merz
12-13-23, 12:59 PM
#44
Senior Member
Join Date: Jun 2006
Posts: 20,305
Mentioned: 130 Post(s)
Tagged: 0 Thread(s)
Quoted: 3464 Post(s)
Liked 2,834 Times
in
1,998 Posts
My nextdoor neighbor just got back a set of trim rings for a 1960�s Lancia.
chrome will still be around next year but at this point the end is near. 1/2027 is by reference when time is up.
what it means if not delayed by courts, items to be plated will have to be shipped out of state.
chrome is already being phased out in the Auto Industry. If one looks around, very little being used now, stainless, aluminum are the current bright work elements. Badging will probably be the last to go.
