


How to remove a tyre from a rim with NO TOOLS
 04-17-09 | 11:50 PM
#1
Thread Starter
Senior Member
Joined: May 2005
Posts: 7,393
Likes: 10
From: Albany, WA
How to remove a tyre from a rim with NO TOOLS
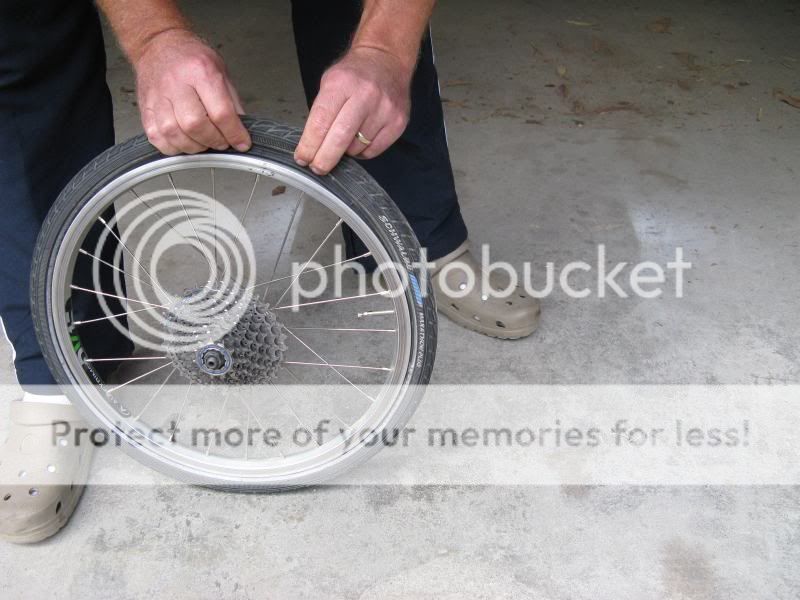
To demonstrate the ease, I chose the most difficult combination I have: Birdy wheel (18") and Marathon Plus tyre.
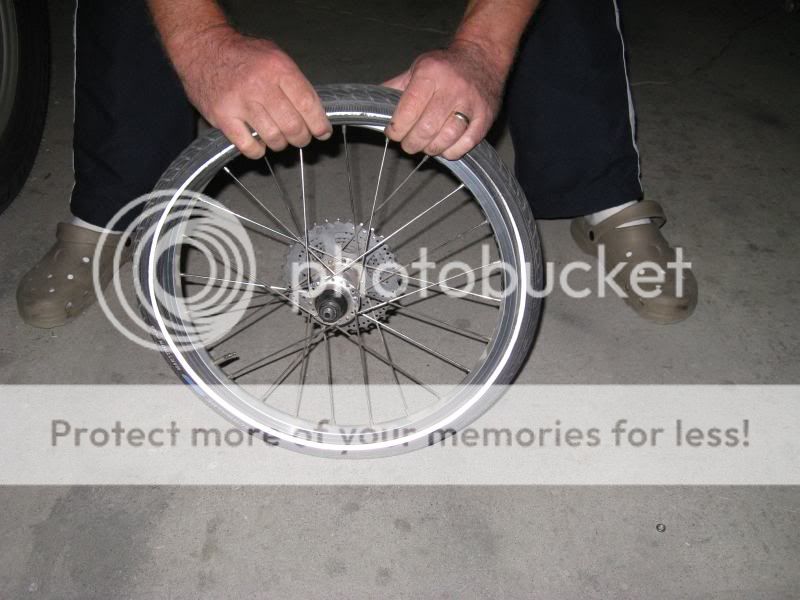
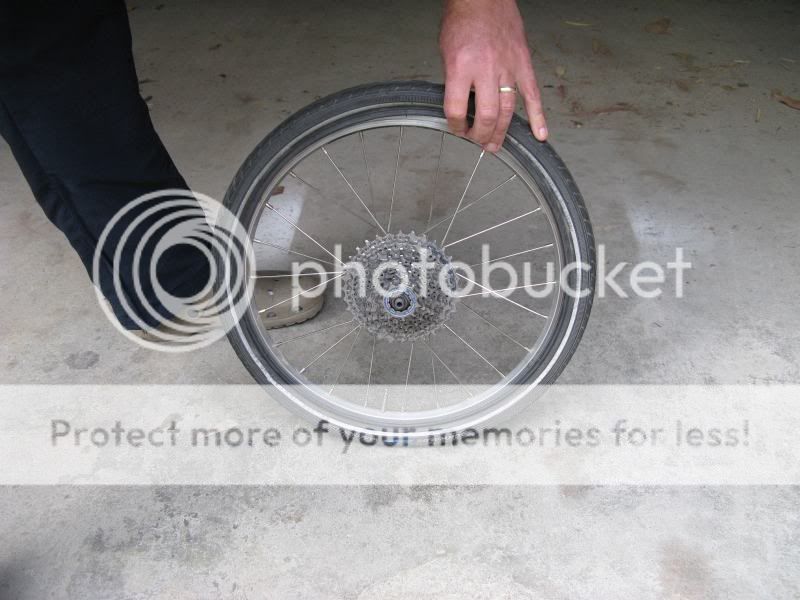
Step 1: FULLY deflate the tyre.
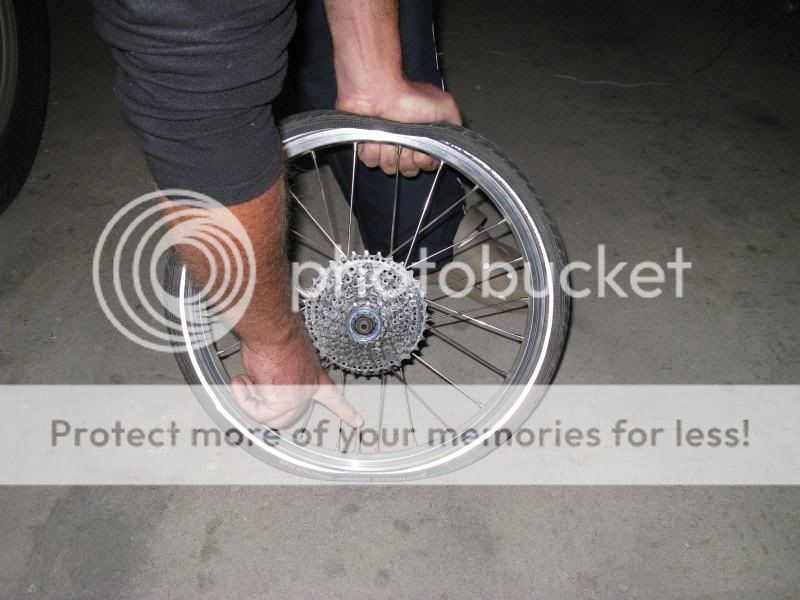
Step 2: With valve at 9 or 3 o'clock, squeeze the tyre beads together while sliding hands forcefully from to pto bottom.
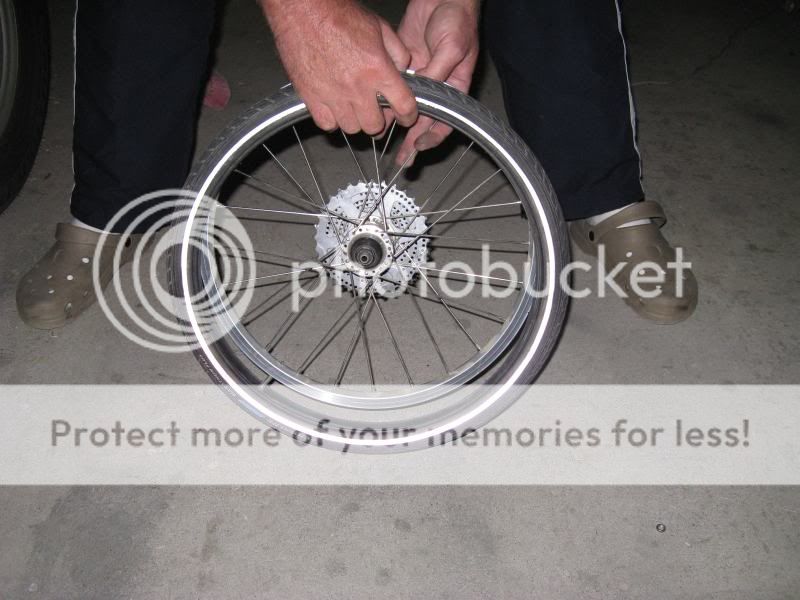
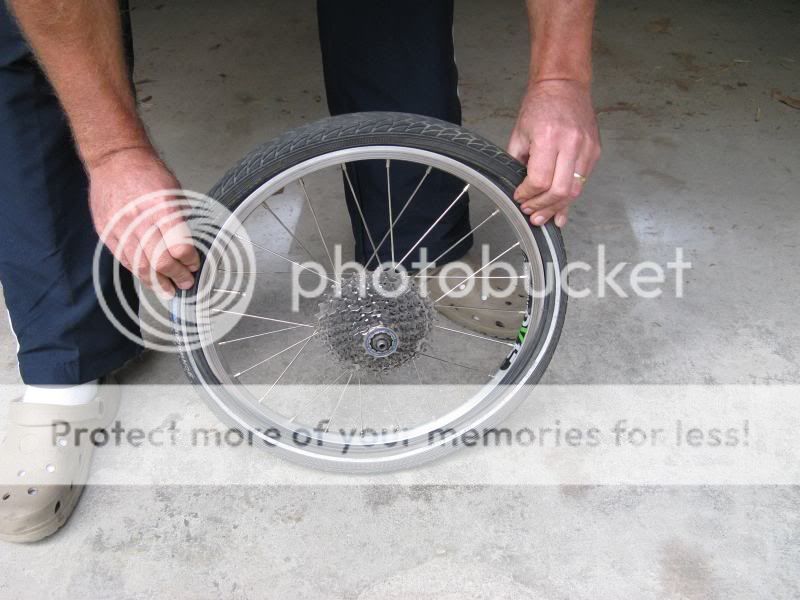
Step 3: Sliding down while squeezing beads to the center of the rim well...
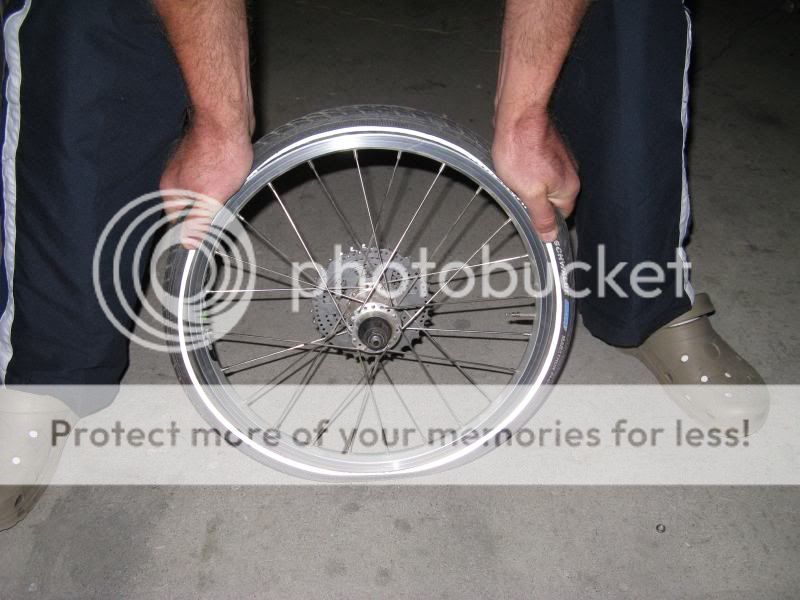
Step 4: When the hands reach the bottom, invert the wheel and strat pushing the beads over the rim wall. In this pic, the bead can just be seen proud of the rim wall.
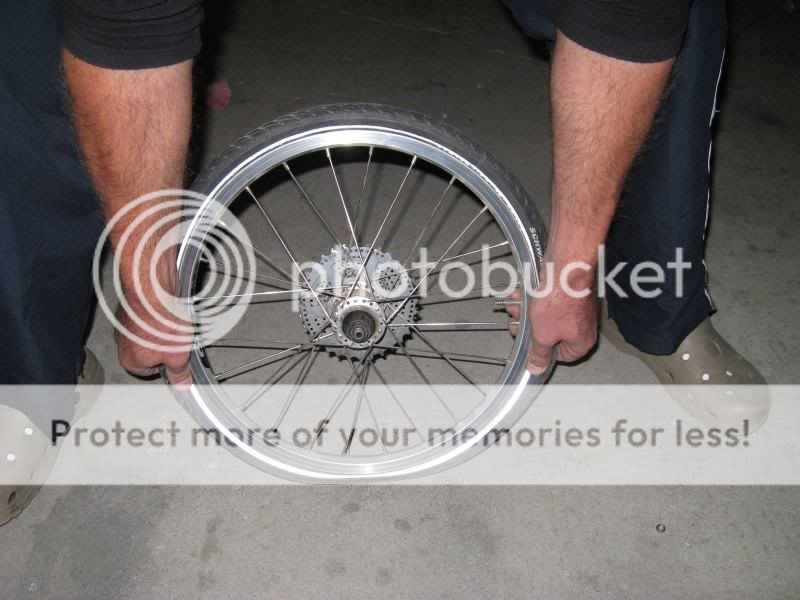
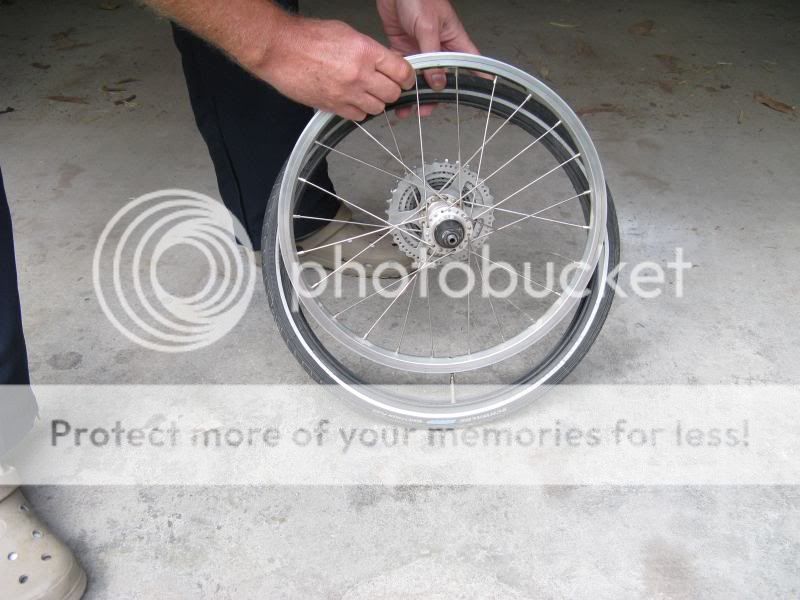
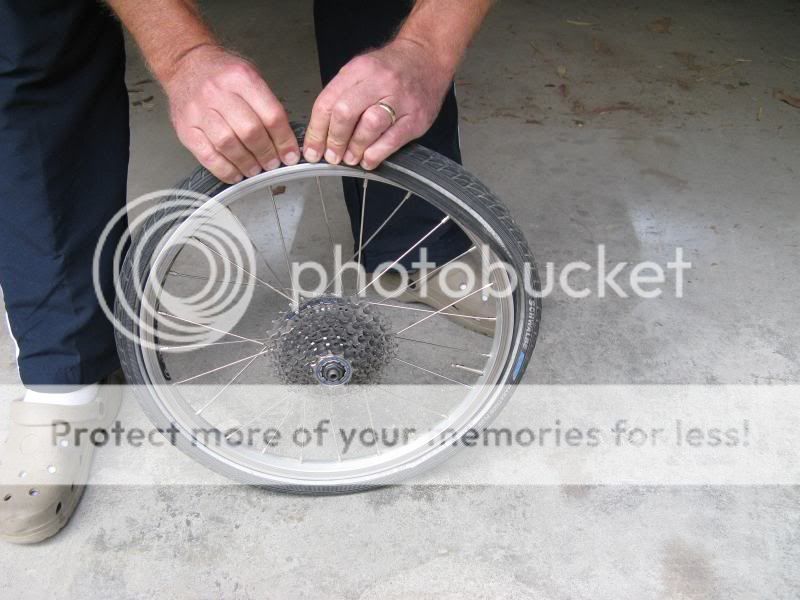
Step 5: Continue pushing both beads over the rim wall until about an 1/8th is done.
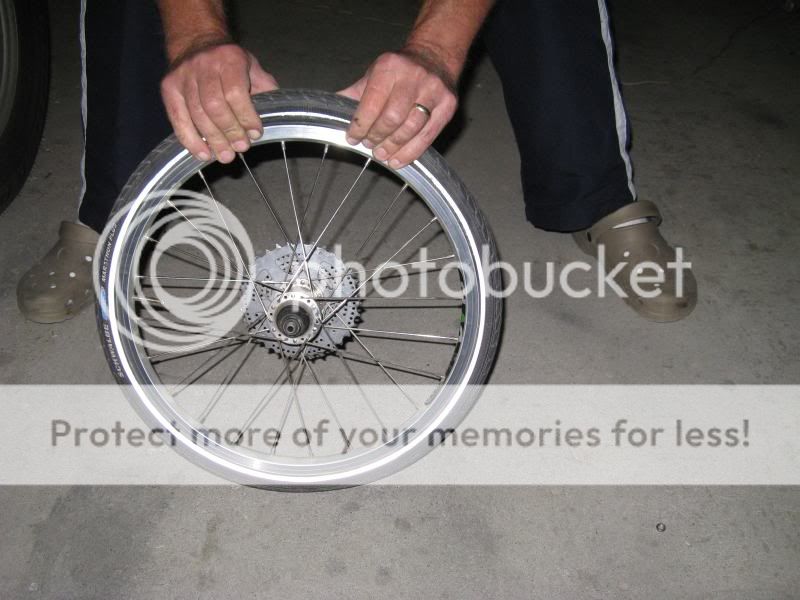
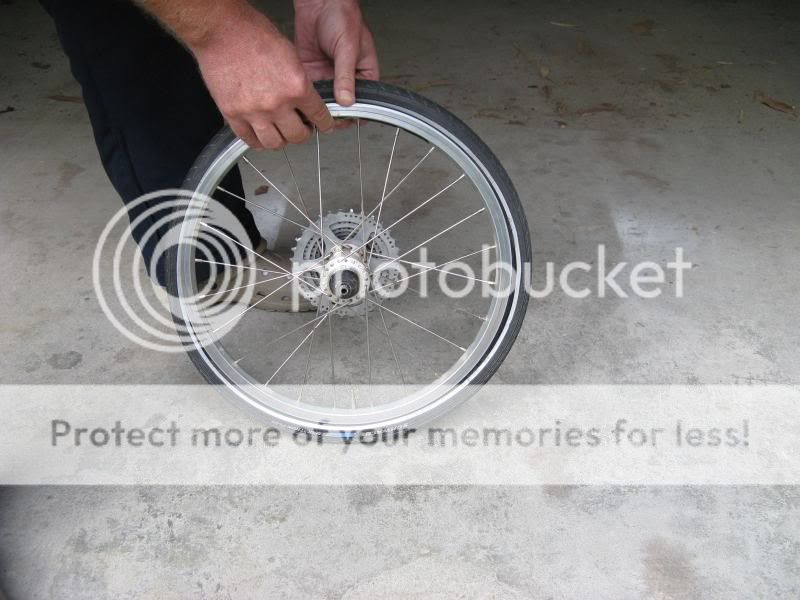
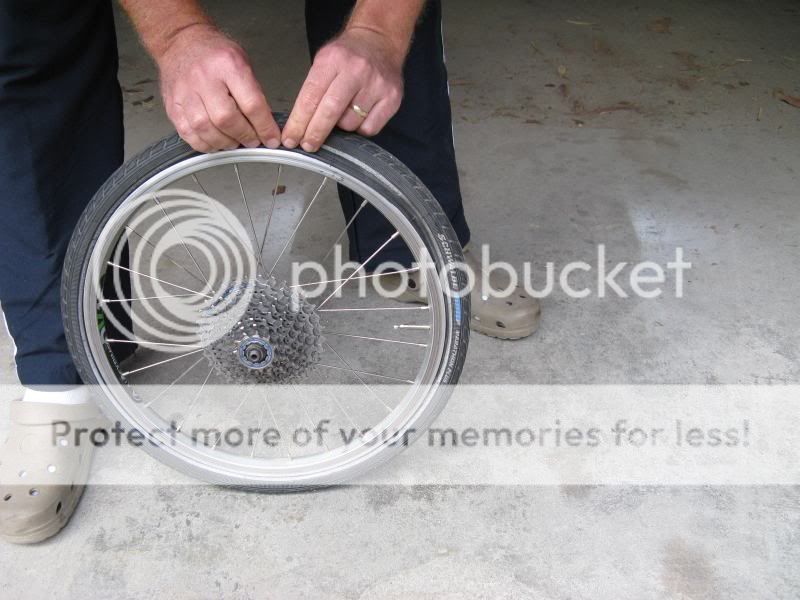
Step 6: Now grip the section that has been pushed past the wall and just pull firmly away from the rim and the whole tyre will slide off at once.
Here is a crappy video:
https://www.youtube.com/watch?v=7xZ6Lybtc8Q
I don't have very strong hands at all. In fact I think they are below average.
Step 1: FULLY deflate the tyre.
Step 2: With valve at 9 or 3 o'clock, squeeze the tyre beads together while sliding hands forcefully from to pto bottom.
Step 3: Sliding down while squeezing beads to the center of the rim well...
Step 4: When the hands reach the bottom, invert the wheel and strat pushing the beads over the rim wall. In this pic, the bead can just be seen proud of the rim wall.
Step 5: Continue pushing both beads over the rim wall until about an 1/8th is done.
Step 6: Now grip the section that has been pushed past the wall and just pull firmly away from the rim and the whole tyre will slide off at once.
Here is a crappy video:
https://www.youtube.com/watch?v=7xZ6Lybtc8Q
I don't have very strong hands at all. In fact I think they are below average.
Last edited by jur; 04-17-09 at 11:55 PM.
 04-18-09 | 12:52 AM
#2
Thread Starter
Senior Member
Joined: May 2005
Posts: 7,393
Likes: 10
From: Albany, WA
Here's how to put it back again:
Step 1: Put the tube in the tyre, making sure it is seated well. Inflating slightly helps.
Step 2: Put just one bead at a time into the rim well.
From the other side:

Step 3. Work the one bead all the way over the rim wall. This should be easy.
Step 4: Now work the remaining bead over the wall.

Start with the valve at 3 or 9 o'clock and work the bead over the wall past the valve.
If the tube was inflated slightly, fully deflate it now before proceeding.

Step 5: Now concentrate with both hands on just one end of the bead portion that is still outside the wall. All the while, make sure the bead is nicely in the center (deepest part) of the rim well to give most slack.
Using talcum powder will make the beads slippery for easier work. Mine were not powdered for this demo.
Step 1: Put the tube in the tyre, making sure it is seated well. Inflating slightly helps.
Step 2: Put just one bead at a time into the rim well.
From the other side:
Step 3. Work the one bead all the way over the rim wall. This should be easy.
Step 4: Now work the remaining bead over the wall.
Start with the valve at 3 or 9 o'clock and work the bead over the wall past the valve.
If the tube was inflated slightly, fully deflate it now before proceeding.
Step 5: Now concentrate with both hands on just one end of the bead portion that is still outside the wall. All the while, make sure the bead is nicely in the center (deepest part) of the rim well to give most slack.
Using talcum powder will make the beads slippery for easier work. Mine were not powdered for this demo.
04-18-09 | 02:56 AM
#3
小型自転車マニアック \(^o^)y
Joined: Jan 2008
Posts: 133
Likes: 0
From: Okinawa, Japan
Bikes: Mu P8, customized Xootr Swift
Thats just plain impressive!
Last tube change out on my Mu, I was struggling with a tool & about to throw the rim/tire against the wall..!
I like your way MUCH more Jur. I'll give it a go next time, but will have the tools on stand by. ; )
Last tube change out on my Mu, I was struggling with a tool & about to throw the rim/tire against the wall..!
I like your way MUCH more Jur. I'll give it a go next time, but will have the tools on stand by. ; )
 04-18-09 | 11:24 AM
#6
Senior Member
Joined: Feb 2007
Posts: 862
Likes: 0
From: Arizona
Bikes: Swift folder, single speed
Hey, thanks, Jur! I've been riding bikes all my life and I never knew there was an easier way to do this. It's generally a bit of a struggle for me with tire irons and all. I can hardly wait util my next flat so I can try it out!
04-19-09 | 01:41 AM
#7
Junior Member
Joined: May 2008
Posts: 6
Likes: 0
Nice photo essay, Jur!
I guess the only couple things I'd add is that the what Jur has done so well showing is...the FIRST time I take a tube off I make sure the wheel has the thinnest rim tape/protector possible. Filament packing tape makes great rim strips. Cut to width to fit down into the drop center, it will do a great job of covering the spoke nipples and holes. By minimizing the rim strip thickness the tire bead drops further into the drop center and better allows "tool-less" tire changes.
I would also add that I personally like to use the heel of my hands to roll the tire over the edge of the bead that last 6-8 inches. It seems to work well for me.
IF you haven't mastered this tool-less strategy...I'd suggest you get a QuikStik brand tire tool. You'll throw your other tire tools away after using this little beauty! Super simple and virtually eliminates pinched tubes on the way back on! Try it...you'll like it!
04-19-09 | 01:54 AM
#8
Senior Member
Joined: Feb 2007
Posts: 862
Likes: 0
From: Arizona
Bikes: Swift folder, single speed
I looked up QuikStik.
World's fastest tire change with QuikStik:
https://www.youtube.com/watch?v=moA9R...eature=related
It takes me more time than that just to unscrew the valve cap!
World's fastest tire change with QuikStik:
https://www.youtube.com/watch?v=moA9R...eature=related
It takes me more time than that just to unscrew the valve cap!
04-19-09 | 09:22 AM
#9

Senior Member
Joined: Dec 2008
Posts: 1,821
Likes: 1
I tried the tool-less method on my wheel (Alex double wall + Marahton) and had no success. Moving the tire to the center of the rim does not help much as the bottom of the rim's well is almost flat. I also tried to use levers at the last step (after moving the tire to the center) but it was just as difficult as usual.
Either I need to work on my technique or this is a tough wheel/tire combination. I may take my wheel to a LBS and ask them to take the tire off. If they will do it easily then I need to keep practicing.
Jur, please let me know when you will have the next tire removal workshop in my area. ;-)
Kam
Either I need to work on my technique or this is a tough wheel/tire combination. I may take my wheel to a LBS and ask them to take the tire off. If they will do it easily then I need to keep practicing.
Jur, please let me know when you will have the next tire removal workshop in my area. ;-)
Kam
04-19-09 | 07:19 PM
#10

Raleigh20 PugFixie, Merc
Joined: Sep 2004
Posts: 1,997
Likes: 4
From: London UK
Bikes: 1982 Raleigh Twenty Hotrod Fixie; 1984 Peugeot Premier Fixie, 2007 Merc Lightweight folder
Crocs!
__________________
My Raleigh Twenty site | foldr : A flickr pool | #6460, #5632 & #3407 on the fixedgeargallery
My Raleigh Twenty site | foldr : A flickr pool | #6460, #5632 & #3407 on the fixedgeargallery
04-19-09 | 07:41 PM
#11

crazy bike girl
Joined: Jul 2007
Posts: 3,325
Likes: 3
From: CA Central Coast
Bikes: '07 Orbea Onix, '07 Birdy Yellow, '06 Cannondale Bad Boy (stolen)
I struggled with my Birdy tire...I could get it off ok, but had a really hard time getting it back on even with tire levers. 
__________________
Countries I've ridden in: US, Canada, Ireland, UK, Germany, Netherlands, France, China, Singapore, Malaysia
States I've ridden in: Illinois, Connecticut, Massachusetts, Pennsylvania, California, Nevada, Missouri, Colorado
Countries I've ridden in: US, Canada, Ireland, UK, Germany, Netherlands, France, China, Singapore, Malaysia
States I've ridden in: Illinois, Connecticut, Massachusetts, Pennsylvania, California, Nevada, Missouri, Colorado
04-19-09 | 08:33 PM
#12
Thread Starter
Senior Member
Joined: May 2005
Posts: 7,393
Likes: 10
From: Albany, WA
 (Once I wore them in, they are superior in comfort and have become my favourite... go on, sledge me, I can take it...
  )
04-19-09 | 09:02 PM
)
04-19-09 | 09:02 PM
#13

Senior Member
Joined: Aug 2005
Posts: 1,319
Likes: 0
From: Vancouver, Washington and Ocean Shores, Washington, USA
Bikes: 2 - 2007 Custom Bike Fridays, 2 - 2009 Bike Friday Pocket 8's, Gravity 29'er SS, 2 - 8-spd Windsor City Bikes, 1973 Raleigh 20 & a 1964 Schwinn Tiger
The whole thing is a CROC!!!
I have never found it that easy even with tools, but since Jur recommends it - with pictures no less - I will give it one more try at the time of my next flat tire.
Lou
I have never found it that easy even with tools, but since Jur recommends it - with pictures no less - I will give it one more try at the time of my next flat tire.
Lou
04-19-09 | 09:03 PM
#14

Galveston County Texas
Joined: Nov 2007
Posts: 33,335
Likes: 1,285
From: In The Wind
Bikes: 02 GTO, 2011 Magnum
iI is easy with some 700 x 28 tires.
__________________
Fred "The Real Fred"
Fred "The Real Fred"
04-19-09 | 09:50 PM
#16
Senior Member
Joined: Dec 2008
Posts: 1,821
Likes: 1
I looked up QuikStik.
World's fastest tire change with QuikStik:
https://www.youtube.com/watch?v=moA9R...eature=related
It takes me more time than that just to unscrew the valve cap!
World's fastest tire change with QuikStik:
https://www.youtube.com/watch?v=moA9R...eature=related
It takes me more time than that just to unscrew the valve cap!
The Pedro levers are still my favorites, they are thin, strong and when I use them, I can take the tire off after only a short struggle.
Kam
04-20-09 | 11:26 AM
#17
Junior Member
Joined: May 2008
Posts: 6
Likes: 0
Kam,
At the risk of sounding condescending, are you breaking the bead all the way ariound the tire before you try to insert the Quik-Stik? I realize some rims have little or no drop center...which will limit how much "give" you will get out of moving the bead to the center. Let me just say that the Quik Stik has always worked for me when I've used it, whenever I can't go tool-less, that is!
YMMV
04-20-09 | 11:57 AM
#18

on by

Joined: Mar 2006
Posts: 958
Likes: 754
From: Wisconsin
Bikes: Bacchetta Giro 20 ATT, Waterford RS-33, Salsa Vaya
I'd love to see a tool-less vid of you changing any 700x23 road tire. I had a set of Mich Carbons that were an absolute b*tch even with levers. They were so tight that they once caused the rim tape to shift (w/tube deflated) which lead to multiple flats.
Thanks for the demos
Thanks for the demos
04-20-09 | 08:22 PM
#19
Hey Jur! ... thanks for the photos and crappy video ... I like the idea of installing both tire and tube together.. normally I mount them separately, usually without tools.. I tried your way over the weekend on an Airnimal (520mm Velocity rims) that I'm playing with.. worked slick!! 

... I like the idea of installing both tire and tube together.. normally I mount them separately, usually without tools.. I tried your way over the weekend on an Airnimal (520mm Velocity rims) that I'm playing with.. worked slick!!
04-20-09 | 10:30 PM
#20
Thread Starter
Senior Member
Joined: May 2005
Posts: 7,393
Likes: 10
From: Albany, WA
Hey Jur! ... thanks for the photos and crappy video ... I like the idea of installing both tire and tube together.. normally I mount them separately, usually without tools.. I tried your way over the weekend on an Airnimal (520mm Velocity rims) that I'm playing with.. worked slick!!
... I like the idea of installing both tire and tube together.. normally I mount them separately, usually without tools.. I tried your way over the weekend on an Airnimal (520mm Velocity rims) that I'm playing with.. worked slick!!
04-20-09 | 10:41 PM
#21
Thread Starter
Senior Member
Joined: May 2005
Posts: 7,393
Likes: 10
From: Albany, WA
I googled it and found some more sites showing the same technique even with a less crappy video:
https://www.teamestrogen.com/content/asa_levers (this one from a women, showing it is a question of technique)
https://www.mbaction.com/ME2/dirmod.a...5083C6CE13DD22
https://www.teamestrogen.com/content/asa_levers (this one from a women, showing it is a question of technique)
https://www.mbaction.com/ME2/dirmod.a...5083C6CE13DD22
04-20-09 | 11:46 PM
#22
Senior Member
Joined: Dec 2008
Posts: 1,821
Likes: 1
Jur, I have Marathon tires and this wheel (20" version):
https://www.alexrims.com/product_deta...=2&cat=2&id=71
How does the depth of the center of the rim's well compares to yours?
It is pretty flat so moving the tire to the middle does not create much clearance in the other side. Or, my technique may need improvement.
Edit: here is another 20" wheel https://www.alexrims.com/product_deta...7&cat=6&id=117 and it has a significantly deeper well. This made me to think that some rim/tire combination are easier to remove than others.
Kam
Last edited by kamtsa; 04-20-09 at 11:53 PM.
04-21-09 | 12:55 AM
#23
Thread Starter
Senior Member
Joined: May 2005
Posts: 7,393
Likes: 10
From: Albany, WA
Jur, I have Marathon tires and this wheel (20" version):
https://www.alexrims.com/product_deta...=2&cat=2&id=71
How does the depth of the center of the rim's well compares to yours?
It is pretty flat so moving the tire to the middle does not create much clearance in the other side. Or, my technique may need improvement.
Edit: here is another 20" wheel https://www.alexrims.com/product_deta...7&cat=6&id=117 and it has a significantly deeper well. This made me to think that some rim/tire combination are easier to remove than others.
Kam
https://www.alexrims.com/product_deta...=2&cat=2&id=71
How does the depth of the center of the rim's well compares to yours?
It is pretty flat so moving the tire to the middle does not create much clearance in the other side. Or, my technique may need improvement.
Edit: here is another 20" wheel https://www.alexrims.com/product_deta...7&cat=6&id=117 and it has a significantly deeper well. This made me to think that some rim/tire combination are easier to remove than others.
Kam
Scaling from the two drawings, mine has a 6.4mm well while yours is 7.2mm, so deeper than mine.
But you are correct, some rim and tyre combinations are much more difficult than others. EG, my Sun Ringle Rhynolite rim + Big Apple on the R20 is ridiculously easy. The Velocity Aeroheat + Conti GP is about the same or a little more difficult than the demo (I tried that one later). But it is true that after first reading about the technique in the first link above, and after mastering it, I have not failed in a single case to remove a tyre without a tool. The method I describe by sliding the hands down while squeezing the bead together, I later saw done by an ex pro rider on a road wheel during the Fleche-Opperman trial (see long rides thread).
04-21-09 | 01:40 AM
#24
Senior Member
Joined: Dec 2008
Posts: 1,821
Likes: 1
04-27-09 | 08:46 AM
#25
Junior Member
Joined: May 2008
Posts: 6
Likes: 0
Asa's info is also good stuff. I'd add that I always position the label on the tire at the tube stem. When I remove the tube I look for the offending hole. IF I've inadvertently just run over a huge, yet somehow unseen stinkin' rock or something...I look for a "snake bite" on the inside of the tube. (this would be a GREAT time to say you need to develop a "feel" for tire pressure. Thin walled, lightweight tubes leach out air and some need to be re-inflated before every ride. Feel what a fully inflated tire feels like on your bike after a full inflation and remember that your finger nail probably doesn't cause the tire to budge) So...if you forgot all of that and didn't check you tire pressure before you left home and you flatted, check for two little "snake bite type" holes on the INSIDE of the tube where they would come in contact with the rim should you hit some offending obstruction...like the edge of a curb, rock, stick...you get the picture.
No snake bite, use Asa's suggestion that you check the outside of the tire for little pieces of glass, wire, THORNS, etc. By using the label to always positon the tire/tube in the same relative location near the stem, when your find the hole you can now go back to the tire and say: Self...this hole is about 8 inches from the stem...look at tire (especially if you haven't danced around too much and know how the tube came out!) and search the offending area of tire for a sharp protrusion. Actually FINDING the offender will sometimes require re-inflating the tube to see where the leak is. (Sometimes the hole is SO small that I can't hear or see the leak. That's when I hold the tube up near my face and rotate it by my face. Often you will feel the rush of air as it passes by your face) Why do all of this? To Asa's point, IF you flatted because of say...a glass shard protruding thru your tire and you re-install your new tube into the old penetrated tire...VIOLA, you get more tool-less tire changing practice! Only THIS time you also get to pratice your patchings skills, too. You HAVE a patch kit with you...RIGHT?
Nothing you can find on the outside? Now you have to be REAL CAREFUL. First LOOK inside the tire in the area you've deemed the "offending area" with your tire label location trick. Can't see anything? CAREFULLY run your fingers LIGHTLY around inside the area. Many things like glass or wire will be picked up by your tire and then with each successive revolution driven further and further into your tire and then your tube until...PUFF...you flat! It may not be visible from the outside, but careful scrutiny on the inside will most often net the problem. (That's why it's important to QUICKLY wipe your tires with your gloves after you unexpectedly ride thru broken glass...you don't wear cycling gloves? 'Nother story!) I grasp the tire between to hands and kind of roll it inside-out so I can get a really good look. I've had multiple flats on the same tire because I simply couldn't find a stinkin' little piece of really sharp wire that was sticking thru my tire JUST far enough to flat over time. In defense of self...it was slightly bent, so I like to think it was screwing itself around making it even MORE difficult to find as I ran my hand around inside the tire after each flat thinking: it's GOTTA be in here somewhere...OUCH! Found it.
The label locator thing will go a long way toward allowing you to pinpoint problems, rather than whipping the tube out like some Rodeo rider after he just tied all four legs together on a roped calf...TA-DA!.