


Repairing Eyelets on a well used Voyager
 08-21-25 | 01:52 PM
#1
Thread Starter
Senior Member


Joined: Aug 2012
Posts: 675
Likes: 283
From: Seattle
Repairing Eyelets on a well used Voyager
Had a quick repair yesterday. A lady called and asked how quickly I could fix an eyelet on a very well loved early 90s Schwinn Voyager. It's her primary mode of transportation so it was urgent. She sent a few pictures that confused the discussion a bit but I thought I had the gist. Turns out, 3 of the 4 eyelets were damaged or had been rewelded by someone in the midwest! I'm a sucker for keeping a well-used and loved bike on the road, so I agreed.
I removed the 3 that were damaged, turned 3 new ones (the originals are much bigger than ones I get from typical suppliers).
by https://www.flickr.com/photos/54319503@N05/, on Flickr
You can see I put small miters in the dropout that nestle the eyelet perfectly. I then brazed them on with nickel silver and painted flat black.
by https://www.flickr.com/photos/54319503@N05/, on Flickr
by https://www.flickr.com/photos/54319503@N05/, on Flickr
As mentioned, the bike has seen some miles. It turns out she rode it from east coast to west coast several years ago and it's her primary transportation here. On her cross-country trip, she had breakages along the way. Apparently it's easy to find people to weld in the midwest. The top rack mounts are both welded (MIG blobs on top of eyelets?) and out of phase on the seatstays, one of the dropout eyelets was welded but only on the outside so it broke off pretty easily with plyers. Luckily it distorted enough from the welding that she couldn't get an M5 screw into it, so it was unused and hadn't broken!
by https://www.flickr.com/photos/54319503@N05/, on Flickr
Other things I noticed:
I removed the 3 that were damaged, turned 3 new ones (the originals are much bigger than ones I get from typical suppliers).

You can see I put small miters in the dropout that nestle the eyelet perfectly. I then brazed them on with nickel silver and painted flat black.


As mentioned, the bike has seen some miles. It turns out she rode it from east coast to west coast several years ago and it's her primary transportation here. On her cross-country trip, she had breakages along the way. Apparently it's easy to find people to weld in the midwest. The top rack mounts are both welded (MIG blobs on top of eyelets?) and out of phase on the seatstays, one of the dropout eyelets was welded but only on the outside so it broke off pretty easily with plyers. Luckily it distorted enough from the welding that she couldn't get an M5 screw into it, so it was unused and hadn't broken!

Other things I noticed:
- The stays for the rear fender seem to be rubbing on the bottom of the rack which would have added pressure and could have led to the latest eyelet failure
- The stays had a lot of built in stress so I adjusted (bent) them
- The rear was spaced for 130mm but the hub (Phil) was 135 so I respaced and aligned that.
- WIDE MTB cranks on a very small road frame for a small rider
- Phil hubs that are worth 3x the whole bike value.
__________________
https://www.flickr.com/photos/54319503@N05/
https://www.draper-cycles.com
https://www.flickr.com/photos/54319503@N05/
https://www.draper-cycles.com
 08-21-25 | 08:12 PM
#2

Old fart


Joined: Nov 2004
Posts: 26,256
Likes: 5,133
From: Appleton WI
Bikes: Several, mostly not name brands.
For the second eyelets we brazed onto Campagnolo 1010 dropouts for the model 720, we milled an indent the same diameter as the OD of the eyelet. This held the eyelet nicely during brazing.

08-22-25 | 01:26 AM
#3
Thread Starter
Senior Member
Joined: Aug 2012
Posts: 675
Likes: 283
From: Seattle
Exactly what I did. The original eyelets happened to be 1/2" in diameter and I have a 1/2" carbide burr so I just touched the burr to the right spot and "voila"!
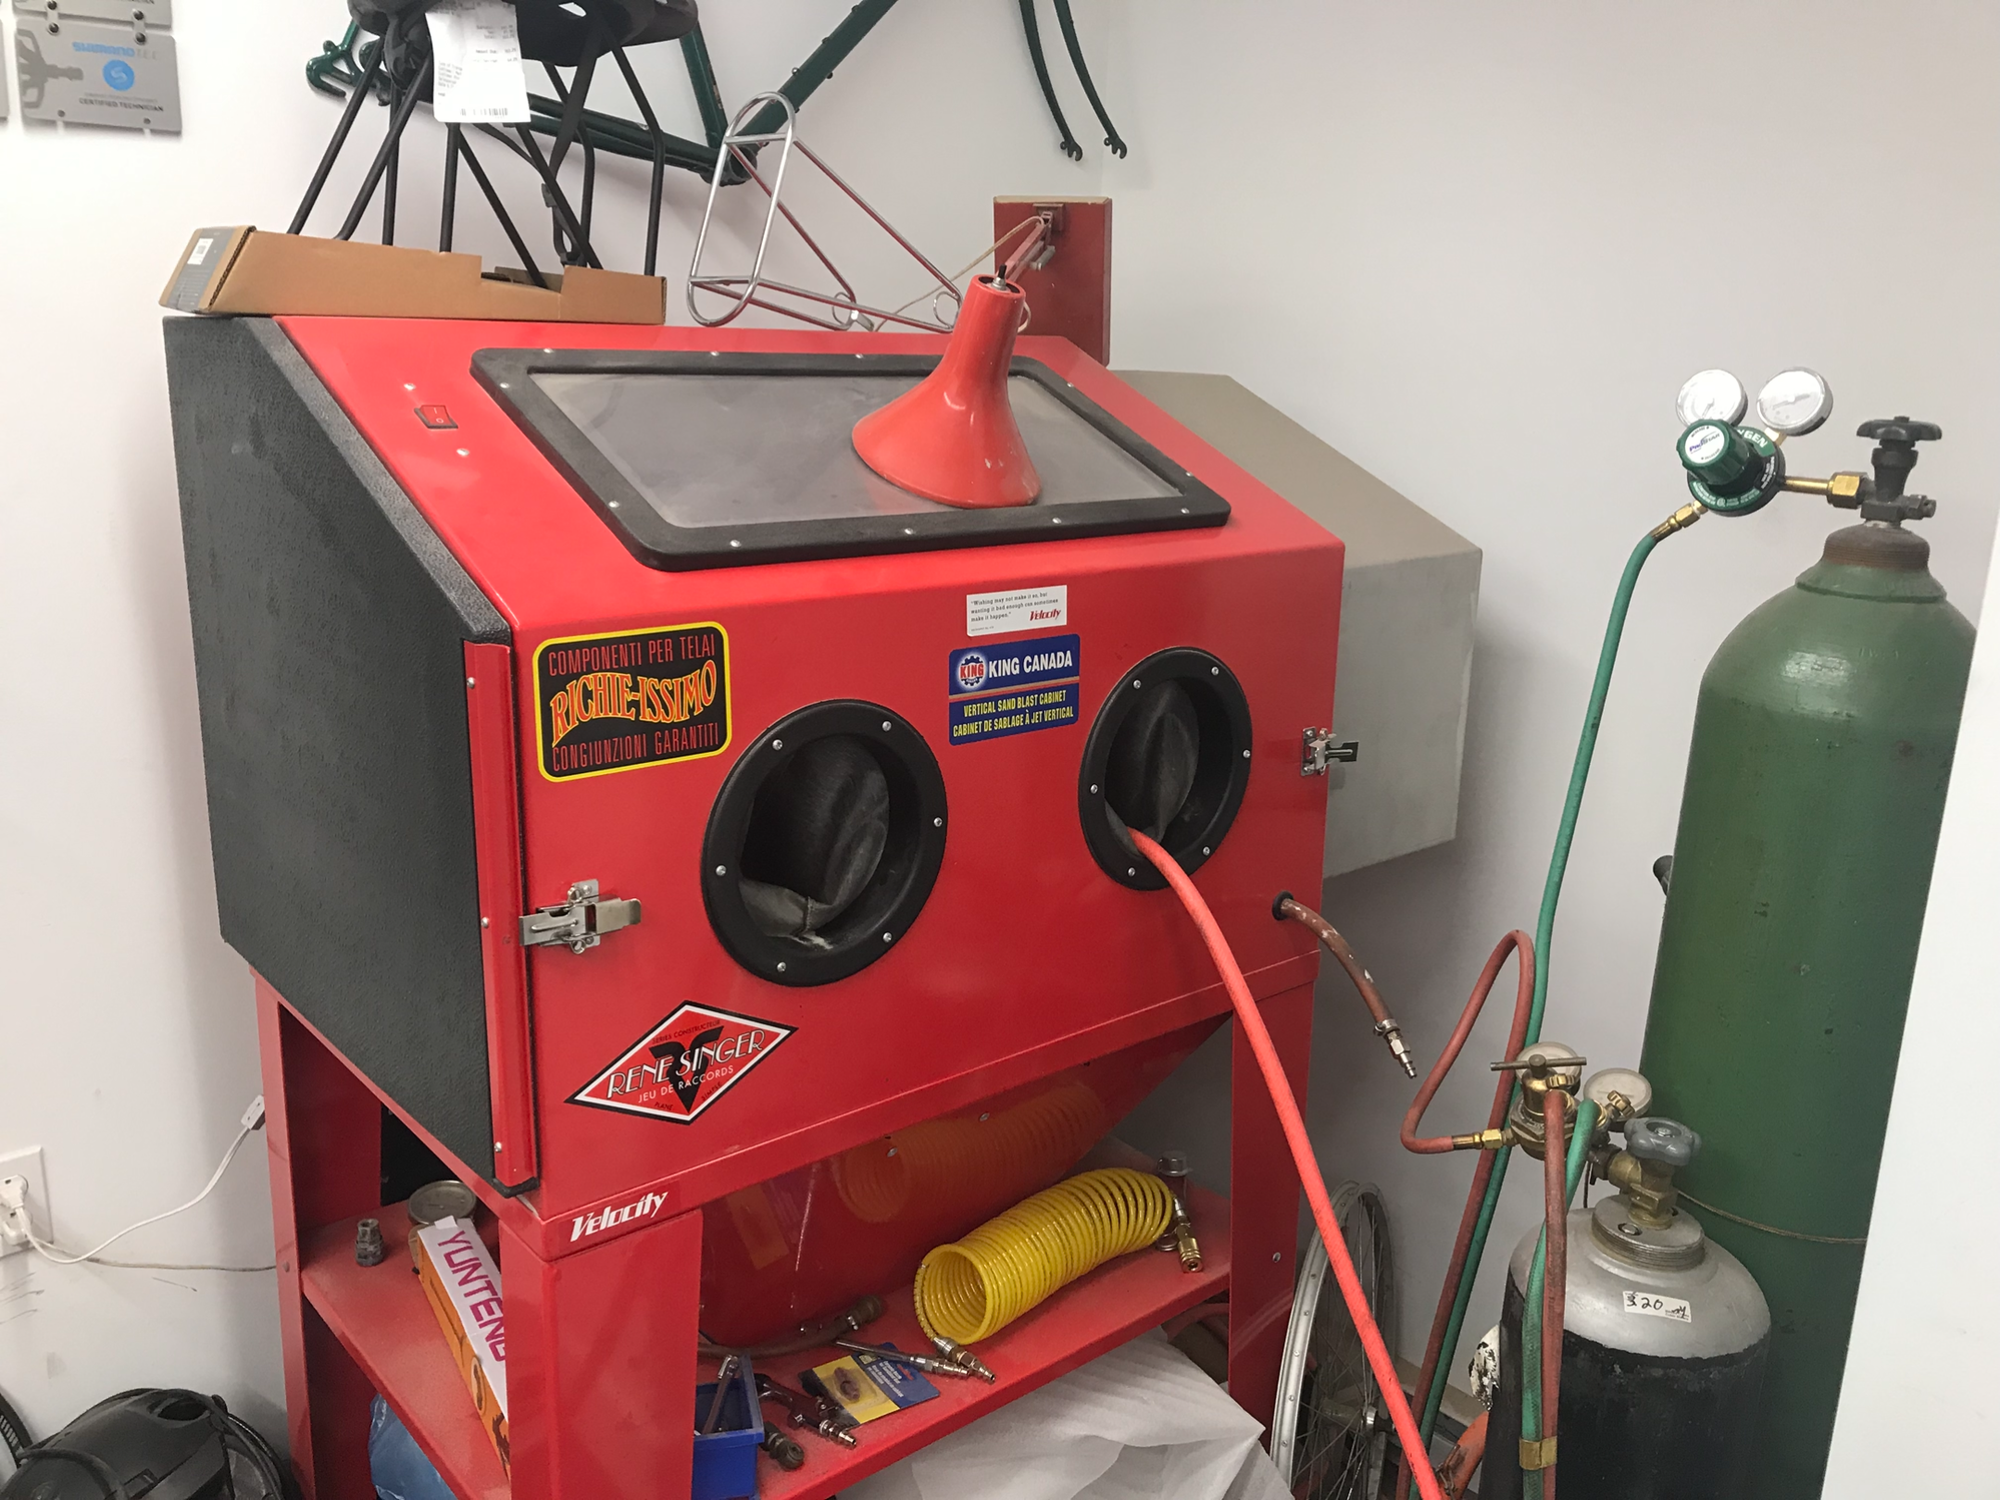
PS - my next investment is a sandblasting cabinet.
PS - my next investment is a sandblasting cabinet.
__________________
https://www.flickr.com/photos/54319503@N05/
https://www.draper-cycles.com
https://www.flickr.com/photos/54319503@N05/
https://www.draper-cycles.com
08-22-25 | 08:15 AM
#4
Senior Member
Joined: Feb 2012
Posts: 19,290
Likes: 5,382
From: Rochester, NY
Bikes: Stewart S&S coupled sport tourer, Stewart Sunday light, Stewart Commuting, Stewart Touring, Co Motion Tandem, Stewart 3-Spd, Stewart Track, Fuji Finest, Mongoose Tomac ATB, GT Bravado ATB, JCP Folder, Stewart 650B ATB
When I bought my blasting cabinet I went to these guys for upgrading parts and media. HOME | Tacoma Company They were very helpful, spending a lot of time on the phone running through the ins and outs of cheap units and how to improve their performance.
Good timing for this topic as I am in the process of making an extension for one end of my cabinet and I plan to report back here after I've made real progress. At only about 4' long the cabinet is just barely big enough to blast a frame and getting good attack angles on the dropouts or head tube is quite a contorting trick currently. I plan to replace an end door with a box. Andy
__________________
AndrewRStewart
AndrewRStewart
Last edited by Andrew R Stewart; 08-22-25 at 08:19 AM.
08-22-25 | 10:17 AM
#5

Senior Member


Joined: Apr 2009
Posts: 3,625
Likes: 5,352
From: Seattle
I wonder if Davidson ever sold his? When he moved from Pike Place to Fremont, the blaster was there, disassembled in a heap for a long time. I didn't visit all that often so maybe he eventually assembled it. The new owner of the shop might be interested in selling it, unless he does his bead-blasted finish on Ti in-house. It's big enough to turn a frame every which way, and we did tandems by building a tent over the open door, and just trying not to point the gun in that direction... not always successfully, so that room got pretty dusty.
Bill bought a big expensive dust collector but then never attached it or wired it for power, and it sat there like that for years... collecting dust!

Last edited by bulgie; 08-22-25 at 10:24 AM.
08-22-25 | 11:22 AM
#6
Thread Starter
Senior Member
Joined: Aug 2012
Posts: 675
Likes: 283
From: Seattle
Of course, you're welcome anytime! I don't know where I would put it either. I'm trying to find space for my Diacro #3 that has been in storage for 8 months now!
I might run air line outside and leave it along the back wall of the garage but I think moisture might be a problem. I also worry that my air compressor isn't strong enough and I don't have 220v so can't upgrade. I think maybe a small one on a rolling stand might work. I could roll it out to the driveway, do my blasting and then roll it back into the heated/AC'd shop where i can control the humidity (it's Seattle so, dampness). It would really be for blasting dropouts, lugs, crowns and shells before brazing. Having it be large enough to handle a fork or chainstays/dropouts would be nice I suppose. One large enough to handle a full frame would be unreasonable in my shop.
I also need to rebuild my lathe and mill so, this might have to wait.
__________________
https://www.flickr.com/photos/54319503@N05/
https://www.draper-cycles.com
https://www.flickr.com/photos/54319503@N05/
https://www.draper-cycles.com
08-22-25 | 11:25 AM
#7
Old fart
Joined: Nov 2004
Posts: 26,256
Likes: 5,133
From: Appleton WI
Bikes: Several, mostly not name brands.
08-22-25 | 12:35 PM
#8
Senior Member
Joined: Apr 2009
Posts: 3,625
Likes: 5,352
From: Seattle
Pretty sure every home in the US has 220, you just need a 220 breaker and line run to wherever. If you have room in your panel for another breaker, this is not a big project. I can do it (have done it) but I wouldn't recommend that unless you're an electrician. I'm not, so I might be fixin' to burn the house down. When I had a 100A sub-panel run out to my shed, mostly for the welder but also a few other outlets, I used a cheap electrician who clearly was new at it, he made some mistakes but he sure was cheap! I can get you his info, maybe he's better at it by now?
Your lathe, mill and air compressor will all run better on 220, at half the amps, so I'd suggest it is worth it. Re-wiring the motors for 220 is usually trivial, involving no tools other than a screwdriver to take the cover plate off, and then it's just undoing and re-doing some wire nuts. The chart for how to wire it is almost always on the motor nameplate, or can be looked up if the plate is unreadable/gone.
In fact I'd recommend combining that into a larger more expensive project for the lathe and mill (not needed for the compressor), namely replacing the motors with 3-phase and a VFD. Super smooth start-up, infinitely-variable speed by twisting a dial, even electrical braking to stop the spindle faster if you want that. Good VFDs have all sorts of motor-protection tech, I don't understand any of it but it sounds cool! But I mostly like it for the instant speed control. Much less belt-flipping.
I still have to flip belts sometimes, because the range of speed you can get out of the VFD alone isn't enough. I run mine down to maybe 10 Hz sometimes (1/6th of the nameplate speed on the motor @ 60 Hz), though such slow speeds can be trouble if you run it too long with a sizable load -- the motor overheats, from the fan moving too slowly. So I use 30 Hz (half speed) as a normal minimum, and 120 as the max, four-to-one range. Not enough to go from a 2" holesaw in steel to a 2 mm drill in aluminum.
I have converted 5 machines to 3-ph. and VFDs now, so if you want I can help with that. After the lathe and mill, I put 'em on my drill press, belt sander and even my buffing wheel, just because I was given a free 3-phase motor and scored a VFD for it cheap.
New 3-phase motors and VFDs are expensive but I have gotten all of mine cheap off ebay or Craig's. VFDs are complex electronic devices so maybe that's risky, but all 5 of mine have been perfect. With motors though, it's the opposite: 3-ph. is so much simpler than a single-phase motor, there's not much that can go wrong, other than a bearing wearing out, which is fixable in your shop, you don't need a specialist. So in my experience, they're definitely safe to buy used, especially on ebay with their liberal return policy. I have bought really ugly-looking ones which sell cheap like sub-$100. The good American-made VFDs I like are more like $200-$400 used or "open box", though Chinese garbage can be had new for less than $100. (Not recommended; horror-stories abound). I get the kind with fully-sealed "wash-down" enclosures so dust and swarf can't get into the electronics. You can make your own enclosure for the unsealed type, with a cooling fan, and air filter on the intake, but then the costs add up, so buying the sealed one in the first place might end up cheaper.
OK I just wrote a damn book (again), I'll shut up now, but I'm happy to answer any Qs.
08-22-25 | 03:57 PM
#9
semi-retired framebuilder
Joined: Dec 2007
Posts: 128
Likes: 475
From: Halifax, Nova Scotia, Canada
Bikes: twenty-three at last count
When I bought my blasting cabinet I went to these guys for upgrading parts and media. HOME | Tacoma Company They were very helpful, spending a lot of time on the phone running through the ins and outs of cheap units and how to improve their performance.
Good timing for this topic as I am in the process of making an extension for one end of my cabinet and I plan to report back here after I've made real progress. At only about 4' long the cabinet is just barely big enough to blast a frame and getting good attack angles on the dropouts or head tube is quite a contorting trick currently. I plan to replace an end door with a box. Andy
Good timing for this topic as I am in the process of making an extension for one end of my cabinet and I plan to report back here after I've made real progress. At only about 4' long the cabinet is just barely big enough to blast a frame and getting good attack angles on the dropouts or head tube is quite a contorting trick currently. I plan to replace an end door with a box. Andy
Go for it, Andy.
08-23-25 | 03:35 AM
#10
Thread Starter
Senior Member
Joined: Aug 2012
Posts: 675
Likes: 283
From: Seattle
I used the burr and then adjusted the alignment with a few strokes of a round file.
__________________
https://www.flickr.com/photos/54319503@N05/
https://www.draper-cycles.com
https://www.flickr.com/photos/54319503@N05/
https://www.draper-cycles.com
Last edited by duanedr; 08-23-25 at 03:41 AM.
08-23-25 | 03:39 AM
#11
Thread Starter
Senior Member
Joined: Aug 2012
Posts: 675
Likes: 283
From: Seattle
Aye, there's the rub! the power to the shop runs under the driveway and through foundation wall. I've had electricians out to help and we've all come to the conclusion that it's not worth it. When my wife finally gets me to agree to repave the driveway, I'll dig it up and run 220 from the panel in the house but until then, it's 110.
__________________
https://www.flickr.com/photos/54319503@N05/
https://www.draper-cycles.com
https://www.flickr.com/photos/54319503@N05/
https://www.draper-cycles.com
08-23-25 | 11:19 AM
#12
Senior Member
Joined: Apr 2009
Posts: 3,625
Likes: 5,352
From: Seattle
Aye, there's the rub! the power to the shop runs under the driveway and through foundation wall. I've had electricians out to help and we've all come to the conclusion that it's not worth it. When my wife finally gets me to agree to repave the driveway, I'll dig it up and run 220 from the panel in the house but until then, it's 110.
08-24-25 | 10:16 AM
#13
Thread Starter
Senior Member
Joined: Aug 2012
Posts: 675
Likes: 283
From: Seattle
08-24-25 | 12:29 PM
#14
Senior Member
Joined: Apr 2009
Posts: 3,625
Likes: 5,352
From: Seattle
How about your clothes dryer, is it electric by any chance? If so you'd just need a real heavy "extension cord" to reach from the dryer plug to the welder. I did that briefly when I first got my welder, before I had the new sub-panel out in the shed. I just bought the length I needed of heavy 3-conductor wire and attached the male and female plugs to match the dryer socket and the welder respectively. My dryer circuit was only 30 A, but remember, that's as much power as 60 A @ 110 V. I think my ~200 A (max) welder said it wanted a 40 A breaker (I forget), but it worked fine for the welding I did while on the dryer plug. That included welding 1/8" thick steel (square tube) to build the table for my benchtop mill, and some 3/16" thick. Probably could have welded 1/4" but I don't think I did back then.
Remember if you buy wire for the extension cord, the conductors might have to be heavier depending on the length. There are charts to tell you what gauge wire you need for each amperage and distance. And that much copper can get expensive.
Obviously unplugging the dryer and running that heavy cord out a door or window is suboptimal! But if you only do it once in a while -- and while the wife is out? Ooh maybe have a 220 receptacle added on the outside of the house, then you would only need to run the extension cord across the driveway, and coil it back up after each use.
Crazy? And probably moot if you have already purchased the small welder that only runs on 110. Or do you have a dual-voltage welder that can do either, with a pigtail adapter? That's how my welder is, with the max amps cut way back when you run it on 110.
Anyway, after all that impractical advice I do have one more practical suggestion, if you have something heavier to weld, bring it over to my place. I currently (no pun) have that ~200A TIG, and also just got a ~280A MIG just for one project of heavier steel (3/8" and 1/2"), after which I will probably sell it.
Remember if you buy wire for the extension cord, the conductors might have to be heavier depending on the length. There are charts to tell you what gauge wire you need for each amperage and distance. And that much copper can get expensive.
Obviously unplugging the dryer and running that heavy cord out a door or window is suboptimal! But if you only do it once in a while -- and while the wife is out?
Ooh maybe have a 220 receptacle added on the outside of the house, then you would only need to run the extension cord across the driveway, and coil it back up after each use.Crazy? And probably moot if you have already purchased the small welder that only runs on 110. Or do you have a dual-voltage welder that can do either, with a pigtail adapter? That's how my welder is, with the max amps cut way back when you run it on 110.
Anyway, after all that impractical advice I do have one more practical suggestion, if you have something heavier to weld, bring it over to my place. I currently (no pun) have that ~200A TIG, and also just got a ~280A MIG just for one project of heavier steel (3/8" and 1/2"), after which I will probably sell it.
