


Show my your home made chain whip
 09-13-07, 05:46 PM
#1
is as Gurgus does.
Thread Starter
Join Date: Feb 2004
Location: Otisburg
Posts: 910
Bikes: A whole bunch o' bikes.
Mentioned: 0 Post(s)
Tagged: 0 Thread(s)
Quoted: 1 Post(s)
Likes: 0
Liked 0 Times
in
0 Posts
Show my your home made chain whip
I want a chain whip, don't want to lay out the cashish for one. Anyone got pics of their homemade chain whip? I'm lookin' for idears.
Gracias.
Gracias.
 09-13-07, 05:58 PM
#3
Senior Member
Join Date: May 2007
Posts: 1,072
Mentioned: 0 Post(s)
Tagged: 0 Thread(s)
Quoted: 0 Post(s)
Likes: 0
Liked 0 Times
in
0 Posts
the sette one from pricepoint is excellente for about 7 bucks, but i am sure it wouldn't be too hard to make one:
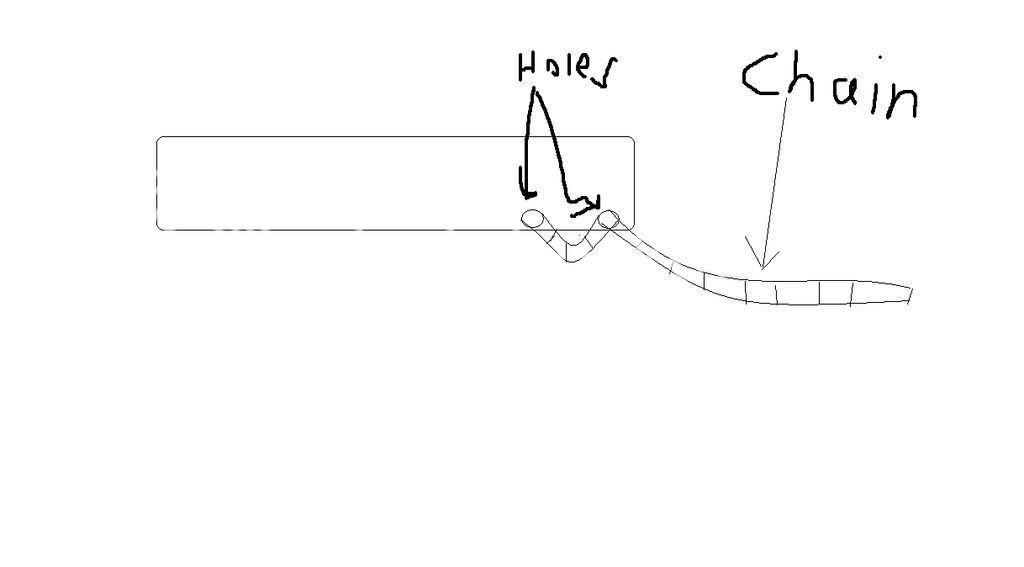
heres my plain it includes a piece of aluminum with two holes, and a chain:
attach the chain to the holes is the hardest part
heres my plain it includes a piece of aluminum with two holes, and a chain:
attach the chain to the holes is the hardest part
 09-14-07, 08:55 AM
#7
Bike Honky

Join Date: Oct 2004
Location: corvallis, OR
Posts: 422
Bikes: KHS touring thing that's old, French? fixxie, 69 schwinn stingray show bike.
Mentioned: 0 Post(s)
Tagged: 0 Thread(s)
Quoted: 1 Post(s)
Likes: 0
Liked 0 Times
in
0 Posts
Steel strap and a cutting torch
Last edited by bottom-bracket; 09-14-07 at 08:55 AM. Reason: html?
09-14-07, 09:11 AM
#8
switching to guns

Join Date: Sep 2004
Location: kings county, nyc
Posts: 1,968
Bikes: allez fuji tracku nishiki TT GT KHS arrow Miner 29'er CIOCC Corsair and now a f*cking awesome waterford skeet velo
Mentioned: 0 Post(s)
Tagged: 0 Thread(s)
Quoted: 1 Post(s)
Likes: 0
Liked 0 Times
in
0 Posts
been usin this for years and I never looked back

09-14-07, 09:39 AM
#10

Senior Member
Join Date: Oct 2004
Location: Western Morris Cty, NJ
Posts: 558
Mentioned: 0 Post(s)
Tagged: 0 Thread(s)
Quoted: 0 Post(s)
Likes: 0
Liked 1 Time
in
1 Post
My home made chain whip is nothing but a length of old chain. When I need a chain whip I clamp down on one end with a set of Vice-Grips. Instant chain whip.
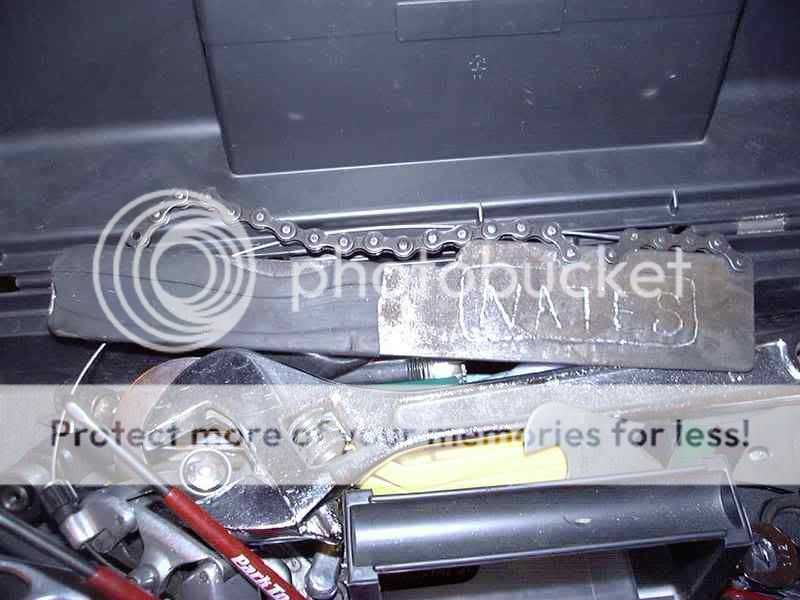
I tried making one like the original picture but my aluminum stock just buckled. I like my vice-grip better.
I tried making one like the original picture but my aluminum stock just buckled. I like my vice-grip better.
09-14-07, 10:54 AM
#11
Boston did not sob

Join Date: Jul 2007
Posts: 377
Mentioned: 0 Post(s)
Tagged: 0 Thread(s)
Quoted: 0 Post(s)
Likes: 0
Liked 0 Times
in
0 Posts
I use one of these babies:

Works like a charm on the lockring too.
My next project will involve using it to remove my old headset cups.
This tool pretty much does it all.
Works like a charm on the lockring too.
My next project will involve using it to remove my old headset cups.
This tool pretty much does it all.
09-14-07, 11:35 AM
#12
Boston did not sob
Join Date: Jul 2007
Posts: 377
Mentioned: 0 Post(s)
Tagged: 0 Thread(s)
Quoted: 0 Post(s)
Likes: 0
Liked 0 Times
in
0 Posts
How to use pipe wrench for cup removal:
https://www.utahmountainbiking.com/fix/headset2.htm
https://www.utahmountainbiking.com/fix/headset2.htm

 09-14-07, 11:39 AM
#14
Elitist

Join Date: Jul 2005
Location: Atlanta, GA
Posts: 15,965
Mentioned: 88 Post(s)
Tagged: 0 Thread(s)
Quoted: 1386 Post(s)
Liked 92 Times
in
77 Posts
Speaking of DIY and chain whips: https://www.bikeforums.net/singlespeed-fixed-gear/212385-tech-tip-convert-3-32-chain-whip-fit-1-8-3-32-cogs.html
09-14-07, 11:56 AM
#15
*****es love tarck
Join Date: Apr 2006
Location: Sandy, UT
Posts: 3,301
Bikes: so many
Mentioned: 1 Post(s)
Tagged: 0 Thread(s)
Quoted: 1 Post(s)
Likes: 0
Liked 0 Times
in
0 Posts
How to use pipe wrench for cup removal:
https://www.utahmountainbiking.com/fix/headset2.htm
https://www.utahmountainbiking.com/fix/headset2.htm
My home headset replacement technique:
I use a long screwdriver and hammer for cup removal. *tap tap tap* around the inside where a proper headset cup remover tool goes, moving in a criss cross pattern around the cups. Crown race removal is the same, but sometimes you need a smaller screwdriver. For the crown race install I use a seatpost just larger than the steer tube and the old race as mentioned in the article.
The cup install is more tricky and a bit scary. I put the cups in my beer fridge ice box and carefully and evenly *warm* the head tube with a torch (from the inside so as not to damage the paint). Be very careful not to get it too hot and make sure to heat it evenly and slowly or it will warp. You want it about as hot as it would be if you left it in the sun on a really hot day. The cups usually just drop right in at this point, easy as pie. If not, tap them in using a board like the article says. Have everything ready to go, the metals will cool/warm back to room temp pretty quicky and you'll have to do it again. You have to be ultra careful or you could ruin your frame, if it looks like the cups are even thinking of going in crooked, stop and take it to a shop.
Seriously, I thought about not even sharing this cause you could **** up your bike. It's better to just take it to a shop, but I'm a cheap *******.
__________________

 09-14-07, 11:59 AM
#17
crotchety young dude

Join Date: Jan 2005
Location: SF, CA
Posts: 4,818
Bikes: IRO Angus; Casati Gold Line; Redline 925; '72 Schwinn Olympic Paramount
Mentioned: 0 Post(s)
Tagged: 0 Thread(s)
Quoted: 2 Post(s)
Likes: 0
Liked 0 Times
in
0 Posts
Rotafix.
