


Post your rattlecan jobs
 09-16-07, 11:14 AM
#51
v. 2.0
Join Date: Feb 2007
Location: Atlanta, GA
Posts: 287
Bikes: 2006 Giant Bowery, early 1990s Diamondback "newspaper" bike
Mentioned: 0 Post(s)
Tagged: 0 Thread(s)
Quoted: 0 Post(s)
Likes: 0
Liked 0 Times
in
0 Posts

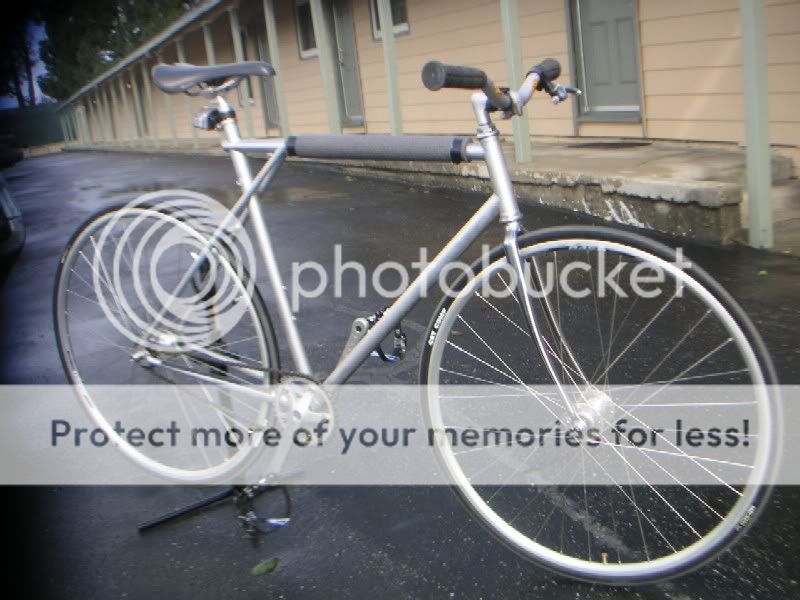
After the last coat of paint, just spray the clear coat--no prep work. The farther away you hold the clear coat, the more matte it will be. Mine was a matte finish.
 02-29-08, 12:45 PM
#53
Senior Member
Join Date: Nov 2007
Posts: 206
Mentioned: 0 Post(s)
Tagged: 0 Thread(s)
Quoted: 0 Post(s)
Likes: 0
Liked 0 Times
in
0 Posts

Hand sanded. Primered (Rustoleum Metal Primer, white label) 2 coats. Wet sanded 200 grit. Painted (Rustoleum White Label High Gloss Enamel). Baked. Touched up some bubbles by wet sanding and repainting.
02-29-08, 12:55 PM
#54
"this is not suck"
Join Date: Feb 2008
Posts: 387
Mentioned: 0 Post(s)
Tagged: 0 Thread(s)
Quoted: 0 Post(s)
Likes: 0
Liked 3 Times
in
3 Posts
you guys need to read this:
re-printed from another thread:
for years I tried to find a way to paint without a compressor, and after a couple of years just gave up and went and got compressors and iwata $500 paint guns, and spent so much money I had to start a motorcycle restoration buisness. (which I am now retired from), but I learned some things along the way:
if you MUST use a rattlecan, there are some things to keep in mind, and some new technologies you should be aware of.
first off, they put all kinds of paint in spray cans, so why not spend an extra few dollars and get GOOD spray paint, eh? you wont find ANY "good" spray paints at hardware stores, or discount auto supply stores (auto zone, kragen etc,..) or at wal-mart or target.
go to an autobody supply house (called "color shops") they are listed in the yellow pages. GOOD spray paint can be found at these locations, and it'll be a shocking $7 to $20 a can for the good stuff.
a) get SEALER (1K epoxy if possible) thats to coat the bare metal (DO NOT get "acid etch" or "etch" primer, it just makes trouble later on)
b)get 2 part GLAZING PUTTY to fill tiny pits, or nicks, or grinder marks (metalglaze by evercoat works the best)
c)get HIGH BUILD PRIMER, thats to fill sanding scratches from grinding, or sanding filler.
d) get the color coat*: you can use a gloss color coat, but for best durability topcoat it with one of the clearcoats listed below.
(*most color shops can put automotive basecoats in spray cans now, and because urethane basecoats aren't catalyzed, they work beautifully in a spray can.)
when it comes to clearcoats you have TWO quality choices, one is reasonable, the other is just ridiculous in price, but you get some of the best clearcoat on the planet in a special one use mixable spray can.
1) U-POL MOISTURE ACTIVATED SPRAY CLEAR:
https://www.levineautoparts.com/upclear1uvre.html
the stuff is simply amazing for a rattlecan clearcoat, it'll take overnight to cure enough to be usable, and after 2 weeks you can sand and buff it like a catalyzed urethane clear! very tough and durable.
CAUTION: both of these clearcoats use some pretty heavy duty solvents in their makeup, and unless you are topcoating a standard basecoat, you should shoot a test panel to test for compatability with whatever basecoat you might be using.
2) R&M 2 COMPONENT URETHANE CLEARCOAT
https://www.ketone.com/rm_aeromax_urethane_clearcoat.php
this is a genuine 2 part urethane clearcoat in a special can that once activated will harden in a couple of hours, and can be sanded and polished the next day.
at $36 a can it's NOT cheap, but if you compare it to renting a compressor, paint gun and all the crap that goes with it. (or BUYING it all), then it's actually a very reasonably priced clearcoat, and easy as falling off the sofa on sunday afternoon to use. GREAT PRODUCT!
things to remember:
most of the "nibs" (crap that lands in the paint and creates a tiny bump) come from YOU, not the surrounding area, as most people believe, so wear a PAINT SUIT, it's not so much to protect you from the paint (which it does), but it contains all your hair, skin cells, dandruff, sanding dust, yada yada, and keeps it OFF the paint job
you can paint outside in the driveway, with the ground wetted down, and then move the parts inside a closed up room (garage, tool shed, basement etc,..) and leave undisturbed for 12 hours. do it at mid morning, or noon when the bugs are fewest, and before afternoon winds stir up dust.
this works GREAT on a hot day where the pieces sit in a hot garage for 12 hours, when you pull that out, it's always a nice suprise to see how good they look! try it, you'll see!
PRACTICE, PRACTICE, PRACTICE painting has a HYOOOGE learning curve, and it always amazes me that people with no idea of how to paint something NEVER practice on a steel plate, or the garage fridge, or a toolbox, they ALWAYS seem to try and "learn" on the thing they are trying to paint, like their vintage colnago, or RB-1 or something.
please don't do that, because I haven't written a "how to fix yer fuxored painting attempt" yet, and would rather not have to
you can use cheap paints and clearcoats to practice with, because all the better quality stuff is easier to use, covers better, builds thicker etc,..., so once you "learn" on the cheapo, when switching to the better paint to shoot your bike, you shouldn't have any trouble
================================================
and here's my matte silver/aluminum quickie (mostly to cover the van halen special that was on it when I first got it!)
================================================
I am currently writing a more in depth, step-by-step article with plenty of pictures, on painting bicycles using nothing but rattlecan paints for URBAN VELO magazine
https://www.urbanvelo.org/
should be in print by april (just in time for spring re-paints!)
shoot em if ya got em
Last edited by j0e_bik3; 02-29-08 at 01:09 PM.
02-29-08, 12:55 PM
#55

J.A.M

Join Date: Oct 2004
Location: Monterey, CA
Posts: 1,230
Bikes: Pista
Mentioned: 0 Post(s)
Tagged: 0 Thread(s)
Quoted: 0 Post(s)
Likes: 0
Liked 1 Time
in
1 Post
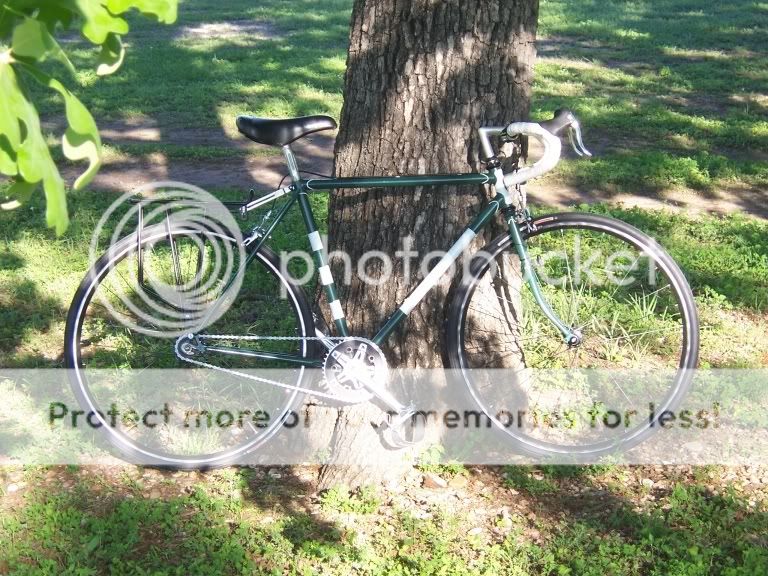
Built this for my fiancee. $15.00 from a university bike auction... think the paint cost more.


__________________
The Bianchi That Could
The Bianchi That Could
02-29-08, 02:01 PM
#56
Senior Member
Join Date: Mar 2006
Location: San Francisco
Posts: 2,760
Bikes: Steelman eurocross, Surly CrossCheck, IRO Rob Roy...
Mentioned: 0 Post(s)
Tagged: 0 Thread(s)
Quoted: 0 Post(s)
Likes: 0
Liked 0 Times
in
0 Posts
Some of you have crazy skills with a can. I'm lucky if I can use a touch up marker correctly.
02-29-08, 02:22 PM
#57
out of shape
Join Date: Dec 2006
Location: va
Posts: 1,456
Mentioned: 0 Post(s)
Tagged: 0 Thread(s)
Quoted: 1 Post(s)
Likes: 0
Liked 0 Times
in
0 Posts
the above repost is good info. even if you're using cheap paint, practice really helps, prep is ALWAYS important, and technique matters. getting one of those $2 snap-on trigger handles helps make your spray more uniform and staves off finger fatigue. immersing the cans you're using in a bucket of warm water raises the pressure and helps ensure good mixing and spray.
02-29-08, 02:39 PM
#58
Middle-aged fogie
Join Date: Aug 2007
Location: SoBo (south of Boston)
Posts: 120
Mentioned: 0 Post(s)
Tagged: 0 Thread(s)
Quoted: 0 Post(s)
Likes: 0
Liked 0 Times
in
0 Posts
02-29-08, 02:56 PM
#59
"this is not suck"
Join Date: Feb 2008
Posts: 387
Mentioned: 0 Post(s)
Tagged: 0 Thread(s)
Quoted: 0 Post(s)
Likes: 0
Liked 3 Times
in
3 Posts
the above repost is good info. even if you're using cheap paint, practice really helps, prep is ALWAYS important, and technique matters. getting one of those $2 snap-on trigger handles helps make your spray more uniform and staves off finger fatigue. immersing the cans you're using in a bucket of warm water raises the pressure and helps ensure good mixing and spray.
(* with paint gun stuff, you can mix slower, or faster solvents (reducers) to match the temp in the painting area)
02-29-08, 03:00 PM
#60
i'm importlandt
Join Date: Aug 2007
Location: Portland, OR
Posts: 210
Bikes: conversion fixie
Mentioned: 0 Post(s)
Tagged: 0 Thread(s)
Quoted: 0 Post(s)
Likes: 0
Liked 0 Times
in
0 Posts

its my old single speed, hidious as all get out. just a frame sitting in my garage now.
02-29-08, 10:06 PM
#61
Senior Member
Join Date: Nov 2007
Posts: 206
Mentioned: 0 Post(s)
Tagged: 0 Thread(s)
Quoted: 0 Post(s)
Likes: 0
Liked 0 Times
in
0 Posts
03-01-08, 01:08 AM
#62
aka: A.SPL !

Join Date: Nov 2007
Location: Bay Area
Posts: 139
Bikes: 08 Bianchi Pista
Mentioned: 0 Post(s)
Tagged: 0 Thread(s)
Quoted: 0 Post(s)
Likes: 0
Liked 0 Times
in
0 Posts

bought the frameset for 20 bucks off craigslist.
spent about 25 bucks in paint. started off by shaving all the braze ons, aircraft stripper, wet sand, self etching primer, LOTS of color coats(2 full cans), 1 light coat of silver metalic, 1 full can of wheel clear coat.
over all i thought it came out great. but 3 months later... even after all the prep work it still chips. its ok though i think it adds character
03-01-08, 09:31 AM
#63
Get some.

Join Date: Jun 2007
Location: Landlocked
Posts: 52
Bikes: 1978 Schwinn World Traveler III
Mentioned: 0 Post(s)
Tagged: 0 Thread(s)
Quoted: 0 Post(s)
Likes: 0
Liked 0 Times
in
0 Posts
I think the most important thing when painting with spraypaint is to use light coats, and give plenty of time between coats to properly harden. If you do a ton of coats, the lower layers will never probably harden and the paint will be soft and chip/scratch easily.
03-01-08, 09:40 AM
#64
Senior Member

Join Date: Feb 2008
Location: Central NC
Posts: 98
Bikes: Giant NRS1, CdaleR400, Surly S-Roller & Fuji Track
Mentioned: 0 Post(s)
Tagged: 0 Thread(s)
Quoted: 0 Post(s)
Likes: 0
Liked 0 Times
in
0 Posts
I quit smoking & focused my need to fidget towards my first fix - a Diamondback Expert TG. I began first by hacking and shaving hanger, frame pump mount nipple and braze-ons. After filing, I then hand sanded the paint away. I used stripper very sparingly to only remove paint in those places my sand paper couldn't reach. It was not originally intended but I discovered that my girl had some peel n' stick vinyl in her art scraps that had a sparkling texture and that's what you see on the tubes and fork ends (it clear coated well to my surprise and looked really neat in person). This bike now belongs to my buddy Josh but I haven't seen him or this bike in some time.

 03-01-08, 11:09 AM
#66
"this is not suck"
Join Date: Feb 2008
Posts: 387
Mentioned: 0 Post(s)
Tagged: 0 Thread(s)
Quoted: 0 Post(s)
Likes: 0
Liked 3 Times
in
3 Posts
shoot WET* coats, but as you said, give PLENTY of time before the next coat, and don't build up too many layers.
this stuff dries by evaporation, if you top a layer that has not fully evaporated it's solvents, then the next coat traps that solvent, and that layer (and usually all the layers under once the solvents start working on them) never dries fully, and you get soft, easily chippable paint jobs.
(* if shot too far away, or misted on, the paint actually dries in mid air, and won't stick like it should, and each paint droplet will also leave a raised bump, instead of leveling out like it would if it was shot wet, and you get texture (read: orange peel) and it'll peel and flake easily)
03-01-08, 05:32 PM
#67
Junior Member
Join Date: Jul 2007
Posts: 132
Mentioned: 0 Post(s)
Tagged: 0 Thread(s)
Quoted: 1 Post(s)
Likes: 0
Liked 8 Times
in
5 Posts
i just rattlecanned my spin wheel with krylon fusion paint. I think it looks pretty good. Its starting to chip a little bit probably because i didnt sand it enough. Just make sure that when you spray your frame or whatever that you do lots of light coats, and let them dry before you put on the next one. Also make sure that you have the nozzle a reasonable distance away, if you get to close it will drip for sure and its a bzatch to fix drips. Id also recommend using clear coat after youve got the undercoat the way you want.
03-01-08, 08:00 PM
#68
Mitcholo

Join Date: Aug 2006
Location: Oost Vlaanderen in mind, Cleveland in body
Posts: 8,850
Bikes: 2010 Mitcholo w/ Sram Force/Red
Mentioned: 0 Post(s)
Tagged: 0 Thread(s)
Quoted: 2 Post(s)
Likes: 0
Liked 0 Times
in
0 Posts
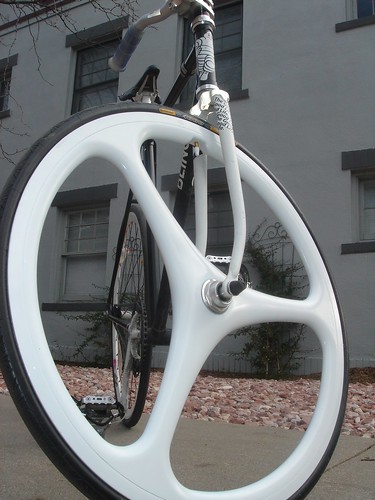
Duplicolor Mirage paint, let clearcoat on frame cure for 2 months. Wet sanded with 2000grit sandpaper, then hand buffed with 3M buffing compound until glossy. Re-buffed twice over. Put a coat of Turtle Wax on it, and now it's like glass. No orange peel at all. Even the Bondo-work is invisible. It helps that the color is a very masking color, as I'm not the best with Bondo. The matching fork got sprayed and baked a few days later, and is currently curing while in use, so I'm not putting a brake on it.
These show off the smoothness of the finish the best.
The full frame picture is before the last two buffings and the wax, so it's a little bit blotchy, but whatever, it's just for racing.


These show off the smoothness of the finish the best.
The full frame picture is before the last two buffings and the wax, so it's a little bit blotchy, but whatever, it's just for racing.
03-01-08, 08:18 PM
#69


Bicycle Repair Man !!!

This week's build at the shop...

