


Giordano Viaggio Build
 02-10-15, 06:18 PM
#51
Full Member
Regarding your rear brake caliper mount, can you get a next size up IS to post adapter instead of spacers? It looks like you are trying to run a 180mm rotor with a 160mm mount.
I also count myself lucky to live in area with lots of tandems, some of which were cheap like my Nashbar/KHS.
I also count myself lucky to live in area with lots of tandems, some of which were cheap like my Nashbar/KHS.
 02-11-15, 10:19 AM
#52


Senior Member
Join Date: Jul 2005
Posts: 5,984
Mentioned: 26 Post(s)
Tagged: 0 Thread(s)
Quoted: 2488 Post(s)
Liked 735 Times
in
520 Posts
FYI: besides the melting nylon/plastic issue, you would want a 100% solid, flat metal washer that will retain the alignment angles.
Also, assume you used the Road BB7 disc caliper and not Mtn, and not sure what the cable pull required for your front canti brakes will be. If either are mtn versions, you need a travel agent to increase cable pull?
Also, assume you used the Road BB7 disc caliper and not Mtn, and not sure what the cable pull required for your front canti brakes will be. If either are mtn versions, you need a travel agent to increase cable pull?
H
 02-11-15, 03:16 PM
#53
Member
Thread Starter
Join Date: Jan 2015
Posts: 33
Mentioned: 0 Post(s)
Tagged: 0 Thread(s)
Quoted: 1 Post(s)
Likes: 0
Liked 1 Time
in
1 Post
The disk is 185mm BB5 (I recall) mtb. The Tektro levers are RL520 for mtn disk and v. They were the same price as standard levers, so I decided to not use the extra travel agents I have from a mid-90s hard tail. Leisestrum is correct that the Nashbar cross levers probably won't work, but I'll know for sure once I try them. If they don't work, I'll leave them on until I can afford/justify long-pull cross levers.
I'll look into post adapters, rather than spacers, when I get around to working on the rear brake. First I want to get the front crankset installed, the seat height set, and the steerer tube cut to the final length. Brakes will probably be the last piece I do after that drivetrain is installed and shifting correctly.
I'll look into post adapters, rather than spacers, when I get around to working on the rear brake. First I want to get the front crankset installed, the seat height set, and the steerer tube cut to the final length. Brakes will probably be the last piece I do after that drivetrain is installed and shifting correctly.
02-16-15, 02:50 PM
#54
Nigel
Join Date: Mar 2011
Location: San Jose, CA
Posts: 2,991
Bikes: 1980s and 1990s steel: CyclePro, Nishiki, Schwinn, SR, Trek........
Mentioned: 12 Post(s)
Tagged: 0 Thread(s)
Quoted: 384 Post(s)
Likes: 0
Liked 6 Times
in
6 Posts
Long Pull cross levers:
New Tektro RL741 Road Bike V Brake Levers Black | eBay
These are for use with V-brakes and MTB cable operated disc brakes.
I ordered a pair yesterday, not sure when I'll get to try them out.
Paul also has long pull compatible cross levers, for a bit more $$$: Cross Lever from Paul Component Engineering
02-16-15, 04:26 PM
#55
Senior Member
Join Date: Mar 2010
Location: City of Brotherly Love
Posts: 1,562
Bikes: Raleigh Companion, Nashbar Touring, Novara DiVano, Trek FX 7.1, Giant Upland
Mentioned: 0 Post(s)
Tagged: 0 Thread(s)
Quoted: 22 Post(s)
Likes: 0
Liked 0 Times
in
0 Posts
Two questions here. Once you were replacing the fork, why didn't you get a disc compatible fork? Why didn't you go with road version of the BB7?
02-17-15, 12:00 PM
#56
Member
Thread Starter
Join Date: Jan 2015
Posts: 33
Mentioned: 0 Post(s)
Tagged: 0 Thread(s)
Quoted: 1 Post(s)
Likes: 0
Liked 1 Time
in
1 Post
nfmisso, I also ordered the Tektro RL740s last week (741 is for 31.8 bars) and installed them Saturday. I decided against installing and running the Nashbar levers, which I'm almost positive would not have worked. I'm sure the Paul's are good units, but too pricey for this build. I was glad to find the RL740s. I hadn't heard of them till now and it looks like Tektro no longer makes them. At least I couldn't find them on their site.
Bezalel, the fork is disc compatible, but since I had an extra v-brake on hand I decided to use it to save money. I went with the MTB disc in the rear for the same reason: I had an extra on hand.
If I were to do it again I would probably use the Claris brifters that come on the bike, run the v-brake in the front w/ a travel agent, and get a road disc for the rear. That setup would be about $40 cheaper than the route I'm taking since I have a travel agent and v-brake already. The bar-end shifters I plan to use look to be more expensive than I anticipated. The cheapest place to get them looks to be ChainReaction, but their in England and unless I spend $100 shipping will be high.
02-17-15, 12:53 PM
#57
Senior Member
Join Date: Mar 2010
Location: City of Brotherly Love
Posts: 1,562
Bikes: Raleigh Companion, Nashbar Touring, Novara DiVano, Trek FX 7.1, Giant Upland
Mentioned: 0 Post(s)
Tagged: 0 Thread(s)
Quoted: 22 Post(s)
Likes: 0
Liked 0 Times
in
0 Posts
Nevermind, the Ultegras aren't that expensive to warrant a switch to 9-speed (unless you have other 9-speed parts on hand).
02-17-15, 02:41 PM
#58
Nigel
Join Date: Mar 2011
Location: San Jose, CA
Posts: 2,991
Bikes: 1980s and 1990s steel: CyclePro, Nishiki, Schwinn, SR, Trek........
Mentioned: 12 Post(s)
Tagged: 0 Thread(s)
Quoted: 384 Post(s)
Likes: 0
Liked 6 Times
in
6 Posts
Dura-Ace 8 speed:
Robot Check
Robot Check
02-22-15, 09:05 AM
#59
Senior Member
Join Date: Jun 2008
Location: Pittsburgh, PA
Posts: 2,468
Bikes: Co-Motion Cappuccino Tandem,'88 Bob Jackson Touring, Co-Motion Cascadia Touring, Open U.P., Ritchie Titanium Breakaway, Frances Cycles SmallHaul cargo bike. Those are the permanent ones; others wander in and out of the stable occasionally as well.
Mentioned: 7 Post(s)
Tagged: 0 Thread(s)
Quoted: 427 Post(s)
Likes: 0
Liked 339 Times
in
229 Posts
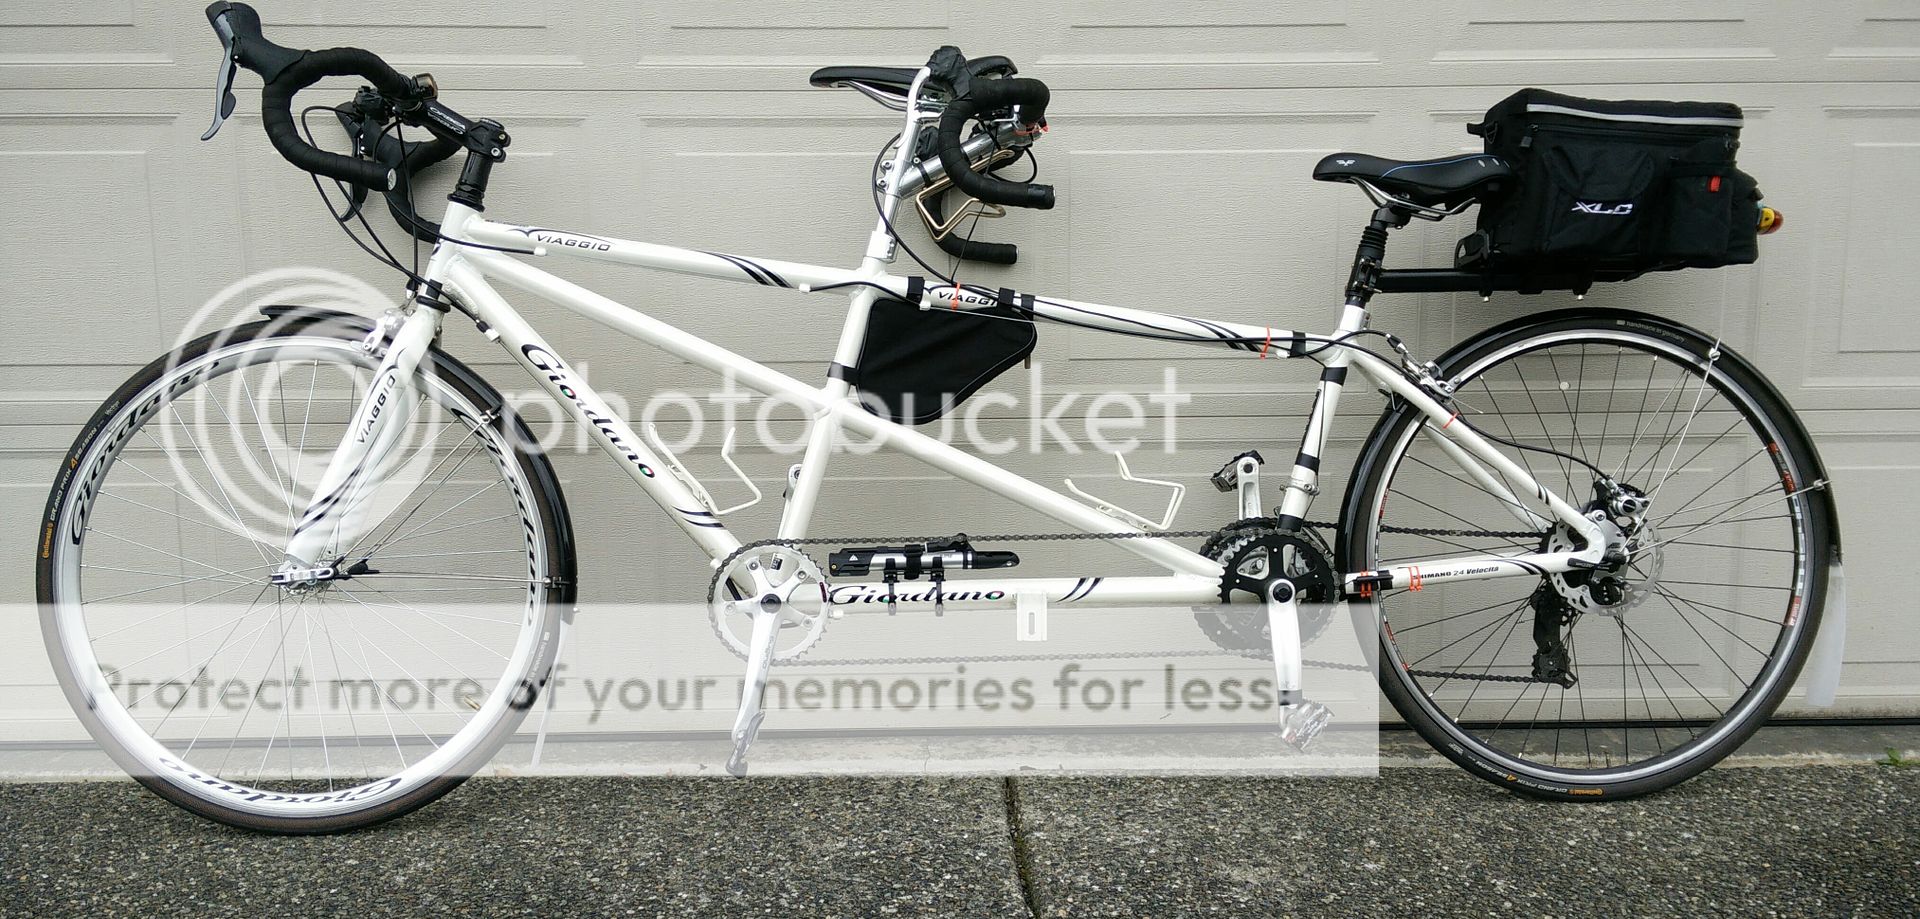
Bezalel, more than a few people have asked me the same question about my heavily modified 1993 Geo Metro! I drive the Metro because it gets over 40mpg, and I continue to maintain it because I enjoy wrenching on cars. I decided to build up the Viaggio because it looked to a be and is indeed a good, though perhaps not great, frame. I spent many months watching Craiglist for suitable tandems and never found one for less than $1500. When I'm done I hope the Viaggio build will come in under $1300, and I believe it will be as good or better than tandems priced higher. If you know of sources for tandem frames under $1000, I would love to know of them, and the things that make them better than the Viaggio. If you have any questions about the Viaggio's construction, I'm happy to answer them and take pics.
I tend to agree with this assessment. I look at eBay tandems pretty regularly and find that bikes that would interest me don't come up all that frequently. A significant percentage of eBay tandem sellers don't want to ship their bikes (understandably), and then there are always a few sellers (as with any market in used goods) who seem to have an unrealistic idea of what their bikes are actually worth. Going through that for long enough makes the idea of a bike showing up on your doorstep for $500 seem pretty appealing.
02-24-15, 04:03 PM
#60
Legs; OK! Lungs; not!
Join Date: Apr 2009
Location: Coral Springs, FL
Posts: 2,096
Bikes: ''09 Motobecane Immortal Pro (Yellow), '02 Diamondback Hybrid, '09 Lamborghini Viaggio, ''11 Cervelo P2
Mentioned: 0 Post(s)
Tagged: 0 Thread(s)
Quoted: 3 Post(s)
Likes: 0
Liked 9 Times
in
4 Posts
bkgeig, I read your thread with interest. in Aug of '09 I bought the bike, then known as the Lamborghini Viaggio (it was marketed by a relative of the great car builder, hence the name.) The bike then was $508 delivered, and arrived in good shape, but the brakes were WORTHLESS! Also the wheels were poorly built and metal flakes from drilling the spoke holes caused flats until I removed the tires, cleaned them up, and replace the rim tape. I ultimately bought some Velocity Tandem wheels, and I never looked back. Though they were disk ready, there were no mounts on the frame or fork. Besides here in flat SoFla, not much need for massive breaking power. The Avid 7s did the trick.
I solved the noisy chain idler by dropping by the LBS and getting a scrapped Dura-Ace rear derailler and taking the wheel off that.
One thing that I liked about the bike is that the frame is SM - XL back to front. With an assortment of seat posts for the rear I'be been able to accomodate a large range of stokers. Currently my 12 y/o grandson is my stoker and has been for quite a while. Between my 5'10" wife Joy and 5' grandson Ironman Tyler, we've got about 3,000 to 4,000 (s)miles on the bike. I still love riding it, and put about 40 miles a week on it now with my grandson.
Joy and I hit 43 on a bridge once, and Tyler and I have done several long rides, most ly for Cancer charities since we are both survivors.
Read all about my Viaggio here https://www.bikeforums.net/tandem-cyc...mborghini.html
02-25-15, 02:00 PM
#61
Member
Thread Starter
Join Date: Jan 2015
Posts: 33
Mentioned: 0 Post(s)
Tagged: 0 Thread(s)
Quoted: 1 Post(s)
Likes: 0
Liked 1 Time
in
1 Post
Hey Bbothib, thanks for the link to you Lamborghini! I've seen other write-ups online but not that one. Glad to hear you'll still enjoying the Viaggio. I put about 3000 miles a year on my commuter; I expect to put about that many on the Viaggio for the next 5 years or so, as long as the kids don't mind riding with me.
I haven't had a lot of time to work on the build recently, and just discovered I might need to rebuild the turbo in my pickup. The projects never end! I'm currently a bit flummoxed by the handlebar height. On my commuter the bars are about 1cm below the seat; on my road bike they're about 2.5 cm lower. When I initially test fitted the stem and bars on the Viaggio last weekend and adjusted them to what seemed a comfortable height, they measured nearly 6cm below the seat. I want to double and triple check the fit before I cut the steerer tube. I hope to do that some time next week.
I got the front crankset installed one night last week. Am waiting on a 39 tooth ring to match the rear. If I can't tension the chain properly with a half-link, my next try will be a "ghost" ring. If that doesn't work I'll pull a pulley from a spare derailleur in my parts box.
02-26-15, 02:43 PM
#62
Legs; OK! Lungs; not!
Join Date: Apr 2009
Location: Coral Springs, FL
Posts: 2,096
Bikes: ''09 Motobecane Immortal Pro (Yellow), '02 Diamondback Hybrid, '09 Lamborghini Viaggio, ''11 Cervelo P2
Mentioned: 0 Post(s)
Tagged: 0 Thread(s)
Quoted: 3 Post(s)
Likes: 0
Liked 9 Times
in
4 Posts
Hey Bbothib, thanks for the link to you Lamborghini! I've seen other write-ups online but not that one. Glad to hear you'll still enjoying the Viaggio. I put about 3000 miles a year on my commuter; I expect to put about that many on the Viaggio for the next 5 years or so, as long as the kids don't mind riding with me.
I haven't had a lot of time to work on the build recently, and just discovered I might need to rebuild the turbo in my pickup. The projects never end! I'm currently a bit flummoxed by the handlebar height. On my commuter the bars are about 1cm below the seat; on my road bike they're about 2.5 cm lower. When I initially test fitted the stem and bars on the Viaggio last weekend and adjusted them to what seemed a comfortable height, they measured nearly 6cm below the seat. I want to double and triple check the fit before I cut the steerer tube. I hope to do that some time next week.
I got the front crankset installed one night last week. Am waiting on a 39 tooth ring to match the rear. If I can't tension the chain properly with a half-link, my next try will be a "ghost" ring. If that doesn't work I'll pull a pulley from a spare derailleur in my parts box.
I haven't had a lot of time to work on the build recently, and just discovered I might need to rebuild the turbo in my pickup. The projects never end! I'm currently a bit flummoxed by the handlebar height. On my commuter the bars are about 1cm below the seat; on my road bike they're about 2.5 cm lower. When I initially test fitted the stem and bars on the Viaggio last weekend and adjusted them to what seemed a comfortable height, they measured nearly 6cm below the seat. I want to double and triple check the fit before I cut the steerer tube. I hope to do that some time next week.
I got the front crankset installed one night last week. Am waiting on a 39 tooth ring to match the rear. If I can't tension the chain properly with a half-link, my next try will be a "ghost" ring. If that doesn't work I'll pull a pulley from a spare derailleur in my parts box.
https://www.nashbar.com/bikes/Product...45_-1___204726
and got an adjustable stem, but I can't find it on Nashbar. Might have got it on Amazon. Anyway, one of my objectives was to maximize adaptablity to accomodate a range of stokers and captains. Now, 5 yrs later, my son has moved away, and my grandson is my only stoker, so adjustablility is no longer important, now anyway. Perhaps in 5 years my grandson can captain as his little brother stokes for him!
Note my post to Iron. I suggest you consider the 90 OOP for the pedals since you stoker is a much less powerful cyclist. My grandson really enjoys feeling as if he is contributing.
Also don't expect some sort of magical speed boost with a tandem. Somehow I seemed to expect the longbike would be faster. In fact, the endurance speed is approximately (RS1 + RS2)/2 where RS is each riders "endurance speed" that is what they can maintain for a long ride. It is true that the stoker benefits from the wind shadow of the captain as compared to what their RS would otherwise be on a single bike, but the effect is negligible compared tandem racers do to your much lower speed and the endurance of your stoker. Having said that, I think you will be very pleased as compared to a trail a bike set up.
Next to my Moto and Cervelo, the Lambo is my favorite bike to ride. I look forward to my daily rides to pick up the GKs. Today I had a real treat. The oldest GK was on early release, and I had a nice stiff tail wind for the entire 5 mi ride to his school. With out the Kiddie trailer I was really flying, and was able to ride the road and eschew the sidewalk. I should have worn my Garmin because I think I was cruising at 19 or 20. :^) The ride home was into the wind, but it wasn't too bad without the trailer.
And regarding projects...
Now that my son move out a year ago, I'm redoing his bedroom. Stripped the popcorn off the ceiling, painted the ceiling and walls, ripped out the carpet and leveled the floor. This weekend the new wood floor goes down. Then there are the lawn sprinklers that need to be repaired for the summer, and clean up the work bench, redo the spare bathroom... and so it goes. Meanwhile my bikes need some TLC!
Last edited by bobthib; 02-26-15 at 02:48 PM.
02-27-15, 12:36 AM
#63
Junior Member
Join Date: Feb 2013
Posts: 21
Mentioned: 0 Post(s)
Tagged: 0 Thread(s)
Quoted: 0 Post(s)
Likes: 0
Liked 0 Times
in
0 Posts
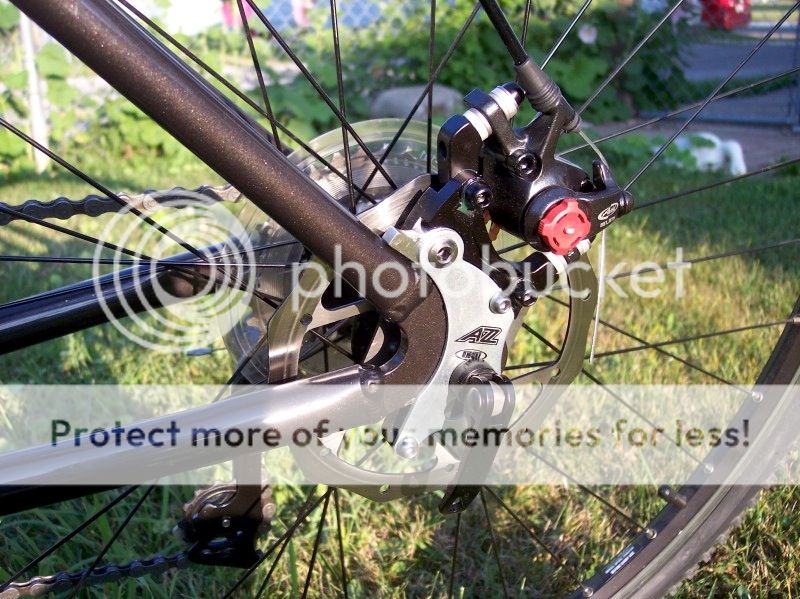
Hi Bobthib, I'd read your thread and many Amazon reviews on this tandem before buying it. Here are things I've upgraded/changed:
1. Captain crankset to Sugino XD 175cm (170cm crank arms hurt my left knee with hard effort)
2. Handlebars to 44cm S-work carbon with traditional bend (from part bin!)
3. Seats
4. Rear wheel to disc brake (A2Z adapter and 160 disc rotor fit perfectly). It's operated by stoker when needed.
5. Ultegra brakes
6. Conti GP 4-Season 28mm tires (roll smooth but very soft compound..a lot of cuts and already 2 flats from winter road junks and glass)
7. Quill stem adapter BBB BHP-20/21 from Wiggle (the best looking and with spacers, everything appears "threadless"!)
And best of all, the most surprising solution to the noisy chain tensioner is to remove it!!! It's a $3.95 KMC Z51-OL Half Link, 3/32-Inch from Amazon. Thanks to bkgeig for suggesting this. Due to the distance between captain and stoker BBs, 40/40 timing chainrings need a half-link while 39/39 would not need it. So, bkgeig, try to connect your 39/39 without a half-link. I got perfect tension on mine (see pic)
After all of these, I think I still have not made a silk purse out of sow's ear, but it meets our needs now. I can not blame the tandem for holding us back any more.
Next upgrade will be stoker cranks to a higher gearing. We spin out often here in the hilly terrains of Pacific NW. And If I were to go full disc brake set up, I would get Cannondale Fatty fork that is still for sale at bikewagon for $80. It weighs a ton but it doesn't matter, we still can not climb faster than a turtle anyway.


Last edited by smoothie_biker; 02-27-15 at 12:43 AM.
03-06-15, 11:29 AM
#64
Member
Thread Starter
Join Date: Jan 2015
Posts: 33
Mentioned: 0 Post(s)
Tagged: 0 Thread(s)
Quoted: 1 Post(s)
Likes: 0
Liked 1 Time
in
1 Post
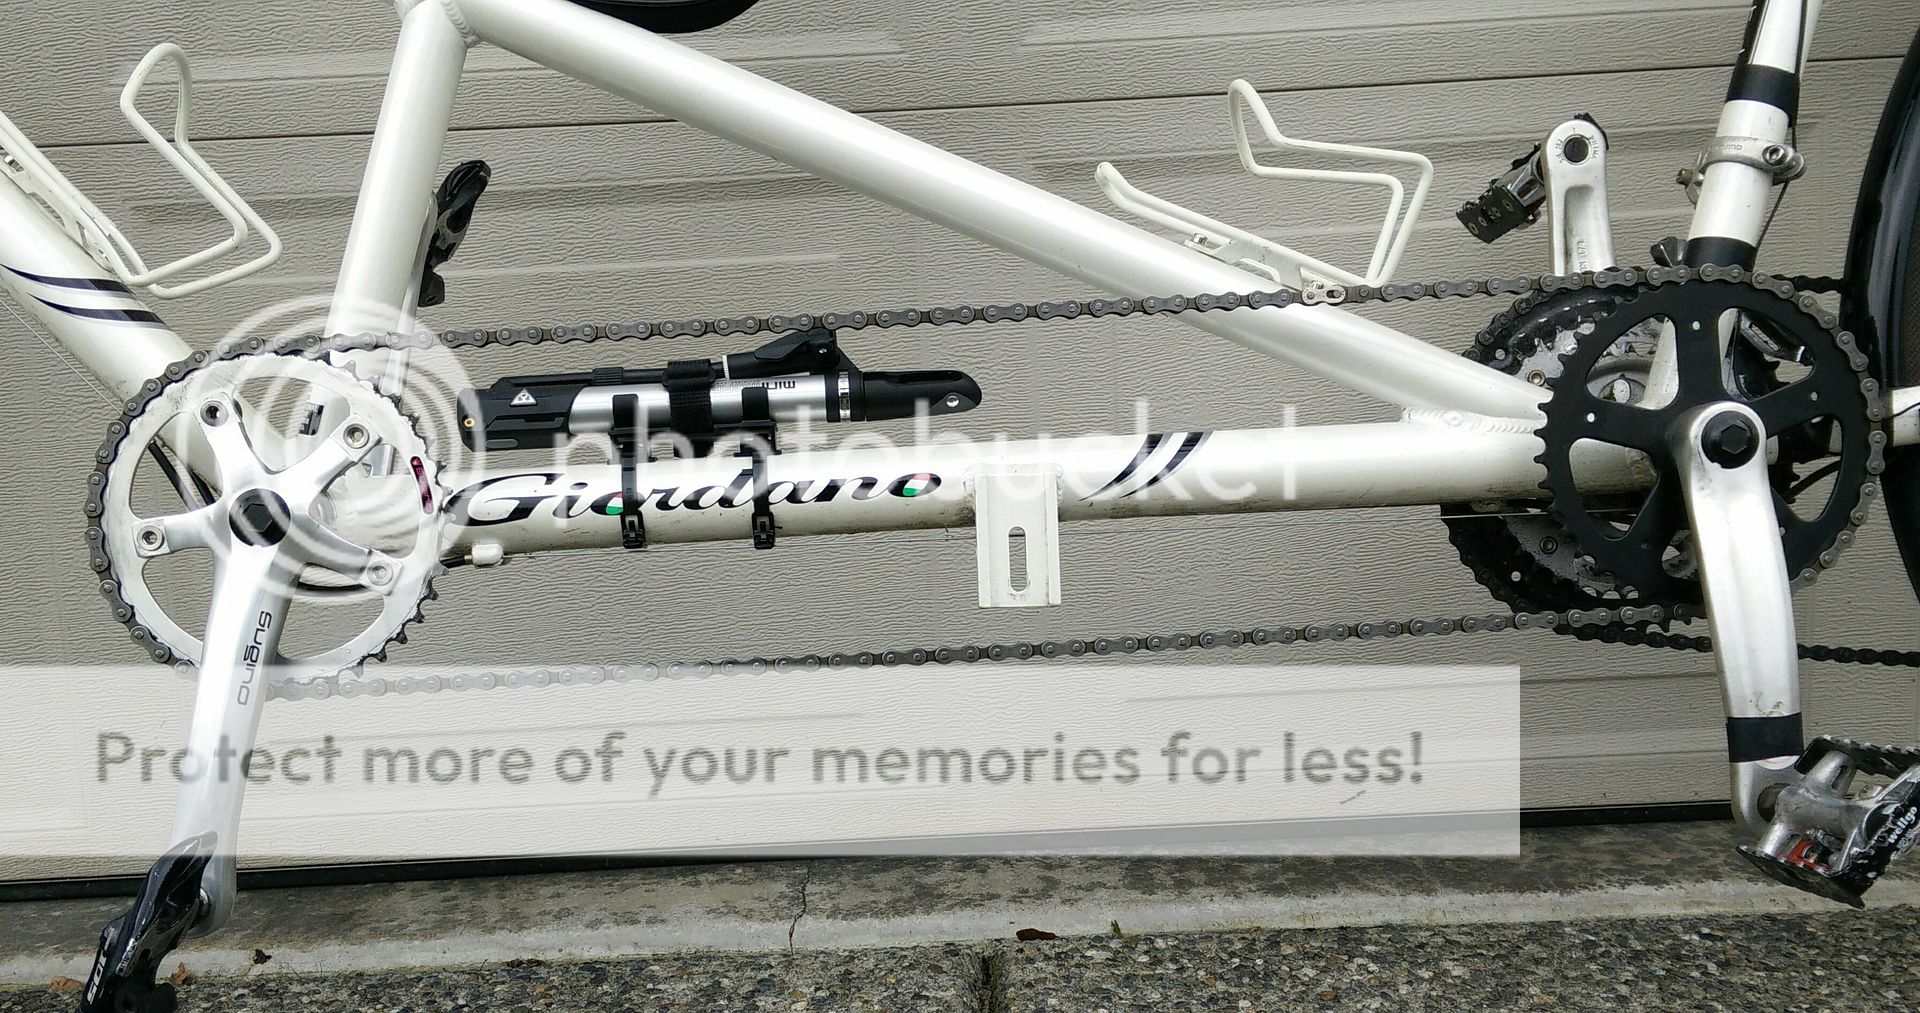
Got the 39 tooth Origin 8 chain ring installed last night. I had to make some spacers for the chain ring bolts. These are 10mm washers knocked down just slightly with an angle grinder. I might upgrade them to stainless eventually, but I'm not too worried about it in SoCal. Total cost for these was about $1.50.

The Deore crankset is of course mounted backwards. I had to pull the Wellgo pedals off their spindles and reverse them, left pedal on right spindle etc. I then added Loctite to the threads before tightening the pedals down. Based on other posts I've read, this should secure the pedals. These Wellgo pedals use loose ball bearings. If you do this, I recommend dismantling them slowly over a white cloth or paper.

I then mounted the chain. With 39 teeth front and rear the chain was too loose with a half-link. As it's setup now, no half-link, it's a bit tighter than I would like. I can feel resistance when I turn the crank. I might experiment with a ghost ring. Most likely I'll leave it as is. I'll make the final decision after test riding.

The Deore crankset is of course mounted backwards. I had to pull the Wellgo pedals off their spindles and reverse them, left pedal on right spindle etc. I then added Loctite to the threads before tightening the pedals down. Based on other posts I've read, this should secure the pedals. These Wellgo pedals use loose ball bearings. If you do this, I recommend dismantling them slowly over a white cloth or paper.
I then mounted the chain. With 39 teeth front and rear the chain was too loose with a half-link. As it's setup now, no half-link, it's a bit tighter than I would like. I can feel resistance when I turn the crank. I might experiment with a ghost ring. Most likely I'll leave it as is. I'll make the final decision after test riding.
03-07-15, 04:48 PM
#65
Legs; OK! Lungs; not!
Join Date: Apr 2009
Location: Coral Springs, FL
Posts: 2,096
Bikes: ''09 Motobecane Immortal Pro (Yellow), '02 Diamondback Hybrid, '09 Lamborghini Viaggio, ''11 Cervelo P2
Mentioned: 0 Post(s)
Tagged: 0 Thread(s)
Quoted: 3 Post(s)
Likes: 0
Liked 9 Times
in
4 Posts
Nice! Enjoying the updates.
03-08-15, 01:44 PM
#66
Senior Member
Join Date: Mar 2010
Location: City of Brotherly Love
Posts: 1,562
Bikes: Raleigh Companion, Nashbar Touring, Novara DiVano, Trek FX 7.1, Giant Upland
Mentioned: 0 Post(s)
Tagged: 0 Thread(s)
Quoted: 22 Post(s)
Likes: 0
Liked 0 Times
in
0 Posts
When it comes to tandem cranks, Sugino XDs are relatively inexpensive so you shouldn't have to install anything backwards.
03-09-15, 12:17 PM
#67
Member
Thread Starter
Join Date: Jan 2015
Posts: 33
Mentioned: 0 Post(s)
Tagged: 0 Thread(s)
Quoted: 1 Post(s)
Likes: 0
Liked 1 Time
in
1 Post
Thanks for the tip on the Sugino. I'll keep them in mind if my current setup doesn't hold up.
On Friday night I took the angle grinder to the A2Z adapter. The problem was, in my application, that the adapter didn't quite touch the seatstay. It sat about 1/16" proud. Hopefully the gap will be visible in the pic below. I might have been able to leave it as is, but I'm not inclined to "hope for the best" when it comes to brakes. Eventually, I'm pretty sure, either the adapter or the frame would have succumbed to the force of repeated braking, allowing the "shoe" to eventually move the 1/16" to touch the stay.
In this pic the "shoe" of the adapter isn't quite hitting the stay. You can see where I've already marked with the perm marker the area I plan to remove on the adapter plate.

I anticipated this mod, as I had to do something even more drastic for the A2Z on my commuter. Here's how much material I had to remove in order for the adapter to work on my Trek XO1, which has very little flat dropout area.

Here's the modified adapter. I had to grind a bit off the in-board plate so that it would clear the junction of the stay and the dropout, and some more on the out-board plate for the same reason.

Here's a the adapter installed. The pic is a bit deceiving. The front and back of the "shoe" contact the stay, but there is a gap in the middle just above the weld.

Modifying the adapter like this has moved the caliper down enough that I'll need at most 2mm of shim. Unfortunately the rotor is badly out of true, so before I can setup the rear brakes I need to buy a rotor truing fork.
On Friday night I took the angle grinder to the A2Z adapter. The problem was, in my application, that the adapter didn't quite touch the seatstay. It sat about 1/16" proud. Hopefully the gap will be visible in the pic below. I might have been able to leave it as is, but I'm not inclined to "hope for the best" when it comes to brakes. Eventually, I'm pretty sure, either the adapter or the frame would have succumbed to the force of repeated braking, allowing the "shoe" to eventually move the 1/16" to touch the stay.
In this pic the "shoe" of the adapter isn't quite hitting the stay. You can see where I've already marked with the perm marker the area I plan to remove on the adapter plate.
I anticipated this mod, as I had to do something even more drastic for the A2Z on my commuter. Here's how much material I had to remove in order for the adapter to work on my Trek XO1, which has very little flat dropout area.
Here's the modified adapter. I had to grind a bit off the in-board plate so that it would clear the junction of the stay and the dropout, and some more on the out-board plate for the same reason.
Here's a the adapter installed. The pic is a bit deceiving. The front and back of the "shoe" contact the stay, but there is a gap in the middle just above the weld.
Modifying the adapter like this has moved the caliper down enough that I'll need at most 2mm of shim. Unfortunately the rotor is badly out of true, so before I can setup the rear brakes I need to buy a rotor truing fork.
03-12-15, 10:38 AM
#68
Junior Member
Join Date: Feb 2013
Posts: 21
Mentioned: 0 Post(s)
Tagged: 0 Thread(s)
Quoted: 0 Post(s)
Likes: 0
Liked 0 Times
in
0 Posts
Good job on your "modding work". I notice that your installation of the adapter is a bit different (see pics below) from everyone else. I did that (aligning outside plate with big hole for skewer rod to go through) and my disc brake was sitting 15mm too high. I went back and reread the instruction. The smaller one is actually the skewer hole. I don't know what the big hole is for (maybe for some weight saving?). So, after realignment with smaller hole for skewer, my disc brake fits great with 160 rotor and Shimano 160 rear IS caliper adapter.


Last edited by smoothie_biker; 03-12-15 at 10:46 AM.
03-13-15, 11:24 AM
#69
Member
Thread Starter
Join Date: Jan 2015
Posts: 33
Mentioned: 0 Post(s)
Tagged: 0 Thread(s)
Quoted: 1 Post(s)
Likes: 0
Liked 1 Time
in
1 Post
Hah! That'll teach me to read the instructions! Thanks. I'll try the other hole next week. That would probably explain why I needed the spacers for the calipers.
03-24-15, 02:50 PM
#70
Member
Thread Starter
Join Date: Jan 2015
Posts: 33
Mentioned: 0 Post(s)
Tagged: 0 Thread(s)
Quoted: 1 Post(s)
Likes: 0
Liked 1 Time
in
1 Post
Last night I got the fork cut down and installed. Front brakes too. Ideally the arms on these XT liner-pull brakes would be more vertical, but this fork is narrower than the mtb fork they're designed for. They work well anyway. I had to true the front wheel a little. I anticipate that it will need more truing after a few rides.

I decided to re-evaluate the timing chain, and I'm glad I did. The pin was under a lot of tension when I broke the chain. So I re-installed the half-link and then the stock tensioner. Here's a short clip of the tensioner. I haven't spent any time adjusting it and I'm pretty sure the pulley isn't completely parallel to the chain. Despite my comment in the video, it might also be a bit too tight. The "clunking" noise, I'm pretty sure, is the chain tightening on the tensioner and starting to come off.
.be
Next I'm going to remove the 52 tooth ring on the crankset and try using that as a ghost ring. If that doesn't work, or even if it does, I think I'll try bolting a pulley directly to the bracket on the frame. Similar to the setup below, except that the pulley will bolt directly to the bracket, not an arm, and tension will adjust by moving the pulley up or down. A spacer will establish the distance of the pulley from the bracket, which shouldn't need to change unless the cranks do.

I decided to re-evaluate the timing chain, and I'm glad I did. The pin was under a lot of tension when I broke the chain. So I re-installed the half-link and then the stock tensioner. Here's a short clip of the tensioner. I haven't spent any time adjusting it and I'm pretty sure the pulley isn't completely parallel to the chain. Despite my comment in the video, it might also be a bit too tight. The "clunking" noise, I'm pretty sure, is the chain tightening on the tensioner and starting to come off.
Next I'm going to remove the 52 tooth ring on the crankset and try using that as a ghost ring. If that doesn't work, or even if it does, I think I'll try bolting a pulley directly to the bracket on the frame. Similar to the setup below, except that the pulley will bolt directly to the bracket, not an arm, and tension will adjust by moving the pulley up or down. A spacer will establish the distance of the pulley from the bracket, which shouldn't need to change unless the cranks do.
04-07-15, 11:05 AM
#71
Member
Thread Starter
Join Date: Jan 2015
Posts: 33
Mentioned: 0 Post(s)
Tagged: 0 Thread(s)
Quoted: 1 Post(s)
Likes: 0
Liked 1 Time
in
1 Post
Got the timing chain and brakes finished over the weekend. Shifters are ordered from the UK, so could take a few weeks to arrive.
I couldn't get the chain tension correct without a tensioner. No half-link was too tight, half-link was too loose. The 52-tooth ghost ring worked, but it was awfully close to the front chainring. 53 or 54 teeth would be better. Both of those however cost more than $40. So it was off to Ace hardware to explore other options.
Here's how I built the tensioner. The bolt is 8mm, though 5/16 would probably work too. I used metric because I had it on hand already and I only have a metric tap and die set, not SAE. Originally I thought I might thread the bolt more. Ended up using a cut-down spring instead.

The finished version. The jockey wheels is packed full of grease.

Mounted to the hanger. You'll notice I used metal and rubber washers in this final version to try to isolate some resonance from the bolt and to fine-tune the spacing.

Action footage:
https://youtu.be/qaSREPMzzxU Before I installed the chain I lined up the chainrings and tensioner with a laser pointer borrowed from work.


I'm going to ride as is for a while to see how I like the 39 teeth gearing. I have a feeling I'll eventually install 40 or even larger chainrings. At that point I'll return to the half-link or ghost ring options. Brakes are next.
I couldn't get the chain tension correct without a tensioner. No half-link was too tight, half-link was too loose. The 52-tooth ghost ring worked, but it was awfully close to the front chainring. 53 or 54 teeth would be better. Both of those however cost more than $40. So it was off to Ace hardware to explore other options.
Here's how I built the tensioner. The bolt is 8mm, though 5/16 would probably work too. I used metric because I had it on hand already and I only have a metric tap and die set, not SAE. Originally I thought I might thread the bolt more. Ended up using a cut-down spring instead.
The finished version. The jockey wheels is packed full of grease.
Mounted to the hanger. You'll notice I used metal and rubber washers in this final version to try to isolate some resonance from the bolt and to fine-tune the spacing.
Action footage:
https://youtu.be/qaSREPMzzxU Before I installed the chain I lined up the chainrings and tensioner with a laser pointer borrowed from work.
I'm going to ride as is for a while to see how I like the 39 teeth gearing. I have a feeling I'll eventually install 40 or even larger chainrings. At that point I'll return to the half-link or ghost ring options. Brakes are next.
04-07-15, 11:48 AM
#72
Member
Thread Starter
Join Date: Jan 2015
Posts: 33
Mentioned: 0 Post(s)
Tagged: 0 Thread(s)
Quoted: 1 Post(s)
Likes: 0
Liked 1 Time
in
1 Post
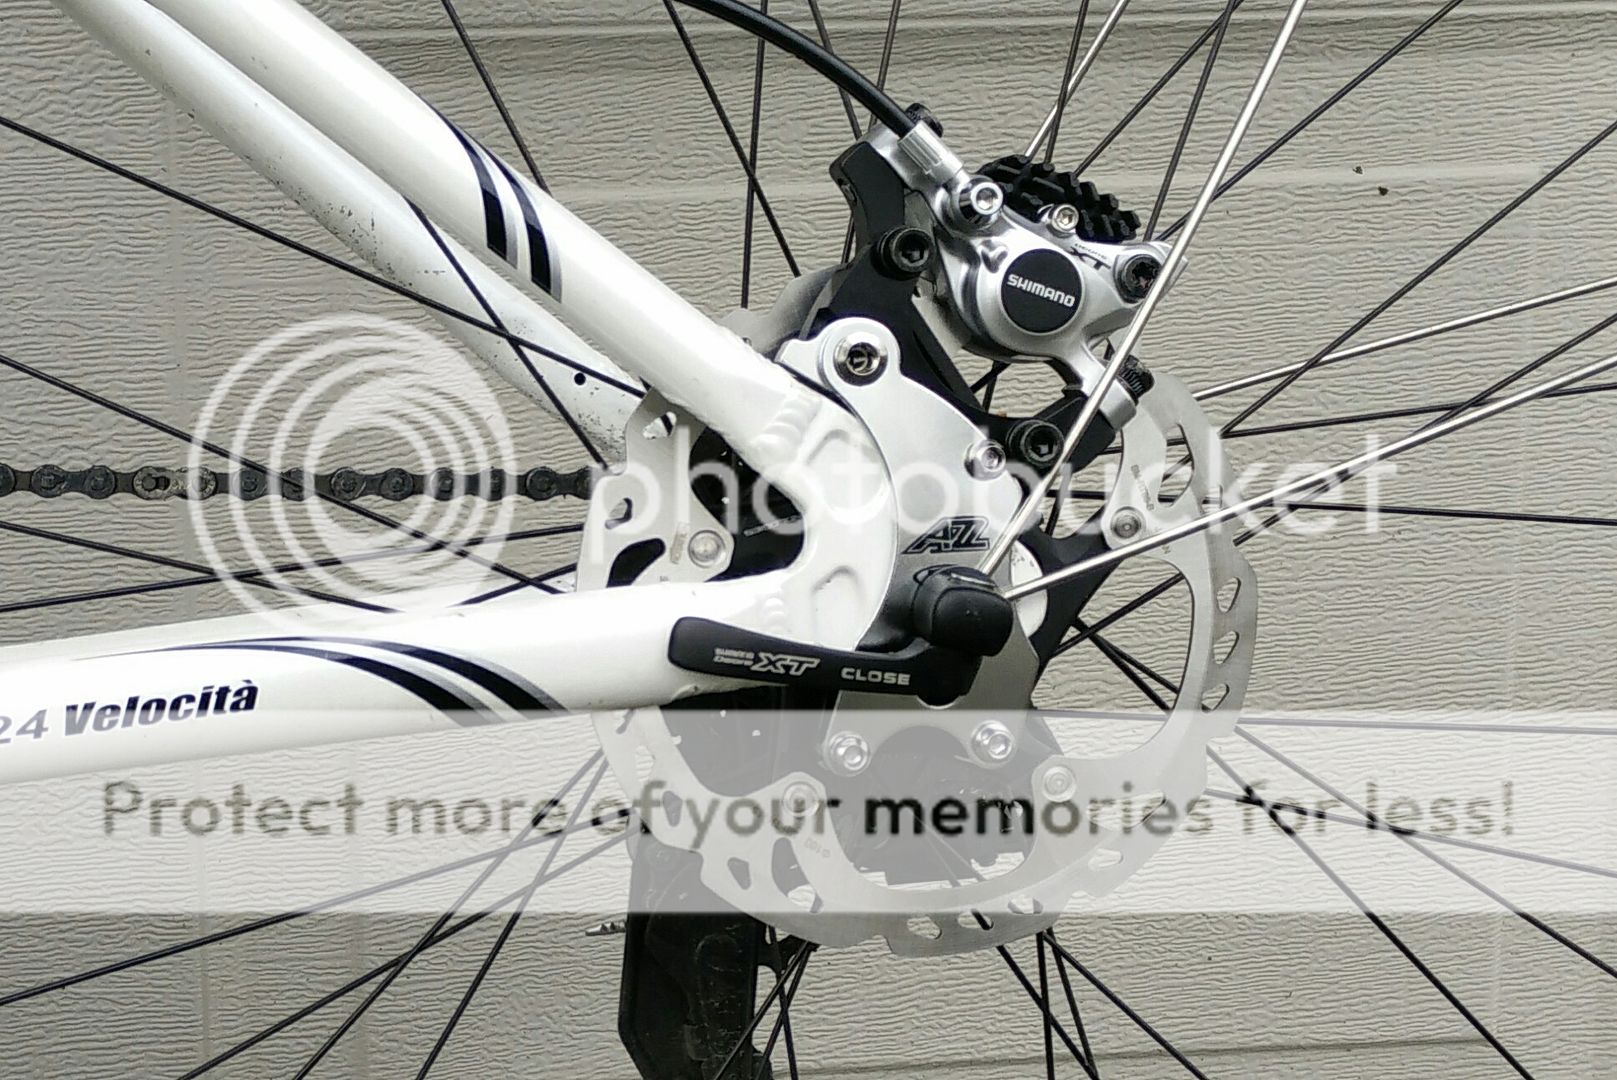
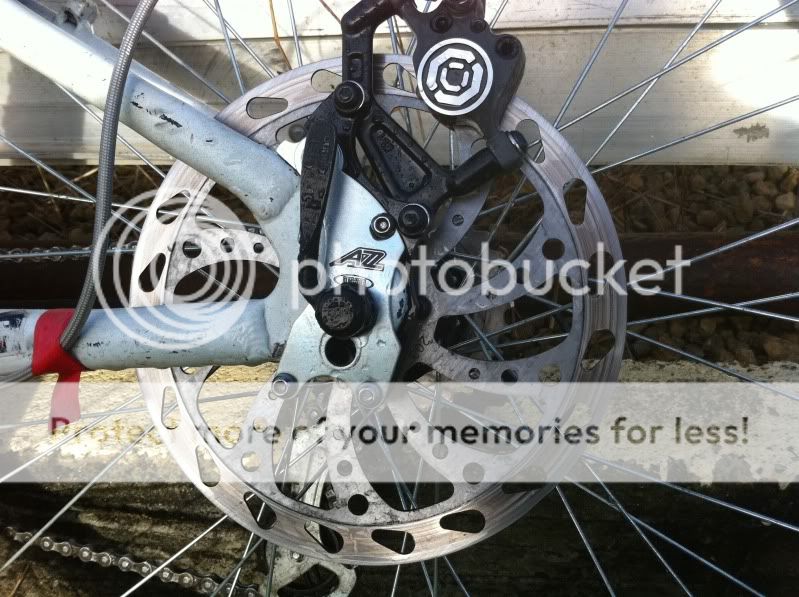
I don't know why, but I could not get the rear brake set up "correctly" the way smoothie_biker did. I checked the brakes themselves. The rotor and mount are both marked 185mm. When I tried to run the skewer through the small hole the calipers hit the rotor. Even using the larger hole, the caliper hit the rotor. I had to install a nut/spacer to raise the caliper up adequately (I checked Avid's website; this spacing is within spec). Perhaps the problem is that these are mtb brakes? Anyway, here's the final setup:

I ran compressionless housing most of the way, hoping to improve performance.

The brakes perform about as well as I expected, and as they do on my commuter. WAY better than the brakes that came on the bike and slightly better modulation than the linear pull on the front. I still need to fine tune them a bit but need a third hand.
I ran compressionless housing most of the way, hoping to improve performance.
The brakes perform about as well as I expected, and as they do on my commuter. WAY better than the brakes that came on the bike and slightly better modulation than the linear pull on the front. I still need to fine tune them a bit but need a third hand.
04-10-15, 08:44 AM
#73
Junior Member
Join Date: Feb 2013
Posts: 21
Mentioned: 0 Post(s)
Tagged: 0 Thread(s)
Quoted: 0 Post(s)
Likes: 0
Liked 0 Times
in
0 Posts
It looks like your project has come along way. Good work on the DIY chain tensioner. I would revisit going without tensioner again once you've put in a few hundred miles on it. By then the tension should be good like mine (timing chain stretched + chainring teeth worn down a bit). Also, how do like the Carbon fork? One Amazon reviewer says it's flexy if you have steer tube with more than 20mm of spacers.
04-14-15, 03:04 PM
#74
Member
Thread Starter
Join Date: Jan 2015
Posts: 33
Mentioned: 0 Post(s)
Tagged: 0 Thread(s)
Quoted: 1 Post(s)
Likes: 0
Liked 1 Time
in
1 Post
The shifters arrived today. Can't work on them until next week, but then I hope to get this thing all done and riding finally.
smoothie_biker, the fork legs are carbon but the steerer tube is aluminum. It might flex with as many spacers as I have; on the other hand, I might never notice the flex. I'll try to give full ride report in a month or so.
smoothie_biker, the fork legs are carbon but the steerer tube is aluminum. It might flex with as many spacers as I have; on the other hand, I might never notice the flex. I'll try to give full ride report in a month or so.
04-29-15, 12:00 PM
#75
Member
Thread Starter
Join Date: Jan 2015
Posts: 33
Mentioned: 0 Post(s)
Tagged: 0 Thread(s)
Quoted: 1 Post(s)
Likes: 0
Liked 1 Time
in
1 Post
Got the shifters installed and everything tuned up over the weekend. Here's a pic of the handlebar setup:

Took our first ride into school yesterday and the second this morning:

You can see in the pic above the pedal blocks I made for the back from 2x4s. I considered buying crank extenders, but they're $100 and my daughter will only need them for less than a year. After our first ride I turned up the rear handlebar so that she isn't so stretched out.
I've updated the build costs in post #4 . The total came in under $900. I still have a few small parts to buy and to sell, which should about cancel out, so I haven't included them.
According to my scale, the total weight was just a hair over 40lb with the wooden pedal blocks installed. Without them it would probably be around 38lb. So it's about the same weight as the stock bike. I suppose the added weight of the brake adapter and brakes offset the weight savings from the fork and cranks.
Some thoughts on the ride: First, my fit was way off. I expected to do some adjusting but not this much. I'm just under 6' tall (5'12" according to my wife) with a 32" inseam. I have the seatpost above the minimum insertion point to get comfortable leg extension. I also have the seat set as far back as possible on the post to get my knees over the pedals. One of my first purchases will be a 400mm post with more offset. The stem I had on hand is 110mm. It's way too long. I've ordered both a 80 and 90mm to see what's most comfortable. That should get me more comfortably placed and reduce some of the twitchiness I feel right now in the front end.
The tensioner I made is barely audible while riding. I don't notice it. As of now I plan to stick with 39t rings and maybe eventually go to 38t. We're in the lowest gear on our morning climb to school.
I'll try to remember to post some additional thoughts after we've ridden for a couple of weeks and I have the new stem installed.
Took our first ride into school yesterday and the second this morning:
You can see in the pic above the pedal blocks I made for the back from 2x4s. I considered buying crank extenders, but they're $100 and my daughter will only need them for less than a year. After our first ride I turned up the rear handlebar so that she isn't so stretched out.
I've updated the build costs in post #4 . The total came in under $900. I still have a few small parts to buy and to sell, which should about cancel out, so I haven't included them.
According to my scale, the total weight was just a hair over 40lb with the wooden pedal blocks installed. Without them it would probably be around 38lb. So it's about the same weight as the stock bike. I suppose the added weight of the brake adapter and brakes offset the weight savings from the fork and cranks.
Some thoughts on the ride: First, my fit was way off. I expected to do some adjusting but not this much. I'm just under 6' tall (5'12" according to my wife) with a 32" inseam. I have the seatpost above the minimum insertion point to get comfortable leg extension. I also have the seat set as far back as possible on the post to get my knees over the pedals. One of my first purchases will be a 400mm post with more offset. The stem I had on hand is 110mm. It's way too long. I've ordered both a 80 and 90mm to see what's most comfortable. That should get me more comfortably placed and reduce some of the twitchiness I feel right now in the front end.
The tensioner I made is barely audible while riding. I don't notice it. As of now I plan to stick with 39t rings and maybe eventually go to 38t. We're in the lowest gear on our morning climb to school.
I'll try to remember to post some additional thoughts after we've ridden for a couple of weeks and I have the new stem installed.

