


DIY Pannier advice, por favor
 06-16-20, 12:43 PM
#1

Senior Member
Thread Starter
Join Date: Nov 2013
Location: Southern California
Posts: 1,450
Mentioned: 14 Post(s)
Tagged: 0 Thread(s)
Quoted: 791 Post(s)
Liked 741 Times
in
406 Posts
DIY Pannier advice, por favor
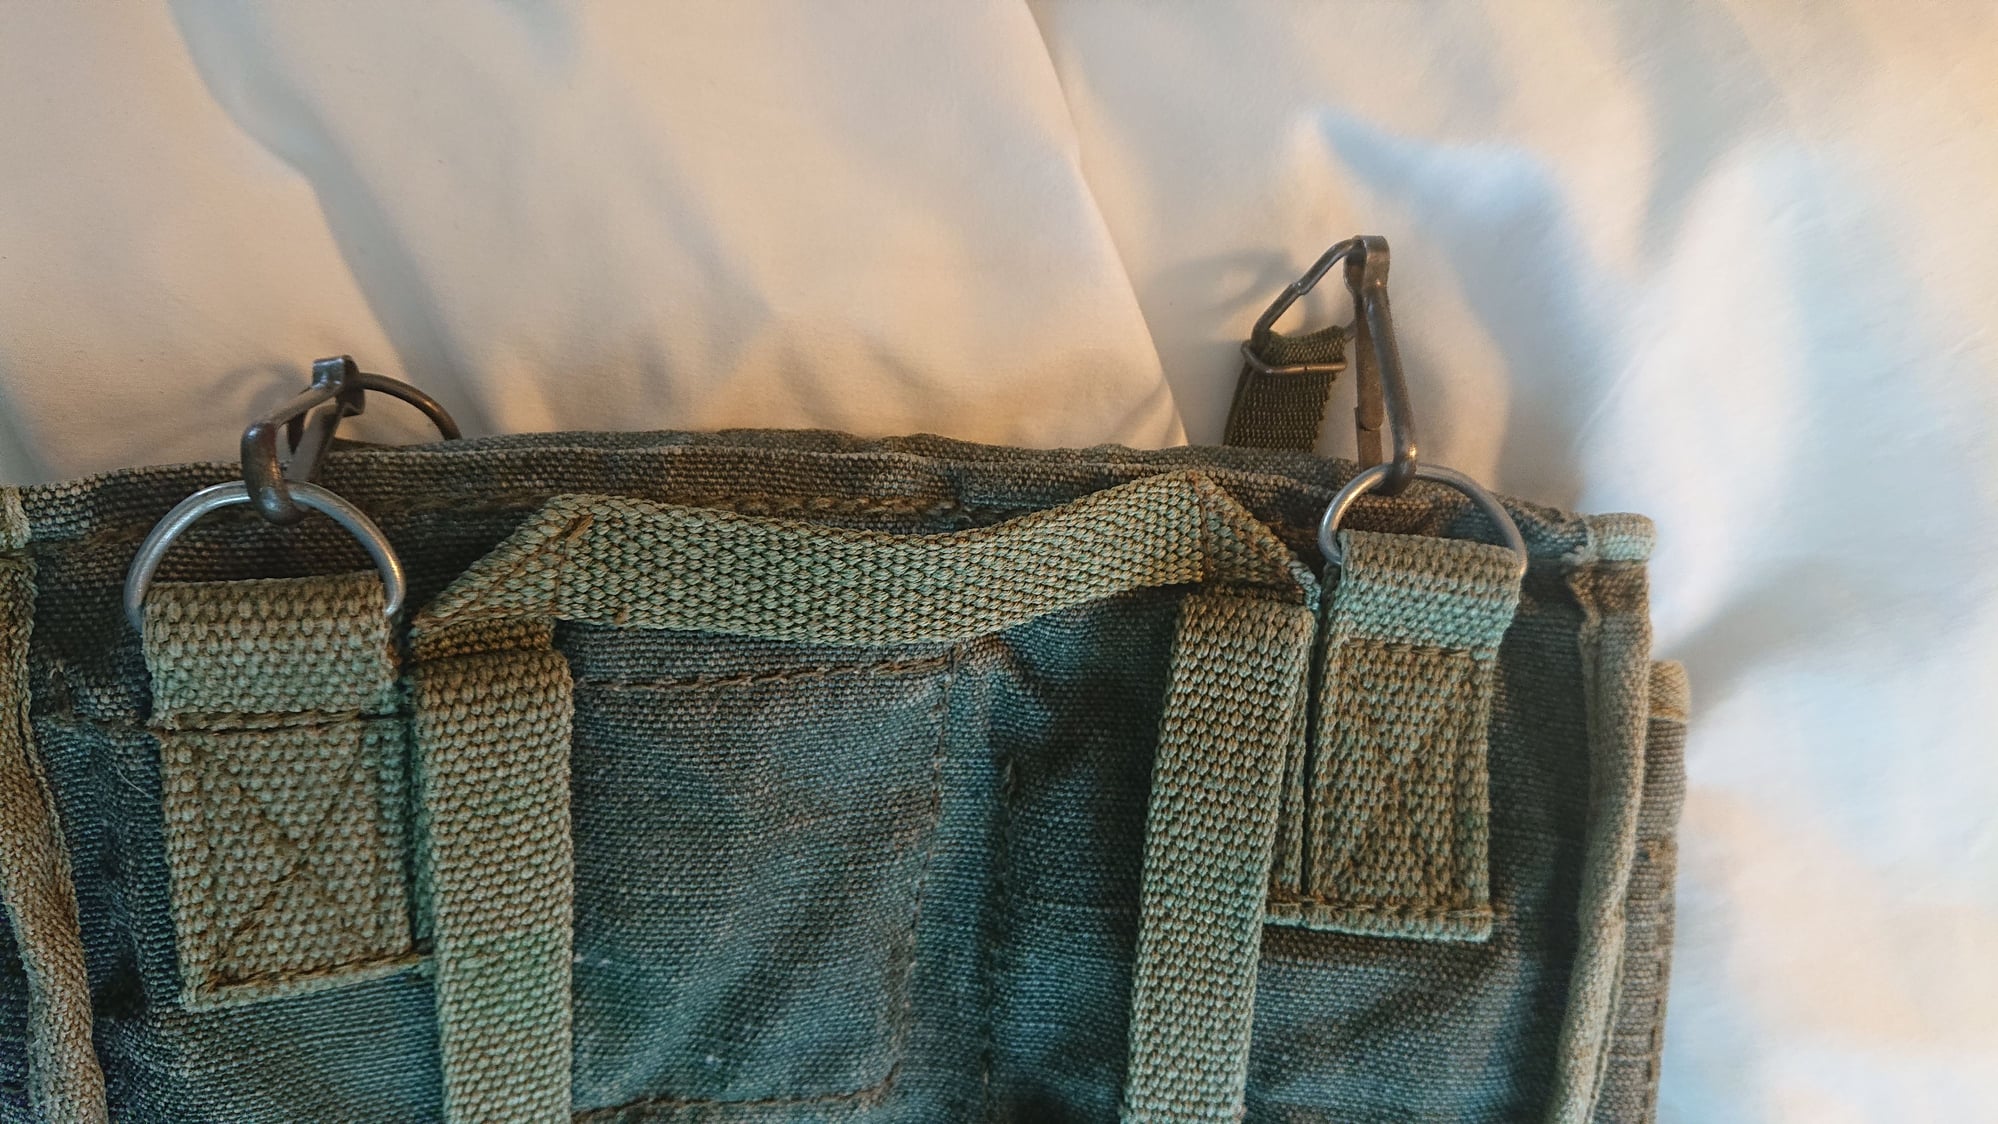
I recently purchased a couple military surplus bags and am trying to find a way to attach the panniers to my bike on the cheap. There's two d-rings attached to the back of the bag with some thick, well-stitched webbing. Would a couple s-hooks suffice? All I'm planning on doing is bending the s-hook closed around the d-ring. Possibly plasti-dipping the other side that will hang onto the rail of the rack. Will this be fine, or will the pannier jump off the rack? I am also going to run a couple rivets through the bag to attach a bungee cord that will hook the lower part of the rack. If you have a better pannier hook suggestion I'm all ears. Though I'm trying to do this as cheaply as possible.
Oh, and to prevent the pannier hooks from sliding forward and aft I'm going to wrap some zipties on the rack.
Oh, and to prevent the pannier hooks from sliding forward and aft I'm going to wrap some zipties on the rack.
 06-16-20, 12:44 PM
#2
Senior Member

Whatever you do, make sure the pannier cannot get caught in the wheel. That will end your ride in a hurry.
Likes For alan s:
06-16-20, 12:52 PM
#3
Senior Member
Join Date: Jul 2011
Location: Salem Oregon
Posts: 1,030
Bikes: 2019 Trek Stash 7, 1994 Specialized Epic 1986 Diamondback Ascent 1996 Klein Pulse Comp, 2006 Specialized Sequoia Elite
Mentioned: 5 Post(s)
Tagged: 0 Thread(s)
Quoted: 418 Post(s)
Liked 521 Times
in
290 Posts
You might want to stiffen up the side of the bag that is against the rack by slipping something in the bag on that side. If you aren't concerned with quickly taking the bags off and on the racks, you could even tie the bags to the rack.
You will want something to attach the bag to the bottom of your rack to keep them from bouncing off. Many systems do use a bungee. My kitty litter buckets bounced off a couple of times before I addressed that issue!
Do you have pictures of the bags?
You will want something to attach the bag to the bottom of your rack to keep them from bouncing off. Many systems do use a bungee. My kitty litter buckets bounced off a couple of times before I addressed that issue!
Do you have pictures of the bags?
06-16-20, 01:06 PM
#4
Senior Member

Join Date: Nov 2014
Location: Eastern Iowa
Posts: 631
Bikes: 2014 Trek Allant drop bar conversion, modified Schwinn MTN commuter, 2015 Trek 520, Soma ES, Salsa Journeyman, 1980 Trek 414
Mentioned: 0 Post(s)
Tagged: 0 Thread(s)
Quoted: 178 Post(s)
Liked 355 Times
in
166 Posts
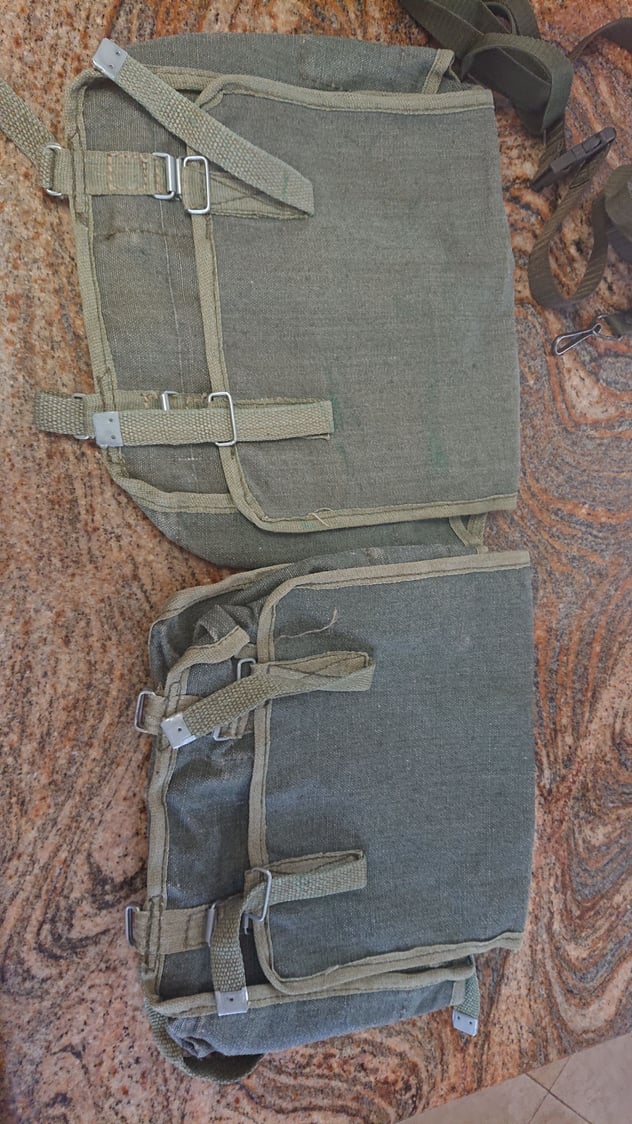
I have done this with military 'musette bags'. I will take photos and give a description of the hardware when i settle in at home tonite
06-16-20, 01:59 PM
#5
Senior Member
Thread Starter
Join Date: Nov 2013
Location: Southern California
Posts: 1,450
Mentioned: 14 Post(s)
Tagged: 0 Thread(s)
Quoted: 791 Post(s)
Liked 741 Times
in
406 Posts
You might want to stiffen up the side of the bag that is against the rack by slipping something in the bag on that side. If you aren't concerned with quickly taking the bags off and on the racks, you could even tie the bags to the rack.
You will want something to attach the bag to the bottom of your rack to keep them from bouncing off. Many systems do use a bungee. My kitty litter buckets bounced off a couple of times before I addressed that issue!
Do you have pictures of the bags?
You will want something to attach the bag to the bottom of your rack to keep them from bouncing off. Many systems do use a bungee. My kitty litter buckets bounced off a couple of times before I addressed that issue!
Do you have pictures of the bags?

 06-16-20, 03:59 PM
#6
Senior Member
No need to rivet the coroplast, just put some on the bottom/backside bent in an "L". I just zip tie my stuff bags to the rack. 1 and 2.5 gallon zip lock bags for inside too.
Likes For Leebo:
06-16-20, 04:14 PM
#7
Senior Member
Join Date: Jun 2014
Location: Ontario, Canada
Posts: 4,624
Bikes: iele Latina, Miele Suprema, Miele Uno LS, Miele Miele Beta, MMTB, Bianchi Model Unknown, Fiori Venezia, Fiori Napoli, VeloSport Adamas AX
Mentioned: 16 Post(s)
Tagged: 0 Thread(s)
Quoted: 1324 Post(s)
Liked 927 Times
in
640 Posts
I'd see about buying pannier hooks at a bike shop. I've used cut down and bent screen door springs to replace worn out springs on panniers. I use a S-hook at the bottom of the spring to hold the pannier to the lower rail or lower leg of the rack. The hooks can be bolted to where the D-rings are. Reinforcing the bag with thick plastic or thin hardboard so that it doesn't fop around and get into the wheel is a great idea.
Cheers
Cheers
06-16-20, 07:47 PM
#8
Senior Member
Join Date: Nov 2014
Location: Eastern Iowa
Posts: 631
Bikes: 2014 Trek Allant drop bar conversion, modified Schwinn MTN commuter, 2015 Trek 520, Soma ES, Salsa Journeyman, 1980 Trek 414
Mentioned: 0 Post(s)
Tagged: 0 Thread(s)
Quoted: 178 Post(s)
Liked 355 Times
in
166 Posts
I have attached some photos for reference. Sorry about the long-winded description.
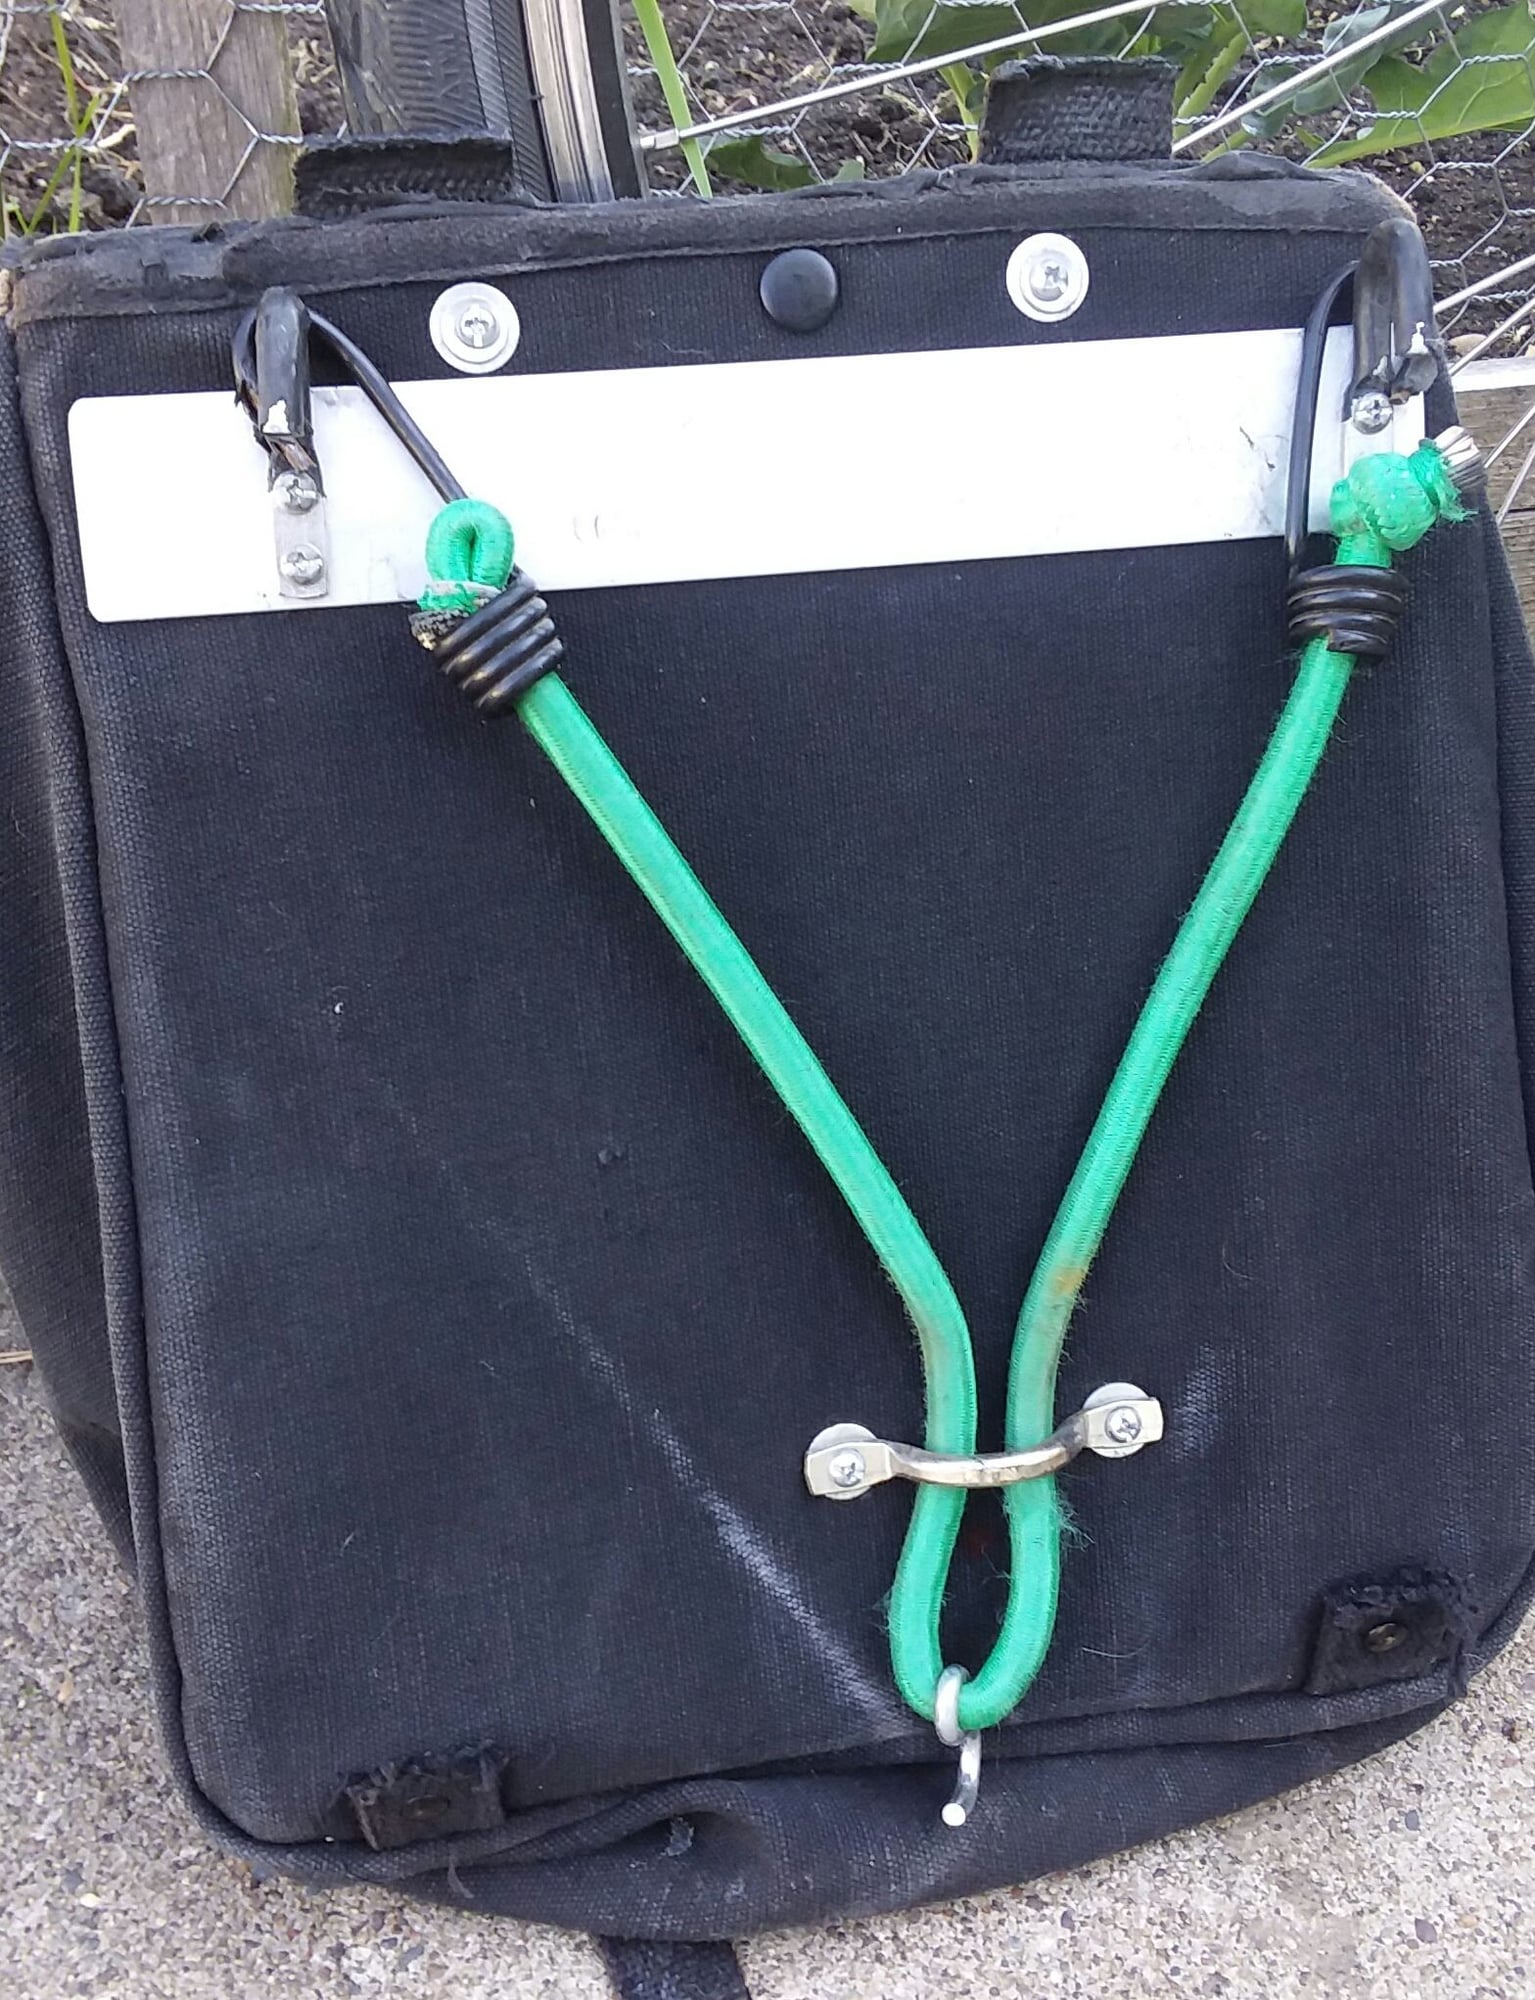
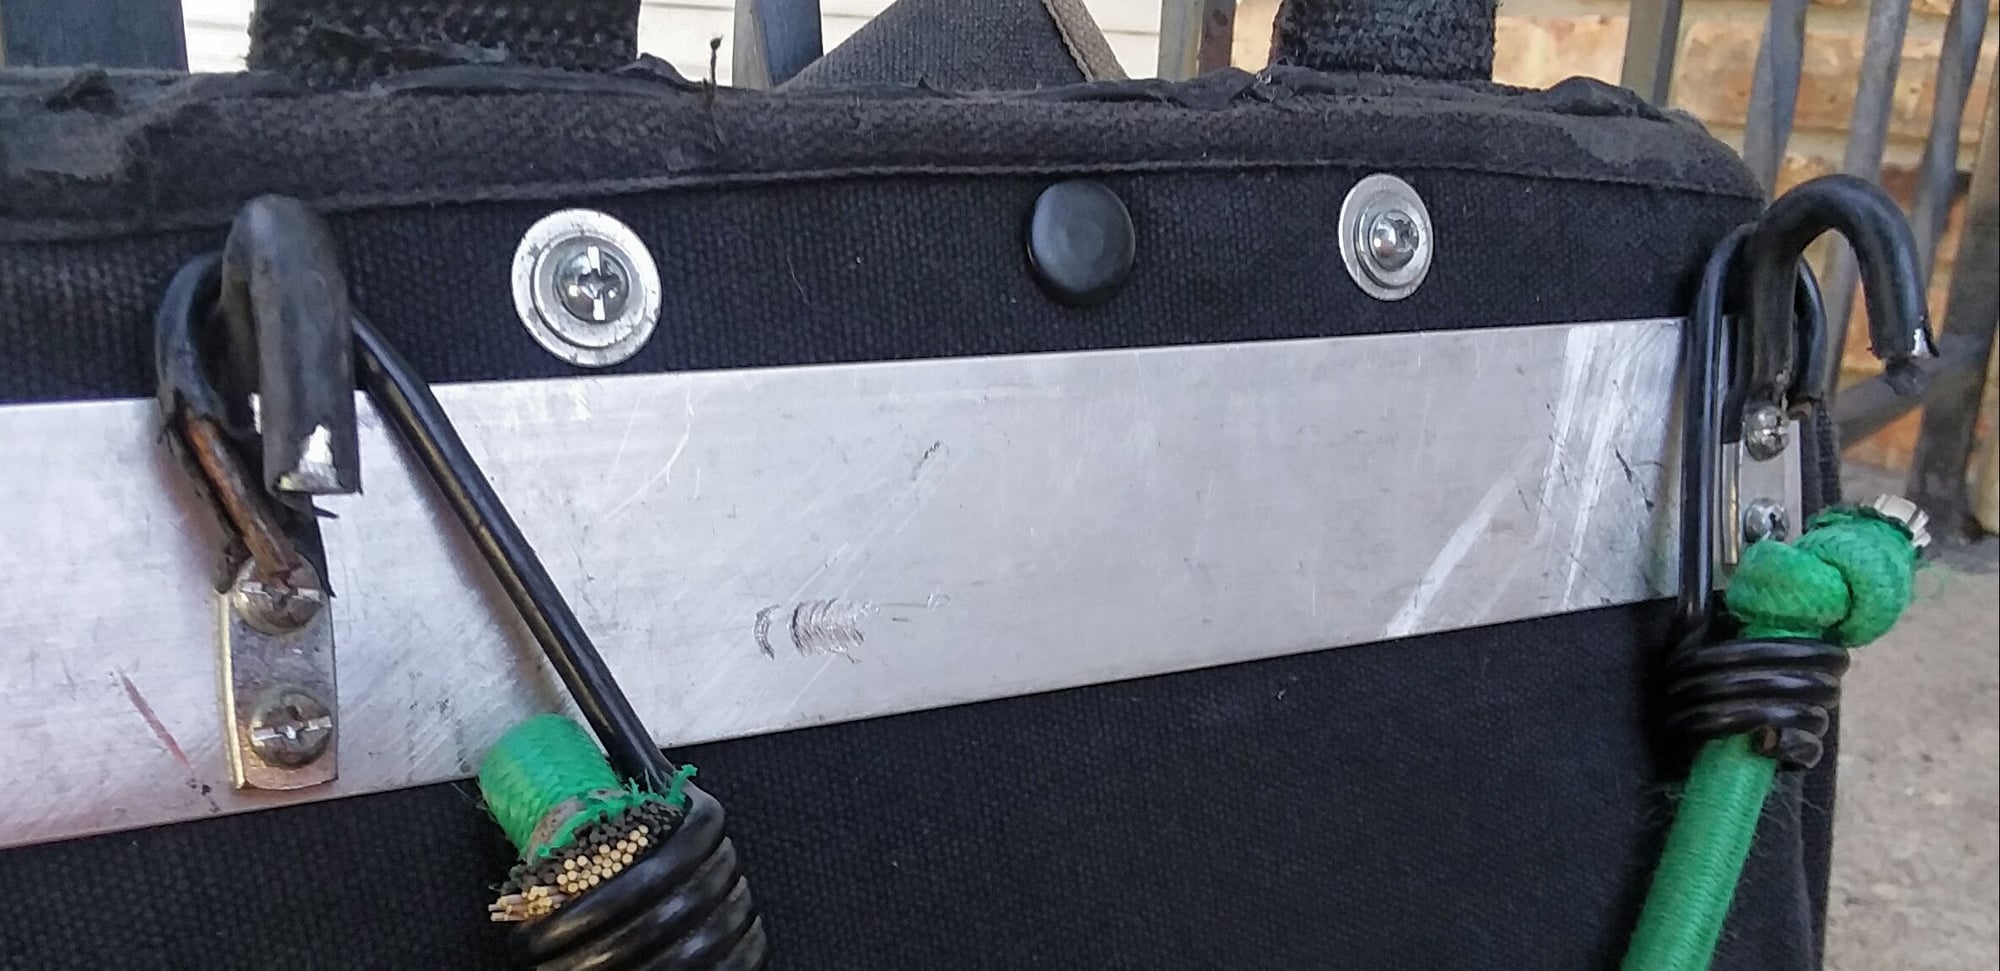
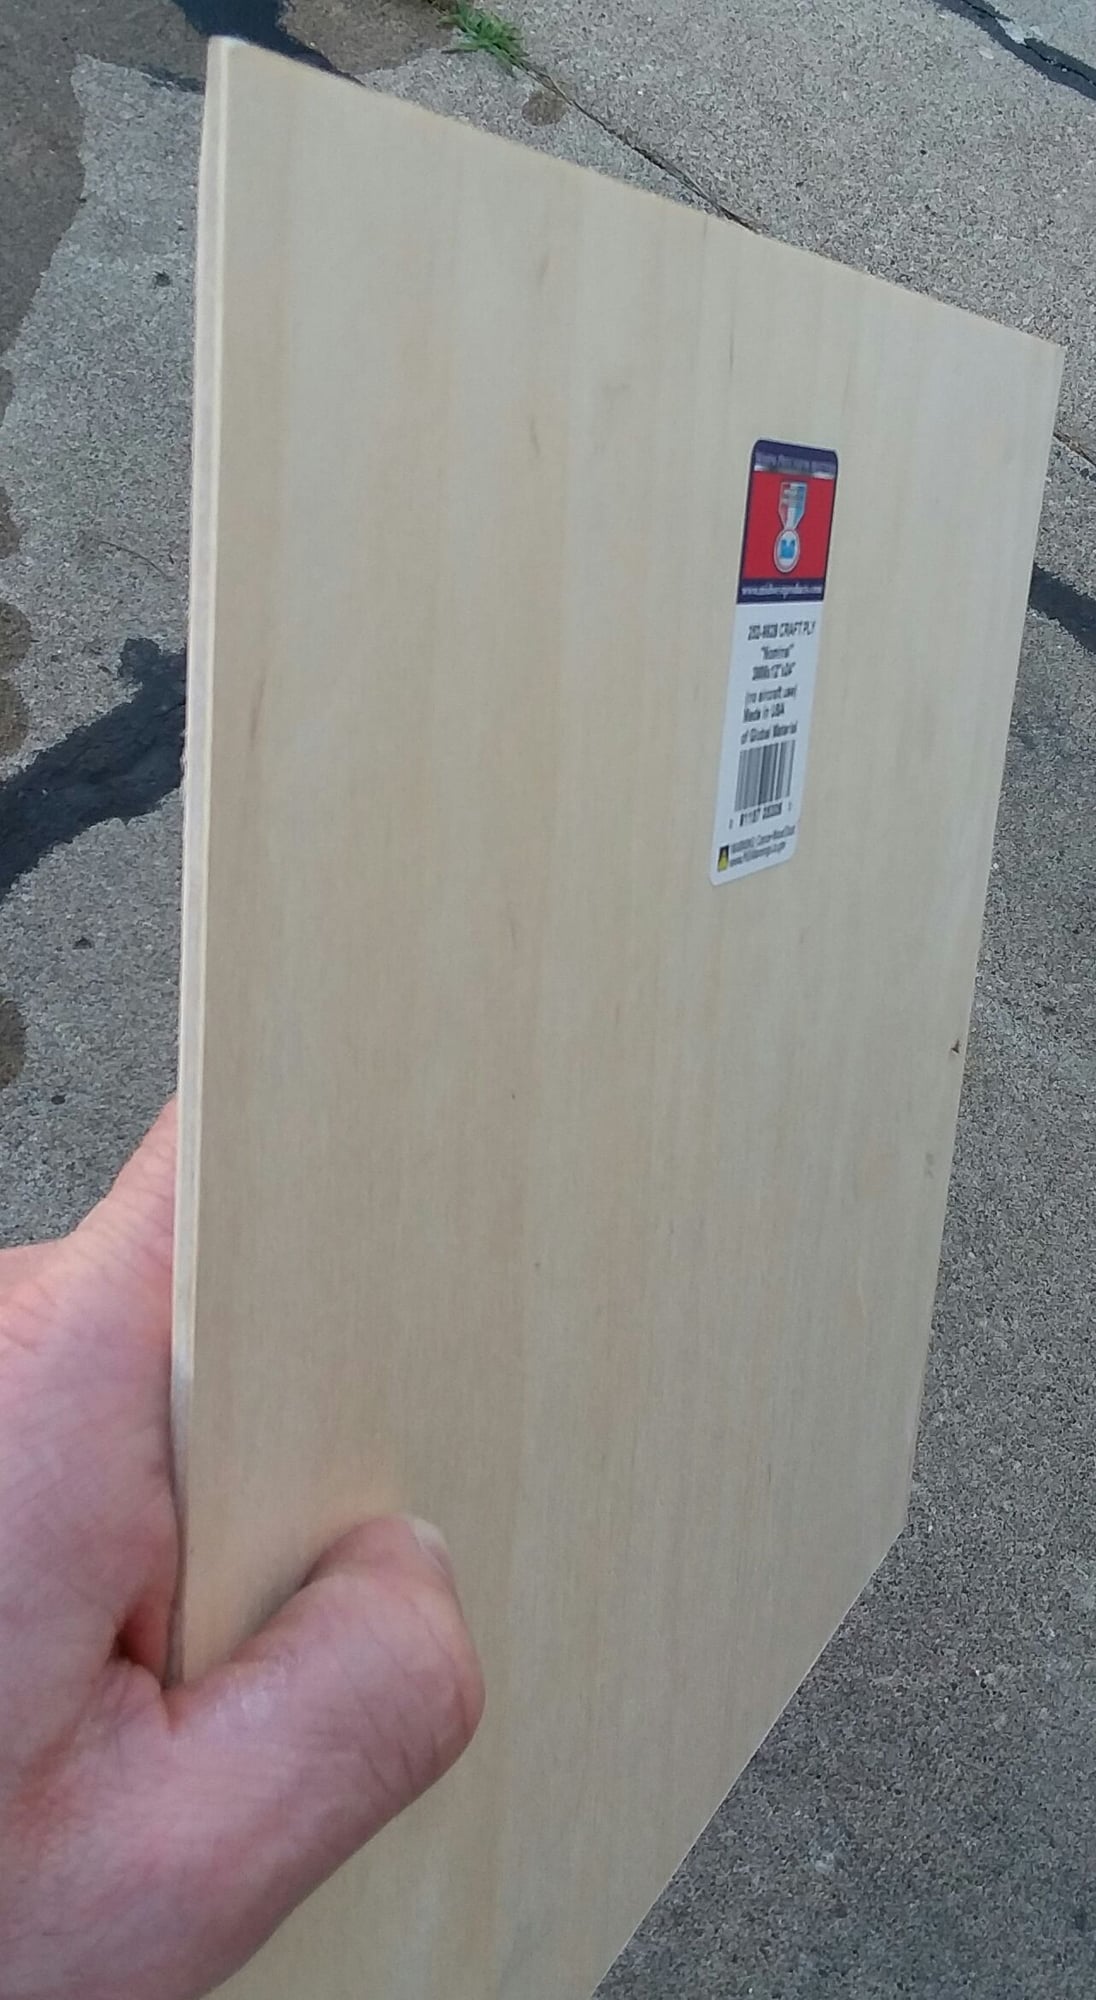
These were made with a military surplus 'Musette' bag. I removed the shoulder straps and added hardware for mounting to a rear rack. The nice thing about these bags is that they have a slip compartment on the backside which is designed for holding maps, and is great for slipping in a stiffener plate, adding structure to the bag, keeping it stable and out of the rear wheel. I used thin plywood for the stiffener, which was from the crafts section at the hardware store. I found it has the best strength to weight ratio, without being bulky, and is a good foundation on which to mount the other hardware. If you don't have this map slip in your bag, you could leave the plate exposed either inside the bag, or on the rear side. I closed up this stiffner plate compartment up top with black silicone caulk to keep out water. The stiffner could be coated with plasti-dip or painted to shield it from the elements if left exposed on the rear.
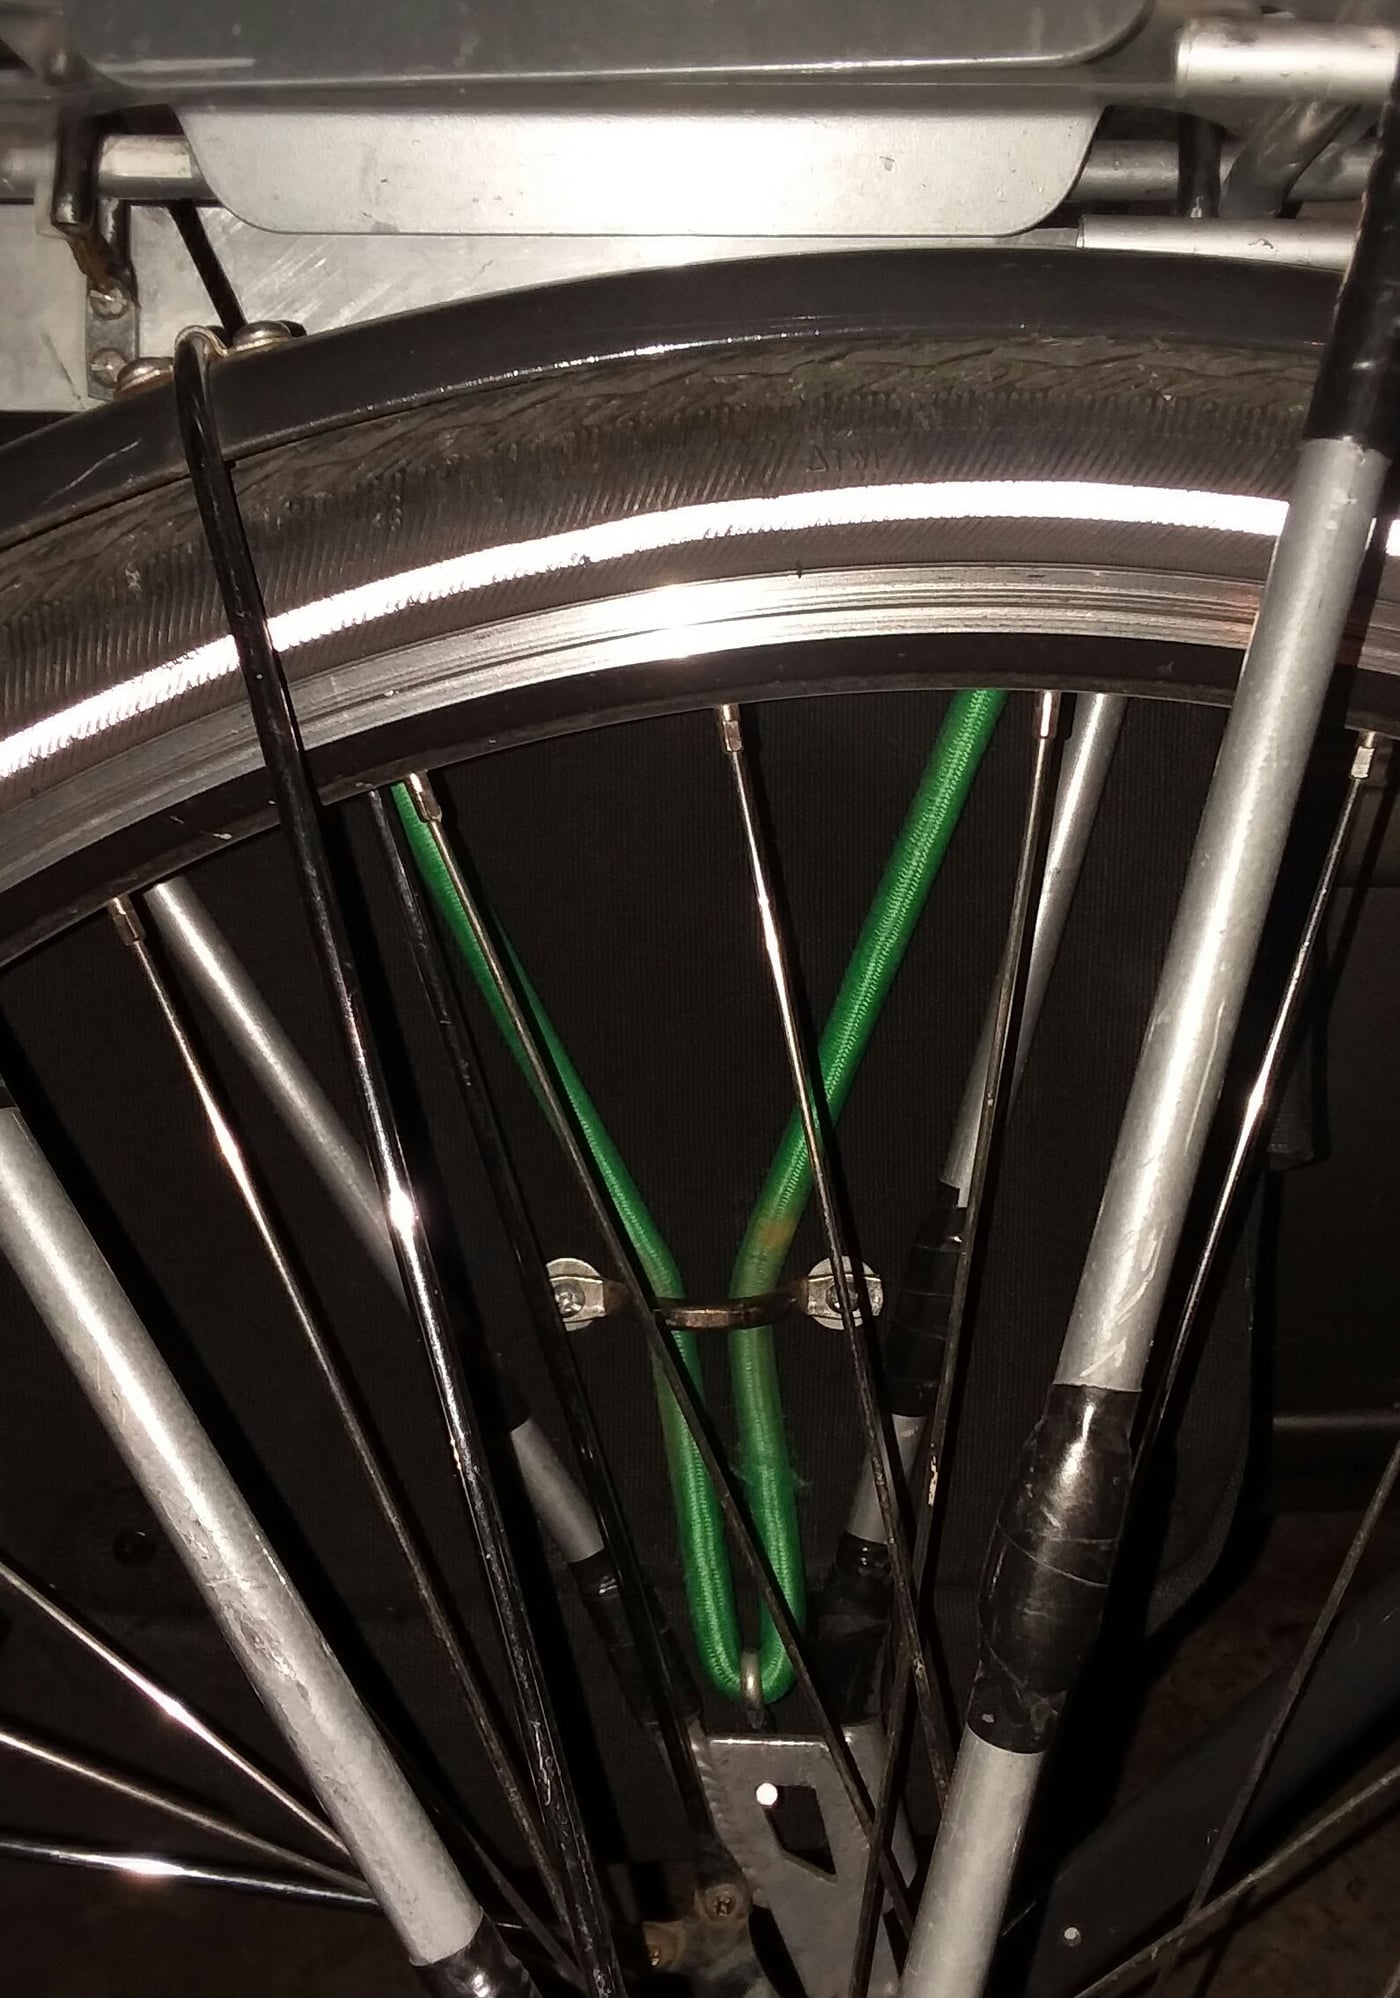
I added a strip of aluminum for reinforcement and to help the bag wear longer in the area that will be riding on the rack top rail. The hooks attached to the top of the bag on this aluminum rail are offset to push the bags back as far as possible when mounted on the rack, helping keep heel strike to a minimum. I used plasti-dip where the hooks will contact the rack rail (which needs to be re-dipped) helping keep things from sliding around and rattling. The lower portion of the bag uses a small drawer pull-handle piece i found at the hardware store. A bungee gets attached to the upper hooks (held on by bungee tension only), goes through this lower handle piece, and attached with an S-hook to the lower portion of the rack. The shorter the bungee, the more secure the whole setup will become. Make sure the lower pull-handle attachment/bungee guide is placed properly to not interfere with the rack structure. You can see in the last picture when my bag is mounted, this is centered between the vertical rack struts. I have two sets of bungees of different lengths which can be quickly swapped our, allowing the bags to be used in a few different applications including on a low-rider front rack.
Everything was laid out for the rack i intended using with the bags, and the hardware holes were drilled through the stiffener, as well as the aluminum plate. Washers on all screw hardware help distribute the tension, and locktite keeps everything secure after assembly. I custom fit all screw lengths to keep things tidy and make sure there was no excess screw length to catch on the rack, or belongings inside the bags.
These have proven very durable, as i used them exclusively for a few years before buying a pair of waterproof Ortleibs (although i used scotchgard on the bags to keep them adequately water resistant). They are now being used, along with the bike for which they were fashioned, by my son.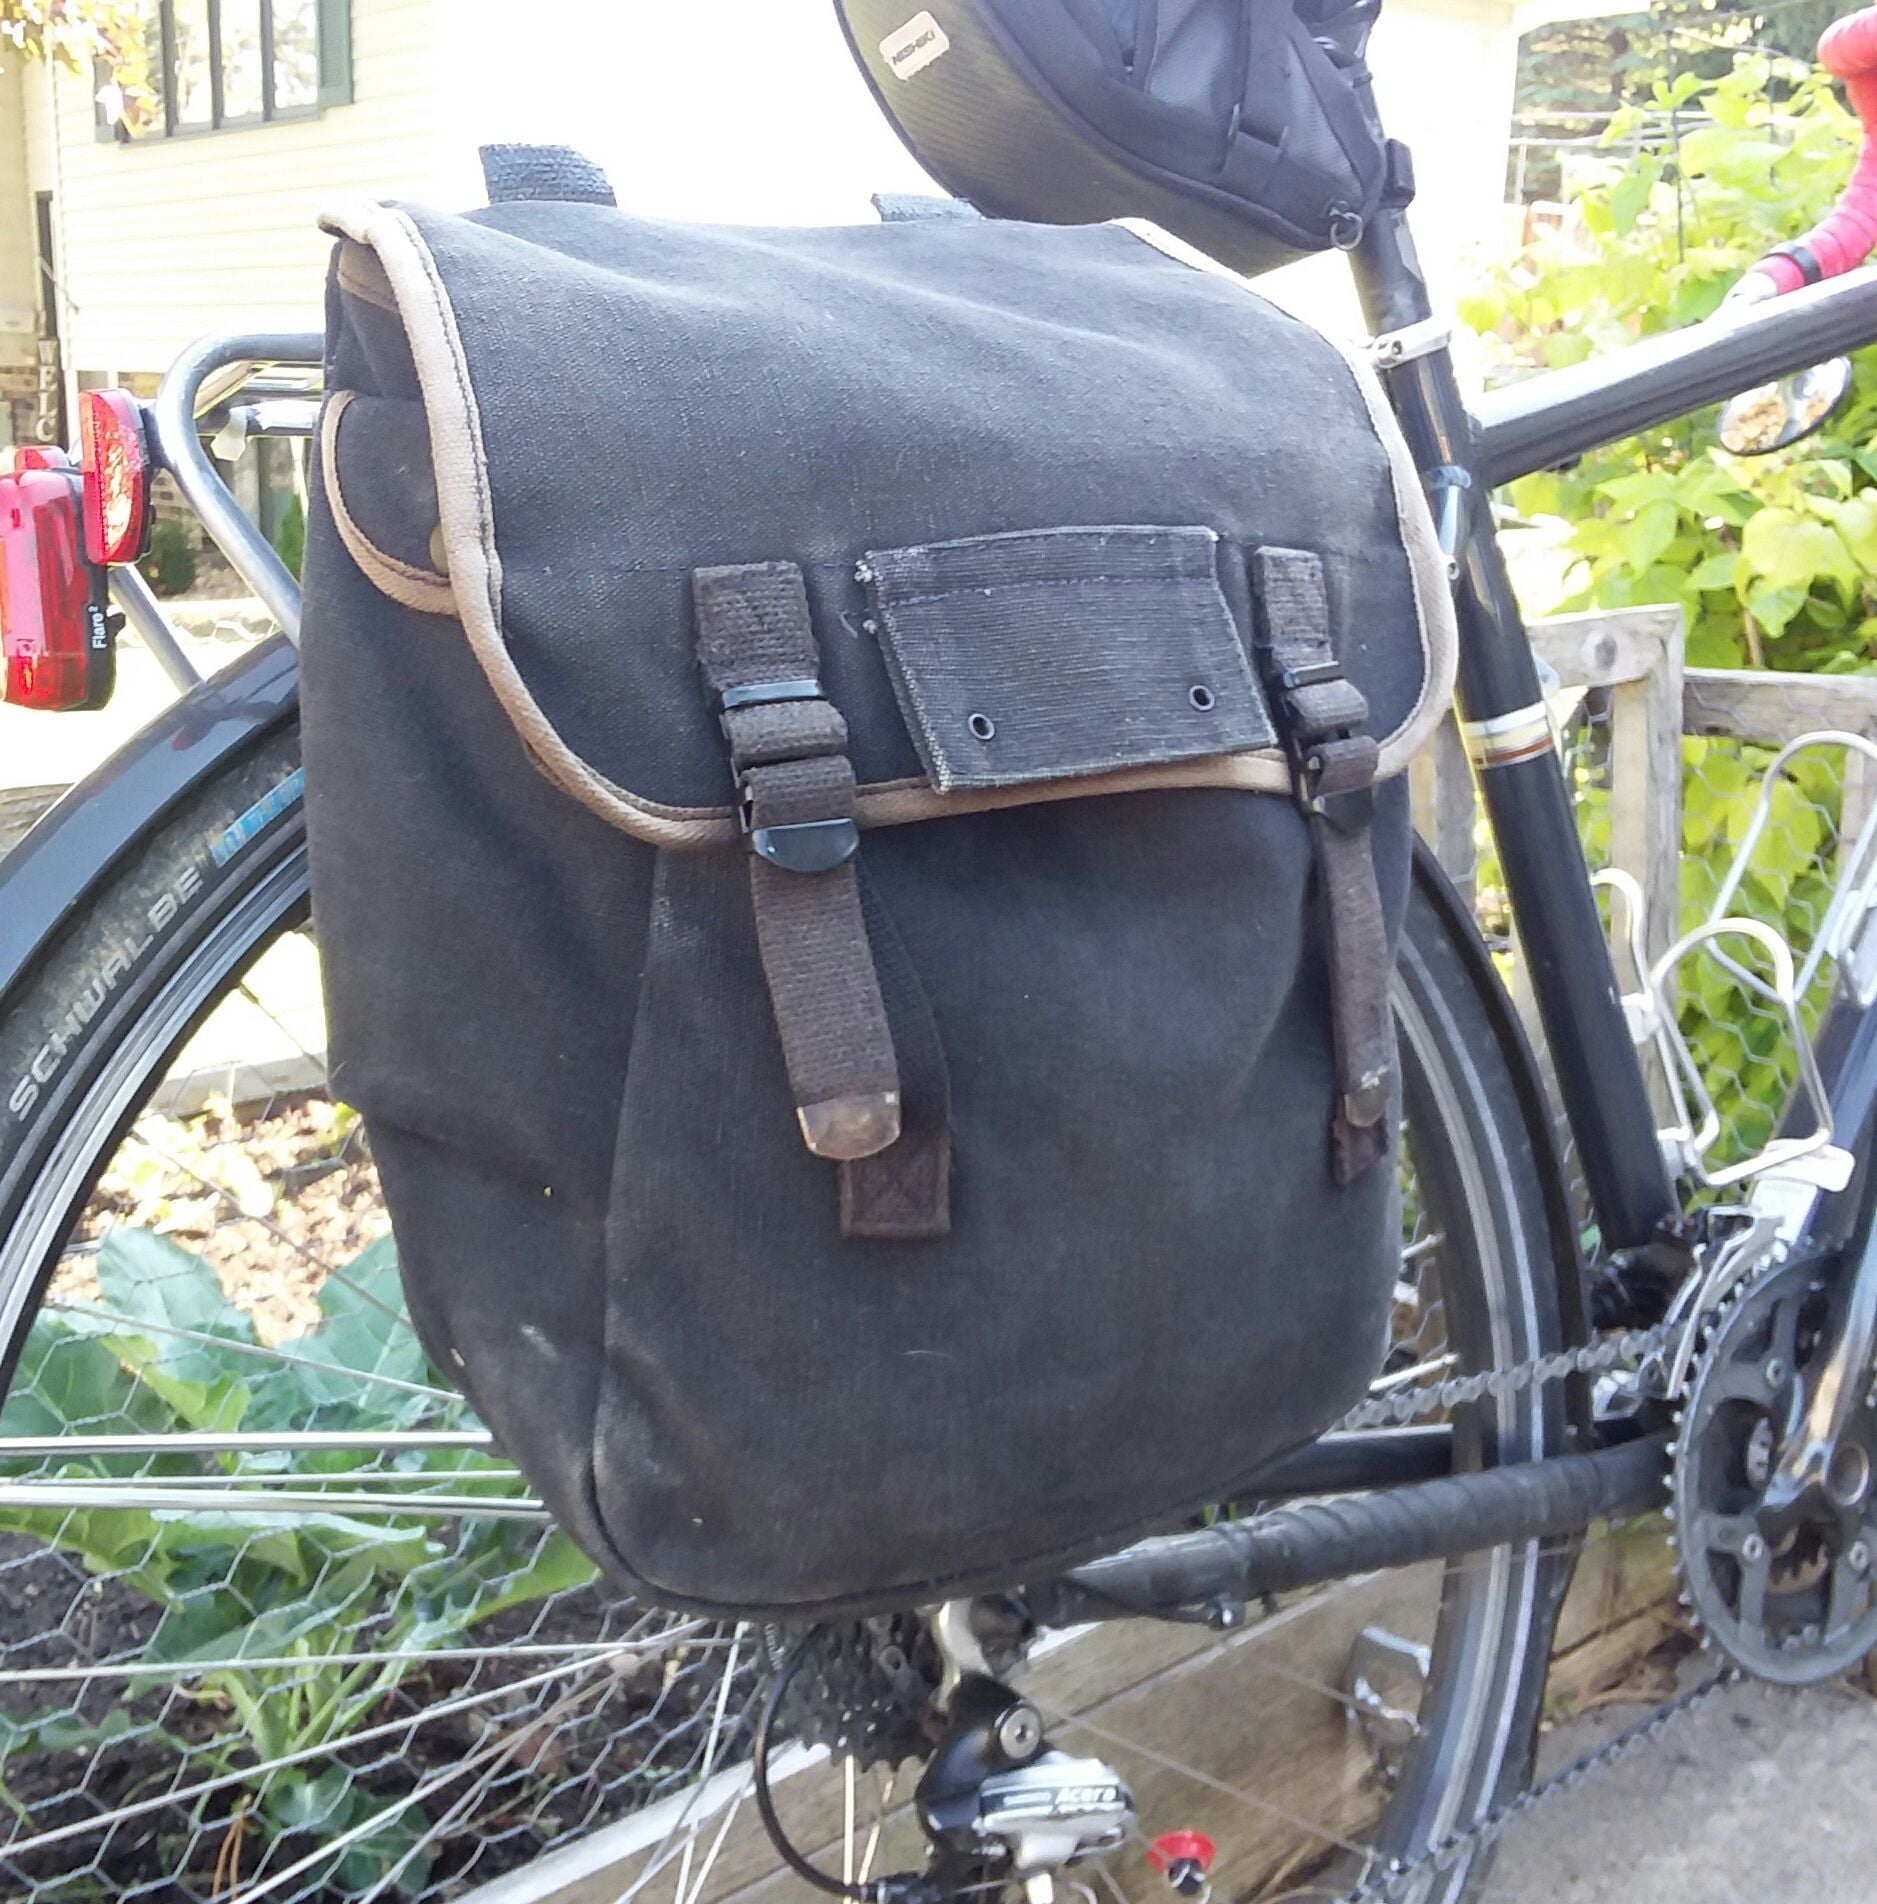

These were made with a military surplus 'Musette' bag. I removed the shoulder straps and added hardware for mounting to a rear rack. The nice thing about these bags is that they have a slip compartment on the backside which is designed for holding maps, and is great for slipping in a stiffener plate, adding structure to the bag, keeping it stable and out of the rear wheel. I used thin plywood for the stiffener, which was from the crafts section at the hardware store. I found it has the best strength to weight ratio, without being bulky, and is a good foundation on which to mount the other hardware. If you don't have this map slip in your bag, you could leave the plate exposed either inside the bag, or on the rear side. I closed up this stiffner plate compartment up top with black silicone caulk to keep out water. The stiffner could be coated with plasti-dip or painted to shield it from the elements if left exposed on the rear.
I added a strip of aluminum for reinforcement and to help the bag wear longer in the area that will be riding on the rack top rail. The hooks attached to the top of the bag on this aluminum rail are offset to push the bags back as far as possible when mounted on the rack, helping keep heel strike to a minimum. I used plasti-dip where the hooks will contact the rack rail (which needs to be re-dipped) helping keep things from sliding around and rattling. The lower portion of the bag uses a small drawer pull-handle piece i found at the hardware store. A bungee gets attached to the upper hooks (held on by bungee tension only), goes through this lower handle piece, and attached with an S-hook to the lower portion of the rack. The shorter the bungee, the more secure the whole setup will become. Make sure the lower pull-handle attachment/bungee guide is placed properly to not interfere with the rack structure. You can see in the last picture when my bag is mounted, this is centered between the vertical rack struts. I have two sets of bungees of different lengths which can be quickly swapped our, allowing the bags to be used in a few different applications including on a low-rider front rack.
Everything was laid out for the rack i intended using with the bags, and the hardware holes were drilled through the stiffener, as well as the aluminum plate. Washers on all screw hardware help distribute the tension, and locktite keeps everything secure after assembly. I custom fit all screw lengths to keep things tidy and make sure there was no excess screw length to catch on the rack, or belongings inside the bags.
These have proven very durable, as i used them exclusively for a few years before buying a pair of waterproof Ortleibs (although i used scotchgard on the bags to keep them adequately water resistant). They are now being used, along with the bike for which they were fashioned, by my son.
Last edited by SalsaShark; 06-16-20 at 08:08 PM.
06-16-20, 11:36 PM
#9
Senior Member
Thread Starter
Join Date: Nov 2013
Location: Southern California
Posts: 1,450
Mentioned: 14 Post(s)
Tagged: 0 Thread(s)
Quoted: 791 Post(s)
Liked 741 Times
in
406 Posts
SalsaShark
Those are fantastic pictures, thank you! I really like how you attached the bungee with the s-hook and the little handle. I think I'm going to copy your design, except use some s-hooks to attach the pannier to the rack's rails at the top rather than j-hooks like you've done. I'd like to do it your way, but I'm trying to be uber cheap. Hopefully a strong bungee holding the bag down will help reduce sway even if the d-rings will be able to shift around.
Those are fantastic pictures, thank you! I really like how you attached the bungee with the s-hook and the little handle. I think I'm going to copy your design, except use some s-hooks to attach the pannier to the rack's rails at the top rather than j-hooks like you've done. I'd like to do it your way, but I'm trying to be uber cheap. Hopefully a strong bungee holding the bag down will help reduce sway even if the d-rings will be able to shift around.
Likes For Piff:
06-17-20, 02:38 AM
#10
Senior Member
Join Date: Nov 2013
Location: Near Pottstown, PA: 30 miles NW of Philadelphia
Posts: 2,184
Bikes: 2 Trek Mtn, Cannondale R600 road, 6 vintage road bikes
Mentioned: 83 Post(s)
Tagged: 0 Thread(s)
Quoted: 472 Post(s)
Liked 1,028 Times
in
404 Posts
Great thread idea. Who else has good DIY pannier designs, things that have worked well. I've been pondering DIY front panniers for longer day rides when I may want some rain gear, a few extra layers, hard copy of War and Peace, vacuum tube radio, etc. I'm not sure I'll even like the idea so I do not want to spend $$$$$ on "the good stuff" yet.
Thanks for these two ideas.
Thanks for these two ideas.
Likes For Prowler:
06-17-20, 05:12 AM
#11
Senior Member

Join Date: Apr 2011
Location: Alpharetta, GA
Posts: 15,280
Bikes: Nashbar Road
Mentioned: 71 Post(s)
Tagged: 0 Thread(s)
Quoted: 2934 Post(s)
Liked 341 Times
in
228 Posts
When I used s-hooks, same idea, the bag was normally secure but once - out of maybe a hundred - one of the hooks did get pushed off the rack somehow. Had I not also belted the bag to the rack stays it might have fallen off. I prefer a carabiner clip now.
Some years ago I simply bound two bags' straps together, which rested over the rack. No hardware needed and no way for one to detach. I'd just stretch the bungee cord over the top of the strap. I've always put something inside to stiffen the bag, and used something to hold the bag(s) against the rack stay.
Some years ago I simply bound two bags' straps together, which rested over the rack. No hardware needed and no way for one to detach. I'd just stretch the bungee cord over the top of the strap. I've always put something inside to stiffen the bag, and used something to hold the bag(s) against the rack stay.
06-17-20, 07:34 AM
#12
Senior Member
And to partially go against the diy angle, you could also go with tried and trued and reliable already made attachment systems sold separately at reasonable prices.
known brand systems are available, both top and bottom.
have seen that German brand stuff, krux and something, can never remember the name.
I know MEC here in Canada sells hardware for their panniers.
known brand systems are available, both top and bottom.
have seen that German brand stuff, krux and something, can never remember the name.
I know MEC here in Canada sells hardware for their panniers.
06-17-20, 07:37 AM
#13
Senior Member
But hey, we all used hook and bungee systems and they worked, sometimes hopped off rails if bungee not tight enough or when hitting a big bump.
06-17-20, 02:25 PM
#14
Senior Member
Join Date: Apr 2014
Location: Maine, USA
Posts: 1,612
Bikes: Corvid Sojourner, Surly Ice Cream Truck, Co-Motion Divide, Co-Motion Java Tandem, Salsa Warbird, Salsa Beargrease, Carver Tandem
Mentioned: 3 Post(s)
Tagged: 0 Thread(s)
Quoted: 533 Post(s)
Liked 435 Times
in
227 Posts
those look cool! nice job!
06-19-20, 09:01 AM
#15
Mad bike riding scientist

Join Date: Nov 2004
Location: Denver, CO
Posts: 27,341
Bikes: Some silver ones, a red one, a black and orange one, and a few titanium ones
Mentioned: 152 Post(s)
Tagged: 1 Thread(s)
Quoted: 6200 Post(s)
Liked 4,200 Times
in
2,357 Posts
I recently purchased a couple military surplus bags and am trying to find a way to attach the panniers to my bike on the cheap. There's two d-rings attached to the back of the bag with some thick, well-stitched webbing. Would a couple s-hooks suffice? All I'm planning on doing is bending the s-hook closed around the d-ring. Possibly plasti-dipping the other side that will hang onto the rail of the rack. Will this be fine, or will the pannier jump off the rack? I am also going to run a couple rivets through the bag to attach a bungee cord that will hook the lower part of the rack. If you have a better pannier hook suggestion I'm all ears. Though I'm trying to do this as cheaply as possible.
Oh, and to prevent the pannier hooks from sliding forward and aft I'm going to wrap some zipties on the rack.
Oh, and to prevent the pannier hooks from sliding forward and aft I'm going to wrap some zipties on the rack.
__________________
Stuart Black
Plan Epsilon Around Lake Michigan in the era of Covid
Old School�When It Wasn�t Ancient bikepacking
Gold Fever Three days of dirt in Colorado
Pokin' around the Poconos A cold ride around Lake Erie
Dinosaurs in Colorado A mountain bike guide to the Purgatory Canyon dinosaur trackway
Solo Without Pie. The search for pie in the Midwest.
Picking the Scablands. Washington and Oregon, 2005. Pie and spiders on the Columbia River!
06-19-20, 12:47 PM
#16
Senior Member
Multiple Amens to the importance of preventing wheel/pannier contact. They are sworn enemies and will fight to the death. If the pannier cannot jam itself in the wheel, breaking spokes, and possibly the rider, the wheel will slowly chew away the pannier until it has a nice big hole in it.


