


Fixing spokes while on tour
 10-08-08, 08:06 PM
#1
Member
Thread Starter

Join Date: May 2005
Location: WOODBURY, CT.
Posts: 30
Bikes: LEMOND VERSAILLES, Surly Crosscheck
Mentioned: 0 Post(s)
Tagged: 0 Thread(s)
Quoted: 0 Post(s)
Likes: 0
Liked 0 Times
in
0 Posts
Fixing spokes while on tour
If a spoke brakes on the drive side rear wheel then a chainwhip, cresent wrench and cassette socket will be needed to replace the spoke. The weight of these tools is heavy. Does anyone have any tricks to get around having to carry these boat anchors?


 10-08-08, 09:23 PM
#4
-

An ounce of prevention is worth a kilo of tools - build a good wheel to start with, you won't break spokes.
BTW those hypercracker tools don't necessarily work like you may hope. Some break, many won't fit properly due to dropout and/or chainstay design/size/shape. Even when they work they will probably damage the finish, and possibly even dent the chainstay or bend the dropout - I've seen both. Something to consider.
BTW those hypercracker tools don't necessarily work like you may hope. Some break, many won't fit properly due to dropout and/or chainstay design/size/shape. Even when they work they will probably damage the finish, and possibly even dent the chainstay or bend the dropout - I've seen both. Something to consider.
Last edited by seeker333; 10-08-08 at 10:50 PM.
10-09-08, 12:26 AM
#5
Senior Member
Someone here posted a while ago (and I apologise for not remembering who and, yes, I should use the Search function) a picture of an ordinary woven nylon bag strap wrapped around the cassette and attached to a spoke to stop the cassette from turning; the lockring then can be removed simply and easily.
Given that the strap would end up greasy, a spare strap of say 2' in length, tucked away in the toolkit specificialy for this purpose would be ideal.
The tool for undoing the lockring isn't particularly heavy if you shop around, and I carry a crescent wrench anyway.
Given that the strap would end up greasy, a spare strap of say 2' in length, tucked away in the toolkit specificialy for this purpose would be ideal.
The tool for undoing the lockring isn't particularly heavy if you shop around, and I carry a crescent wrench anyway.
10-09-08, 06:22 AM
#6
Senior Member
BTW those hypercracker tools don't necessarily work like you may hope. Some break, many won't fit properly due to dropout and/or chainstay design/size/shape. Even when they work they will probably damage the finish, and possibly even dent the chainstay or bend the dropout - I've seen both. Something to consider.
The one thing that will help a lot if you expect to use these tools is to be sure thet the lockring is not too tight. There is not reason it needs to be extremely tight and having it fairly loose guarantees an easier time using one of these little tools.
In any case it is a good idea to try using whatever method you choose at home before you rely on it on the road.
Check out these threads for other info including the method Rowan mentioned:
https://www.bikeforums.net/touring/256400-seatpost-chainwhip-trick-any-pics.html
https://www.bikeforums.net/touring/340192-changing-drive-side-spokes-road.html

 10-09-08, 07:15 AM
#8
Guest
Posts: n/a
Mentioned: Post(s)
Tagged: Thread(s)
Quoted: Post(s)
 And my rear wheel went back to the shop as a warranty issue.
10-09-08, 08:37 AM
And my rear wheel went back to the shop as a warranty issue.
10-09-08, 08:37 AM
#9
Senior Member
Join Date: Aug 2006
Location: Central Coast, CA
Posts: 3,392
Bikes: Surly LHT, Specialized Rockhopper, Nashbar Touring (old), Specialized Stumpjumper (older), Nishiki Tourer (model unknown)
Mentioned: 0 Post(s)
Tagged: 0 Thread(s)
Quoted: 1 Post(s)
Likes: 0
Liked 2 Times
in
2 Posts
The Unior mentioned above worked OK for me. The reports I heard of breakage were for the Stein Hypercracker which has since been redesigned.
The one thing that will help a lot if you expect to use these tools is to be sure thet the lockring is not too tight. There is not reason it needs to be extremely tight and having it fairly loose guarantees an easier time using one of these little tools.
In any case it is a good idea to try using whatever method you choose at home before you rely on it on the road.
Check out these threads for other info including the method Rowan mentioned:
https://www.bikeforums.net/showthread.php?t=256400
https://www.bikeforums.net/showthread.php?t=340192
The second time the lockring came off, I knew how the Hypercracker worked a whole lot better. This time I didn't even take the panniers off the bike. I took the rear wheel off, put the Hypercracker on, put the wheel back on the bike, and used the frame for leverage. I didn't tighten it as much as my strength would allow, but I did put plenty of torque on it; I didn't want it to loosen again. It hasn't come loose since.
In hindsight, I wish I had practiced with the Hypercracker at home before leaving on tour. However, after my two experiences with it, my opinion is that it is a well-designed tool and I don't see it failing as others have reported (evidently, the previous design?) It is far smaller and lighter than the lockring tool/crescent wrench/chain whip combination I was carrying before. As one who has broken spokes on tour before, and suffered greatly because of it, I now consider the Hypercracker an essential and invaluable part of my touring kit.
10-09-08, 09:02 AM
#10

cyclopath

Join Date: Apr 2006
Location: Victoria, BC
Posts: 5,264
Bikes: Surly Krampus, Surly Straggler, Pivot Mach 6, Bike Friday Tikit, Bike Friday Tandem, Santa Cruz Nomad
Mentioned: 0 Post(s)
Tagged: 0 Thread(s)
Quoted: 0 Post(s)
Likes: 0
Liked 6 Times
in
6 Posts
I've got the Hypercracker [possibly the older version - not 100%] - having used it several times at home practicing I can see how it could damage your bike or get damaged itself even though that didn't happen to me - yet.
It's a handy tool and I would carry it on a long tour. I also carry fiber fix spokes which I would use first to solve my immediate problem and get rolling. If a bike shop with proper tools was in my future I'd just ride with the fiber fix spoke until I was there. If that wasn't possible I'd ride until camp and take care of the problem over a cup of tea when I am relaxed and have lots of time - less likely to damage anything.
Any North American sources for the Unior tool?
10-09-08, 12:59 PM
#11
-
IMO ff spokes are the best solution in this situation. No chance of damaging bike, no tools needed, easy install, not heavy or bulky, low cost. It's an appropriate fix for a problem which, in my experience, is unlikely to occur in the first place if you've done your homework.
10-09-08, 01:18 PM
#12
Mad bike riding scientist

Join Date: Nov 2004
Location: Denver, CO
Posts: 27,341
Bikes: Some silver ones, a red one, a black and orange one, and a few titanium ones
Mentioned: 152 Post(s)
Tagged: 1 Thread(s)
Quoted: 6200 Post(s)
Liked 4,198 Times
in
2,355 Posts
")
__________________
Stuart Black
Plan Epsilon Around Lake Michigan in the era of Covid
Old School�When It Wasn�t Ancient bikepacking
Gold Fever Three days of dirt in Colorado
Pokin' around the Poconos A cold ride around Lake Erie
Dinosaurs in Colorado A mountain bike guide to the Purgatory Canyon dinosaur trackway
Solo Without Pie. The search for pie in the Midwest.
Picking the Scablands. Washington and Oregon, 2005. Pie and spiders on the Columbia River!
10-09-08, 07:08 PM
#13
member
Join Date: Feb 2008
Location: Ontario, Canada
Posts: 140
Mentioned: 0 Post(s)
Tagged: 0 Thread(s)
Quoted: 1 Post(s)
Likes: 0
Liked 0 Times
in
0 Posts
I have a hypercracker as well. Some care has to be taken making sure it won't slip out of the lock ring splines. I don't use a chain whip. I remove the cassette by holding it with one hand and the other on the 'cracker; as staehpj1 pointed out, it doesn't need to be that tight. It's alot less frustrating doing it this way, than putting the wheel back on, loosen the ring by turning the crank, etc. I only remove it to service the bearings anyway. No broken spokes so far...
10-09-08, 07:41 PM
#15
Scott

Join Date: Jun 2006
Posts: 2,393
Bikes: Too Many
Mentioned: 0 Post(s)
Tagged: 0 Thread(s)
Quoted: 1 Post(s)
Likes: 0
Liked 1 Time
in
1 Post
I recently found a box of bike parts in a thrift store. I was shocked to find this hub in it.

Note the keyhole slots. You can change a spoke without removing the freewheel. Why can't someone start making these again? It's such a simple and elegant design. I laced it up and use it with a 7-speed freewheel. All I need to replace a spoke is just a small spoke wrench.
Note the keyhole slots. You can change a spoke without removing the freewheel. Why can't someone start making these again? It's such a simple and elegant design. I laced it up and use it with a 7-speed freewheel. All I need to replace a spoke is just a small spoke wrench.
10-10-08, 01:21 AM
#16
Senior Member
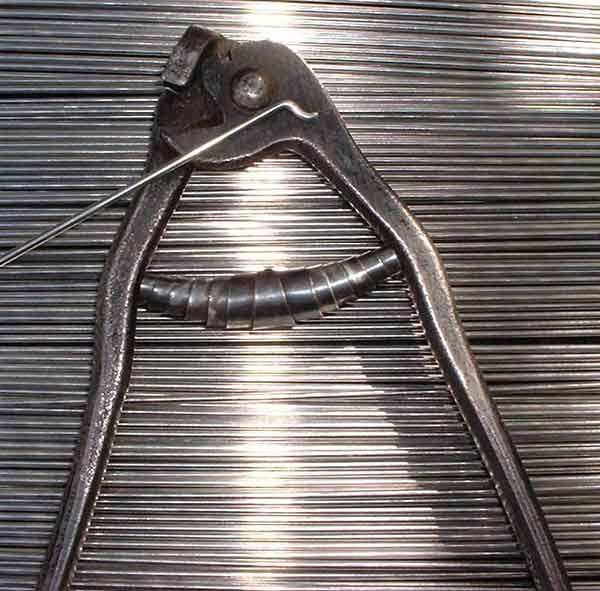
In fact, a simpler course would be to use spokes with a Z bend on the end of the them... that is, the mushroom end has been removed, and the spoke bent to its new shape. I haven't tried these, but understand they work simply and well without removing the cassette.
Obviously, you need to start with a much longer spoke than the original(s) and need a vice and pliers to do the job. I would imagine traditional galvanised steel spokes would be easier to shape than stainless ones.
Anyone have practical experience with this method?
Obviously, you need to start with a much longer spoke than the original(s) and need a vice and pliers to do the job. I would imagine traditional galvanised steel spokes would be easier to shape than stainless ones.
Anyone have practical experience with this method?
10-10-08, 02:23 AM
#17
Caffeinated.
Join Date: Aug 2004
Location: Waltham, MA
Posts: 1,541
Bikes: Waterford 1900, Quintana Roo Borrego, Trek 8700zx, Bianchi Pista Concept
Mentioned: 0 Post(s)
Tagged: 0 Thread(s)
Quoted: 0 Post(s)
Likes: 0
Liked 1 Time
in
1 Post
I used a Stein Hypercracker a few times on my year tour for cassette maintenence & cassette changex2. I bent it a little bit the first time I used it, user error. Supposedly it is re-designed now, but I would still recommend practicing with one at home, as you could possibly really muck up your rear drop out/hanger.
Along with the hypercracker I took real spare spokes & nipples (3 rear each side, and front), and a couple fibre fix spokes. My thinking for all the spares was not so much breaking spokes due to fatigue/rough roads, but more in the case of rough multi-modal transportation handling (buses/trucks/trains/planes). & In case of a "foreign object" lodging through a moving wheel (rock/stick/dog etc).
-The spares turned out to be un-neccasary, but I'm glad I had them especailly since I had an odd size wheel-set (700c).
10-10-08, 02:48 AM
#18
Formerly Known as Newbie

Join Date: Mar 2002
Location: Helsinki, Finland
Posts: 6,249
Mentioned: 1 Post(s)
Tagged: 0 Thread(s)
Quoted: 2 Post(s)
Likes: 0
Liked 4 Times
in
3 Posts
I have the Next Best Thing II (https://www.m-gineering.nl/indexg.htm, click "hard to finds"), and 4 spare spokes taped on my rear rack tubing. From what I've seen it's simpler in design than Hypercracker, so less things that can go wrong there. Works well enough, but it provides way too much leverage for tightening (a no-no, as staehpj1 mentioned). The manufacturer also warns against this.
In addition I carry a couple of "First Aid" wire thingys in the saddle bag:
https://www.roseversand.de/output/con...0&detail2=2323
In a pinch I believe those can be installed without removing the lockring. I've never had to use them though.
--J
In addition I carry a couple of "First Aid" wire thingys in the saddle bag:
https://www.roseversand.de/output/con...0&detail2=2323
In a pinch I believe those can be installed without removing the lockring. I've never had to use them though.
--J
__________________
To err is human. To moo is bovine.
Who is this General Failure anyway, and why is he reading my drive?
Become a Registered Member in Bike Forums
Community guidelines
To err is human. To moo is bovine.
Who is this General Failure anyway, and why is he reading my drive?
Become a Registered Member in Bike Forums
Community guidelines
Last edited by Juha; 10-10-08 at 02:51 AM.
10-10-08, 06:14 AM
#19
Senior Member
In fact, a simpler course would be to use spokes with a Z bend on the end of the them... that is, the mushroom end has been removed, and the spoke bent to its new shape. I haven't tried these, but understand they work simply and well without removing the cassette.
Obviously, you need to start with a much longer spoke than the original(s) and need a vice and pliers to do the job. I would imagine traditional galvanised steel spokes would be easier to shape than stainless ones.
Anyone have practical experience with this method?
Obviously, you need to start with a much longer spoke than the original(s) and need a vice and pliers to do the job. I would imagine traditional galvanised steel spokes would be easier to shape than stainless ones.
Anyone have practical experience with this method?
10-10-08, 06:50 AM
#20
Tinkerer since 1980
Join Date: Sep 2006
Location: London
Posts: 922
Bikes: Coppi racer, Old school BMX, some random a fixed wheel convertion
Mentioned: 0 Post(s)
Tagged: 0 Thread(s)
Quoted: 0 Post(s)
Likes: 0
Liked 1 Time
in
1 Post
I've read about people filing 3 "sides" off of the mushroom end so you can hook the spoke through the flange but under tension it still stays put.
10-10-08, 10:50 AM
#22
phredite
Join Date: Jan 2007
Posts: 320
Bikes: Salsa Casseroll, Surly Long Haul Trucker, Soma Groove
Mentioned: 0 Post(s)
Tagged: 0 Thread(s)
Quoted: 0 Post(s)
Likes: 0
Liked 0 Times
in
0 Posts
In fact, a simpler course would be to use spokes with a Z bend on the end of the them... that is, the mushroom end has been removed, and the spoke bent to its new shape. I haven't tried these, but understand they work simply and well without removing the cassette.
Obviously, you need to start with a much longer spoke than the original(s) and need a vice and pliers to do the job. I would imagine traditional galvanised steel spokes would be easier to shape than stainless ones.
Anyone have practical experience with this method?
Obviously, you need to start with a much longer spoke than the original(s) and need a vice and pliers to do the job. I would imagine traditional galvanised steel spokes would be easier to shape than stainless ones.
Anyone have practical experience with this method?
I'd use my multi-tool to cut off the head, and then measure for the bend next to the spoke side that I needed to replace, make the bend, insert, and true it up. Works like a charm, and hold up really well. I ran one wheel with a few z-bend spokes for years on my commuting/touring rig, just to see how long they would survive. I eventually gave up and replaced the z-bends with proper spokes. I'd have no problem doing this on tour, and in fact have helped several people on tour with this trick. They continued on without any problem for at least a few days to where we would continue on our own ways.
10-10-08, 03:09 PM
#23
Senior Member

Join Date: Aug 2005
Posts: 3,866
Mentioned: 14 Post(s)
Tagged: 0 Thread(s)
Quoted: 595 Post(s)
Liked 281 Times
in
192 Posts
What Rowan and fc said, make a few of these this winter when you have nothing better to do and you're good to go next season.
From Jim Langley's website:
An emergency spoke is one that can be inserted in a wheel without removing the wheel from the bike or removing the cassette cogs, tire and tube. To make one, you get a spoke that’s the same type as what’s in your wheel (so that it’ll screw into the nipples in your wheel). A shop can help you with this. But get that spoke about 5 mm longer than what you have now. To turn it into an emergency spoke, cut the head off the bottom of the spoke (non-threaded end) and bend two 90-degree bends into the spoke so the end looks like and upside-down L. With this bend in the end of the spoke, if you break a spoke on the road and you have your emergency spoke, you’ll be able to extract the broken spoke and easily replace it with the emergency spoke. Because the emergency spoke has no head, you just poke the bend into the hub hole, weave the spoke through the others, screw it into a nipple and tension the spoke. No wheel disassembly required! This trick also allows you to repurpose long spokes and cut them down to use in smaller wheels for bicycle repairs (so you don’t have to search for the right size spokes). BACK
10-10-08, 03:48 PM
#24
Mad bike riding scientist
Join Date: Nov 2004
Location: Denver, CO
Posts: 27,341
Bikes: Some silver ones, a red one, a black and orange one, and a few titanium ones
Mentioned: 152 Post(s)
Tagged: 1 Thread(s)
Quoted: 6200 Post(s)
Liked 4,198 Times
in
2,355 Posts
If you want the best way...but certainly not the cheapest...go with a Phil FSC. No chain whip, no hypercracker, no problems. A 5mm allen wrench and the thing comes apart.

A hypercracker is $40 but a rear FSC is around $300. Not cheap but very elegant
...go with a Phil FSC. No chain whip, no hypercracker, no problems. A 5mm allen wrench and the thing comes apart.A hypercracker is $40 but a rear FSC is around $300. Not cheap but very elegant
__________________
Stuart Black
Plan Epsilon Around Lake Michigan in the era of Covid
Old School�When It Wasn�t Ancient bikepacking
Gold Fever Three days of dirt in Colorado
Pokin' around the Poconos A cold ride around Lake Erie
Dinosaurs in Colorado A mountain bike guide to the Purgatory Canyon dinosaur trackway
Solo Without Pie. The search for pie in the Midwest.
Picking the Scablands. Washington and Oregon, 2005. Pie and spiders on the Columbia River!
10-11-08, 01:45 PM
#25
Senior Member

Join Date: Dec 2007
Location: Western Ma.
Posts: 958
Bikes: Diamondback "parkway" Spec. "expedition
Mentioned: 0 Post(s)
Tagged: 0 Thread(s)
Quoted: 47 Post(s)
Likes: 0
Liked 42 Times
in
33 Posts
I have a freewheel and all I carry is the freewheel tool. When I had problems, I have found most people will let you use the tools in their garage. I have also stopped at auto repair shops and used wrenches and vices.

