


Making Your Own Studded Tyres
 03-17-13, 12:26 PM
#201
Senior Member
Join Date: Feb 2013
Location: Mesa, AZ
Posts: 561
Bikes: 1992 Trek 800 Antelope, 1971 Triumph
Mentioned: 0 Post(s)
Tagged: 0 Thread(s)
Quoted: 0 Post(s)
Likes: 0
Liked 0 Times
in
0 Posts
I haven't seen any posts on here with people that have tubeless tires. Is studding a tubeless tire possible?
Josh
Josh
 04-06-13, 09:44 AM
#202
Full Member

Join Date: Oct 2012
Location: Upstate NY
Posts: 339
Bikes: Various "modded" eZips and multiple econversions
Mentioned: 0 Post(s)
Tagged: 0 Thread(s)
Quoted: 2 Post(s)
Likes: 0
Liked 2 Times
in
2 Posts
Spring 2013
Finally packed away my Winter bike.
Homemade studded tires proved adequate for all, but the deepest snow.

We didn't get a great amount of snow ... but the cold seemed ... never-ending.
Gittin' old ... actually ran my car most of this Winter ...
I'm sad to say that I never got a chance to try my "HedgeHog". Sold it to a Pennsylvania eBiker with a front hub motor. He needed it worse than I did!

I grew too attached to it, was tempted to hang it on the wall as artwork. First run in the salty snow would have started it rusting. Will post up, second hand, report when available.


Homemade studded tires proved adequate for all, but the deepest snow.
We didn't get a great amount of snow ... but the cold seemed ... never-ending.
Gittin' old ... actually ran my car most of this Winter ...
I'm sad to say that I never got a chance to try my "HedgeHog". Sold it to a Pennsylvania eBiker with a front hub motor. He needed it worse than I did!
I grew too attached to it, was tempted to hang it on the wall as artwork. First run in the salty snow would have started it rusting. Will post up, second hand, report when available.
Last edited by DrkAngel; 07-21-14 at 03:20 AM.
04-07-13, 10:37 AM
#203
Banned
I haven't seen any posts on here with people that have tubeless tires. Is studding a tubeless tire possible?
08-15-13, 11:54 AM
#204
Member
Join Date: Aug 2013
Posts: 26
Mentioned: 0 Post(s)
Tagged: 0 Thread(s)
Quoted: 0 Post(s)
Likes: 0
Liked 0 Times
in
0 Posts
Um, just go buy some proper studded tires for christ's sake. They're expensive, but they're made properly and you could probably run them tubeless. The real carbide studs will wear much, much longer than some cheap screws.
08-15-13, 12:04 PM
#205


Bicycle Repair Man !!!
Thread Starter

I ran some Marathon studded tyres on my folder last year and these are very good, I could pop wheelies on ice and when the front wheel came back down it was almost at a full stop... they are not as pleasant to ride in a straight line when there is no ice because their studs are too close to centre.
These were gifts from a friend... otherwise one is looking at roughly $160.00 to purchase these. $160.00 buys a lot of screws.
08-15-13, 12:13 PM
#206
Member
Join Date: Aug 2013
Posts: 26
Mentioned: 0 Post(s)
Tagged: 0 Thread(s)
Quoted: 0 Post(s)
Likes: 0
Liked 0 Times
in
0 Posts
True, I purchased a set of the Nokian tires last winter and they are not cheap.
I love the DIY scene but last winter I rode in some pretty awful conditions, very far from my vehicle or a safe, warm place. I would not want to chance my health on jerry rigged studded tires. If you're just looking for something cheap to get around town or back and forth from school, work, the store, etc., then these are probably an excellent budget setup.
I love the DIY scene but last winter I rode in some pretty awful conditions, very far from my vehicle or a safe, warm place. I would not want to chance my health on jerry rigged studded tires. If you're just looking for something cheap to get around town or back and forth from school, work, the store, etc., then these are probably an excellent budget setup.
08-15-13, 12:23 PM
#207
Bicycle Repair Man !!!
Thread Starter
True, I purchased a set of the Nokian tires last winter and they are not cheap.
I love the DIY scene but last winter I rode in some pretty awful conditions, very far from my vehicle or a safe, warm place. I would not want to chance my health on jerry rigged studded tires. If you're just looking for something cheap to get around town or back and forth from school, work, the store, etc., then these are probably an excellent budget setup.
I love the DIY scene but last winter I rode in some pretty awful conditions, very far from my vehicle or a safe, warm place. I would not want to chance my health on jerry rigged studded tires. If you're just looking for something cheap to get around town or back and forth from school, work, the store, etc., then these are probably an excellent budget setup.
For me that is riding at -40C over ice, hard, pack and snow and passing through areas where a mechanical failure or tyre failure is really going to suck because it is just going to be you and the cold... when you live in a place where the wind chill can be bad enough to cause frostbite in well under a minute you take winter really seriously.
Over 40,000 km of winter riding I have had one flat and no mechanical issues... I am also prepared to hike it if I cannot bike it and carry appropriate gear for that.
My personal best, (or worst) was commuting at -46 C / -52F and have spent weeks where my commutes were done at -30 to -40 C.
08-15-13, 01:31 PM
#208
Banned
just wont have tungsten steel screws in the Hardware store..
Nokian Tires use that alloy , same as car tires do.. lasts a long time.
my Tires were bought in 91. still OK, [it is not MN all the winter, there is occasional Black Ice for a week , or so,
because of the cold air coming out the gorge , from behind the Cascades ..
Nokian Tires use that alloy , same as car tires do.. lasts a long time.
my Tires were bought in 91. still OK, [it is not MN all the winter, there is occasional Black Ice for a week , or so,
because of the cold air coming out the gorge , from behind the Cascades ..
12-02-13, 07:58 AM
#209
Full Member
Join Date: Oct 2012
Location: Upstate NY
Posts: 339
Bikes: Various "modded" eZips and multiple econversions
Mentioned: 0 Post(s)
Tagged: 0 Thread(s)
Quoted: 2 Post(s)
Likes: 0
Liked 2 Times
in
2 Posts
Best Tire Pressure For Studded Tires
As mentioned previously, fat knobby tires are best for riding on top of the snow, while thin studded tires are better for cutting through the snow to let studs touch road surface.
My homemade tires use a stud free center with 2 outrigger rows of studs.

Since these tires are necessary for all-terrain use, everything from glare ice to bare bricks, I do want lots of rubber on the road as well as solid stud contact.
On the straight inner rows of studs both hit with reasonable pressure and while number of studs on the ice decreases with a moderate turn, the studs dig in more firmly and 2nd row of studs grip with a heavier turn or any slip.
Tire pressure?
Well I am working a compromise ...
I use full (65psi) tire pressure.
Lower pressure will let more studs contact at any moment ...
But, each stud has less "dig-in" pressure, less cutting depth-grip.
And ... the higher pressure decreases tire deformation, which with cold tires is severely power robbing!
My common Mountain tread works excellently with a 1/3 of knobbies studded.
Pattern works nice, as well as keeping a minimum of 3 studs contacting under all circumstances.
Lots of rubber on the road and minimal stud wear on the straight.
But! For trying to ride on top of snow, lower tire pressure-fatter tire is much preferable!
My homemade tires use a stud free center with 2 outrigger rows of studs.
Since these tires are necessary for all-terrain use, everything from glare ice to bare bricks, I do want lots of rubber on the road as well as solid stud contact.
On the straight inner rows of studs both hit with reasonable pressure and while number of studs on the ice decreases with a moderate turn, the studs dig in more firmly and 2nd row of studs grip with a heavier turn or any slip.
Tire pressure?
Well I am working a compromise ...
I use full (65psi) tire pressure.
Lower pressure will let more studs contact at any moment ...
But, each stud has less "dig-in" pressure, less cutting depth-grip.
And ... the higher pressure decreases tire deformation, which with cold tires is severely power robbing!
My common Mountain tread works excellently with a 1/3 of knobbies studded.
Pattern works nice, as well as keeping a minimum of 3 studs contacting under all circumstances.
Lots of rubber on the road and minimal stud wear on the straight.
But! For trying to ride on top of snow, lower tire pressure-fatter tire is much preferable!
Last edited by DrkAngel; 07-21-14 at 03:08 AM.
12-06-13, 03:02 PM
#210
Banned
FYI Link to these https://www.gripstuds.com/Bicycle.php they screw in from the Outside.
12-12-13, 12:58 PM
#211
Senior Member

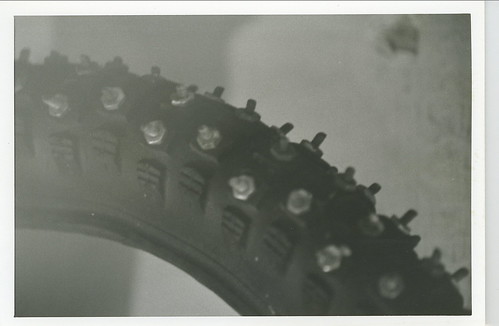
I must have forgot to post this photo earlier, because it doesn't say I replied to this thread.
This photo shows a 20x2.125 BMX knobby with 252 #6 x 1/2 inch machine screws, with nuts. Some silicone caulk was smeared over the slots, inside the tire, to keep the screw from cutting the tube. This photo is from the 1980's , and it's a B&W photo, to make it copy better on a photocopier.
12-12-13, 01:09 PM
#212
Bicycle Repair Man !!!
Thread Starter
As mentioned previously, fat knobby tires are best for riding on top of the snow, while thin studded tires are better for cutting through the snow to let studs touch road surface.
My homemade tires use a stud free center with 2 outrigger rows of studs.

Since these tires are necessary for all-terrain use, everything from glare ice to bare bricks, I do want lots of rubber on the road as well as solid stud contact.
On the straight inner rows of studs both hit with reasonable pressure and while number of studs on the ice decreases with a moderate turn, the studs dig in more firmly and 2nd row of studs grip with a heavier turn or any slip.
Tire pressure?
Well I am working a compromise ...
I use full (65psi) tire pressure.
Lower pressure will let more studs contact at any moment ...
But, each stud has less "dig-in" pressure, less cutting depth-grip.
And ... the higher pressure decreases tire deformation, which with cold tires is severely power robbing!
My common Mountain tread works excellently with a 1/3 of knobbies studded.
Pattern works nice, as well as keeping a minimum of 3 studs contacting under all circumstances.
Lots of rubber on the road and minimal stud wear on the straight.
But! For trying to ride on top of snow, lower tire pressure-fatter tire is much preferable!
My homemade tires use a stud free center with 2 outrigger rows of studs.
Since these tires are necessary for all-terrain use, everything from glare ice to bare bricks, I do want lots of rubber on the road as well as solid stud contact.
On the straight inner rows of studs both hit with reasonable pressure and while number of studs on the ice decreases with a moderate turn, the studs dig in more firmly and 2nd row of studs grip with a heavier turn or any slip.
Tire pressure?
Well I am working a compromise ...
I use full (65psi) tire pressure.
Lower pressure will let more studs contact at any moment ...
But, each stud has less "dig-in" pressure, less cutting depth-grip.
And ... the higher pressure decreases tire deformation, which with cold tires is severely power robbing!
My common Mountain tread works excellently with a 1/3 of knobbies studded.
Pattern works nice, as well as keeping a minimum of 3 studs contacting under all circumstances.
Lots of rubber on the road and minimal stud wear on the straight.
But! For trying to ride on top of snow, lower tire pressure-fatter tire is much preferable!
He was blown away at how well they hooked up on the hard pack and ice, I placed a single row of studs just off centre and did not stud the outer lugs.
For my hybrid I rebuilt a Kenda Klondike 700/30 who's studs had all worn out... 104 studs up front.
We have had even more people taking up winter cycling here and our studding workshops have been packed.
12-12-13, 02:48 PM
#213
weirdo
Join Date: Jan 2008
Location: Reno, NV
Posts: 1,962
Mentioned: 0 Post(s)
Tagged: 0 Thread(s)
Quoted: 0 Post(s)
Likes: 0
Liked 3 Times
in
3 Posts
Has anybody had success in studding a non-knobby tire? I sure would like a studded 26 x 1.5-ish slick for black ice busting, but have doubts as to how well any screws would hold in thinner rubber. Even if I were to give up on the slick aspect, I don`t know of any 26 inch versions of the knobby 32 to 35 mm CX tires that are so readily available.
01-10-14, 08:22 AM
#214
Senior Member
I looked through this thread on DIY studded tires and didn't find any comments on using "proper" studs. I found, online, places where you can purchase screw-in studs and replacement studs (eg, if your commercial studded tire lost some) and tools to install both.
Wouldn't "real" studs be better than screws?
Wouldn't "real" studs be better than screws?
01-10-14, 12:37 PM
#215
Senior Member
I looked through this thread on DIY studded tires and didn't find any comments on using "proper" studs. I found, online, places where you can purchase screw-in studs and replacement studs (eg, if your commercial studded tire lost some) and tools to install both.
Wouldn't "real" studs be better than screws?
Wouldn't "real" studs be better than screws?
01-13-14, 10:59 AM
#216
Senior Member
Screw in studs: https://www.maxigripstore.ca/maxigrip-ice-studs-hm11/
Flat studs: https://www.tirerack.com/winter/tech/...jsp?techid=151
Nokian replacement studs: https://www.biketiresdirect.com/produ...lacement-studs
Flat studs: https://www.tirerack.com/winter/tech/...jsp?techid=151
Nokian replacement studs: https://www.biketiresdirect.com/produ...lacement-studs
01-17-14, 09:02 AM
#217
Senior Member
I am wondering if I should stud the outermost row or the row just inside of the outermost.
01-20-14, 06:38 AM
#218
Junior Member
Join Date: Dec 2013
Location: in saskatchewan, CND
Posts: 21
Bikes: older fuji del ray/anjou, shwinn suspend, kona mtb, and many more!!
Mentioned: 0 Post(s)
Tagged: 0 Thread(s)
Quoted: 0 Post(s)
Likes: 0
Liked 0 Times
in
0 Posts
zip ties dont work... not yet that ive tried.... they broke my tires have been relitavly light but im making home built chains yet
02-12-14, 02:24 PM
#219
Senior Member
Join Date: Apr 2010
Posts: 550
Mentioned: 0 Post(s)
Tagged: 0 Thread(s)
Quoted: 0 Post(s)
Likes: 0
Liked 0 Times
in
0 Posts
A few years ago I used 1/8th inch pop rivets from the inside of the tire with washers on the outside shank. Make a liner out of an old tube for the inside and use the good tube inside of the tire. Worked for three years for me. They wore fast but were cheaper than the Hakka's I bought later.
02-18-14, 08:25 AM
#220
Senior Member
Has anyone tried the screw-in tire studs? If so, can you report on success/failure/issues?

03-17-14, 08:34 AM
#221
Senior Member
I have been slowly studding (screwing? LOL) a pair of older Kenda tires for winter use using the recommended method of taking an awl, punching through a knob to the inside, then screwing a #8 wood screw using the mark as a guide for placement. However, after a while, I was getting tingling in my palm from the awl so even working on the tire for about 10 minutes would cause a bit of pain and I'd stop. This weekend, I noticed that if I pushed the knob from the outside as if I was trying to turn the tire inside out, I could see the square outline of the knob on the inside of the tire casing so I experimented with just using that as I guide. For the most part, it worked and since my palm wasn't affected by the screwdriver, I was able to work for 40 minutes or so and finish the front tire without pain.
I found that if I pushed on the knob with the pad of my forefinger and then, from the inside, screwed the screw towards the pad of my finger, most of the time, the position of the screw in the knob was good. I also could tell that just as the tip of the screw was getting close to the surface of the knob, I could feel it with the pad of my finger and if I had positioned the screw off centre, I could tell and would then reverse the screw and try in a slightly different spot to get it right.
Although I made more positional mistakes without the awl than I did with the awl (and had to retry the screw more often), the fact that my palm didn't hurt from pushing the awl through more than offset the extra attempts. It also was faster: with the awl, it would take about 1 minute each, whereas without the awl, it was closer to about 40sec each.
It may be that some tires, like the ones I'm working with, are better suited to this technique because by pushing on the knob, you can see the shape of it on the inside of the casing. Other tires may not work so I wouldn't recommend this as a general technique.
03-18-14, 08:57 PM
#222
Full Member
Join Date: Oct 2012
Location: Upstate NY
Posts: 339
Bikes: Various "modded" eZips and multiple econversions
Mentioned: 0 Post(s)
Tagged: 0 Thread(s)
Quoted: 2 Post(s)
Likes: 0
Liked 2 Times
in
2 Posts
After 3 Winters, my homemade studded tire finally suffered a tube failure.
As mentioned previously, I used no type of tire liner-tube protection.
My intention was to determine unprotected damage and survivability. I fully expected the used, twice patched tube to fail rather quickly. After 1 full season tube showed no apparent damage ... surprising!
There was some rust coloration near a few screws, so I covered inside of tire with a wrap of clear boxing tape as a barrier to protect tube from rust damage. After another 2 Winters the original tube finally failed where it pressed against one of the outside screws.
Next?
Outside rows of screws still have plenty of grip but inner rows are worn down and will be replaced.
Old inner tube will be slit around the inside edge, stem removed, and placed over new tube as a tire liner.
Additionally, I will wrap inside of tire with a wrap or 2 of duck tape.
This can be a difficult-tricky job.
Easiest method involves turning tire inside out!

This allows a simple wrapping which produces a weather resistant, protective, stabilization layer.
Wrapping loosely allows pressing tape against rubber between screws, which helps prevent tears when tire expands as pressure added.
Overall ... I would rate the design as very effective, inexpensive with nearly unlimited snow-ice capability-survivability.
Bare road wear is excessive, maybe a couple hundred miles between internal row screw replacements.
4 rows of screws.
Every 3rd knobby.
1/2" for outer rows.
3/8" for inner rows.

As mentioned previously, I used no type of tire liner-tube protection.
My intention was to determine unprotected damage and survivability. I fully expected the used, twice patched tube to fail rather quickly. After 1 full season tube showed no apparent damage ... surprising!
There was some rust coloration near a few screws, so I covered inside of tire with a wrap of clear boxing tape as a barrier to protect tube from rust damage. After another 2 Winters the original tube finally failed where it pressed against one of the outside screws.
Next?
Outside rows of screws still have plenty of grip but inner rows are worn down and will be replaced.
Old inner tube will be slit around the inside edge, stem removed, and placed over new tube as a tire liner.
Additionally, I will wrap inside of tire with a wrap or 2 of duck tape.
This can be a difficult-tricky job.
Easiest method involves turning tire inside out!
This allows a simple wrapping which produces a weather resistant, protective, stabilization layer.
Wrapping loosely allows pressing tape against rubber between screws, which helps prevent tears when tire expands as pressure added.
Overall ... I would rate the design as very effective, inexpensive with nearly unlimited snow-ice capability-survivability.
Bare road wear is excessive, maybe a couple hundred miles between internal row screw replacements.
4 rows of screws.
Every 3rd knobby.
1/2" for outer rows.
3/8" for inner rows.
Last edited by DrkAngel; 07-21-14 at 03:03 AM.
10-23-14, 09:03 AM
#223
Senior Member
Join Date: Jun 2013
Location: Bozeman
Posts: 4,094
Bikes: 199? Landshark Roadshark, 198? Mondonico Diamond, 1987 Panasonic DX-5000, 1987 Bianchi Limited, Univega... Chrome..., 1989 Schwinn Woodlands, Motobecane USA Record, Raleigh Tokul 2
Mentioned: 25 Post(s)
Tagged: 0 Thread(s)
Quoted: 1131 Post(s)
Likes: 0
Liked 0 Times
in
0 Posts
Contrary to most of the posts in this thread, I did not have good luck with "homemade" studded tires. They looked almost exactly like the ones in the post above mine. They were made by a LBS for ~1/2 the price of a decent studded tire. I used it for one season. They were "fine" over packed snow and the like, but if I ever touched glare ice (which happened frequently as I ride through a parking lot with bad drainage) I slipped everywhere, even when I was being super careful. The studs were definitely in contact, as I could hear them clickety clack over the road all of the time. Now, I'm not one of those bikers who has little to no coordination. I've been riding dirtbikes and bikes my entire life, but I found these tires hard to control over any sort of serious ice.
So, this season I ponied up the money and bought my girlfriend and I some nokians for both the front and back of our bikes. I wasn't about to trust another season to homemade tires. And honestly, cheap nokians (highly rated ones) are only ~$55 from REI. That's not a large price to pay for actual studded tires.
So, this season I ponied up the money and bought my girlfriend and I some nokians for both the front and back of our bikes. I wasn't about to trust another season to homemade tires. And honestly, cheap nokians (highly rated ones) are only ~$55 from REI. That's not a large price to pay for actual studded tires.
10-24-14, 06:40 PM
#224
Senior Member

Join Date: Aug 2007
Location: central ohio
Posts: 1,536
Bikes: 96 gary fisher 'utopia' : 99 Softride 'Norwester'(for sale), 1972 Raleigh Twenty. Surly 1x1 converted to 1x8, 96 Turner Burner
Mentioned: 1 Post(s)
Tagged: 0 Thread(s)
Quoted: 9 Post(s)
Likes: 0
Liked 4 Times
in
4 Posts
Which model of Nokian did you get?
10-27-14, 08:45 AM
#225
Senior Member
Join Date: Jun 2013
Location: Bozeman
Posts: 4,094
Bikes: 199? Landshark Roadshark, 198? Mondonico Diamond, 1987 Panasonic DX-5000, 1987 Bianchi Limited, Univega... Chrome..., 1989 Schwinn Woodlands, Motobecane USA Record, Raleigh Tokul 2
Mentioned: 25 Post(s)
Tagged: 0 Thread(s)
Quoted: 1131 Post(s)
Likes: 0
Liked 0 Times
in
0 Posts
I got the Mount and Grounds for the back, and W240s for the front. (Or, if my GF has trouble, the W240s for her bike and the mount and grounds for mine.) The mount and grounds from REI are only $59. This honestly surprised me since most actual bike tires (mountain) are just as, or even more expensive than that.