


Blog I found on cold setting the rear wheel stays.

 01-17-16, 12:14 PM
#2

Senior Member
Usually the right chainstay bends easier than the left one, and if you bend them with equal pressure, the right one will move much more than the left.
I would also not trust that contraption for keeping the dropouts aligned. IMO at a minimum you need a set of dropout tools to go resetting frames at home. Align the dropouts after bending stays and stringing the frame.
I've done a couple with wood levers, but the official alignment tools are easier. It actually takes some practice to get an idea of when the metal is about to give. For most home mechanics, this is one operation where I think you should consider taking your bike to a shop.
(ex pro mechanic)
01-17-16, 12:22 PM
#3
Senior Member
Join Date: Aug 2005
Location: Pittsburgh, PA
Posts: 33,656
Bikes: '96 Litespeed Catalyst, '05 Litespeed Firenze, '06 Litespeed Tuscany, '20 Surly Midnight Special, All are 3x10. It is hilly around here!
Mentioned: 39 Post(s)
Tagged: 0 Thread(s)
Quoted: 2026 Post(s)
Likes: 0
Liked 1,096 Times
in
742 Posts
I've used this technique with success myself on a 1983 Trek 400 and a 1985 Bridgestone 400 frames (both lugged steel) to spread their 126 mm dropouts to 130 mm. The jobs went well and the alignments remained good. You must "over stretch" the dropouts so the spring back gives you the correct final spacing and the all-thread rod technique makes it easy to count turns and check permanent displacement frequently. I didn't try to get to the exact 130 mm spacing on either bike but left them at 128 or 129 mm which was close enough for easy wheel insertion but didn't chance overdoing it.
The first comment below the blog is correct, alternately tightening the nuts from side to side does not assist in maintaining alignment. I did it that way but it didn't mean anything.
Edit: Salamandrine's comment is correct if the stays are not similar in shape and diameter as the thinner, more indented one will bend first and further. I didn't have that problem but it can be real issue.
Last edited by HillRider; 01-17-16 at 12:26 PM.
01-17-16, 12:34 PM
#4
Senior Member
Join Date: Apr 2009
Location: New Rochelle, NY
Posts: 38,716
Bikes: too many bikes from 1967 10s (5x2)Frejus to a Sumitomo Ti/Chorus aluminum 10s (10x2), plus one non-susp mtn bike I use as my commuter
Mentioned: 140 Post(s)
Tagged: 1 Thread(s)
Quoted: 5787 Post(s)
Liked 2,580 Times
in
1,430 Posts
I also found it interesting, but maybe not the same way you did. I found it to be a nicely presented demonstration that the information you get off the internet is often worth exactly what you paid for it.
There's a glaring fallacy which demonstrates the blogger's fundamental lack of knowledge and understanding of mechanics. It's where he insists on making sure to turn the nuts on both sides by an equal amount, even to marking and counting. If you don't see the problem, consider the implications in light of Newton's 3rd Law.
Regardless of the care taken, or not, there's no assurance that the method will preserve symmetry, and predictably the weaker stay will do most or all of the bending.
__________________
FB
Chain-L site
An ounce of diagnosis is worth a pound of cure.
Just because I'm tired of arguing, doesn't mean you're right.
�One accurate measurement is worth a thousand expert opinions� - Adm Grace Murray Hopper - USN
WARNING, I'm from New York. Thin skinned people should maintain safe distance.
FB
Chain-L site
An ounce of diagnosis is worth a pound of cure.
Just because I'm tired of arguing, doesn't mean you're right.
�One accurate measurement is worth a thousand expert opinions� - Adm Grace Murray Hopper - USN
WARNING, I'm from New York. Thin skinned people should maintain safe distance.
Last edited by FBinNY; 01-17-16 at 06:18 PM.
01-17-16, 05:29 PM
#5
Newbie
Trouble with the threaded rod method is that it does not matter if you turn left night and right nut equal amounts, the force being transferred will go to the weakest side. This is typically the chainstay that is indented, so you risk a misaligned rear triangle.
I recently cold set a steel tandem frame from 140mm (1990's standard) to 160mm (modern standard to fit a disk brake with a non dished wheel). I started by removing the bottom brackets, welding up 2 u shaped fixtures, bolting these through the bottom brackets and clamping the brackets to my welding table. I then welded an upside down "T" and clamped this to the table about 300mm away from the dropout, and in line with the axle. I used a heavy duty clamp between the dropout and the "T" to slowly cold set each side over the exact same amount.
BTW I reinforced the chain stay and seat stay bridges with external clamps before cold setting.
01-17-16, 05:52 PM
#6
Senior Member
Join Date: Feb 2012
Location: Rochester, NY
Posts: 18,084
Bikes: Stewart S&S coupled sport tourer, Stewart Sunday light, Stewart Commuting, Stewart Touring, Co Motion Tandem, Stewart 3-Spd, Stewart Track, Fuji Finest, Mongoose Tomac ATB, GT Bravado ATB, JCP Folder, Stewart 650B ATB
Mentioned: 0 Post(s)
Tagged: 0 Thread(s)
Quoted: 4205 Post(s)
Liked 3,864 Times
in
2,312 Posts
The inaccuracies in the blog are why this post belongs here in the bicycle mechanics forum and not the frame builders one Andy.
Andy.
Andy.
01-17-16, 06:09 PM
#7

Super Moderator

Join Date: Jul 2004
Location: Ffld Cnty Connecticut
Posts: 21,843
Bikes: Old Steelies I made, Old Cannondales
Mentioned: 12 Post(s)
Tagged: 0 Thread(s)
Quoted: 1173 Post(s)
Liked 927 Times
in
612 Posts
I also found it interesting, but maybe not the same way you did. I found it to be a nicely presented demonstration that the information you get off the internet is often wrth what you paid for it.
There's a glaring fallacy which demonstrates the blogger's fundamental lack of knowledge and understanding of mechanics. It's where he insists on making sure to turn the nuts on both sides by an equal amount, even to marking and counting. If you don't see the problem, consider the implications in light of Newton's 3rd Law.
Regardless of the care taken, or not, there's no assurance that the method will preserve symmetry, and predictably the weaker stay will do most or all of the bending.
__________________
Bikes: Old steel race bikes, old Cannondale race bikes, less old Cannondale race bike, crappy old mtn bike.
FYI: https://www.bikeforums.net/forum-sugg...ad-please.html
Bikes: Old steel race bikes, old Cannondale race bikes, less old Cannondale race bike, crappy old mtn bike.
FYI: https://www.bikeforums.net/forum-sugg...ad-please.html
01-18-16, 08:20 AM
#8
afraid of whales
Join Date: Apr 2009
Location: Front Range, CO
Posts: 4,306
Mentioned: 6 Post(s)
Tagged: 0 Thread(s)
Quoted: 347 Post(s)
Likes: 0
Liked 5 Times
in
5 Posts
Eric the IGHerMay 5, 2014 at 4:31 PM
The all-thread method assumes that each chainstay will deform symmetrically. Esp in the case of older frames, this isn't true. Usually the right side chainstay isn't as stiff due to the dimpling to make room for the chainring. So using the all-thread method makes the right side chainstay do most/all the movement/setting, the left side stay in place. That will cause the frame to be mis-aligned.If I'm spacing from 120mm to 135mm I move one side 7.5mm first, then the other side. I check the dropout alignment (with h-tools) after moving one side and re-align the dropout to the un-moved side keeping the proper reference to the center of the seat tube.To hold the frame in place, I use a bench vise and wooden blocks to hold the bottom bracket between the faces (with the frame upright). Then I can really lean into the stays and move them cleanly. I have found that adding in more than ~5mm of spacing will require the dropouts to be re-aligned with h-tools or a big wrench and a good eye.
The all-thread method assumes that each chainstay will deform symmetrically. Esp in the case of older frames, this isn't true. Usually the right side chainstay isn't as stiff due to the dimpling to make room for the chainring. So using the all-thread method makes the right side chainstay do most/all the movement/setting, the left side stay in place. That will cause the frame to be mis-aligned.If I'm spacing from 120mm to 135mm I move one side 7.5mm first, then the other side. I check the dropout alignment (with h-tools) after moving one side and re-align the dropout to the un-moved side keeping the proper reference to the center of the seat tube.To hold the frame in place, I use a bench vise and wooden blocks to hold the bottom bracket between the faces (with the frame upright). Then I can really lean into the stays and move them cleanly. I have found that adding in more than ~5mm of spacing will require the dropouts to be re-aligned with h-tools or a big wrench and a good eye.
01-18-16, 08:35 AM
#9

Randomhead
Join Date: Aug 2008
Location: Happy Valley, Pennsylvania
Posts: 24,397
Mentioned: 0 Post(s)
Tagged: 0 Thread(s)
Quoted: 4 Post(s)
Liked 3,698 Times
in
2,518 Posts
I have a way of holding the bb shell and then bending the stays. Having said that, the first time i went from 126 to 130, I just put the frame down on the carpet, stepped on the NDS dropout, and yanked the chainstays apart. I don't think that frame is particularly well aligned anyway.
01-18-16, 08:59 AM
#10
Senior Member
Join Date: Aug 2005
Location: Pittsburgh, PA
Posts: 33,656
Bikes: '96 Litespeed Catalyst, '05 Litespeed Firenze, '06 Litespeed Tuscany, '20 Surly Midnight Special, All are 3x10. It is hilly around here!
Mentioned: 39 Post(s)
Tagged: 0 Thread(s)
Quoted: 2026 Post(s)
Likes: 0
Liked 1,096 Times
in
742 Posts
Going from 126 mm to a nominal 130 mm doesn't seem to require dropout realignment but going from 120 to 130 or 126 to 135 certainly would.
01-18-16, 11:09 AM
#11
Senior Member
Thread Starter
Join Date: Mar 2015
Posts: 491
Mentioned: 0 Post(s)
Tagged: 0 Thread(s)
Quoted: 9 Post(s)
Likes: 0
Liked 1 Time
in
1 Post
Sounds to me like not many posters agreed with his technique...........I got some good info from the replies.
I am riding a old 24 inch Raleigh 10 speed, that I converted into a Shimano 3 speed, by muscling a old 3 speed wheel onto the bike and have not experienced any problems with it. It turned into a really nice riding bike. I will just leave as is rather then cold set the frame.
I am riding a old 24 inch Raleigh 10 speed, that I converted into a Shimano 3 speed, by muscling a old 3 speed wheel onto the bike and have not experienced any problems with it. It turned into a really nice riding bike. I will just leave as is rather then cold set the frame.
Last edited by elmore leonard; 01-18-16 at 11:13 AM.
01-19-16, 11:00 AM
#12
Senior Member
Join Date: Sep 2011
Location: The First State.
Posts: 1,168
Bikes: Schwinn Continental, Schwinn Paramount, Schwinn High Plains, Schwinn World Sport, Trek 420, Trek 930,Trek 660, Novara X-R, Giant Iguana. Fuji Sagres mixte.
Mentioned: 0 Post(s)
Tagged: 0 Thread(s)
Quoted: 35 Post(s)
Liked 22 Times
in
10 Posts
I've used this technique with success myself on a 1983 Trek 400 and a 1985 Bridgestone 400 frames (both lugged steel) to spread their 126 mm dropouts to 130 mm. The jobs went well and the alignments remained good. You must "over stretch" the dropouts so the spring back gives you the correct final spacing and the all-thread rod technique makes it easy to count turns and check permanent displacement frequently. I didn't try to get to the exact 130 mm spacing on either bike but left them at 128 or 129 mm which was close enough for easy wheel insertion but didn't chance overdoing it.
The first comment below the blog is correct, alternately tightening the nuts from side to side does not assist in maintaining alignment. I did it that way but it didn't mean anything.
Edit: Salamandrine's comment is correct if the stays are not similar in shape and diameter as the thinner, more indented one will bend first and further. I didn't have that problem but it can be real issue.
The first comment below the blog is correct, alternately tightening the nuts from side to side does not assist in maintaining alignment. I did it that way but it didn't mean anything.
Edit: Salamandrine's comment is correct if the stays are not similar in shape and diameter as the thinner, more indented one will bend first and further. I didn't have that problem but it can be real issue.
 Untitled by galoot_loves_tools, on Flickr
Last edited by Paramount1973; 01-19-16 at 11:18 AM.
01-19-16, 11:04 AM
#13
Senior Member
Join Date: Aug 2005
Location: Pittsburgh, PA
Posts: 33,656
Bikes: '96 Litespeed Catalyst, '05 Litespeed Firenze, '06 Litespeed Tuscany, '20 Surly Midnight Special, All are 3x10. It is hilly around here!
Mentioned: 39 Post(s)
Tagged: 0 Thread(s)
Quoted: 2026 Post(s)
Likes: 0
Liked 1,096 Times
in
742 Posts
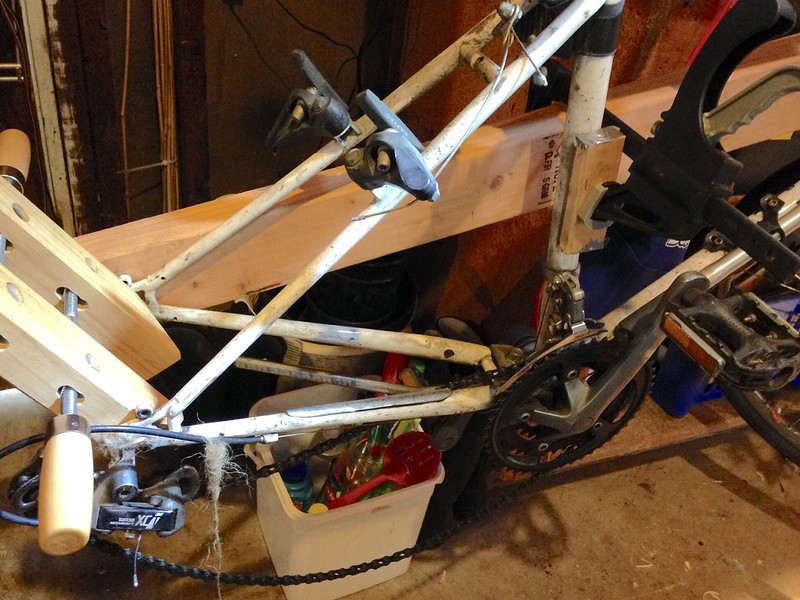
My solution to this is to reinforce either chainstay with a length of 2x4. I rest the ends of the 2x4 on the rear dropout and the headtube and clamp the center of the 2x4 to the seat tube. The seat tube has a long seatpost inserted in it and I use a concave clamp block to spread the force on the seat tube. You don't want to bend that. I can control the extent to which either chainstay will deflect and I home in on the alignment by shifting the 2x4 to one side or the other. I do the cold setting with the bike in the works stand.
Untitled by galoot_loves_tools, on Flickr
Untitled by galoot_loves_tools, on Flickr
01-19-16, 11:37 AM
#14
Senior Member
Join Date: Sep 2011
Location: The First State.
Posts: 1,168
Bikes: Schwinn Continental, Schwinn Paramount, Schwinn High Plains, Schwinn World Sport, Trek 420, Trek 930,Trek 660, Novara X-R, Giant Iguana. Fuji Sagres mixte.
Mentioned: 0 Post(s)
Tagged: 0 Thread(s)
Quoted: 35 Post(s)
Liked 22 Times
in
10 Posts
Yep. This method came to me after reading Sheldon's technique. I wanted a way to do this without having to strip the bike down to the frame.
01-19-16, 01:21 PM
#15
Senior Member
Join Date: Apr 2009
Location: New Rochelle, NY
Posts: 38,716
Bikes: too many bikes from 1967 10s (5x2)Frejus to a Sumitomo Ti/Chorus aluminum 10s (10x2), plus one non-susp mtn bike I use as my commuter
Mentioned: 140 Post(s)
Tagged: 1 Thread(s)
Quoted: 5787 Post(s)
Liked 2,580 Times
in
1,430 Posts
For years I've used a far simpler method based on the principle of the turkey wishbone. After fitting a threaded rod or axle to one dropout as a gauge, I lay the frame on it's side and put one foot halfway up the lower chain stay. I then grab the upper dropout and lift until I feel it give (it's very obvious). I spread it only half the needed width and flip the frame and repeat.
The method is fast and reliable, and because the equal force is distributed unevenly to produce lower bending moments on the lower stay, only the upper side will bend.
The method is fast and reliable, and because the equal force is distributed unevenly to produce lower bending moments on the lower stay, only the upper side will bend.
__________________
FB
Chain-L site
An ounce of diagnosis is worth a pound of cure.
Just because I'm tired of arguing, doesn't mean you're right.
�One accurate measurement is worth a thousand expert opinions� - Adm Grace Murray Hopper - USN
WARNING, I'm from New York. Thin skinned people should maintain safe distance.
FB
Chain-L site
An ounce of diagnosis is worth a pound of cure.
Just because I'm tired of arguing, doesn't mean you're right.
�One accurate measurement is worth a thousand expert opinions� - Adm Grace Murray Hopper - USN
WARNING, I'm from New York. Thin skinned people should maintain safe distance.
01-19-16, 04:44 PM
#16
Senior Member
Join Date: Aug 2005
Location: Pittsburgh, PA
Posts: 33,656
Bikes: '96 Litespeed Catalyst, '05 Litespeed Firenze, '06 Litespeed Tuscany, '20 Surly Midnight Special, All are 3x10. It is hilly around here!
Mentioned: 39 Post(s)
Tagged: 0 Thread(s)
Quoted: 2026 Post(s)
Likes: 0
Liked 1,096 Times
in
742 Posts
01-21-16, 10:51 AM
#17
afraid of whales
Join Date: Apr 2009
Location: Front Range, CO
Posts: 4,306
Mentioned: 6 Post(s)
Tagged: 0 Thread(s)
Quoted: 347 Post(s)
Likes: 0
Liked 5 Times
in
5 Posts
Looks like all the methods I see assume the right and left side chainstays have the same stiffness and the bending will be distributed evenly between left and right side. That is not the case, esp with older steel frames that have the right chainstay dimpled for chainring clearance.
It's much better to remove the crankset/bottom bracket, vise the frame's BB shell using a couple of wood buffers to protect the BB threads. Then move each dropout independently, 1/2 of the distance you're adding (going from 120mm to 135mm requires 7.5mm movement on each side). This way you preserve the factory alignment.
If you add more than 5mm total spacing (2.5mm each side) you'll need H-tools to realign the dropouts. In that case, move one side, then realign the dropout using the un-moved side's dropout as a reference to align the now-out-of-alignment dropout. Next, move the other side and then align the dropout to the previously moved side's dropout. This way you preserve the factory alignment.
01-21-16, 12:43 PM
#18
Senior Member
Join Date: Aug 2005
Location: Pittsburgh, PA
Posts: 33,656
Bikes: '96 Litespeed Catalyst, '05 Litespeed Firenze, '06 Litespeed Tuscany, '20 Surly Midnight Special, All are 3x10. It is hilly around here!
Mentioned: 39 Post(s)
Tagged: 0 Thread(s)
Quoted: 2026 Post(s)
Likes: 0
Liked 1,096 Times
in
742 Posts
No, not really. The only method that assumes the stays will bend equally is the threaded rod and nut technique discussed in the OP. All of the other responses (yours included) recommend various method to isolate each chainstay and bend them individually.

Thread
Thread Starter
Forum
Replies
Last Post
immunizer
Bicycle Mechanics
8
08-16-11 07:14 AM
