


Doubts about my derailleur hanging postition.
 06-22-11, 02:05 PM
#1
Member
Thread Starter
Join Date: Jun 2011
Posts: 41
Mentioned: 0 Post(s)
Tagged: 0 Thread(s)
Quoted: 0 Post(s)
Likes: 0
Liked 0 Times
in
0 Posts
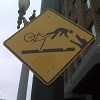
Doubts about my derailleur hanging postition.
So is this normal?
this setting, has the screw out the most, screwing the screw out any futher is futile<-
how do i know how high the last derailleur wheel should be>?
with no chain on it?
this setting, has the screw out the most, screwing the screw out any futher is futile<-
how do i know how high the last derailleur wheel should be>?
with no chain on it?
Last edited by Runeazn; 06-22-11 at 02:11 PM.
 06-22-11, 02:22 PM
#3
Member
Thread Starter
Join Date: Jun 2011
Posts: 41
Mentioned: 0 Post(s)
Tagged: 0 Thread(s)
Quoted: 0 Post(s)
Likes: 0
Liked 0 Times
in
0 Posts
yeah..
okay but how do i know the b tension is right or not right?
about the chain.. i have it i just dont know what to do..
internet says add 1 link, with biggest tooth combination
other one says 2..
and i do not trust the one done in store, i dont know why i just dont trust it, and it has been budged 45 degrees one chain link
06-22-11, 02:28 PM
#4
Senior Member
Join Date: Apr 2011
Location: Rhode Island
Posts: 68
Mentioned: 0 Post(s)
Tagged: 0 Thread(s)
Quoted: 1 Post(s)
Likes: 0
Liked 0 Times
in
0 Posts
You don't adjust the B tension until you have the chain on.
Here is the Sheldon article on correct chain length:
https://sheldonbrown.com/derailer-adjustment.html#chain
If you look at the picture, that's way better than any description of the correct overlap. Also, when measuring for the correct chain length you do not run the chain through the derailleur. Just over the largest cog combinations.
06-22-11, 02:34 PM
#5
Member
Thread Starter
Join Date: Jun 2011
Posts: 41
Mentioned: 0 Post(s)
Tagged: 0 Thread(s)
Quoted: 0 Post(s)
Likes: 0
Liked 0 Times
in
0 Posts
but thats only 1 ok..
so its
moutn derailleur
chain
shifting cable
adjustments?
but problem is i cant put the shifting cable in the derailleur, without the derailleur being lower..
so its
moutn derailleur
chain
shifting cable
adjustments?
but problem is i cant put the shifting cable in the derailleur, without the derailleur being lower..
06-22-11, 02:41 PM
#6

Senior Member
Join Date: Jan 2008
Location: Beaverton, OR
Posts: 14,744
Bikes: Yes
Mentioned: 525 Post(s)
Tagged: 0 Thread(s)
Quoted: 3230 Post(s)
Liked 3,868 Times
in
1,439 Posts
The b-screw adjustment should be the last thing you do.
I usually add one link beyond the big-big combination. I think perhaps the 2 link statements are a product of ambiguity in what constitutes a link. For instance, the Park Tool site says, "From the closet rivet, lengthen the chain by counting over an additional two rivets (two links), which is a distance of one-inch." But the picture shows this:

which I'd call one link. Sheldon Brown says, "Mesh the two ends on to the large chainwheel so that one complete link (one inch, -- one inner and one outer half-link) overlaps." Note that Park Tool says two links, while Sheldon says one link, but they both say one inch.
On the other hand, if you're unsure it's safest to add an extra link. A chain that's a link too long might bounce off your chain stay now and then, or maybe contribute to sub-optimal shifting. A chain that's a link too short tends to break things if you shift into the big-big gear, sometimes a lot of things.
I usually add one link beyond the big-big combination. I think perhaps the 2 link statements are a product of ambiguity in what constitutes a link. For instance, the Park Tool site says, "From the closet rivet, lengthen the chain by counting over an additional two rivets (two links), which is a distance of one-inch." But the picture shows this:
which I'd call one link. Sheldon Brown says, "Mesh the two ends on to the large chainwheel so that one complete link (one inch, -- one inner and one outer half-link) overlaps." Note that Park Tool says two links, while Sheldon says one link, but they both say one inch.
On the other hand, if you're unsure it's safest to add an extra link. A chain that's a link too long might bounce off your chain stay now and then, or maybe contribute to sub-optimal shifting. A chain that's a link too short tends to break things if you shift into the big-big gear, sometimes a lot of things.
06-22-11, 02:44 PM
#7
Senior Member
Join Date: Jan 2008
Location: Beaverton, OR
Posts: 14,744
Bikes: Yes
Mentioned: 525 Post(s)
Tagged: 0 Thread(s)
Quoted: 3230 Post(s)
Liked 3,868 Times
in
1,439 Posts
06-22-11, 03:02 PM
#9
Senior Member
Join Date: Jan 2008
Location: Beaverton, OR
Posts: 14,744
Bikes: Yes
Mentioned: 525 Post(s)
Tagged: 0 Thread(s)
Quoted: 3230 Post(s)
Liked 3,868 Times
in
1,439 Posts
Here's the order I'd use:
Mount derailleur
Adjust high limit screw
Install chain
Install shifting cable (make sure you have it routed correctly)
Adjust low limit screw (it may help to tweak the cable tension a bit to do this)
Adjust cable tension
Adjust b-screw
Mount derailleur
Adjust high limit screw
Install chain
Install shifting cable (make sure you have it routed correctly)
Adjust low limit screw (it may help to tweak the cable tension a bit to do this)
Adjust cable tension
Adjust b-screw
06-22-11, 03:35 PM
#10
Member
Thread Starter
Join Date: Jun 2011
Posts: 41
Mentioned: 0 Post(s)
Tagged: 0 Thread(s)
Quoted: 0 Post(s)
Likes: 0
Liked 0 Times
in
0 Posts
so what about if i already set the low limit lol,
i get the limit settings,
just have the derailleur wheel aligned with the cog wheel
but what/how to check , what the b screw is supposed to change
also if i reset b screw to normal my derailleur makes a 90 degree angle..
so on the horizontal line, to the left a 90 degree hanging derailleur..
i get the limit settings,
just have the derailleur wheel aligned with the cog wheel
but what/how to check , what the b screw is supposed to change
also if i reset b screw to normal my derailleur makes a 90 degree angle..
so on the horizontal line, to the left a 90 degree hanging derailleur..
Last edited by Runeazn; 06-22-11 at 04:10 PM.
06-22-11, 05:07 PM
#11
Senior Member
Join Date: Jan 2008
Location: Beaverton, OR
Posts: 14,744
Bikes: Yes
Mentioned: 525 Post(s)
Tagged: 0 Thread(s)
Quoted: 3230 Post(s)
Liked 3,868 Times
in
1,439 Posts
The b-screw sets how far the derailleur jockey wheels are from the cassette when your chain is on the big cog. Set the screw so that there's a small gap. I wouldn't worry too much about that unless you're having a problem.
06-22-11, 05:18 PM
#12
Senior Member
Join Date: Jun 2011
Location: Sunnyvale, California
Posts: 1,180
Bikes: Bridgestone RB-1, 600, T700, MB-6 w/ Dirt Drops, MB-Zip, Bianchi Limited, Nashbar Hounder
Mentioned: 0 Post(s)
Tagged: 0 Thread(s)
Quoted: 1 Post(s)
Likes: 0
Liked 0 Times
in
0 Posts
Most derailleurs have a slanted parallelogram or trapezoidal design that naturally pushes in and down with increasing cable tension. The b-screw rotates the initial pivot angle of the derailleur body and supposedly sets the amount of chain wrap around the rear cluster. (Note: It doesn't appear to me that it changes the chain wrap significantly to ever put a cyclist in jeopardy of chain slippage). The b-screw setting therefore also determines the relative position of the top derailleur pulley relative to the cassette/freewheel cogs. If the b-screw is loosened too much, this means the RDR wraps more around the cogs, body rotates counter clockwise, but also the possibility that the top pulley won't clear the big cog (lowest gear). It may actually be noisy (buzzing) and harder to shift to the big cog under these conditions. The best way I test is to have the bike in a stand, and then spin the cranks and put gearing it into a big rear-small front configuration and shift the rear between biggest and second biggest cogs and watch the relative position of the pulley. If my hand feels buzzing or that riding in the big cog on the rear is stiffer than normal, it's usually a sign I need to tighten the b-screw to rotate the body a little bit and you should hear and feel reduced buzzing as you turn that screw.
Before your done, put the gears into a cross-chain big-big combination and run through the rear shifting to make sure the shifting is crisp on the other cogs. I've noticed a growing trend with "mega-range" cassettes where there is a honkin' last big cog in the rear, and relatively close range outer 6-8 cogs. I used to think this made shifting inconsistent for some gears relative to others, depending on the slant angle of the derailleur design. But I think the hyperglide helps mask some of these by having notched ramps where the chain is free to leap to adjacent cogs with minimal required side load. This means there may be no need to have the top pulley track closer to the gears like on shorter arm and less slanted road bike derailleurs. If so, you can safely screw in the b-screw a bit further, and leave more clearance for the big rear cog and top pulley, and shifting remains good for all the other speeds. And I hate to admit it, but having worked on some of the cheapest bikes, the ultra bottom of the barrel Shimano Tourney TX31/TX35 RDR have shifting with a wide range HG cassette as good as my short arm road RDRs with narrow range. But you will want to check shifting to validate that for you setup.
Before your done, put the gears into a cross-chain big-big combination and run through the rear shifting to make sure the shifting is crisp on the other cogs. I've noticed a growing trend with "mega-range" cassettes where there is a honkin' last big cog in the rear, and relatively close range outer 6-8 cogs. I used to think this made shifting inconsistent for some gears relative to others, depending on the slant angle of the derailleur design. But I think the hyperglide helps mask some of these by having notched ramps where the chain is free to leap to adjacent cogs with minimal required side load. This means there may be no need to have the top pulley track closer to the gears like on shorter arm and less slanted road bike derailleurs. If so, you can safely screw in the b-screw a bit further, and leave more clearance for the big rear cog and top pulley, and shifting remains good for all the other speeds. And I hate to admit it, but having worked on some of the cheapest bikes, the ultra bottom of the barrel Shimano Tourney TX31/TX35 RDR have shifting with a wide range HG cassette as good as my short arm road RDRs with narrow range. But you will want to check shifting to validate that for you setup.
Last edited by gyozadude; 06-22-11 at 05:41 PM.
06-23-11, 10:06 AM
#15
Senior Member
First off stop trying to adjust things until the chain is on. Some initial adjusting can be done by those that have a good eye and know what to look for but you're obviously new to this stuff. So keep it really basic and simple.
As for getting the housing and cable to fit into the derailleur it's as easy as springing forward the cage so you can "aim" the housing into the stop. But in your case because you're so panic'y over this stuff I'd suggest you do things in this order;
As for getting the housing and cable to fit into the derailleur it's as easy as springing forward the cage so you can "aim" the housing into the stop. But in your case because you're so panic'y over this stuff I'd suggest you do things in this order;
- Mount derailleur-done
- Measure out the chain length using the overlap method shown in the link at Sheldon's site.
- Install the chain through the derailleur and connect the ends. Use an installation pin if it's a Shimano chain or other brand that does not use a master link. Use the quick connect master link if it's a SRAM or KMC or similar.
- NOW install the housing and cable. Start with the adjusters in as far as they'll go to install the cable. Then you're ready to add some tension using the adjusters.
- Set the shifting up so it shifts equally well through the middle gears. With that done shift to the extreme gears and adjust the limit screws. If the shifting isn't smooth then play with the B screw to reduce or increase the wrap of the chain.
06-23-11, 10:11 AM
#16
Member
Thread Starter
Join Date: Jun 2011
Posts: 41
Mentioned: 0 Post(s)
Tagged: 0 Thread(s)
Quoted: 0 Post(s)
Likes: 0
Liked 0 Times
in
0 Posts
im mounting on the chain,
but it overlaps with 3 and a half/ or with 4 links?
so i need to remove 2 links right?
see attached picture 2 post above..
and i already adjusted the high and low screw..
high, those derailleur wheels needs to be aligned up to the biggest cog wheel
low, lowest cog wheel needs to align to the derailleur wheel..
i dont need to reset this do i? as i got the finally aligned up and i do think i have a good eye,
06-23-11, 10:28 AM
#17
Senior Member
You may or may not need to fine tune it. If it's close then you're off to a good start. You'll find out if you did it right by trying to force a shift off to the inside on the big ring or if it drops off onto the axle on the small when shift testing. It's hard to set the big gear inner travel limit screw until there's a cable on it and you're trying to force the derailleur in with the shifter. So you will certainly want to double check them once the chain is on and you're testing the shifting.
Using Sheldon's pictures as a guide yes, you should remove one more link PAIR. I like to call them pairs since you always need to remove both an outer and inner link to allow the connection. But if you connected the chain as it is now it would not be a bad thing. The length of the chain isn't THAT critical as long as it's not too short.
Using Sheldon's pictures as a guide yes, you should remove one more link PAIR. I like to call them pairs since you always need to remove both an outer and inner link to allow the connection. But if you connected the chain as it is now it would not be a bad thing. The length of the chain isn't THAT critical as long as it's not too short.
06-23-11, 10:35 AM
#18
Member
Thread Starter
Join Date: Jun 2011
Posts: 41
Mentioned: 0 Post(s)
Tagged: 0 Thread(s)
Quoted: 0 Post(s)
Likes: 0
Liked 0 Times
in
0 Posts
what i always question is,
how much of cable should i let the derailleur eat, means how much length should i let it overshoot the bolt to the right, how tight does it need to be.
how much of cable should i let the derailleur eat, means how much length should i let it overshoot the bolt to the right, how tight does it need to be.
06-23-11, 10:49 AM
#19
Senior Member
You always want enough cable hanging out past the screw that the strands won't unwind. That generally means two inches or more. Anything less and the strands can unwind from the kinking that occurs under the fixing screw. But then the end of the cable is always quite sharp so I always use a crimp on cap so I don't stab myself and the cable can't fray from hitting or rubbing on stuff.
As for how tight to pull it that is why you turn in all the barrel adjusters you have to start with. Then pull the cable tight by hand or lightly tight with some pliers and tighten the pinch screw. It still won't be tight enough but you get the final tension and length adjustment from the barrel adjuster. At that point I click up the shifter one notch, start pedalling and screw out the barrel adjuster(s) far enough to make the chain shift to the second gear. Then I shift test up and down through all the gears and fine tune the adjuster so the shifts occur with about the same time delay. Finally I'll set the inner travel limit screw so that I can just shift comfortably onto the big sprocket but no more than that. And on the small ring I'll adjust the outward limit screw so that it hesitates about droppign onto that gear and then ease it out about one turn so it easily drops on.
The critical limit screw adjsutment is the inward travel one. If you have any amount of over travel beyond what is needed to shift onto that gear then you risk having it be able to overshift and fall into the gap. Reasons why this can happen are numerous such as shifting under load while riding up a hill or shifting while riding over something or in such a manner that the frame flexes slightly at just the wrong momemt and wrong direction. So adjusting the limit screw by feel and testing rather than by eye is something I prefer to do. Because this uses the limit screw for indexing the last shift you'll find that the shifter gets a little tight as the derailleur comes up against the limit screw and then just barely clicks and holds on the last index notch.
06-23-11, 03:07 PM
#20
Member
Thread Starter
Join Date: Jun 2011
Posts: 41
Mentioned: 0 Post(s)
Tagged: 0 Thread(s)
Quoted: 0 Post(s)
Likes: 0
Liked 0 Times
in
0 Posts
shifting to that big ass wheel is hard..
as it laggs and gives a lot of noise..
also my front derailleur cant shift from 3>2 but can 3>1
this problem existed already when i bought it, and they wanted to charge me 20 euro for it so i said nvm.
as it laggs and gives a lot of noise..
also my front derailleur cant shift from 3>2 but can 3>1
this problem existed already when i bought it, and they wanted to charge me 20 euro for it so i said nvm.
06-23-11, 07:42 PM
#21
Senior Member

Join Date: Jul 2005
Location: Boulder County, CO
Posts: 4,397
Bikes: '80 Masi Gran Criterium, '12 Trek Madone, early '60s Frejus track
Mentioned: 6 Post(s)
Tagged: 0 Thread(s)
Quoted: 514 Post(s)
Liked 450 Times
in
338 Posts
https://www.parktool.com/uploads/imag...lp/chain50.jpg
https://www.parktool.com/uploads/imag...lp/chain54.jpg
https://www.parktool.com/uploads/imag...lp/chain51.jpg
https://www.parktool.com/uploads/imag...lp/chain53.jpg

Thread
Thread Starter
Forum
Replies
Last Post
Roll-Monroe-Co
Bicycle Mechanics
11
06-09-16 01:42 PM
